Topic edit video with blender: Unlock the full potential of video editing with Blender, a powerful, free software that brings your creative visions to life with advanced features and an intuitive interface.
Table of Content
- What is the process for editing videos with Blender 2.8?
- Introduction to Blender\"s Video Editing Capabilities
- Key Features of Blender\"s Video Sequence Editor
- Downloading and Installing Blender
- Basic Video Editing Techniques
- Advanced Video Editing Techniques
- Special Effects and VFX Integration
- YOUTUBE: Blender As A Video Editor: It\'s Actually Really Good!
- Audio Editing and Synchronization
- Color Grading and Correction
- Tips for Efficient Workflow in Blender
- Resources for Learning Video Editing with Blender
What is the process for editing videos with Blender 2.8?
To edit videos with Blender 2.8, follow these steps:
- Launch Blender and create a new project.
- Import your video footage into Blender by going to the \"File\" menu and selecting \"Import\" > \"Video Sequence\".
- Drag and drop your video clips onto the timeline to arrange them in the desired order.
- Use the editing tools in the Video Sequence Editor to trim, cut, and arrange your video clips.
- Add transitions between clips by selecting the transition type and duration from the Transitions menu.
- Enhance your video with effects and filters by selecting the strip and adding effects from the \"Add\" menu.
- Add audio to your video by importing audio files and aligning them with your video clips on the timeline.
- Adjust the audio levels and add fades using the audio editing tools available in Blender.
- Preview your video by playing it back in the Video Sequence Editor.
- Once you are satisfied with your edits, export your video by going to the \"Render\" menu and selecting the output format and settings.
READ MORE:
Introduction to Blender\"s Video Editing Capabilities
Blender is not just a tool for 3D modeling and animation but also a comprehensive suite for video editing that rivals many paid software in terms of features and flexibility. With its Video Sequence Editor (VSE), Blender offers a robust platform for both novice and experienced video editors. Its capabilities allow for a wide range of editing tasks, from simple cuts and splices to complex compositing and video effects.
- Non-linear editing allows you to arrange video clips, images, and sounds in any order without altering the original files.
- Layer-based compositing enables you to combine multiple video and audio tracks for sophisticated editing.
- Live preview, luma waveform, chroma vectorscope, and histogram displays assist in precise editing and color correction.
- Blender supports a wide range of video file formats and codecs, ensuring compatibility with most media types.
- Advanced features such as video masking, color grading, and adding effects like transitions and filters expand the creative possibilities.
Whether you\"re looking to perform basic edits or dive into more intricate video production, Blender provides a powerful, cost-effective solution. The software\"s extensive documentation and active community further support users in learning and mastering its video editing capabilities.

Key Features of Blender\"s Video Sequence Editor
Blender\"s Video Sequence Editor (VSE) is a powerful toolset for video editing that provides a wide array of functionalities to create professional-grade videos. Here are some of its standout features:
- Non-Linear Editing: Blender\"s VSE operates on a non-linear editing system, allowing you to insert, cut, and splice video clips without altering the original files.
- Live Preview: It offers a live preview feature, enabling you to view your edits in real-time, along with luma waveform, chroma vectorscope, and histogram displays for advanced color correction and grading.
- Multi-track Editing: You can manage multiple video and audio tracks, layering them for complex compositions, including up to 32 slots for videos, images, audio, and effects.
- Effects and Transitions: Blender includes a variety of video effects and transitions, from basic cuts to complex graphic overlays, all customizable to fit your project\"s needs.
- Audio Mixing and Syncing: Comprehensive audio mixing tools allow for adjusting levels, syncing audio with video, and visualizing waveforms directly within the editor.
- Rendering and Encoding: Flexible rendering options support a wide range of output formats and codecs, enabling you to produce high-quality videos optimized for various platforms.
These features make Blender\"s VSE a versatile choice for video editors looking to leverage free software for their video production needs, from simple editing tasks to intricate visual storytelling.

Downloading and Installing Blender
Getting started with Blender for video editing is straightforward. Follow these steps to download and install Blender on your computer:
- Visit the Official Blender Website: Go to [Blender\"s official website](https://www.blender.org/download/) to find the latest version of the software.
- Choose Your Operating System: Blender is available for Windows, macOS, and Linux. Select the version compatible with your operating system.
- Download Blender: Click on the download button for your OS. The website may offer a choice between an installer and a portable version. The installer will add Blender to your system\"s programs, while the portable version can be run from any location on your disk.
- Install Blender: If you chose the installer version, run the downloaded file and follow the on-screen instructions to complete the installation. For the portable version, simply extract the ZIP file to your preferred location.
- Launch Blender: After installation, open Blender. You might want to pin it to your taskbar or create a shortcut for easy access.
With Blender installed, you\"re ready to start exploring its video editing capabilities. The interface might seem daunting at first, but with practice, you\"ll find it intuitive and powerful for your video editing projects.

Basic Video Editing Techniques
Mastering basic video editing techniques in Blender sets a solid foundation for more advanced projects. Here are essential steps to begin with:
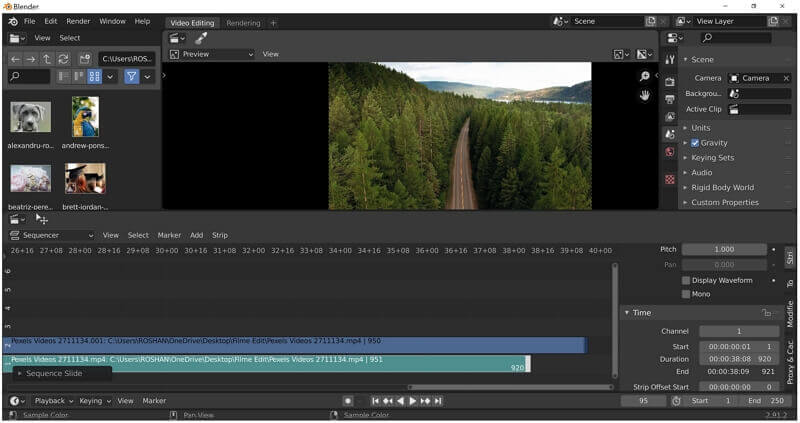
- Setting Up the Video Sequence Editor: Start by selecting \"Video Editing\" from the layout menu at the top of the Blender interface to open the Video Sequence Editor (VSE).
- Importing Media: Use \"Add\" > \"Movie\" to import video clips, \"Add\" > \"Sound\" for audio files, and \"Add\" > \"Image\" for photos. Navigate to your files, select them, and click \"Add Movie Strip\" or the appropriate option for your media type.
- Basic Cutting and Trimming: Select a video strip, then position the playhead where you want to cut. Use the shortcut \"K\" to cut the strip. To trim, select a strip end and drag it to your desired length.
- Adding Transitions: Blender offers several transitions between clips. Place two clips next to each other, select them both, then choose \"Add\" > \"Effect Strip\" > \"Cross\" or \"Wipe\" for basic transitions.
- Adjusting Video Properties: In the \"Strip\" menu, you can adjust properties like the start time, duration, and blending mode of your video strips.
- Adding Text and Titles: Use \"Add\" > \"Text\" to create titles or text overlays. Customize the text properties in the \"Effect Strip\" properties panel.
- Exporting Your Video: Once your editing is complete, go to \"Render\" > \"Render Animation\" or press \"Ctrl + F12\" to export your video. Adjust the output settings in the \"Output Properties\" tab to suit your project\"s needs.
These basic techniques are just the beginning of what you can achieve with Blender\"s Video Sequence Editor. With practice, you\"ll be able to tackle more complex projects and utilize Blender\"s full range of video editing capabilities.

_HOOK_
Advanced Video Editing Techniques
For those looking to elevate their video editing skills in Blender beyond the basics, mastering advanced techniques is crucial. Here are steps to explore more complex functionalities:
- Color Grading: Enhance your video\"s look and feel by using the \"Color Balance\" and \"Curves\" tools. Access these from the \"Effect Strip\" properties to adjust the color dynamics of your footage.
- Masking and Compositing: Create masks to hide or reveal parts of a video. Use the \"Mask\" option under the \"Add\" menu and combine it with other clips using the \"Alpha Over\" or \"Alpha Under\" effects for complex compositing.
- Animation and Keyframes: Animate properties of video strips or effects over time by inserting keyframes. Right-click on a property and select \"Insert Keyframe\" to create animations for transitions, effects, or even motion graphics.
- Speed Control: Change the playback speed of your clips without altering their pitch. Add a \"Speed Control\" effect strip and adjust the speed factor or length to make clips faster or slower.
- Video Stabilization: Reduce shaky footage by using Blender\"s Movie Clip Editor to track motion and stabilize clips. This requires tracking points and setting up a stabilization node in the compositor.
- Advanced Audio Editing: For detailed audio editing, use the \"Video Sequence Editor\" to sync audio, adjust volume levels, or apply filters. For more complex audio manipulation, consider using dedicated software and then re-importing the audio back into Blender.
- Custom Transitions and Effects: Beyond built-in transitions, you can create custom effects using the compositor. This involves layering multiple strips and applying node-based effects to achieve unique results.
These advanced techniques require practice and experimentation but can significantly enhance the quality and creativity of your video projects. Blender\"s comprehensive toolset supports endless possibilities for those willing to dive deeper into video editing and production.

Special Effects and VFX Integration
Incorporating special effects and visual effects (VFX) into your videos can transform them from simple edits to cinematic experiences. Blender, with its comprehensive suite of tools, stands out as a powerful platform for integrating special effects and VFX into your projects. Here\"s how to get started:
- Utilizing Blender\"s Compositor: The node-based compositor allows for complex post-production effects, including color correction, keying, and masking. Start by accessing the \"Compositing\" workspace and explore the array of nodes available for creating your desired effects.
- Creating 3D Visual Effects: Blender\"s 3D modeling and animation tools enable the addition of 3D elements into video projects. From simple text animations to complex 3D characters, you can create elements in Blender and integrate them into your videos using the VSE.
- Simulation for Realistic Effects: Leverage Blender\"s simulation tools for creating realistic effects such as fire, smoke, water, and cloth dynamics. These simulations can be rendered and composited onto your video footage to add depth and realism.
- Tracking and Masking: For integrating effects seamlessly into your footage, use Blender\"s motion tracking tools to track objects within your video. This allows for accurate placement of 3D elements or effects that move realistically with your footage.
- Particle Systems for Special Effects: Create stunning particle effects such as rain, snow, or magical particles. Blender\"s particle system is versatile, allowing for a wide range of visual effects that can enhance the storytelling in your videos.
Blender\"s capabilities for special effects and VFX integration are vast, providing filmmakers and video editors with the tools needed to push the boundaries of their creative visions. Whether you\"re working on a personal project or a professional production, Blender\"s toolkit can help bring your ideas to life with stunning visual effects.

Blender As A Video Editor: It\'s Actually Really Good!
Video Editing: Dive into the captivating world of video editing and unleash your creativity! Learn how to turn raw footage into polished masterpieces with cutting-edge techniques and innovative tools. Elevate your storytelling skills and bring your vision to life! Tutorial: Ready to level up your skills? Join this engaging tutorial and master new techniques in no time! Discover step-by-step instructions, insider tips, and expert guidance that will empower you to excel in your craft. Let\'s learn and grow together!
Blender 3D Beginner Video Editing Tutorial FREE Video Editor
Get 50% OFF your first bag of coffee with Trade Coffee when you click here http://cen.yt/TradeSouthernShotty and enter code ...
Audio Editing and Synchronization
Audio is a crucial element in video editing, and Blender provides tools for effective audio editing and synchronization. Enhancing your video with the right audio can elevate the overall impact. Here\"s how to manage audio within Blender:
- Importing Audio: Add audio files to your project by selecting \"Add\" > \"Sound\" in the Video Sequence Editor (VSE). Blender supports various audio formats, allowing you to incorporate music, dialogue, and sound effects.
- Synchronizing Audio with Video: To sync audio with video, use the waveform display in the VSE to match audio cues with visual elements. This is crucial for dialogue and action synchronization.
- Audio Mixing: Blender allows for basic audio mixing within the VSE. Adjust volume levels, mute audio tracks, or set the balance between multiple audio sources to create a cohesive sound landscape.
- Keyframe Animation for Audio: Create dynamic audio effects by keyframing volume or other properties. This technique is useful for fading audio in or out and adjusting audio levels throughout your video.
- Audio Effects and Filters: While Blender\"s built-in audio editing capabilities are somewhat limited compared to dedicated audio software, you can still apply basic effects like high-pass or low-pass filters to enhance your audio tracks.
For projects requiring advanced audio editing, consider using dedicated audio software in conjunction with Blender. Export your video\"s audio track, edit it in the audio software, then re-import it back into Blender for final synchronization and rendering.

Color Grading and Correction
Color grading and correction are essential steps in post-production that enhance the visual quality of your video, giving it a polished look. Blender\"s comprehensive suite of tools enables you to perform these tasks with precision. Here\"s how to approach color grading and correction in Blender:
- Accessing the Color Tools: Open the \"Color\" tab in the Video Sequence Editor (VSE) or use the node editor in the Compositing layout to access color correction tools.
- Adjusting Color Balance: Use the color balance tool to adjust the shadows, midtones, and highlights of your video. This can dramatically change the mood or time of day of your footage.
- Using Curves for Correction: The RGB curves tool allows for precise adjustments to the color and luminance levels. Manipulate the curve to correct exposure or color imbalances.
- Applying Color Grading: Color grading involves applying a color palette to your footage to convey a specific aesthetic or emotion. Experiment with the \"Look\" dropdown menu in the \"Color Management\" section to apply different film looks.
- Correcting White Balance: Use the white balance tool to adjust the color temperature, ensuring that whites appear white under different lighting conditions. This is crucial for maintaining color consistency across clips.
- Utilizing LUTs: Blender supports the use of LUTs (Look-Up Tables) for color grading. Import LUT files to apply professional color grades to your footage quickly.
Effective color grading and correction can transform your video, enhancing storytelling and visual appeal. While Blender offers powerful tools for these tasks, mastering them requires practice and a good eye for color.
Tips for Efficient Workflow in Blender
Maximizing efficiency in Blender, especially for video editing, can significantly improve your productivity and project quality. Here are practical tips to streamline your workflow:
- Customize Your Layout: Blender allows for extensive customization. Arrange your workspace by dragging and dropping panels to suit your editing workflow, and save these layouts for future use.
- Keyboard Shortcuts: Learn and use keyboard shortcuts for common actions to save time. Shortcuts for cutting clips, changing views, or adding effects can speed up your editing process significantly.
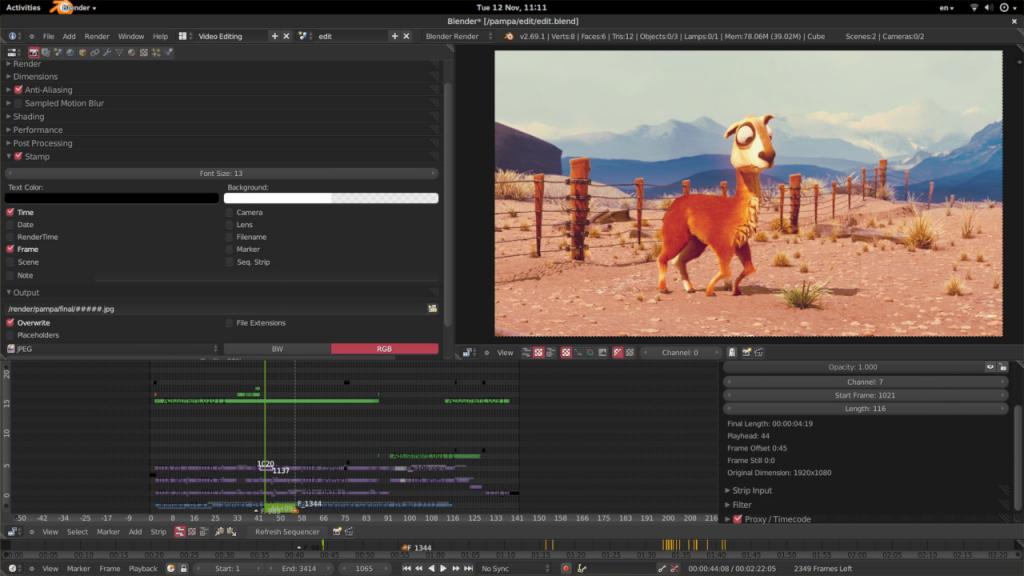
- Proxy Editing: For high-resolution footage, use Blender\"s proxy editing feature to improve playback performance. This allows you to edit with lower-resolution clips, swapping them back to high resolution for rendering.
- Batch Rendering: Use the command line for batch rendering, which can render multiple sequences or projects in one go, saving time and allowing you to work on other tasks.
- Color Management: Set up color management settings at the beginning of your project to maintain consistency across your workflow, especially if your project will be displayed on various screens or media.
- Use Blender Add-ons: Explore and integrate Blender add-ons that can automate repetitive tasks or add functionality tailored to video editing, such as automatic transitions or advanced color grading tools.
- Regularly Save and Version Your Projects: Incrementally save different versions of your project to avoid losing work and to make it easier to go back to previous versions if needed.
By adopting these tips, you can enhance your efficiency in Blender, allowing you to focus more on the creative aspects of video editing. Remember, a streamlined workflow is key to managing complex projects effectively.

_HOOK_
READ MORE:
Resources for Learning Video Editing with Blender
Blender is not only powerful but also supported by a vast array of learning resources that cater to all skill levels. Whether you\"re a beginner or looking to advance your skills, here are some key resources:
- Blender Official Tutorials: The Blender Foundation offers an extensive collection of tutorials on their official website and YouTube channel, covering everything from basic video editing to complex visual effects.
- Online Courses: Platforms like Udemy, Coursera, and Lynda offer structured courses on Blender, including focused lessons on video editing, 3D modeling, and animation.
- Community Forums: Blender Artists Forum and the Blender subreddit are excellent places to seek advice, share your work, and learn from the experiences of other Blender users.
- Video Tutorials: YouTube hosts a wealth of video tutorials from experienced Blender users. Channels like Blender Guru, CG Geek, and Darrin Lile offer tutorials that range from beginner to advanced levels.
- Books and E-books: There are numerous books available that cover Blender in depth, including \"Blender For Dummies\" and \"The Complete Guide to Blender Graphics.\" These resources are great for those who prefer reading to video content.
- Blender Conferences and Workshops: Attending Blender conferences or workshops can provide valuable hands-on experience and networking opportunities with other Blender enthusiasts.
Utilizing these resources can dramatically shorten the learning curve for video editing in Blender, helping you to quickly move from basic edits to complex projects.
Embrace the power of Blender for video editing to unlock your creative potential. With its comprehensive features and supportive community, Blender stands as a beacon for aspiring and seasoned editors alike, promising an enriching journey into video production.