Topic blender edit video: Discover the power of Blender for video editing, a tool that transforms your visual content into captivating stories, with advanced features suited for both beginners and professionals alike.
Table of Content
- What are the key features of Blender for editing videos?
- Understanding Blender\"s Video Editing Capabilities
- Getting Started with Blender for Video Editing
- Key Features of Blender\"s Video Sequence Editor (VSE)
- Step-by-Step Guide to Editing Videos in Blender
- Tips and Tricks for Efficient Video Editing in Blender
- How to Add and Manipulate Video and Audio Clips in Blender
- YOUTUBE: Is Blender good for Video Editing
- Advanced Video Editing Techniques in Blender
- Using Blender for Color Grading and Correction
- Adding Effects and Transitions in Blender
- Exporting Your Final Video from Blender
- Common Issues and How to Solve Them in Blender Video Editing
- Blender Video Editing Best Practices and Workflow Optimization
- Resources for Learning More About Video Editing in Blender
What are the key features of Blender for editing videos?
Blender is a powerful tool that offers a range of features for editing videos. Some key features of Blender for video editing include:
- Video Sequence Editor: Blender has a built-in video sequence editor that allows users to perform basic video editing tasks like cutting, splicing, and trimming.
- Effects and Transitions: Blender offers a variety of effects and transitions that can be applied to your videos to enhance their visual appeal.
- Keyframe Animation: Users can create keyframe animations to add movement and effects to their videos.
- Color Grading: Blender provides tools for color grading and color correction, allowing users to adjust the colors and tones of their videos.
- Audio Editing: In addition to video editing, Blender also allows users to edit audio tracks and add sound effects to their videos.
- 3D Animation: For users looking to add 3D elements to their videos, Blender offers powerful 3D animation tools.
READ MORE:
Understanding Blender\"s Video Editing Capabilities
Blender, renowned for its 3D modeling and animation prowess, also boasts a robust video editing suite known as the Video Sequence Editor (VSE). This feature-rich editor caters to a wide range of video editing needs, from simple cuts and splices to complex compositing and animation tasks. Let\"s delve into what makes Blender a powerful tool for video editors.
- Non-Linear Editing: Blender\"s VSE operates on a non-linear editing system, allowing you to assemble, cut, and splice your footage non-destructively.
- Live Preview: Enjoy real-time playback and preview of your edits, ensuring a seamless editing experience.
- Multi-Track Editing: Layer multiple video and audio tracks, enabling complex compositions with ease.
- Effects and Transitions: Access a variety of visual effects and transitions to enhance your video content.
- Audio Mixing: Comprehensive audio mixing tools allow for detailed sound editing, including syncing and volume control.
- Color Grading: Advanced color correction and grading tools help you achieve the perfect look for your video.
- Video Masking and Animation: Leverage Blender\"s animation tools to create masks and animate elements within your video projects.
- Rendering and Encoding: Output your projects in various formats, taking advantage of Blender\"s efficient rendering engine.
Whether you\"re a novice exploring the basics of video editing or a seasoned professional seeking to integrate 3D elements into your projects, Blender\"s video editing capabilities offer a comprehensive toolkit to bring your creative visions to life.

Getting Started with Blender for Video Editing
Embarking on your video editing journey with Blender involves several key steps to ensure a smooth start. This powerful, open-source software offers a rich set of features for video editing, accessible to both beginners and professionals. Follow this step-by-step guide to set up Blender for video editing tasks.
- Download and Install Blender: Visit the official Blender website to download the latest version compatible with your operating system. Installation is straightforward, with options for customizing the install based on your preferences.
- Explore the Interface: Upon launching Blender, take some time to familiarize yourself with the layout. Blender\"s interface can be customized to suit your workflow, with panels and windows that can be resized and rearranged.
- Switch to Video Editing Layout: Blender includes various workspaces for different tasks. Switch to the Video Editing layout by selecting it from the top menu to access the Video Sequence Editor (VSE).
- Import Your Media: Begin by importing your video clips, images, and audio files into the VSE. You can do this by dragging and dropping files into the timeline or using the Add menu.
- Basic Editing Techniques: Learn the basics of cutting, moving, and arranging clips on the timeline. Blender allows for non-linear editing, so you can experiment with your clips without altering the original files.
- Adding Effects and Transitions: Explore Blender\"s built-in effects and transitions to enhance your video. These can be accessed from the Add menu within the VSE.
- Audio Editing: Blender also provides tools for editing audio directly within the VSE. You can adjust volume levels, sync audio with video, and add sound effects.
- Rendering Your Project: Once you\"re satisfied with your edit, the final step is rendering. This process combines your edits into a single video file. Adjust rendering settings according to your project\"s needs and output format.
With patience and practice, you\"ll soon be able to leverage Blender\"s full potential for your video editing projects, creating professional-quality videos from the comfort of your own computer.

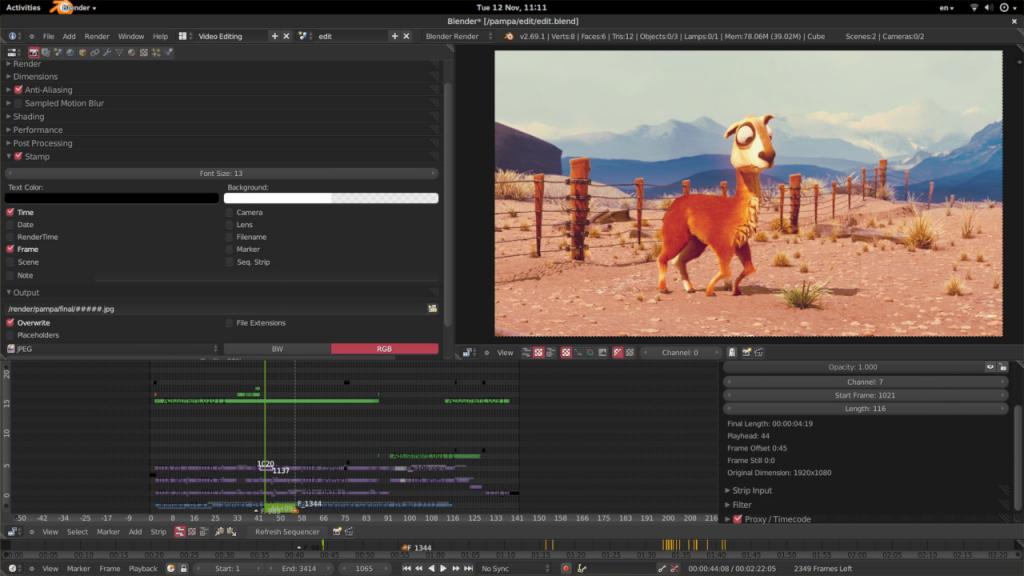
Key Features of Blender\"s Video Sequence Editor (VSE)
Blender\"s Video Sequence Editor (VSE) is a powerful, feature-rich platform that caters to a wide array of video editing needs. From simple cuts to sophisticated effects, the VSE is designed to provide a comprehensive editing experience. Here are some of its key features:
- Non-Linear Editing: The VSE offers a non-linear editing environment, allowing you to piece together video and audio clips in any sequence without altering the original files.
- Multiple Tracks: You can work with numerous video, audio, and effect tracks, enabling complex layering and compositing for your projects.
- Live Preview: The VSE provides a live preview window, enabling you to view your edits in real time as you make them.
- Effects and Transitions: A variety of effects and transitions are available directly within the VSE, from color correction and grading to wipes and fades.
- Audio Mixing and Syncing: Comprehensive audio tools allow for effective mixing, syncing, and manipulation of soundtracks alongside your video.
- Adjustment Layers: Similar to professional editing software, Blender offers adjustment layers for applying effects across multiple clips non-destructively.
- Speed Control: You can easily adjust the playback speed of your video clips, creating slow-motion or fast-forward effects within your projects.
- Animation Support: Leverage Blender\"s robust animation tools to add animated graphics or effects to your video projects.
- Proxy Rendering: For smoother editing of high-resolution footage, the VSE supports proxy rendering, allowing you to work with lower-resolution placeholders.
- Customizable Layout: The VSE interface is highly customizable, enabling you to arrange and resize panels to suit your workflow.
Whether you\"re creating short films, YouTube videos, or complex visual presentations, Blender\"s VSE provides the tools necessary to bring your vision to life with precision and creativity.

Step-by-Step Guide to Editing Videos in Blender
- Launch Blender and Set Up for Video Editing: Start Blender and switch to the Video Editing workspace from the top menu. This workspace provides the Video Sequence Editor (VSE) layout optimal for video editing tasks.
- Importing Your Media: Use the \"Add\" menu in the VSE to import your video, audio, and image files into the sequencer. You can also drag and drop files directly into the timeline.
- Arranging Your Clips: Click and drag your clips to arrange them on the timeline. Use the cut tool (Shift+K) to trim clips or split them into sections.
- Adding Transitions and Effects: Blender allows you to add transitions between clips from the \"Add\" menu, such as crossfades or wipes. Effects like color grading can be applied from the \"Effect Strip\" submenu.
- Working with Audio: Align your audio clips with your video. You can adjust volume, sync audio with video, and mix multiple audio tracks directly in the VSE.
- Adding Text and Titles: Use the \"Add\" menu to create text overlays or titles by selecting \"Text\". Customize the font, size, and position in the properties panel.
- Color Correction and Grading: Enhance your video\"s look by adjusting colors through the \"Color\" effect strip. You can adjust brightness, contrast, saturation, and more.
- Animating Elements: For more dynamic edits, you can animate properties of video strips or effects using keyframes. Move the playhead to your desired frame, change a property, and press \"I\" to insert a keyframe.
- Previewing Your Edit: Use the timeline controls to play back your project. Adjust your edits as needed based on the preview.
- Rendering Your Video: Once you\"re satisfied with your edit, go to the \"Output Properties\" tab to set your output format and file destination. Then, render your project by clicking \"Render\" and \"Render Animation\".
This guide outlines the basic steps for editing a video in Blender, from setting up your project to rendering the final product. With practice, you\"ll be able to explore more advanced features and techniques Blender offers for video editing.

_HOOK_
Tips and Tricks for Efficient Video Editing in Blender
- Utilize Proxy Strips for High-Resolution Footage: Working with high-resolution video can be demanding on your system. Enable proxy strips to edit more smoothly by reducing the playback resolution without affecting the final output quality.
- Keyboard Shortcuts Are Your Friends: Learning Blender\"s keyboard shortcuts can drastically speed up your editing process. For instance, \"K\" for cut, \"G\" to grab/move strips, and \"Shift + A\" to add new strips or effects.
- Organize Your Timeline: Use meta strips to group related clips and effects together. This not only keeps your timeline tidy but also makes complex edits more manageable.
- Experiment with Blender\"s Compositing Nodes: For advanced effects and color grading, delve into Blender\"s node-based compositing. This allows for a non-destructive workflow and more control over your video\"s final look.
- Customize Your Workspace: Blender allows you to customize and save your workspace layouts. Create a layout that puts all your frequently used tools within easy reach.
- Use the VSE Transform Tool for Quick Adjustments: The VSE Transform add-on enables you to scale, rotate, and move clips directly in the video preview window, similar to other video editing software.
- Optimize Your Render Settings: Before rendering your final video, ensure your render settings are optimized for your project. This includes selecting the right output format, resolution, and compression settings.
- Leverage Blender\"s Community Resources: Blender has a vast and supportive community. Online forums, tutorials, and templates can be invaluable resources as you learn and grow your video editing skills.
These tips and tricks can help streamline your video editing process in Blender, allowing you to focus more on creativity and less on navigating technical hurdles.

How to Add and Manipulate Video and Audio Clips in Blender
Editing video and audio in Blender is a straightforward process once you familiarize yourself with the Video Sequence Editor (VSE). Follow these steps to add and manipulate video and audio clips in your projects:
- Switch to the Video Editing Workspace: Open Blender and switch to the Video Editing layout by selecting it from the top menu. This workspace provides you with the Video Sequence Editor for editing.
- Adding Clips: To add video or audio clips, click on \"Add\" in the VSE toolbar and select \"Movie\" for video files or \"Sound\" for audio files. Navigate to your files and select them to add them to the sequence editor.
- Arranging Clips on the Timeline: Drag and drop your clips on the timeline to position them. You can also cut (K key), duplicate (Shift+D), and delete (X key) clips directly in the timeline.
- Synchronizing Audio and Video: If your video and audio are separate, align them on the timeline by moving the strips so they start at the same frame. Use the waveform displayed on the audio strip as a guide for precise synchronization.
- Adjusting Clip Properties: With a clip selected, you can adjust its properties in the strip properties panel on the right. This includes start and end frames, volume for audio clips, and opacity for video clips.
- Applying Effects: Blender allows you to apply various effects to your clips. Add effect strips such as color correction, transform, or Gaussian blur by selecting \"Add\" > \"Effect Strip\" and choosing the desired effect.
- Animating Properties: You can animate most properties of your video and audio clips. With the cursor over a property, press \"I\" to insert a keyframe. Move to a different frame, change the property, and press \"I\" again to create an animation.
- Previewing Your Edit: Use the play controls under the timeline to preview your edit. Adjust as necessary until you are satisfied with the result.
- Rendering Your Project: Go to the Output Properties panel to set your output format and destination. Click \"Render\" > \"Render Animation\" to render your project to a video file.
By following these steps, you\"ll be able to effectively add and manipulate video and audio clips in Blender, creating dynamic and engaging video content.

Is Blender good for Video Editing
Software: Explore the innovative world of software and unlock endless possibilities with our video showcasing cutting-edge technology and powerful tools. Join us on a journey of creativity and efficiency like never before! Video: Dive into the captivating realm of video production with our stunning showcase of visuals, storytelling, and emotions. Let our video take you on a cinematic adventure that will leave you inspired and entertained.
Blender As A Video Editor It\'s Actually Really Good
Blender, which is free and open source software, is one of the best programs for creating professional-quality 3D animations.
Advanced Video Editing Techniques in Blender
Once you\"re comfortable with the basics of video editing in Blender, you can start to explore more advanced techniques to elevate your projects. These methods allow for greater creativity and precision, enabling you to produce professional-quality videos.
- Color Grading with Nodes: Blender\"s node-based compositing allows for sophisticated color grading. Access this feature through the Compositing workspace, where you can use nodes to adjust colors, contrast, brightness, and more for cinematic quality.
- Video Masking for Special Effects: Create masks to hide or reveal parts of a video clip, allowing for effects such as text behind objects or selective color correction. Masks can be animated for dynamic effects.
- 3D Integration: One of Blender\"s unique advantages is the seamless integration of 3D objects into your video. You can add 3D models to your scenes, animate them, and even use the camera tracking feature to match the movement of the camera in your video footage.
- Speed Ramping: Speed ramping is a technique that varies the speed of video playback for dramatic or comedic effect. Keyframe the speed factor in the VSE to smoothly transition between different speeds within the same clip.
- Custom Transitions and Effects: Beyond the built-in transitions, you can create custom effects and transitions using Blender\"s animation and compositing capabilities. This includes creating unique wipes or utilizing 3D animations as transitions.
- Audio Spectrum Visualization: Create visualizations for audio tracks using Blender\"s animation tools. This is great for music videos or visual podcasts.
- Multi-Camera Editing: Simulate a multi-camera setup by switching between different video clips based on timing or audio cues. This technique is useful for interviews, performances, and more.
These advanced techniques require a deeper understanding of Blender\"s tools and features, but they offer limitless possibilities for creative video editing. With practice and experimentation, you can leverage Blender to bring your most ambitious video projects to life.

Using Blender for Color Grading and Correction
Color grading and correction are crucial steps in video post-production, allowing you to enhance the visual quality of your footage or create a specific mood. Blender, with its comprehensive set of tools, supports advanced color grading and correction workflows. Here\"s how to utilize these features in Blender:
- Access the Color Management Settings: Start by adjusting the color management settings in the properties panel. This includes setting the correct color space for your project to ensure accurate color representation.
- Use the Sequencer\"s Strip Modifiers: For basic color correction, apply strip modifiers to your video clips in the Video Sequence Editor (VSE). This includes adjustments for brightness, contrast, saturation, and white balance.
- Advanced Color Grading with Nodes: For more detailed color grading, switch to the Compositing workspace. Here you can use nodes to apply complex color adjustments, such as curves, color balance, and hue correction. This node-based approach offers flexibility and precision for achieving the desired look.
- Integrate with the 3D View: If your project combines video with 3D elements, you can perform color grading on your 3D scenes using the same node-based system in the compositing workspace, ensuring consistency across your project.
- Look Up Tables (LUTs): Blender supports the use of LUTs for color grading. LUTs can be applied via the compositor to quickly apply a color grade based on a pre-existing color profile, useful for matching footage from different sources or achieving a cinematic look.
- Rendering Your Color-Graded Footage: Once you\"re satisfied with your color grading, ensure your render settings are configured correctly to preserve the quality of your color work. Pay special attention to the output format and color depth to avoid compression artifacts or banding.
By following these steps, you can leverage Blender\"s powerful color grading and correction tools to enhance your video projects, whether you\"re aiming for a natural look or a stylized visual theme.

Adding Effects and Transitions in Blender
Blender\"s Video Sequence Editor (VSE) offers a variety of effects and transitions to enhance your video projects. Whether you\"re looking to smooth the flow between clips or add visual interest, here\"s how to incorporate these elements into your edits:
- Accessing Transitions: To add transitions between clips, place two clips on the timeline so they overlap for the duration of the transition. Right-click to select the end of the first clip and the beginning of the second clip, then use the \"Add\" menu to choose a transition, such as Cross, Wipe, or Fade.
- Applying Video Effects: Blender includes several video effects that can be added from the \"Add\" menu in the VSE. This includes effects like Gaussian Blur, Color Balance, Glow, and more. Select your clip and then choose the effect you want to apply.
- Customizing Effects: After adding an effect strip, you can customize its properties in the strip\"s properties panel. This allows you to adjust the intensity, duration, and other parameters to achieve the desired effect.
- Animating Effects: You can animate the properties of effects over time by inserting keyframes. Move to the frame where you want the change to start, adjust the property value, and press \"I\" while hovering over the property field to insert a keyframe.
- Using Adjustment Layers: For effects that you want to apply to multiple clips simultaneously, use an adjustment layer. Place the adjustment layer above the clips in the timeline, and any effects added to this layer will affect all clips below it.
- Rendering Effects: Ensure your render settings are correctly configured to include all effects and transitions in the final output. Pay special attention to the rendering resolution and frame rate to maintain the quality of your effects.
By mastering the use of effects and transitions in Blender, you can significantly enhance the visual appeal and storytelling power of your video projects.

_HOOK_
Exporting Your Final Video from Blender
Once you have completed your video project in Blender, the final step is to export or render it into a video file format that can be shared or published. Here\"s a step-by-step guide to exporting your final video from Blender:
- Choose the Output Format: In the Properties panel, navigate to the Output tab. Here, you can select your desired file format under the File Format menu. Common formats include FFmpeg video (for MP4, AVI, MOV, etc.), MPEG, and AVI Raw.
- Set the Output Path: Specify the directory where you want your rendered video to be saved by clicking on the folder icon next to the Output field. Enter the name of your file or accept the default name provided by Blender.
- Configure Video and Audio Encoding: If you choose FFmpeg video as the output format, you will need to configure the encoding settings for both video and audio. Click on the Encoding tab to expand the encoding options. Select the codec, quality, and bitrate that best suit your project\"s needs.
- Adjust Resolution and Frame Rate: Ensure the resolution and frame rate are set correctly for your project in the Dimensions tab. You can choose from presets or enter custom values for both the resolution and the frame rate.
- Render Your Video: Once all settings are configured, go to the Render menu at the top of Blender and select \"Render Animation\" or press Ctrl+F12. Blender will start rendering your video, a process that can take some time depending on the complexity of your project and the capabilities of your computer.
- Check the Rendered Video: After rendering is complete, locate the output file in the directory you specified earlier. Play the video using your preferred media player to ensure that it has been exported correctly and meets your expectations.
Exporting your video from Blender might seem complex at first, but once you are familiar with the output settings, it becomes a straightforward process. With these steps, you can efficiently render and share your creative work with the world.
Common Issues and How to Solve Them in Blender Video Editing
Blender is a powerful tool for video editing, but users may encounter several common issues. Here are some typical problems and solutions to help you navigate and resolve these challenges:
- Video and Audio Out of Sync: This can happen due to variable frame rate video files. Convert your video to a constant frame rate using external tools before importing it into Blender.
- Slow Performance with High-Resolution Footage: Use proxies to edit more comfortably. Enable proxy rendering in the properties panel of the strip to create lower-resolution versions of your clips for smoother playback during editing.
- Difficulty Finding Certain Features: Blender\"s interface can be overwhelming for new users. Take advantage of Blender\"s extensive documentation and tutorials available online to familiarize yourself with the interface and tools.
- Rendering Errors: Make sure all your paths for output and temporary files are set correctly. Check the console window for specific error messages that can guide you to the problem\"s source.
- Unexpected Crashes: Blender may crash due to insufficient system resources, outdated drivers, or software bugs. Save your work frequently, update your graphics drivers, and ensure your system meets Blender\"s requirements.
- Issues with Effects Not Showing: Double-check that you\"ve correctly applied and configured the effects. Some effects may also require rendering to be visible, so preview your edits by rendering a small portion of your video.
Encountering issues during video editing with Blender is not uncommon, but with patience and practice, you can learn to quickly resolve these challenges and take full advantage of Blender\"s powerful editing capabilities.
Blender Video Editing Best Practices and Workflow Optimization
Maximizing efficiency and maintaining high quality in Blender video editing requires adherence to best practices and workflow optimization strategies. Here are key tips to enhance your video editing process:
- Plan Your Project: Before starting, outline your project\"s structure, including key scenes, transitions, and effects. This planning phase helps streamline the editing process.
- Organize Your Assets: Use Blender\"s file management system to organize your video clips, audio files, and images. Proper organization saves time and reduces confusion during editing.
- Use Proxy Editing: For high-resolution footage, enable proxies to improve playback performance. Editing with lower-resolution placeholders makes the process smoother, and you can switch back to full resolution for rendering.
- Learn Keyboard Shortcuts: Familiarize yourself with Blender\"s keyboard shortcuts. Quick access to frequently used functions speeds up your workflow significantly.
- Regularly Save Your Work: Blender, like any complex software, can experience crashes. Regularly save your project to avoid losing progress.
- Color Grade at the End: Perform color correction and grading as one of the final steps. This ensures that all clips have consistent coloration and that any changes in lighting or style are uniformly applied.
- Render in Passes: For complex projects, consider rendering your project in passes. This allows you to focus on rendering specific elements separately, which can be especially useful for adjusting effects or correcting errors without having to re-render the entire project.
- Stay Updated: Blender is continuously updated with new features and improvements. Keep your software up to date to take advantage of the latest tools and enhancements.
Implementing these best practices and workflow optimization tips can significantly improve your efficiency and the quality of your final video projects in Blender.
READ MORE:
Resources for Learning More About Video Editing in Blender
Mastering video editing in Blender is an ongoing process, and there are numerous resources available to help you enhance your skills. Whether you\"re a beginner or looking to advance your knowledge, here are some valuable resources:
- Blender Official Documentation: The Blender Manual offers comprehensive guides and tutorials covering all aspects of Blender, including the Video Sequence Editor (VSE).
- Blender Guru: A well-known figure in the Blender community, Blender Guru provides tutorials that range from beginner to advanced levels, including video editing techniques.
- CG Cookie: This platform offers a wide range of Blender tutorials, including specific courses on video editing within Blender, suitable for all skill levels.
- YouTube Tutorials: YouTube hosts a vast collection of video tutorials covering every aspect of Blender, including video editing. Channels like Blender Guru, CG Geek, and Ducky 3D are great places to start.
- Blender Artists Community: The Blender Artists forum is an excellent place to ask questions, share knowledge, and connect with other Blender users. You can find many posts related to video editing.
- Blender Stack Exchange: A question and answer site for people who use Blender to create 3D graphics, animations, or films. It\"s a great place to find specific answers to technical questions.
- Online Courses: Websites like Udemy and Coursera offer structured courses on Blender, including sections dedicated to video editing. These courses often provide a mix of video lessons, quizzes, and projects.
By exploring these resources, you can build a solid foundation in video editing with Blender and continually expand your skills as you take on more complex projects.
Embark on your Blender video editing journey to unlock endless creative possibilities. With the right tools, tips, and resources at your disposal, transforming your visual stories into cinematic masterpieces has never been more accessible. Start creating today!