Topic how to model human in blender: Embark on a creative journey to master human modeling in Blender, unlocking the potential to bring your imaginative characters to life with this comprehensive guide.
Table of Content
- How can I model a human in Blender?
- Understanding Blender\"s Interface and Basic Setup
- Choosing the Right Reference Images for Modeling
- Starting Your Model with a Basic Mesh
- Refining the Basic Shape into a Humanoid Form
- Detailing Your Model: Adding Facial Features and Limbs
- Sculpting for Realism: Techniques and Tools
- YOUTUBE: Blender Modelling Tutorial for Absolute Beginners: Simple Human
- Texturing: Creating Skin, Eyes, and Hair
- Rigging Your Model for Animation
- Posing and Fine-Tuning Your Model
- Rendering and Final Touches: Lighting and Camera Setup
How can I model a human in Blender?
Modeling a human in Blender requires a systematic approach. Here\'s a step-by-step guide to help you get started:
Reference Images: Gather reference images of humans from various angles (front, back, side) to serve as a guide throughout the modeling process.
Import Reference Images: Import the reference images into Blender by selecting the \"Add\" menu, then \"Image\" and choosing \"Reference\" as the image type. Position and scale the images as needed.
Add a Base Mesh: Start by adding a basic mesh object, such as a cube or a cylinder, to serve as the base of your human model.
Shape the Torso: Modify the base mesh to match the proportions of the human torso. Use the scale, rotation, grab, and extrude tools to shape the mesh accordingly.
Create Limbs: Extrude and shape additional geometry to form the arms, legs, and hands. Pay attention to the proportions and anatomical details.
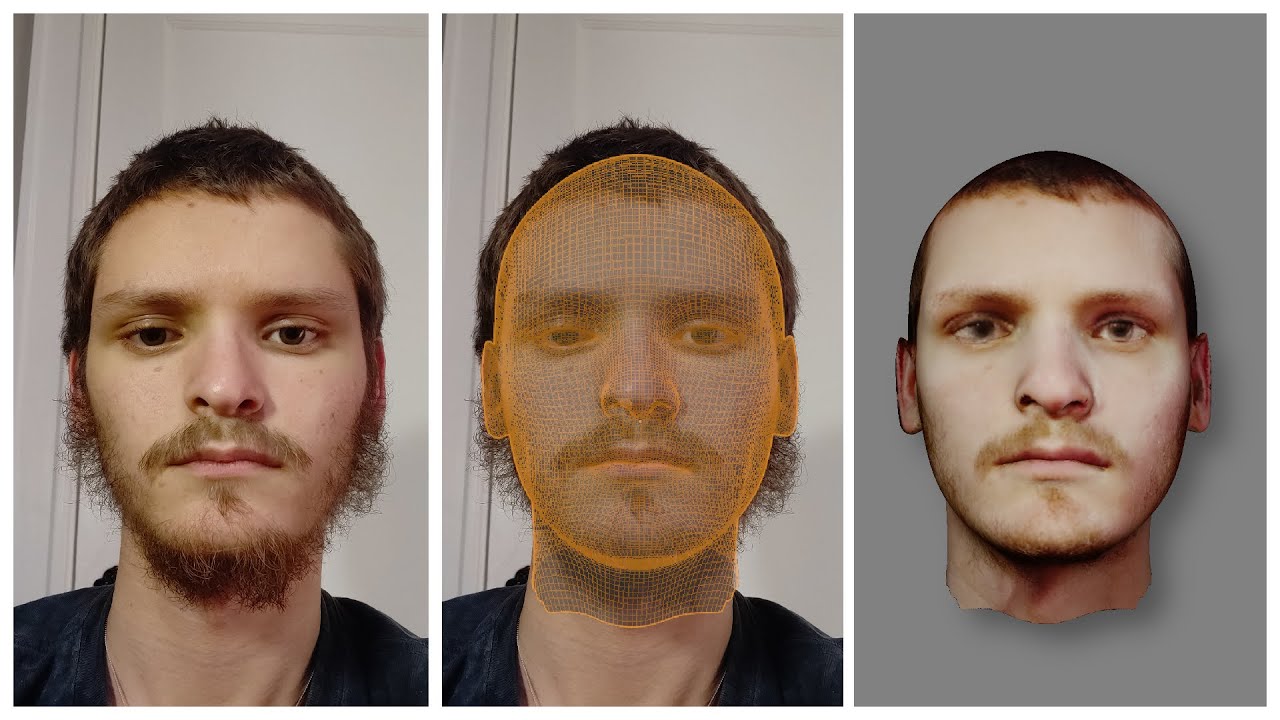
Add Facial Features: Sculpt or shape the areas for the face, including the eyes, nose, mouth, and ears. Remember to refer to your reference images to achieve accurate results.
Refine the Details: Sculpt or add additional geometry to the model to provide finer details such as fingers, toes, muscle definition, and other specific features.
Detailed Sculpting: Use the sculpting tools in Blender to refine the overall shape and add more intricate details to the human model.
Topology Cleanup: Ensure clean topology of your mesh by removing unnecessary vertices, edges, or faces. This step can involve merging vertices, using the limited dissolve tool, or other mesh cleanup techniques.
UV Unwrapping: Unwrap the model\'s UVs for texturing purposes. This step allows you to apply textures accurately to the model\'s surface.
Texture and Material Assignment: Apply materials and textures to your model to enhance its appearance. This step involves adding colors, patterns, and other visual elements to the model.
Finalize and Export: Once you are satisfied with the model, finalize it by checking for any issues, adjusting the materials if necessary, and exporting it in a desired format for use in other applications or rendering engines.
READ MORE:
Understanding Blender\"s Interface and Basic Setup
Blender\"s interface might seem daunting at first, but it\"s designed to offer you all the tools you need for 3D modeling right at your fingertips. This section will help you get comfortable with the basic setup and navigation, so you can start modeling a human figure with confidence.
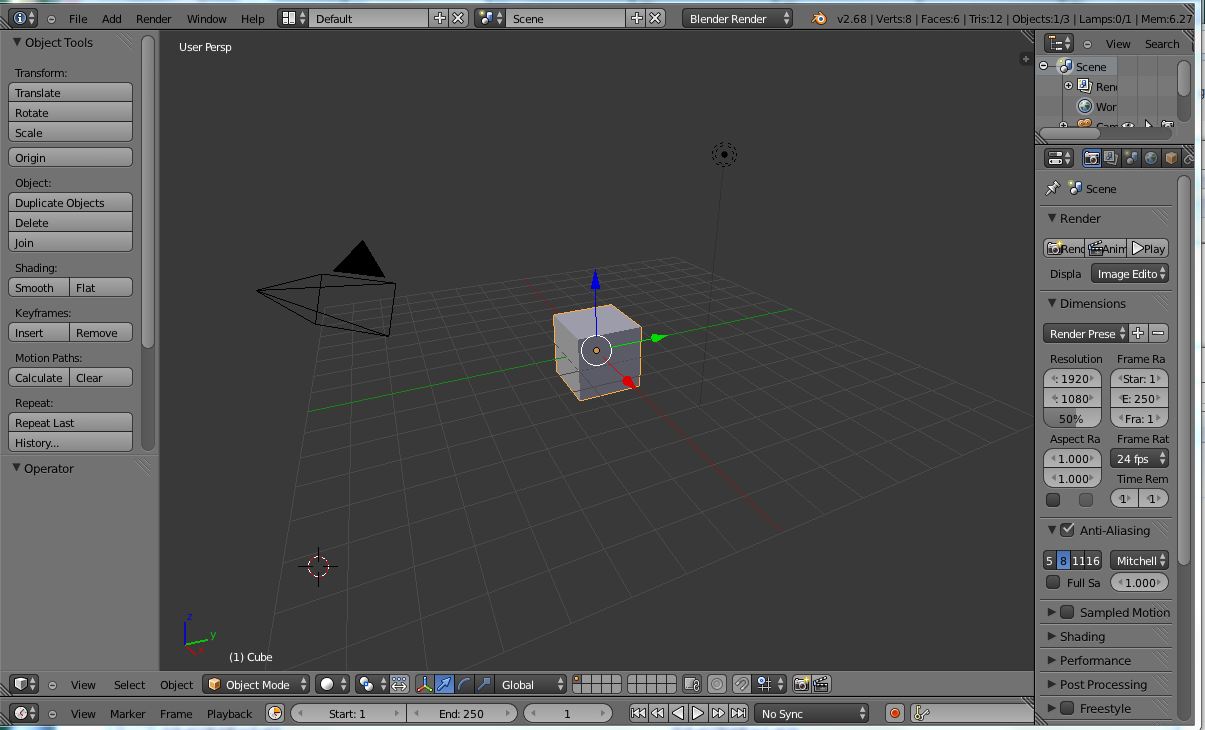
- Launch Blender: Start by opening Blender. You\"ll be greeted with the default screen, which includes a 3D viewport, a timeline, and various panels for editing and properties.
- Explore the Interface: Familiarize yourself with the main areas of Blender\"s interface:
- 3D Viewport: The main area where you\"ll model and view your scene.
- Properties Panel: Where you can adjust the settings for objects, materials, modifiers, and more.
- Outliner: A hierarchical list of all objects in your scene, making it easy to select and organize elements.
- Basic Navigation: Learn how to navigate the 3D viewport. Use the middle mouse button to orbit, scroll to zoom in and out, and shift + middle mouse button to pan.
- Adding Objects: To start modeling, you\"ll need to add objects to your scene. Press Shift+A to open the Add menu and select \"Mesh\" to see a list of basic shapes. For human modeling, starting with a cube or sphere is common.
- Edit Mode: Enter Edit Mode (Tab key) to modify the mesh. This is where you\"ll spend most of your time, shaping your human model. You can select vertices, edges, or faces to move, scale, or extrude.
- Basic Modeling Tools: Familiarize yourself with Blender\"s modeling tools like Extrude (E key), Loop Cut (Ctrl+R), and Subdivide. These tools will help you add detail and form to your human model.
- Viewing Options: Use the Numpad keys to switch between various standard views (front, side, top) and the Z key to toggle between solid, wireframe, and rendered view modes. This will help you get a better perspective on your model\"s shape and proportions.
Remember, practice and exploration are key to mastering Blender\"s interface. Don\"t hesitate to experiment with different tools and settings to see what they do. With time, you\"ll become more comfortable and efficient in navigating and modeling within Blender.

Choosing the Right Reference Images for Modeling
Choosing the right reference images is crucial in creating a realistic human model in Blender. This step ensures accuracy in proportions and details, making your model come to life. Here’s how to select and use reference images effectively:
- Identify Your Needs: Determine the type of human model you want to create (e.g., male, female, child). Consider the model\"s purpose, such as animation, game development, or static renders, which will influence your choice of references.
- Search for High-Quality Images: Look for clear, high-resolution images that cover multiple angles (front, side, and back). Websites like Unsplash or Pixabay offer free, high-quality photos you can use as references.
- Use Consistent Lighting: Images with consistent lighting conditions are preferable. They provide a better understanding of the form and volume of the human body, reducing the risk of modeling errors.
- Include Anatomical References: For detailed modeling, include anatomical references that show muscle structure, bone alignment, and body proportions. These are invaluable for sculpting realistic features.
- Setting Up Reference Images in Blender: Once you have your reference images, setting them up in Blender is straightforward:
- Open Blender and switch to the front view in your 3D viewport.
- Go to \"Add\" > \"Image\" > \"Reference\" and select your image file.
- Adjust the reference image\"s position and scale it to match your modeling grid. This helps in creating a model with accurate proportions.
- Modeling from Reference Images: As you model, continuously compare your work with your reference images. This iterative process will help you capture the essence and details of the human form accurately.
Remember, the goal is not to replicate the reference image but to use it as a guide for proportions, anatomy, and overall form. With practice, you’ll find that reference images are invaluable tools in your modeling toolkit.
Starting Your Model with a Basic Mesh
Beginning your human model in Blender starts with a simple mesh. This initial shape is the foundation of your model, which you will refine and detail into a human figure. Here’s how to start:
- Selecting the Initial Shape: Most human models begin with a basic shape, like a cube or a sphere. A cube is often preferred for its simplicity and ease of manipulation.
- Positioning Your Mesh: Place your mesh in the center of the 3D viewport to ensure symmetry and balance as you model.
- Modifying the Mesh: Enter Edit Mode (Tab key) to start shaping your mesh. Use tools like extrude (E key), scale (S key), and move (G key) to begin forming the basic human shape.
- Adding a Mirror Modifier: To make modeling easier and ensure symmetry, add a Mirror Modifier from the Modifiers tab. This tool mirrors every action you take on one side of the mesh to the other, saving time and effort.
- Defining the Torso: Start by shaping the torso. It’s the central part of your model and will guide the proportions and placement of other body parts like the head, arms, and legs.
- Refining the Shape: Use the subdivision surface modifier to smooth out the mesh and add more geometry for detailing. This step helps in creating more complex shapes like the curvature of muscles.
- Blocking Out Major Limbs: Begin to extrude limbs from the torso. Keep proportions in mind, using your reference images as a guide.
- Continuous Refinement: As you add details, continuously refine and adjust the mesh. Look at your model from different angles and compare it to your reference images to ensure accuracy.
Starting with a basic mesh and progressively refining it allows for a controlled and accurate approach to modeling human figures in Blender. Patience and practice are key to mastering this process.

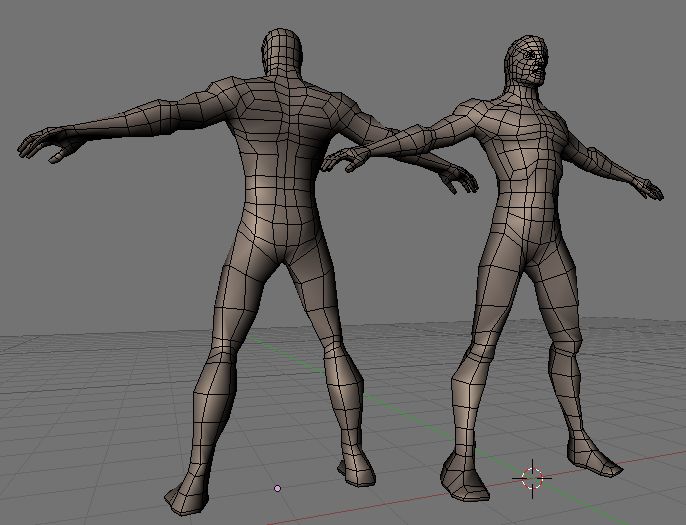
Refining the Basic Shape into a Humanoid Form
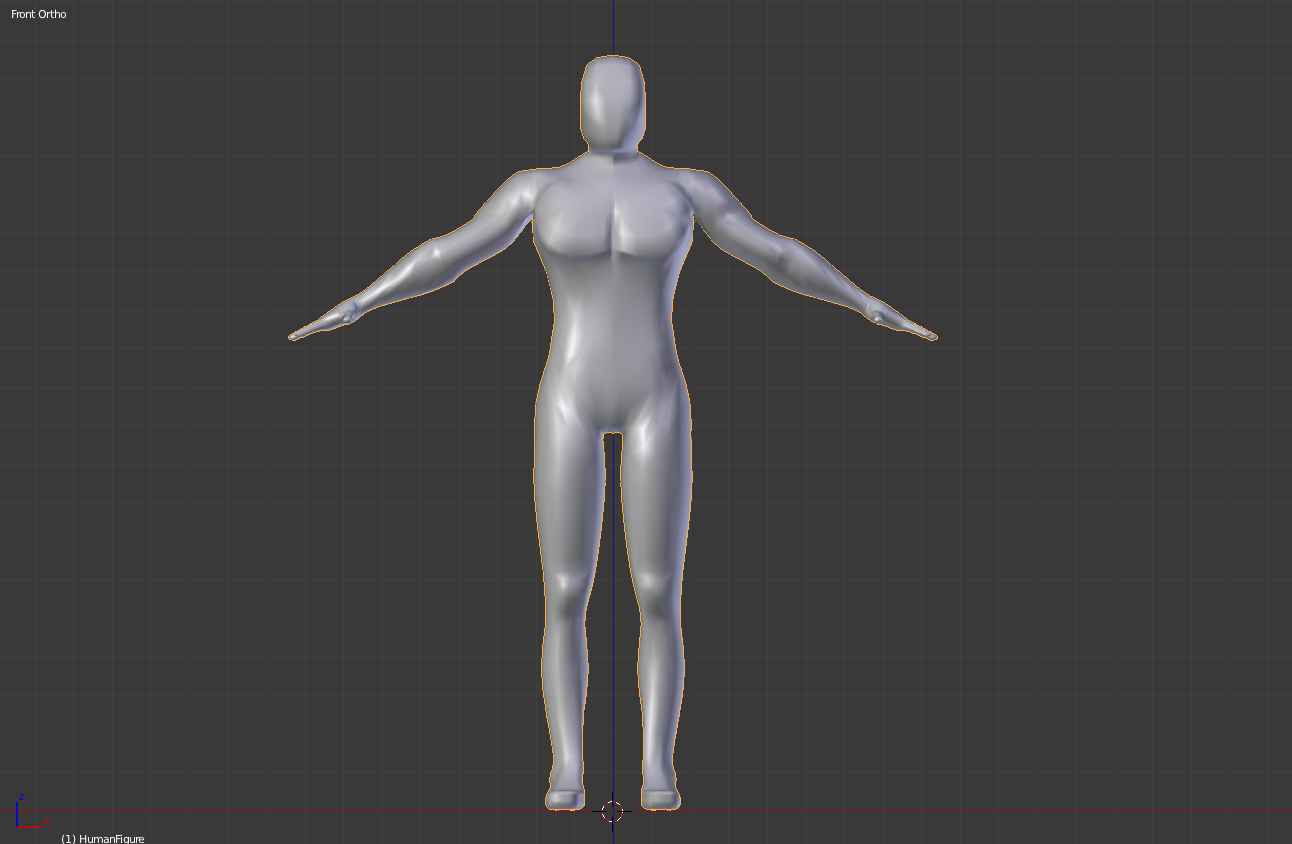
After establishing a basic mesh, the next step is refining it into a more detailed humanoid form. This phase involves enhancing the model with human-like features and proportions. Follow these detailed steps to refine your basic shape into a humanoid form:
- Study Human Anatomy: Understanding human anatomy is crucial. Pay attention to major muscle groups, bone structure, and proportions to ensure realism.
- Adjust Proportions: Use reference images to adjust the proportions of your basic mesh. Ensure the head, torso, limbs, and overall body proportions are accurate.
- Define Muscle Groups: Begin defining muscle groups by adding more geometry to areas like the arms, legs, chest, and back. Use sculpting tools in Blender for more detailed shaping.
- Add Facial Features: Start blocking out facial features such as the eyes, nose, mouth, and ears. Remember, subtlety is key in creating realistic faces.
- Refine Limbs: Further refine the arms and legs, ensuring they have a natural look and feel. Pay attention to the hands and feet, as they require detailed modeling to look convincing.
- Detailing the Torso: Add definition to the torso by highlighting the collarbones, ribcage, and abdominal muscles, adjusting the mesh to reflect these features accurately.
- Sculpt for Realism: Utilize Blender’s sculpting tools to add finer details such as wrinkles, veins, or specific muscle tendons. This step greatly enhances the realism of your model.
- Review and Refine: Continuously compare your model with your reference images. Rotate your model in the viewport to inspect it from every angle, making adjustments as necessary to improve accuracy and detail.
This process of refinement is iterative. Don’t be afraid to go back and make adjustments as you add detail. With patience and attention to detail, you\"ll transform a simple mesh into a realistic humanoid figure.
_HOOK_
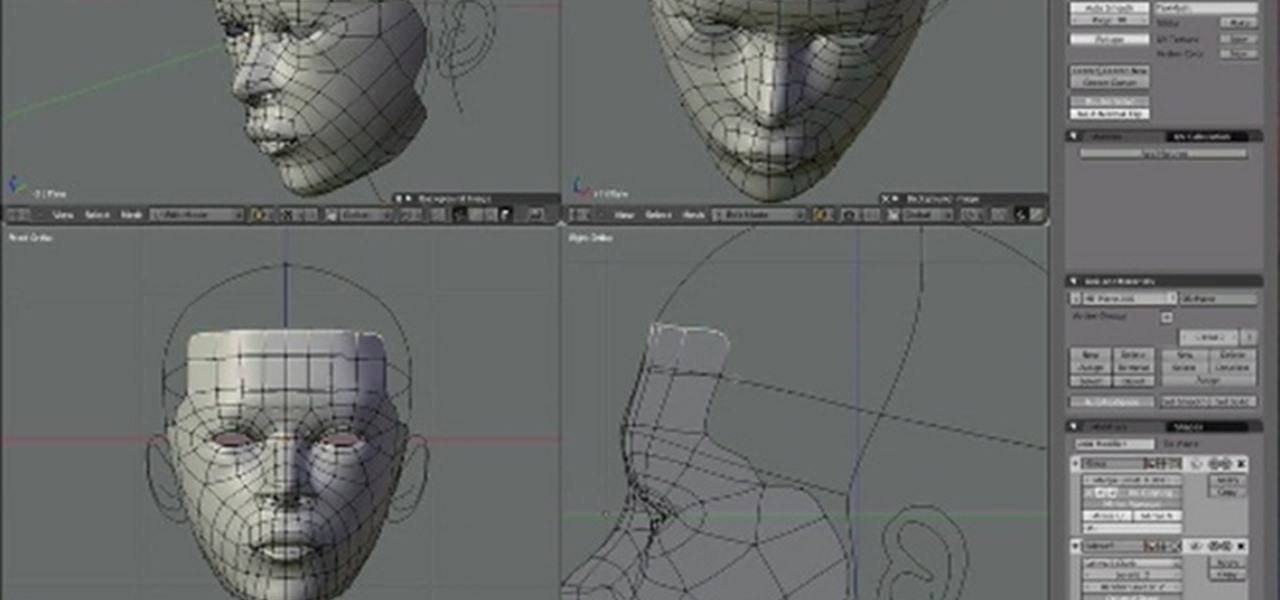
Detailing Your Model: Adding Facial Features and Limbs
After refining your model into a humanoid form, the next step is to add detailed facial features and limbs. This stage is crucial for bringing your model to life and adding personality. Follow these steps to detail your model:
- Facial Features:
- Begin with the eyes, creating them using spheres or by extruding eye sockets from the face mesh. Position them accurately in the skull.
- Model the nose by extruding and refining the vertices to form the bridge and nostrils.
- For the mouth, create a loop cut around where the mouth will be and extrude inward to form the mouth cavity. Detail the lips by sculpting them to be more pronounced.
- Add ears by either starting with a flat plane shaped around an ear\"s anatomy or extruding from the side of the head, refining the shape with sculpting tools.
- Limbs:
- Arms and legs should have been blocked out during the initial stages. Now, refine these limbs by adding muscle definition and correct proportions.
- Hands and feet are complex and require attention to detail. Start with a basic shape and extrude fingers and toes, using reference images for accuracy.
- Ensure joints like elbows, knees, wrists, and ankles have enough geometry to deform naturally when posed or animated.
- Refining Details: Use Blender\"s sculpting tools to add finer details such as wrinkles, fingernails, and clothing folds. Sculpting adds a layer of realism that is hard to achieve with basic modeling alone.
- Review and Adjust: Continuously compare your model against your reference images. Adjust proportions and details as necessary, striving for a balance between realism and artistic style.
Detailing your model with facial features and limbs is a meticulous process that can significantly enhance the realism and appeal of your human model. With practice, these steps will become an integral part of your modeling workflow in Blender.

Sculpting for Realism: Techniques and Tools
Sculpting in Blender is a powerful process for adding realism to your human models. It allows for detailed texturing and shaping that can bring your characters to life. Here are some techniques and tools essential for sculpting realistic human figures:
- Understanding Blender\"s Sculpt Mode: Sculpt Mode provides a set of tools for shaping and texturing your model. Familiarize yourself with its interface and key tools like the Grab, Clay Strips, Crease, and Smooth brushes.
- Start with a Base Mesh: Before sculpting, ensure your model has a basic form. A well-constructed base mesh reduces the complexity of sculpting finer details later.
- Subdivision Surfaces: Use subdivision surfaces to increase the mesh density without losing the base form. This provides more geometry to sculpt finer details.
- Dynotopo (Dynamic Topology): Dynotopo dynamically subdivides the mesh as you sculpt, allowing for intricate detail without pre-subdividing the mesh. It\"s ideal for creating complex textures and forms.
- Sculpting Details: Begin adding details gradually. Start with larger muscle groups and anatomical features before moving to finer details like wrinkles, scars, and pores.
- Symmetry: For efficiency, use the symmetry option to mirror your sculpting actions across the model. This is especially useful for facial features and body anatomy.
- Brush Strength and Size: Adjust the brush strength and size to suit the detail level you\"re working on. Lower strength and smaller brushes are better for fine details.
- Stylized vs. Realistic: Decide on the level of realism. For hyper-realistic models, focus on subtle anatomical details. For stylized characters, emphasize distinctive features without over-detailing.
- Reference Images: Always have reference images at hand. They are crucial for understanding light, shadow, and how muscles and skin textures look under different conditions.
- Practice and Patience: Sculpting requires practice. Start with simpler projects to develop your skills before attempting more detailed and complex human forms.
With the right techniques and a thoughtful approach, sculpting in Blender can elevate your human models from basic shapes to highly realistic figures. Remember, the key to realism lies in observation, understanding of human anatomy, and meticulous attention to detail.

Blender Modelling Tutorial for Absolute Beginners: Simple Human
Learn the art of Blender modeling like a pro with this comprehensive tutorial! From basic shapes to intricate designs, this video will guide you step-by-step in creating stunning 3D models.
Blender Character Modeling Tutorial for Absolute Beginners - Part 1
Transform your imagination into reality with this character modeling tutorial. Unlock the secrets of sculpting lifelike characters with Blender and bring your creations to life in the virtual world. Don\'t miss out on this amazing opportunity to enhance your skills!
Texturing: Creating Skin, Eyes, and Hair
Texturing is a critical step in bringing your human model to life in Blender. It involves applying colors, patterns, and details to make the model look as realistic as possible. Here’s a step-by-step guide to texturing skin, eyes, and hair:
- Skin Texturing:
- Start with a base color that matches the skin tone you’re aiming for. Apply this as a base texture to your model.
- Use texture painting to add variations in skin tone, such as blushes, freckles, or tan lines. Blender’s texture painting tools allow you to paint directly onto your model.
- For realism, add a subsurface scattering shader to your material. This simulates the light passing through skin, giving it a natural glow.
- High-resolution images or procedural textures can be used to create skin pores and wrinkles for added detail.
- Eyes:
- Model the eye with a sphere, and use a separate sphere for the cornea to give it a reflective surface.
- Apply a high-resolution iris texture to the eye. You can find realistic eye textures online or create your own.
- Adjust the material settings to give the eye a realistic wet look, crucial for lifelike characters.
- Hair:
- For realistic hair, use Blender’s particle system. This allows you to simulate individual hair strands, offering control over length, density, and curliness.
- Alternatively, for low-poly models or stylized characters, you can use textured planes arranged to form the hair shape.
- Adjust the hair material’s shine and color to match your character’s appearance. Adding a translucent shader can simulate light passing through hair for added realism.
Texturing is both an art and a science, requiring experimentation and adjustments to achieve the desired look. By carefully texturing skin, eyes, and hair, you can elevate your human model from a simple 3D shape to a character that looks alive and ready to be part of your digital world.

Rigging Your Model for Animation
Rigging is the process of creating a skeleton for your model so it can move. This step is essential for animation and involves setting up bones and controls in Blender. Follow these steps to rig your human model for animation:
- Create the Armature: Start by adding an armature to your model. In Object Mode, press Shift+A and select Armature > Single Bone. This bone will act as the basis for your skeleton.
- Adjust Bone Placement: In Edit Mode, position and scale the bones to match the humanoid form of your model. Ensure each major body part has a corresponding bone (e.g., spine, arms, legs).
- Name Your Bones: Properly naming your bones is crucial for organization and animation. Use a consistent naming convention that includes the body part and side (e.g., arm.L, arm.R).
- Parenting Mesh to Armature: With your armature in place, select your mesh, then Shift-select your armature and press Ctrl+P. Choose \"With Automatic Weights\" to let Blender calculate the influence of each bone on the mesh.
- Adjust Weight Paint: Enter Weight Paint Mode to fine-tune the influence of each bone. This step is crucial for ensuring natural movement in your animations.
- Add Inverse Kinematics (IK): For more control over limb movement, add IK constraints to bones like arms and legs. This allows for more intuitive posing and animation.
- Setting Up Control Rig: For complex animations, create a control rig with custom shapes that drive your armature. This step is advanced and requires a good understanding of Blender’s rigging tools.
- Test the Rig: Before moving on to animation, test your rig thoroughly. Pose your model in various positions to ensure the joints move correctly and the mesh deforms naturally.
Rigging is a detailed process that requires patience and precision. By carefully setting up your armature and adjusting weight paints, you can create a rig that brings your human model to life with realistic animations.

Posing and Fine-Tuning Your Model
After rigging your human model, the next step is posing and fine-tuning to ensure it meets your vision. This process involves adjusting the model\"s posture, expression, and ensuring all elements look natural and cohesive. Follow these steps to pose and fine-tune your model:
- Understanding the Pose: Before posing your model, have a clear idea of the desired pose. Reference images or sketches can be invaluable for this step.
- Selecting Bones for Posing: In Pose Mode, select the bones you want to manipulate. Use the R (rotate), G (grab/move), and S (scale) shortcuts to adjust the bones\" positions and angles.
- Adjusting Limb Rotation: Focus on natural joint movements. Rotate limbs in a way that mimics real human motion, paying close attention to elbows, knees, and wrists.
- Facial Expressions: Use the facial rig to adjust your model\"s expression. Small changes to the eyes, mouth, and eyebrows can significantly impact the model\"s overall mood and personality.
- Checking Proportions and Balance: Regularly zoom out to view the entire model. Ensure that the pose is balanced and that proportions remain consistent from all angles.
- Adding Props or External Objects: If your scene includes props or other objects, position these in relation to your model. Ensure interactions look natural and physically plausible.
- Final Adjustments: Make final adjustments to the pose, considering the composition, lighting, and background of your scene. Small tweaks can often make a big difference in the final result.
- Testing Deformations: Move your model through a range of motions to test the skin\"s deformation around joints. Make any necessary weight painting adjustments to ensure smooth movement.
Posing and fine-tuning are where your model truly comes to life. This step requires a keen eye for detail and an understanding of human anatomy and motion. With patience and practice, you can achieve poses that are both dynamic and realistic.
_HOOK_
READ MORE:
Rendering and Final Touches: Lighting and Camera Setup
Rendering your human model in Blender is the final step in the 3D modeling process, where you bring your creation to life with realistic lighting, shadows, and camera angles. Here\"s how to set up your scene for rendering:
- Choose the Right Renderer: Blender offers different rendering engines like Cycles and Eevee. Cycles is a ray-trace based renderer that provides realistic lighting effects, while Eevee is a real-time renderer for faster results.
- Setting Up the Lighting: Lighting is crucial for realism. Consider using three-point lighting, which includes a key light, fill light, and back light to highlight your model\"s form and texture.
- Adjust the Camera: Position the camera to capture your model from the best angle. Pay attention to composition and framing. Use the rule of thirds to make your render more dynamic and interesting.
- Choose a Background: A suitable background can enhance your model. You can use a simple color, a gradient, or import an HDRI image for more realistic environmental lighting.
- Material and Texture Adjustments: Ensure your materials and textures are set up correctly. Check for realistic skin, eye, and hair textures, adjusting the shaders if necessary.
- Final Render Settings: Adjust your render settings for the best quality. This includes setting the resolution, sampling rate, and any other settings specific to your chosen renderer.
- Post-Processing: Use Blender’s Compositor or an external image editing software to adjust colors, contrast, and add any final touches to your render.
Rendering is both an art and a science, requiring experimentation to get the perfect result. By carefully setting up your lighting, camera, and render settings, you can produce a stunningly realistic image of your human model in Blender.
Embarking on the journey of modeling a human in Blender can be challenging but incredibly rewarding. With patience and practice, you can bring your unique characters to life, ready to animate and integrate into your digital world.