Topic uv unwrapping in blender: Discover the secrets of UV unwrapping in Blender, a crucial technique for bringing your 3D models to life with realistic textures. Master this skill to enhance your digital artistry.
Table of Content
- How to do UV unwrapping for beginners in Blender?
- Understanding UV Unwrapping and Its Importance
- Step-by-Step Guide to UV Unwrapping in Blender
- Best Practices for Efficient UV Mapping
- Common UV Unwrapping Techniques and When to Use Them
- Advanced Tips for UV Unwrapping Complex Models
- Optimizing UV Layouts for Texture Baking
- YOUTUBE: UV Unwrapping Blender 2.80 Fundamentals
- Tools and Add-ons to Enhance UV Unwrapping in Blender
- Troubleshooting Common UV Unwrapping Issues
- Integrating UV Maps with Texturing and Shading Workflows
- Case Studies: Real-World Applications of UV Unwrapping
How to do UV unwrapping for beginners in Blender?
To do UV unwrapping for beginners in Blender, follow these steps:
- Select the object you want to unwrap by right-clicking on it in the 3D viewport.
- Go to Edit Mode by pressing Tab or selecting it from the mode selector at the bottom of the viewport.
- Select all the faces you want to unwrap by pressing A (or use box select with B).
- Open the UV Editing workspace by selecting it from the layout selector at the top of the interface.
- In the UV Editing workspace, make sure you have the UV Editor panel open.
- Press U or go to UV > Unwrap in the UV menu to unwrap the selected faces.
- You can choose different unwrapping methods depending on your needs, such as Smart UV Project or Project from View.
- Once unwrapped, you will see the UV map of your object in the UV Editor. You can adjust and manipulate the UV layout as needed.
- After making any necessary adjustments, you can create a new image texture or use an existing one to apply to your UV-mapped object.
READ MORE:
Understanding UV Unwrapping and Its Importance
UV unwrapping in Blender is the process of projecting a 3D model\"s surface onto a 2D plane to efficiently map textures. This essential step in 3D modeling allows for precise control over texture placement, ensuring that graphics appear realistic and accurately detailed on the model. Understanding UV unwrapping is crucial for anyone looking to excel in 3D design, as it directly impacts the visual quality of the final product.
- Facilitates Accurate Texturing: UV unwrapping ensures that textures align correctly with the model\"s geometry, avoiding stretching or distortion.
- Enhances Realism: Proper UV mapping allows for high-resolution textures that contribute to the realism of the model.
- Optimizes Game and Animation Performance: Efficient UV layouts help in reducing the load on graphics processors, crucial for game development and animation.
- Allows for Detailed Customization: UV unwrapping gives artists the freedom to add intricate details and variations to textures, making each project unique.
Mastering UV unwrapping in Blender not only improves the aesthetic quality of your models but also enhances your workflow efficiency, making it a foundational skill in the repertoire of 3D artists and designers.

Step-by-Step Guide to UV Unwrapping in Blender
UV unwrapping in Blender transforms your 3D models into ready-to-texture canvases. Follow this comprehensive guide to master the UV unwrapping process.
- Select Your Model: Begin by importing or selecting the model you wish to unwrap in Blender.
- Enter Edit Mode: Switch to Edit Mode (Tab key) to access the model\"s vertices, edges, and faces.
- Mark Seams: Identify and select edges where the mesh will be cut for unwrapping. Right-click and choose \"Mark Seam\" under the Edge menu. Seams guide the unwrapping process to achieve optimal texture alignment.
- Unwrap the Model: With seams marked, select all faces (A key) and press U to open the Unwrap menu. Choose \"Unwrap\" to apply UV mapping based on the marked seams.
- Adjust UV Map: Open the UV/Image Editor window to view and adjust the UV map. Use tools to move, scale, or rotate UV islands for better texture fitting.
- Apply Textures: With the UV map adjusted, you can now apply textures to your model. In the Shader Editor, create a new material and assign a texture node linked to your UV map.
This step-by-step guide ensures that even beginners can successfully unwrap models in Blender, paving the way for detailed and realistic texturing.

Best Practices for Efficient UV Mapping
Efficient UV mapping is crucial for achieving high-quality textures with optimal performance. Here are best practices to enhance your UV mapping process in Blender.
- Plan Your Seams: Strategically place seams in less noticeable areas or along natural breaks in the model to minimize visible texture seams.
- Minimize Distortion: Use the \"Minimize Stretch\" option in the UV editor to reduce texture distortion. Ensure UV islands are proportionally scaled to the model\"s geometry.
- Optimize UV Space: Arrange UV islands to maximize the use of the UV space, leaving minimal gaps. This approach improves texture resolution and efficiency.
- Keep UV Islands Consistent: Aim for uniform UV island sizes to ensure textures display evenly across the model. Avoid scaling islands too differently to prevent texture pixelation or blurring.
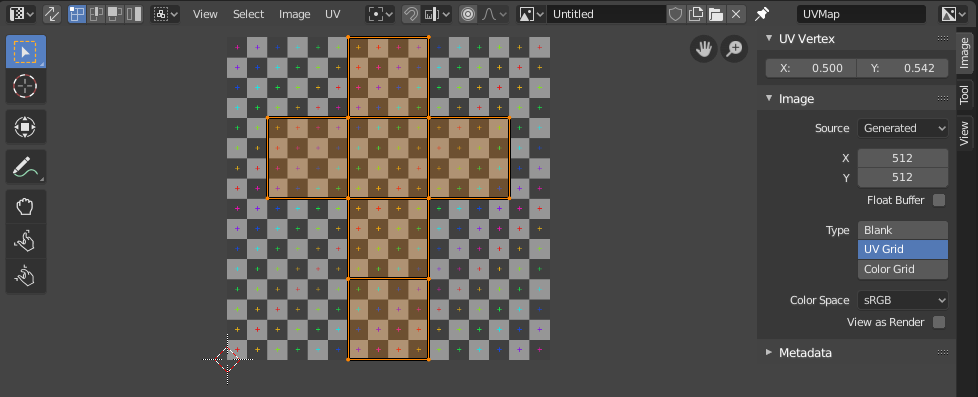
- Utilize UV Grids: Before applying final textures, use a UV grid texture to check for distortion. This helps in identifying and correcting any issues with the UV map.
- Organize UV Layers: For complex models, use multiple UV layers to manage different aspects of the texturing process, such as color maps, bump maps, and specular maps.
- Stay Updated: Blender continuously evolves, so stay updated with the latest tools and techniques for UV mapping to enhance your workflow and output quality.
Adhering to these best practices ensures your UV mapping process is both efficient and effective, leading to better textured models and a more streamlined workflow in Blender.

Common UV Unwrapping Techniques and When to Use Them
Understanding the variety of UV unwrapping techniques in Blender can significantly enhance your texturing workflow. Here\"s a look at some common methods and their optimal use cases.
- Basic Unwrap: Use for simple objects with minimal distortion. Ideal for straightforward geometries like cubes and spheres.
- Smart UV Project: Best for complex objects or when quick unwrapping is needed. It automatically generates seams and UV layouts, suitable for objects where precise seam placement is less critical.
- Project From View: Effective for objects viewed from a fixed perspective. It projects the UV map based on the current camera view, ideal for flat surfaces or game assets viewed from one angle.
- Cylinder Projection: Use for cylindrical shapes. This method projects UVs in a cylindrical fashion around the object\"s axis, perfect for bottles, cans, or arms.
- Sphere Projection: Suitable for spherical and semi-spherical objects. It projects UVs in a spherical layout, ideal for heads, balls, or planets.
- Cube Projection: Best for box-like objects. This technique projects UVs from a cubic perspective, ensuring all sides are unwrapped with equal emphasis.
- Live Unwrap: Allows for interactive seam marking and UV adjustment. Use when you need to tweak seams and see results in real-time, great for iterative detailing.
Choosing the right UV unwrapping technique for your project can save time and improve the quality of your textures. Experiment with these methods to find the most efficient workflow for your models.
_HOOK_
Advanced Tips for UV Unwrapping Complex Models
UV unwrapping complex models in Blender requires a blend of strategic planning and advanced techniques. Here are some expert tips to elevate your UV mapping game.
- Incremental Seams: Start by marking seams on larger, distinct sections and progressively refine smaller areas. This method helps manage complexity by breaking down the model into more manageable pieces.
- Pin UV Vertices: In the UV/Image Editor, pin vertices (P key) to lock parts of the UV map while you unwrap other sections. Useful for maintaining sections of the map you\"re satisfied with.
- Utilize the Stretching Display: Turn on the stretching display in the UV editor to visually identify areas of the UV map that may cause texture distortion. Aim to minimize stretching for more uniform texture application.
- Live Unwrap for Real-time Adjustments: Use the live unwrap feature to make real-time adjustments. Seamlessly edit seams and watch the UV map update instantly, perfect for fine-tuning.
- Seamless Textures: When possible, use seamless textures to hide the seams. This can greatly enhance the appearance of complex models by making the transitions between UV islands less noticeable.
- UV Sculpting: Blender\"s UV sculpting tools allow for intuitive manipulation of UV maps, similar to sculpting a 3D model. Use these tools to push and pull UV islands, smoothing out imperfections.
- Multi-Object UV Editing: Work with multiple objects\" UVs simultaneously to ensure consistency across parts. This is particularly useful when several objects share the same texture space.
These advanced techniques provide the finesse needed for tackling complex models, ensuring your UV maps are both efficient and high quality.
Optimizing UV Layouts for Texture Baking
Texture baking in Blender is a powerful technique to transfer details from high-poly models to low-poly counterparts. Optimizing your UV layouts is crucial for achieving the best results. Here\"s how to ensure your UVs are ready for baking.
- Maximize UV Space: Arrange your UV islands to use as much of the UV space as possible. Larger UV islands mean more detail in the baked texture.
- Avoid Overlapping UVs: Ensure UV islands do not overlap unless intentionally sharing texture information. Overlapping UVs can result in baking errors or unwanted texture repeats.
- Uniform Texel Density: Strive for consistent texel density across the UV map. This ensures uniform detail levels in the baked textures, avoiding areas that look significantly different in quality.
- Padding Between Islands: Add adequate padding between UV islands to prevent bleeding of textures at the edges. This is particularly important for models that will undergo mipmapping in games.
- Consider the End Use: Tailor your UV layout strategy to the model\"s final use. For games, efficiency and mipmapping are key; for static renders, you might prioritize detail over texture size.
- Use Blender\"s Baking Tools: Utilize Blender\"s baking settings to adjust margins, influence the baking process, and ensure optimal outcomes. Experiment with settings to find the best fit for your project.
- Test Bakes: Perform test bakes with simple materials to quickly identify and correct issues in your UV layout before committing to the final bake.
By following these guidelines, you can create optimized UV layouts that lead to high-quality texture bakes, enhancing the visual fidelity of your 3D models.
UV Unwrapping Blender 2.80 Fundamentals
Fundamentals: Dive deep into the world of investing with this enlightening video on the fundamentals. Learn how to build a solid foundation, understand key concepts, and make informed decisions for financial success. Beginners: Calling all beginners! This video is your ultimate guide to getting started on your fitness journey. Gain valuable insights, tips, and motivation to kickstart your health and wellness goals. You got this!
UV Unwrapping for Beginners Blender Tutorial
In this Blender tutorial I will show you how to do UV Unwrapping for Beginners. ○ Setup texture Maps Tutorial: ...
Tools and Add-ons to Enhance UV Unwrapping in Blender
Texture baking in Blender is a powerful technique to transfer details from high-poly models to low-poly counterparts. Optimizing your UV layouts is crucial for achieving the best results. Here\"s how to ensure your UVs are ready for baking.
- Maximize UV Space: Arrange your UV islands to use as much of the UV space as possible. Larger UV islands mean more detail in the baked texture.
- Avoid Overlapping UVs: Ensure UV islands do not overlap unless intentionally sharing texture information. Overlapping UVs can result in baking errors or unwanted texture repeats.
- Uniform Texel Density: Strive for consistent texel density across the UV map. This ensures uniform detail levels in the baked textures, avoiding areas that look significantly different in quality.
- Padding Between Islands: Add adequate padding between UV islands to prevent bleeding of textures at the edges. This is particularly important for models that will undergo mipmapping in games.
- Consider the End Use: Tailor your UV layout strategy to the model\"s final use. For games, efficiency and mipmapping are key; for static renders, you might prioritize detail over texture size.
- Use Blender\"s Baking Tools: Utilize Blender\"s baking settings to adjust margins, influence the baking process, and ensure optimal outcomes. Experiment with settings to find the best fit for your project.
- Test Bakes: Perform test bakes with simple materials to quickly identify and correct issues in your UV layout before committing to the final bake.
By following these guidelines, you can create optimized UV layouts that lead to high-quality texture bakes, enhancing the visual fidelity of your 3D models.

Troubleshooting Common UV Unwrapping Issues
UV unwrapping in Blender is a crucial process in the texturing workflow, but it can sometimes lead to challenges. Below are some common issues encountered during UV unwrapping and their solutions to help you achieve better results.
Issue 1: Overlapping UVs
Overlapping UVs can cause textures to apply incorrectly. To resolve this, enter the UV Editing workspace, select your mesh, and in the UV editor, use the \"UV\" > \"Pack Islands\" tool to separate the UVs. Ensure \"Margin\" is adjusted to prevent overlaps.
Issue 2: Distorted UV Maps
Distorted UV maps occur when the mesh\"s geometry is not evenly unwrapped. To fix, ensure your mesh is properly marked with seams (\"Edge\" > \"Mark Seam\") around the areas you want to unfold. Use the \"Unwrap\" option again after adjusting seams for a more accurate UV layout.
Issue 3: Missing UVs
If parts of your mesh do not appear in the UV editor, they may not be unwrapped. Select these parts in edit mode, press U, and choose an unwrapping method. If the entire mesh is missing, ensure you\"re in edit mode with all vertices selected before unwrapping.
Issue 4: Stretched Textures
Stretched textures often result from uneven UV island scaling. In the UV editor, use \"UV\" > \"Minimize Stretch\" to reduce stretching. Adjusting the island scale manually can also help achieve more uniform texture distribution.
Issue 5: Too Many Seams
Excessive seams can lead to fragmented UVs and inefficient texture space usage. Simplify your UV layout by reducing the number of seams. Focus on placing seams in less noticeable areas or along natural breaks in the model.
Issue 6: Texture Pixelation
Texture pixelation is often due to low texture resolution or poor UV island distribution. Ensure UV islands are proportionally scaled to match their importance on the model. Consider increasing your texture\"s resolution or using \"UV\" > \"Pack Islands\" to optimize space.
Issue 7: Difficulty Selecting UV Islands
If selecting UV islands is cumbersome, use the \"Sync Selection\" mode in the UV editor. This synchronizes the selection between the 3D viewport and the UV editor, making it easier to identify and adjust specific UV islands.
Issue 8: Unintended Texture Tiling
Unintended texture tiling occurs when UV islands extend outside the UV bounds. To fix this, use \"UV\" > \"Constrain to Image Bounds\" in the UV editor to keep all UV islands within the 0-1 UV space.
Additional Tips
- Regularly check your UV layout in the 3D viewport with a test texture to identify and correct issues early.
- Utilize Blender\"s \"Live Unwrap\" feature for real-time adjustments to your UV map as you mark seams or move vertices.
- Explore Blender add-ons designed to enhance UV unwrapping workflows, offering more automated solutions and advanced features.

Integrating UV Maps with Texturing and Shading Workflows
Successfully integrating UV maps into texturing and shading workflows in Blender is essential for achieving realistic or stylized visuals in your 3D projects. This process involves several key steps and considerations to ensure that textures align correctly with the 3D geometry and that materials react as expected under various lighting conditions.
Step 1: Proper UV Unwrapping
Begin by ensuring your model is correctly UV unwrapped. This involves selecting appropriate edges for seams, unwrapping the mesh, and optimizing the UV layout to minimize stretching and maximize texture resolution utilization. Tools like \"Smart UV Project\" and \"Unwrap\" can be invaluable for complex models.
Step 2: Texture Application
Once unwrapped, apply textures to your model using Blender\"s shader editor. Textures can be images, procedural patterns, or a combination of both. Use nodes to connect textures to the material\"s color, roughness, and other properties. Ensure the texture\"s mapping node is set to use the correct UV map if multiple maps are present.
Step 3: Shading Setup
In the shader editor, develop the material\"s appearance by adjusting nodes that affect its surface characteristics, such as Principled BSDF, which provides a comprehensive range of material properties like metallic, specular, and emissive qualities.
Step 4: UV Map Adjustments for Detailing
For detailed texturing work, such as adding decals or specific features, additional UV maps may be necessary. You can create and assign different UV maps for various parts of the material, allowing for intricate texture placement without affecting the main texture\"s layout.
Step 5: Testing and Iteration
Regularly preview your model under different lighting conditions and camera angles. This step helps identify any mismatches between the UV map and texture application, allowing you to go back and adjust the UV layout or texture settings as needed.
Step 6: Baking Textures
In projects where performance is critical, such as games or VR applications, bake your textures. This process transfers shading and lighting information onto the textures themselves, reducing the computational load during real-time rendering.
Additional Tips
- Use the \"Node Wrangler\" addon to quickly preview textures and shaders directly in the viewport.
- For organic models, consider using \"Project From View\" for areas that require more control over texture placement.
- Experiment with \"Blender\"s Texture Paint\" mode to manually adjust or add details to your textures directly on the model.
Integrating UV maps with texturing and shading effectively requires practice and experimentation. By following these steps and exploring Blender\"s comprehensive toolset, you can achieve detailed and visually compelling results in your 3D projects.
_HOOK_
READ MORE:
Case Studies: Real-World Applications of UV Unwrapping
UV unwrapping is a fundamental step in the 3D modeling process, critical for applying textures accurately to models. This section explores real-world case studies that highlight the versatility and necessity of UV unwrapping across various industries, from entertainment to product design.
1. Video Game Development
In the creation of video game assets, UV unwrapping ensures that textures are correctly applied to characters, environments, and objects, enhancing realism and immersion. A notable example is the development of open-world games, where designers meticulously unwrap complex models to apply detailed textures that remain consistent under dynamic lighting conditions.
2. Film and Animation
For animated films and special effects in movies, UV unwrapping is used to texture characters and settings, contributing to the visual storytelling. Pixar and other animation studios rely on advanced UV unwrapping techniques to bring their imaginative worlds to life with textures that accurately mimic real-world materials.
3. Architectural Visualization
Architects and designers utilize UV unwrapping to apply realistic textures to 3D models of buildings and interiors. This application allows clients to visualize the final appearance of a construction project, including the play of light and shadow on various surfaces, enhancing the decision-making process.
4. Product Design and Prototyping
In product design, UV unwrapping facilitates the application of brand logos, patterns, and textures to prototypes. This process is crucial for visualizing the final product before manufacturing, allowing designers to make adjustments to the aesthetics and functionality of the product.
5. Educational and Training Simulations
UV unwrapping plays a vital role in creating realistic models for educational and training simulations. By applying accurate textures to models of human anatomy, machinery, or historical artifacts, educators can create immersive learning experiences that enhance understanding and retention of complex subjects.
6. Virtual Reality (VR) and Augmented Reality (AR)
In VR and AR experiences, UV unwrapping ensures that textures wrap correctly around 3D models, creating a seamless and immersive experience for users. This is particularly important in applications such as virtual tours, interactive learning modules, and augmented reality shopping apps.
These case studies demonstrate the critical role of UV unwrapping in a wide range of applications, proving its value in enhancing realism, aesthetic appeal, and functionality in 3D models across various industries.
Mastering UV unwrapping in Blender opens the door to creating visually stunning and highly detailed 3D models. Whether for gaming, film, or design, honing this skill will elevate your projects and bring your creative visions to life.