Topic how to create a uv map in blender: Discover the secrets of UV mapping in Blender and transform your 3D models with stunning textures. This guide unveils step-by-step techniques to master UV mapping, enhancing your digital artistry skills.
Table of Content
- How to create a UV map in Blender?
- Understanding UV Mapping Basics
- Preparing Your Model for UV Mapping
- Marking Seams for Efficient Unwrapping
- Unwrapping the Model and Adjusting the UV Map
- YOUTUBE: UV Unwrapping Explained for Beginners Blender Tutorial
- Using Blender\"s UV Mapping Tools and Techniques
- Applying Textures Using UV Maps
- Optimizing UV Layouts for Better Texture Quality
- Troubleshooting Common UV Mapping Issues
- Advanced UV Mapping Techniques for Complex Models
- Best Practices for UV Mapping Workflow
- Utilizing Add-ons and Extensions for Enhanced UV Mapping
How to create a UV map in Blender?
To create a UV map in Blender, follow these steps:
- Open Blender and select the object you want to create a UV map for.
- Switch to Edit Mode by pressing Tab.
- Select the faces of the object that you want to unwrap by right-clicking on them.
- Press U on your keyboard to bring up the UV Mapping options.
- Choose from the different unwrapping methods available, such as Smart UV Project or Unwrap.
- Adjust the UV map in the UV Editor window to ensure it is properly laid out.
- You can also create seams on the object to control how the UV map is unwrapped.
- Once you are satisfied with the layout, you can export the UV map as an image file if needed.
READ MORE:
Understanding UV Mapping Basics
UV mapping in Blender is a critical process for applying textures to 3D models. It involves unwrapping the model\"s surface and laying it out in a 2D image space, allowing textures to be accurately applied to the model\"s surfaces. Understanding UV mapping is essential for creating realistic or stylized textures on your models.
- What is UV Mapping: It maps the 3D surface of your model to a 2D texture space, using the \"U\" and \"V\" axes to represent the horizontal and vertical coordinates in the texture space.
- Why it\"s Important: UV mapping allows for detailed textures to be accurately applied to complex 3D shapes, enhancing the visual detail and realism of your models.
- Seams and Unwrapping: Identifying and marking seams is crucial for unwrapping your model effectively. Seams are edges where the mesh is \"cut\" to lay flat in 2D space.
Starting with a simple model can help beginners grasp the fundamentals of UV mapping. Blender offers various tools for marking seams, unwrapping models, and editing UVs, making it flexible for different types of projects.
- Begin by selecting your model and entering Edit Mode.
- Mark seams on your model to guide the unwrapping process.
- Use the Unwrap command to generate the UV map.
- Adjust the UV layout in the UV/Image Editor to optimize texture placement.
Practicing UV mapping with different models and textures will build your skills and intuition for creating effective UV layouts. Remember, the goal of UV mapping is to create a seamless blend between your 3D model and its 2D texture, producing a cohesive and visually appealing result.

Preparing Your Model for UV Mapping
Before starting the UV mapping process, it\"s crucial to prepare your 3D model to ensure a smooth and efficient workflow. Proper preparation can significantly impact the ease of unwrapping and the quality of the final texture application. Follow these steps to get your model ready for UV mapping.
- Clean Up the Mesh: Ensure your model is free of unnecessary vertices, faces, and edges. Simplify your geometry to make unwrapping easier.
- Check for Non-Manifold Edges: Non-manifold geometry can cause issues during unwrapping. Use Blender\"s Select > Select All by Trait > Non-Manifold to identify and fix these problems.
- Apply Object Transforms: Applying scale and rotation (Ctrl+A) to your model ensures that the UVs will unwrap correctly. Unapplied transforms can lead to distorted UVs.
- Define Your Texture Resolution: Knowing your target texture resolution helps in planning the UV layout to match the level of detail required for your project.
- Mark Seams: Decide where to place seams for unwrapping. Seams should be placed in less noticeable areas and along natural breaks in the model.
These preparatory steps are fundamental in achieving a good UV map. A well-prepared model leads to a more efficient mapping process and higher quality results. As you become more familiar with these steps, you\"ll develop a keen eye for effective seam placement and mesh optimization, which are key skills in UV mapping.

Marking Seams for Efficient Unwrapping
Marking seams is a crucial step in the UV mapping process, as it determines how the 3D model will be unfolded into a 2D image. Efficient seam placement is key to minimizing visible texture seams and maximizing the texture space. Follow these guidelines for effective seam marking.
- Analyze Your Model: Start by examining your model to identify natural breaks or hidden areas where seams would be least noticeable.
- Use the Edge Select Mode: In Blender\"s Edit Mode, use Edge Select to choose edges where you will place your seams.
- Marking the Seams: With edges selected, press Ctrl+E and choose \"Mark Seam\" from the menu. This will highlight your selected edges as seams.
- Consider the Texture: Think about how your texture will wrap around the model. Place seams in areas where the texture has a natural break or where distortion is less likely to be noticeable.
- Use the UV Editing Workspace: Blender’s UV Editing workspace provides tools and views specifically for UV mapping, allowing you to see real-time updates as you mark seams.
Effective seam placement can greatly improve the unwrapping process, leading to better texture alignment and a more realistic appearance. Practice and experimentation are crucial, as different models will require different strategies for seam placement.
- Minimize Seams Visibility: Place seams in less conspicuous locations, such as under arms, behind ears, or where objects naturally separate.
- Optimize for Texture Painting: If you plan to texture paint, consider how seams may affect your painting workflow and adjust their placement accordingly.
Remember, the goal of marking seams is to create a UV map that best represents your model\"s surface in two dimensions, facilitating accurate texture application.

Unwrapping the Model and Adjusting the UV Map
After marking the seams, the next step in UV mapping is unwrapping the model. Unwrapping translates your 3D model into a 2D representation, allowing for texture application. Adjusting the UV map ensures textures align correctly on your model\"s surface.
- Select Your Model: In Edit Mode, select the entire model (A) to prepare for unwrapping.
- Unwrap the Model: With your model selected and seams marked, press U and select \"Unwrap\". Blender will unfold the model based on the seams you\"ve marked.
- Inspect the Initial Unwrap: Open the UV/Image Editor to view your model\"s UV map. Look for any overlaps or stretching that could affect texture application.
- Adjusting UVs: Use the tools in the UV/Image Editor to adjust the UVs. This can include moving, scaling, or rotating parts of the UV map to better fit your texture.
- Utilize UV Pack Islands: To optimize the use of texture space, use the \"Pack Islands\" function (in the UV menu) to efficiently arrange the UV islands within the UV space.
Properly unwrapping and adjusting your UV map is crucial for achieving realistic textures on your model. This process might require several iterations to perfect, especially for complex models.
- Pin UV Vertices: For complex adjustments, you can pin vertices in the UV/Image Editor to maintain their position while rearranging other parts of the UV map.
- Live Unwrap: Enable \"Live Unwrap\" for dynamic adjustments, allowing you to see how changes affect the UV map in real time.
Adjusting the UV map is an art in itself, requiring patience and practice. Over time, you\"ll develop a keen eye for how textures map onto 3D surfaces and how to adjust UVs for the best results.
_HOOK_
UV Unwrapping Explained for Beginners Blender Tutorial
\"Learn the fascinating art of UV Unwrapping in this video! Discover how to efficiently unwrap 3D models for texturing and rendering, taking your creations to the next level of realism and detail.\"
UV Unwrapping Blender Tutorial
\"Join this comprehensive Blender Tutorial and unlock the full potential of this powerful 3D software! Master essential tips, tricks, and techniques to bring your ideas to life with creativity and precision.\"
Using Blender\"s UV Mapping Tools and Techniques
Blender offers a comprehensive set of tools and techniques for UV mapping that cater to various needs, from simple objects to complex scenes. Understanding and utilizing these tools effectively is key to achieving detailed and realistic textures on your models.
- Seam Cutting for Manual Unwrapping: Use the Mark Seam tool to define the edges where the mesh will be cut before unwrapping. This is crucial for complex models where automatic unwrapping might not give the desired result.
- Smart UV Project: For objects without a clear seam path, the Smart UV Project tool automatically unwraps the mesh based on angle limits, making it a quick solution for simple models.
- UV Sculpting: This tool allows for the manual adjustment of UV maps with a brush, enabling fine control over stretching and compression in specific areas of the texture.
- Live Unwrap: When enabled, any changes to the seams or mesh are immediately reflected in the UV map, facilitating a dynamic workflow.
- UV Packing: After unwrapping, the UV Packing tool optimizes the layout of the UV islands within the texture space to minimize wasted areas, ensuring that the texture resolution is used efficiently.
Additionally, Blender\"s UV/Image Editor workspace provides a visual platform for tweaking UVs, aligning and distributing islands, and checking for texture distortion. Familiarity with these tools and techniques empowers artists to create detailed and immersive textures that bring 3D models to life.
- Start by marking seams on your model to guide the unwrapping process.
- Experiment with different unwrapping methods to see which best suits your model.
- Adjust the UV map manually in the UV/Image Editor to perfect the texture alignment.
By mastering these tools, you can significantly enhance the visual quality of your projects, making Blender a powerful ally in 3D modeling and texturing.
Applying Textures Using UV Maps
Once you have unwrapped your model and adjusted its UV map, the next step is applying textures to bring your model to life. This process involves assigning image textures to the model based on its UV map, allowing for detailed and realistic surface appearances.
- Prepare Your Texture: Ensure the texture image is ready and accessible. High-resolution images yield better results for detailed models.
- Assign a Material: In the Properties panel, go to the Material tab and create a new material for your model if one doesn\"t already exist.
- Add a Texture: Within the same Material tab, switch to the Texture section, add a new texture, and select \"Image or Movie\" as the type. Then, open your texture image.
- Configure Texture Mapping: Set the texture\"s coordinates to \"UV\" and select the appropriate UV map from the list if your model has more than one.
- Adjust Texture Settings: Tweak the texture\"s scale, rotation, and position as needed in the UV/Image Editor to align with your model\"s features.
Applying textures using UV maps in Blender enables a high degree of control over how an image conforms to the 3D surface, allowing artists to achieve precise and realistic results. Remember, the key to effective texturing is not only in the application but also in the preparation of both the UV map and the texture image.
- Test Render: After applying the texture, perform a test render to see how the texture appears on the model under lighting conditions.
- Repeat and Refine: Texturing is an iterative process. It may be necessary to go back and adjust the UV map or texture settings to achieve the desired outcome.
With practice, applying textures using UV maps becomes an intuitive part of the 3D modeling workflow, greatly enhancing the visual appeal of your creations.

Optimizing UV Layouts for Better Texture Quality
Optimizing your UV layouts is crucial for maximizing texture quality on your 3D models. An efficient UV layout ensures that textures appear clear, detailed, and free from distortion. Follow these steps to enhance the texture quality through UV layout optimization.
- Minimize Stretching: Use Blender\"s UV editing tools to minimize stretching in the UV layout. Areas of significant stretching will display textures poorly, affecting the model\"s overall appearance.
- Maximize Texture Space: Arrange UV islands to make the most of the available texture space. Larger UV islands for detailed areas can improve texture clarity and detail.
- Avoid Overlapping UVs: Unless intentionally creating mirrored textures, avoid overlapping UV islands to prevent texture baking issues and ensure unique texturing across the model.
- Utilize Texture Density: Ensure consistent texture density across different parts of the model. Uniform texture density prevents areas from looking disproportionately detailed.
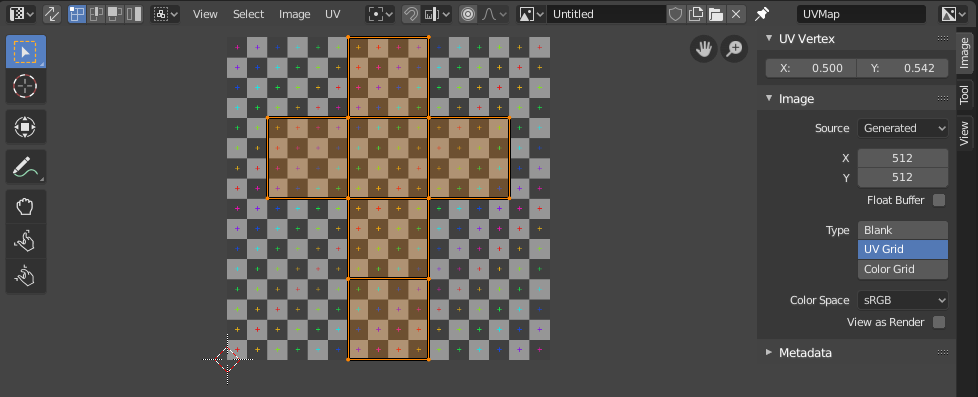
- Use Grid and Checker Maps: Apply grid or checker map textures to your model temporarily to visually identify distortion and stretching in the UV layout.
Optimizing UV layouts is an iterative process that might require going back and forth between the 3D viewport and UV editor. Tools like the UV packer and UV sculpt can aid in adjusting and optimizing the layout for the best texture application.
- Keep UV Islands Organized: Group related UV islands together and align edges where possible to simplify the texture painting or baking process.
- Use Seams Strategically: Place seams in areas that minimize visible texture seams, especially in areas of high visibility, to enhance the model\"s visual coherence.
By following these guidelines, you can significantly improve the visual quality of your textures, making your 3D models more realistic and visually appealing.

Troubleshooting Common UV Mapping Issues
UV mapping can sometimes be challenging, with various issues arising that affect the quality of your project. Here are solutions to some common problems encountered during the UV mapping process in Blender.
- Textures Appear Stretched: This often occurs when the UV map doesn\"t accurately represent the model\"s geometry. To fix, adjust the UV islands in the UV/Image Editor, ensuring they proportionally match the model\"s surface areas.
- Seams are Visible on the Model: If seams are visible, consider moving them to less conspicuous parts of the model or adjusting the texture\"s alignment and scale to hide the seam transitions better.
- UV Islands Overlap: Overlapping UVs can cause textures to display incorrectly. Use the \"Pack Islands\" feature in Blender to automatically arrange the UVs within the bounds, or manually adjust the islands to avoid overlap.
- Inconsistent Texture Resolution: This issue is usually due to varying sizes of UV islands. Ensure uniform scaling of UV islands relative to each other to maintain consistent texture detail across the model.
- Difficulty Selecting or Editing UVs: If you\"re having trouble selecting or manipulating UVs, make sure you\"re in UV Vertex select mode in the UV/Image Editor. Also, check if any UV vertices are pinned that may be restricting movement.
These solutions address the most frequent challenges faced during UV mapping. With practice and patience, overcoming these obstacles becomes a smoother part of your workflow, leading to better textured models and more efficient UV mapping processes.

Advanced UV Mapping Techniques for Complex Models
When working with complex models, standard UV mapping techniques might not suffice. Advanced methods can help tackle the challenges of unwrapping intricate shapes, ensuring high-quality textures without visible seams or distortion. Explore these techniques to elevate your UV mapping skills.
- Multi-Object UV Editing: Work with multiple objects simultaneously in Blender\"s UV/Image Editor. This approach allows for consistent texture scaling and alignment across different parts of a complex model or scene.
- Live Unwrap and Pinning: Utilize Blender\"s live unwrap feature along with pinning to dynamically adjust UVs while keeping crucial vertices fixed. This method is particularly useful for making real-time adjustments to complex unwraps.
- Projection Mapping: For objects with non-standard shapes, projection mapping (such as cubic, cylindrical, or spherical projection) can provide a more accurate starting point for UV unwrapping.
- UV Sculpting: Blender includes a UV sculpt tool that allows for direct manipulation of UV vertices and edges, similar to sculpting on a 3D model. This tool is invaluable for fine-tuning the UV map of complex surfaces.
- Seamless Textures and Cloning: Use seamless textures to avoid visible seams. Additionally, the clone brush in texture paint mode can help blend seams by painting directly on the model\"s texture.
Implementing these advanced techniques requires patience and practice but leads to significantly improved results for complex models. Whether you\"re working on detailed character models, intricate architectural structures, or organic shapes, mastering advanced UV mapping methods will enhance your texturing workflow and final outputs.
_HOOK_
Best Practices for UV Mapping Workflow
Efficient UV mapping is essential for creating high-quality textures that bring your 3D models to life. Following best practices in your UV mapping workflow can significantly enhance the texture\"s appearance and save time. Here are key guidelines to optimize your UV mapping process.
- Plan Your Seams: Before unwrapping, strategize on where to place seams for minimal visibility and distortion. Think like a tailor; seams should lie along the edges where fabric pieces would naturally join.
- Keep UV Islands Proportional: Maintain the proportions of UV islands relative to their corresponding 3D model parts. This ensures that textures are evenly distributed and prevents stretching.
- Utilize UV Grids for Testing: Apply a UV grid texture to your model initially to check for distortion. Adjust the UV map as necessary to ensure even distribution of the grid across the model.
- Maximize Texture Space: Arrange UV islands efficiently to use as much of the UV space as possible, which maximizes texture resolution and detail.
- Avoid Overlapping for Unique Textures: Unless creating mirrored textures, keep UV islands from overlapping to ensure every part of the model receives a unique part of the texture.
- Consistent Texture Density: Aim for a consistent texture density across different parts of the model to avoid noticeable differences in texture resolution and detail.
- Optimize UV Layouts for Animation: If the model will be animated, consider how deformation will affect the texture and place seams accordingly to minimize stretching during motion.
Adhering to these best practices not only streamlines the UV mapping process but also ensures that the final product meets the highest quality standards. Continual learning and adaptation of new techniques will further refine your skills and efficiency in UV mapping.
READ MORE:
Utilizing Add-ons and Extensions for Enhanced UV Mapping
Blender\"s functionality can be significantly expanded with the use of add-ons and extensions, many of which are specifically designed to enhance UV mapping workflows. These tools can automate complex processes, offer more precise controls, and introduce new techniques for managing UVs. Here are some steps and tips for leveraging these resources.
- Explore Blender\"s Add-on Catalog: Start by exploring the add-ons available within Blender\"s own catalog. Look for UV mapping tools under the categories of \"UV\", \"Texturing\", or \"Modeling\".
- Install Third-party Add-ons: Numerous third-party developers create powerful add-ons for Blender. These can often be found on dedicated Blender community websites or digital marketplaces.
- UV Squares: This add-on is great for straightening UV maps and making them more grid-like, which is particularly useful for architectural models.
- TexTools: A comprehensive suite for UV mapping and texturing, offering tools for UV layout optimization, texture baking, and more.
- UV Packmaster: An advanced solution for packing UV maps efficiently, minimizing wasted space and optimizing texture resolution.
When utilizing add-ons and extensions, always ensure they are compatible with your version of Blender. Regularly update both Blender and your add-ons to benefit from the latest features and improvements.
Integrating these tools into your UV mapping workflow can save time, enhance texture quality, and open up new possibilities for your 3D projects. Experiment with different add-ons to find the ones that best suit your specific needs and preferences.
Mastering UV mapping in Blender opens a world of creativity and precision in texturing 3D models. With practice, the right tools, and a keen eye for detail, you can bring your digital creations to life with stunning realism and artistic flair.