Topic blender uv unwrap tutorial: Embark on a journey to unlock the full potential of your 3D projects with this Blender UV unwrap tutorial, designed to elevate your texturing skills to professional levels.
Table of Content
- What is the best Blender UV unwrap tutorial for beginners?
- Understanding UV Unwrapping and Its Importance
- Getting Started with Blender\"s UV Unwrap Tool
- Marking Seams for Efficient Unwrapping
- Unwrapping Strategies for Different Model Types
- Using Blender\"s UV Editor for Precision
- YOUTUBE: UV Unwrapping Explained for Beginners Blender Tutorial
- Advanced UV Unwrapping Techniques and Tips
- Optimizing UV Layouts for Texture Painting
- Common UV Unwrapping Pitfalls and How to Avoid Them
- Utilizing Add-ons and Tools for Enhanced UV Mapping
- Best Practices for UV Mapping Complex Models
- Exporting and Integrating UV Maps into Your Workflow
What is the best Blender UV unwrap tutorial for beginners?
The best Blender UV unwrap tutorial for beginners is the one provided by Blender Guru. This tutorial covers the basics of UV unwrapping in Blender and is suitable for those who are new to the process. Here is a step-by-step guide on how to access and follow this tutorial:
- Visit the Blender Guru website at www.blenderguru.com
- Go to the tutorials section or use the search bar to look for the UV unwrap tutorial.
- Click on the tutorial titled \"Blender UV Unwrap Tutorial for Beginners.\"
- Follow along with the video tutorial, pausing when needed to complete each step in Blender.
- Pay close attention to the explanations and demonstrations provided in the tutorial to grasp the concepts effectively.
- Practice UV unwrapping on your own Blender projects to reinforce your understanding.
By following this tutorial from Blender Guru, beginners can learn the fundamentals of UV unwrapping in Blender and improve their skills in creating UV maps for their 3D models.
READ MORE:
Understanding UV Unwrapping and Its Importance
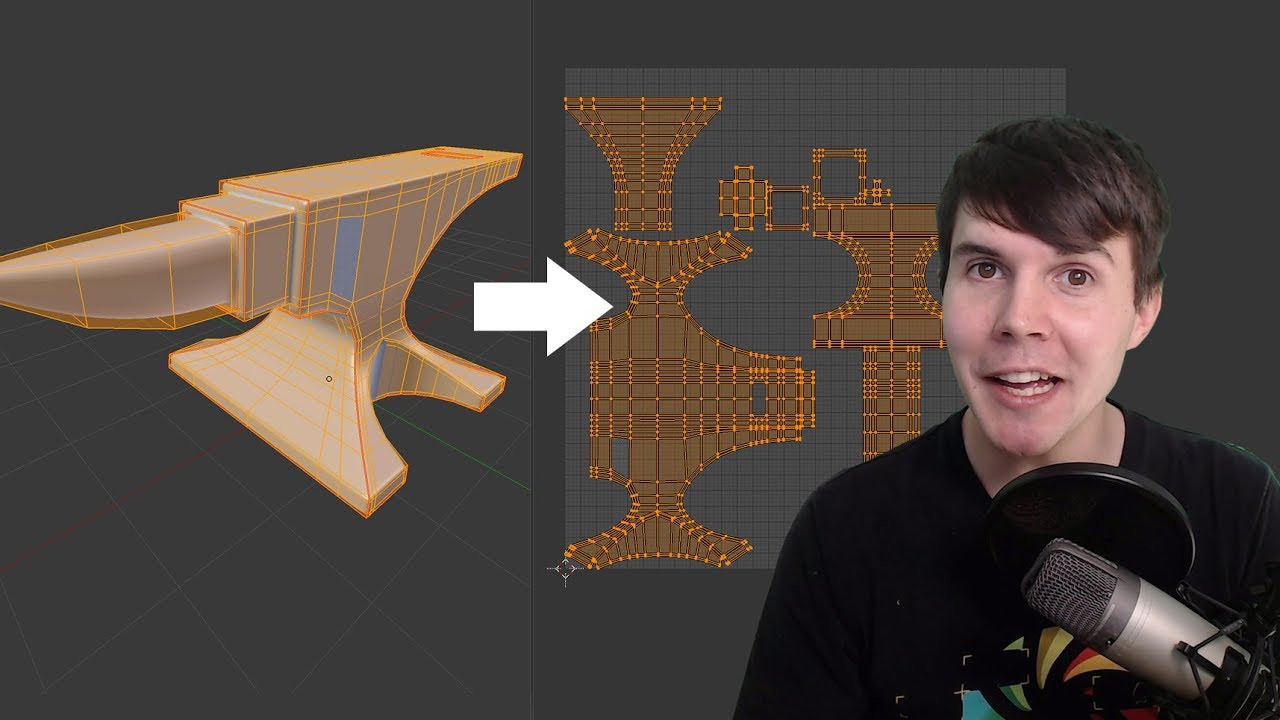
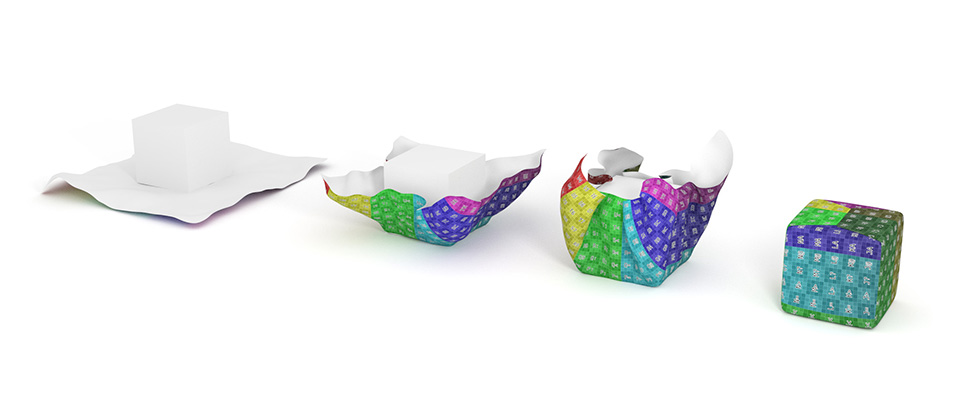
UV unwrapping is a critical process in 3D modeling that involves projecting a 3D model onto a 2D plane to create a texture map. This technique allows for the detailed painting of textures on a model\"s surface, ensuring that graphics look realistic when rendered. Understanding UV unwrapping is fundamental for anyone involved in 3D design, as it directly affects the visual quality and authenticity of the model in the digital environment.
The importance of UV unwrapping cannot be overstated. It enables artists to precisely control how textures wrap around 3D objects, ensuring that images are not distorted and appear as intended. Proper UV unwrapping is crucial for:
- Texture Accuracy: It ensures that textures are accurately mapped to the model, maintaining detail and scale without stretching or squashing.
- Efficient Use of Texture Space: By optimizing the layout of UVs, artists can make the most of the texture space, allowing for higher resolution textures within limited space.
- Seamless Textures: Effective UV unwrapping helps in hiding seams, making the texture appear continuous and natural across the model.
- Lighting and Shading: Correct UV mapping is essential for the proper application of lighting and shading effects, which rely on the model\"s surface properties to simulate realism.
UV unwrapping also plays a significant role in various industries, including video games, animation, visual effects, and architectural visualization, where the visual quality of models can greatly impact the overall experience. By mastering UV unwrapping techniques, artists can create more immersive and visually appealing environments and characters.
In summary, UV unwrapping is a foundational skill in 3D modeling that affects texture application, visual realism, and the overall quality of digital creations. As such, it\"s essential for 3D artists to understand and implement effective UV unwrapping strategies in their workflow.

Getting Started with Blender\"s UV Unwrap Tool
Blender\"s UV Unwrap tool is a powerful feature for mapping 2D textures to 3D models. This section provides a step-by-step guide to begin using the UV Unwrap tool, ensuring you have the foundational knowledge to start unwrapping your models effectively.
- Open Your Model in Blender: Start by importing or creating your 3D model in Blender. Ensure your model is ready for texturing by completing any necessary modeling adjustments.
- Select the Mesh: In Edit Mode, select the mesh you wish to unwrap. You can select the entire mesh or just parts of it, depending on your texturing needs.
- Marking Seams: For complex models, it\"s essential to mark seams to guide the unwrapping process. Seams are edges where the mesh will be \"cut\" for flattening. Select edges that outline natural breaks in the model, such as clothing lines or object boundaries, and press Ctrl+E > Mark Seam.
- Unwrapping the Mesh: With your seams marked, select all vertices (A) you wish to unwrap, then press U to open the Unwrap menu. Choose \"Unwrap\" to apply the default unwrapping method. Blender will calculate the unwrap based on your seam placement.
- Adjusting in the UV Editor: Switch to the UV Editing workspace to see your unwrapped mesh in the UV Editor. Here, you can adjust the UV layout manually to optimize texture space usage and minimize texture stretching.
- Applying Textures: With your UV map prepared, you can now apply textures in the Shader Editor. Assign an image texture node to your material and select your texture. The UV map controls how this texture is applied to the model.
Understanding and utilizing Blender\"s UV Unwrap tool is essential for creating detailed and realistic textures for your 3D models. By following these steps, you\"ll be well on your way to mastering UV unwrapping in Blender. Practice with different models and seam placements to become more proficient in creating efficient and effective UV maps.
Marking Seams for Efficient Unwrapping
Marking seams is a crucial step in the UV unwrapping process in Blender, as it determines how a 3D model is split into a 2D texture map. Efficient seam placement can significantly enhance the quality of the unwrap, reducing texture distortion and making the texturing process more straightforward. Follow these steps to effectively mark seams for your model:
- Analyze Your Model: Begin by examining your model to identify logical places for seams. These are typically areas where the model would naturally separate, such as clothing lines, edges of objects, or hidden areas less likely to be seen.
- Enter Edit Mode: With your model selected, enter Edit Mode (Tab key) to start selecting edges where you want to place seams.
- Selecting Edges for Seams: Use edge select mode (press 2) to select edges where you wish to mark seams. You can select multiple edges by holding Shift while clicking.
- Mark the Seams: Once you have selected all the desired edges for seams, press Ctrl+E to open the Edge menu and choose \"Mark Seam.\" You\"ll see the selected edges turn red, indicating they are marked as seams.
- Review and Adjust Seams: Carefully review your seam placements. Good seam placement should allow the model to unfold naturally without causing too much distortion in the texture. Adjust as necessary by clearing seams (Ctrl+E > Clear Seam) and remarking them until you are satisfied.
- Use the UV Editing Layout: Switch to the UV Editing layout to preview how your seams affect the unwrapped mesh. This can help you identify areas where the unwrap might be improved by adjusting seam placements.
Marking seams effectively is an art that requires practice and an understanding of both your model\"s geometry and how textures will be applied. By strategically placing seams, you can ensure that your textures look as realistic and seamless as possible, enhancing the overall quality of your 3D projects.

Unwrapping Strategies for Different Model Types
Each model type presents unique challenges for UV unwrapping due to its shape, complexity, and intended use. Developing a strategy tailored to the model type can greatly enhance the efficiency of your workflow and the quality of your final textures. Here are some strategies for unwrapping various model types in Blender:
- Organic Models (Characters and Animals): For organic models, prioritize seam placement in less noticeable areas, such as underarms or behind legs, to hide them from view. Use the LSCM (Least Squares Conformal Maps) unwrap method for more natural-looking unwraps that minimize distortion.
- Hard Surface Models (Machines, Furniture): Hard surface models often have clear edges where seams can be logically placed. Utilize the angle-based unwrapping to flatten these models, as it effectively deals with the sharp angles and flat surfaces typical of hard surface models.
- Environment Models (Landscapes, Buildings): For larger environment models, consider breaking down the model into smaller sections and unwrap each piece individually. This approach allows for better control over texture resolution and detail, especially for large or complex scenes.
- Clothing: For clothing, unwrap each piece as a separate object, placing seams along natural fabric seams or edges. This approach facilitates more realistic texture patterns and fabric simulations.
- Objects with Symmetry: Take advantage of model symmetry by unwrapping one half and mirroring the UV layout to the other. This not only saves time but also ensures uniform texture distribution across symmetrical models.
Regardless of the model type, always aim for an efficient use of texture space by arranging UV islands compactly while avoiding overlap and maintaining a consistent texel density across the model. Experimenting with Blender\"s different unwrapping methods and settings can also reveal more optimal strategies for each unique model.
Ultimately, the key to successful UV unwrapping lies in understanding the geometry and surface characteristics of your model, coupled with strategic seam placement and UV island organization. With practice and experimentation, you can develop unwrapping strategies that bring out the best in your textures and models.

_HOOK_
Using Blender\"s UV Editor for Precision
Blender\"s UV Editor is a powerful tool that offers precise control over the placement and scaling of UV maps. This feature is crucial for achieving high-quality textures that align perfectly with your 3D model. Here\"s how to use the UV Editor to refine your UV unwraps for the best possible results:
- Accessing the UV Editor: After unwrapping your model, switch to the UV Editing layout. This layout splits the screen between the 3D Viewport and the UV Editor, allowing you to see your model and its UV map side by side.
- Selecting UV Islands: In the UV Editor, UV islands represent the unwrapped parts of your model. You can select individual islands or vertices within the UV Editor to adjust their placement and scale. Use the Lasso Select (Ctrl+Left Mouse Button) or Box Select (B) tools for easier selection.
- Moving and Scaling UV Islands: With UV islands selected, you can move them by clicking and dragging or scale them using the Scale tool (S). Precise placement and scaling are essential for ensuring textures appear correctly on your model.
- Rotating UV Islands: Sometimes, UV islands need to be rotated to fit better within the texture space or to align textures properly on the model. Select the UV island and use the Rotate tool (R) to adjust its orientation.
- Aligning and Snapping: For a cleaner UV map, use the Align (Alt+A) and Snap (Shift+Tab) features to align edges or vertices of UV islands. This is particularly useful for models with repetitive patterns or when you need to pack UV islands closely together.
- Packing UV Islands: Use the Pack Islands (Ctrl+P) feature to automatically arrange all UV islands within the UV space efficiently. This tool maximizes the use of available texture space and helps in maintaining a consistent scale across all islands.
- Checking for Overlaps and Stretching: The UV Editor provides tools to highlight overlapping UVs and areas where textures might stretch. Use these visual aids to identify and correct potential issues with your UV layout.
Mastering the UV Editor in Blender is essential for any 3D artist looking to create detailed and realistic textures. By taking advantage of the editor\"s precision tools, you can ensure that your textures look as intended, enhancing the overall quality of your 3D projects.
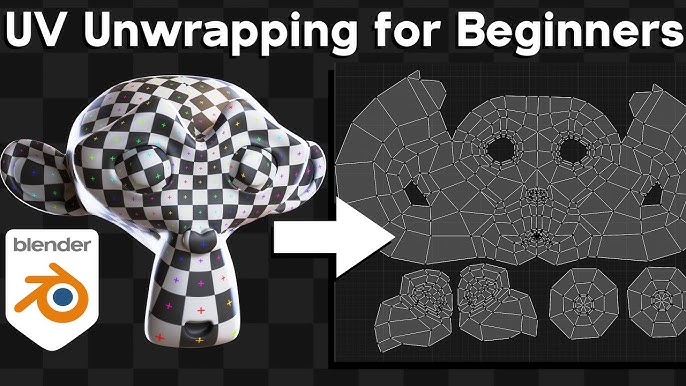
UV Unwrapping Explained for Beginners Blender Tutorial
UV Unwrapping: Learn the fascinating world of UV unwrapping in this video tutorial! Unlock the secrets of texture mapping and create stunning 3D models with ease. Elevate your skills and dive into the realm of high-quality rendering today. Beginners: Dive into the exciting realm of 3D modeling as a beginner with this informative video guide. Gain valuable insights and practical tips to kickstart your journey in the world of digital design. Start creating your own masterpieces now!
Advanced UV Unwrapping Techniques and Tips
To elevate your UV unwrapping skills beyond the basics, incorporating advanced techniques and tips into your workflow can significantly improve the efficiency and quality of your texture mapping. These advanced strategies will help you tackle complex models and achieve more realistic textures in Blender:
- Live Unwrap: Enable the Live Unwrap feature in Blender to see real-time adjustments as you mark or clear seams. This dynamic feedback is invaluable for making quick decisions about seam placement on complex models.
- Pinning UVs: Use pinning to lock certain vertices in place in the UV Editor. This technique is especially useful when making adjustments to surrounding UVs, as it ensures that pinned UVs remain stationary, maintaining critical texture alignments.
- Seamless Textures: To create seamless textures, pay close attention to how UV islands are arranged. Ensure that repeating patterns match up at the edges of UV islands. Utilizing the Snap to Pixels feature can aid in aligning these edges precisely.
- Texel Density: Maintaining consistent texel density across your model is crucial for ensuring that textures appear uniform, with no areas looking blurrier or more detailed than others. Use Blender\"s Texel Density tools to check and standardize the texel density across all UV islands.
- Custom Unwrap Algorithms: Experiment with Blender\"s different unwrap algorithms (e.g., Conformal vs. Angle Based) to find the best fit for your model. Each algorithm has its strengths, and switching between them can yield better unwraps for specific model types.
- UV Sculpting: For fine-tuning UV maps, Blender\"s UV Sculpt tools allow you to push and pull UVs much like sculpting clay. This can be particularly helpful for eliminating minor overlaps or stretching in dense areas of the UV map.
- UV Layout Export: Exporting the UV layout as an image can be a helpful reference when creating textures in external graphics software. This guide ensures your textures align perfectly with the UV islands when brought back into Blender.
Incorporating these advanced techniques into your UV unwrapping process will not only streamline your workflow but also enhance the realism and detail of your final textures. Continuous practice and experimentation with these strategies are key to mastering UV unwrapping in Blender.
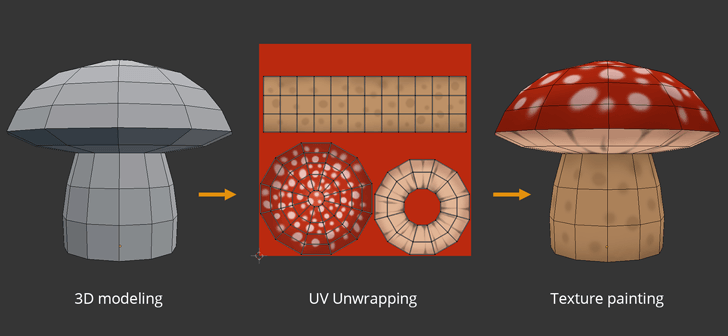
Optimizing UV Layouts for Texture Painting
Optimizing UV layouts is essential for achieving high-quality texture painting results. A well-organized UV layout not only makes the painting process more efficient but also ensures that the textures display correctly on the 3D model. Follow these steps and tips to optimize your UV layouts for texture painting in Blender:
- Maximize Texture Space: Arrange UV islands to utilize as much of the UV space as possible. This maximization helps in achieving higher resolution textures, which translate to more detailed and crisp texture painting.
- Avoid Overlapping: Ensure that UV islands do not overlap unless you intentionally want the same texture pattern to appear on multiple parts of the model. Overlapping can cause unexpected results in texture painting.
- Uniform Scaling: Keep UV islands scaled uniformly to maintain consistent texture detail across the model. Non-uniform scaling can lead to areas of the texture appearing stretched or compressed.
- Consider Texture Symmetry: For models with symmetrical features, you can mirror UV islands to save texture space and reduce painting time. This technique is especially useful for characters and creatures.
- Maintain Texel Density: Ensure that the texel density is consistent across all parts of the model. Consistent texel density prevents some areas from looking more detailed than others, resulting in a uniform appearance.
- Utilize Seams and Islands: Place seams strategically and use UV islands to your advantage by separating parts of the model that will have different textures or materials. This separation simplifies the texture painting process.
- Preview Textures: Frequently preview your texture work on the 3D model to check for any issues with the UV layout, such as stretching, compression, or misalignment. Adjust the UV layout as needed to correct these issues.
By optimizing your UV layouts with these strategies, you can greatly enhance the efficiency and quality of your texture painting workflow in Blender. A well-prepared UV layout serves as a strong foundation for creating detailed and realistic textures for your 3D models.
Common UV Unwrapping Pitfalls and How to Avoid Them
UV unwrapping is a complex process, and it\"s easy to encounter issues that can affect the quality of your project. Being aware of common pitfalls and knowing how to avoid them can greatly improve your UV mapping workflow. Here are some frequently encountered problems and solutions:
- Overlapping UVs: Overlaps can cause textures to display incorrectly. Ensure you carefully arrange UV islands, using the UV Editor\"s tools to identify and separate overlapping areas.
- Stretching and Distortion: This occurs when UV islands are not proportionate to their 3D model counterparts. Use Blender\"s tools to visualize stretching in the UV Editor and adjust the islands accordingly.
- Inconsistent Texel Density: Different texel densities across your model can make some textures look blurry and others too sharp. Maintain a consistent texel density by checking it in the UV Editor and scaling UV islands as needed.
- Ignoring Seams in Strategic Locations: Placing seams without thought can lead to visible texture seams on the model. Place seams in less noticeable areas or along natural breaks in the model to hide them.
- Poor Use of Texture Space: Failing to efficiently utilize the available UV space can result in lower resolution textures. Pack UV islands closely while ensuring they do not overlap to maximize texture resolution.
- Not Considering Texture Mirroring: For symmetrical models, mirroring parts of the UV layout can save time and ensure consistency. Be mindful of unique details that may not work well with mirroring.
- Forgetting to Check for Errors: Always review your UV map for potential issues like overlaps, stretching, or unused spaces before moving on to texturing. Blender provides several tools and overlays in the UV Editor to help identify and fix these issues.
By avoiding these common pitfalls, you can ensure a smoother UV unwrapping process and achieve higher quality textures in your 3D projects. Remember, practice and patience are key to mastering UV unwrapping in Blender.
Utilizing Add-ons and Tools for Enhanced UV Mapping
Blender\"s capabilities in UV mapping can be significantly extended with the use of add-ons and external tools. These resources can simplify complex tasks, introduce new functionalities, and streamline the UV mapping process. Here\"s how to leverage these tools for enhanced UV mapping in Blender:
- UV Squares: This add-on is designed to straighten UV maps, turning distorted islands into grids of squares. It\"s particularly useful for objects that need uniform texture distribution, like fabric patterns or grids.
- TexTools: A comprehensive suite for texture work in Blender, TexTools offers a wide range of features for UV mapping, including alignment, straightening, and packing. Its tools for checking texture density and baking are invaluable for professional-quality projects.
- UV Packmaster: Known for its efficient packing algorithm, UV Packmaster maximizes the usage of texture space, significantly reducing wasted areas. It supports various packing options, including rotation, scaling, and margin settings for optimal packing results.
- UV Layout: Though not a Blender add-on, UVLayout is a standalone software that specializes in creating and editing UV textures. Its powerful unwrapping and packing algorithms can be used alongside Blender for complex UV mapping tasks.
- Blender\"s Magic UV: Included in Blender\"s add-on collection, Magic UV offers a variety of UV editing features, such as UVW mapping, copy/pasting UVs, and flipping or rotating UV islands. It\"s a versatile tool that can enhance your UV mapping workflow.
- Materialize: While not directly a UV mapping tool, Materialize is a standalone program that can create textures from photographs. It can be used in conjunction with Blender to generate maps (diffuse, bump, specular, etc.) that are then accurately mapped using Blender\"s UV tools.
Incorporating these add-ons and tools into your Blender projects can significantly enhance your UV mapping capabilities, allowing for more precise control, better texture packing, and ultimately, higher quality textures. Always ensure that any add-ons or tools are compatible with your version of Blender to avoid conflicts or issues.

_HOOK_
Best Practices for UV Mapping Complex Models
UV mapping complex models can be a daunting task, requiring careful planning and execution to ensure high-quality textures that enhance the realism and detail of the model. Here are some best practices to follow when UV mapping complex models in Blender:
- Plan Your Seams: Before unwrapping, thoroughly analyze your model to determine the most strategic places to place seams. Aim to hide seams in less noticeable areas or along natural breaks in the model.
- Break Down the Model: For highly complex models, consider breaking them down into smaller parts or sections. This approach makes it easier to manage the UV mapping process and allows for more detailed texturing.
- Maintain Consistent Scale: Ensure that the scale of your UV islands is consistent across the model to avoid texture distortion. Use Blender\"s tools to visualize and adjust the scale of UV islands as needed.
- Utilize Pinned Vertices: When adjusting UV islands, use pinned vertices to maintain critical points in place. This technique is especially useful when fine-tuning the UV map to minimize distortion.
- Maximize Texture Space: Efficiently use the available texture space by packing UV islands closely, but be mindful to leave enough margin between islands to prevent bleeding during texture filtering.
- Check for Distortion: Regularly use Blender\"s tools to check for stretching or distortion in the UV map. Address any issues promptly to ensure the textures will look natural on the model.
- Employ Multiple UV Maps: For models requiring different levels of detail in various areas, consider using multiple UV maps. This method allows for greater control over texture resolution and distribution.
- Test with Temporary Textures: Apply temporary checkerboard or grid textures to the model to easily identify issues with the UV map, such as stretching or misaligned seams. Adjust the UV layout accordingly before applying the final textures.
By following these best practices, you can achieve more accurate and effective UV mapping for complex models, resulting in higher quality textures and more realistic 3D representations. Remember, patience and practice are key to mastering the UV mapping process.

READ MORE:
Exporting and Integrating UV Maps into Your Workflow
Once you\"ve completed the UV unwrapping process in Blender, exporting and integrating your UV maps into your workflow is crucial for texturing and further processing in other software or game engines. This section will guide you through the steps to efficiently export your UV layouts and incorporate them into your projects.
- Preparing Your UV Map for Export
- Before exporting, ensure your UV map is optimized and organized. This includes consolidating UV islands, minimizing stretches, and ensuring the UV map fills as much of the UV space as possible to maximize texture resolution. Use the UV packer tool in Blender to optimize the layout.
- Exporting UV Layout from Blender
- To export your UV layout, go to the UV Editor, and navigate to \"UV\" > \"Export UV Layout\". Choose your preferred file format (PNG, SVG, EPS) and specify the export options such as fill opacity, outline color, and size. Click \"Export UV Layout\" to save your UV map.
- Integrating UV Maps into Texturing Software
- With your UV map exported, you can now import it into your texturing software, such as Substance Painter or Photoshop. Use the UV layout as a guide to paint your textures or to align details correctly on your model. This step is crucial for creating high-quality textures that accurately fit your 3D model.
- Using UV Maps in Game Engines
- If you\"re developing for games, importing your model along with its UV map into game engines like Unity or Unreal Engine is straightforward. Ensure your textures are correctly applied based on the UV map for accurate representation in the game environment. This step might include importing your model, applying the texture, and adjusting material properties to achieve the desired look.
- Best Practices for UV Map Integration
- Keep your UV layout and textures organized and clearly named, especially for complex models with multiple texture sets.
- Test your textures on the 3D model frequently during the texturing process to ensure alignment and scale are correct.
- Consider the final use of your model (e.g., games, animation, VR) to optimize the UV map and texture resolution accordingly.
By following these steps, you can effectively export and integrate your UV maps into your workflow, ensuring that your models look their best in any application or game engine. Remember, a well-prepared UV map is key to high-quality texturing and can significantly impact the visual appeal of your 3D models.
Mastering Blender\"s UV unwrapping tools opens up endless possibilities for your 3D projects. Dive into our comprehensive guide to unlock advanced texturing techniques and bring your models to life with unparalleled detail and realism.