Topic adobe illustrator drop shadow: Discover the transformative power of Adobe Illustrator"s drop shadow feature to elevate your graphics with depth, realism, and professional flair. This comprehensive guide unveils the secrets to mastering drop shadows in your designs.
Table of Content
- How to create a drop shadow in Adobe Illustrator?
- Getting Started with Drop Shadows
- Step-by-Step Guide to Adding Drop Shadows
- Customizing Drop Shadow Settings
- Understanding Blend Modes
- Adjusting Opacity for Impact
- YOUTUBE: How to Make Shadow in Illustrator | Drop Shadow Illustrator | Adobe Illustrator 2023
- Controlling Offset and Distance
- Tweaking Blur for Realism
- Choosing the Right Color and Darkness
- Applying Drop Shadows to Different Elements
- Enhancing Text with Drop Shadows
- Adding Depth to Shapes and Images
- Advanced Drop Shadow Techniques
- Creating Multiple Shadows for Complexity
- Experimenting with Inner and Offset Shadows
- Editing and Removing Drop Shadows
- Optimizing Performance with Drop Shadows
- Exporting and Using Drop Shadow Designs
- Frequently Asked Questions About Drop Shadows
How to create a drop shadow in Adobe Illustrator?
To create a drop shadow in Adobe Illustrator, follow these steps:
- Select the object or group you want to add the drop shadow to
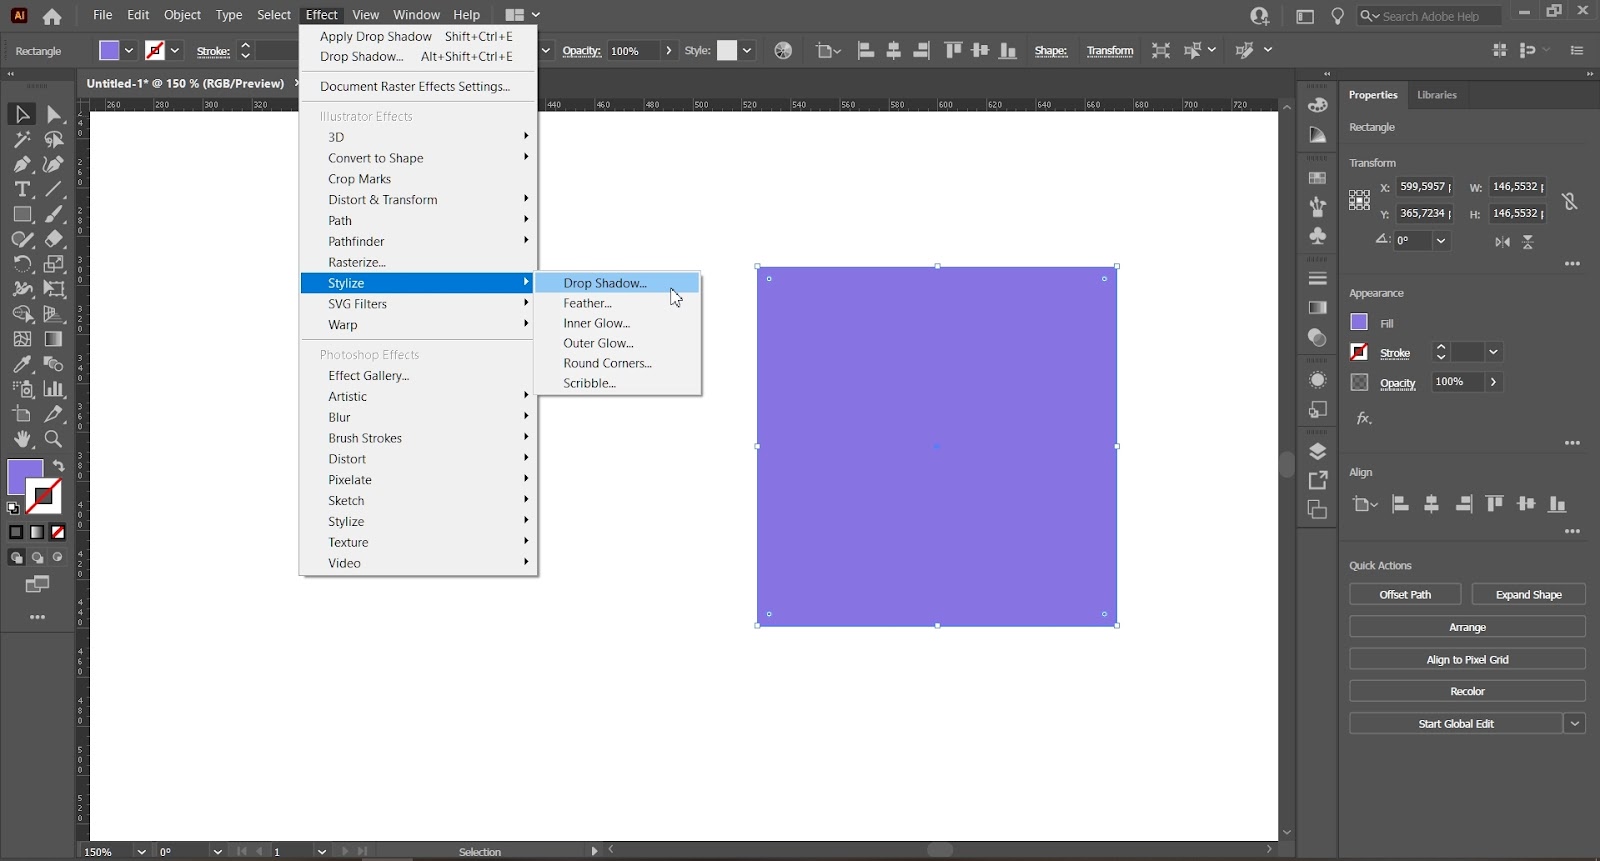
- Go to the menu bar and select Effect > Stylize > Drop Shadow
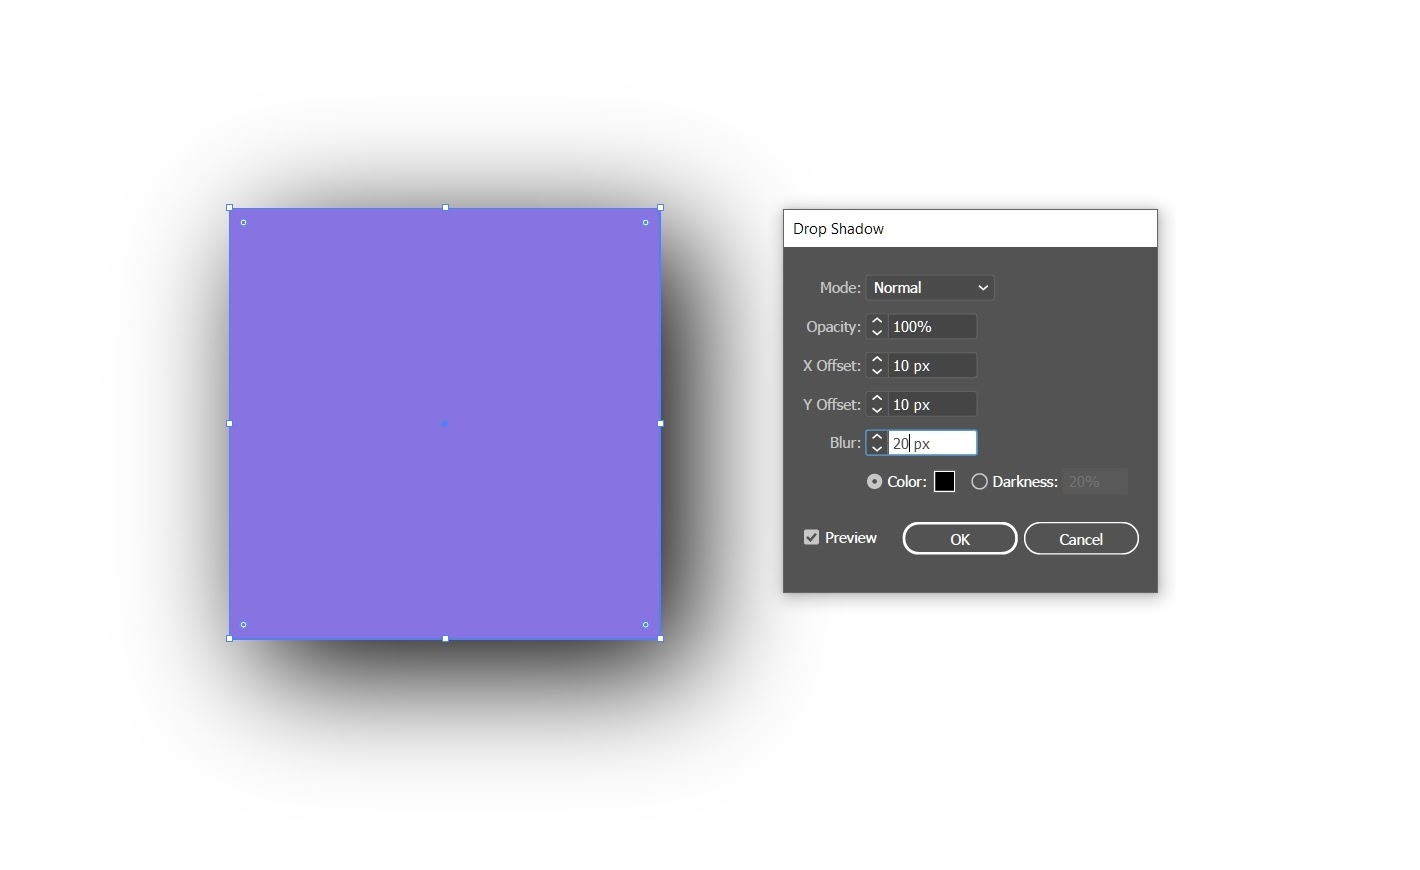
- A drop shadow window will open
- In the drop shadow window, you can adjust the settings to customize the appearance of the drop shadow
- Options you can adjust include:
- Opacity: Controls the transparency of the shadow
- Offset X and Offset Y: Determines the position of the shadow relative to the object
- Blur: Adjusts the blur radius of the shadow
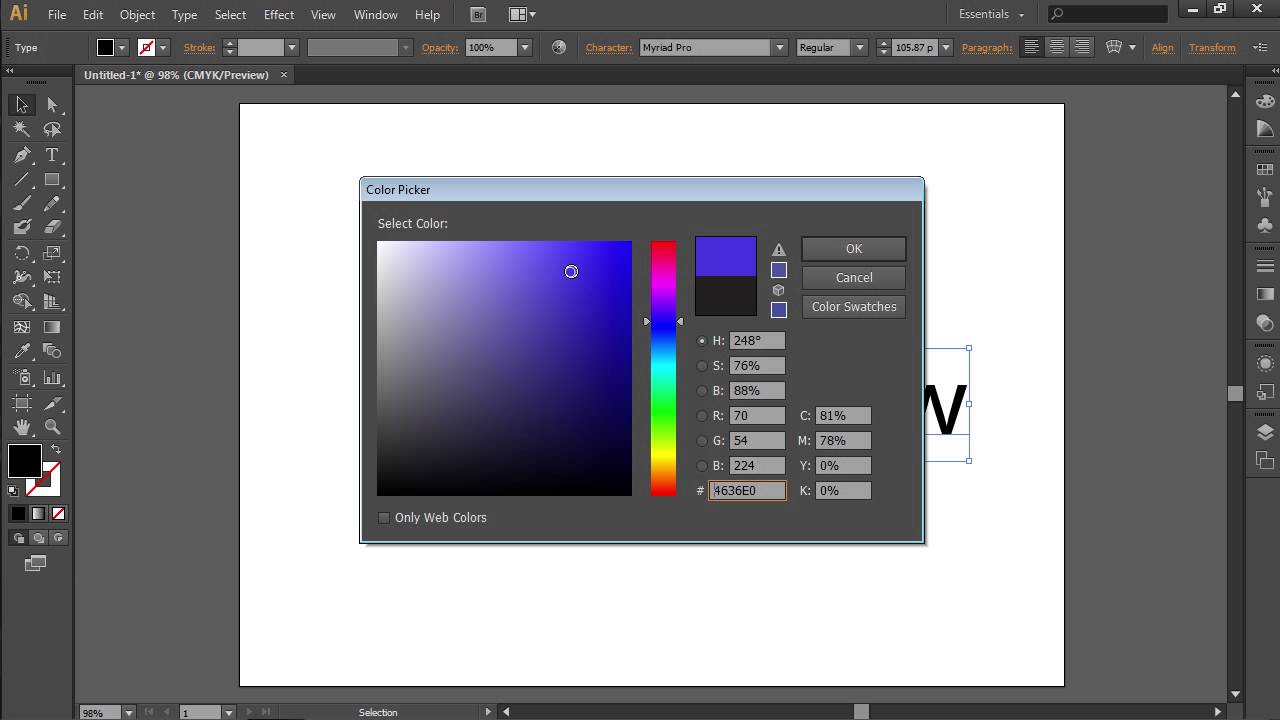
- Color: Allows you to choose the color of the shadow
- Mode: Defines how the shadow blends with the underlying layers
- Once you have adjusted the settings to your liking, click OK
READ MORE:
Getting Started with Drop Shadows
Adobe Illustrator\"s drop shadow effect is a powerful tool to add depth and realism to your graphics. It\"s ideal for texts, objects, or groups, enhancing the visual appeal of your design. The key to a successful drop shadow lies in understanding and effectively manipulating its settings.
- Begin with an Object: Start by selecting the object to which you want to apply the drop shadow. This could be text, an image, or any vector graphic.
- Access Drop Shadow Settings: Navigate to the Effect menu, choose Stylize, and then select Drop Shadow. This action opens the drop shadow dialog box where you can adjust various settings.
- Customize Your Shadow: Within the dialog box, explore different options like Mode, Opacity, X and Y Offset, Blur, Color, and Darkness. Each of these settings allows you to control how the shadow interacts with your design. For instance, adjusting the X and Y Offset changes the shadow\"s position, while the Blur setting affects its sharpness.
- Preview and Apply: Illustrator provides a preview feature, enabling you to see the changes in real-time. Once satisfied with the settings, click OK to apply the drop shadow.
- Edit or Remove the Shadow: If you need to edit or remove the drop shadow later, use the Appearance panel. Here, you can fine-tune the shadow or delete it entirely.
Remember, the drop shadow can significantly impact your design, so use it thoughtfully to enhance your artwork. It\"s not just about applying the effect; it\"s about crafting it to complement your design\"s overall style and message.
Illustrator\"s flexibility in editing and customizing drop shadows makes it a go-to tool for designers seeking to add a professional touch to their artwork. Whether it’s text, images, or vector graphics, the drop shadow effect can elevate your design from flat to dynamically engaging.
Step-by-Step Guide to Adding Drop Shadows
Adding drop shadows in Adobe Illustrator enhances the depth and realism of your designs. Follow these steps to create effective drop shadows:
- Select Your Object: Begin by selecting the object you want to apply the drop shadow to using the Selection Tool.
- Access the Drop Shadow Option: Go to the Effect menu in the top menu bar, navigate to Stylize, and select Drop Shadow. This opens the drop shadow dialogue box.
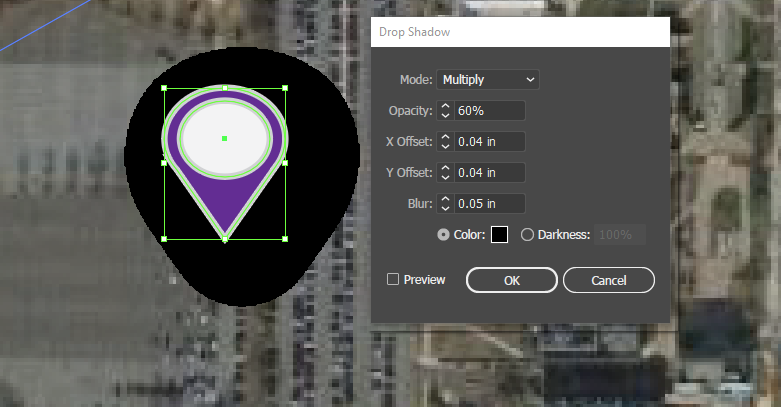
- Adjust Drop Shadow Settings: In the drop shadow dialogue box, you have several options to fine-tune your shadow:
- Mode: Choose the blending mode for the shadow. \"Multiply\" is a commonly used mode, but there are other options to explore.
- Opacity: This controls the transparency of your shadow. A lower opacity results in a lighter shadow.
- X and Y Offset: These settings adjust the distance of the shadow from the object, horizontally and vertically.
- Blur: This option softens the edges of your shadow. Adjusting the blur can help in creating a more realistic shadow effect.
- Color and Darkness: Choose the color of your shadow. You can also adjust the darkness to match the shadow with your design.
- Preview and Apply: Utilize the preview feature to see the changes in real-time. Once you\"re satisfied, click OK to apply the drop shadow.
- Edit or Delete the Shadow: To edit or remove the drop shadow, use the Appearance panel. You can access it from the Window menu. In the Appearance panel, find the Drop Shadow effect and edit or delete it as needed.
Remember, the drop shadow effect is not just about adding depth; it\"s about complementing your design\"s style. Experiment with different settings to see how they affect the overall look of your design.

Customizing Drop Shadow Settings
Adobe Illustrator\"s Drop Shadow feature offers various settings to tailor shadows to fit your design perfectly. Here\"s how to customize them:
- Choosing the Right Mode: The Mode setting determines how the shadow blends with the background. \"Multiply\" is commonly used, but exploring other modes like \"Overlay\" or \"Screen\" can yield different effects.
- Adjusting Opacity: Opacity controls how transparent or opaque the shadow appears. A higher opacity results in a denser shadow, while a lower opacity creates a subtler effect.
- Setting X and Y Offset: These settings adjust the shadow\"s position relative to the object. X Offset moves the shadow horizontally, while Y Offset moves it vertically. Experiment with different values to find the right placement.
- Manipulating Blur: Blur affects the sharpness of the shadow\"s edges. A higher blur value results in a softer, more diffused shadow, ideal for a realistic look.
- Choosing Shadow Color: While black is a default choice, you can select any color for your shadow. This can be especially useful for creating stylized or thematic designs.
- Using Darkness: The Darkness setting allows you to adjust the shadow\"s intensity. This is particularly useful when working with colored shadows, as it affects the depth of the chosen color.
Remember, the goal is to create a shadow that complements your design without overpowering it. Subtle adjustments can make a significant difference in the overall look of your artwork. Experiment with different settings to see what works best for your specific design needs.
Understanding Blend Modes
Blend modes in Adobe Illustrator\"s drop shadow effect determine how the shadow interacts with the colors and layers beneath it. Each mode offers a unique approach to blending the shadow with your artwork:
- Multiply: This common mode creates a darker effect by multiplying the shadow color with the colors beneath it. Ideal for realistic shadows on lighter backgrounds.
- Screen: Contrary to Multiply, Screen lightens the colors, useful for creating softer, more subtle shadows.
- Overlay: Overlay combines the Multiply and Screen modes, darkening or lightening colors based on the underlying layer. It adds depth while maintaining color vibrancy.
- Darken: This mode selects the darker of the base or shadow color, creating a more intense and concentrated shadow effect.
- Lighten: Opposite to Darken, Lighten selects the lighter color, creating a fainter shadow, useful for subtle depth.
- Color Dodge: Brightens the underlying colors, creating a vivid, intensified shadow. Useful for dramatic, high-contrast designs.
- Color Burn: Darkens the underlying colors, enhancing the shadow\"s depth and intensity for a more dramatic effect.
Understanding these blend modes allows you to create various shadow effects, from subtle and soft to bold and dramatic. Experiment with different modes to see how they affect your design and choose the one that best suits your creative vision.
_HOOK_
Adjusting Opacity for Impact
Opacity plays a crucial role in defining the impact of a drop shadow in Adobe Illustrator. Adjusting the shadow\"s opacity can either subtly hint at depth or strongly assert the object\"s presence. Here\"s how to adjust opacity for maximum impact:
- Access Drop Shadow Settings: After selecting your object, navigate to Effect > Stylize > Drop Shadow.
- Find the Opacity Slider: In the Drop Shadow dialog box, locate the Opacity setting. This controls the transparency of the shadow.
- Adjusting for Subtlety: For a subtle shadow, reduce the opacity. A lower opacity renders the shadow lighter, allowing for a hint of depth without overwhelming the object.
- Adjusting for Boldness: For a more pronounced shadow, increase the opacity. A higher opacity makes the shadow more distinct and noticeable, enhancing the 3D effect.
- Balancing with Background: Consider the color and brightness of your background. Adjust the opacity to ensure your shadow stands out or blends in, as required by your design.
- Preview Changes: Use the Preview option to see the effect of your opacity adjustments in real-time. This helps in making incremental changes until you achieve the desired effect.
Remember, the right opacity setting can make or break the visual effectiveness of your drop shadow. Experiment with different levels to find the perfect balance for your design, keeping in mind the overall aesthetic and message of your artwork.

How to Make Shadow in Illustrator | Drop Shadow Illustrator | Adobe Illustrator 2023
Discover the mesmerizing art of shadow play in our captivating video. Immerse yourself in the enchanting world of delicate silhouettes and masterful puppetry techniques that will leave you awestruck.
Controlling Offset and Distance
Effectively controlling the offset and distance of drop shadows in Adobe Illustrator is key to achieving depth and realism in your designs. Here\"s a step-by-step guide to master this technique:
- Select Your Object: Start by selecting the object to which you want to apply the drop shadow. Use the Selection Tool from the toolbar.
- Apply Drop Shadow: Go to Effect > Stylize > Drop Shadow. This opens the drop shadow dialog box.
- Adjusting X and Y Offset: The X Offset controls the horizontal distance of the shadow from the object, and the Y Offset controls the vertical distance. Adjust these settings to position the shadow precisely where you want it relative to the object.
- Setting the Right Distance: Increase the offset values to move the shadow further away from the object, creating a sense of depth. Decrease the values to bring the shadow closer for a more subtle effect.
- Using Preview for Accuracy: Always use the Preview option to instantly see the impact of your adjustments. This helps in making precise changes.
- Finalizing the Effect: Once you are satisfied with the position of the shadow, click OK to apply the effect.
Remember, the position and distance of the drop shadow can dramatically change the look of your design. Experiment with different offset values to find the perfect balance that enhances the overall aesthetic of your artwork.
Create a Drop Shadow in Adobe Illustrator Tutorial
Unlock your creative potential with our step-by-step tutorial video. Our expert guidance will have you mastering new skills and techniques in no time, allowing you to create stunning works of art. Get ready to unleash your imagination!
Tweaking Blur for Realism
Adjusting the blur of a drop shadow in Adobe Illustrator is essential for adding realism to your designs. Here’s how to fine-tune the blur to achieve a natural-looking shadow:
- Accessing Drop Shadow Settings: Select the object, then navigate to Effect > Stylize > Drop Shadow.
- Finding the Blur Option: In the drop shadow dialog box, look for the Blur setting. This controls the softness of the shadow\"s edges.
- Setting the Blur Level:
- For a softer shadow that suggests a light source at a distance, increase the blur value.
- To create a sharp, distinct shadow that implies a close light source, reduce the blur value.
- Previewing the Effect: Use the Preview option to see how the blur adjustment affects the shadow in real-time.
- Balancing Realism: Adjust the blur in conjunction with other settings like opacity and offset to balance the shadow\"s realism with the overall design.
- Finalizing the Shadow: Once you achieve a realistic look, click OK to apply the changes.
Experiment with different blur levels to see how they influence the perception of depth and distance in your design. A well-tuned blur can significantly enhance the realism and depth of your drop shadow, making your artwork more visually appealing and lifelike.

Choosing the Right Color and Darkness
Color and darkness are vital components of the drop shadow effect in Adobe Illustrator, playing a significant role in creating a realistic and visually appealing shadow. Follow these steps to choose the appropriate color and darkness for your shadow:
- Selecting Shadow Color: After applying the drop shadow effect, you have the option to choose any color for the shadow. The default is typically black, but adjusting the color to complement or contrast with your design can enhance the overall impact.
- Adjusting Darkness: The darkness setting allows you to control the intensity of the shadow\"s color. This is especially useful when you are not using black for your shadow. A higher percentage of darkness results in a deeper, more pronounced shadow, while a lower percentage yields a lighter effect.
- Considerations for Realism: For a natural look, select a shadow color that aligns with the real-world lighting conditions. For instance, shadows in a sunlit environment may have a warmer tone.
- Experimenting with Color Combinations: Don\"t hesitate to try different color and darkness combinations. The right choice can significantly elevate the depth and dimensionality of your artwork.
- Previewing Your Changes: Always use the Preview option in the drop shadow dialog box to immediately see the effect of your color and darkness adjustments.
Remember, the goal is to create a shadow that enhances the realism and aesthetic appeal of your design. The right color and darkness settings can make your artwork stand out and convey the desired mood or message.

Applying Drop Shadows to Different Elements
Drop shadows in Adobe Illustrator can be applied to a variety of elements, enhancing depth and dimension in your designs. Whether it\"s text, shapes, or images, each element can benefit uniquely from the addition of a drop shadow. Here\"s how to apply drop shadows effectively across different elements:
- Applying to Text: Select the text, then navigate to Effect > Stylize > Drop Shadow. Adjust the settings like opacity, offset, and blur to make the text stand out.
- Applying to Shapes: For shapes, follow a similar process. After selecting the shape, go to Effect > Stylize > Drop Shadow and customize the shadow to complement the shape’s dimensions.
- Applying to Images: Drop shadows on images can create a layered effect. Select the image, apply the drop shadow, and adjust settings to create a sense of depth.
- Consistency Across Elements: Maintain consistent shadow settings across different elements for a cohesive look. Ensure that the light source direction, blur, and color settings are harmonious.
- Layering Shadows: You can layer multiple shadows on a single element for a more complex effect. Repeat the drop shadow process and vary the settings for each layer.
Experimenting with drop shadows on various elements can significantly enhance the visual appeal of your design. It adds a professional touch and can make elements pop out on the canvas.

_HOOK_
Enhancing Text with Drop Shadows
Adding a drop shadow to text in Adobe Illustrator can significantly enhance its impact and readability. Here\"s a step-by-step guide to effectively applying drop shadows to text:
- Selecting the Text: Using the Selection Tool (V), select the text to which you want to apply the drop shadow.
- Accessing Drop Shadow Options: Navigate to the “Effect” menu, choose “Stylize,” then select “Drop Shadow” to open the settings panel.
- Customizing Shadow Settings: In the Drop Shadow dialog box, adjust the settings to suit your design needs. Options include:
- Mode: Choose the blending mode (e.g., Multiply).
- Opacity: Adjust the transparency of the shadow.
- X and Y Offset: Set the distance and angle of the shadow relative to the text.
- Blur: Control the softness of the shadow edges.
- Color: Pick a shadow color that complements the text.
- Previewing Changes: Utilize the Preview option to see the effects of your adjustments in real-time.
- Applying the Effect: Once you are satisfied with the settings, click OK to apply the drop shadow to your text.
Remember, the right drop shadow can make text pop out on any background, increasing its visibility and effectiveness. Experiment with different settings to achieve the desired result that complements your overall design.

Adding Depth to Shapes and Images
Applying drop shadows to shapes and images in Adobe Illustrator is an effective way to add depth and dimension to your designs. Here’s how to do it step-by-step:
- Selecting the Element: Start by selecting the shape or image you want to enhance with a drop shadow. Use the Selection Tool (V) for this.
- Accessing Drop Shadow Settings: With the element selected, go to Effect > Stylize > Drop Shadow. This will open the drop shadow dialog box.
- Customizing the Drop Shadow: Adjust the settings in the dialog box to fit your design needs. Key settings include:
- Mode: Usually, ‘Multiply’ is a good starting point.
- Opacity: Set how transparent or solid the shadow appears.
- X and Y Offset: These determine the shadow\"s position relative to the element.
- Blur: Adjust this to control how sharp or diffused the shadow\"s edges are.
- Color: Choose a shadow color that complements the element.
- Previewing the Effect: Use the Preview option in the dialog box to see the effects in real-time and make adjustments as needed.
- Applying the Shadow: Once satisfied with the settings, click OK to apply the drop shadow to your shape or image.
By following these steps, you can create visually appealing designs with enhanced depth, making your shapes and images stand out more effectively.
Advanced Drop Shadow Techniques
Advanced drop shadow techniques in Adobe Illustrator allow for more complex and dynamic effects, enhancing the visual depth and realism in your designs. Here are some sophisticated methods to master:
- Layering Multiple Shadows: Apply multiple drop shadows to a single element for a more complex effect. Each shadow can have different settings for opacity, angle, and distance to create a layered look.
- Using Different Blend Modes: Experiment with various blend modes for your drop shadows, like Multiply, Screen, or Overlay, to achieve different visual effects and interactions with underlying colors.
- Colorful Shadows: Instead of sticking to black or gray, try using colored shadows to add a unique touch to your design. Adjust the color to complement or contrast with the main element.
- Offset Shadows for Depth: Create offset shadows by adjusting the X and Y Offset settings. This can make the element appear as if it\"s floating above the surface or cast a longer shadow.
- Custom Shadow Shapes: Go beyond standard drop shadows by using tools like the Pen or Brush to create custom shadow shapes that add unique stylistic elements to your design.
- Gradient Shadows: Apply a gradient to your shadow for a more realistic and dynamic look. This can mimic the natural fading of shadows in real life.
- Textured Shadows: Add texture to your shadows for a more organic feel. This can be done by adding noise or using textured brushes.
- Shadow Interaction: Consider how shadows interact with other design elements. Use shadows to create illusions of elements weaving in and out of each other.
These advanced techniques can significantly elevate the professionalism and sophistication of your design work in Adobe Illustrator, making it stand out with added depth and creativity.
Creating Multiple Shadows for Complexity
Creating multiple shadows in Adobe Illustrator adds complexity and depth to your designs. Here\"s a step-by-step guide to achieve this advanced technique:
- Start with the Basic Shadow: Apply the first drop shadow to your object by going to Effect > Stylize > Drop Shadow. Adjust settings like mode, opacity, offset, blur, and color to your preference.
- Adding Additional Shadows: To add more shadows, open the Appearance panel (Window > Appearance). Here, you can add new drop shadow effects on top of the existing one, each with its own unique settings.
- Varying Shadow Properties: For each new shadow layer, adjust properties such as angle, distance, color, and blur differently to create a layered and complex effect.
- Consider Shadow Interaction: Think about how each shadow interacts with others and the overall design. The goal is to create a sense of depth and dimensionality without cluttering the design.
- Experiment with Colors and Blends: Try different shadow colors and blend modes for each shadow layer to see how they affect the mood and style of your design.
- Preview and Adjust: Use the Preview feature in the Drop Shadow dialog box to see your changes in real-time. Make adjustments until you achieve the desired level of complexity and depth.
By carefully layering and adjusting multiple drop shadows, you can add a sophisticated and professional touch to your Illustrator projects.
Experimenting with Inner and Offset Shadows
Inner and offset shadows in Adobe Illustrator are great for adding depth and interest to your designs. Experimenting with these techniques can create unique and eye-catching effects. Here\"s how to effectively use inner and offset shadows:
- Inner Shadows for Depth: To create an inner shadow, select your object and go to Effect > Stylize > Inner Glow. Set the mode to \"Multiply\" and choose a dark color. Adjust the opacity and blur to simulate a shadow inside the object.
- Creating Offset Shadows: Offset shadows give the impression that the object is raised above the background. Select your object, then apply a drop shadow (Effect > Stylize > Drop Shadow). Adjust the X and Y offset to position the shadow at a desired distance from the object.
- Adjusting Shadow Parameters: Play with the opacity, blur, and color settings to make your shadows soft or sharp, subtle or prominent, depending on the effect you’re aiming for.
- Layering for Complexity: Combine inner and offset shadows on the same object for a more complex effect. This can create an illusion of depth and layering.
- Experiment with Colors: Don\"t limit your shadows to black and gray. Try using colors for shadows to add a creative twist to your design.
- Preview and Fine-Tune: Always preview your changes as you adjust the settings. Fine-tuning the balance between shadow size, blur, and opacity is key to achieving a professional look.
Inner and offset shadows can transform your designs from flat to visually striking. Experimentation is key to mastering these effects in Illustrator.
_HOOK_
Editing and Removing Drop Shadows
Editing and removing drop shadows in Adobe Illustrator is straightforward and allows for significant flexibility in design. Here\"s how to manage these effects:
- Accessing the Appearance Panel: To edit or remove a drop shadow, first open the Appearance panel by going to Window > Appearance.
- Selecting the Object: With the Appearance panel open, select the object or text layer that has the drop shadow you wish to edit or remove.
- Editing the Drop Shadow: In the Appearance panel, locate the drop shadow effect. To edit, click on the effect to open the drop shadow dialog box. Here, you can adjust settings like mode, opacity, offset, blur, and color.
- Removing the Drop Shadow: To remove the drop shadow, click on the effect in the Appearance panel and then click on the trash can icon. Alternatively, you can drag the drop shadow effect to the trash can icon.
- Temporary Disabling: If you want to temporarily disable the drop shadow without deleting it, click the eye icon next to the Drop Shadow effect in the Appearance panel.
- Preview Changes: Use the Preview feature while editing to see the effects of your adjustments in real-time.
By understanding how to effectively edit and remove drop shadows, you can have greater control over the aesthetic of your Illustrator projects.
Optimizing Performance with Drop Shadows
Optimizing performance when using drop shadows in Adobe Illustrator is crucial for maintaining a smooth workflow. Here are some tips for achieving this:
- Limit Shadow Complexity: Complex shadows can slow down Illustrator. Use simpler shadow effects for designs with many elements.
- Use Shadows Judiciously: Apply drop shadows only where necessary. Overuse can lead to performance issues, especially in large documents.
- Adjust Shadow Settings: Minimize the use of high blur levels and large offsets, as these can be more resource-intensive.
- Rasterize Shadows: For finalized designs, consider rasterizing shadows to reduce file complexity. This can be done via Object > Rasterize.
- Preview Settings: Toggle off the high-quality preview when working with shadows to improve Illustrator’s performance.
- Keep Software Updated: Ensure that Illustrator is up-to-date, as newer versions often include performance optimizations.
- Hardware Considerations: Use a powerful graphics card and sufficient RAM to handle intensive Illustrator tasks.
By following these steps, you can effectively manage drop shadows in Illustrator while ensuring optimal performance.
Exporting and Using Drop Shadow Designs
Exporting and effectively using designs with drop shadows in Adobe Illustrator requires attention to detail to maintain the quality of the effect. Here’s a guide to exporting and using these designs:
- Finalizing Your Design: Ensure that your drop shadow effects are correctly applied and finalized in your Illustrator document.
- Choosing the Right Format: When exporting, choose a format that supports transparency, like PNG or SVG, to maintain the quality of the drop shadows.
- Export Settings: Go to File > Export > Export As and select your desired format. Adjust the settings like resolution and color profile as needed for your final output.
- Checking Transparency: Ensure that the transparency settings are correctly configured to preserve the drop shadow effect, especially when exporting to formats like PNG.
- Dealing with Rasterization: Be aware that some export formats may rasterize the drop shadow effect. If needed, manually rasterize the shadow in Illustrator for more control before exporting.
- Using in Other Applications: When importing your exported design into other applications, check to see that the drop shadow displays correctly. Adjustments may be necessary depending on the software.
- Printing Considerations: If printing, ensure that the drop shadows are correctly represented in the print preview and adjust print settings as necessary to achieve the desired effect.
By following these steps, you can successfully export and use your Illustrator designs with drop shadows in various mediums while retaining their visual impact.
READ MORE:
Frequently Asked Questions About Drop Shadows
Drop shadows are a commonly used feature in Adobe Illustrator, and several questions often arise regarding their application and effects. Here are some frequently asked questions about drop shadows:
- Can drop shadows be applied to both text and shapes? Yes, Illustrator’s drop shadow feature can be applied to both text and shapes, allowing designers to add depth to various elements within their designs.
- How do I adjust the blending mode of a drop shadow? In the drop shadow dialog box, you can choose from various blending modes like Multiply, Screen, or Overlay. These modes let you vary how the colors of the shadow blend with underlying objects.
- What is the difference between opacity and darkness in drop shadow settings? Opacity controls how transparent or solid the shadow appears, while darkness adjusts the intensity of the shadow’s color.
- Can drop shadows be exported to other design software or formats? Yes, when exporting Illustrator files to other compatible formats or software, drop shadows are typically preserved as part of the design.
- How can I remove a drop shadow from an object? To remove a drop shadow, use the Appearance panel to locate the drop shadow effect and delete it. You can also temporarily disable the effect by clicking the eye icon next to it.
- Are there performance considerations when working with drop shadows? Drop shadows, especially on complex designs or numerous objects, can impact Illustrator’s performance. Simplifying shadow effects and minimizing the number of objects with drop shadows can help optimize performance.
- Are there alternative methods to create shadows in Illustrator besides the Drop Shadow effect? Yes, designers can create custom shadows using gradient fills, transparency settings, or blending modes to achieve specific shadow effects.
Understanding these aspects of drop shadows can help you effectively use this feature in your Illustrator projects.
Mastering drop shadows in Adobe Illustrator unlocks a new realm of creative potential, enhancing your designs with depth, realism, and professional polish. Embrace these techniques to transform your artwork from ordinary to extraordinary.