Text Blender Tutorial: Mastering 3D Typography for Stunning Visuals

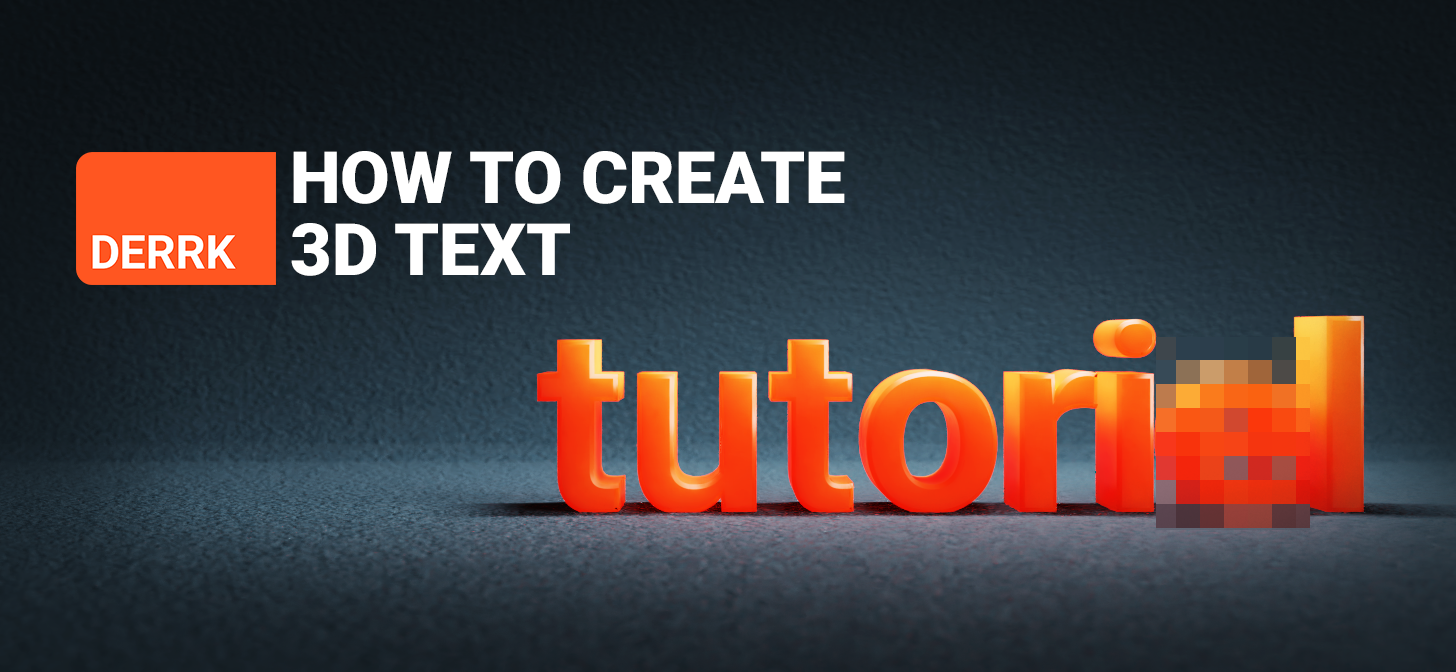
Topic text blender tutorial: Discover the art of 3D typography with our comprehensive Text Blender Tutorial, designed to transform beginners into proficient users, creating visually stunning text effects effortlessly.

What are the steps for editing text in Blender according to online tutorials?

To edit text in Blender according to online tutorials, you can follow these steps:

  1. Open Blender and create a new project.
  2. Select the Text tool from the toolbar on the left side of the screen.
  3. Click on the 3D viewport where you want to place the text.
  4. Type in the text you want to create or edit.
  5. Once the text is created, you can adjust its properties such as font, size, alignment, and spacing.
  6. To edit the text further, you can enter Edit Mode by selecting the text object and pressing Tab or by clicking the Edit Mode button.
  7. In Edit Mode, you can select individual characters or words, move them around, change their size, or edit the text content.
  8. Exit Edit Mode by pressing Tab again or clicking the Object Mode button to see your changes.
  9. Additionally, you can convert the text object to a mesh or curve for further editing options.
  10. Remember to save your project regularly to avoid losing your work.

Getting Started with 3D Text

Begin by adding text to your scene through the \"Shift + A\" menu, selecting the \"Text\" option. This action creates a default text object, ready for customization.

Basic Text Editing

  1. To edit the text, enter Edit Mode by pressing \"Tab\", allowing you to type your desired text.
  2. Adjust the font and style in the Font properties panel for more personalized designs.

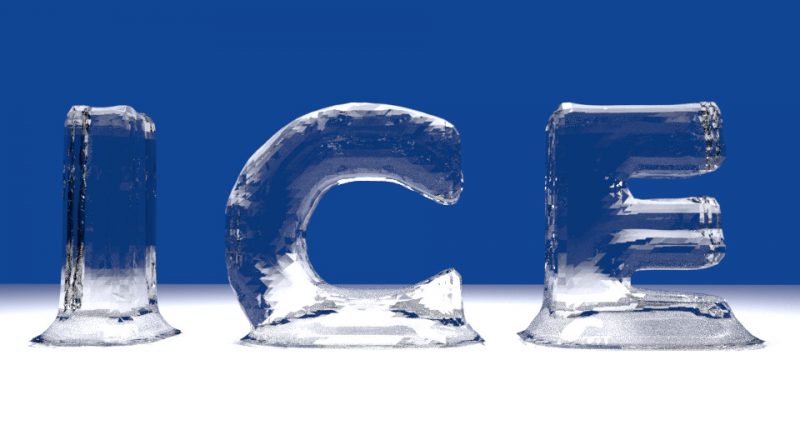
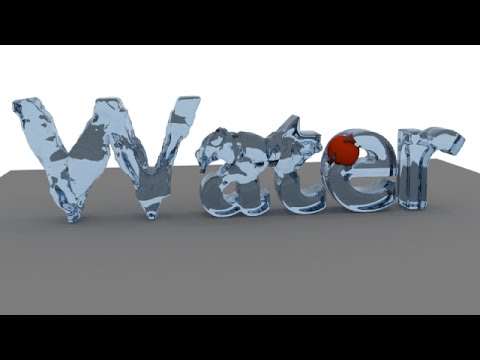
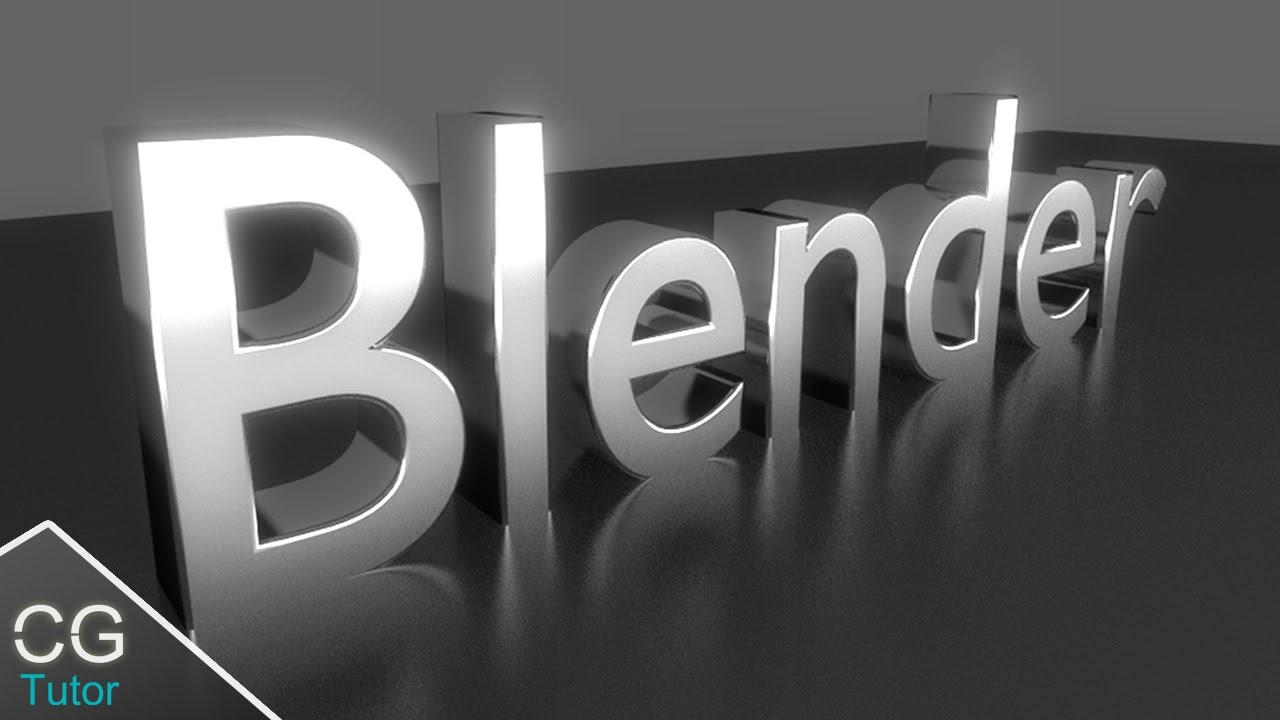
Transforming Text into 3D

  • Utilize the \"Extrude\" option in the Geometry tab to give your text depth and a 3D appearance.
  • Enhance the 3D effect by modifying the \"Bevel\" settings, creating rounded edges for a more polished look.

Getting Started with 3D Text

Advanced Text Effects

For more complex designs, convert your text into a mesh by right-clicking and selecting \"Convert to Mesh\". This allows for further editing and application of modifiers for unique effects.

Animation and Dynamics

Animating text can bring your projects to life. Keyframe the position, rotation, and scale of your text objects to create dynamic animations.

Advanced Text Effects

Practical Applications

3D text in Blender can be used for a variety of projects, including logo design, titling for animations, and creating detailed 3D models for printing.

StepDescription
Add TextSelect \"Text\" from the \"Shift + A\" menu to add text to your scene.
Edit TextPress \"Tab\" to enter Edit Mode and type your text.
ExtrudeAdjust the \"Extrude\" setting in Geometry tab to create depth.
BevelModify \"Bevel\" settings for rounded edges.

With these steps and techniques, you\"re well on your way to mastering text manipulation in Blender, opening up new possibilities in your 3D projects.

Practical Applications

How to Use Text in Blender Tutorial

Animation: Dive into a vibrant world of creativity and imagination with mesmerizing animations that will captivate your senses. Let the colorful characters and dynamic movements bring a smile to your face! Modeling: Explore the fascinating art of modeling and witness the intricate process of creating stunning designs from scratch. Immerse yourself in the world of shapes and forms that come to life before your eyes.

3D Text in Blender Everything You Need to Know

This is a beginner\'s tutorial to 3D text in Blender. Add text, edit text and understand the text settings in Blender. I\'ll cover the ...

Advanced Text Effects

For more complex designs, convert your text into a mesh by right-clicking and selecting \"Convert to Mesh\". This allows for further editing and application of modifiers for unique effects.

Animation and Dynamics

Animating text can bring your projects to life. Keyframe the position, rotation, and scale of your text objects to create dynamic animations.

Advanced Text Effects

_HOOK_

Practical Applications

3D text in Blender can be used for a variety of projects, including logo design, titling for animations, and creating detailed 3D models for printing.

With these steps and techniques, you\"re well on your way to mastering text manipulation in Blender, opening up new possibilities in your 3D projects.

Practical Applications

Practical Applications

3D text in Blender can be used for a variety of projects, including logo design, titling for animations, and creating detailed 3D models for printing.

StepDescription
Add TextSelect \"Text\" from the \"Shift + A\" menu to add text to your scene.
Edit TextPress \"Tab\" to enter Edit Mode and type your text.
ExtrudeAdjust the \"Extrude\" setting in Geometry tab to create depth.
BevelModify \"Bevel\" settings for rounded edges.

With these steps and techniques, you\"re well on your way to mastering text manipulation in Blender, opening up new possibilities in your 3D projects.

Practical Applications

Introduction to Blender\"s Text Tools

Blender\"s text tools open up a world of creativity for digital artists and designers. This section will guide you through the basics of creating and manipulating text in Blender, ensuring you have a solid foundation to explore more advanced techniques.

  1. Adding Text: Start by pressing \"Shift+A\" in the 3D viewport, select \"Text\" to add a new text object. This is your starting point for any text-based project.
  2. Editing Text: Enter Edit Mode by pressing \"Tab\". Here, you can type your desired text directly into the 3D viewport.
  3. Font Customization: In the Properties panel, under the \"Font\" tab, you can change the font type, size, and style to match your project\"s needs.
  4. Extrusion and Bevel: To give your text depth and dimension, use the \"Extrude\" and \"Bevel\" options under the \"Geometry\" section of the \"Font\" tab.
  5. Texturing and Materials: Apply textures and materials to your text for visual impact. Navigate to the \"Material Properties\" tab to add colors, textures, or shaders.

By mastering these basic tools, you\"ll be well-equipped to start experimenting with 3D text in your Blender projects, adding a professional touch to your creations.

Introduction to Blender\

Starting with 3D Text in Blender

Embarking on the journey of 3D text creation in Blender is an exciting process that brings your artistic and typographic visions to life. This section walks you through the initial steps to get you up and running with 3D text.

  1. Creating Your First Text Object: In Blender\"s 3D viewport, press \"Shift+A\" to open the add menu, then select \"Text\" to place a new text object in your scene.
  2. Entering Edit Mode: With the text object selected, press \"Tab\" to switch to Edit Mode, where you can delete the default \"Text\" and type your desired content.
  3. Adjusting the Font Settings: In the Properties panel on the right, navigate to the \"Font\" tab where you can choose your font style, size, and alignment to fit your project\"s theme.
  4. Manipulating Text Shape: Experiment with the \"Extrude\", \"Bevel\", and \"Taper\" options under the \"Geometry\" section to add depth and dimension to your text.
  5. Applying Materials: To color your text, go to the \"Material Properties\" tab and create or assign a material. You can customize the color, add textures, or even use shaders for more complex effects.
  6. Positioning Your Text: Use the transformation tools (move, rotate, scale) to position your text within the 3D space, ensuring it fits perfectly within your scene or composition.

These initial steps serve as the foundation for creating compelling 3D text in Blender. As you become more familiar with these processes, you\"ll be well-equipped to explore more advanced techniques and integrations within your projects.

Starting with 3D Text in Blender

Advanced Text Editing Techniques

Once you\"re familiar with the basics of creating 3D text in Blender, you can elevate your designs with advanced editing techniques. This section explores methods to enhance your text for more complex and visually appealing results.

  1. Curve Modification: Convert your text to a curve to manipulate its shape more intricately. This allows for bending or twisting text in unique ways.
  2. Displacement Modifiers: Use displacement modifiers to give your text an uneven, textured look. This can add realism or a stylized effect depending on the texture chosen.
  3. Shading and Lighting: Experiment with different shading modes and lighting setups to make your text pop. Proper use of shadows and highlights can add depth and dimension.
  4. Particle Systems: For dynamic text effects, apply particle systems to your text. This can simulate effects like crumbling text, text made of water, or other complex animations.
  5. Animation Techniques: Animate your text to bring it to life. Keyframe animations, shape keys, and physics simulations can create engaging motion graphics.

By mastering these advanced techniques, you can create sophisticated text effects that stand out in any project, from film titles to logo animations.

Advanced Text Editing Techniques

_HOOK_

Texturing and Materials for 3D Text

Adding textures and materials to 3D text is crucial for creating visually compelling and integrated designs. This section will guide you through the process of enhancing your Blender text creations with various textures and materials to achieve the desired impact.

  1. Applying Basic Materials: Start by selecting your text object and going to the Material Properties tab. Here, you can create a new material and adjust its color, specular highlights, and roughness to create simple yet effective looks.
  2. Using Textures: To add complexity, you can apply textures to your materials. Whether it\"s an image texture for realistic effects or procedural textures for abstract designs, this step greatly enhances the visual quality of your text.
  3. UV Unwrapping: For text objects converted to meshes, UV unwrapping allows for precise control over how image textures are applied. This method is ideal for applying logos, patterns, or detailed designs onto your 3D text.
  4. Shaders and Nodes: Dive deeper into Blender\"s powerful shader editor to create custom materials. Using nodes, you can combine different shaders, textures, and effects to create unique materials that make your text stand out.
  5. Environmental Effects: Consider how your text interacts with its environment. Reflective and refractive materials can simulate glass or metallic effects, adding realism or artistic flair to your projects.

By exploring the wide range of texturing and material options available in Blender, you can elevate your 3D text to new heights, making it an integral part of your artistic or commercial projects.

Texturing and Materials for 3D Text

Animating Text in Blender

Animating text can add a dynamic and engaging element to your projects. This section will guide you through the basic steps to bring your 3D text to life in Blender, from simple animations to complex motion graphics.

  1. Keyframe Animation: Start by inserting keyframes for the properties you wish to animate, such as location, rotation, and scale. This can be done in the timeline by pressing \"I\" and selecting the desired property.
  2. Shape Keys: For text that changes shape or morphs, use Shape Keys. These allow you to transition smoothly from one text shape to another.
  3. Text Effects with Modifiers: Apply modifiers like Wave, Build, or Decimate to create unique animations without manually keyframing every detail.
  4. Particle Systems: For more complex effects, such as text disintegrating or forming from particles, use Blender\"s particle system in conjunction with your text object.
  5. Animation Nodes: For advanced users, the Animation Nodes addon provides a node-based interface to create procedural animations for text and other objects.

With these techniques, you can animate your text to express ideas creatively, whether for title sequences, logo animations, or dynamic typography in motion graphics.

Using Blender\"s Text for Logo Creation

Blender is not just for 3D modeling and animation; it\"s also a powerful tool for creating stunning 3D logos using its text capabilities. This section delves into the process of transforming simple text into a professional logo.

  1. Conceptualizing Your Logo: Start with a clear idea of what your logo should represent. Sketch out ideas and consider how text can be used creatively to embody your brand.
  2. Choosing the Right Font: Select a font that aligns with your brand\"s identity. Blender allows you to import custom fonts, giving you endless possibilities for customization.
  3. 3D Text Manipulation: Use Blender\"s text tools to extrude, bevel, and modify your text to add depth and dimension, making it stand out.
  4. Applying Materials and Textures: Enhance your logo with materials and textures for a more polished look. Consider reflective materials for a sleek, modern appearance or matte finishes for a classic feel.
  5. Lighting and Rendering: Proper lighting can dramatically affect the appearance of your logo. Experiment with different lighting setups to highlight your logo\"s best features. Finally, render your logo with a transparent background for versatility in use.

By following these steps, you can create a unique and memorable logo in Blender that effectively communicates your brand\"s essence.

Best Practices for Typography in 3D Design

Effective typography is crucial in 3D design to convey messages clearly and add aesthetic value to your projects. This section highlights best practices for incorporating typography into your 3D designs in Blender.

  1. Choice of Font: Select fonts that align with the overall design theme and purpose of your project. Consider readability and character distinctiveness when choosing fonts for 3D text.
  2. Spacing and Alignment: Adjust the spacing between letters (kerning) and lines (leading) to improve readability and visual appeal. Proper alignment ensures that your text is harmoniously integrated with other design elements.
  3. Scale and Proportion: Be mindful of the scale and proportion of your text relative to other objects in the scene. Text should be sized appropriately to maintain balance and hierarchy in your design.
  4. Color and Contrast: Use colors that contrast well with the background and other elements to ensure that your text stands out and is easy to read. Consider the emotional impact of color choices on your message.
  5. Material and Texture: Applying materials and textures to text can greatly enhance its impact. Choose materials that reflect the mood of your project, from sleek metallics for a modern look to rustic textures for a vintage feel.
  6. Lighting Effects: Lighting can dramatically affect the readability and mood of your text. Use lighting strategically to highlight your text and create the desired atmosphere.

By adhering to these best practices, you can effectively utilize typography in your 3D designs to communicate your message and enhance the overall aesthetic of your projects.

Exporting and Integrating Blender Text into Other Projects

Blender\"s versatility extends to exporting text and integrating it into other projects, whether for video editing, game development, or web design. This section provides a step-by-step guide on how to export 3D text from Blender and use it across various platforms.

  1. Converting Text to Mesh: Before exporting, convert your text object to a mesh by selecting the text and pressing \"Alt+C\". Choose \"Mesh from Curve/Meta/Surf/Text\" to make it compatible with other software.
  2. Choosing the Right Format: Determine the appropriate file format for your project. For 3D printing or further editing in other 3D software, formats like OBJ or STL are recommended. For game engines like Unity or Unreal, FBX or glTF may be more suitable.
  3. Exporting Your Text: Go to \"File\" > \"Export\" and select the desired format. Adjust export settings based on your needs, such as scaling and material export options.
  4. Importing into Other Software: Open your target software and import the exported file. Most software has an import function that easily allows you to bring in Blender exports.
  5. Integration Tips: When integrating into other projects, consider the scale and orientation of your text. You may need to adjust these in the target software to ensure your text looks as intended.

By following these steps, you can smoothly transition your Blender text creations into other projects, expanding the possibilities for your designs and animations.

_HOOK_

Community Resources and Tutorials for Further Learning

The Blender community is a rich source of knowledge and inspiration for those looking to advance their skills in 3D text and beyond. Here are key resources and tutorials for further learning and exploration.

  • Blender Artists Forum: An active community where you can find help, share your work, and discuss everything Blender-related. It\"s a great place to ask questions and learn from experienced users.
  • BlenderNation: Offers daily news, tutorials, art, and resources. It\"s an excellent source for staying updated on the latest Blender features and community creations.
  • Blender Guru: Known for high-quality tutorials that cover a wide range of topics, including text manipulation. Perfect for both beginners and advanced users looking to refine their skills.
  • CG Cookie: Provides comprehensive courses and tutorials on Blender, including text creation and animation. A subscription-based platform that offers in-depth learning paths.
  • YouTube: A vast resource with thousands of free tutorials. Channels like Blender Guru, CG Geek, and Ducky 3D offer tutorials specifically focused on text effects and logo creation.

By leveraging these community resources, you can continuously grow your Blender skills, stay inspired, and connect with fellow enthusiasts and professionals in the field.

Embark on your journey to mastering 3D text in Blender with confidence. Whether for artistic expression or professional projects, the possibilities are limitless. Start exploring and unleash your creative potential today.

FEATURED TOPIC