Topic 3d model for blender: Explore the vibrant world of Blender by mastering the art of 3D modeling, from sourcing free models to creating your own, our guide unlocks endless creative possibilities for artists and designers alike.
Table of Content
- How to create a 3D model for Blender?
- Top Sources for Free and Premium Blender 3D Models
- How to Choose the Right 3D Model for Your Project
- Step-by-Step Guide to Importing and Modifying 3D Models in Blender
- Exploring Blender\"s Model Libraries: BlenderKit and Sketchfab
- Tips for Creating Your Own 3D Models in Blender
- Best Practices for Organizing and Managing Your Blender Model Collection
- YOUTUBE: Blender Tutorial: Making a 3D Model of a Soda Can
- How to Enhance Your 3D Models with Blender\"s Texturing and Shading Tools
- Animating 3D Models in Blender: A Beginner\"s Guide
- Using Blender Models for Game Development, VR/AR, and Animation
- Community and Resources for Blender 3D Model Enthusiasts
How to create a 3D model for Blender?
To create a 3D model for Blender, you can follow the steps below:
- Open Blender: Launch Blender on your computer.
- Create a New Project: Start a new project by selecting \"File\" from the top menu and choosing \"New\" or by using the shortcut key \"Ctrl+N\".
- Add a Mesh Object: To start creating your 3D model, you can add a mesh object like a cube, sphere, or cylinder. You can do this by either selecting \"Add\" from the top menu and choosing the desired mesh object or by pressing \"Shift+A\" and selecting the mesh object you want to add.
- Modify the Mesh: Once you have added the mesh object, you can modify its shape and size using the various modeling tools available in Blender. These tools can be found in the toolbar on the left side of the 3D Viewport. Some common modeling tools include extrusion, scaling, and rotation.
- Apply Materials and Textures: To make your 3D model more visually appealing, you can apply materials and textures. Materials control the appearance of your objects, while textures add details like color or patterns. You can access the material and texture settings in the Properties panel.
- UV Unwrap: If you want to apply textures to specific areas of your model, you may need to UV unwrap it. UV unwrapping is the process of projecting the 3D surface onto a 2D plane for texturing. You can access the UV unwrapping tools in the UV Editing workspace or by selecting the desired faces in Edit Mode and unwrapping them using the \"U\" key.
- Refine the Model: Continuously refine your model by adjusting its shape, adding more details, or refining the topology. You can use various tools like sculpting brushes, modifiers, and subdivision surfaces to increase the level of detail in your model.
- Save and Export: Once you are satisfied with your 3D model, save your project by selecting \"File\" from the top menu and choosing \"Save\" or by using the shortcut key \"Ctrl+S\". To export your model for use in other software or platforms, select \"File\" and then \"Export\" to choose the desired file format (e.g., .obj, .fbx, .stl).
READ MORE:
Top Sources for Free and Premium Blender 3D Models
Whether you\"re a beginner or an experienced 3D artist, finding the right models can make all the difference in your projects. Here are the top sources for both free and premium Blender 3D models to help bring your visions to life.
- Blender Market: A marketplace for premium Blender models, offering a wide range of high-quality assets from professional artists.
- CGTrader: Offers both free and premium 3D models, with a large selection available specifically for Blender users.
- TurboSquid: Known for its extensive collection of 3D models, TurboSquid features assets for Blender that cater to all levels of expertise.
- Sketchfab: Provides an immersive way to explore and download free and premium 3D models, many of which are compatible with Blender.
- BlenderKit: Integrated directly into Blender, BlenderKit offers thousands of free models, materials, and brushes created by the community.
Each of these platforms offers unique advantages, from community-driven collections to professional-grade models, ensuring you have access to the best resources for your 3D modeling projects in Blender.

How to Choose the Right 3D Model for Your Project
Choosing the right 3D model is crucial for the success of your project. Here are key factors to consider to ensure you select the best model for your needs.
- Project Requirements: Assess the specific needs of your project. Consider the complexity, style, and theme of the model that would best suit your project\"s objectives.
- Model Quality: Look for models with high-quality textures, materials, and detailed geometry. High-quality models can significantly enhance the realism and appeal of your project.
- Compatibility: Ensure the model is compatible with Blender. Check for any additional requirements such as plugins or scripts needed to use the model effectively.
- Customizability: Choose models that are easy to modify. This allows you to tweak and tailor the model to fit perfectly into your scene or project.
- License and Usage Rights: Understand the licensing terms. Ensure the model can be used for your intended purpose, whether it\"s for personal, educational, or commercial use.
By carefully considering these factors, you can select the right 3D model that not only meets your project\"s requirements but also enhances your creative workflow in Blender.

Step-by-Step Guide to Importing and Modifying 3D Models in Blender
Importing and modifying 3D models in Blender is a straightforward process. Follow these steps to seamlessly integrate models into your projects and customize them to your needs.
- Prepare the Model File: Ensure the 3D model is in a format compatible with Blender, such as .obj, .fbx, or Blender\"s native .blend files.
- Import the Model: Go to File > Import and select the format of your model. Navigate to the location of your file, select it, and click \"Import\".
- Review the Model: Once imported, examine the model for any issues. Check the scale, orientation, and that all textures are correctly applied.
- Modify the Model: Use Blender\"s powerful editing tools to modify the model. This can include scaling, rotating, adding or removing parts, and adjusting textures.
- Apply Materials and Textures: If your model needs new materials or textures, go to the Shading workspace to create or assign them.
- Rigging (if applicable): For models that require animation, you may need to create or adjust the rigging to suit your animation needs.
- Save Your Work: Once you are satisfied with the modifications, save your Blender file to preserve the changes.
With these steps, you can easily import and tailor 3D models for any project, enhancing your creativity and productivity in Blender.

Exploring Blender\"s Model Libraries: BlenderKit and Sketchfab
BlenderKit and Sketchfab are two comprehensive libraries offering a vast range of 3D models for Blender users. Here\"s how you can leverage these platforms to find the perfect models for your projects.
- BlenderKit:
- Integrated directly within Blender, BlenderKit provides an accessible library of thousands of free and premium models, materials, and brushes.
- To access, simply go to the BlenderKit tab in the Blender sidebar and search for the type of model you need.
- BlenderKit models come with complete asset information, making it easier to choose the right one for your project.
- Sketchfab:
- Sketchfab offers a diverse collection of 3D models, many of which are available for direct import into Blender.
- To use Sketchfab models, visit the Sketchfab website, select a model, and download it in a Blender-compatible format.
- Sketchfab also allows artists to publish and sell their models, providing a platform for community sharing and support.
By exploring these libraries, you can find high-quality models that fit any theme or project requirement, enhancing your Blender creations with ease.

_HOOK_
Tips for Creating Your Own 3D Models in Blender
Creating your own 3D models in Blender is a rewarding skill that opens up endless possibilities. Here are some tips to help you get started and improve your modeling process.
- Start Simple: Begin with basic shapes and gradually add detail. This helps in understanding form and topology without getting overwhelmed.
- Use Reference Images: Import reference images into Blender to guide your modeling. This ensures accuracy and proportionality in your designs.
- Master the Modifier Stack: Learn to use modifiers like Subdivision Surface, Mirror, and Solidify. Modifiers can significantly speed up your workflow and enhance your models.
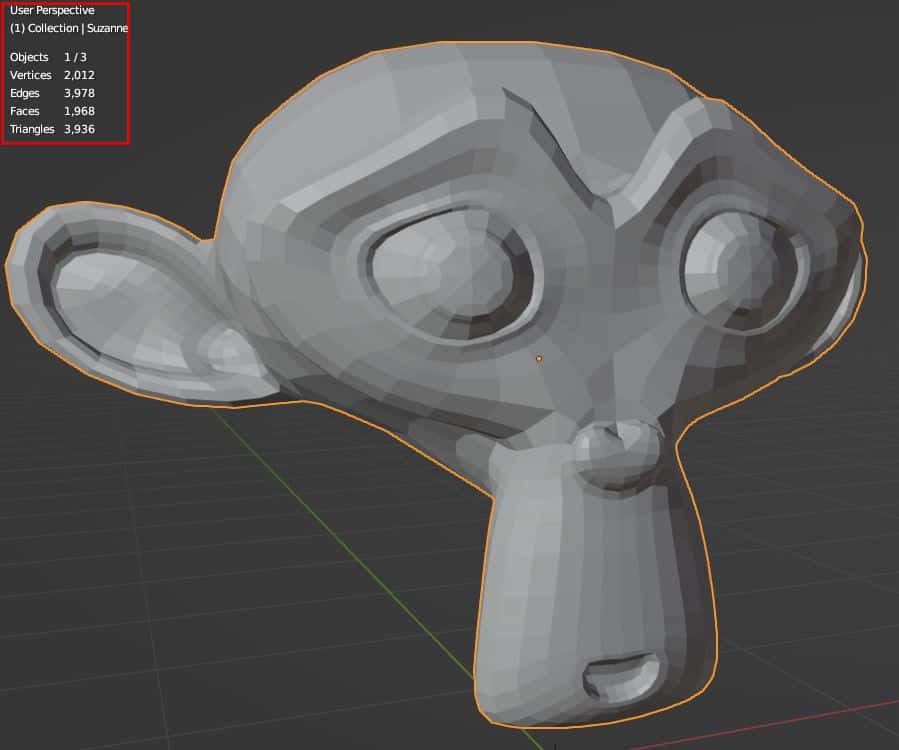
- Practice Efficient Topology: Good topology is key for models that deform well and render efficiently. Focus on creating clean, quad-based topology for best results.
- Learn Shortcuts: Blender\"s efficiency lies in its shortcuts. Familiarize yourself with key shortcuts to speed up your modeling process.
- Experiment with Sculpting: For organic models, try Blender\"s sculpting tools. Sculpting can add detailed features and textures to your models.
- Stay Organized: Use layers and naming conventions to keep your project organized, especially for complex models with multiple parts.
- Seek Feedback: Share your work with the Blender community for constructive feedback. This can provide new insights and help improve your skills.
By following these tips and practicing regularly, you can enhance your ability to create stunning 3D models in Blender.
Best Practices for Organizing and Managing Your Blender Model Collection
Keeping your Blender model collection organized is crucial for efficiency and ease of access. Here are best practices to help manage your 3D models effectively.
- Use Descriptive Filenames: Name your files clearly and consistently to make them easy to identify. Include important details like the object name and version number.
- Organize by Project or Category: Create folders to categorize your models by project, type, or usage. This simplifies finding specific models when needed.
- Implement a Version Control System: For collaborative or complex projects, use version control tools to track changes and manage different versions of your models.
- Utilize Blender\"s Asset Browser: Take advantage of Blender\"s Asset Browser to organize and preview your models directly within the software.
- Archive Unused Models: Keep your working directory clean by archiving older or unused models. Store them separately but ensure they are still accessible if needed.
- Regularly Update and Refine Your Collection: Periodically review and update your model collection. Remove duplicates, update models, and refine organization structures.
- Backup Your Models: Regularly backup your model collection to prevent data loss. Consider cloud storage or external drives for backups.
By following these practices, you can maintain a well-organized collection that enhances your workflow and productivity in Blender.

Blender Tutorial: Making a 3D Model of a Soda Can
Dive into the captivating world of 3D modeling and explore limitless possibilities! Unleash your creativity and bring your imagination to life with this mesmerizing video, where you\'ll discover the intricate process of designing and shaping stunning 3D models that will leave you in awe.
Blender Tutorial: Using AI to Create 3D Models with ChatGPT and Blender
Embark on a mind-blowing journey of AI integration and witness the future come to life! This extraordinary video will showcase the seamless integration of artificial intelligence into various aspects of our lives, offering a fascinating glimpse into the cutting-edge technology shaping our world. Prepare to be amazed by the limitless potential and endless opportunities AI brings!
How to Enhance Your 3D Models with Blender\"s Texturing and Shading Tools
Blender\"s texturing and shading tools can significantly improve the realism and visual appeal of your 3D models. Follow these steps to master texturing and shading in Blender.
- Understand UV Mapping: Begin by unwrapping your model to create a UV map. This process projects the 3D model onto a 2D plane for texturing.
- Select High-Quality Textures: Use high-resolution textures for the best visual results. Consider creating your own textures or sourcing them from reputable online libraries.
- Utilize Blender\"s Shader Editor: Open the Shader Editor to create and customize materials. Connect different nodes, such as image textures, shaders, and color ramps, to create complex materials.
- Experiment with Procedural Textures: Blender offers powerful procedural texturing capabilities. These textures are generated mathematically and can be endlessly customized for unique effects.
- Apply Bump and Normal Maps: Enhance surface detail without adding geometry by using bump and normal maps. These maps simulate texture and depth on your model.
- Adjust Lighting and Rendering Settings: Proper lighting and rendering settings are crucial for showcasing your textures and materials. Experiment with different lighting setups and render settings to achieve the best look.
- Use the Principled BSDF Shader: For most materials, the Principled BSDF shader offers a versatile and user-friendly way to create realistic materials with minimal effort.
By mastering these texturing and shading techniques in Blender, you can create stunningly detailed and lifelike 3D models for any application.

Animating 3D Models in Blender: A Beginner\"s Guide
Animating your 3D models in Blender can bring them to life. This beginner\"s guide will help you start with basic animation techniques in Blender.
- Understanding Keyframes: Learn how to set keyframes, which are the foundation of animation in Blender. Keyframes mark the start and end points of any animation.
- Basic Movement Animation: Start by animating simple movements. Select your model, move to a specific frame, position your model, and insert a keyframe. Repeat this process to create motion over time.
- Using the Timeline: Familiarize yourself with the timeline at the bottom of the Blender interface. It allows you to scrub through your animation and manage keyframes.
- Animating with the Dope Sheet: The Dope Sheet provides a more detailed view of your keyframes and animations, making it easier to edit timing and sequences.
- Introduction to the Graph Editor: The Graph Editor offers a visual representation of your animation curves. Use it to smooth out or refine the motion of your animations.
- Rigging Your Model: For complex animations, especially characters, you\"ll need to rig your model. Rigging involves creating a skeleton that controls your model\"s movements.
- Using Inverse Kinematics (IK): IK simplifies the animation process by allowing you to manipulate the end effectors of a rig, which in turn controls the rest of the limbs automatically.
- Experiment with Animation Modifiers: Blender includes several modifiers that can automate certain aspects of the animation process, such as the Wave modifier for creating oscillating movements.
Animation in Blender is a vast and complex topic, but starting with these basics will set you on the path to creating dynamic and engaging animations for your 3D models.
Using Blender Models for Game Development, VR/AR, and Animation
Blender models are versatile and can be used across various platforms, including game development, VR/AR experiences, and animation projects. Here\"s how to effectively utilize Blender models in these domains.
- Game Development:
- Optimize models for real-time performance by reducing polygon count and simplifying textures without compromising on visual quality.
- Use Blender\"s rigging and animation tools to create character animations and in-game assets.
- Export models in formats compatible with game engines like Unity or Unreal Engine, typically as FBX or OBJ files.
- Virtual Reality (VR) and Augmented Reality (AR):
- Create immersive environments and interactive objects with Blender\"s modeling and texturing capabilities.
- For VR/AR, focus on optimizing models for performance, considering the higher demands of real-time rendering in immersive environments.
- Test and refine models within VR/AR development platforms to ensure compatibility and user experience.
- Animation:
- Utilize Blender\"s advanced animation tools, including its non-linear animation (NLA) editor and graph editor, for complex animations.
- Experiment with Blender\"s fluid, smoke, and particle simulation features to add dynamic effects to your animations.
- Render animations using Blender\"s powerful rendering engines, Cycles or Eevee, to achieve high-quality output suitable for film or video.
Whether you\"re developing a game, creating an immersive VR/AR experience, or producing an animation, Blender\"s comprehensive toolset can help you achieve professional results.
_HOOK_
READ MORE:
Community and Resources for Blender 3D Model Enthusiasts
The Blender community is vibrant and supportive, offering a wealth of resources for both beginners and advanced users. Here\"s how to connect with the community and find valuable resources.
- Blender Artists Community: An online forum where Blender users share their work, ask questions, and provide feedback to each other. A great place to learn and be inspired.
- BlenderNation: Offers daily news about Blender and its community, including tutorials, art, announcements, and more.
- Blender Tutorials:
- Official Blender Foundation YouTube channel provides tutorials for all skill levels.
- Websites like Blender Guru, CG Cookie, and Darrin Lile offer comprehensive tutorials focused on specific techniques and projects.
- Online Courses and Workshops: Platforms like Udemy, Coursera, and Skillshare feature structured courses ranging from beginner to advanced levels.
- Blender Meetups and Conferences: Attend local meetups or international conferences like the Blender Conference to connect with other enthusiasts and professionals.
- Open Projects: Participate in open projects sponsored by the Blender Foundation, which are collaborative efforts to create films and games using Blender.
- Blender Add-ons and Plugins: Explore the wide range of add-ons and plugins developed by the community to enhance Blender\"s functionality.
Engaging with the Blender community and utilizing these resources can significantly enhance your skills, inspire new projects, and connect you with like-minded individuals passionate about 3D modeling and animation.
Embark on a creative journey with Blender and transform your ideas into stunning 3D models. Join a community of enthusiasts, harness powerful tools, and bring your visions to life. The possibilities are limitless.