Topic how to update blender without reinstalling: Discover seamless updates with our comprehensive guide on how to update Blender without reinstalling, ensuring your creative workflow remains uninterrupted and up-to-date with the latest features and improvements.
Table of Content
- How to update Blender without reinstalling?
- Using Third-Party Installers and Updaters
- Updating Through Steam for Auto-Updates
- Updating Blender via the Microsoft Store
- Utilizing the Blender Launcher for Multiple Versions
- Accessing Blender Snap Store for Linux Users
- Direct Download from Official Blender Download Pages
- YOUTUBE: How to Update Blender and Keep Old Settings and Addons
- Managing Updates and Versions with Blender Launcher
- Opting for Daily Builds and LTS Releases
How to update Blender without reinstalling?
If you want to update Blender without reinstalling it, there are a few methods you can try:
- Method 1: Using Steam:
- Install Blender via Steam.
- Enable the auto-update feature in Steam.
- Steam will automatically update Blender whenever a new version is available.
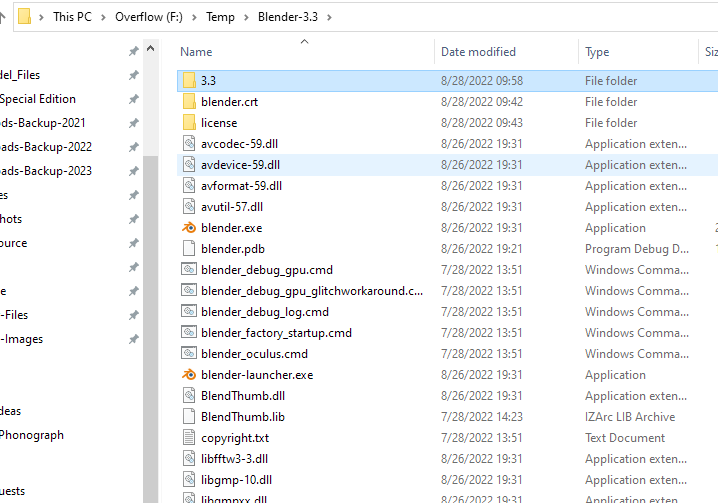
- Method 2: Using the zipped version:
- Download the latest version of Blender as a zip file from the official website.
- Extract the contents of the zip file to a folder of your choice.
- Create a shortcut to the Blender executable (blender.exe) on your desktop or start menu.
- Whenever you want to update, simply download the latest zip file, extract it, and replace the old files with the new ones while keeping your configuration files intact.
READ MORE:
Using Third-Party Installers and Updaters
Updating Blender without reinstalling it is streamlined with the aid of third-party installers and updaters. These tools offer a hassle-free approach to keep Blender up-to-date, bypassing the need for manual downloads and installations.
- Steam: A popular platform for game distribution, Steam also hosts software like Blender. It provides an auto-update feature that ensures Blender remains updated to the latest version without manual intervention. To use Steam:
- Download and install the Steam client.
- Create a Steam account or log in.
- Search for Blender in the Steam store and install it.
- Enable auto-updates to automatically receive the latest Blender updates.
- Microsoft Store: Windows users can update Blender through the Microsoft Store, which automatically updates installed applications. Simply search for Blender in the store and install it to benefit from automatic updates.
- Blender Launcher: A dedicated tool for managing multiple Blender versions. It allows for easy switching between different Blender builds and automatically updates to the latest version. To use Blender Launcher:
- Download Blender Launcher from its official GitHub page.
- Extract the downloaded file and run the Blender Launcher.
- Select the directory for storing Blender builds.
- Use the tool to download, install, and manage Blender versions.
These third-party tools not only facilitate keeping Blender up-to-date but also enhance your workflow by offering additional features such as managing multiple versions and enabling automatic updates.

Updating Through Steam for Auto-Updates
Steam offers a convenient method to keep Blender automatically updated without manual intervention. This platform, primarily known for gaming, supports Blender updates seamlessly through its auto-update feature. Follow these steps to ensure Blender stays up-to-date through Steam:
- Install Steam: If you haven\"t already, download and install the Steam client from its official website.
- Create an Account: Open Steam and sign up or log into your existing account.
- Find Blender: Use the search bar to find Blender within the Steam store. It is available for free.
- Install Blender: Click on the \"Free\" button to add Blender to your Steam library and start the installation process.
- Enable Auto-Updates: Once installed, Steam automatically sets Blender to update whenever a new version is released. To check or change this setting:
- Right-click Blender in your Steam library.
- Select \"Properties\", then navigate to the \"Updates\" tab.
- Ensure the option \"Always keep this game updated\" is selected.
This method not only keeps Blender up to date but also simplifies managing your installation, allowing you to focus more on creating and less on maintenance.
Updating Blender via the Microsoft Store
For Windows users, the Microsoft Store presents a straightforward solution to keep Blender updated automatically. This method eliminates the need for manual downloads and installations, streamlining the update process directly through the store\"s interface. Follow these detailed steps to update Blender via the Microsoft Store:
- Open the Microsoft Store: Access the Microsoft Store from your Windows search bar or taskbar.
- Search for Blender: Use the search function within the Microsoft Store to find Blender. You will likely find the latest official release version listed.
- Install or Update Blender: If Blender is not yet installed, you can install it directly. If you already have Blender, the store will typically handle updates automatically. However, you can check for updates manually by navigating to the \"Downloads and updates\" section of the Microsoft Store.
- Automatic Updates: Ensure that the automatic updates feature is enabled in the Microsoft Store settings. This ensures that Blender, along with any other applications downloaded from the Microsoft Store, will be updated automatically whenever a new version is available.
This update method is especially convenient for those who prefer a hands-off approach, allowing for seamless updates without interrupting your workflow.

Utilizing the Blender Launcher for Multiple Versions
The Blender Launcher is an essential tool for artists and developers who need to manage multiple versions of Blender efficiently. This standalone application simplifies the process of downloading, installing, and updating different Blender versions without the need to reinstall. Follow these steps to make the most out of Blender Launcher:
- Download Blender Launcher: Start by downloading the Blender Launcher from its official GitHub repository.
- Installation: Extract the downloaded file and run the Blender Launcher executable. No formal installation is required, making it convenient and portable.
- Configuration: Upon first launch, the Blender Launcher will ask you to select a directory to store your Blender versions. Choose a location with sufficient space.
- Downloading Versions: The Blender Launcher interface allows you to browse and download any available version of Blender, including stable releases, daily builds, and experimental branches.
- Switching Between Versions: Easily switch between installed versions through the Blender Launcher\"s interface, allowing for seamless workflow transitions between projects requiring different Blender functionalities.
- Automatic Updates: Enable automatic updates for your preferred versions, ensuring you always have the latest features and bug fixes.
This tool is particularly useful for testing new features, ensuring compatibility across different project requirements, and maintaining a clean workflow. By utilizing the Blender Launcher, you can keep your creative process efficient and organized, with immediate access to any version of Blender you need.
_HOOK_
Accessing Blender Snap Store for Linux Users
For Linux users, the Snap Store offers a convenient way to install and update Blender without the need for manual reinstallation. Snaps are app packages for desktop, cloud, and IoT that are easy to install, secure, cross-platform and dependency-free. Here’s how to utilize the Snap Store to keep Blender up-to-date:
- First, ensure that snap support is enabled on your Linux distribution. Most recent versions of Ubuntu come with snap pre-installed. For other distributions, you may need to install snapd manually.
- Open a terminal window.
- Type sudo snap install blender --classic to install Blender for the first time. If Blender is already installed via Snap, it should automatically update to the latest version. However, you can manually update Blender by typing sudo snap refresh blender in the terminal.
- If you want to switch to a specific version or channel (for example, to use a beta version or a specific stable release), you can use the command sudo snap switch blender --channel=
followed by sudo snap refresh.
By using the Snap Store, updates are handled automatically, ensuring that you always have the latest version of Blender with all the newest features and bug fixes. This method simplifies the update process, eliminating the need to manually download and reinstall Blender with each new release.
Direct Download from Official Blender Download Pages
Updating Blender directly from the official Blender download pages is a straightforward process that ensures you\"re getting the software directly from the source. This method is ideal for users who prefer to manually manage their updates and want to ensure they\"re using the version that best suits their needs, be it the latest release, a long-term support (LTS) version, or even a daily build for cutting-edge features. Here\"s how you can update Blender using direct downloads:
- Visit the official Blender website and navigate to the download section.
- On the download page, you will find options for the latest version of Blender, LTS versions, and experimental builds. Choose the version that best fits your requirements.
- Click on the download button for your operating system (Windows, macOS, or Linux). If there are specific instructions or additional options for your OS, they will be listed on the download page.
- Once the download is complete, extract the files (if necessary) and run the installer. If you\"re updating an existing installation, you may be prompted to replace the older version. Opting to replace the older version will update Blender while preserving your settings and preferences.
- Follow the installation prompts to complete the update process. Once installed, launch Blender to ensure the update has been applied successfully.
This method allows you to have control over when and how you update Blender, providing the flexibility to work with multiple versions or to install updates at a time that suits you best. Remember, downloading directly from the official Blender website ensures you\"re getting a secure and verified version of the software.
How to Update Blender and Keep Old Settings and Addons
Stay in the know with the latest update! Discover the new features, improvements, and bug fixes that will enhance your experience. Watch the video now to learn all the exciting changes.
How to Update Blender Without Losing Addons and Settings
Unlock your creativity and take your 3D designs to the next level with Blender. This powerful software will revolutionize your work, allowing you to bring your imagination to life. Don\'t miss out on this amazing video showcasing Blender\'s endless possibilities.
Managing Updates and Versions with Blender Launcher
The Blender Launcher is a third-party tool designed to help users manage multiple versions of Blender on their system with ease. It\"s especially useful for those who need to switch between different Blender versions for various projects or want to test new features available in development builds without affecting their stable setup. Here\"s how to use the Blender Launcher to manage updates and versions:
- Download the Blender Launcher from its official GitHub repository or website. Ensure you\"re downloading the latest release compatible with your operating system.
- Extract the downloaded file to a location of your choice. The Blender Launcher does not require installation; it runs directly from the extracted folder.
- Open the Blender Launcher application. On its first run, it will prompt you to set a directory for storing Blender versions. Choose a directory that has enough space to accommodate multiple versions of Blender.
- The main interface of Blender Launcher will display a list of available Blender versions, including stable releases, LTS (Long Term Support) versions, and experimental branches. You can download any version by clicking the download icon next to the version name.
- Once a version is downloaded, it will appear in the \"Library\" section of the Blender Launcher. You can start any version directly from the launcher with a single click.
- To update an existing version, simply check if there is a newer build available in the \"Online\" section and download it. The launcher allows you to keep both the old and new versions, or you can delete the older version to save space.
- The Blender Launcher also provides features to customize the launcher\"s behavior, such as setting a preferred Blender version as default or configuring the launcher to automatically check for updates.
Using the Blender Launcher simplifies the process of managing multiple Blender installations and ensures you can easily update to the latest version or switch between versions as needed without the hassle of manually reinstalling the software.

READ MORE:
Opting for Daily Builds and LTS Releases
Blender offers two distinct types of releases that cater to different user needs: Daily Builds and Long-Term Support (LTS) Releases. Daily Builds are ideal for users who want access to the latest features and are willing to tolerate potential instability. LTS Releases, on the other hand, offer stability and support for users working on long-term projects. Here\"s how you can opt for these versions:
- Understanding Daily Builds: Daily Builds, also known as nightly builds, are development versions of Blender that include the latest changes and features added by developers. These builds are not fully tested and may contain bugs, but they offer a glimpse into the future of Blender.
- To download Daily Builds, visit the official Blender Builder website.
- Look for the section labeled \"Experimental\" or \"Daily Builds.\"
- Select the version you wish to download and follow the instructions to install it on your system.
- Choosing LTS Releases: LTS Releases are stable versions of Blender that receive critical fixes and updates for an extended period. These versions are recommended for users working on projects that require a stable environment over time.
- Go to the official Blender download page.
- Find the section dedicated to LTS Releases.
- Choose the LTS version that suits your needs. LTS versions are supported for two years with updates focused on stability and compatibility.
- Download and install the chosen LTS version, following the same process as you would for a regular stable release.
By choosing between Daily Builds and LTS Releases, you can tailor your Blender experience to fit your specific needs, whether you\"re exploring the latest developments in 3D modeling and animation or working on a project that demands reliability and consistency over time.
Keeping Blender up-to-date is seamless with these methods, ensuring you always have access to the latest features and improvements without the hassle of reinstalling. Choose the approach that best fits your workflow and enjoy creating with Blender.