Topic how to use blender on mac: Embark on a journey to master Blender on your Mac, unlocking the full potential of 3D modeling, animation, and rendering with this comprehensive guide.
Table of Content
- How to navigate and move objects in Blender on a Mac?
- Downloading and Installing Blender on Mac
- Understanding Blender\"s Interface and Key Features
- Setting Up Blender for Mac: Preferences and Performance Tips
- Basic 3D Modeling Techniques in Blender
- YOUTUBE: Blender for MacOS Users: No 3-Buttons Mouse Viewport Navigation
- Texturing and Rendering on Mac
- Animation Basics with Blender
- Using Blender with Apple Silicon Macs
- Keyboard Shortcuts and Tips for Mac Users
- Common Issues and Solutions for Mac Users
- Resources for Further Learning
How to navigate and move objects in Blender on a Mac?
To navigate and move objects in Blender on a Mac, follow these steps:
- First, open Blender by clicking on the Blender icon in your Applications folder.
- Once Blender is open, you can navigate the 3D viewport using the following keyboard and mouse controls:
- To rotate the view, hold down the middle mouse button and move the mouse.
- To pan the view, hold down Shift and the middle mouse button, then move the mouse.
- To zoom in or out, scroll up or down with the middle mouse button, or use a two-finger swipe on a Mac trackpad.
- To move objects in Blender, use the following steps:
- Select the object you want to move by right-clicking on it in the 3D viewport.
- With the object selected, press the \"G\" key on your keyboard to enter grab mode.
- Move the mouse to translate the object in the desired direction.
- Left-click to confirm the object\'s new position.
These steps should help you navigate and move objects in Blender successfully on your Mac.
READ MORE:
Downloading and Installing Blender on Mac
To start using Blender on your Mac, follow these steps to download and install the software smoothly:
- Visit the official Blender website at https://www.blender.org/download/ to find the latest version of Blender suitable for Mac.
- Click on the \"macOS\" button to download the Blender version compatible with your Mac operating system. Ensure you select the right version for your Mac\"s CPU architecture (Intel or Apple Silicon).
- Once the download is complete, open the downloaded file. This will mount a new volume containing the Blender application.
- Drag the Blender application from the mounted volume to your Applications folder. This step is crucial for installing Blender on your Mac.
- After moving Blender to your Applications folder, you can eject the mounted volume as it is no longer needed.
- To launch Blender, open your Applications folder and double-click on the Blender icon. Depending on your macOS security settings, you might need to confirm that you trust the application before it opens for the first time.
Following these steps, you will have Blender installed on your Mac, ready for 3D modeling, animation, and more. Remember to check the system requirements on the Blender website to ensure your Mac meets the necessary specifications for optimal performance.
Understanding Blender\"s Interface and Key Features
Blender\"s comprehensive interface might seem daunting at first, but understanding its layout and key features is crucial for leveraging its full potential on your Mac. Here\"s a breakdown to help you get started:
- 3D Viewport: The heart of Blender, where you can view and interact with your 3D scene. You can navigate the viewport using your mouse and keyboard shortcuts.
- Timeline: Located at the bottom of the default layout, it controls animation playback and keyframe management.
- Outliner: A hierarchical view of all objects in the scene, making it easy to select and manage various elements.
- Properties Panel: Displays settings for the active object, scene, or material. You can adjust object properties, rendering settings, and more here.
- Shader Editor: For creating and editing materials using a node-based interface, allowing complex material setups.
- UV/Image Editor: Where you unwrap and edit the UV maps of your objects, crucial for texturing.
Blender also includes various workspaces tailored to specific tasks, such as modeling, UV editing, texture painting, rigging, animation, and rendering. You can switch between these workspaces using the tabs at the top of the Blender window.
Key Features:
- Modeling and Sculpting: Blender offers powerful tools for creating detailed 3D models and sculptures.
- Texturing and Shading: A wide range of options for texturing, shading, and material creation to bring realism to your models.
- Animation and Rigging: Comprehensive tools for character rigging and animation, making it possible to create complex animations.
- Simulation: Physics simulations for realistic animation of fluids, smoke, fire, and cloth.
- Rendering: High-quality rendering options with both Cycles and Eevee render engines, offering both ray-traced and real-time rendering capabilities.
By familiarizing yourself with Blender\"s interface and key features, you can start creating stunning 3D artwork and animations on your Mac. Practice and experimentation are key to mastering Blender\"s vast toolset.
Setting Up Blender for Mac: Preferences and Performance Tips
Optimizing Blender for your Mac ensures a smoother workflow and better performance. Here are some essential preferences and performance tips:
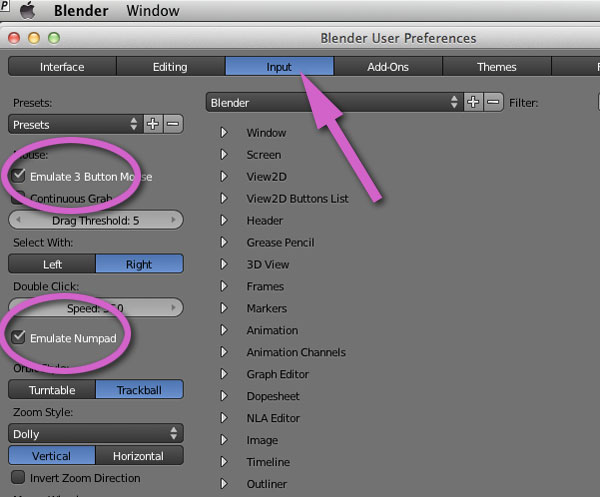
- Accessing Preferences: Open Blender and navigate to Edit > Preferences. This menu allows you to customize Blender’s behavior to fit your needs.
- Interface: Under the Interface tab, you can adjust the scale of the interface elements, which is particularly useful for high-resolution displays found on many Macs.
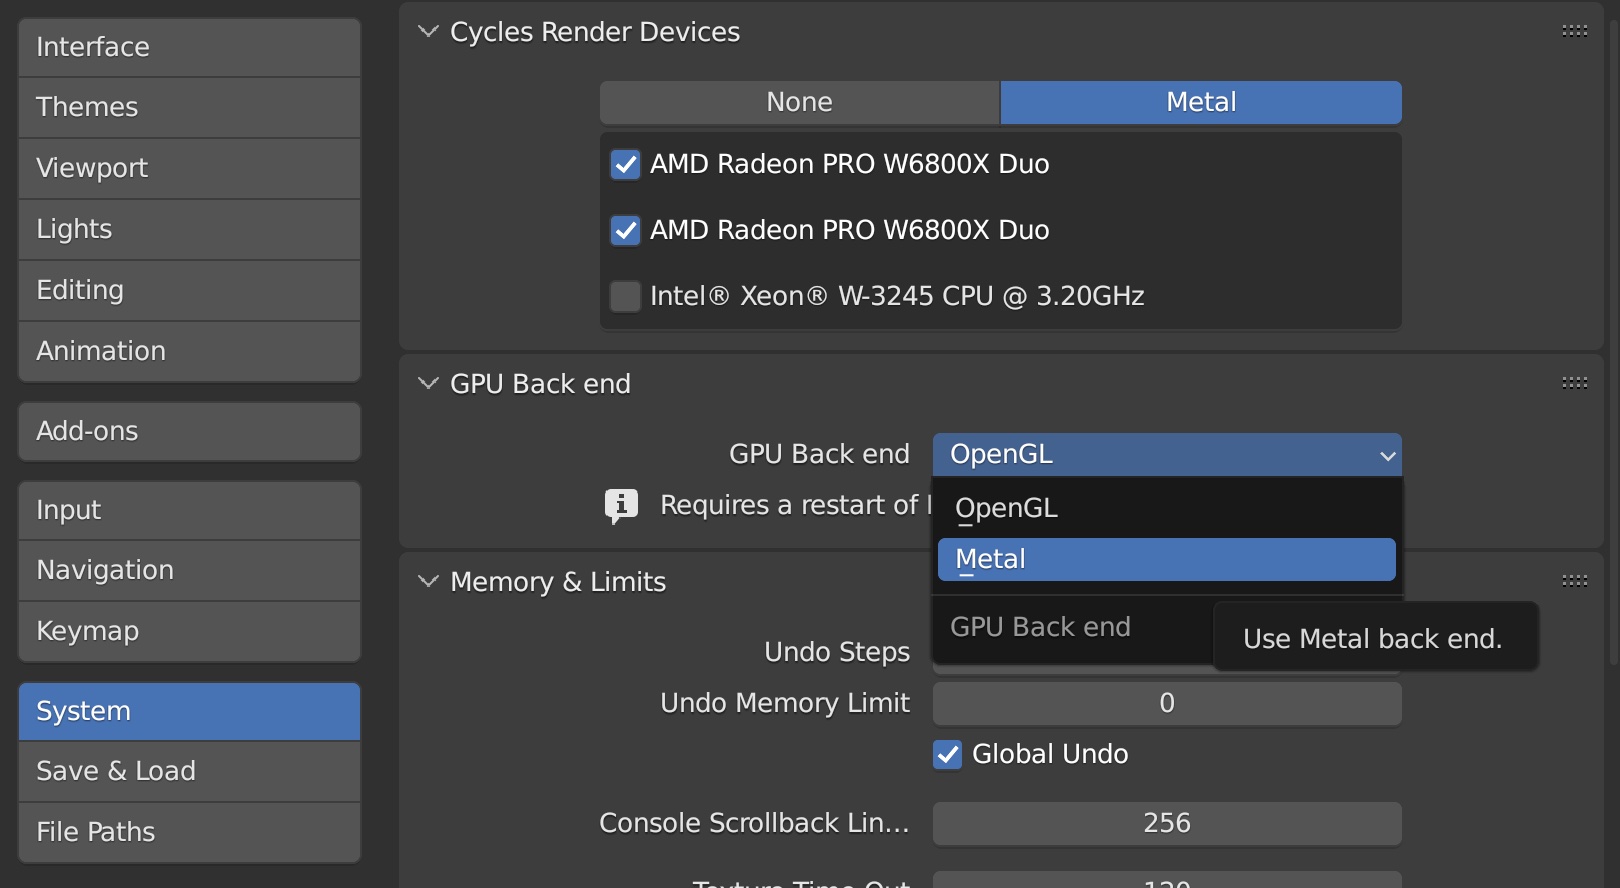
- System: The System tab contains important settings for memory, CPU, and GPU usage.
- For better performance, enable CUDA or OptiX if you have an NVIDIA GPU, or Metal for AMD GPUs.
- Adjust the number of threads for rendering to match your CPU\"s capabilities. Choosing \"Auto-detect\" lets Blender decide the optimal setting.
- Memory & Limits: Increase the undo steps if you have sufficient RAM to spare, giving you more flexibility to revert changes.
- Save & Load: Enable \"Auto Save Temporary Files\" to recover your work in case of a crash. You can adjust the interval for auto-saving.
Performance Tips:
- Viewport Shading: Use \"Solid\" or \"Wireframe\" mode for modeling and navigating large scenes to improve viewport responsiveness.
- Render Settings: For test renders, reduce the render resolution and increase it only for your final output.
- Simulation Quality: Lower the quality settings for simulations during the testing phase and increase them for the final render.
- Use Collections: Organize your scene into collections to easily hide and show groups of objects, improving viewport performance.
- Limit Subdivision Surfaces: Use subdivision surfaces sparingly and apply them only when necessary to maintain a high frame rate in the viewport.
By adjusting these settings and following these tips, you can significantly enhance your Blender experience on Mac, making your 3D modeling and animation projects more enjoyable and efficient.

Basic 3D Modeling Techniques in Blender
3D modeling is a foundational skill in Blender. Mastering basic techniques is essential for creating anything from simple objects to complex scenes. Here\"s how to get started:
- Starting with a Primitive: Begin by adding a basic shape (primitive) to your scene. Use the Add menu (Shift+A) and select from meshes like Cube, Sphere, Cylinder, etc., as your starting point.
- Editing Mode: Press Tab to switch between Object and Edit mode. In Edit mode, you can modify the shape by selecting vertices, edges, or faces.
- Manipulating Vertices, Edges, and Faces:
- Use the G key to grab and move selected elements.
- Scale them with S, and rotate with R.
- Extrude with E to extend your mesh.
- Subdivision Surface Modifier: Add a Subdivision Surface modifier to smooth your object. This can be found in the Modifiers tab of the Properties panel.
- Loop Cuts: Use Ctrl+R to add loop cuts, which helps in defining the shape more precisely and supports the structure for subdivision surfaces.
- Proportional Editing: Toggle Proportional Editing with O to move parts of your mesh while influencing nearby vertices. This is useful for organic modeling.
- Boolean Operations: Use Boolean modifiers to combine or subtract shapes. This is a powerful way to create complex structures from simple forms.
Practice these techniques to build your confidence and understanding of 3D modeling. Blender\"s vast array of tools and modifiers can seem overwhelming, but focusing on these basics will provide a solid foundation for your journey in 3D design and animation.

_HOOK_
Blender for MacOS Users: No 3-Buttons Mouse Viewport Navigation
Explore the wonders of viewport navigation in this must-watch video! Master the art of smoothly navigating through Blender\'s 3D view so you can effortlessly create stunning visualizations and bring your ideas to life. Get ready to embark on a journey of seamless exploration!
Texturing and Rendering on Mac
Texturing and rendering are crucial for bringing your 3D models to life in Blender. Here’s how you can achieve stunning visuals on your Mac:
- Applying Textures:
- Switch to the Shading workspace to start texturing your object.
- Use the Node Editor to add and connect texture nodes. Blender supports various textures, including Image Textures for using photographs or custom images.
- Adjust the mapping and scale of textures to fit your model correctly using the Mapping and Texture Coordinate nodes.
- UV Unwrapping:
- In Edit Mode, select all faces of your model and choose UV > Unwrap to generate a UV map.
- Adjust the UV layout in the UV/Image Editor to match your texture. This step is essential for precise texture application.
- Material Settings:
- Create materials in the Properties panel to change the color, reflectivity, transparency, and more.
- Combine different shaders to achieve realistic material effects.
- Lighting Your Scene: Proper lighting is key to a good render. Experiment with different light sources and intensities to highlight your model’s textures and materials.
- Rendering:
- Select your render engine (Cycles for photorealistic rendering or Eevee for real-time) in the Render Properties panel.
- Adjust render settings such as resolution, samples, and lighting to balance quality and rendering time.
- Use the Render or F12 button to produce your final image. For animations, set your frame range and output settings before rendering.
With these steps, you can create textured and rendered scenes or models in Blender on your Mac that look professional and lifelike. Remember, mastering texturing and rendering takes practice and experimentation, so don’t hesitate to try different techniques to see what works best for your project.

Why I Decided to Learn Blender on a Macbook Pro
Unlock your creative potential and dive into the world of Blender with this incredible video tutorial. Whether you\'re a beginner or an experienced artist, you\'ll learn valuable techniques and tips that will enhance your skills and empower you to create magnificent 3D masterpieces. Don\'t miss out on this opportunity to become a Blender pro!
Animation Basics with Blender
Animation in Blender opens up a world of creative possibilities. Here\"s a primer to get you started with animation on your Mac:
- Understanding Keyframes:
- Keyframes are the cornerstone of animation, marking the start and end points of any movement or transformation.
- To insert a keyframe, select your object, move to the desired frame in the timeline, make your transformation (move, rotate, scale), and press I to choose the property to keyframe.
- Timeline and Dope Sheet:
- The Timeline provides a simple interface for scrubbing through your animation.
- The Dope Sheet offers a more detailed view of all keyframes and their timing, allowing for precise adjustments.
- Animating Properties: Almost any property in Blender can be animated, from object transformations to material and lighting changes. Experiment with animating different properties to achieve dynamic effects.
- Graph Editor:
- For finer control over the interpolation of keyframes, use the Graph Editor. This allows you to adjust the speed and timing of animations with bezier curves.
- Rigging for Animation:
- Complex models can be rigged with bones (armatures) to simplify the animation process. Bones control parts of your mesh as if they were limbs and joints.
- Weight painting is used to define how much influence each bone has over different parts of the mesh.
- Animation Playback: Press the Play button in the Timeline to review your animation. Adjust the frame range as needed to focus on specific sections.
- Rendering Animations: In the Render Properties, set your output format to an animation file format like AVI or MPEG, and adjust your render settings as needed before rendering your animation.
With practice, these basics will serve as a foundation for more complex animations, allowing you to bring your Blender projects to life on your Mac.
Using Blender with Apple Silicon Macs
Apple Silicon Macs, powered by the M1 and M2 chips, offer significant performance benefits for Blender users. Here\"s how to optimize your experience:
- Downloading the Right Version: Ensure you download the ARM version of Blender specifically optimized for Apple Silicon from the Blender website. This version will provide better performance and efficiency.
- Running Blender Natively: Running Blender natively on Apple Silicon, rather than through Rosetta 2 emulation, ensures maximum performance. Verify you\"re using the native version in the Blender About section.
- Optimizing Preferences for Apple Silicon:
- In Blender\"s Preferences, under the System tab, select Metal for the Cycles render engine to leverage the full power of the GPU.
- Adjust the Thread setting to \"Auto\" to let Blender decide the optimal number of threads for rendering, taking advantage of the high-efficiency cores on Apple chips.
- Memory Management: Apple Silicon Macs often have unified memory architecture, which is shared between the CPU and GPU. Monitor your project\"s memory usage to prevent exceeding the available memory, which can slow down performance.
- Using Eevee and Cycles: Both Eevee and Cycles render engines are optimized for Apple Silicon, but you might find Eevee offers faster real-time rendering for complex scenes, while Cycles provides high-quality, photorealistic results.
- Plug-ins and Add-ons Compatibility: Check the compatibility of any third-party plug-ins or add-ons with the ARM architecture. Developers are rapidly updating their tools, but some may still need to catch up.
By following these tips, you can harness the full power of your Apple Silicon Mac for Blender, ensuring a smooth and efficient 3D modeling, texturing, and rendering experience.

Keyboard Shortcuts and Tips for Mac Users
Maximizing efficiency in Blender on a Mac involves mastering keyboard shortcuts. Here are essential shortcuts and tips specifically for Mac users:
- General Navigation:
- Orbit around scene: Hold down Option and drag with the left mouse button.
- Pan: Hold Shift + Option and drag with the left mouse button.
- Zoom: Scroll with the mouse wheel or Ctrl + Option and drag with the left mouse button.
- Object and Edit Mode Switching: Press Tab to toggle between Object and Edit mode.
- Selection:
- Select object: Right-click or use Cmd + Left-click (depending on your settings).
- Box select: Press B and drag with the left mouse button.
- Editing and Modeling:
- Extrude: E
- Loop cut: Ctrl + R
- Delete: X or Delete
- Rendering: Render image: F12; Render animation: Ctrl + F12
- Saving and Opening Files:
- Save: Cmd + S
- Open: Cmd + O
Tips for Mac Users:
- Customize your shortcuts in Blender\"s Preferences if the default setup doesn\"t suit your workflow.
- Use a three-button mouse or a trackpad with gesture support for easier navigation in Blender\"s 3D viewport.
- Keep an eye on Blender updates for macOS-specific improvements and optimizations.
Mastering these shortcuts will significantly speed up your workflow, making the 3D creation process on your Mac more intuitive and enjoyable.

Common Issues and Solutions for Mac Users
Mac users may encounter specific issues while using Blender. Here are some common problems and their solutions:
- Blender Crashes on Startup:
- Ensure your Mac meets the minimum system requirements for Blender.
- Update to the latest version of Blender and your Mac\"s operating system.
- If the issue persists, try resetting Blender\"s preferences by renaming the Blender Foundation folder in your user library.
- Performance Issues with High-poly Models:
- Switch to Solid or Wireframe view mode when working with complex scenes.
- Adjust the viewport\"s subdivision levels and simplify the scene where possible.
- Issues with Apple Silicon Macs:
- Download the ARM version of Blender for improved compatibility and performance.
- Check for any available updates specifically optimized for Apple Silicon.
- Graphics Driver or Rendering Issues:
- Ensure your graphics drivers are up to date, though macOS typically includes these updates automatically.
- Try changing the rendering engine (Eevee or Cycles) settings or use CPU rendering if GPU issues occur.
- Problems with Add-ons or Plugins:
- Verify that the add-ons are compatible with your version of Blender and macOS.
- Reinstall any add-ons that are causing issues or check for updated versions.
Addressing these common issues can help ensure a smooth and efficient Blender experience on your Mac. Always consider participating in the Blender community forums for help with any specific problems you encounter.

_HOOK_
READ MORE:
Resources for Further Learning
Expanding your Blender skills is a continuous journey. Here are valuable resources for further learning:
- Blender Official Website: The Blender website hosts a wealth of tutorials, a user manual, and a community forum for all levels of expertise.
- Blender Guru: Well-known for the \"Donut\" tutorial, Blender Guru offers comprehensive tutorials for beginners and advanced users alike.
- CG Cookie: This learning platform provides a wide range of Blender tutorials, covering everything from modeling and texturing to animation and game development.
- YouTube: YouTube is a treasure trove of free Blender tutorials. Channels like Darrin Lile and CG Geek offer tutorials on a variety of topics.
- Blender Artists Community: The Blender Artists forum is a great place to seek advice, share your work, and connect with other Blender enthusiasts.
- BlenderNation: Stay updated with the latest Blender news, tutorials, and art showcases.
- Books and E-books: For those who prefer reading, there are numerous books and e-books available that cover Blender in detail, from beginner guides to advanced techniques.
Utilizing these resources can greatly accelerate your learning process and enhance your skills in Blender. Whether you prefer video tutorials, reading material, or interactive community engagement, there\"s something out there for everyone.
Embarking on your Blender journey on Mac opens endless possibilities for creativity and innovation. With these guidelines, you\"re well-equipped to explore, create, and transform your 3D visions into reality. Happy blending!