Topic how to use blender on a mac: Discover the ease of using Blender on your Mac with our comprehensive guide, designed to boost your creativity and streamline your 3D modeling workflow.
Table of Content
- How to use Blender on a Mac?
- Installing Blender on macOS
- Understanding Blender\"s Interface on Mac
- Configuring Blender Preferences for Mac Users
- Using the Trackpad and Gestures with Blender on Mac
- Keyboard Shortcuts Specific to Mac
- YOUTUBE: Blender Tutorial 1 - Movement on a Mac How To
- Managing Files and Projects on macOS
- Optimizing Blender Performance on Mac
- Rendering and Exporting Projects on a Mac
- Troubleshooting Common Issues on Mac
- Resources and Communities for Blender Mac Users
How to use Blender on a Mac?
To use Blender on a Mac, follow these steps:
- Go to the official Blender website.
- Click on the \"Download\" button to start downloading the latest version of Blender for Mac.
- Once the download is complete, locate the downloaded file in your \"Downloads\" folder.
- Double-click the downloaded file to open the installer.
- Follow the on-screen instructions to install Blender on your Mac.
- After the installation is finished, locate the Blender application in your Applications folder and double-click it to launch the software.
- You can now start using Blender on your Mac for various purposes such as 3D modeling, animation, and more.
READ MORE:
Installing Blender on macOS
Getting Blender up and running on your Mac is straightforward. Follow these steps to begin your journey into 3D modeling, animation, and more with Blender.
- Visit the official Blender website at blender.org.
- Navigate to the download section and select the macOS version.
- Click on the download link for the latest version compatible with your Mac. The website automatically suggests the best version for your system.
- Once the download is complete, open the .dmg file to mount the Blender disk image.
- Drag the Blender icon to your Applications folder to install it.
- Open Blender from your Applications folder. If you see a security prompt preventing the app from opening, go to System Preferences > Security & Privacy and allow Blender to run.
- After launching Blender for the first time, you may want to adjust your preferences and input settings, particularly if you\"re using a trackpad or a non-standard mouse setup.
Welcome to Blender on macOS! You\"re now ready to start creating.

Understanding Blender\"s Interface on Mac
Blender\"s interface may seem daunting at first, but with a bit of guidance, you\"ll find it incredibly powerful and user-friendly. Here\"s a breakdown of the key areas to get you started on your Mac.
- 3D Viewport: The heart of Blender, where you\"ll spend most of your time modeling, animating, and viewing your creations.
- Timeline: Located at the bottom, it controls animation playback and keyframe management.
- Properties Panel: On the right side, this panel provides access to object properties, material settings, world settings, and more.
- Outliner: A hierarchical view of all the objects in your scene, located at the top right, making it easy to select and manage objects.
- Tool Shelf and Modes: On the left side of the 3D Viewport, the tool shelf offers various tools for editing your objects, while the mode menu allows you to switch between object mode, edit mode, and other specialized modes.
To customize the interface for your workflow, Blender allows you to resize and rearrange panels, as well as create new ones. You can also save these layouts for future use. Familiarizing yourself with Blender\"s interface on your Mac will greatly enhance your efficiency and enjoyment of the software.
Configuring Blender Preferences for Mac Users
Customizing Blender\"s settings can greatly improve your user experience, especially on a Mac. Here are key preferences to configure:
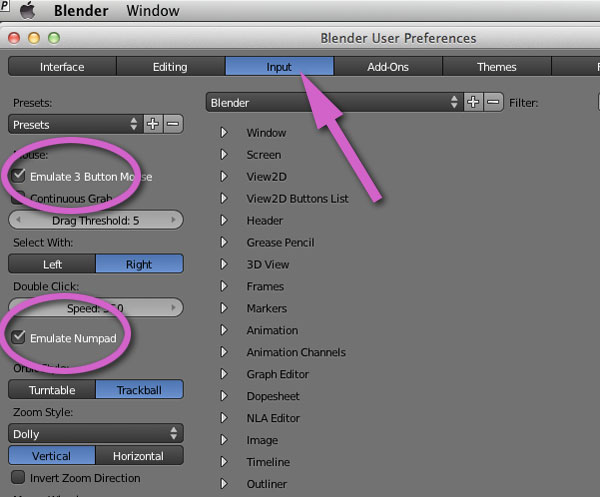
- Interface: Navigate to Edit > Preferences > Interface. Consider enabling \"Emulate Numpad\" if you\"re using a MacBook without a numeric keypad. This allows you to use the number row above the letters as numpad inputs, essential for quick 3D view navigation.
- Input: Under Edit > Preferences > Input, adjust settings for your input devices. For trackpad users, enable \"Emulate 3 Button Mouse\" and \"Natural Trackpad Direction\" to enhance navigation and selection in the 3D viewport.
- Themes: To customize the look of Blender, go to Edit > Preferences > Themes. You can adjust colors of the interface to reduce strain on your eyes during long sessions.
- Add-ons: Blender supports a wide range of add-ons for extended functionality. Access them via Edit > Preferences > Add-ons. Consider exploring add-ons specifically beneficial for Mac users, like those enhancing trackpad functionality.
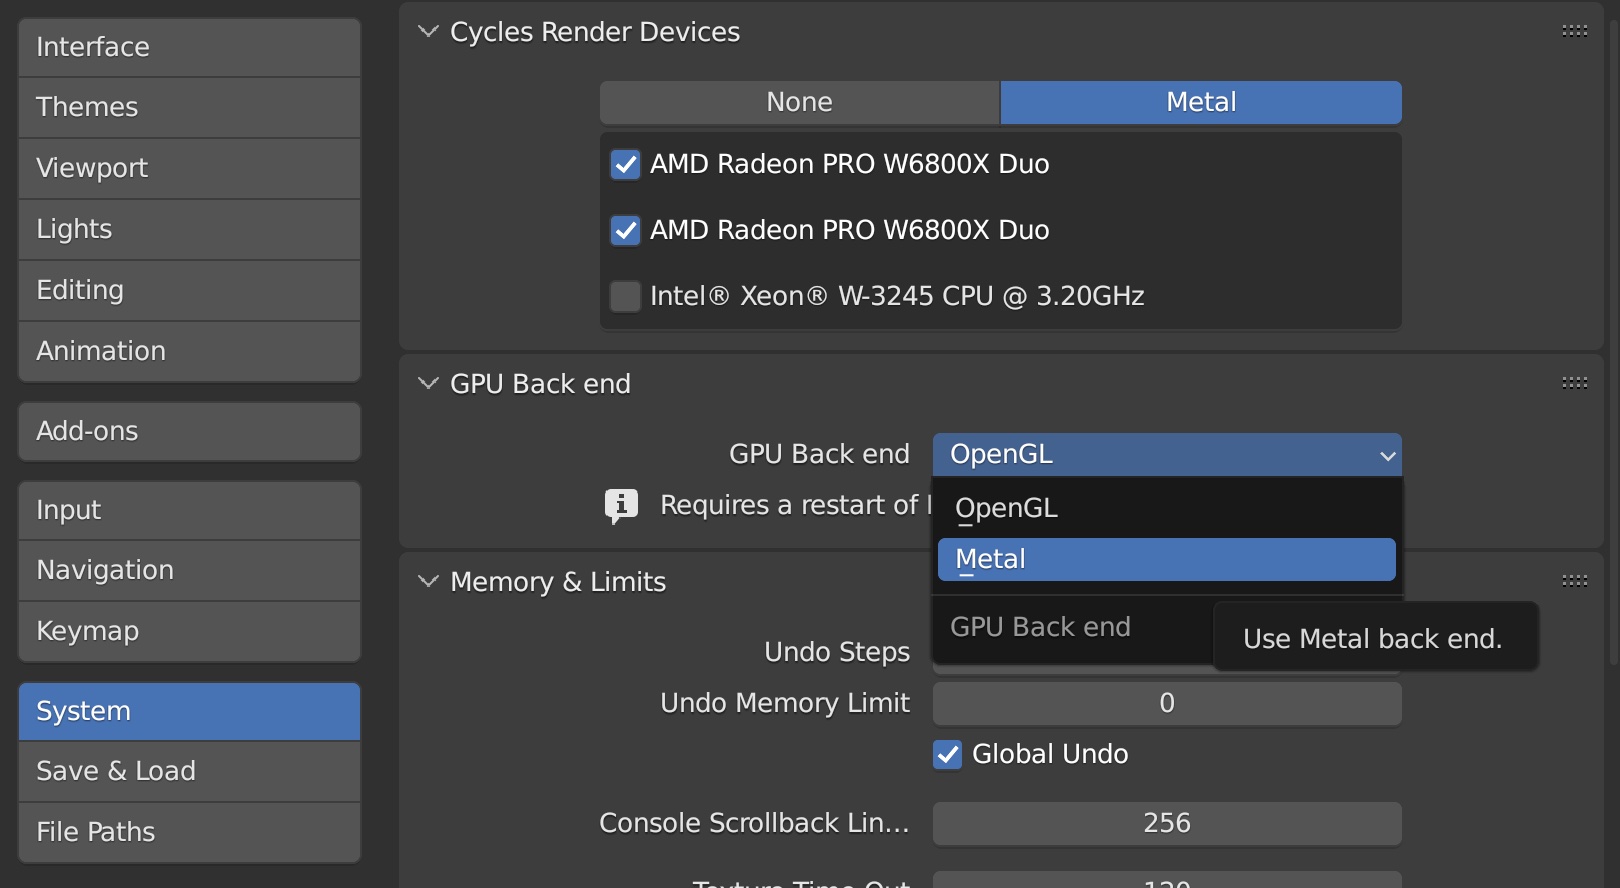
- System: In Edit > Preferences > System, adjust memory and performance settings based on your Mac\"s specifications. Pay attention to the \"Cycles Render Devices\" for optimizing render times using GPU or CPU, depending on your setup.
After configuring these preferences, ensure to save your settings by clicking on the \"Save Preferences\" button at the bottom left of the Preferences window. This makes your adjustments permanent, tailoring Blender more closely to your Mac workflow.

Using the Trackpad and Gestures with Blender on Mac
Maximizing the efficiency of Blender on a Mac involves mastering the trackpad and its gestures. Here\"s how to navigate Blender\"s 3D viewport and tools with ease:
- Rotating the View: Use two fingers on the trackpad and move them in a circular motion to rotate around your scene.
- Panning: To pan the view, hold down the Shift key and then use two fingers to move sideways or up and down.
- Zooming: Pinch with two fingers to zoom in and out of your scene. This gesture is intuitive and mirrors general Mac usage.
- Selecting Objects: Tap with one finger to select objects. If you\"ve enabled \"Emulate 3 Button Mouse\" in Blender\"s preferences, you can also select by holding the Command key and then tapping.
- Emulating Middle Mouse Button: To emulate the middle mouse button, which is often used for orbiting, you can use three fingers to tap or, depending on your settings, hold down the Command key and use two fingers to move the view.
These gestures and trackpad controls can significantly enhance your workflow and make navigating Blender on your Mac more intuitive. Remember, you might need to adjust your system preferences or Blender settings to optimize these controls for your specific workflow.

_HOOK_
Keyboard Shortcuts Specific to Mac
Maximizing productivity in Blender on a Mac involves mastering keyboard shortcuts tailored for macOS. These shortcuts streamline operations, from basic navigation to complex modeling, enhancing your 3D creation process.
General Shortcuts
- Cmd + O: Open File
- Cmd + S: Save File
- Cmd + Z: Undo
- Cmd + Shift + Z: Redo
- Cmd + Q: Quit Blender
- Spacebar: Play/Pause Animation
Viewport Navigation
- Scroll Wheel: Zoom In/Out
- Shift + Middle Mouse: Pan Viewport
- Cmd + F: Search Tools
Object and Edit Mode Shortcuts
- Tab: Toggle between Object and Edit Mode
- A: Select/Deselect All
- G: Grab/Move selected object
- R: Rotate selected object
- S: Scale selected object
Modeling and Animation
- Ctrl + B: Bevel Edges in Edit Mode
- I: Insert Keyframe
- Shift + D: Duplicate Objects/Elements
Advanced Editing
- Cmd + Tab: Switch between Vertex, Edge, and Face select modes
- H: Hide Selected Objects
- Alt + H: Reveal Hidden Objects
These shortcuts are just the beginning. As you become more familiar with Blender on macOS, you\"ll find that using these shortcuts can significantly speed up your workflow, making your 3D modeling, texturing, and animation tasks more efficient.

Blender Tutorial 1 - Movement on a Mac How To
Get ready to become an expert in no time with this amazing tutorial video! Learn all the tips and tricks to master a new skill and watch your progress soar to incredible heights.
How to install Blender on MacOS
Discover the easiest and quickest way to install the latest software or app with this helpful video guide. Say goodbye to frustrating installations and hello to seamless and efficient setup processes.
Managing Files and Projects on macOS
Effectively managing files and projects in Blender on macOS requires a structured approach to organization, version control, and collaboration. By adopting these practices, Blender users can streamline their workflows, ensure data integrity, and facilitate teamwork.
Organizational Strategy
Start by creating a dedicated \"Blender Projects\" folder in your Documents. Each project should have its own folder within this directory, with subfolders for various assets like images, textures, and scripts. This hierarchical structure keeps your workspace tidy and ensures that all related files are easily accessible.
- Use meaningful names for your Blender files and subfolders to simplify locating specific assets or projects.
- Avoid storing files on your desktop or in the Downloads folder to minimize clutter and potential data loss.
- Consider using an inspiration folder to store and organize any materials that spark creativity, revisiting it regularly to stay inspired.
Version Control and Asset Management
Integrating version control systems like Git with Blender projects on macOS offers numerous benefits, including the ability to track changes, revert to previous versions, and collaborate more effectively with others. Platforms such as GitHub, GitLab, and Azure DevOps can be connected to your projects, enabling seamless version control.
- Utilize tools like Anchorpoint for asset management, which supports file locking to avoid conflicts and facilitates easy sharing and collaboration on projects.
- Anchorpoint also offers features for building shot lists, asset databases, and tasks that directly link with your files and folders, streamlining the workflow.
Custom Builds and Project Tools
For teams working on complex projects, it might be beneficial to use custom builds of Blender or specific add-ons tailored to the project\"s needs. Project Tools scripts can help synchronize Blender versions and shared add-ons across all users contributing to the project, ensuring consistency.
- Create shortcuts for Blender on macOS to quickly access the version or build required for your project, whether through the Dock, Terminal, or Finder.
- Update your Blender setup within the project as needed to ensure all team members are using the most up-to-date version.
By adopting a disciplined approach to file management, leveraging version control, and utilizing project tools, Blender users on macOS can significantly enhance their productivity and collaboration capabilities.
Optimizing Blender Performance on Mac
Optimizing Blender\"s performance on a Mac involves several strategies to ensure smooth and efficient operation, especially for complex 3D projects. Follow these steps to maximize your Blender experience on macOS:
- Update Blender and macOS: Always use the latest version of Blender and ensure your macOS is up to date to benefit from the latest performance enhancements and bug fixes.
- Configure Blender\"s Preferences: In Blender\"s preferences, adjust settings for memory, interface, and system to optimize performance. For example, increasing the memory cache limit in the System settings can improve playback speed in the Video Sequence Editor.
- Utilize Metal GPU Rendering: For Macs with Apple Silicon or supported GPUs, enable Metal GPU rendering in the system settings to significantly reduce render times and improve overall performance.
- Manage Scene Complexity: Use layers and collections to manage and hide objects not currently being worked on. Simplify scenes by reducing polygon counts and using modifiers efficiently.
- Optimize Render Settings: Adjust render settings for efficiency. Lowering resolution, reducing samples, and using denoising can speed up render times without greatly impacting quality for drafts or previews.
- Close Background Applications: Ensure no unnecessary applications are running in the background that could consume valuable system resources.
- Upgrade Hardware: If possible, consider upgrading your Mac\"s RAM or moving to a model with a more powerful GPU for better performance in demanding tasks.
- Use External Drives for Projects: Running projects from an external SSD can improve performance by reducing the load on your Mac\"s primary drive.
- Network Rendering: For larger projects, consider using network rendering options to distribute render tasks across multiple computers.
By following these tips, you can significantly improve Blender\"s performance on your Mac, leading to a more efficient and enjoyable 3D modeling, animating, and rendering experience.

Rendering and Exporting Projects on a Mac
Rendering and exporting projects in Blender on a Mac involves several steps to ensure the final output meets your quality requirements and is compatible with your intended use or distribution platform. Follow these guidelines to efficiently render and export your Blender projects on macOS:
- Choose the Right Render Engine: Blender offers different render engines, such as Eevee for fast, real-time rendering and Cycles for more photorealistic results. Select the one that best suits your project\"s needs.
- Configure Render Settings: Access the Render Properties panel to adjust settings such as resolution, frame rate, and sampling. For animations, specify the start and end frames under the Dimensions section.
- Optimize Lighting and Materials: Ensure your materials and lighting setups are optimized for the selected render engine to achieve the best balance between render quality and speed.
- Use Render Layers and Passes: For complex scenes, consider using render layers and passes to have more control in post-processing. This allows for selective editing and compositing of different elements of your scene.
- Preview Renders: Use the Rendered viewport shading mode or render a small section of your scene to preview the final look before committing to a full render. This can save time by identifying any issues early on.
- Render the Project: Once satisfied with the setup, click the Render button for a single image or Render Animation for sequences. Ensure your Mac is plugged in and consider closing other applications to allocate maximum resources to Blender.
- Exporting Your Project:
- To export still images, use the Image Editor window, and select Image > Save As.
- For animations, Blender automatically exports to the directory specified in the Output Properties panel. Supported formats include MPEG, AVI, and QuickTime.
- Post-Processing: Use Blender\"s Compositor for post-processing or export your renders for external editing. This can include color correction, adding effects, or compositing different render passes.
- File Management: Organize your exported files by naming them appropriately and storing them in designated folders for easy access and archiving.
By following these steps, you can render and export high-quality projects from Blender on your Mac, ready for presentation, sharing, or further processing.
Troubleshooting Common Issues on Mac
Using Blender on a Mac can sometimes present challenges unique to this operating system. If you encounter problems, here are some common issues and solutions to help you resolve them and get back to creating:
- Blender Crashes on Startup:
- Ensure your macOS is up to date and meets Blender\"s minimum system requirements.
- Reset Blender\"s preferences by renaming or removing the configuration folder, which can be found in Users/[YourUsername]/Library/Application Support/Blender/.
- Graphics Issues or Poor Performance:
- Update your graphics drivers or switch between supported graphics processing units (GPUs) in Blender\"s system preferences.
- For Macs with integrated and discrete GPUs, ensure Blender is using the more powerful discrete GPU.
- Unresponsive Trackpad Gestures:
- Go to Blender\"s preferences and adjust the input settings to better match macOS trackpad sensitivities and gestures.
- Consider using a mouse or tablet for more precise control in detailed work.
- Issues with File Paths or External Drives:
- Ensure Blender has the necessary permissions to access external drives or folders by checking the Security & Privacy settings in macOS.
- Use absolute file paths when working with projects stored on external drives.
- Problems with Add-ons or Custom Scripts:
- Verify that the add-ons or scripts are compatible with your version of Blender and macOS.
- Try reinstalling the add-on or script, ensuring it\"s placed in the correct directory.
- Render Failures or Errors:
- Check the console window for specific error messages that can guide troubleshooting.
- Adjust render settings, such as reducing resolution or sample rate, to see if the issue persists at lower settings.
If issues continue despite these troubleshooting steps, consider seeking help from the Blender community forums or the Blender Stack Exchange, where experienced users can offer more specific advice.

_HOOK_
READ MORE:
Resources and Communities for Blender Mac Users
Finding the right resources and communities can significantly enhance your Blender experience on a Mac. Whether you\"re a beginner seeking tutorials or an experienced user looking for advanced tips, there\"s a wealth of information available:
- Blender Artists Forum: A vibrant community where Blender users, including many Mac users, share their work, ask questions, and offer advice on a wide range of topics.
- Blender Stack Exchange: A question-and-answer site for people who use Blender to create 3D graphics, animations, or games. It\"s a great place to find solutions to technical issues or to ask for help with specific Blender functions.
- Blender Network: Connect with professional Blender artists and trainers. This platform is ideal for finding mentors, collaborators, or even job opportunities related to Blender.
- Official Blender Tutorials: The Blender Foundation offers a series of official tutorials suitable for all levels, from beginners to advanced users. These tutorials cover everything from basic navigation to complex modeling and animation techniques.
- YouTube and Vimeo: There are countless video tutorials available for free, covering every aspect of Blender. Channels like Blender Guru, CG Cookie, and Darrin Lile offer tutorials that are often geared towards users of all platforms, including macOS.
- Online Courses and Workshops: Websites like Udemy, Coursera, and Skillshare offer structured courses that can take you from a novice to an expert. Look for courses that focus on using Blender on a Mac to ensure compatibility with your system.
- Local Meetups and User Groups: Search for local Blender meetups or user groups in your area. These gatherings are a great way to meet fellow Blender enthusiasts, exchange knowledge, and collaborate on projects.
- Books and eBooks: There are many comprehensive guides and reference books available for Blender. While not all are specifically for Mac users, the software\"s cross-platform nature means most of the information is applicable.
By engaging with these resources and communities, you can learn new skills, get inspired, and connect with others who share your passion for Blender on Mac.
Unlock the full potential of Blender on your Mac with our comprehensive guide, designed to help you navigate through installation, optimization, and creativity. Join the vibrant community of Blender Mac users and bring your 3D projects to life.