Topic how to make blender game: Dive into the exciting world of game development with Blender, where we simplify the process of making your own Blender game, empowering creativity and innovation in every step.
Table of Content
- How to make a game in Blender?
- Understanding Blender and UPBGE
- Setting Up Your Blender Environment for Game Development
- Creating Your First Game Model in Blender
- Texturing and Rigging Your Game Characters
- Implementing Logic Bricks for Game Mechanics
- Using Python Scripting for Advanced Game Logic
- YOUTUBE: How to Make Game Models for Beginners: Start to Finish (Blender)
- Designing Levels and Environments
- Adding Sound and Music to Your Game
- Optimizing Your Game for Performance
- Publishing and Sharing Your Blender Game
How to make a game in Blender?
Creating a game in Blender involves several steps. Here is a step-by-step guide to help you get started:
- Download and install Blender: Visit the official Blender website (https://www.blender.org) and download the latest version of Blender suitable for your operating system. Install it on your computer.
- Learn the basics of Blender: Familiarize yourself with Blender\'s interface and controls. There are various tutorials and resources available online, including video tutorials on YouTube, that can help you get started.
- Model your game assets: Design and create 3D models, characters, environments, and other elements for your game using Blender\'s modeling tools. You can also import pre-made models if needed.
- Create animations: Use Blender\'s animation tools to animate your game characters and objects. This includes defining movements, actions, and reactions for your game elements.
- Add textures and materials: Apply textures and materials to your models to enhance their appearance. Blender provides powerful tools for creating realistic materials and applying textures.
- Set up the game logic: Blender has a built-in game engine called the Blender Game Engine (BGE) for creating interactive games. Set up the game logic using nodes, scripting (Python), or a combination of both to define the behavior and interaction of your game elements.
- Test and debug: Test your game within the Blender Game Engine to identify and fix any issues or bugs. This will help ensure that your game functions correctly before exporting.
- Export your game: Once you are satisfied with your game, you can export it from Blender into a playable format. The available export options may vary depending on the Blender version you are using. Common formats include standalone executables or game files compatible with game engines like Unity or Unreal Engine.
- Share and distribute: Share your game with others by hosting it on a website, uploading it to game distribution platforms, or packaging it into an installer. Promote your game through social media and other channels to reach a wider audience.
Note that the Blender Game Engine has limited development and support, as mentioned in the search results. If you require advanced game development features, you may consider using alternative game engines like Unity or Unreal Engine in combination with Blender for asset creation.
Remember to explore further resources, tutorials, and forums specific to game development in Blender to refine your skills and expand your knowledge.
READ MORE:
Understanding Blender and UPBGE
Blender is a comprehensive, free, and open-source 3D creation suite that supports the entire 3D pipeline, including modeling, rigging, animation, simulation, rendering, compositing, and motion tracking. It\"s ideal for individuals and small teams who wish to create 3D models, animations, and games. UPBGE, an acronym for the Upgraded Blender Game Engine, is a fork of the original Blender Game Engine. It integrates deeply with Blender, providing a unified workflow for game development. This means you can design, develop, and test your game entirely within Blender\"s ecosystem.
- Introduction to Blender\"s Interface and Key Features
- Overview of UPBGE and its integration with Blender
- Advantages of using Blender and UPBGE for game development
Utilizing Blender and UPBGE allows developers to streamline their workflow, from initial modeling to final game deployment, without the need for external software. This integrated approach not only simplifies the development process but also offers a robust set of tools for creating detailed and interactive 3D games.

Setting Up Your Blender Environment for Game Development
Setting up your Blender environment is the first step towards creating your own games. This process involves configuring Blender with the necessary tools and add-ons for game development, particularly focusing on UPBGE (Upgraded Blender Game Engine), which enhances Blender\"s capabilities for creating interactive 3D games.
- Download and Install Blender: Ensure you have the latest version of Blender installed from the official Blender website to access the most recent features and improvements.
- Install UPBGE: Download and install UPBGE from its official website. This step is crucial as UPBGE extends Blender\"s game development capabilities significantly.
- Configure Blender Preferences: Go to Blender\"s preferences and customize your settings for game development, including input, add-ons, and system settings to optimize performance.
- Explore Blender\"s Interface: Familiarize yourself with Blender\"s interface, focusing on the layout, shortcuts, and the 3D viewport which is essential for game development.
- Set Up a Project Folder: Organize your work by setting up a project folder. This helps in managing your assets, scripts, and files effectively.
By following these steps, you\"ll have a robust foundation to start developing your game in Blender, with all necessary tools at your disposal for modeling, texturing, animation, and game logic.
Creating Your First Game Model in Blender
Creating your first game model in Blender is an exciting step towards bringing your game ideas to life. This process involves several key steps, from conceptualizing your model to adding the final touches that make it ready for game implementation.
- Concept and Design: Start with a clear concept of what you want to create. Sketching your idea on paper or a digital medium can help solidify your vision before moving into 3D modeling.
- Basic Modeling: Open Blender and start with basic shapes to block out your model\"s form. Use Blender\"s modeling tools to refine these shapes into the basic silhouette of your game model.
- Detailing: Once the basic form is established, add details to your model. This can include sculpting finer features, adding textures, and creating materials that give your model a unique look.
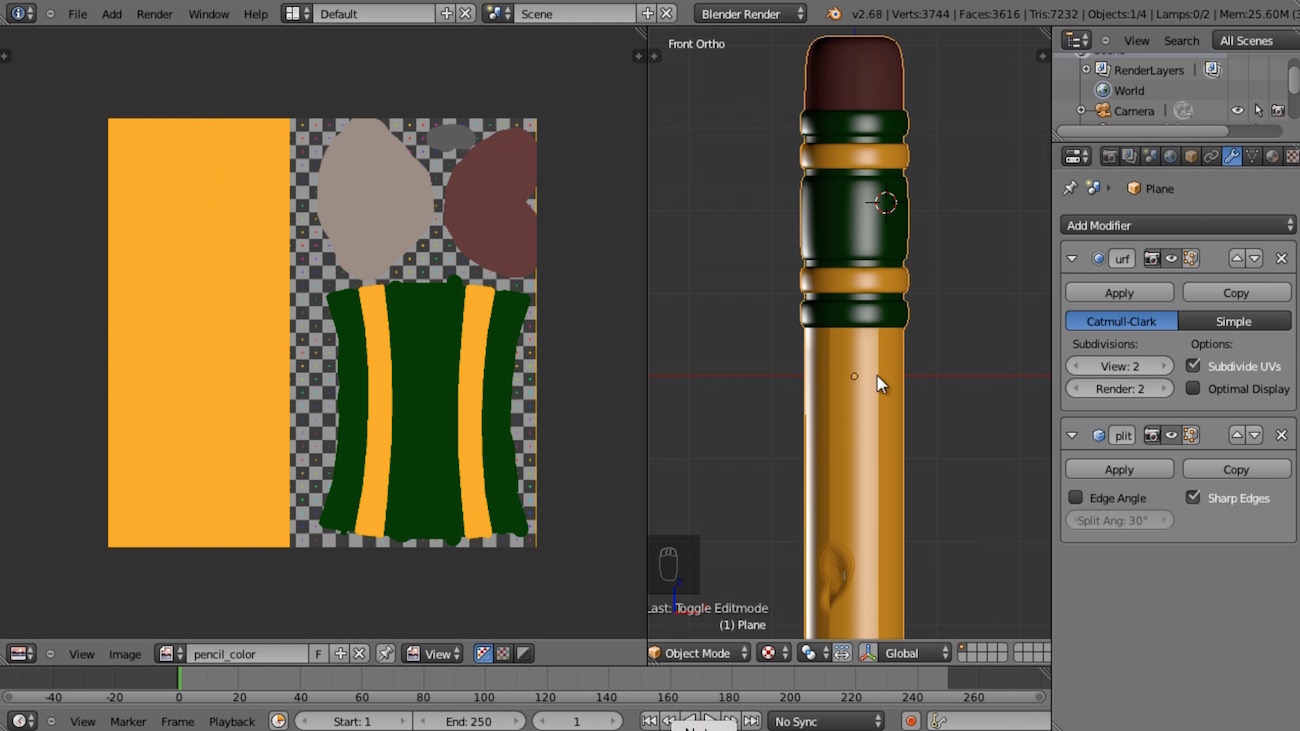
- UV Unwrapping: Prepare your model for texturing by unwrapping it. This process involves projecting your 3D model onto a 2D plane to apply textures accurately.
- Texturing: Apply textures to your model to give it color, depth, and realism. You can create textures within Blender or import them from external sources.
- Rigging: If your model requires movement, you\"ll need to rig it. Rigging involves creating a skeleton that can be animated to make your model move.
- Animation: Animate your model if necessary. Use Blender\"s animation tools to create movements, actions, or expressions that bring your model to life within the game environment.
- Exporting: Once your model is complete, export it in a format compatible with your game engine. Ensure all textures and animations are correctly bundled with your model.
Following these steps, you\"ll have a game-ready model created in Blender. Each step is crucial for ensuring that your model looks and performs as intended in your game. Happy modeling!

Texturing and Rigging Your Game Characters
Texturing and rigging are crucial steps in bringing your Blender game characters to life. Texturing adds color, detail, and realism to your models, while rigging sets them up for animation. Here’s how to texture and rig your game characters in Blender.
- Preparing Your Model: Before texturing and rigging, ensure your character model is complete. This includes finalizing the shape and details of your model.
- UV Unwrapping: Start by unwrapping your model. UV unwrapping is the process of projecting a 3D model onto a 2D plane to apply textures. In Blender, use the UV editing layout to unwrap your model efficiently.
- Texturing: With your model unwrapped, apply textures to your character. You can use Blender’s painting tools to create textures directly onto your model or import external textures. Consider using shaders to add effects like metallicity or transparency.
- Rigging: Rigging is the process of adding bones to your character for animation. In Blender, use the armature system to create a skeleton. Place bones at all major joints and parent your model’s mesh to the armature.
- Weight Painting: After rigging, use weight painting to define how different parts of your model are influenced by the movements of specific bones. This step is crucial for realistic animations.
- Animating: With your character rigged and textured, you’re now ready to animate. Use Blender’s animation tools to create movements, expressions, and actions for your character.
Following these steps will ensure your game characters are visually appealing and ready for animation, making your Blender game more engaging and dynamic.
_HOOK_
Implementing Logic Bricks for Game Mechanics
Logic Bricks in Blender, particularly when using UPBGE, offer a visually intuitive way to create game mechanics without deep coding knowledge. They are essential for defining the behavior of objects in your game, from player movements to environmental interactions. Here\"s how to implement them:
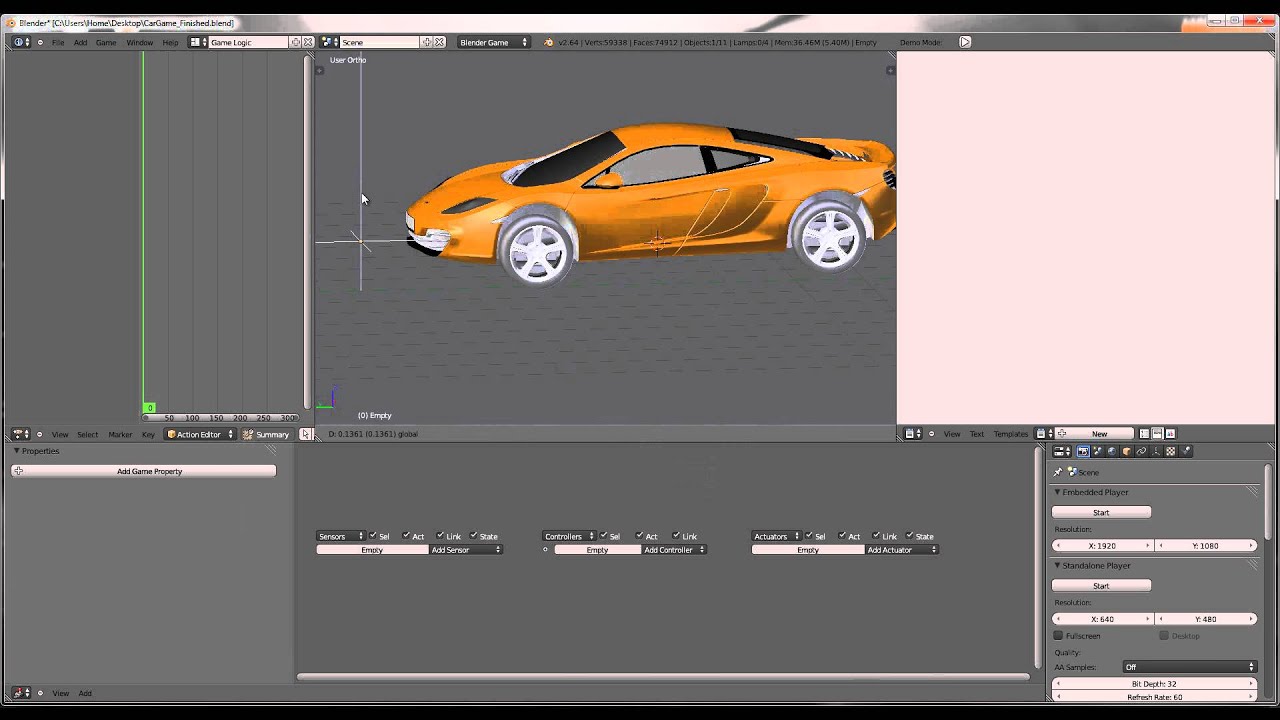
- Accessing the Logic Editor: Switch to the Logic Editor layout in Blender to start working with Logic Bricks.
- Understanding Logic Bricks: Logic Bricks are divided into Sensors, Controllers, and Actuators. Sensors detect events, Controllers make decisions, and Actuators execute actions based on those decisions.
- Creating a Simple Mechanic: Begin by adding a Sensor (e.g., Keyboard sensor for input). Connect this to a Controller, and then to an Actuator (e.g., Motion actuator for movement).
- Configuring Bricks: Configure each Logic Brick according to your game\"s needs. For example, set the Keyboard sensor to detect a specific key press and the Motion actuator to apply movement in a direction.
- Testing Your Setup: Test the logic setup by playing the game in Blender\"s embedded player. Adjust the logic bricks as necessary to refine gameplay.
By iteratively creating and testing logic bricks setups, you can develop complex game mechanics tailored to your game\"s requirements. This hands-on approach facilitates rapid prototyping and experimentation, making it a powerful tool for game developers of all skill levels.
Using Python Scripting for Advanced Game Logic
Python scripting in Blender opens up a world of possibilities for game developers, allowing for more complex and interactive game mechanics beyond what\"s achievable with logic bricks alone. This section will guide you through the basics of using Python in your Blender game projects, including setting up scripts, accessing game objects, and creating interactive gameplay elements.
Getting Started with Python in Blender
- Understanding the Blender Python API: Familiarize yourself with the Blender Python API documentation to understand how to interact with Blender and UPBGE (Unified Blender Game Engine) through Python.
- Setting Up the Scripting Environment: Open the scripting layout in Blender to access the text editor, where you can write and run your Python scripts.
- Creating Your First Script: Start by writing a simple script, such as one that moves an object in your game. Use the text editor to create a new Python file and write your code.
Accessing and Manipulating Game Objects
To modify game objects using Python, you\"ll need to understand how to access them and apply transformations or actions.
- Use the bpy module for general Blender operations and the bge.logic module for game-specific functionality.
- Access objects in the game scene using bge.logic.getCurrentScene().objects to get a list of all objects.
- Manipulate objects by changing their properties, such as location, rotation, and scale, or by applying forces and torques for physics-based movement.
Creating Interactive Gameplay Elements
Python scripting allows you to create complex game logic, such as inventory systems, character movement, AI behavior, and more.
- Event Handling: Detect player inputs or other game events and trigger actions in response. Use event listeners or check the state of input devices in your game loop.
- Dynamic Object Interaction: Script interactions between game objects, such as collision detection and response, picking up items, or triggering traps and puzzles.
- Game State Management: Use Python to track and manage the state of your game, including player progress, score, health, and inventory items.
Optimizing Your Scripts for Performance
Ensure your game runs smoothly by writing efficient Python code and optimizing script execution.
- Avoid using heavy operations in frequently called functions, such as the game loop.
- Use logic bricks where possible for simple tasks to reduce the processing load of Python scripts.
- Profile your scripts to identify bottlenecks and optimize code execution.
Debugging and Testing Your Scripts
Debugging is an essential part of game development. Use Blender\"s console window and print statements to debug your Python scripts, and test your game thoroughly to ensure all scripts work as intended.
Advanced Scripting Techniques
As you become more comfortable with Python in Blender, explore advanced scripting techniques to enhance your game:
- Integrate external Python libraries for additional functionality, such as advanced math operations or network features for multiplayer games.
- Create custom UI elements within the game using Blender\"s drawing functions.
- Utilize shaders and GPU programming for stunning visual effects.
Python scripting in Blender is a powerful tool for game developers, enabling the creation of unique and complex game mechanics. With practice and exploration, you can leverage Python to bring your game ideas to life in ways that were previously unimaginable.

How to Make Game Models for Beginners: Start to Finish (Blender)
Learn the art of Blender game modeling and unlock your creative potential! Dive into this captivating video tutorial that will guide you step-by-step in creating stunning game models that will impress both friends and industry professionals alike. Watch now and level up your game design skills!
How to Play Your Own Games in Blender
Get ready for hours of adrenaline-pumping fun with Blender game playing! Embark on an immersive gaming experience like no other as you join the world of Blender gaming. From action-packed adventures to mind-bending puzzles, this video showcases the best of what Blender games have to offer. Don\'t miss out on this thrilling video, hit play now!
Designing Levels and Environments
Creating engaging levels and environments is crucial for the success of any game. This section will guide you through the process of designing captivating and immersive game worlds using Blender. From conceptualization to the final touches, each step is important to bring your game to life.
Conceptualizing Your Game Environment
- Define the Theme and Setting: Start by deciding the overall theme and setting of your game. Whether it\"s a futuristic city, a mystical forest, or a post-apocalyptic wasteland, the setting will guide your design choices.
- Sketch Your Ideas: Create rough sketches of your levels and environments. This helps visualize the space and identify key elements like paths, obstacles, and landmarks.
- Plan Gameplay Elements: Consider how the design of the environment affects gameplay. Plan for elements like puzzles, enemy encounters, and exploration areas.
Building the Foundation
With a clear concept in place, start building the basic structure of your game environment in Blender.
- Use Blender\"s modeling tools to create the terrain, buildings, and other large structures. Pay attention to scale and proportions to ensure a realistic or consistent game world.
- Design pathways and zones with gameplay in mind, allowing for exploration, combat, or other interactions.
Adding Details and Textures
Details and textures bring your game environments to life, making them feel rich and immersive.
- Apply textures to surfaces to add realism or style, depending on your game\"s aesthetic. Blender offers a variety of texturing tools, including UV mapping for detailed texture placement.
- Add smaller objects and details, such as furniture, vegetation, and environmental props, to enhance the scene\"s depth and interest.
Lighting and Atmosphere
Effective lighting and atmospheric effects can dramatically impact the mood and feel of your game environments.
- Use Blender\"s lighting tools to create dynamic lighting setups that support the game\"s theme and time of day.
- Experiment with fog, particle effects, and color grading to add atmosphere and depth to the environment.
Optimization for Game Performance
Ensure that your game runs smoothly by optimizing the level and environment designs.
- Optimize models by reducing polygon counts where possible without significantly impacting visual quality.
- Use level of detail (LOD) techniques to manage the complexity of objects based on their distance from the camera.
- Organize your scene efficiently, grouping objects and using layers to manage visibility and rendering load.
Playtesting and Iteration
Playtesting is essential to understand how players interact with your environment and to identify any issues.
- Gather feedback on the design, flow, and feel of your levels.
- Make adjustments based on playtesting feedback, improving gameplay flow, visual appeal, or performance as needed.
Designing levels and environments in Blender is a creative and iterative process. By focusing on the theme, details, and player experience, you can create engaging game worlds that captivate and delight players.

Adding Sound and Music to Your Game
Sound and music are essential elements that can significantly enhance the gaming experience, adding depth, emotion, and immersion. This section will guide you through the process of integrating sound effects and music into your Blender game projects, ensuring your game not only looks good but also sounds great.
Understanding Sound in Games
Before adding audio to your game, it\"s important to understand the different types of sound used in games and how they contribute to the overall experience.
- Sound Effects (SFX): These are the sounds that game objects make, such as footsteps, weapon sounds, and environmental noises. They help make the game world more realistic and responsive.
- Music: Background music sets the mood and atmosphere of the game, enhancing the emotional and thematic elements.
- Dialogue and Voiceovers: These add depth to the story and characters, providing context and personality.
Adding Sound Effects
- Prepare Your Sound Files: Gather or create sound effect files in a format compatible with Blender, such as WAV or MP3.
- Importing Sounds into Blender: Use the sound actuator in Blender’s logic editor to add sound files to your game. You can assign different sounds to different actions or events.
- Configuring Sound Settings: Adjust the volume, pitch, and loop settings for each sound effect to fit the action it represents. You can also use 3D sound settings to make the audio appear to come from specific locations in the game world.
Integrating Music
- Selecting Appropriate Music: Choose music that matches the mood and theme of your game’s various levels and scenes.
- Looping Background Music: For continuous playback, ensure your background music is looped seamlessly. This keeps the immersion uninterrupted during gameplay.
- Dynamic Music: Consider using dynamic music that changes based on gameplay events or player actions for a more interactive audio experience.
Optimizing Audio for Performance
Audio can impact game performance, so it\"s important to optimize sound files.
- Compress audio files to reduce their size without significantly compromising quality.
- Use audio streaming for longer tracks to lower memory usage.
- Limit the number of simultaneous sound effects to prevent audio clipping and performance issues.
Testing and Adjusting Audio Levels
Properly balancing audio levels is crucial for a good player experience.
- Conduct playtests to get feedback on the audio. Ensure that sound effects, music, and dialogue are clearly audible and well-balanced.
- Adjust the volume levels as needed to make sure no sound overpowers the others, maintaining a cohesive audio landscape.
By thoughtfully adding and adjusting sound and music, you can greatly enhance the atmosphere, immersion, and emotional impact of your Blender game. Remember to consider the technical aspects of audio integration to ensure your game runs smoothly across all platforms.
Optimizing Your Game for Performance
Optimizing your game is crucial for ensuring that it runs smoothly on a variety of hardware, providing a seamless experience for all players. This section outlines strategies for enhancing the performance of your Blender game, covering everything from asset optimization to efficient scripting.
Asset Optimization
- Reduce Polygon Counts: Use as few polygons as possible for models while still achieving the desired visual quality. Consider using modifiers like Decimate in Blender to simplify models without significantly impacting appearance.
- Optimize Textures: Lower the resolution of textures where high detail is unnecessary, and use compressed texture formats to reduce file sizes. Also, try to reuse textures to save memory.
- Combine Meshes: Where possible, combine static objects into a single mesh to reduce the number of draw calls, which can significantly improve rendering performance.
Level of Detail (LOD) Systems
Implementing LOD systems can greatly enhance performance by adjusting the detail of objects based on their distance from the camera.
- Create multiple versions of a model with varying levels of detail, and switch between them dynamically as the object moves closer to or further from the camera.
- Blender’s LOD system allows for easy setup and management of different LOD levels for game assets.
Efficient Lighting and Shadows
Lighting and shadows can be particularly demanding on performance. Optimize them without compromising too much on visual quality.
- Use baked lighting and shadows for static objects to save on real-time processing power.
- Limit the use of real-time shadows and spotlights, opting for simpler shadow techniques or fewer light sources in performance-critical areas.
Script and Logic Optimization
Scripts and game logic can also impact performance, especially if not well optimized.
- Avoid using complex calculations in frequently called functions, such as the game\"s update loop.
- Use profiling tools to identify bottlenecks in your scripts and optimize them for efficiency.
- Consider the use of multithreading for intensive tasks, if supported, to improve performance.
Optimizing Game Physics
Physics calculations are another common source of performance issues.
- Adjust the physics settings in Blender to balance accuracy and performance. This may include reducing the physics simulation rate or simplifying collision meshes.
- Use simple collision shapes (like boxes or spheres) for objects that don\"t require complex interactions.
Testing and Profiling
Regular testing and profiling are key to identifying performance issues early on.
- Use Blender’s built-in profiling tools to monitor game performance and identify areas that need optimization.
- Test your game on various hardware configurations to ensure it performs well across a wide range of systems.
By carefully considering each aspect of your game\"s design and implementation, and applying these optimization strategies, you can significantly improve the performance and accessibility of your Blender game. Remember, optimization is an ongoing process that should continue throughout the development cycle.

_HOOK_
READ MORE:
Publishing and Sharing Your Blender Game
Once you\"ve completed the development of your Blender game, it\"s time to share your creation with the world. Publishing and distributing your game can seem daunting, but by following a structured approach, you can efficiently reach your audience. This section provides a step-by-step guide to publishing and sharing your Blender game.
Preparing Your Game for Release
- Final Testing: Conduct thorough testing of your game to ensure there are no bugs or performance issues. Consider beta testing with a small group of users to gather feedback and make necessary adjustments.
- Optimize Assets: Ensure all game assets are fully optimized for the best performance across all target platforms.
- Create Marketing Materials: Prepare promotional materials such as screenshots, trailers, and a compelling game description to attract potential players.
Choosing the Right Platforms for Distribution
Decide where you want to publish your game. Popular options include:
- Game Distribution Platforms: Platforms like Steam, itch.io, and Game Jolt are popular among indie developers for their large audiences and ease of use.
- Mobile App Stores: If your game is designed for mobile, consider publishing it on the Google Play Store or Apple App Store.
- Your Own Website: Hosting your game on your own website gives you full control over distribution and monetization.
Understanding Distribution Requirements and Fees
Each platform has its own set of requirements and fees for publishing games:
- Research the submission guidelines, fee structures, and any required approvals or ratings for your chosen platforms.
- Prepare any necessary documentation and digital assets that must accompany your submission.
Implementing Monetization Strategies
If you plan to monetize your game, consider the following options:
- Direct Sales: Charge a one-time purchase price for your game.
- In-Game Purchases: Offer digital items or benefits for purchase within the game.
- Advertisements: Include ads in your game as a form of revenue.
Launching and Promoting Your Game
- Choose a Launch Date: Select a launch date and build anticipation by sharing teasers and updates with your audience.
- Promote on Social Media: Use social media platforms to spread the word about your game. Engaging with gaming communities can also drive interest.
- Seek Reviews: Contact game reviewers and influencers to get your game reviewed, which can significantly boost visibility.
Gathering Feedback and Providing Support
After your game is released, it\"s important to stay engaged with your community:
- Monitor feedback from players to identify any issues or areas for improvement.
- Provide regular updates and patches to fix bugs and add new content, keeping your game fresh and engaging.
Publishing and sharing your Blender game is the culmination of your hard work and creativity. By carefully planning your release strategy and engaging with your audience, you can maximize your game\"s reach and impact.
Embark on the thrilling journey of game creation with Blender and UPBGE! From modeling to publishing, our comprehensive guide ensures you have all the tools to bring your unique game ideas to life. Start crafting your gaming masterpiece today!