Topic how to model a character in blender: Discover the art of 3D character modeling in Blender with this comprehensive guide, designed to take you from beginner to expert by mastering the essential techniques and workflows for creating dynamic and engaging characters.
Table of Content
- How to model a character in Blender?
- Setting Up Reference Images
- Creating the Low Poly Base
- UV Mapping and Texturing
- Rigging and Weight Painting
- Animation and Posing
- Advanced Techniques
- Resources
- Creating the Low Poly Base
- UV Mapping and Texturing
- Rigging and Weight Painting
- Animation and Posing
- YOUTUBE: How to Make a Character in Blender - My Full Process in 10 Minutes
- Advanced Techniques
- Resources
- UV Mapping and Texturing
- Rigging and Weight Painting
- Animation and Posing
- Advanced Techniques
- Resources
- Rigging and Weight Painting
- Animation and Posing
- Advanced Techniques
- Resources
- Animation and Posing
- Advanced Techniques
- Resources
- Advanced Techniques
- Resources
- Resources
- Introduction to Character Modeling in Blender
- Setting Up Your Blender Workspace for Character Modeling
- Importing and Setting Up Reference Images
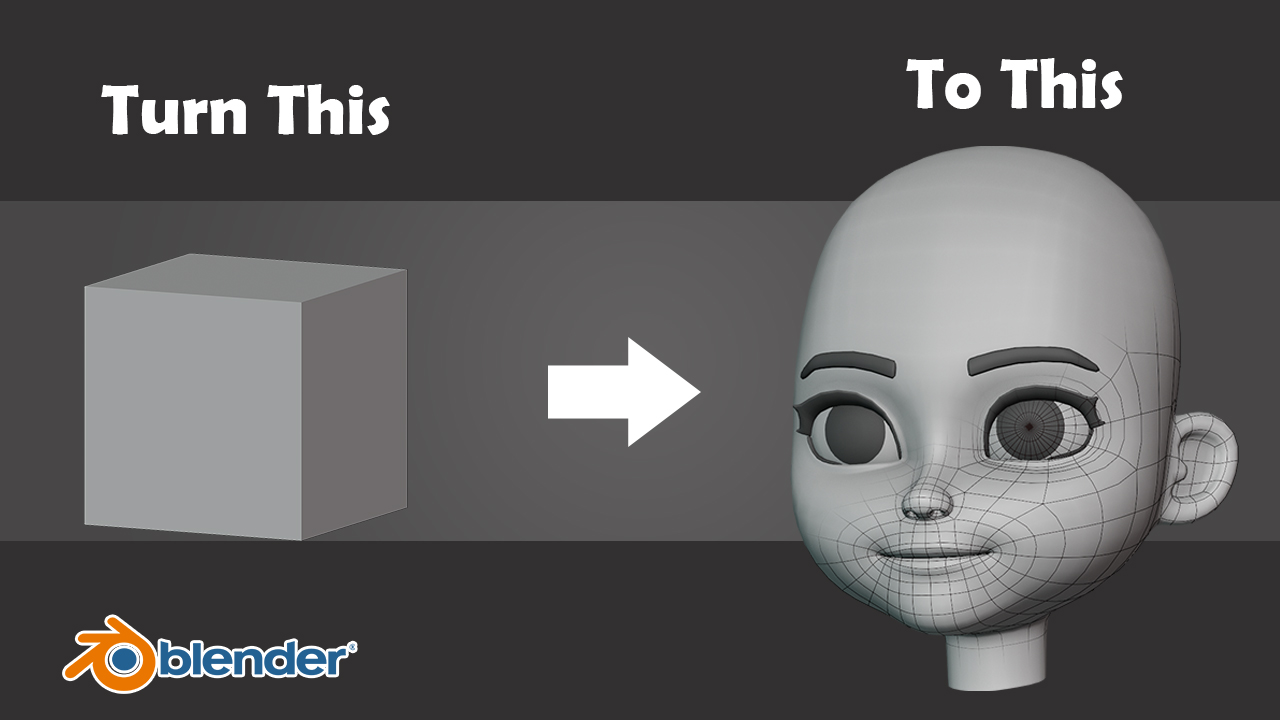
- Starting with a Basic Shape or Sculpting
- Creating a Low Poly Base Model
- Techniques for Effective Topology
- Detailing Your Character: Sculpting Techniques
- UV Mapping and Texturing for Realism
- Rigging Your Character for Animation
- Weight Painting for Natural Movements
- Animating Your Character: Basics to Advanced Techniques
- Exporting Your Model for Games or Animation
- Resources and Further Learning
How to model a character in Blender?
To model a character in Blender, follow these step-by-step instructions:
- Gather references: Begin by collecting reference images or sketches of the character you want to model. These references will help guide you in creating an accurate representation.
- Open Blender: Launch the Blender software on your computer. If you don\'t have it installed, download and install it from the official website.
- Create a new project: In Blender, start a new project by selecting \"File\" from the top menu and then choosing \"New\" or pressing Ctrl+N.
- Switch to Object Mode: In the bottom-left corner of the screen, change the current mode to \"Object Mode\" if it is not already selected. This mode allows you to create and manipulate objects.
- Add a mesh: Click on the \"Add\" menu or press Shift+A to add a new object to the scene. Choose \"Mesh\" and then select a basic shape like a cube, sphere, or cylinder to serve as the starting point for your character\'s body.
- Sculpt the base shape: Use tools like Grab, Scale, and Rotate in Edit Mode to adjust the shape of the initial mesh and form a rough outline of your character. You can switch to Edit Mode by pressing Tab or selecting it from the dropdown menu at the top of the screen.
- Refine the details: Continue sculpting the character by adding more vertices, edges, and faces, and refining the shape. Use tools like Extrude, Loop Cut, and Proportional Editing to create the desired form.
- Add facial features: Focus on the facial region and add the character\'s eyes, nose, mouth, and other facial features using the same modeling techniques.
- Shape the body: Move on to shaping the body by adjusting proportions, adding limbs, and refining the overall structure.
- Pay attention to topology: Ensure that the topology (the flow and distribution of vertices) is clean and optimized. This will help with animations and further detailed modeling.
- Add finer details: Use sculpting brushes, such as those for wrinkles, muscles, and skin texture, to add finer details to the character\'s surface.
- Create UV maps: Set up UV maps to define how texture or image files will be applied to the character\'s surface. This step is crucial for adding color, patterns, and textures to your character.
- Finalize the topology: Once you are satisfied with the overall shape and details, retopologize your character if necessary. This involves creating a clean, optimized mesh with a lower polygon count.
- UV unwrap the retopologized mesh: UV unwrap the retopologized mesh to transfer the UV maps from the original sculpt onto the new mesh. This will help in applying textures accurately.
- Add materials and textures: Apply materials to different parts of the character to define their appearance. Then, assign textures to add color, bumps, and other surface properties.
- Preview and render: Use the rendering capabilities of Blender to preview and render your character from different angles and under various lighting conditions.
- Save and export: Finally, save your project and export it in the desired file format, such as OBJ, FBX, or STL, depending on your requirements.
READ MORE:
Setting Up Reference Images
- Switch camera to the front orthographic view.
- Use ‘Shift + A’ to add an image as reference or background.
- Adjust the size, position, and opacity to match your needs.

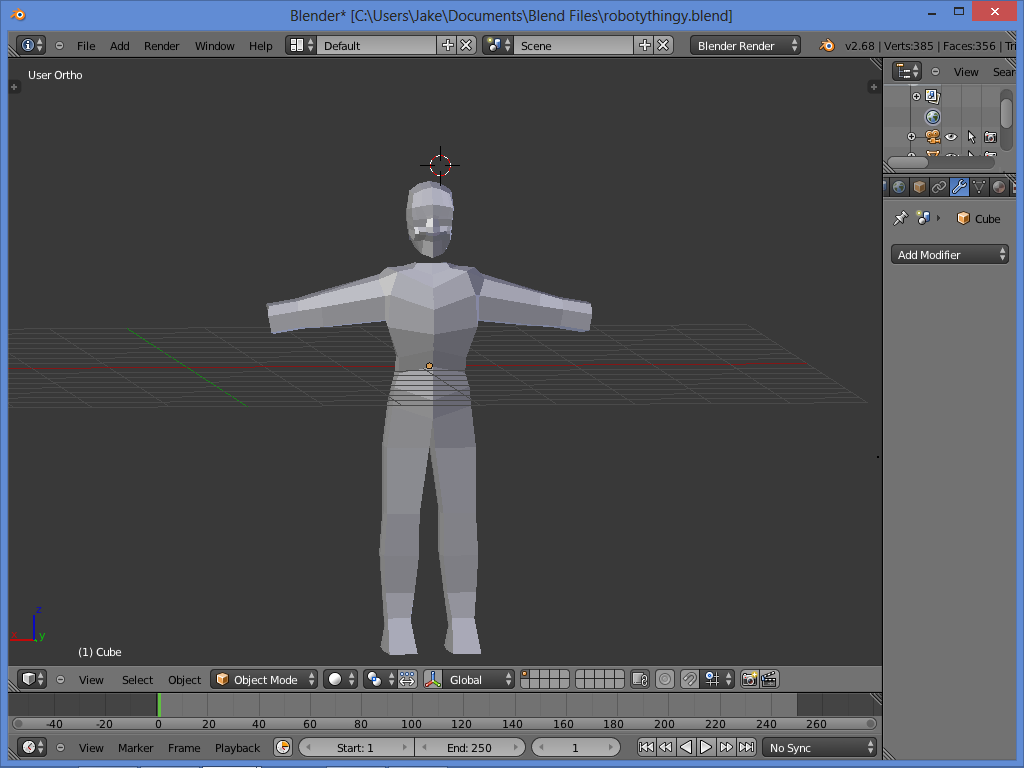
Creating the Low Poly Base
Begin by constructing a low poly model that captures the basic shape of your character. This can be started from various approaches like the head, body, or limbs based on the artist\"s preference.

UV Mapping and Texturing
Unwrap your model for texturing, optimizing the UV layout to minimize stretching and distortion. Create or import textures, applying them to your model for detailed and realistic effects.

Rigging and Weight Painting
- Create an armature with bones for the character\"s skeleton.
- Adjust bone hierarchy and parent the mesh with automatic weights for skinning.
- Refine skinning using weight painting to control the influence of bones on the mesh.
_HOOK_
Animation and Posing
Animate your character by creating keyframes that define the movement, using the timeline and dope sheet for more complex animations. Apply the principles of animation for natural and engaging character movement.
Advanced Techniques
Explore advanced modeling techniques such as sculpting for realistic characters, focusing on workflow and advice from professional Blender studios.

Resources
- Blender Studio\"s character modeling course for efficient topology and clean edge flow.
- Realistic character workflow documentation based on movie production experiences.
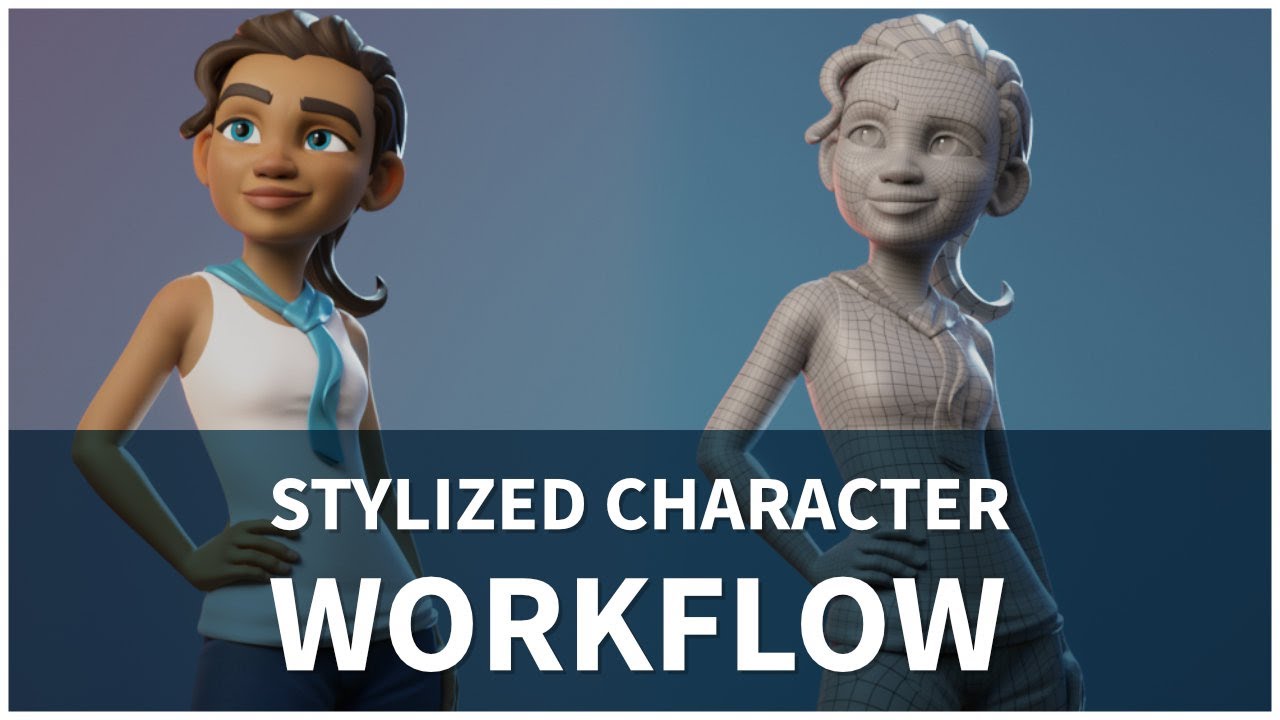
- Stylized character workflow for creating unique and expressive characters.

Creating the Low Poly Base
Begin by constructing a low poly model that captures the basic shape of your character. This can be started from various approaches like the head, body, or limbs based on the artist\"s preference.
UV Mapping and Texturing
Unwrap your model for texturing, optimizing the UV layout to minimize stretching and distortion. Create or import textures, applying them to your model for detailed and realistic effects.

_HOOK_
Rigging and Weight Painting
- Create an armature with bones for the character\"s skeleton.
- Adjust bone hierarchy and parent the mesh with automatic weights for skinning.
- Refine skinning using weight painting to control the influence of bones on the mesh.
Animation and Posing
Animate your character by creating keyframes that define the movement, using the timeline and dope sheet for more complex animations. Apply the principles of animation for natural and engaging character movement.
How to Make a Character in Blender - My Full Process in 10 Minutes
Discover the fascinating world of Blender character modeling and unlock your creativity! Whether you\'re a beginner or an advanced user, this video will guide you through step-by-step techniques to create incredible 3D characters like never before. Don\'t miss out on this inspiring journey of bringing your imagination to life!
Making an Anime Character in 3D
Dive into the enchanting realm of 3D anime character modeling and witness the magic unfold! This captivating video is your ultimate guide to crafting stunning anime characters in a three-dimensional space. Join us as we explore the techniques, tools, and tips that will elevate your character creations to a whole new level of awesomeness!
Advanced Techniques
Explore advanced modeling techniques such as sculpting for realistic characters, focusing on workflow and advice from professional Blender studios.
Resources
- Blender Studio\"s character modeling course for efficient topology and clean edge flow.
- Realistic character workflow documentation based on movie production experiences.
- Stylized character workflow for creating unique and expressive characters.
UV Mapping and Texturing
Unwrap your model for texturing, optimizing the UV layout to minimize stretching and distortion. Create or import textures, applying them to your model for detailed and realistic effects.
_HOOK_
Rigging and Weight Painting
- Create an armature with bones for the character\"s skeleton.
- Adjust bone hierarchy and parent the mesh with automatic weights for skinning.
- Refine skinning using weight painting to control the influence of bones on the mesh.
Animation and Posing
Animate your character by creating keyframes that define the movement, using the timeline and dope sheet for more complex animations. Apply the principles of animation for natural and engaging character movement.
Advanced Techniques
Explore advanced modeling techniques such as sculpting for realistic characters, focusing on workflow and advice from professional Blender studios.
Resources
- Blender Studio\"s character modeling course for efficient topology and clean edge flow.
- Realistic character workflow documentation based on movie production experiences.
- Stylized character workflow for creating unique and expressive characters.
Rigging and Weight Painting
- Create an armature with bones for the character\"s skeleton.
- Adjust bone hierarchy and parent the mesh with automatic weights for skinning.
- Refine skinning using weight painting to control the influence of bones on the mesh.
_HOOK_
Animation and Posing
Animate your character by creating keyframes that define the movement, using the timeline and dope sheet for more complex animations. Apply the principles of animation for natural and engaging character movement.
Advanced Techniques
Explore advanced modeling techniques such as sculpting for realistic characters, focusing on workflow and advice from professional Blender studios.
Resources
- Blender Studio\"s character modeling course for efficient topology and clean edge flow.
- Realistic character workflow documentation based on movie production experiences.
- Stylized character workflow for creating unique and expressive characters.
Animation and Posing
Animate your character by creating keyframes that define the movement, using the timeline and dope sheet for more complex animations. Apply the principles of animation for natural and engaging character movement.
Advanced Techniques
Explore advanced modeling techniques such as sculpting for realistic characters, focusing on workflow and advice from professional Blender studios.
_HOOK_
Resources
- Blender Studio\"s character modeling course for efficient topology and clean edge flow.
- Realistic character workflow documentation based on movie production experiences.
- Stylized character workflow for creating unique and expressive characters.
Advanced Techniques
Explore advanced modeling techniques such as sculpting for realistic characters, focusing on workflow and advice from professional Blender studios.
Resources
- Blender Studio\"s character modeling course for efficient topology and clean edge flow.
- Realistic character workflow documentation based on movie production experiences.
- Stylized character workflow for creating unique and expressive characters.
Resources
- Blender Studio\"s character modeling course for efficient topology and clean edge flow.
- Realistic character workflow documentation based on movie production experiences.
- Stylized character workflow for creating unique and expressive characters.
Introduction to Character Modeling in Blender
Character modeling in Blender is a multifaceted process that combines creativity with technical skills to bring virtual characters to life. It\"s essential for animations, games, and visual effects, offering endless possibilities for storytelling and digital creation. This comprehensive guide aims to introduce you to the basics and advanced techniques of character modeling in Blender, ensuring you have a solid foundation to start creating your own 3D characters.
- Reference Material: Before diving into modeling, it\"s crucial to gather reference material. This could include images of characters similar to what you aim to create, anatomical references for accurate proportions, and any other visual aids that will guide your modeling process.
- Workspace Setup: Customizing Blender\"s workspace to suit character modeling tasks is a preliminary step that enhances efficiency. This involves setting up panels, tools, and viewports for easy access to frequently used functions.
- Modeling Approach: There are several approaches to begin modeling, such as starting with a basic shape and sculpting details or creating a low-poly model and refining it. The choice depends on your project requirements and personal preference.
- Topology & Detailing: Effective topology is key for a model that deforms well in animation. Techniques for adding details, such as sculpting facial features and textures, contribute significantly to the character\"s realism and personality.
- UV Mapping & Texturing: Proper UV mapping and texturing bring your character to life with colors, patterns, and the illusion of depth. It\"s where your model starts to look less like a 3D object and more like a living being.
- Rigging & Animation: Rigging is the process of creating a skeleton for your model that defines how it moves. Weight painting ensures that the model deforms naturally with the rig. These steps are essential for preparing your character for animation.
- Exporting: Once your character is modeled, textured, rigged, and animated, you\"ll need to export it for use in games, films, or other media. Blender supports various formats suitable for different platforms.
Through dedication and practice, you\"ll develop the skills to create detailed and expressive characters that can be used in a wide range of digital projects. Remember, character modeling in Blender is both an art and a science, requiring patience and creativity.
_HOOK_
Setting Up Your Blender Workspace for Character Modeling
Setting up your Blender workspace efficiently is crucial for a smooth and effective character modeling process. A well-organized workspace can significantly enhance your productivity and make the complex process of character modeling more manageable. Follow these steps to optimize your Blender workspace for character modeling:
- Choose the Right Layout: Start by selecting a layout that best suits character modeling. Blender offers various layouts tailored for different tasks. For character modeling, the \"Modeling\" layout is a good starting point, as it provides a large 3D view and easy access to modeling tools.
- Customize Your Viewport: Customize the 3D viewport to focus on your model. You can split the viewport into multiple views (front, side, and top) for a more comprehensive perspective of your character. Use the numpad shortcuts to quickly switch between views.
- Set Up Reference Images: Importing reference images is essential for accuracy in character modeling. Use the \"Background Images\" feature in the N-panel or add an \"Image Empty\" in your 3D viewport for direct reference within your workspace.
- Organize Your Tools: Blender\"s toolbar and tool settings can be customized to keep your most-used tools accessible. Pin tools you frequently use in the toolbar for quick access, and organize your properties panel to show relevant tabs such as modifiers, materials, and textures.
- Configure Shading Settings: Adjust shading settings to suit character modeling. Enable \"Matcap\" and \"Cavity\" shading for enhanced visibility of details and form. These settings help in understanding the volume and surface details of your character better.
- Adjust User Preferences: Go to \"Edit > Preferences\" to fine-tune Blender\"s behavior to your liking. You can adjust navigation, keymap, and interface settings to optimize your workflow. Customizing keybindings for frequently used actions can save time.
- Use Layers and Collections: Organize your model using layers and collections. This helps in managing different parts of your character, such as body, clothes, and accessories, separately and efficiently.
- Enable Useful Add-ons: Blender supports numerous add-ons that can streamline your modeling process. Enable add-ons like \"LoopTools\" and \"F2\" for advanced modeling capabilities. Check the preferences menu to explore and activate these add-ons.
By following these steps, you can create a Blender workspace that is optimized for character modeling, making the process more intuitive and efficient. Remember, the goal is to have a workspace that complements your workflow and allows you to focus on creativity and detail in your character modeling projects.
Importing and Setting Up Reference Images
Importing and setting up reference images in Blender is a critical step in character modeling. It ensures accuracy, proportion, and realism in your models. This section provides a step-by-step guide to effectively use reference images for character modeling in Blender.
- Prepare Your Reference Images: Before starting in Blender, select clear, high-quality images. Ideally, you should have front, side, and back views of your character. Ensure these images are straight and aligned for consistent scaling.
- Start a New Project in Blender: Open Blender and start a new project. It\"s a good practice to save your project before proceeding further.
- Import Reference Images: To import a reference image, switch to the \"Modeling\" workspace. Use the shortcut \"Shift+A\" to access the Add menu, then navigate to \"Image\" > \"Reference\". Locate and select your reference image file(s) from your computer.
- Adjust the Reference Images: Once imported, you can move, scale, and rotate the reference images to match your modeling needs. Use the \"N\" key to open the side panel in the viewport for additional settings like opacity, which can be helpful for tracing over the image.
- Positioning Your Images: For accurate modeling, position your reference images correctly. Place the front view image in the front orthographic view (\"Numpad 1\"), and the side view in the side orthographic view (\"Numpad 3\"). Ensure the images are placed at the center of your grid floor to maintain symmetry.
- Lock the Reference Images: To prevent accidental movement while modeling, it\"s a good idea to lock your reference images. In the \"Outliner\" window, click on the filter icon and enable the \"Selectable\" option, then deselect the checkbox next to your reference image to lock it.
- Use Layers for Multiple References: If you have multiple reference images, such as detailed shots of the character\"s face, hands, or feet, you can organize them on separate layers or collections. This allows you to toggle visibility and focus on specific areas without clutter.
- Save Your Setup: After setting up your reference images, save your Blender file. This ensures that you can return to your setup anytime without needing to re-import and adjust your reference images again.
By following these steps, you\"ll have a solid foundation for beginning your character modeling process in Blender. Reference images are invaluable for achieving accurate proportions and details, significantly impacting the quality of your final model.
Starting with a Basic Shape or Sculpting
Beginning your character modeling journey in Blender can be approached in two primary ways: starting with a basic shape (box modeling) or sculpting from a more organic, freeform process. Each method has its advantages, and the choice often depends on personal preference, the complexity of the character, and the final use of the model (e.g., animation, game asset).
- Box Modeling:
- Starting with Basic Shapes: Begin by creating simple geometric shapes, such as cubes or spheres, to form the basic silhouette of your character. This method is precise and allows for easy control over topology from the start.
- Refining the Shape: Gradually add more detail by subdividing the geometry and reshaping it to match your reference images. This step-by-step process is excellent for maintaining control over the model’s topology, crucial for animation.
- Advantages: Box modeling is beneficial for its direct approach to creating clean topology, making it easier to manage and animate the model.
- Sculpting:
- Creating a Base Mesh: Start with a dynamic topology (dyntopo) or a multiresolution mesh to sculpt your character. This approach is more freeform, allowing for a more artistic and organic development of your character.
- Adding Details: Sculpting tools in Blender enable you to add complex details like muscles, facial expressions, and textures directly onto your model. This method is ideal for creating highly detailed or stylized characters.
- Advantages: Sculpting is favored for its flexibility and the ability to easily experiment with shapes and details. It’s particularly useful for characters where realism and intricate details are important.
- Combining Both Methods: Often, a hybrid approach is used, where the basic shape is first created through box modeling, and finer details are added through sculpting. This combination leverages the strengths of both methods for optimal results.
Regardless of the approach you choose, both box modeling and sculpting require practice and patience. Start with simpler projects to build your skills and gradually move on to more complex characters as you become more comfortable with the tools and techniques in Blender.
Creating a Low Poly Base Model
Creating a low poly base model is a crucial step in character modeling, especially for games or animations where efficiency and performance are key. This process begins with setting up your Blender workspace with necessary reference materials to ensure accuracy and ease during modeling.
Setting Up Reference Materials
- Start by importing reference images into Blender to guide your modeling process. This can involve using the image editor within Blender or having reference images open on a second monitor.
- For direct reference in the 3D viewport, use the \"Shift + A\" menu to add a reference or background image that matches the character\"s anatomy, aiding in accurate dimension modeling.
Building the Low Poly Base
With references in place, model the basic shape of your character, focusing on minimalistic geometry that captures the essential form. This can be done through several approaches:
- Head First: Starting with the head, ensuring accurate proportions before moving to the body and limbs.
- Body First: Beginning with the body as it\"s typically the largest part, allowing for easier proportioning of limbs and head.
- Separate Limbs: Modeling each body part independently and joining them later, which can simplify the process but requires careful attention to proportions and topology.
- Minimalist Approach: Starting with simple shapes like a cube and using tools such as subdivide and extrude to refine the model into a more detailed character base.
Duplicating the Base for Future Use
Consider saving your low poly base model as a reusable asset in Blender\"s asset library for future projects, which can significantly speed up your workflow.
Adding Base Detail
Begin adding basic details to your character, such as fingers, toes, and facial features. This step involves more intricate use of Blender\"s modeling tools to refine the shape and ensure the model adheres to anatomical accuracy.
By following these steps and employing a mix of strategies based on your project\"s needs, you can create a versatile and efficient low poly base model ready for further detailing or rigging.
Techniques for Effective Topology
Effective topology is crucial for creating 3D models that are both efficient and high in quality. Proper topology ensures that your character deforms naturally during animation, is optimized for performance, and allows for more detailed sculpting. Here are key techniques and practices for achieving effective topology in Blender:
Understanding Edge Flow
Edge flow refers to the direction in which polygons (faces) are arranged around a model, particularly around areas of deformation such as joints, eyes, and mouth. Good edge flow helps in achieving smooth deformations during animations. It\"s important to align edges with the direction of movement for parts of the character that will animate.
Using Quads for Flexibility
- Stick to quad-based topology (four-sided polygons) as much as possible. Quads are easier to deform, subdivide, and work with in general than triangles or n-gons (polygons with more than four sides).
- Quads help maintain a smooth surface and make the model more manageable for further sculpting, texturing, and rigging.
Minimizing N-Gons and Triangles
While quads are preferred, sometimes n-gons and triangles are inevitable, especially in less deformable areas. However, aim to minimize their use as they can cause issues with deformations, smoothing, and subdivision surfaces.
Maintaining Even Polygon Density
Uniform polygon density across your model ensures smooth subdivisions and texture distribution. Areas of the model that require more detail for animation or sculpting may need a higher density, but avoid large disparities in polygon size and count.
Optimizing for Animation
- Focus on areas of your model that will have a lot of movement, such as the face, hands, and joints. These areas should have a topology that facilitates smooth and natural movements.
- Use loops around eyes and mouth for facial expressions, and at joints for bending.
Using Modifiers Wisely
Blender\"s modifiers, like the Subdivision Surface modifier, can help achieve a smoother model without manually adding more geometry. Use these tools to preview and adjust your topology for the best balance between model complexity and performance.
Cleaning Up Your Mesh
Regularly check your model for unnecessary vertices, edges, or faces that contribute nothing to the shape or function of your model. Removing excess geometry helps in keeping the model efficient and easier to work with.
By following these techniques, you can ensure that your character models are not only visually appealing but also optimized for animation and performance within Blender.
_HOOK_
Detailing Your Character: Sculpting Techniques
Sculpting in Blender is a pivotal phase where your character begins to gain its unique features and details that set it apart. This process can be intricate, requiring both patience and creativity. Below, we outline essential techniques and tips to help you achieve a high level of detail in your character models.
- Understanding Sculpt Mode: Begin by switching to Sculpt Mode in Blender. This mode offers a suite of tools designed for adding complexity and detail to your 3D models. Familiarize yourself with the different brushes and their effects, such as the Grab, Crease, Smooth, and Clay strips.
- Dyntopo for Dynamic Topology: Enable Dynamic Topology (Dyntopo) for a flexible sculpting process. Dyntopo adjusts the mesh’s topology in real-time as you sculpt, allowing for the addition of details without worrying about the underlying geometry. This is crucial for creating detailed facial features, muscles, and textures.
- Starting with Broad Shapes: Begin your sculpting with broad shapes and general forms. Use larger brush sizes to establish the overall proportions and silhouette of your character. Avoid getting caught up in details too early; focus on the character\"s posture, weight, and balance.
- Adding Details Gradually: Once the basic form is in place, gradually reduce the brush size to add smaller details. Work on defining muscle groups, facial expressions, and any character-specific features like scars, wrinkles, or tattoos. Use reference images as a guide to ensure accuracy and realism.
- Using Layers for Non-Destructive Sculpting: Take advantage of Blender’s layers feature to sculpt details non-destructively. This allows you to experiment with different levels of detail or variations without permanently altering the underlying model. Layers can be especially useful for testing different expressions or modifications.
- Custom Brushes and Alphas: For intricate textures and patterns, consider creating or importing custom brushes and alphas. These can be used to imprint detailed designs onto your character, such as fabric textures, scales, or battle damage. This technique can add a layer of depth and realism to your model.
- Retopology for Optimal Geometry: After sculpting, you may need to retopologize your model to create a cleaner, more animation-friendly topology. This involves creating a new mesh that captures the details of your sculpt with a more efficient distribution of polygons. Use Blender’s retopology tools to facilitate this process, ensuring your model retains its detailed features while being optimized for animation or game engines.
- Applying Multiresolution Modifier: For additional detail work without altering the base mesh, apply the Multiresolution modifier. This modifier allows you to sculpt at a higher resolution while keeping the original mesh intact. It’s ideal for final touches and high-resolution detail work.
Detailing your character in Blender is a blend of art and technique, requiring a keen eye for detail and a solid understanding of sculpting tools. By following these steps and continuously practicing, you can create detailed, lifelike characters that are ready for animation or game development. Remember, the key to successful sculpting is patience and experimentation, so don\"t hesitate to try new techniques and push the boundaries of your creativity.
UV Mapping and Texturing for Realism
UV mapping and texturing are essential steps in the character modeling process, allowing you to add intricate details and lifelike qualities to your 3D models. This section guides you through the process of unwrapping your model, applying textures, and fine-tuning them for enhanced realism in Blender.
- Understanding UV Mapping: UV mapping is the process of projecting a 3D model\"s surface onto a 2D plane to apply textures accurately. It\"s akin to unfolding a 3D object into a flat image. Start by selecting your character model and switching to the UV Editing workspace in Blender.
- Marking Seams for Efficient Unwrapping: Before unwrapping, identify and mark the seams of your model. Seams are edges where the mesh will be \"cut\" to lay flat. Strategically place seams in less noticeable areas, such as under the arms or behind legs, to minimize visible texture seams.
- Unwrapping Your Model: With seams marked, select all faces of your model and unwrap it (U key > Unwrap). Blender will unfold the mesh based on the seams you\"ve marked, creating a UV map. You may need to adjust the placement and scale of the UV islands in the UV Editor to make efficient use of the texture space.
- Applying Textures: Texturing involves applying image textures to your UV map. You can use Blender\"s Shader Editor to create and assign materials with various textures (diffuse, specular, bump, and normal maps) to your character. For realism, incorporate high-quality images and procedural textures that mimic real-world materials.
- Painting Textures Directly: For specific details or to add variation, use Blender’s Texture Paint mode. This allows you to paint directly onto your 3D model, giving you control over the placement and intensity of colors, details, and effects.
- Using Subsurface Scattering: For realistic skin textures, utilize subsurface scattering (SSS) within your material settings. SSS simulates light penetrating the surface of translucent materials like skin, adding depth and lifelikeness to your character.
- Adding Bump and Normal Maps: Enhance the realism of textures with bump and normal maps. These maps simulate the appearance of relief on the surface of your model, adding details like wrinkles, pores, and fabric textures without the need for additional geometry.
- Final Adjustments: Review your textured model under different lighting conditions and angles. Make any necessary adjustments to the UV layout, texture resolution, or material properties to ensure your character looks realistic and detailed from every perspective.
UV mapping and texturing are critical for bringing your character to life in Blender. By carefully unwrapping your model, applying detailed textures, and making use of Blender\"s powerful texturing tools, you can achieve stunning realism in your character projects. Remember, patience and attention to detail are key in this stage—take your time to refine your textures and UV layout for the best possible results.
Rigging Your Character for Animation
Rigging is a crucial step in character animation, providing a skeleton that allows you to animate your model with movements and expressions. This section outlines the process of creating a rig for your character in Blender, ensuring it\"s ready for animation.
- Understanding the Armature: Armatures in Blender are skeletons made up of bones, used to deform and animate your character model. Start by creating a new armature object and positioning it within your character. Each bone controls specific parts of the character\"s mesh.
- Adding Bones to Your Armature: Enter Edit Mode for the armature to begin adding bones. Place the root bone at the base of the spine, then extrude bones along the spine, limbs, and other movable parts of your character. Use naming conventions to keep track of bone functions and sides (e.g., \"Arm.L\", \"Arm.R\" for left and right arms).
- Adjusting Bone Roll and Orientation: Correct bone roll and orientation are critical for predictable deformations during animation. Adjust the roll angle to ensure that the bones\" axes are aligned properly with the character\"s geometry. This step prevents unexpected twisting during animation.
- Setting Up Parent-Child Hierarchies: Organize your bones into a logical hierarchy, where moving a parent bone also moves its children. This setup is essential for animating complex movements like walking, where the leg\"s motion affects the foot and toes.
- Weight Painting for Deformations: Switch to Weight Paint mode to assign vertex groups to bones. This process defines how much influence each bone has over parts of the mesh. Paint carefully to ensure smooth and realistic deformations, particularly around joints.
- Adding Inverse Kinematics (IK) Constraints: For more intuitive posing and animation, add IK constraints to limbs. IK allows you to manipulate the end effector (like a hand or foot) and have the system calculate the position of the rest of the limb accordingly. This is especially useful for legs and arms.
- Testing Your Rig: Before animating, test your rig thoroughly. Pose your character in various positions to check for issues with skinning, weight painting, or bone constraints. Make adjustments as needed to ensure that the rig behaves predictably and allows for a wide range of motion.
- Creating Control Rigs: For complex characters, consider creating a separate control rig layer. This layer consists of custom shapes and controllers that make animating easier and more intuitive, without directly manipulating the bones.
Rigging your character in Blender is a meticulous but rewarding process, laying the foundation for bringing your character to life through animation. By carefully constructing the armature, adjusting weights, and testing the rig, you can ensure your character moves in a realistic and expressive manner. Remember, a well-rigged character can significantly enhance the quality and believability of your animations.
Weight Painting for Natural Movements
Weight painting is an essential process in character rigging that defines how the mesh of your character deforms in response to the movements of the armature (skeleton). Proper weight painting is crucial for achieving natural and realistic movements. Here\"s how to effectively use weight painting in Blender to bring your character to life.
- Selecting Your Character and Armature: Begin by selecting your character model and its armature. Ensure that the armature is correctly parented to the mesh with automatic weights as a starting point. This provides a basic weight distribution that you can refine further.
- Entering Weight Paint Mode: With the character mesh selected, switch to Weight Paint mode. This mode visualizes the weight influence of selected bones on the mesh. Influences are displayed in a gradient from blue (no influence) to red (full influence).
- Understanding Weight Gradient: Get familiar with the weight gradient\"s significance. Areas painted in red will move rigidly with the bone, while areas in blue will remain unaffected. Your goal is to create smooth transitions (gradients) for natural deformations, particularly around joints.
- Adjusting Weights Manually: Use the weight painting tools to manually adjust the influence of bones over the mesh. This includes adding, subtracting, and smoothing weights. Focus on areas where natural movement is crucial, such as elbows, knees, and the spine. Smooth transitions are key to preventing unnatural bending or stretching.
- Testing and Refining: Frequently test the deformation by posing the armature. This helps identify areas where the weight distribution needs adjustment. It\"s often necessary to switch back and forth between posing and weight painting to achieve the best results.
- Using Auto Normalize: Enable the Auto Normalize option in the weight painting tools to maintain the total weight influence on any vertex at 100%. This prevents accidental overweighting, ensuring that vertices are influenced by bones in a balanced manner.
- Mirroring Weights: For symmetrical characters, take advantage of Blender\"s Mirror functionality to copy weights from one side of the character to the other. This saves time and ensures consistency across the model.
- Utilizing Vertex Groups: For precise control, you can also adjust weights in Edit mode by manually assigning vertex groups to specific bones. This method is useful for fine-tuning the influence on small or hard-to-reach areas.
Weight painting is a blend of art and technique, requiring patience and attention to detail to achieve realistic character movements. By carefully adjusting the weight distribution and continuously testing the rig, you can ensure your character moves in a believable and natural way. Remember, the goal of weight painting is to simulate how real muscles and skin deform, so take your time to refine your work for the best possible animation outcomes.
Animating Your Character: Basics to Advanced Techniques
Animation breathes life into your character, transforming a static model into a dynamic entity. This section covers the foundational steps and advanced techniques for animating your character in Blender, ensuring a smooth and lifelike animation process.
- Setting Up the Scene: Before animating, ensure your character and its rig are properly set up and tested. Adjust the scene settings, including the frame rate (typically 24 or 30 fps for smooth animation) and the animation length in frames.
- Understanding Keyframes: Animation in Blender is driven by keyframes, which record the position, rotation, and scale of objects at specific points in time. Start by inserting keyframes for your character’s initial pose at the beginning of the timeline.
- Blocking Out Major Poses: Begin your animation with key poses, or \"extremes,\" which define the main actions of your sequence. Insert keyframes for these poses, spacing them out along the timeline according to the timing of your animation.
- Refining with Breakdowns and In-betweens: Once the key poses are established, add breakdown poses to define the transition between key poses. Then, refine the animation with in-between frames for smoother motion. Blender’s Graph Editor can be used to adjust the interpolation and timing between keyframes.
- Using the Dope Sheet and Graph Editor: The Dope Sheet provides an overview of all keyframes and their timing, while the Graph Editor allows for precise control over the interpolation curves between keyframes. Use these tools to fine-tune the motion and flow of your animation.
- Adding Secondary Actions: Secondary actions add realism and depth to your animation, such as facial expressions, blinking, or the sway of clothing. Animate these after the primary motion to enhance the character’s lifelikeness.
- Implementing Non-linear Animation (NLA): For complex animations or sequences, use Blender’s Non-linear Animation editor to blend and layer different actions. This allows for the reuse of animation clips and can simplify the animation of repetitive actions or cycles, like walking.
- Facial Animation and Lip Sync: Use shape keys or a facial rig to animate expressions and mouth movements. For lip sync, match mouth shapes (phonemes) to the audio dialogue, inserting keyframes to align with the spoken words for accurate synchronization.
- Finalizing Your Animation: Review your animation in its entirety, checking for smooth transitions, natural movements, and the correct timing of actions. Render a preview to evaluate performance and make any necessary adjustments.
Animation in Blender is a creative and technical process that involves layering movements, expressions, and actions to portray emotion and intention. Starting from basic principles and progressing to complex techniques allows for the creation of compelling and realistic character animations. Practice, patience, and experimentation are key to mastering animation in Blender.
_HOOK_
Exporting Your Model for Games or Animation
After modeling, texturing, and rigging your character in Blender, the final step is to export it for use in games or other animation projects. This process requires attention to detail to ensure compatibility and functionality within different engines or software. Follow these steps to successfully export your character.
- Finalize Your Model: Ensure your character is fully modeled, textured, and rigged. Double-check all textures, materials, and animations for completeness and correctness.
- Optimize Your Model: For game development, it\"s crucial to optimize your model to run efficiently. This includes reducing polygon count for low-poly models, baking textures, and ensuring the rig is appropriately simplified for real-time engines.
- Choose the Right Export Format: Common formats for game engines include FBX and OBJ for static models, with FBX being preferred for animated models due to its support for bones and animations. For animation projects, formats like Alembic (ABC) may be used for complex animations.
- Applying Transformations: Before exporting, apply all transformations (location, rotation, scale) to your model. This step ensures that your model retains its intended size, orientation, and position in the target software or engine.
- Exporting the Model: Go to File > Export and select the appropriate format for your project. Adjust the export settings to include all necessary components such as geometry, armature, and animations. Pay special attention to the axis orientation and scale to match the target software\"s requirements.
- Testing in the Target Environment: After exporting, import your model into the game engine or animation software you\"re using. Test the model to check for any issues with textures, rigging, or animations. This step is crucial for identifying and fixing any compatibility issues.
- Adjustments and Re-export: Based on your tests, you may need to return to Blender to make adjustments to the model, textures, or rig. After making the necessary changes, repeat the export process until the model functions correctly in the target environment.
Exporting your character from Blender is the bridge between your creative work and its application in real-world projects. Whether for a game engine like Unity or Unreal Engine, or for use in animation sequences, following these steps ensures that your character transitions smoothly from Blender to your chosen platform. Remember, the key to a successful export is in the details, so take the time to review and refine your model for the best results.
READ MORE:
Resources and Further Learning
Mastering character modeling in Blender is a journey of continuous learning and practice. Whether you\"re a beginner or looking to enhance your skills, numerous resources can guide you through the intricacies of Blender and character creation. Here’s a curated list of resources for further learning and inspiration.
- Blender Official Documentation: Start with the basics by exploring the official Blender manual. It covers all features and tools, providing a solid foundation for beginners and a reference for advanced users.
- Online Tutorials and Courses: Platforms like Udemy, Coursera, and Blender Guru offer comprehensive tutorials and courses ranging from beginner to advanced levels. They cover various aspects of Blender, including character modeling, texturing, rigging, and animation.
- YouTube Channels: YouTube is a treasure trove of free tutorials. Channels like Blender Guru, CG Geek, and Darrin Lile offer step-by-step guides on creating characters and other 3D models in Blender.
- Blender Community and Forums: Joining the Blender community can provide invaluable support. Sites like Blender Artists Forum and the Blender subreddit are great places to ask questions, share your work, and learn from other artists.
- Books and E-Books: For those who prefer reading, there are several books and e-books on Blender. \"Blender 3D Cookbook\" and \"Learning Blender: A Hands-On Guide to Creating 3D Animated Characters\" are excellent resources for deepening your understanding.
- Blender Add-ons: Explore various add-ons created by the community to streamline your workflow and add new functionalities to Blender. Some are specifically designed for character modeling and animation.
- Practice and Personal Projects: The best way to learn is by doing. Engage in personal projects, participate in challenges, and recreate your favorite characters to apply what you’ve learned and push your skills further.
Character modeling in Blender is an evolving discipline, with new techniques and tools constantly emerging. Staying engaged with the community, keeping up with new tutorials, and practicing regularly will ensure your skills remain sharp and up-to-date. Happy modeling!
Embark on a creative journey to bring your imaginative characters to life with Blender. With our comprehensive guide, you\"ll master character modeling, from the basics to advanced techniques, unlocking endless possibilities in the realm of 3D animation and game design.


