Topic how to make animations in blender: Embark on a creative journey with Blender and unlock the secrets of making stunning animations. This guide is your first step towards mastering the art of 3D animation, designed for both beginners and seasoned artists alike.
Table of Content
- How can I create animations in Blender?
- Getting Started with Blender
- Understanding Blender\"s Interface
- Basic Principles of Animation
- Modeling for Animation
- Texturing and Materials
- Rigging Your Characters
- YOUTUBE: Animation for Beginners Blender Tutorial
- Animating Your Characters
- Advanced Animation Techniques
- Lighting and Rendering
- Physics and Simulations in Animation
- Exporting and Sharing Your Animations
How can I create animations in Blender?
To create animations in Blender, follow these steps:
- Create or import your 3D models into Blender.
- Set up your scene by positioning the models, adjusting the lighting, and setting any desired camera angles.
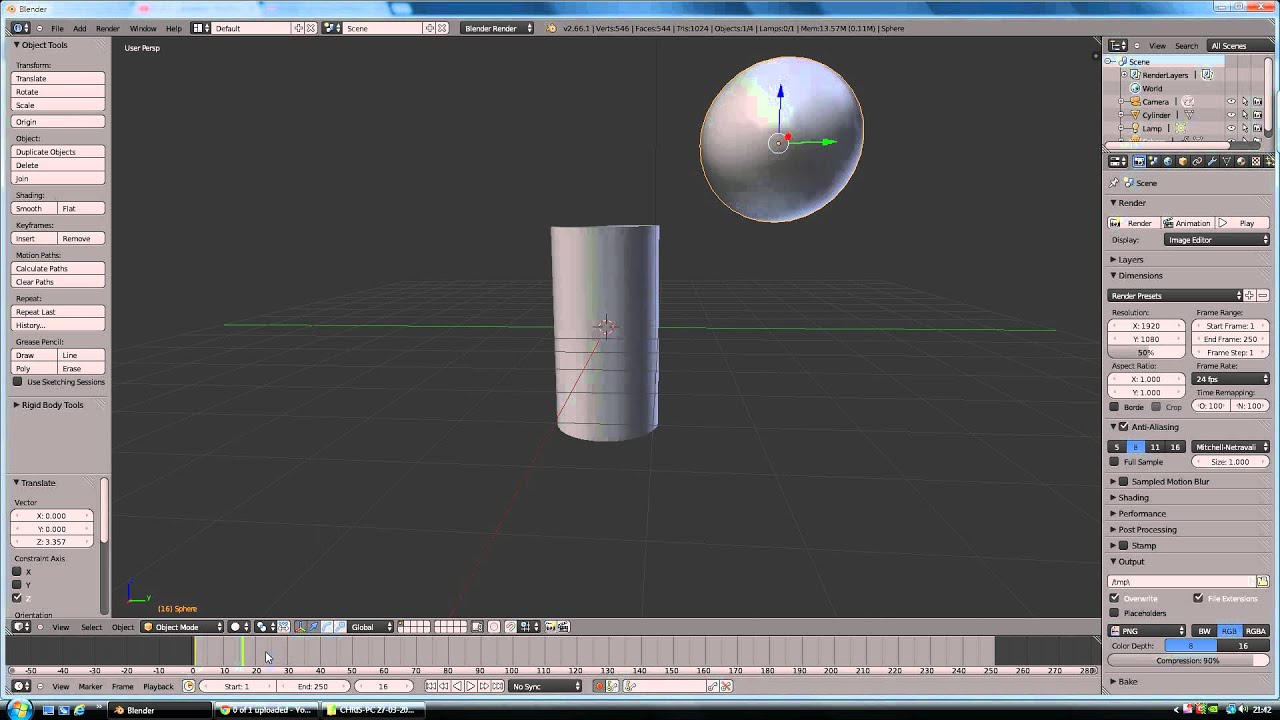
- Open the \"Timeline\" window in Blender.
- Select the first frame of your animation in the timeline.
- Choose the object you want to animate and press \"I\" on your keyboard. This will create a keyframe for the object\'s current position.
- Move forward in the timeline to a later frame.
- Adjust the position, rotation, or scale of the object to create the desired animation.
- Press \"I\" again to create another keyframe, capturing the new object position.
- Repeat steps 6-8 to add more keyframes and create a smooth animation.
- Use the \"Play\" button in the timeline to preview your animation.
- Adjust the timing, easing, and interpolation of keyframes to refine your animation.
- Once satisfied with the animation, you can render it as a video or image sequence.
Experiment with other features and tools in Blender, such as adding materials, textures, or applying physics simulations, to enhance your animations further. Don\'t be afraid to explore Blender\'s extensive documentation and tutorials to delve into more advanced animation techniques.
READ MORE:
Getting Started with Blender
Embarking on your animation journey with Blender opens a world of creative possibilities. This section will guide you through the initial steps to get you up and running with Blender, ensuring a smooth start to your 3D animation projects.
- Download and Install Blender: Visit the official Blender website to download the latest version. Blender is free and open-source, available for Windows, MacOS, and Linux.
- Familiarize Yourself with the Interface: Upon launching Blender, take some time to explore the interface. Look at the 3D viewport, timeline, and editor types. Blender\"s interface is highly customizable to suit your workflow.
- Basic Navigation: Learn the basics of navigating within the 3D viewport. Practice zooming, panning, and rotating the view using your mouse and keyboard shortcuts.
- Add Objects: Discover how to add objects to your scene. Use the \"Add\" menu or shortcut keys to create meshes, lights, and cameras.
- Manipulate Objects: Get comfortable with selecting, moving, rotating, and scaling objects. Understanding these basic operations is crucial for 3D modeling and animation.
- Explore Basic Modeling Tools: Experiment with Blender\"s modeling tools to modify your objects. Try extruding, beveling, and subdividing to create more complex shapes.
- Rendering Your First Scene: Learn how to render your scene with the camera view. Adjust the lighting and materials for a more realistic or stylized look, then render your first image.
With these steps, you\"re well on your way to creating your first animation in Blender. Remember, practice and experimentation are key to mastering Blender\"s vast array of tools and features.

Understanding Blender\"s Interface
Blender\"s interface might seem daunting at first, but it\"s designed for efficiency and flexibility. This section will help you get acquainted with the main areas of the interface, which are essential for creating animations.
- 3D Viewport: The heart of Blender, where you can view and interact with your 3D scene. You can navigate the scene, select and manipulate objects, and much more.
- Timeline: Located at the bottom of the default layout, the Timeline allows you to control the animation playback, set keyframes, and change the current frame.
- Outliner: A hierarchical view of all objects in your scene, including cameras, lights, and meshes. It\"s essential for organizing and selecting different elements of your project.
- Properties Panel: This panel provides access to all the settings for your scene, objects, materials, modifiers, and more. It\"s crucial for fine-tuning the details of your animation.
- Shader Editor: For more advanced users, the Shader Editor allows you to create and modify materials using a node-based interface.
- Dope Sheet and Graph Editor: These animation tools give you detailed control over keyframes and interpolations, allowing for precise adjustments to your animations.
Understanding Blender\"s interface is the first step towards leveraging its full potential for your animation projects. As you become more familiar with these areas, you\"ll find Blender to be an incredibly powerful tool for bringing your creative visions to life.

Basic Principles of Animation
The world of animation is both vast and intricate, requiring a blend of creativity, skill, and technical knowledge. Understanding the basic principles of animation is crucial for anyone looking to create engaging and lifelike animations in Blender. These principles, originally developed by Disney animators Ollie Johnston and Frank Thomas in their book \"The Illusion of Life: Disney Animation,\" serve as the foundation for creating realistic animations. By applying these principles, animators can imbue their characters and scenes with a sense of weight, timing, and emotion, bringing their creations to life.
- Squash and Stretch: This principle gives the illusion of weight and volume to characters as they move. Squash and stretch make movements more exaggerated and appealing.
- Anticipation: Before any significant action, a preparatory movement is made to alert the viewer that something is about to happen, enhancing the realism and anticipation of the action.
- Staging: This involves presenting an idea so that it is unmistakably clear. Whether a character\"s action, a mood, or a reaction, the presentation must be clear to the viewer.
- Straight Ahead Action and Pose to Pose: These are two approaches to drawing animations. Straight ahead action creates more fluid, dynamic movements by drawing frame by frame. Pose to pose involves starting with key frames and then filling in the intervals, ideal for getting the animation\"s structure right.
- Follow Through and Overlapping Action: These principles deal with the concept that parts of the body move at different rates and times. They help to create more natural movement by showing how different parts of an object or character stop moving at different times.
- Slow In and Slow Out: The movement of objects starts and stops slowly, then accelerates in the middle. This principle adds a more natural rhythm to movements.
- Arc: Most natural action tends to follow an arched trajectory. The arc principle makes animation smoother and more lifelike.
- Secondary Action: Adding secondary actions to the main action gives a scene more life and can help to support the main action.
- Timing: Timing is crucial in animation as it affects how fast or slow an action appears to the viewer. It helps to establish the character\"s mood, emotion, and reaction.
- Exaggeration: Exaggeration is used to push movements further to add more drama and impact to animations.
- Solid Drawing: This principle emphasizes the importance of understanding the basics of drawing, including anatomy, weight, balance, light, and shadow. It\"s essential for creating believable three-dimensional animations.
- Appeal: Characters and objects in animation must have an appeal or charisma. This doesn\"t necessarily mean they have to be attractive but rather engaging and interesting to the audience.
By mastering these basic principles, animators can create animations that not only look professional but also resonate emotionally with viewers. Blender, with its comprehensive suite of animation tools, provides an excellent platform for applying these principles to create dynamic and compelling animations.

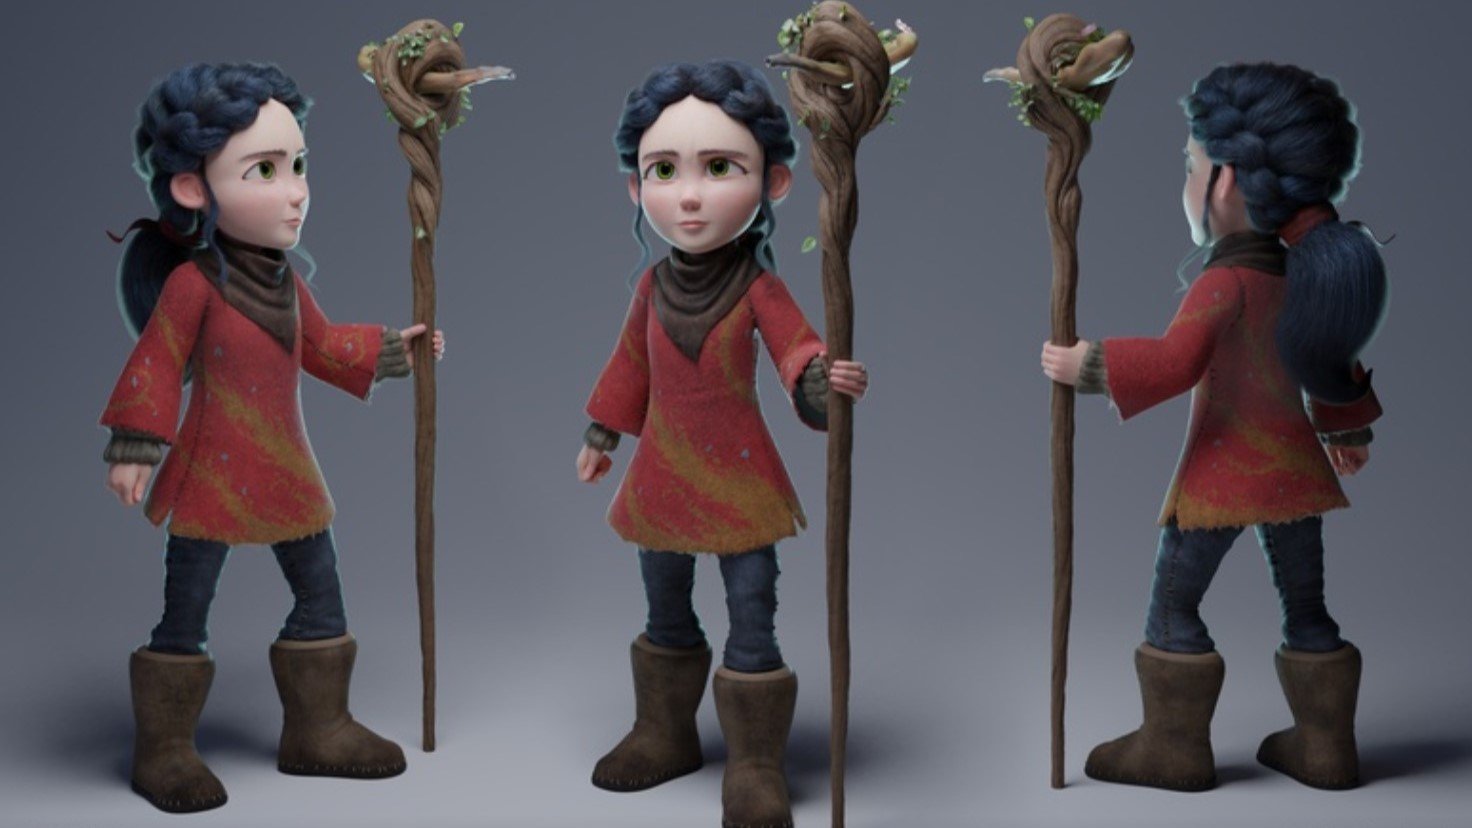
Modeling for Animation
Modeling for animation is a critical step in the animation process, where the foundation for all subsequent animation work is laid down. This step involves creating the 3D models that will later be rigged, animated, and integrated into your scene. Blender offers powerful tools for modeling, enabling artists to create detailed and complex models suitable for animation. Here\"s a step-by-step guide to effective modeling for animation in Blender.
- Concept and Reference Gathering: Begin by collecting concept art, references, and sketches for the character or object you intend to model. This preparation helps ensure accuracy and consistency throughout the modeling process.
- Blocking Out Basic Shapes: Use Blender\"s modeling tools to block out the basic shapes of your model. Focus on getting the proportions and general form right, without worrying about the details at this stage.
- Adding Detail: Once the basic form is established, start adding details to your model. Use modifiers and sculpting tools in Blender to refine the shape and add textures, ensuring that the model looks good from all angles.
- Topology and Edge Flow: Pay attention to the topology of your model. For animation, it\"s crucial to have a clean topology with good edge flow. This makes the model more efficient to animate and deform smoothly.
- Optimization for Animation: Keep your model\"s complexity in mind. A highly detailed model may look impressive, but it can also be challenging to animate. Use techniques like retopology to create a lower-poly version of your model that is easier to rig and animate.
- Materials and Texturing: Apply basic materials and textures to your model. While detailed texturing is not always necessary at this stage, having a basic color scheme can help visualize the final result.
- Rigging Prep: Before moving on to rigging, ensure your model is fully prepared. This includes checking for any non-manifold edges, making sure normals are facing the correct direction, and applying any necessary transformations.
Throughout the modeling process, keep in mind the end goal of animation. The way your model moves and deforms is significantly influenced by its initial construction. By following these steps and utilizing Blender\"s comprehensive toolset, you can create models that are not only visually appealing but also ready for the rigging and animation stages that follow.
_HOOK_
Texturing and Materials
Texturing and applying materials are essential steps in the animation process, adding realism and depth to your 3D models in Blender. This stage transforms your models from simple shapes into vivid, lifelike characters and objects. Texturing refers to the process of creating and applying textures, while materials define how those textures and the object\"s surfaces interact with light. Here\"s how to effectively apply texturing and materials in Blender.
- Understanding Materials: Begin by learning about Blender\"s material system. Materials in Blender can include colors, textures, and shaders that dictate how an object\"s surface looks and reacts to light.
- Creating Textures: Textures can be created within Blender or imported from external sources. These can range from simple color maps to complex patterns that simulate real-world surface details such as scratches, bumps, and reflections.
- UV Mapping: UV mapping is the process of projecting a 2D image texture onto a 3D model. It\"s crucial for accurately applying textures to your model. In Blender, use the UV editing layout to unwrap your model and organize the UV layout efficiently.
- Applying Materials: Once you have your textures, apply materials to your model in the Shader Editor. You can create materials from scratch or use presets. Customize them by adjusting properties like color, roughness, and metallic to achieve the desired look.
- Using Nodes for Advanced Texturing: Blender\"s node system offers advanced control over materials and textures. Use nodes to mix textures, create complex shading effects, and add procedural elements to your materials for dynamic results.
- Shader Effects: Explore Blender\"s various shaders, such as the Principled BSDF, which simulates a wide range of materials with a single shader. This is particularly useful for creating realistic skin, metal, and other surfaces.
- Lighting and Rendering: Test your textures and materials under different lighting conditions. Adjust your materials as needed to ensure they look good in the final render. Consider using HDRI images for realistic environmental lighting.
- Optimization: High-resolution textures and complex materials can significantly increase render times. Optimize your textures and materials for performance, especially if you\"re working on animations or scenes with many elements.
By carefully applying textures and materials, you can dramatically enhance the visual quality of your animations in Blender. These elements add color, detail, and realism, making your scenes more engaging and believable. Remember, the goal is to complement your models and animation with textures and materials that bring your creative vision to life.
Rigging Your Characters
Rigging is a crucial step in the animation process, allowing animators to move and pose their characters in a lifelike and realistic manner. In Blender, rigging involves creating a skeleton (armature) for your model, which acts as a framework to control movement. Here’s a step-by-step guide to rigging your characters in Blender, making them ready for animation.
- Understanding Armatures: Start by learning about Blender’s armature system. Armatures are the bones and joints that make up the skeleton of your character. Each bone controls specific parts of your model’s mesh.
- Adding Bones: Begin rigging by adding bones to your character. Use the Add menu in Edit Mode to place bones where you need them, typically starting with the main parts of the body like the spine, then adding limbs, fingers, and facial bones.
- Naming Bones: It’s crucial to name your bones clearly and consistently. This helps in identifying them later during animation and when setting up complex rigs with many bones.
- Parenting Mesh to Armature: Once your skeleton is complete, you need to connect (parent) your mesh to the armature. This process allows the bones to control the mesh. Use automatic weights to let Blender assign how much influence each bone has over the mesh, or manually paint weights for finer control.
- Creating Control Rigs: For complex characters, you might need to create control rigs. These are additional bones or objects that make animating easier, such as IK (inverse kinematics) handles for legs and arms, allowing for more natural movements.
- Testing the Rig: Before moving on to animation, it’s important to test your rig thoroughly. Pose your character in various positions to ensure the bones are correctly influencing the mesh and that there are no unexpected deformations.
- Customizing Bone Shapes: For better visibility and control, you can customize the appearance of bones in Pose Mode by assigning custom shapes. This is particularly useful for control rigs, making them more intuitive to use.
- Layer Management: Complex rigs can benefit from using layers to organize different parts of the armature. This keeps your workspace tidy and makes it easier to focus on animating specific parts of your character.
Rigging in Blender might seem daunting at first, but by following these steps, you can create a functional and efficient rig that brings your characters to life. Remember, a well-rigged character is the foundation of a successful animation, allowing for expressive and believable movements.
Animation for Beginners Blender Tutorial
Get ready to dive into the mesmerizing world of Blender animation! From jaw-dropping character movements to breathtaking visual effects, this video will take you on an exhilarating journey of creativity and imagination. Don\'t miss out on learning the secrets behind creating stunning animations with Blender!
Become a PRO at Animation in 25 Minutes Blender Tutorial
Looking to master the art of animation? This tutorial is your ultimate guide! Step-by-step, you\'ll be introduced to the fascinating world of animation, learning essential techniques and tips to bring your characters to life. Say goodbye to boring static images and hello to captivating animations with this must-watch tutorial!
Animating Your Characters
Animating characters in Blender involves bringing them to life through motion. To start, ensure your character model is properly rigged and skinned. Here\"s a step-by-step guide to help you animate your characters effectively:
- Prepare Your Scene: Before animating, make sure your character and environment are set up correctly. This includes checking the rig, ensuring all controls work properly, and setting your scene\"s initial frame.
- Understand Keyframes: Animation in Blender is done by setting keyframes. A keyframe is a point in time where you define the position, rotation, and scale of your character. Blender interpolates the motion between these keyframes to create movement.
- Blocking Out the Animation: Start by blocking out the major movements of your animation. Set keyframes for the starting and ending positions of each major action. This step is about getting the timing and the overall flow of the animation right.
- Refining Movements: Once you have the basic movement blocked out, go in and add keyframes between the major actions to refine the motion. This includes adjusting the timing, easing in and out of movements, and making sure the motion is smooth and natural.
- Adding Secondary Actions: Secondary actions are smaller movements that add life and realism to your animation, such as blinking, facial expressions, and subtle shifts in weight. These are usually animated after the primary movements have been established.
- Working with the Graph Editor: The Graph Editor in Blender allows you to fine-tune the interpolation of keyframes. Use it to adjust the speed and timing of your animations for more control over the motion.
- Synchronizing with Audio: If your animation includes dialogue or music, synchronize the movements of your character with the audio. This may involve lip-syncing or timing movements to match the rhythm of the soundtrack.
- Previewing and Tweaking: Regularly preview your animation and make adjustments as needed. Look for any unnatural movements or timing issues and refine them until the animation feels right.
- Adding Details and Polishing: The final step is to add details and polish to your animation. This can include refining facial expressions, adding cloth or hair dynamics, and ensuring that all movements are smooth and cohesive.
Remember, animating characters is an art that requires practice and patience. Take your time to understand the principles of animation and apply them to your work in Blender. With dedication, you\"ll be able to bring your characters to life in a compelling and realistic manner.
Advanced Animation Techniques
After mastering the basics of animation in Blender, you can elevate your skills with advanced techniques. These methods will help you create more sophisticated and dynamic animations. Here’s how to incorporate advanced animation techniques into your projects:
- Motion Capture Integration: For realistic human animations, consider using motion capture data. Blender allows you to import motion capture files and apply them to your rigged characters, significantly reducing animation time while increasing realism.
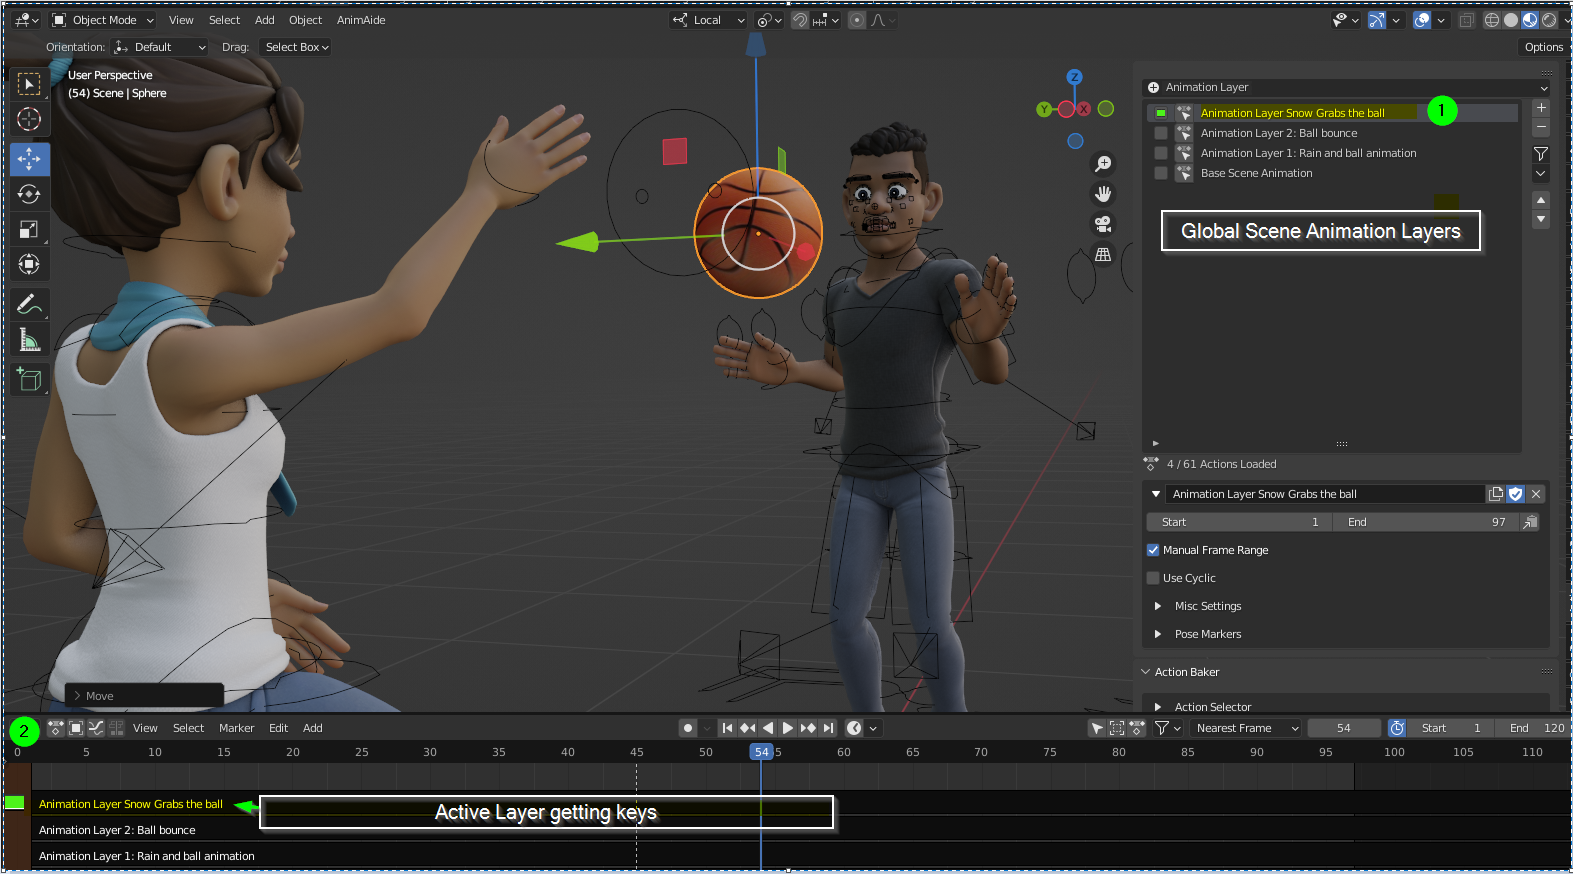
- Nonlinear Animation (NLA): Blender’s Nonlinear Animation editor lets you blend and layer different animation sequences. This technique is useful for creating complex animations from simpler actions, allowing for greater flexibility and efficiency in your workflow.
- Constraints and Modifiers: Use constraints and modifiers to automate movements and create effects that would be difficult to animate manually. For example, the \"Follow Path\" constraint can make an object follow a predetermined path, simplifying complex motion sequences.
- Shape Keys for Facial Animation: Shape keys are powerful for animating facial expressions and lip-syncing. By creating a series of morph targets for different facial expressions, you can smoothly transition between them to convey emotions and dialogue.
- Particle Systems for Environmental Effects: Blender’s particle system can simulate complex environmental effects like rain, smoke, or fire. Integrating these effects into your animations adds a layer of realism and depth.
- Physics Simulations: Utilize Blender’s physics engine to add realistic motion to your animations. Cloth simulation, rigid body dynamics, and fluid dynamics can create natural movements and interactions that would be incredibly time-consuming to animate by hand.
- Grease Pencil for 2D Animation: Combine 2D and 3D animation by using Blender’s Grease Pencil. This unique tool allows you to draw directly in the 3D viewport, enabling the creation of 2D animations within a 3D environment for mixed media projects.
- Scripting for Custom Effects: For truly unique animations, consider learning to script in Blender’s Python API. Scripting allows you to create custom effects, automate repetitive tasks, and even develop new tools for specific animation needs.
- Advanced Lighting and Rendering Techniques: Enhance your animations with advanced lighting and rendering techniques. Experiment with HDR lighting, volumetric lighting, and the use of different render engines like Cycles and Eevee to achieve the desired mood and atmosphere.
By incorporating these advanced techniques, you can push the boundaries of what is possible in Blender. Remember, the key to mastery is practice and experimentation. Don’t be afraid to try new methods and integrate them into your animation workflow for more dynamic and engaging results.
Lighting and Rendering
Lighting and rendering are crucial steps in the animation process in Blender, transforming your 3D models into visually stunning animations. Effective lighting sets the mood and enhances the realism of your scenes, while rendering is the process of generating the final image or animation from your scene setup. Follow these steps to master lighting and rendering in Blender:
- Understanding Blender\"s Render Engines: Blender offers several render engines, including Eevee (real-time render engine) and Cycles (ray-traced render engine). Choose the engine that best suits your project\"s needs based on the balance between quality and render time.
- Setting Up Your Lighting: Start by adding key lights to illuminate your scene. Use three-point lighting (key light, fill light, and back light) to achieve depth and dimension in your characters and environments. Experiment with different types of lights available in Blender, such as point, sun, area, and spotlights, to achieve the desired effect.
- Using HDRIs for Environmental Lighting: High Dynamic Range Images (HDRIs) can be used for realistic environmental lighting. They provide a 360-degree background and light your scene with real-world lighting conditions. This technique is especially useful for outdoor scenes or simulating specific lighting conditions.
- Adjusting Material Properties: Ensure that your materials are set up correctly for the chosen render engine. Material properties like roughness, specularity, and transparency play a significant role in how light interacts with surfaces in your scene.
- Optimizing Render Settings: Before rendering, adjust your render settings for the best balance of quality and efficiency. This includes setting the resolution, sampling rates, and any denoising features. For animations, consider using motion blur to add realism to moving objects.
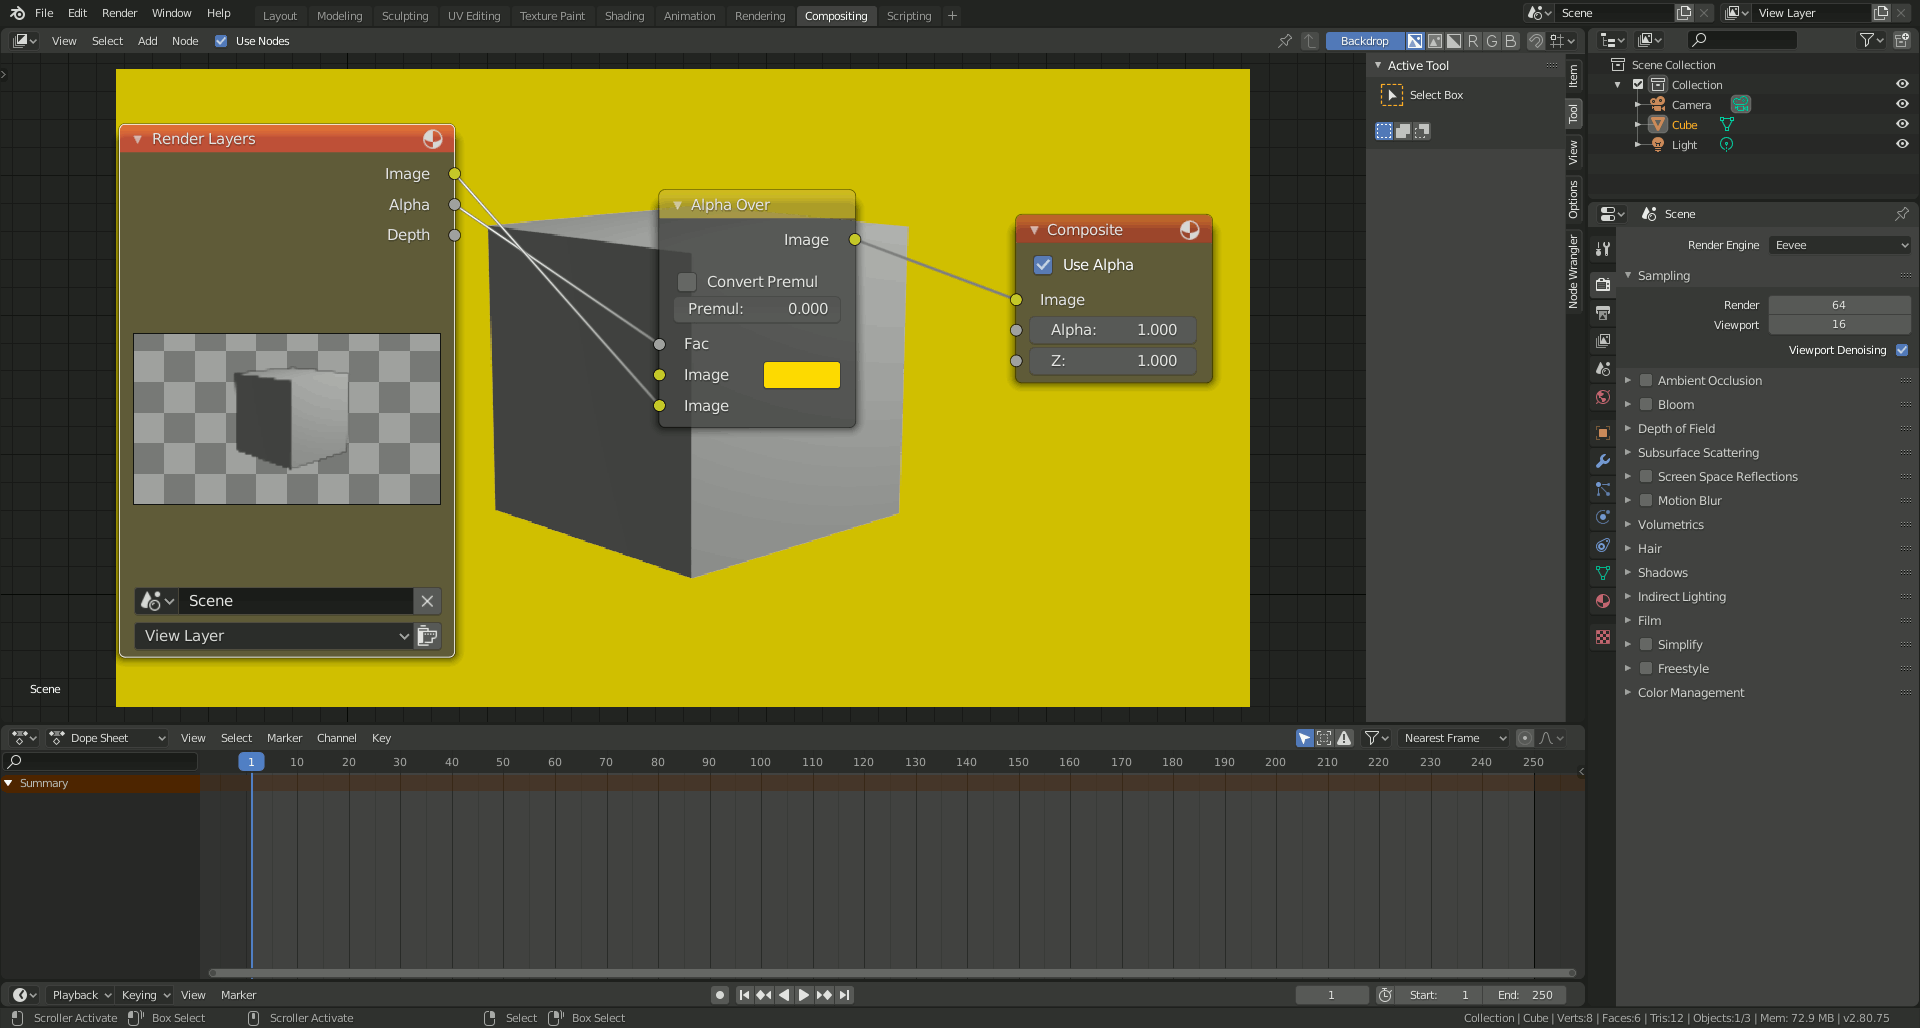
- Rendering Layers and Compositing: Use render layers to render your scene in parts. This approach offers greater control in post-processing, allowing you to adjust lighting, focus, and effects for individual elements without re-rendering the entire scene. Compositing these layers can significantly enhance the final output.
- Exploring Advanced Lighting Techniques: As you become more comfortable with basic lighting, explore advanced techniques such as volumetric lighting for atmospheric effects, caustics for realistic light refraction, and light probes for dynamic lighting in complex scenes.
- Post-Processing and Color Grading: After rendering, use Blender’s compositor or external software for post-processing. This can include color correction, adding visual effects, or integrating your animation with live-action footage.
Mastering lighting and rendering in Blender is a continuous learning process. Each project presents unique challenges and opportunities to experiment with different techniques. By understanding the tools and options available in Blender, you can create compelling and visually appealing animations that bring your creative visions to life.

_HOOK_
Physics and Simulations in Animation
Incorporating physics and simulations into Blender animations can significantly enhance realism and visual interest. Blender provides a robust set of tools for simulating physics, including fluids, smoke, fire, cloth, and rigid bodies. Here\"s how to effectively use these features in your animations:
- Understanding Physics Simulations: Begin by familiarizing yourself with the different types of physics simulations Blender offers. Each simulation type—such as fluid, smoke, cloth, or rigid body—has specific settings and applications.
- Setting Up Simulations: For each simulation, start by defining the domain, which is the 3D space where the simulation occurs. Then, specify your active elements, like fluids or cloth, and any collision objects they interact with.
- Configuring Physics Properties: Adjust the physics properties for each element in your simulation. This includes attributes like mass, friction, and bounce for rigid bodies, or viscosity and surface tension for fluids. These settings determine how realistically your elements interact.
- Creating Realistic Cloth Simulations: To simulate cloth, apply the cloth modifier to your object and adjust settings for stiffness, damping, and collision. Use weight painting to control how different parts of the cloth behave, such as making certain areas stiffer or more flexible.
- Simulating Fluids: Fluid simulations are great for creating realistic water, blood, or other liquid effects. Set up a fluid domain and define your fluid objects, adjusting parameters like flow rate and viscosity. Consider the scale of your scene for the most realistic results.
- Working with Smoke and Fire: For smoke and fire simulations, create a domain and define your flow sources. Adjust settings like temperature difference and smoke density to control the behavior and appearance of the smoke and flames.
- Rigid Body Dynamics: Use rigid body simulations for objects that need to interact with gravity and collide with each other. This is perfect for scenes with falling or colliding objects. Set up constraints for more complex interactions, like hinges or sliders.
- Integrating Simulations with Animations: Combine your physics simulations with keyframe animations for dynamic scenes. For example, animate a character to interact with a simulated cloth or to move through a fluid simulation.
- Optimizing Simulations: Physics simulations can be computationally intensive. Optimize your simulations by simplifying your meshes, reducing simulation resolution for previews, and baking your simulations for final rendering.
- Rendering and Finalizing Your Scene: Once you\"re satisfied with your simulation, proceed to rendering. Simulations can add significant detail and realism to your renders, so ensure your lighting and materials complement the simulation\"s effects.
Physics simulations add a layer of complexity and realism to animations that can\"t be achieved through keyframing alone. With practice and experimentation, you can leverage Blender\"s physics tools to create stunning, lifelike animations that captivate your audience.

READ MORE:
Exporting and Sharing Your Animations
Once you\"ve completed your animation in Blender, the next step is to export it for viewing and sharing. Whether you\"re aiming for online platforms, presentations, or personal archives, exporting your animation properly is crucial. Here’s how to efficiently export and share your animations:
- Choose the Right Export Format: Blender supports various export formats, including AVI, MPEG, and QuickTime for animations, as well as OBJ, FBX, and COLLADA for 3D models. Choose the format that best suits your needs, considering compatibility with the platforms where you\"ll share your work.
- Setting Export Options: When exporting animations, adjust the output settings to match your project\"s requirements. This includes resolution, frame rate, and compression options. For web sharing, consider using H.264 codec for a good balance between quality and file size.
- Rendering Your Animation: Before exporting, you must render your animation. Use Blender’s render settings to optimize the final output. You can render your animation as a sequence of images for maximum quality and then compile them into a video format using Blender\"s Video Sequence Editor or external software.
- Post-Processing and Editing: After rendering, you might want to edit your animation or add post-processing effects. Use video editing software to cut scenes, add transitions, or overlay text and sound. Blender’s own Video Sequence Editor is a handy tool for basic editing tasks.
- Testing Before Sharing: Before sharing your animation, test the exported file on different devices and media players to ensure compatibility and quality. Pay attention to loading times and playback smoothness, especially for online platforms.
- Choosing Platforms for Sharing: Decide on the platforms where you want to share your animation. Options include video sharing platforms like YouTube or Vimeo, social media, or professional networks like LinkedIn. Each platform has its own specifications and audience, so choose accordingly.
- Uploading Your Animation: When uploading your animation, include a compelling title, description, and keywords. These elements are essential for search engine optimization (SEO) and will help your target audience find your work.
- Embedding on Websites: If you have a personal or professional website, consider embedding your animation directly on a page. Use responsive design practices to ensure it displays correctly on all devices.
- Sharing Links and Networking: Share your animation with friends, family, and professional contacts through email or social media. Networking can provide valuable feedback and open up opportunities for collaboration or employment.
- Archiving Your Work: Finally, make sure to save and archive your original Blender files and any exports. Keeping organized archives will help you access and reuse your work in the future, or make adjustments based on feedback.
Exporting and sharing your animations is a rewarding part of the creative process, allowing your work to reach and inspire others. With the right preparation and by following these steps, you can ensure your animations look their best on any platform.
Embark on a creative journey with Blender and transform your visions into captivating animations. From modeling to rendering, this guide empowers you to bring your stories to life, inviting readers to explore the limitless possibilities of animation.