Topic character creator 4 to blender: Explore the transformative journey of integrating Character Creator 4 with Blender to elevate your 3D character design and animation, unlocking new realms of creativity and efficiency in your digital art workflow.
Table of Content
- What is the process of importing characters from Character Creator 4 to Blender?
- Understanding the Workflow from Character Creator 4 to Blender
- Key Features of Character Creator 4 for Blender Users
- Step-by-Step Guide: Importing Characters from CC4 to Blender
- Customizing Characters in Blender: Tips and Tricks for CC4 Users
- Enhancing Character Animations with CC4 and Blender Integration
- Utilizing Blender\"s Advanced Tools with CC4 Characters
- YOUTUBE: Free Accurig Character Creator 4 to Blender Addon
- Auto-Rigging in CC4: Streamlining the Animation Process
- Creating Realistic Textures and Materials for CC4 Characters in Blender
- Exporting Characters from Blender Back to Character Creator 4
- Best Practices for a Smooth CC4 to Blender Workflow
- Common Issues and Solutions in the CC4 to Blender Pipeline
- Future Updates and Community Resources for CC4 and Blender Users
What is the process of importing characters from Character Creator 4 to Blender?
To import characters from Character Creator 4 to Blender, you can follow these steps:
- Export the character from Character Creator 4: In Character Creator 4, export your character as an FBX file. Make sure to select the appropriate settings to ensure compatibility with Blender.
- Open Blender: Launch Blender on your computer.
- Import the FBX file: In Blender, go to File > Import > FBX and select the FBX file that you exported from Character Creator 4.
- Adjust the scale and position: After importing the character, you may need to adjust the scale and position to fit your scene in Blender. Use the transformation tools in Blender to make any necessary adjustments.
- Check the materials and textures: Ensure that the materials and textures of the character are correctly imported. You may need to adjust the textures or reassign materials in Blender.
- Further customize the character: Once the character is imported, you can further customize it in Blender using the available tools and features.
- Save your work: After completing the necessary modifications, remember to save your work in Blender to preserve your progress.
READ MORE:
Understanding the Workflow from Character Creator 4 to Blender
Integrating Character Creator 4 (CC4) with Blender streamlines the process of creating and animating 3D characters, making it accessible for artists and designers of all skill levels. This workflow leverages the strengths of both platforms to produce highly detailed and customizable characters. Here’s a step-by-step breakdown:
- Character Creation in CC4: Start by creating your character in CC4. This software offers a wide range of customization options, including body morphs, facial features, and clothing. You can either start from scratch or use a template as a foundation.
- Exporting from CC4: Once your character is ready, export it as an FBX file. This file format is compatible with Blender and retains all the necessary data, such as textures, materials, and rigging information.
- Importing into Blender: Open Blender and import the FBX file. You may need to adjust the import settings to correctly map the textures and materials. Blender’s powerful tools allow for further customization and editing of the character model.
- Customizing and Rigging: In Blender, you can modify the character further, add props, or create new clothing items. Blender’s advanced rigging tools also allow for the creation of custom animations and poses.
- Animation and Simulation: Utilize Blender’s animation tools to bring your character to life. You can create complex animations, facial expressions, and even simulate cloth dynamics.
- Exporting for CC4 or Other Uses: After animating, you can export your character back into CC4 for further use or into other formats supported by Blender for use in games, films, or other 3D projects.
This workflow enables a seamless transition between CC4 and Blender, ensuring that artists can take advantage of the unique features of both platforms. The combination of CC4’s specialized character creation tools and Blender’s comprehensive 3D modeling and animation capabilities makes for a powerful duo in the world of 3D character design.
Key Features of Character Creator 4 for Blender Users
Character Creator 4 (CC4) offers a plethora of features designed to enhance the 3D character creation process for Blender users. These features are tailored to provide an intuitive, efficient workflow, and high-quality results that can easily be integrated into Blender. Below are the key features of CC4 that stand out for Blender users:
- Highly Customizable Characters: CC4 provides an extensive range of customization options, including detailed facial morphing, body reshaping, and a vast library of clothing and accessories. This allows for the creation of unique characters that can fit any project requirement.
- Real-time PBR Shader Support: The software supports Physically-Based Rendering (PBR) shaders, enabling characters to exhibit realistic textures and materials. These shaders are compatible with Blender, ensuring that characters look as intended when imported.
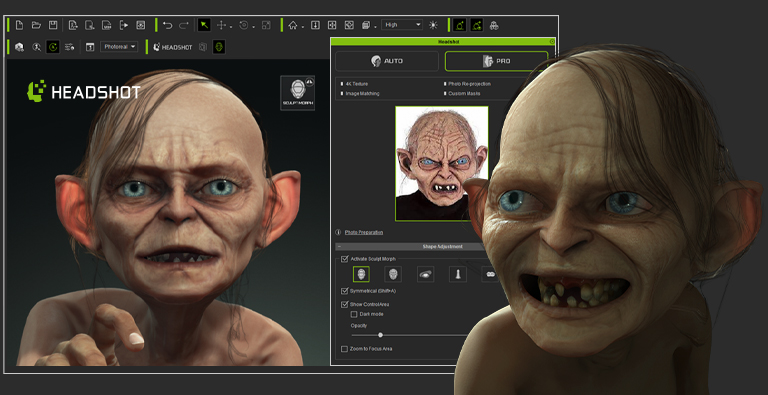
- Auto-Rigging: CC4 comes with an auto-rigging feature that simplifies the process of preparing a character for animation. This feature generates a fully rigged skeleton that is compatible with Blender’s rigging system, allowing for immediate animation work.
- Facial Expression and Lip-sync Tools: With advanced tools for creating facial expressions and lip-sync animations, CC4 enhances the emotive qualities of characters. These animations can be transferred to Blender, making it easier to create complex scenes and dialogues.
- Compatibility with Blender’s Hair System: CC4 characters can be exported with their hair assets in a format that is compatible with Blender’s hair particle system, allowing for further customization and styling within Blender.
- Dynamic Cloth Simulation: The software includes tools for designing clothes that dynamically react to the character\"s movements. These simulations can be baked into animations that are preserved when the character is brought into Blender.
- Extensive Asset Library: CC4 offers an expansive library of assets, including clothing, hair, and accessories that are optimized for use in Blender. This library is regularly updated, providing a continuous source of new elements to enhance character designs.
- Seamless Workflow Integration: The workflow between CC4 and Blender has been optimized to ensure a smooth transition of characters and their assets. This includes straightforward export and import processes, along with compatibility checks to minimize issues.
These features make Character Creator 4 an invaluable tool for Blender users, streamlining the character creation process and enabling the production of highly detailed, realistic characters suitable for any 3D project.

Step-by-Step Guide: Importing Characters from CC4 to Blender
Importing characters from Character Creator 4 (CC4) into Blender involves a series of steps designed to ensure a smooth transition and optimal compatibility. Follow this guide to successfully import your CC4 characters into Blender for further customization and animation.
- Prepare Your Character in CC4: Begin by finalizing your character in Character Creator 4. Make sure all customizations, such as textures, clothing, and morphs, are applied as desired.
- Export Character as FBX: In CC4, go to the \"File\" menu, select \"Export\", and then choose \"Export to FBX\". This format is ideal for Blender, as it supports a wide range of data including meshes, textures, and rigging information.
- Configure Export Settings: When exporting, you will be presented with several options. Ensure that you select \"Include Animation\", \"FBX Binary\", and \"Include Textures\" to export all necessary data. Adjust other settings as needed based on your project requirements.
- Import FBX to Blender: Open Blender and go to \"File\" > \"Import\" > \"FBX (.fbx)\". Navigate to the location of your exported FBX file and select it for import.
- Adjust Import Settings: In the Blender import window, you might need to adjust the scale and orientation settings to match your scene. Blender\"s default unit scale might differ from CC4\"s, so it\"s important to check that your character\"s size is correct.
- Check Textures and Materials: Once imported, inspect your character\"s textures and materials in Blender\"s shading layout. Due to differences in rendering engines, some adjustments to materials and textures may be necessary to achieve the desired look.
- Rigging and Pose Adjustments: If your character\"s rigging requires adjustments or if you wish to pose your character, use Blender\"s rigging tools. The character should be fully rigged thanks to CC4’s auto-rigging feature, but you can further customize it as needed.
- Save Your Project: With your character successfully imported and adjusted, save your Blender project. You can now proceed with additional modeling, texturing, or animation within Blender.
This guide outlines the essential steps for importing characters from Character Creator 4 into Blender. By following these steps, you can ensure that your characters are ready for further development in Blender\"s powerful 3D creation suite.
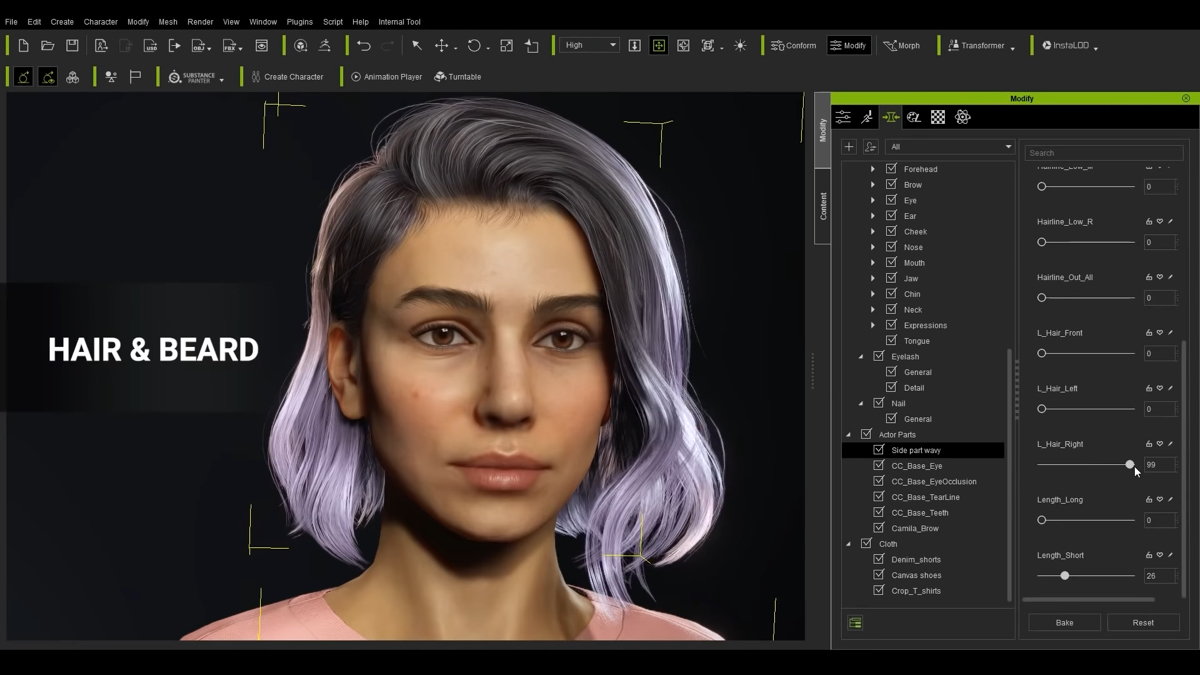
Customizing Characters in Blender: Tips and Tricks for CC4 Users
Importing characters from Character Creator 4 (CC4) into Blender involves a series of steps designed to ensure a smooth transition and optimal compatibility. Follow this guide to successfully import your CC4 characters into Blender for further customization and animation.
- Prepare Your Character in CC4: Begin by finalizing your character in Character Creator 4. Make sure all customizations, such as textures, clothing, and morphs, are applied as desired.
- Export Character as FBX: In CC4, go to the \"File\" menu, select \"Export\", and then choose \"Export to FBX\". This format is ideal for Blender, as it supports a wide range of data including meshes, textures, and rigging information.
- Configure Export Settings: When exporting, you will be presented with several options. Ensure that you select \"Include Animation\", \"FBX Binary\", and \"Include Textures\" to export all necessary data. Adjust other settings as needed based on your project requirements.
- Import FBX to Blender: Open Blender and go to \"File\" > \"Import\" > \"FBX (.fbx)\". Navigate to the location of your exported FBX file and select it for import.
- Adjust Import Settings: In the Blender import window, you might need to adjust the scale and orientation settings to match your scene. Blender\"s default unit scale might differ from CC4\"s, so it\"s important to check that your character\"s size is correct.
- Check Textures and Materials: Once imported, inspect your character\"s textures and materials in Blender\"s shading layout. Due to differences in rendering engines, some adjustments to materials and textures may be necessary to achieve the desired look.
- Rigging and Pose Adjustments: If your character\"s rigging requires adjustments or if you wish to pose your character, use Blender\"s rigging tools. The character should be fully rigged thanks to CC4’s auto-rigging feature, but you can further customize it as needed.
- Save Your Project: With your character successfully imported and adjusted, save your Blender project. You can now proceed with additional modeling, texturing, or animation within Blender.
This guide outlines the essential steps for importing characters from Character Creator 4 into Blender. By following these steps, you can ensure that your characters are ready for further development in Blender\"s powerful 3D creation suite.
_HOOK_
Enhancing Character Animations with CC4 and Blender Integration
Integrating Character Creator 4 (CC4) with Blender opens up advanced possibilities for animating characters. This synergy allows for the creation of complex, realistic animations by leveraging the strengths of both platforms. Here\"s how to enhance character animations using CC4 and Blender integration:
- Prepare Your Character in CC4: Start by creating or importing your character in Character Creator 4. Ensure that your character is fully rigged and ready for animation. CC4\"s auto-rigging feature can simplify this process, providing a solid foundation for further customization in Blender.
- Export to Blender: Once your character is ready, export it using the CC4 to Blender pipeline. This process typically involves exporting your character as an FBX or OBJ file, which can then be imported into Blender. Ensure to include all necessary textures and rigging information during the export.
- Import and Setup in Blender: Import your character into Blender and use the Blender Auto Setup addon for Character Creator characters. This addon automatically configures the imported model for Blender, setting up materials, textures, and rigging correctly.
- Utilize Blender’s Animation Tools: With your character imported and setup, take advantage of Blender\"s powerful animation tools. Use the NLA Editor for complex animation sequences, the Graph Editor for fine-tuning animations, and the Dope Sheet for overall animation management.
- Apply Blender\"s Physics for Realism: Enhance your animations with Blender’s physics simulations. Cloth simulation can add realism to clothing, while rigid body physics can be used for dynamic interactions between your character and the environment.
- Facial Animation and Lip Sync: For detailed facial animations and lip-syncing, Blender offers shape keys and the Grease Pencil tool. These features allow for precise control over facial expressions and mouth movements, synchronized with dialogue.
- Integrate Motion Capture Data: For more lifelike animations, consider integrating motion capture data into your Blender project. Blender supports motion capture data, which can be applied to your CC4 character for realistic human movements.
- Finalize and Export: After animating your character in Blender, you can render your animations using Blender\"s powerful rendering engines, Eevee or Cycles. Your final animations can be exported for use in games, films, or other media, or even sent back to CC4 for further adjustments.
Following these steps, animators and designers can create detailed, lifelike animations by combining the strengths of Character Creator 4 and Blender. The integration of CC4 with Blender not only streamlines the animation workflow but also enhances the quality and realism of character animations.

Utilizing Blender\"s Advanced Tools with CC4 Characters
Blender offers a plethora of advanced tools that can significantly enhance the quality and complexity of animations and models created with Character Creator 4 (CC4). Utilizing these tools allows for a more detailed and refined finishing touch to your characters. Here are steps and tips on how to make the most of Blender\"s capabilities with CC4 characters:
- Advanced Sculpting: Blender\"s sculpting tools provide the ability to add intricate details to your CC4 characters. After importing your character into Blender, use the sculpting mode to refine facial features, muscle definition, and add any specific character traits that require high precision.
- Complex Material and Texture Editing: Blender\"s material and texture editing capabilities are far-reaching. You can use the Shader Editor to create complex materials that react realistically to lighting conditions. Import the textures from CC4 and enhance them in Blender by adding subsurface scattering, glossiness, and bump maps for more realism.
- Realistic Hair and Fur Simulation: With Blender\"s particle system and hair grooming tools, you can create or improve upon the hair and fur of your CC4 characters. These tools allow for the simulation of realistic hair dynamics, giving characters more life-like appearances.
- Environmental Interaction: Blender allows for the simulation of interactions between your character and their environment. This includes cloth simulation for realistic clothing behavior, soft body dynamics for flexible objects, and rigid body physics for interactions with hard surfaces.
- Advanced Lighting and Rendering: Enhance the visual quality of your CC4 characters by using Blender’s advanced lighting and rendering tools. Utilize HDRI maps for realistic environmental lighting and experiment with the Cycles renderer for photorealistic output or Eevee for real-time rendering.
- Rigging and Weight Painting Enhancements: Although CC4 characters come pre-rigged, Blender’s rigging tools offer the possibility to modify or enhance these rigs. Use weight painting to fine-tune how the mesh of your character deforms in relation to the bones during animation.
- Animation Improvements: Blender\"s non-linear animation (NLA) editor and the graph editor can be used to refine the animations imported from CC4. These tools offer more control over the timing and flow of movements, allowing for more complex and nuanced animations.
- Compositing for Final Touches: Finally, use Blender’s compositing nodes to add the final touches to your scenes. This can include color grading, adding effects like blurs and glows, or integrating your character into live-action footage.
By leveraging Blender’s advanced tools, artists can bring CC4 characters to life in ways that are not possible within CC4 alone. This integration not only broadens the creative possibilities but also enhances the final quality of the projects.

Free Accurig Character Creator 4 to Blender Addon
Addon: Explore the exciting world of addons in this captivating video! Discover how these powerful tools can enhance your digital experience and streamline your daily tasks. You won\'t want to miss out on the endless possibilities addons can offer! Workflow: Dive into the world of workflow optimization with this informative video! Learn valuable tips and tricks to boost your productivity and efficiency. Watch as complex processes are simplified and streamlined to help you work smarter, not harder.
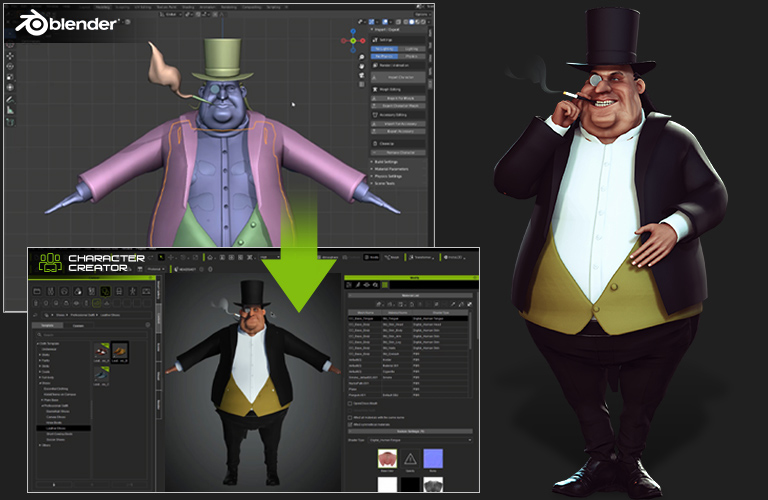
Character Creator Blender Roundtrip Character Workflow
3D Artist - Russell Midfield is a freelance artist who enjoys making tutorials on the 3D character development process.
Auto-Rigging in CC4: Streamlining the Animation Process
Auto-rigging in Character Creator 4 (CC4) introduces a groundbreaking approach to simplifying the character animation process, making it more efficient and accessible for artists and animators of all levels. This feature leverages advanced algorithms to automatically generate a fully functional rig for your 3D characters, reducing the time and technical expertise required to prepare characters for animation.
- Initiating Auto-Rigging: Start by importing your character model into CC4. The auto-rigging process supports a wide range of character types, ensuring versatility in your creative projects.
- Adjusting Rig Parameters: CC4 provides intuitive tools to adjust the rig to fit your character’s unique proportions. You can fine-tune joint positions and orientations to ensure accurate deformations during animation.
- Facial Rigging: The system includes comprehensive options for facial rigging, enabling detailed facial expressions and lip-syncing capabilities. This feature is pivotal for bringing characters to life with realistic animations.
- Compatibility with Blender: CC4 rigs are fully compatible with Blender, facilitating a seamless transition of rigged characters into your Blender projects. This integration supports the direct import of characters, complete with rigging and skin weights, ready for animation in Blender.
- Customization and Flexibility: Even after auto-rigging, CC4 allows for manual adjustments and refinements. Animators can customize rigs to accommodate specific animation requirements, enhancing the character’s range of motion and performance.
- Export and Integration: Once rigging is complete, characters can be exported from CC4 and imported into Blender. The process supports a variety of formats, ensuring compatibility with your workflow.
Auto-rigging in CC4 is designed to streamline the animation process, from initial character design to final animation in Blender. By automating complex rigging tasks, CC4 empowers artists to focus more on the creative aspects of character animation, enhancing productivity and facilitating the creation of more dynamic and engaging animated content.

Creating Realistic Textures and Materials for CC4 Characters in Blender
Creating realistic textures and materials for Character Creator 4 (CC4) characters in Blender is a crucial step in bringing digital creations to life. This process involves the careful application and manipulation of textures, shaders, and lighting to achieve photo-realistic results. By following a structured approach, artists can enhance the visual quality of their characters with rich, detailed textures and materials that respond naturally to various lighting conditions.
- Preparing Textures in CC4: Begin by exporting your character\"s textures from CC4. This includes diffuse, specular, normal maps, and more, which are essential for creating detailed skin, clothing, and accessories.
- Importing Characters and Textures into Blender: Once your character and its textures are exported from CC4, import them into Blender. Ensure that all textures are correctly mapped to the corresponding parts of your character model.
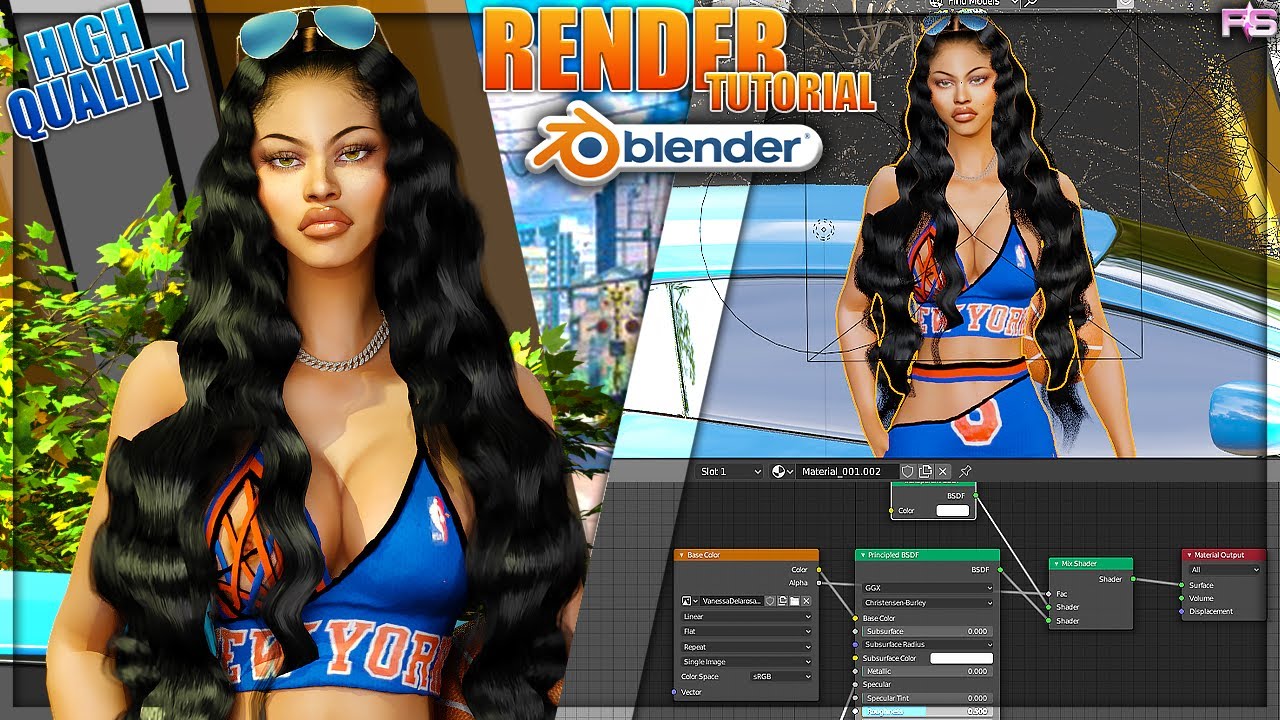
- Utilizing Blender\"s Shader Editor: Open Blender’s Shader Editor to create and apply materials to your character. Use the Principled BSDF shader as a base for most materials, adjusting parameters like roughness, metallic, and subsurface scattering to mimic real-world materials.
- Enhancing Skin Realism: For skin textures, focus on subsurface scattering settings to simulate the light penetration through skin layers. This adds a level of realism to the skin, making it look more lifelike under various lighting conditions.
- Adjusting Textures for Clothing and Accessories: Apply and tweak textures for clothing and accessories, considering the material properties. For instance, increase roughness for fabric materials and add metallic elements for metal accessories.
- Applying HDRI Lighting: Utilize HDRI images for environmental lighting to enhance the realism of textures and materials on your character. HDRI lighting provides a naturalistic ambiance and helps in achieving more realistic shading and reflections.
- Final Tweaks and Rendering: With all materials and textures applied, adjust the lighting and camera angles for your final render. Experiment with Blender\"s rendering settings to enhance the overall visual quality of your character.
Creating realistic textures and materials for CC4 characters in Blender is a meticulous process that significantly impacts the authenticity and appeal of your 3D creations. By leveraging Blender\"s powerful material and lighting tools, you can produce characters that are visually stunning and ready for animation or integration into larger digital projects.

Exporting Characters from Blender Back to Character Creator 4
Exporting characters from Blender back to Character Creator 4 (CC4) is a process that allows for further refinement and use within CC4\"s ecosystem. This workflow is beneficial for leveraging CC4\"s advanced features, such as its morphing tools, clothing, and accessory libraries. The following steps outline how to efficiently transfer your Blender-enhanced characters back into CC4.
- Preparation in Blender: Ensure your character and any modifications made in Blender are complete. This includes finalizing textures, materials, and any rigging adjustments.
- Applying Modifications: Apply all modifiers to your character model in Blender. This step is crucial to ensure that any geometry changes are preserved during the export process.
- Exporting the Model: Export your character model from Blender using the FBX format. When exporting, select the options that include armatures, meshes, and textures to ensure all elements are captured in the export.
- Importing into CC4: Open Character Creator 4 and navigate to the import section. Select the option to import a character model and choose your exported FBX file.
- Adjusting the Imported Model in CC4: Upon import, CC4 may prompt you to adjust the scale and orientation of your model to match CC4\"s defaults. Make the necessary adjustments to ensure your character aligns correctly within the CC4 environment.
- Reapplying Textures and Materials: If any textures or materials need reassignment or adjustment, use CC4\"s material editor to apply and fine-tune them to your character.
- Finalizing the Character: Once your character is imported and adjusted in CC4, you can utilize CC4\"s tools to further customize or enhance your character. This includes applying new clothing, accessories, or using CC4\"s morphing tools for final touches.
Exporting characters from Blender back to CC4 allows for a flexible workflow where the strengths of both platforms can be utilized to create highly detailed and customizable characters. By following these steps, artists can seamlessly transition between Blender and CC4, taking advantage of the unique features each software offers.

_HOOK_
Best Practices for a Smooth CC4 to Blender Workflow
To ensure a seamless workflow between Character Creator 4 (CC4) and Blender, adopting a set of best practices can significantly enhance efficiency and the quality of the final output. Whether you are importing characters from CC4 to Blender for animation, rendering, or further customization, following these guidelines will help you maintain the integrity of your characters and streamline the process.
- Consistent File Organization: Keep your project files, including textures, models, and reference images, organized in clearly labeled folders. This practice helps in avoiding misplaced files and streamlines the import/export process.
- Optimize Models in CC4: Before exporting your character to Blender, optimize the model in CC4. This includes reducing polygon count and ensuring textures are correctly mapped, which helps in maintaining performance in Blender.
- Use Compatible Export/Import Formats: When transferring characters between CC4 and Blender, use formats that preserve the integrity of your models, such as FBX. This format supports the transfer of mesh, rigging, and texture information.
- Preserve Rigging Information: Ensure that the rigging information is correctly exported with your character. This includes checking the export settings in CC4 and the import settings in Blender to maintain bone hierarchies and skin weights.
- Test Animations Early: Conduct early tests of animations with your imported characters in Blender. This helps in identifying and resolving any issues with rigging or deformations early in the workflow.
- Manage Textures and Materials: After importing your character into Blender, check all textures and materials to ensure they have been applied correctly. Make adjustments as necessary using Blender’s material editor to achieve the desired appearance.
- Utilize Blender’s Advanced Features: Take advantage of Blender’s advanced features such as particle systems for hair and fur, cloth simulation for dynamic clothing, and the powerful Eevee and Cycles render engines for final renders.
- Keep Software Updated: Regularly update both CC4 and Blender to their latest versions to take advantage of new features, bug fixes, and improved compatibility.
- Backup Frequently: Regularly save and backup your work at different stages of the workflow. This ensures that you can recover your project in case of software crashes or data loss.
By adhering to these best practices, artists and animators can achieve a smooth and efficient workflow between Character Creator 4 and Blender, leading to high-quality results in character design, animation, and rendering projects.
Common Issues and Solutions in the CC4 to Blender Pipeline
Transitioning characters from Character Creator 4 (CC4) to Blender and vice versa can occasionally present challenges. Understanding these common issues and their solutions can significantly streamline your workflow, ensuring a more efficient and frustration-free experience. Below are some frequently encountered problems and strategies to overcome them.
- Issue: Texture Discrepancies
- Solution: After importing your character into Blender, textures may not appear as they did in CC4. To resolve this, verify the texture paths and ensure they are correctly linked in Blender\"s Shader Editor. Additionally, adjust the shader settings to match CC4\"s PBR (Physically Based Rendering) materials.
- Issue: Rigging and Weight Painting Errors
- Solution: If the character\"s rig behaves unexpectedly or deformations occur, check the weight painting in Blender. It may be necessary to adjust the weight paint to ensure smooth skinning. For complex issues, consider re-importing the rigged model from CC4 with adjusted export settings.
- Issue: Scale and Orientation Mismatch
- Solution: Characters imported from CC4 to Blender may have scale or orientation issues. To fix this, apply the correct scale and rotation in Blender’s Object Mode. Use the \"Apply\" function to apply scale and rotation, ensuring the model\"s dimensions and orientation match those in CC4.
- Issue: Missing or Corrupted Files
- Solution: If files appear missing or corrupted upon import, re-export your character from CC4, ensuring all files are correctly saved and intact. Double-check export settings to include all necessary data, such as textures and rigging information.
- Issue: Animation Transfer Difficulties
- Solution: Transferring animations between CC4 and Blender can sometimes result in lost keyframes or timing issues. To mitigate this, use the NLA (Non-Linear Animation) Editor in Blender to adjust and refine animations. Ensure animation data is correctly exported from CC4 with the appropriate settings.
- Issue: Performance Lag
- Solution: High-poly models or complex scenes can cause performance lag in Blender. Optimize your character in CC4 by reducing the polygon count before export, and consider using Blender’s decimate modifier to further reduce complexity without significantly impacting visual quality.
By anticipating these common issues and knowing how to address them, you can ensure a smoother transition between Character Creator 4 and Blender, allowing for a more productive and creative workflow.
READ MORE:
Future Updates and Community Resources for CC4 and Blender Users
The integration of Character Creator 4 (CC4) with Blender is an evolving landscape, with continuous updates and an active community contributing to its development. Staying informed about future updates and engaging with community resources can significantly enhance your experience and capabilities within both platforms. Here are some insights into upcoming developments and where to find valuable resources.
- Anticipated Updates for CC4: Look forward to enhancements in character realism, including improved skin textures and morphing capabilities. Also, expect advancements in auto-rigging features that streamline the animation process even further.
- Blender Developments: Blender’s roadmap includes updates to its sculpting tools, rendering engine, and animation system, which will benefit CC4 users by providing more powerful tools for character customization and animation.
- Community Forums: Platforms such as the official CC4 and Blender forums, Reddit, and Discord channels serve as excellent resources for tips, tutorials, and troubleshooting advice from experienced users.
- Online Tutorials and Workshops: A wealth of online tutorials, both free and paid, are available, covering everything from basic character creation in CC4 to advanced animation techniques in Blender. These resources are invaluable for users looking to enhance their skills.
- User-Created Content: The community often shares custom scripts, addons, and assets that can be used to enhance your workflow. Websites like Blender Market and Gumroad are great places to find these resources.
- Official Updates and Documentation: Stay updated with official releases and documentation from the developers of CC4 and Blender. These are the best sources for accurate information on new features and how to use them effectively.
Engaging with the community and staying informed about the latest updates are key to maximizing your productivity and creativity in CC4 and Blender. Whether you are a beginner or an experienced user, the community and resources available can provide support and inspiration for your projects.
Embrace the synergy between Character Creator 4 and Blender to unlock new realms of creativity and efficiency in your 3D projects. Join a vibrant community of artists and innovators pushing the boundaries of character design and animation.