Topic blender video editing effects: Discover the power of Blender video editing effects to transform your visual storytelling, enhancing creativity and professional output in your projects.
Table of Content
- What are some popular effects that can be added in Blender video editing?
- Overview of Blender\"s Video Editing Capabilities
- Getting Started with Blender for Video Editing
- Exploring Blender\"s Video Sequence Editor
- Key Video Editing Features in Blender
- Advanced Video Editing Techniques with Blender
- Blender\"s Visual Effects (VFX) Tools and How to Use Them
- YOUTUBE: Blender Tutorial: Adding Effects in Blender Video Editor
- Color Grading and Correction in Blender
- Audio Syncing and Editing in Blender
- Exporting Your Video Projects from Blender
- Blender Video Editing: Tips, Tricks, and Best Practices
- Resources and Tutorials for Learning Blender Video Editing
What are some popular effects that can be added in Blender video editing?
When using Blender for video editing, there are various popular effects that can enhance your videos. Some of these effects include:
- Transitions: Add smooth transitions between video clips to create a seamless flow.
- Color Grading: Adjust the colors and tones of your video to enhance the overall look and mood.
- Text Overlays: Insert text overlays to provide information, titles, or captions within the video.
- Keyframes and Animation: Create animated effects by utilizing keyframes to animate objects or properties in your video.
- Blur and Sharpen: Apply blur effects to create a depth of field or sharpen specific areas of the video for emphasis.
- Filters and Effects: Experiment with various filters and effects to add creative elements to your video, such as vignettes, glows, or stylized looks.
READ MORE:
Overview of Blender\"s Video Editing Capabilities
Blender is not just a 3D modeling and animation tool; it\"s also a powerful video editing software that offers a wide range of functionalities for creators and professionals. Whether you\"re working on simple video cuts or complex compositing and VFX, Blender has the tools to bring your vision to life. Its video editing capabilities are integrated into the Video Sequence Editor (VSE), providing a non-linear editing platform within the software.
- Non-Linear Video Editing: Blender\"s VSE allows for arranging video clips, images, and audio in a non-linear fashion. This flexibility is crucial for complex video projects requiring multiple layers and sequences.
- Effects and Transitions: Users can apply various effects and transitions between clips directly within the editor, including wipes, fades, and more sophisticated graphical overlays.
- Color Grading: Blender includes tools for color correction and grading, enabling you to enhance the visual appeal of your videos and match different shots cohesively.
- Audio Mixing: The software offers audio syncing, mixing, and waveform visualization, providing a comprehensive sound editing suite.
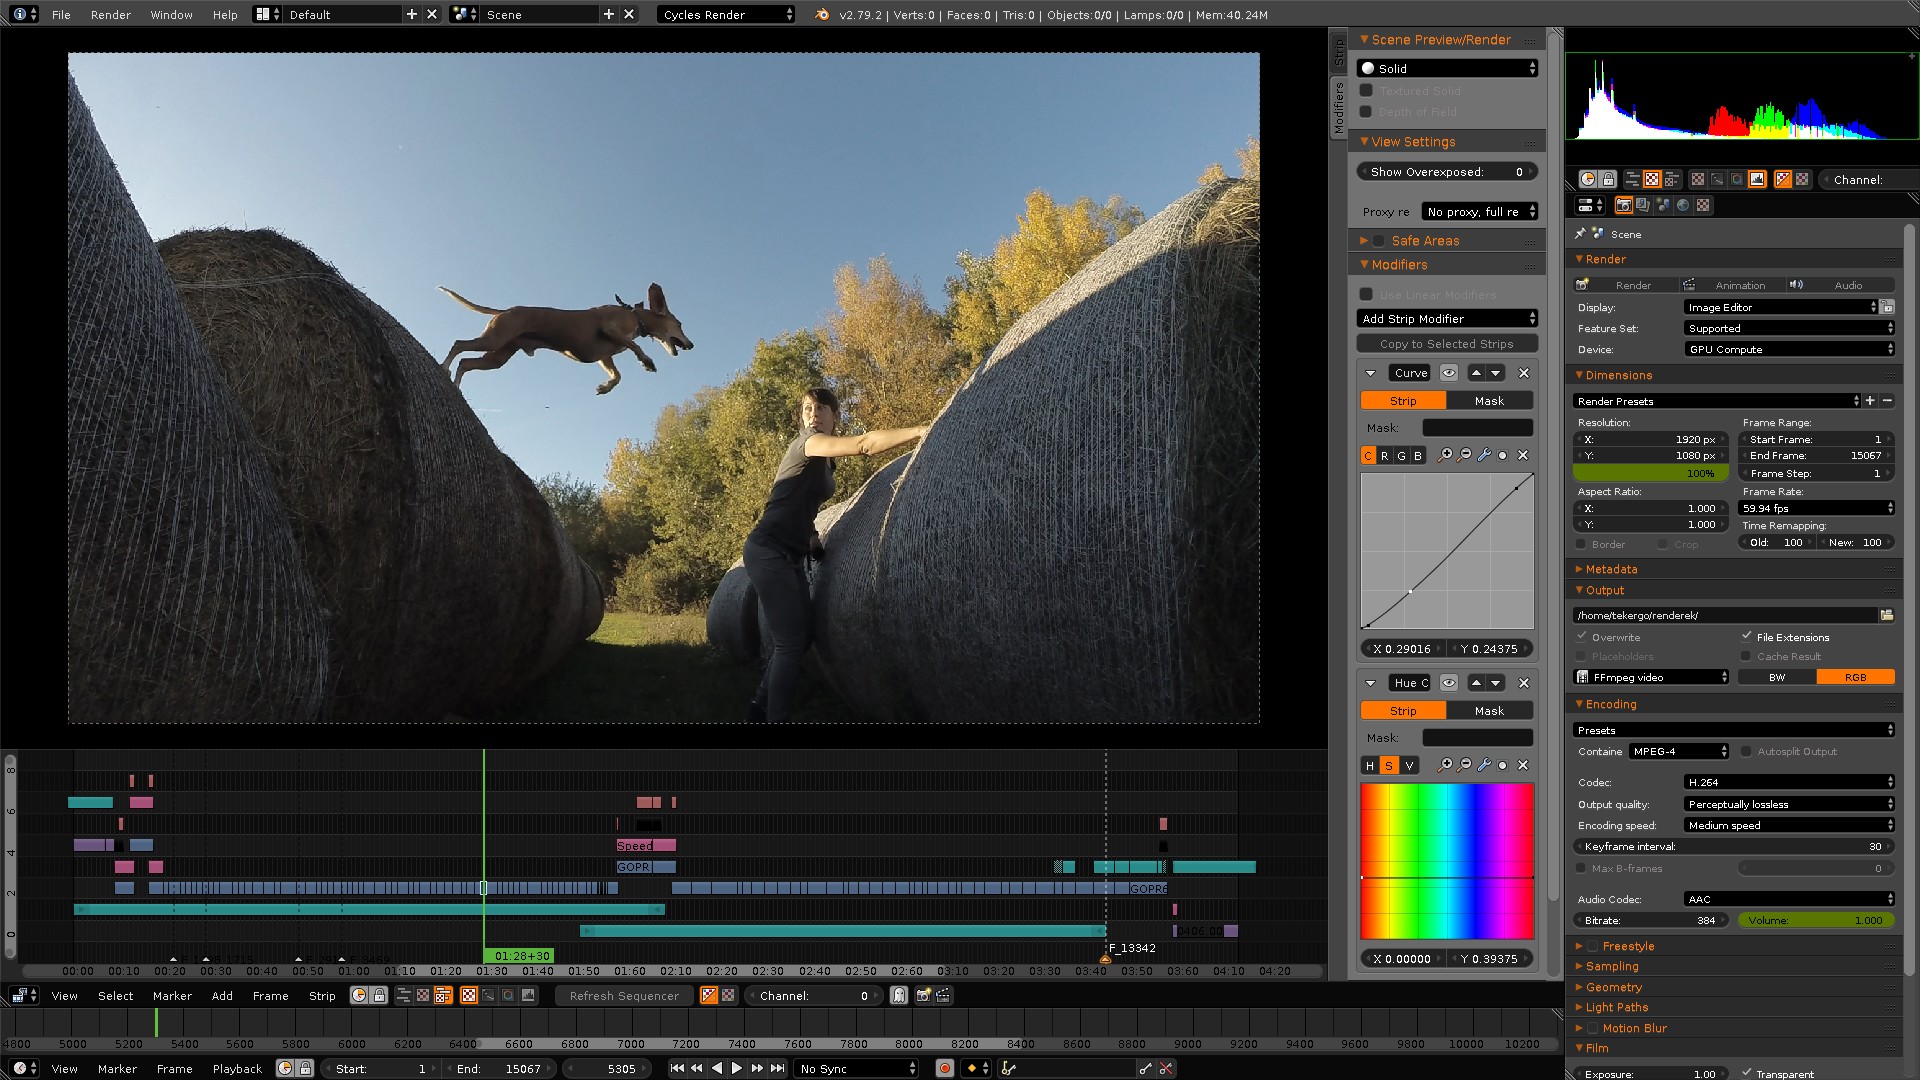
- Live Preview: A standout feature is the ability to view edits in real-time, including live preview, luma waveform, chroma vectorscope, and histogram displays.
- Advanced VFX: Beyond traditional editing, Blender excels in visual effects, offering capabilities like green-screen keying, masking, and motion tracking.
Blender\"s integration of video editing and 3D animation tools makes it a unique choice for projects that require both. From YouTube creators to professional filmmakers, Blender offers an accessible, no-cost solution to video editing and visual effects, promoting creativity and innovation.

Getting Started with Blender for Video Editing
Embarking on video editing with Blender opens a realm of creative possibilities. This powerful software, known for its 3D modeling and animation capabilities, also includes a comprehensive Video Sequence Editor (VSE) for non-linear editing. Here’s how to get started:
- Download and Install Blender: Visit the official Blender website to download the latest version compatible with your operating system.
- Familiarize Yourself with the Interface: Blender\"s interface might be daunting at first glance, but it’s highly customizable and packed with powerful tools. Spend some time exploring the layout, especially the Video Sequence Editor (VSE) where you\"ll be doing most of your video editing work.
- Import Your Media: Start by importing the video clips, images, and audio files you plan to edit. Blender supports a wide range of file formats, making it easy to bring in media from various sources.
- Learn the Basics of Video Editing: Before diving into complex editing techniques, understand the basics like cutting, trimming, and arranging clips on the timeline, as well as adding transitions and effects.
- Explore Blender’s Effects and Transitions: Blender offers a variety of video effects and transitions that can enhance your project. Experiment with these to learn how they can improve your video’s aesthetics and narrative flow.
- Practice Color Correction and Grading: Color plays a significant role in video production. Utilize Blender’s color correction tools to adjust exposure, contrast, saturation, and color grading to give your project a polished look.
- Dive Into Advanced Editing Techniques: As you become more comfortable with Blender, start exploring advanced features like masking, green screen effects, and using the compositor for post-production effects.
- Render and Export Your Project: Once you’re satisfied with your edit, it’s time to render and export your video. Blender offers various export formats, allowing you to choose the best option for your project\"s final delivery.
Remember, learning video editing with Blender is a process. Take advantage of online tutorials, forums, and the Blender community to help you along the way. With patience and practice, you\"ll be able to unlock the full potential of Blender\"s video editing capabilities.

Exploring Blender\"s Video Sequence Editor
Blender\"s Video Sequence Editor (VSE) is a versatile tool for non-linear video editing, allowing users to compile, edit, and animate video clips with ease. It\"s designed for a range of tasks from simple video splicing to complex compositions with multiple layers of video and audio. Here\"s a detailed exploration of what the VSE offers:
- User Interface: The VSE features a timeline-based interface where clips can be dragged and dropped, trimmed, and arranged in layers. The preview area allows for real-time playback and evaluation of edits.
- Adding Clips: Users can add video, audio, and image files to the sequence editor. Blender supports a variety of file formats, making it easy to integrate diverse media types into your project.
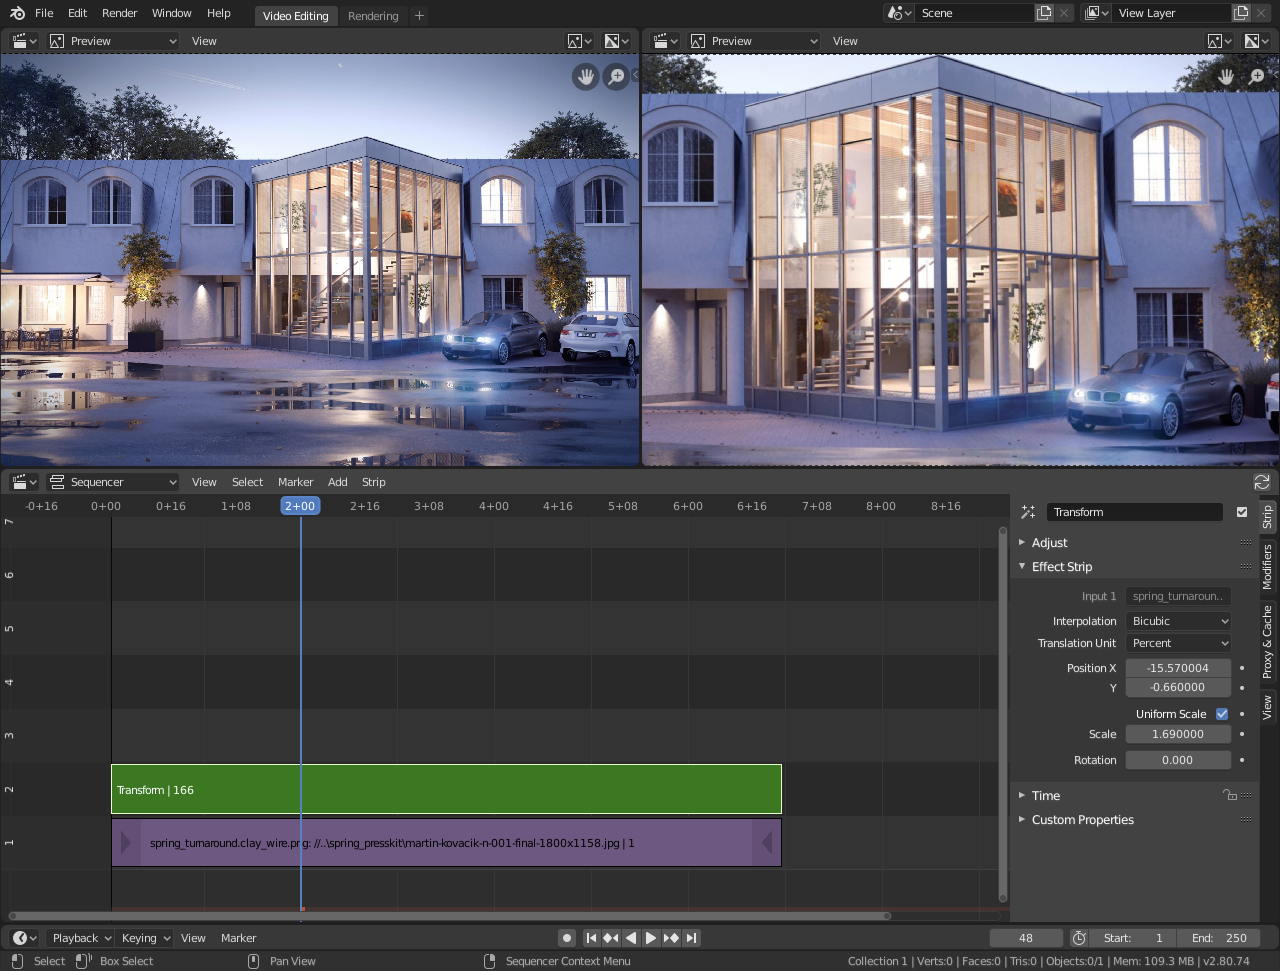
- Transform and Edit: The VSE provides tools for transforming clips including scaling, positioning, and rotation. Basic edits like cuts, fades, and transitions are intuitive to apply.
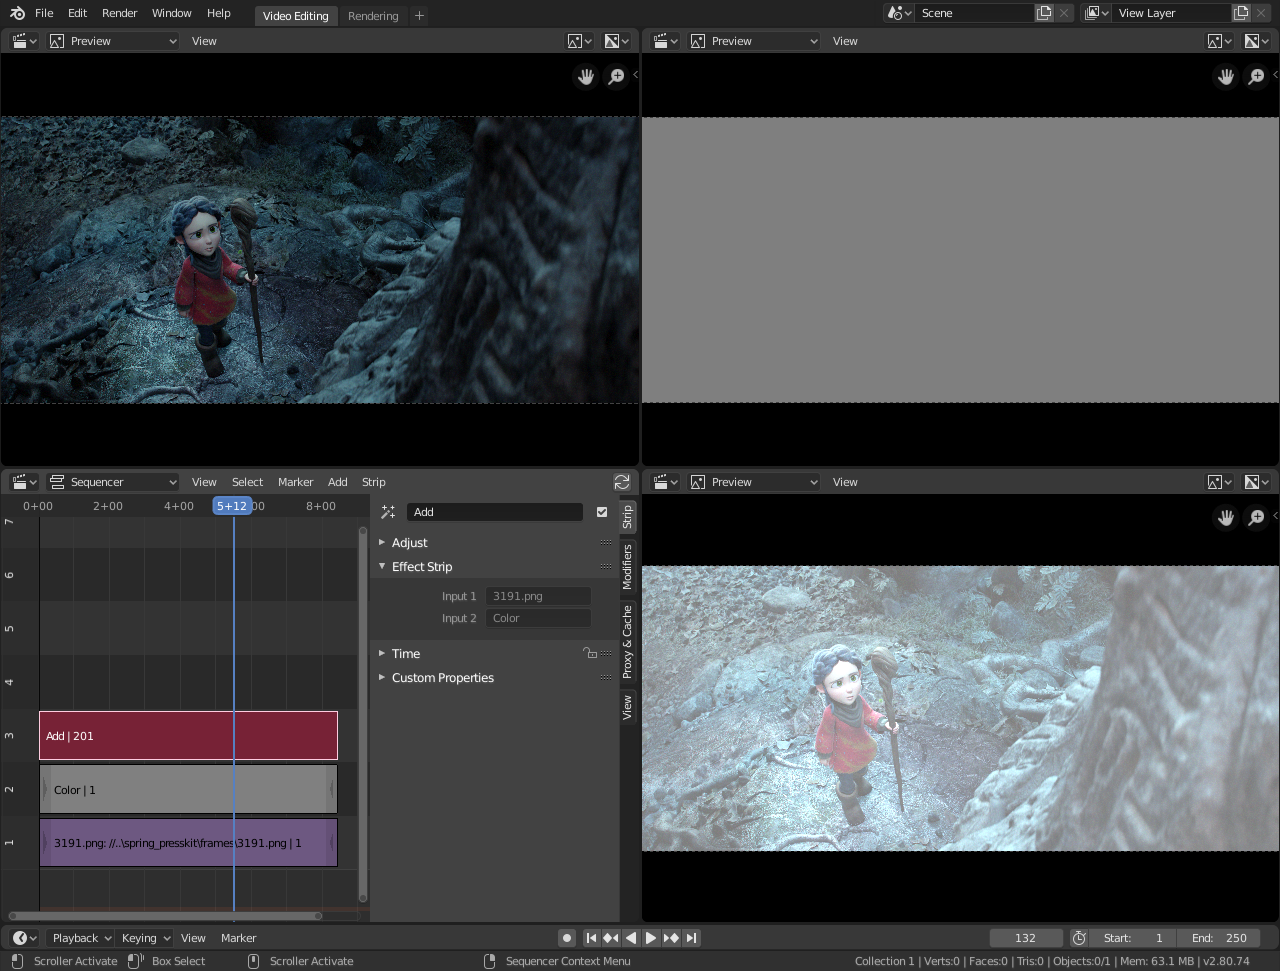
- Effects Strips: Blender enhances video projects with a range of effect strips. These include color correction, speed control, and various filters for artistic effects.
- Audio Editing: Comprehensive audio editing capabilities allow for sound mixing, synchronization, and the addition of sound effects directly within the VSE.
- Animation: Unique to Blender, users can integrate 3D animations directly into their video projects, opening up creative possibilities not available in traditional video editing software.
- Rendering and Output: Once editing is complete, Blender offers flexible rendering options, including various output formats and resolutions to suit different project requirements.
The VSE is a powerful component of Blender, bridging the gap between video editing and 3D animation. By mastering the Video Sequence Editor, users can unleash their creativity, producing professional-quality video projects with rich effects and animations.
Key Video Editing Features in Blender
Blender offers a comprehensive suite of video editing features that cater to both novice editors and professional filmmakers. Its capabilities extend beyond traditional video editing to include 3D modeling, animation, and simulation. Here are the key video editing features in Blender:
- Video Sequence Editor (VSE): A non-linear editing tool for arranging, cutting, and splicing video clips. The VSE also allows for layering of videos, images, and sounds, enabling complex compositing and sequencing.
- Effects and Transitions: Blender includes a variety of effects such as Gaussian blur, color grading, and transitions like crossfades and wipes, allowing for creative video enhancement.
- Color Correction: Advanced color correction tools are available for adjusting brightness, contrast, saturation, and RGB values to achieve the desired look and feel of your video.
- Audio Editing: Comprehensive audio editing features for syncing, mixing, and adding effects to audio tracks directly within the video project.
- Live Preview and Histogram Displays: Real-time preview functionality with luma waveform, chroma vectorscope, and histogram displays for precise editing and color grading.
- Animation Integration: Unique integration with Blender’s animation tools allows for the inclusion of 3D animations and effects in video projects, providing unparalleled creative possibilities.
- Rendering and Output: Flexible rendering options support a range of output formats and resolutions, ensuring high-quality final products suitable for various distribution channels.
- Customizable Interface: Blender’s interface is highly customizable, allowing users to tailor the workspace to their specific editing needs and workflow preferences.
These features make Blender a versatile and powerful tool for video editing, capable of handling simple projects to complex productions involving 3D visual effects and animation.
_HOOK_
Advanced Video Editing Techniques with Blender
Blender\"s robust suite of tools supports advanced video editing techniques, allowing creators to push the boundaries of visual storytelling. Here’s how you can leverage Blender’s capabilities for advanced editing:
- Video Masking and Layering: Utilize Blender’s masking tools to create sophisticated composites. This technique is perfect for adding effects to specific parts of your footage without affecting the rest.
- Color Grading: Go beyond basic correction with Blender’s color grading tools. Use nodes in the compositor to apply complex color schemes and emulate the look of film.
- Motion Tracking and Stabilization: Incorporate live-action footage with 3D elements using Blender’s motion tracking capabilities. This feature is also useful for stabilizing shaky footage.
- 3D Visual Effects: Integrate 3D objects into your video scenes, creating effects that are not possible in traditional 2D video editing software. This includes simulations such as smoke, fire, and fluid dynamics.
- Green Screen/Chroma Keying: Remove backgrounds from footage using Blender’s chroma keying tools, allowing for the insertion of new backgrounds or integration with 3D environments.
- Custom Transitions and Effects: Create your own transitions and effects using Blender’s animation tools. This is particularly useful for creating unique visuals that stand out.
- Audio Spectrum Visualizations: Generate dynamic visualizations based on audio tracks within your project, perfect for music videos or audio-focused content.
- Rendering and Encoding Options: Take advantage of Blender’s rendering engine to output your projects in high quality, experimenting with encoding settings to achieve the best balance between quality and file size.
These advanced techniques can significantly enhance the production value of your projects, making Blender an invaluable tool for video editors and filmmakers looking to explore new creative avenues.

Blender\"s Visual Effects (VFX) Tools and How to Use Them
Blender\"s comprehensive suite of VFX tools enables creators to add stunning visual effects to their video projects. These tools are designed for both simplicity and complexity, allowing for the creation of effects that range from basic color corrections to intricate simulations of natural phenomena. Here’s a guide on how to use some of Blender\"s VFX tools:
- Compositing: Blender’s node-based compositing system allows for the layering of video footage, images, and effects in a non-destructive way. You can combine different elements using nodes to create complex visual effects.
- Chroma Keying: Use the Keying node in the compositor to remove green screen backgrounds, seamlessly integrating your subjects into new environments.
- Simulation Effects: Blender offers simulation tools for creating realistic fire, smoke, fluid, cloth, and particle effects. These simulations can be controlled and animated to fit the scene’s requirements.
- Tracking and Masking: For integrating VFX into live-action footage, Blender provides motion tracking tools that allow you to track objects or camera movements. You can then apply masks to selectively apply effects or integrate 3D elements.
- Color Grading: The compositor also includes tools for advanced color grading, helping you set the mood and tone of your scenes with fine control over colors and lighting.
- 3D Integration: Unique to Blender is the ability to create and integrate 3D models directly into your video projects. This includes adding 3D text, characters, or even entire scenes to your videos.
- Dynamic Paint: This feature allows objects to become a canvas, where other objects can paint on them over time. Use dynamic paint to create effects like footprints in the snow or raindrops on a surface.
Learning to use these tools effectively can take time, but the results are well worth the effort. Blender’s VFX capabilities are powerful enough for professional film and video projects, yet accessible enough for hobbyists looking to add an extra layer of polish to their work.
Blender Tutorial: Adding Effects in Blender Video Editor
Tutorial: Discover an easy-to-follow tutorial that will guide you step-by-step towards mastering a new skill. Learn practical tips and tricks in this engaging video that will leave you feeling inspired and empowered. Skills: Unlock your full potential by honing your skills with this insightful video. Gain valuable knowledge and expertise to enhance your abilities, whether it\'s in your profession or a personal hobby. Start your journey to success now.
5 Blender Skills Every Video Editor Should Know
My Digital Asset Store: https://mediamonopoly.co Coaching / Project Consultation w/ Max: ...
Color Grading and Correction in Blender
Color grading and correction are pivotal in video editing, allowing editors to set the mood, enhance realism, or correct inconsistencies in their footage. Blender provides a robust set of tools for these tasks, enabling both subtle adjustments and dramatic transformations. Here\"s how to approach color grading and correction in Blender:
- Accessing the Color Tools: Blender\"s color grading tools are primarily found within the Compositor, using nodes, and the Sequencer, for direct video clip adjustments.
- Basic Corrections: Start with basic corrections to balance your footage. Adjust the brightness, contrast, saturation, and white balance using the Bright/Contrast and Hue/Saturation nodes or the strip properties in the VSE.
- Using Curves for Precision: The RGB Curves node offers more control, allowing you to fine-tune the luminance and color balance across shadows, midtones, and highlights.
- Color Grading with Nodes: For creative grading, explore nodes like Color Balance for cinematic looks, or use the Look Up Table (LUT) node to apply industry-standard color profiles.
- Masking for Selective Grading: Utilize masks to apply color adjustments to specific areas of your footage, perfect for drawing attention or correcting localized color issues.
- Layering Effects: Layer multiple nodes for complex effects, such as vignettes, film grain, or stylized color washes, enhancing the visual narrative of your project.
- Preview and Adjust: Continuously preview your adjustments in the Image Editor or Sequencer preview to ensure the desired outcome. Iteration is key to achieving the perfect grade.
Mastering color grading and correction in Blender can dramatically improve the visual quality of your projects, making them more engaging and visually coherent. With practice, these tools can help you convey the right atmosphere and tone for your storytelling.

Audio Syncing and Editing in Blender
Blender not only excels in video editing and effects but also offers robust tools for audio syncing and editing, ensuring that your visual content is perfectly matched with sound. Here\"s a guide to managing audio within your Blender projects:
- Importing Audio: Start by importing your audio files into the Video Sequence Editor (VSE). Blender supports a variety of audio formats, allowing you to add music, dialogue, and sound effects to your project.
- Syncing Audio to Video: Use Blender’s waveform display to visually match audio cues to video events. This is crucial for tasks like syncing dialogue to lip movements or timing sound effects with action sequences.
- Adjusting Audio Levels: Within the VSE, you can easily adjust the volume of individual audio strips, ensuring that your audio mix is balanced and clear.
- Adding Effects: Blender allows you to add audio effects directly within the VSE. This includes basic effects like fade in/out and more complex effects achievable through the properties panel.
- Animation Sync: For projects involving animation, Blender’s audio tools can be used to sync animations with sound, enhancing the overall impact of the visual content.
- Output and Encoding: When rendering your final project, ensure that audio settings are correctly configured to include all audio tracks in the output file. Blender supports various audio codecs, allowing for flexibility in project delivery.
Audio syncing and editing in Blender can significantly enhance the professionalism and emotional impact of your projects. By integrating audio seamlessly with visual elements, you create a more immersive and engaging experience for your audience.
Exporting Your Video Projects from Blender
Finalizing your project by exporting it from Blender is the last step in the video editing process. This step converts your work into a standard video file format that can be shared and viewed on various platforms. Follow these steps to export your video projects from Blender:
- Choose Your Output Settings: In the Properties panel, navigate to the Output properties. Here, you can select your desired file format, such as AVI, MPEG, or H.264 for videos, and MP3 or AAC for audio.
- Set the File Path: Specify the directory where your exported file will be saved. Ensure the file path is accessible and easy to find.
- Configure Video and Audio Encoding: In the Output properties, find the Encoding section. Choose the video codec that best suits your needs for quality and compatibility. Don’t forget to configure the audio codec as well to ensure your project’s sound is preserved.
- Resolution and Frame Rate: Adjust the resolution and frame rate settings according to the requirements of your project or the platform where it will be displayed. This ensures your video plays smoothly and looks sharp.
- Render and Export: With all settings configured, click on the Render menu and select Render Animation or press Ctrl+F12. Blender will begin processing your video. Depending on the project\"s complexity and length, this could take some time.
Once the rendering process is complete, your video will be saved to the specified location in the chosen format, ready for sharing and viewing. Exporting your projects correctly is crucial for maintaining the quality and integrity of your work.

_HOOK_
Blender Video Editing: Tips, Tricks, and Best Practices
Mastering video editing in Blender can elevate your projects from good to great. Whether you\"re a beginner or an experienced editor, these tips, tricks, and best practices can help enhance your workflow and final outputs:
- Organize Your Project: Use Blender’s ability to create different scenes and collections to keep your project organized. This can help manage complex projects with numerous elements.
- Utilize Proxies: For smoother playback in the VSE, especially with high-resolution footage, use proxy clips. This can drastically improve editing efficiency.
- Keyboard Shortcuts: Familiarize yourself with Blender’s keyboard shortcuts. This can significantly speed up your editing process.
- Color Management: Make use of Blender’s color management tools to ensure that your final output matches your creative vision.
- Experiment with Blender’s Add-ons: Blender supports a variety of add-ons that can extend its functionality, including video editing enhancements.
- Keep Audio in Sync: Always check your audio synchronization, especially after making cuts or adjustments to your video clips.
- Render Settings: Before final rendering, double-check your render settings to make sure they align with your project\"s needs, focusing on resolution, frame rate, and output format.
- Backup Your Work: Regularly save and create backups of your project. Blender’s incremental save feature can be a lifesaver.
- Stay Updated: Blender is continuously being updated with new features and improvements. Keeping your software up to date can provide you with more tools and a better editing experience.
- Community Resources: Leverage the Blender community for support, tutorials, and templates. There’s a vast amount of resources available online from other Blender users.
By incorporating these tips and practices into your Blender video editing workflow, you can achieve more polished and professional results, making your projects stand out.

READ MORE:
Resources and Tutorials for Learning Blender Video Editing
Gaining proficiency in Blender for video editing requires time, practice, and access to quality educational resources. Fortunately, there\"s a wealth of tutorials and guides available online to help you master Blender\"s video editing capabilities. Here are some recommended resources and tutorials for learning Blender video editing:
- Blender Official Website: The Blender Foundation offers comprehensive manuals, tutorials, and a user forum directly on their official site. It\"s a great starting point for beginners and advanced users alike.
- YouTube Tutorials: YouTube is a treasure trove of Blender tutorials. Channels like Blender Guru, CG Geek, and Ducky 3D specialize in Blender and cover everything from basic video editing techniques to advanced visual effects.
- BlenderNation: BlenderNation provides daily news, articles, tutorials, and tips from the Blender community. It\"s an excellent resource for staying updated on new features and learning from community projects.
- Blender Artists Community: The Blender Artists forum is a vibrant community where users share their work, ask questions, and offer advice on a wide range of Blender topics, including video editing.
- Udemy and Coursera: For a more structured learning path, online learning platforms like Udemy and Coursera offer paid courses on Blender that cover from basic to advanced video editing skills.
- Blender Cloud: Blender Cloud, by the Blender Foundation, offers training, assets, and film production files. It’s a subscription service, but the quality and depth of resources available can significantly accelerate your learning.
Regardless of your skill level, these resources can provide the guidance and knowledge needed to enhance your video editing projects with Blender. Dedication to learning and regular practice are key to becoming proficient in Blender video editing.
Embrace the power of Blender to elevate your video projects with stunning effects and professional-grade editing capabilities. Start your journey into the world of video editing today and unleash your creative potential with Blender.