Topic blender edit video tutorial: Unlock the power of Blender for video editing with our comprehensive guide. From basic cuts to advanced effects, transform your visuals into stunning narratives today.
Table of Content
- What are the steps to edit videos using Blender as shown in the tutorial search results?
- Getting Started with Blender for Video Editing
- Understanding Blender\"s Interface for Video Editing
- Basic Video Editing Techniques in Blender
- Advanced Video Editing Features in Blender
- Working with Audio in Blender
- Adding Effects and Transitions
- YOUTUBE: Blender 3.0 Video Editing Tutorial Ep.1 Interface Output Timeline Import Render
- Color Correction and Grading in Blender
- Animating Text and Graphics
- Rendering and Exporting Your Video
- Best Practices and Tips for Efficient Editing
What are the steps to edit videos using Blender as shown in the tutorial search results?
To edit videos using Blender as shown in the tutorial search results, follow these steps:
- Learn to get started with editing videos using Blender 2.8.
- Upgrade from using Windows Movie Maker to Blender for video editing.
- Set up Blender for video editing by following the tutorials provided.
- Follow the video tutorials that cover the basics of using Blender as a video editor.
- Understand the directory structure and how to set up your project in Blender.
- Learn how to edit your project, including techniques like montage editing.
READ MORE:
Getting Started with Blender for Video Editing
Embarking on video editing with Blender begins with setting up your environment. Download the latest version from the official Blender website and install it on your computer. Familiarize yourself with Blender\"s interface, focusing on the Video Sequence Editor (VSE), where you\"ll spend most of your editing time.
- Download and Install Blender: Start by downloading Blender from its official site and follow the installation instructions.
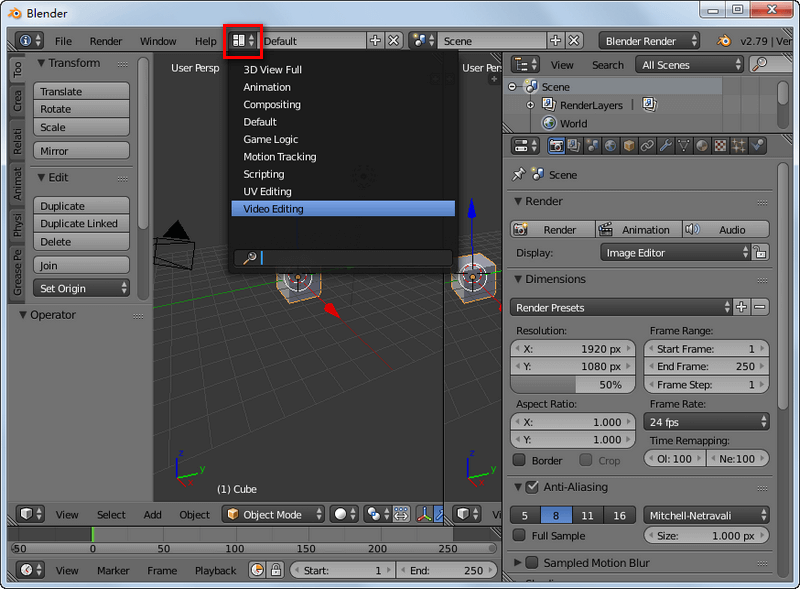
- Open Blender and Select the Video Editing Layout: Blender offers different layouts for various tasks. Select the Video Editing layout to access the Video Sequence Editor.
- Import Your Media: Learn how to import your videos, images, and audio files into Blender. You can do this by going to the Add menu in the VSE and selecting the type of media you want to import.
- Basic Editing Tools: Get acquainted with the basic editing tools such as cutting, moving, and splicing your clips. These tools are essential for the initial stages of your video project.
- Preview Your Project: Use the preview window to watch your edits in real-time. This helps in making informed decisions about your edits.
Following these initial steps will lay a solid foundation for your video editing projects in Blender. As you become more comfortable with the basics, you can explore more advanced features and techniques.

Understanding Blender\"s Interface for Video Editing
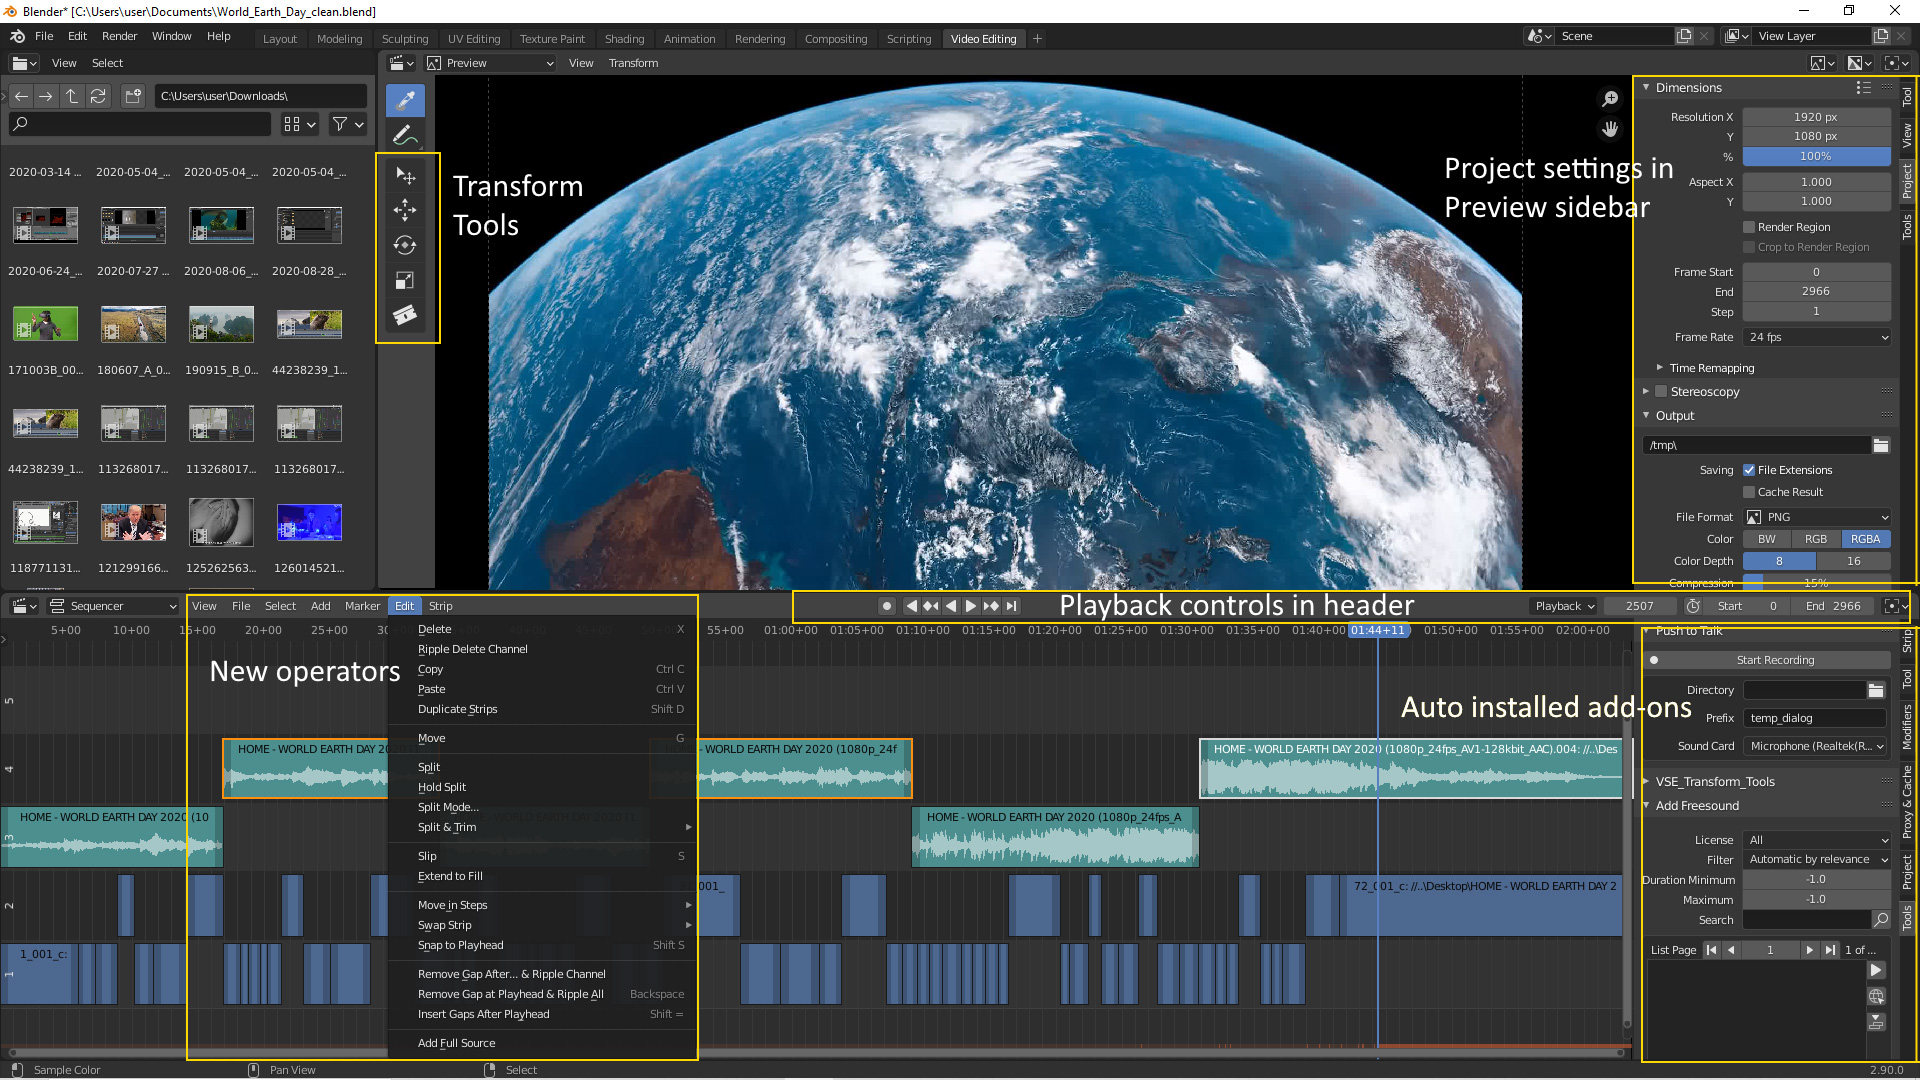
Blender\"s interface for video editing is modular and customizable, designed to optimize your workflow. Key areas include:
- Timeline: This is where you can scrub through your video, manage the timing of clips, and keyframe animations.
- Video Sequence Editor (VSE): The heart of video editing in Blender, allowing you to add, cut, splice, and arrange video clips.
- Preview Window: View your edits in real-time. This window can also display luma waveforms, chroma vectorscope, and histograms for color grading.
- Properties Panel: Adjust render settings, apply effects, and tweak clip properties.
- Graph Editor: For detailed animation curves and keyframe manipulation, vital for creating smooth transitions and effects.
Understanding these components is crucial for efficient navigation and utilization of Blender for video editing projects.

Basic Video Editing Techniques in Blender
Mastering basic video editing techniques in Blender sets the foundation for more complex projects. Start with understanding how to navigate the Video Sequence Editor (VSE), Blender\"s primary tool for video editing.
- Importing Media: Learn to import videos, images, and sounds using the \"Add\" menu in the VSE.
- Clip Cutting and Trimming: Use the cutting tool to split and trim your clips to the desired length.
- Clip Moving and Arrangement: Drag and drop clips in the timeline to arrange your storyline.
- Adding Transitions: Discover how to apply basic transitions between clips for smooth changes.
- Adjusting Playback Speed: Control the speed of your clips for slow motion or fast-forward effects.
These steps will equip you with the skills to begin creating and editing video projects in Blender, paving the way for more advanced techniques.

Advanced Video Editing Features in Blender
Blender is not just for basic video editing; it\"s also powerful enough for advanced projects. This section delves into the sophisticated features that Blender offers for video editing:
- Video Masking: Learn to create and use masks to hide or reveal parts of your footage.
- Color Grading: Enhance your video\"s look with advanced color correction tools and techniques.
- Compositing: Combine visual elements from separate sources into single images, creating the illusion that all those elements are parts of the same scene.
- Audio Mixing and Sound Effects: Discover how to refine your video\"s audio tracks, add sound effects, and ensure clear, balanced sound.
- Animation: Use Blender\"s animation tools to add dynamic elements to your videos, from simple text animations to complex 3D animations.
Exploring these advanced features can significantly improve the quality of your video projects, giving them a professional polish.
_HOOK_
Working with Audio in Blender
Blender\"s Video Sequence Editor (VSE) provides comprehensive tools for audio editing alongside video content, allowing for a seamless integration of sound and visuals. This section outlines the essential steps and tips for working effectively with audio in Blender.
- Importing Audio: Begin by adding your audio file to the sequence editor. You can do this by selecting \"Add\" > \"Sound\" and then browsing to the location of your audio file. Supported formats include WAV, MP3, and OGG.
- Syncing Audio with Video: Once imported, you can drag the audio strip to align it with your video clips. Use the waveform displayed on the audio strip for precise synchronization.
- Audio Mixing: Blender allows for basic mixing controls such as volume adjustment and muting. These can be accessed from the strip\"s properties panel, where you can also keyframe volume changes over time.
- Adding Fade In and Out: To create a fade in or out effect, keyframe the volume of the audio strip at the beginning and end. Adjust the volume from 0 to your desired level for a fade in, and reverse for a fade out.
- Cutting and Splitting Audio: Similar to video clips, you can cut audio strips using the K (cut) tool. This is useful for removing unwanted sections or adjusting timing.
- Adding Effects: For more advanced audio manipulation, you can use the VSE to add effects like reverb or echo. This involves adding an effect strip and selecting the desired audio effect.
- Audio Scrubbing: Enable audio scrubbing from the playback menu to hear audio while scrubbing through the timeline. This feature is invaluable for precise editing and synchronization.
- Rendering with Audio: Ensure your final render includes audio by setting the appropriate audio codec and bitrate in the output settings. Blender supports AAC, MP3, and FLAC among others.
Remember, while Blender offers robust tools for video and audio editing, achieving the best results may require experimentation with these features and settings. Practice and patience are key to mastering audio editing in Blender.

Adding Effects and Transitions
Blender\"s Video Sequence Editor (VSE) isn\"t just for cutting and splicing footage; it also provides a plethora of effects and transitions to enhance your video projects. This section guides you through the process of incorporating these creative touches into your edits, helping you to achieve professional-looking results.
- Accessing Effects: To add an effect, select your video or audio clip in the VSE, then go to \"Add\" > \"Effect Strip\". Here you\"ll find options such as cross, gamma cross, wipe, and more.
- Implementing Transitions:
- Crossfade: Place two strips overlapping in the timeline. Add a \"Gamma Cross\" effect strip to create a smooth transition between them.
- Wipe: For a wipe transition, select the \"Wipe\" effect. You can customize the direction and feathering of the wipe in the effect strip’s properties.
- Color Effects: Enhance or alter the mood of your video by adding color effects. \"Color\" effect strips can be used to apply a solid color overlay, which is useful for creating custom backgrounds or effects.
- Adjusting Properties: Once you\"ve added an effect or transition, adjust its properties in the strip\"s properties panel. Keyframe these properties to change the effect over time.
- Adding Textures and Overlays: Use \"Adjustment Layer\" strips to apply effects that affect all strips below them. This is perfect for adding vignettes, textures, or global color grading.
- Creating Custom Transitions: For more unique transitions, combine different effects and keyframe their properties. Experimenting with opacity, blending modes, and effect strips can yield creative results.
- Previewing Effects: Use the preview window to view your effects in real-time. Adjusting the preview quality settings can help with smoother playback on slower systems.
- Optimizing Performance: Effects and transitions can be resource-intensive. Consider proxy rendering or reducing the preview resolution for a more fluid editing experience.
With these tools and techniques, you can add a dynamic layer to your video projects, making them more engaging and visually appealing. Remember, the key to mastering effects and transitions in Blender is experimentation and practice.

Blender 3.0 Video Editing Tutorial Ep.1 Interface Output Timeline Import Render
Interface: Discover the beautifully designed interface that makes navigating a breeze! With its intuitive layout and user-friendly features, exploring this video will be a delightful experience from start to finish. Watch now! Editing: Dive into the world of professional editing with this video! Learn valuable tips and tricks to enhance your editing skills and create stunning content. Get ready to unlock your creative potential! Watch now!
Color Correction and Grading in Blender
Color correction and grading are crucial steps in video production that enhance the visual impact of your footage. Blender offers a range of tools for adjusting colors, contrast, and overall mood of your video. This section will guide you through the basic and advanced techniques for color correction and grading within Blender.
- Understanding Color Correction: Color correction is the process of adjusting the color balance and contrast of your video to ensure it looks natural across all scenes. This can involve adjusting the highlights, shadows, and midtones to correct for camera discrepancies or lighting conditions.
- Accessing the Color Tools: Blender\"s color correction tools can be found in the Sequencer\"s properties panel when a video strip is selected. Look for the \"Strip Input\" and \"Modifiers\" tabs for basic adjustments, or use the \"Color\" section for more detailed control.
- Basic Adjustments:
- Brightness/Contrast: Adjust the brightness and contrast sliders to correct exposure and contrast levels.
- Hue/Saturation: Modify the hue and saturation for color tuning. This is useful for enhancing specific colors or correcting oversaturated footage.
- Advanced Grading with Nodes: For more complex color grading, switch to Blender\"s Compositor. Here, you can use nodes to apply color grading across your entire project. This includes using curves to adjust color channels, adding color balance nodes, and applying grading techniques like the \"Teal and Orange\" look.
- Using Look-Up Tables (LUTs): LUTs are a powerful tool for color grading that can instantly apply a specific look or film stock emulation to your footage. Import LUTs through the compositor using the \"Color Lookup Table\" node.
- Creating a Consistent Look: To achieve a consistent look across your project, apply color grading adjustments to an adjustment layer or through the compositor. This ensures that all clips beneath the adjustment layer or within the compositor node setup receive the same grading treatment.
- Previewing Adjustments: Always preview your color corrections and grading in real-time. Use the \"Backdrop\" feature in the Compositor to see adjustments live as you apply them.
- Exporting with Color Adjustments: Ensure your export settings are correctly configured to include all color adjustments. This may involve rendering out your project from the Compositor to include all node-based grading.
Effective color correction and grading can transform the mood and feel of your video, making it more engaging and visually appealing. Remember, the key to successful color work is subtlety and consistency across your project.

Animating Text and Graphics
Animating text and graphics in Blender adds a dynamic layer to your video projects, making them more engaging and visually compelling. This section explores the fundamental steps for creating animations, focusing on text and graphic elements within Blender.
- Creating Text Objects: Start by adding a text object in Blender\"s 3D Viewport. You can do this by pressing Shift+A and selecting \"Text\". This creates editable text that you can customize in terms of font, size, and alignment.
- Customizing Text: With the text object selected, go to the \"Object Data Properties\" panel to adjust the font, size, and style. You can import custom fonts by clicking the folder icon next to the font list.
- Animating Text: Animation in Blender is achieved through keyframes. To animate your text, decide on the property you wish to animate (e.g., location, rotation, scale), move to the desired frame in the timeline, change the property, and then press I to insert a keyframe.
- Adding Graphics: Graphics can be imported as SVG files or created within Blender using its powerful modeling tools. To import an SVG, go to \"File\" > \"Import\" > \"Scalable Vector Graphics (.svg)\". Once imported, you can extrude and modify these graphics in the 3D Viewport.
- Animating Graphics: Similar to text, animate your graphics by inserting keyframes for their properties at different points in your timeline. This could include transformations, color changes, or opacity.
- Using the Graph Editor: For smoother animations, use Blender\"s Graph Editor to refine the interpolation between keyframes. This allows for more control over the animation\"s timing and easing.
- Combining with Video Clips: To integrate your animated text and graphics with video clips, use the Video Sequence Editor. You can render your animations as standalone clips and then import them into the VSE for compositing.
- Exporting Animations: Ensure your animations are included in the final video by correctly setting up your render settings. Choose the appropriate output format and render your project to include both the video and animated elements.
By following these steps, you can create engaging text and graphic animations in Blender. Experimentation and practice are key to mastering the art of animation, allowing you to add unique and creative touches to your video projects.
Rendering and Exporting Your Video
Rendering and exporting are the final steps in the video editing process, where you compile and output your project into a video file format. Blender offers robust rendering and exporting capabilities, allowing for high-quality video production. This section will guide you through the process of rendering and exporting your video project in Blender.
- Setting Up Your Render Options: Before rendering, you need to set up your render options. Go to the \"Properties\" panel, select the \"Output Properties\" tab, and choose your desired file format, resolution, and frame rate. Common formats include MPEG, AVI, and QuickTime.
- Configuring Output Properties: In the same \"Output Properties\" tab, specify the output path for your video file. You can also adjust the quality settings here, with higher quality settings resulting in larger file sizes.
- Audio Settings: Don’t forget to configure your audio settings if your project includes sound. Switch to the \"Encoding\" tab within the \"Output Properties\" and select the audio codec that suits your needs.
- Using the Video Sequence Editor (VSE): If you edited your video in the VSE, ensure all your edits are finalized. The VSE allows you to layer video clips, audio tracks, and effects before rendering.
- Previewing Before Rendering: Use the \"Render\" menu to preview your final project before rendering. Select \"Render Animation\" to render a preview to the \"Image Editor\" window or your specified output path.
- Rendering Your Video: Once satisfied with the preview, render your project by going to \"Render\" > \"Render Animation\" or pressing Ctrl+F12. Rendering time will vary based on the complexity of your project and the power of your computer.
- Monitoring the Render Process: Blender displays a progress bar during rendering. You can monitor this to estimate how long the rendering process will take.
- Exporting Your Video: After rendering, your video will be saved to the specified output path in the format you selected. You can now share or distribute your video as needed.
Rendering and exporting in Blender might seem complex at first, but by following these steps and adjusting settings based on your project needs, you can achieve professional-quality video outputs. Remember, the key to a successful render is in the preparation and understanding of Blender\"s powerful rendering engine.

_HOOK_
READ MORE:
Best Practices and Tips for Efficient Editing
Efficient editing is key to a smooth post-production process, especially when working with complex software like Blender. Following best practices and tips can significantly enhance your workflow, save time, and improve the overall quality of your video projects. This section outlines essential advice for efficient video editing in Blender.
- Organize Your Workspace: Start by organizing your project files and workspace. Use separate folders for different types of assets (e.g., video clips, audio files, images). In Blender, customize your layout to have quick access to frequently used tools and panels.
- Use Proxies for High-Resolution Footage: Editing high-resolution footage can be resource-intensive. Use proxy editing to create lower-resolution clips for editing, then switch back to the original high-resolution clips for rendering.
- Keyboard Shortcuts: Learning and using Blender’s keyboard shortcuts can drastically reduce your editing time. Familiarize yourself with shortcuts for common tasks like cutting strips, moving frames, and adding effects.
- Color Labeling: Use color labels to organize your video and audio clips in the timeline. This makes it easier to identify different types of media and their purposes at a glance.
- Use Layers and Scenes: For complex projects, utilize layers and scenes to manage and compartmentalize different parts of your project. This can help in keeping your project organized and more manageable.
- Batch Rendering: If you’re working on multiple scenes or projects, consider batch rendering. This allows you to render multiple projects or scenes in sequence, saving time by automating the process.
- Regularly Save and Backup Your Project: Regularly save your work and consider setting up auto-save features. Additionally, keep backups of your project files in different locations to prevent data loss.
- Optimize Render Settings: Before final rendering, optimize your render settings based on the output you need. This includes selecting the appropriate resolution, frame rate, and compression settings to balance quality and file size.
- Stay Updated: Blender is continuously being updated with new features and improvements. Stay updated with the latest versions and familiarize yourself with new tools and features that can enhance your editing process.
- Learn from the Community: The Blender community is vast and supportive. Participate in forums, watch tutorials, and share your work for feedback. Learning from others can provide new techniques and insights to improve your editing skills.
By incorporating these best practices into your editing workflow, you can leverage Blender\"s full potential and create high-quality video content more efficiently. Remember, the key to mastering Blender is practice, patience, and continuous learning.
Embark on your Blender video editing journey with confidence, armed with these comprehensive guides. From basics to advanced techniques, elevate your video projects and unleash your creative potential in the world of digital storytelling.