Topic blender 3d video editing: Discover the world of Blender 3D video editing, a powerful suite for creating stunning visual stories and effects, accessible to all skill levels.
Table of Content
- What are the capabilities of Blender for 3D video editing?
- Understanding Blender\"s Video Editing Capabilities
- Installation and Setup for Video Editing in Blender
- Basic Video Editing Techniques with Blender
- Advanced Video Editing Features in Blender
- Audio Editing and Mixing in Blender
- Utilizing Blender for Color Grading and Correction
- YOUTUBE: Is Blender good for Video Editing
- Adding Effects and Transitions in Blender
- Animating Texts and Titles in Blender
- Rendering and Exporting Your Video Projects
- Learning Resources and Community Support
What are the capabilities of Blender for 3D video editing?
Blender, a popular 3D modeling and animation software, has several capabilities for video editing as well. Here are some of the main features:
- Video Sequence Editor: Blender comes with a built-in video sequence editor that allows users to perform basic video editing tasks such as cuts, splicing, and transitions.
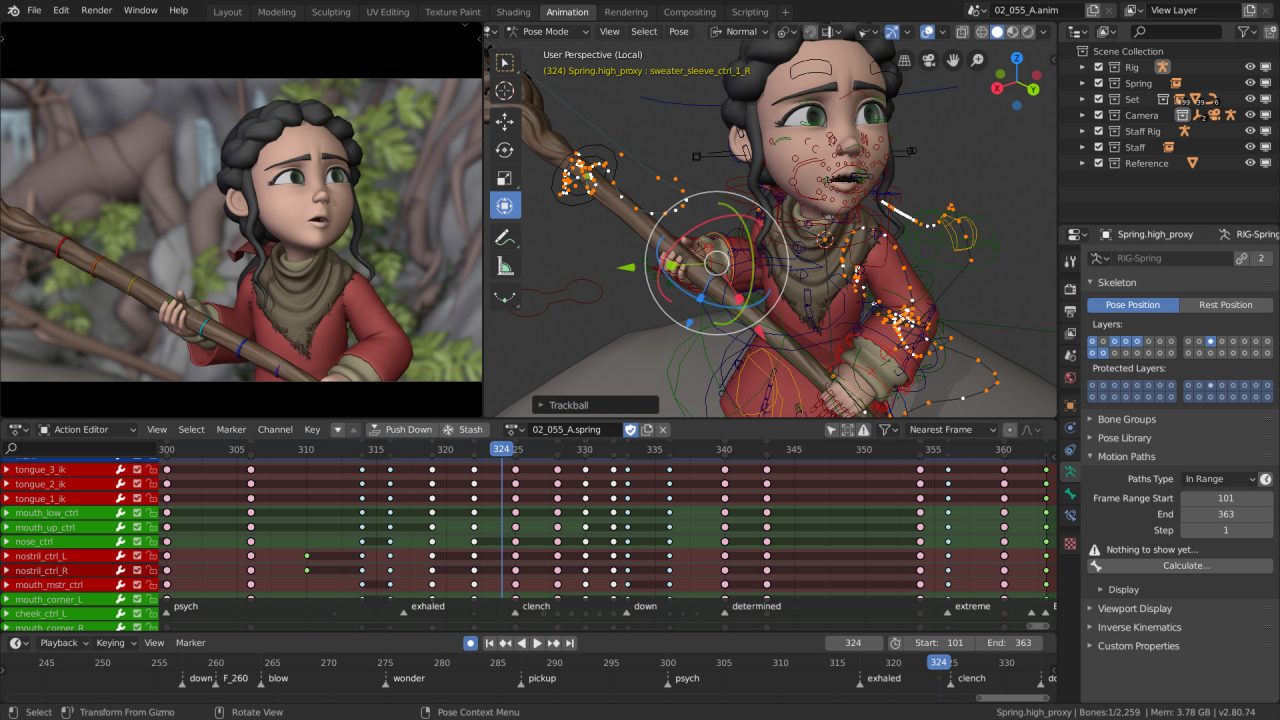
- Keyframe Animation: Users can animate objects and cameras in the 3D environment and integrate them seamlessly into the video editing process.
- Compositing: Blender offers powerful compositing tools that enable users to combine multiple layers of video, images, and effects to create stunning visuals.
- Color Grading: Blender provides tools for adjusting colors, contrast, and brightness to enhance the overall look of the video.
- Effects and Filters: Users can apply a variety of effects and filters to their videos to add creative touches and enhance the visual appeal.
- Rendering: Blender\'s rendering capabilities allow users to export high-quality video files with customizable settings for resolution, frame rate, and format.
Overall, Blender is a versatile tool that offers a range of features for 3D video editing, making it a valuable asset for content creators, animators, and filmmakers.
READ MORE:
Understanding Blender\"s Video Editing Capabilities
Blender\"s video editing module, known as the Video Sequence Editor (VSE), offers a comprehensive set of tools for creating and editing video content. This powerful component supports various aspects of video editing, making it a viable choice for both beginners and professionals. Here\"s an overview of what Blender\"s VSE can do.
- Non-linear Editing: Blender allows for non-linear video editing, enabling users to assemble, cut, and splice video clips without altering the original files.
- Effects and Transitions: Users can apply numerous effects, such as Gaussian blur, color grading, and transitions between clips to enhance the visual appeal of their videos.
- Audio Mixing and Synchronization: With support for multiple audio tracks, Blender facilitates audio mixing, syncing audio with video, and adjusting volume levels directly within the VSE.
- Live Preview: A real-time preview feature lets users see the effects of their edits immediately, aiding in a more intuitive editing process.
- Advanced Features: For more complex projects, Blender includes features like video masking, color correction, and chroma keying to create professional-grade video content.
Blender\"s video editing capabilities are designed to be flexible and powerful, providing users with the tools they need to bring their creative visions to life. Whether you\"re working on simple video projects or complex compositions, Blender\"s VSE is equipped to handle a wide range of video editing tasks.

Installation and Setup for Video Editing in Blender
Getting started with video editing in Blender involves a straightforward installation and setup process. Here\"s a step-by-step guide to prepare Blender for video editing tasks.
- Download Blender: Visit the official Blender website to download the latest version compatible with your operating system (Windows, macOS, Linux).
- Install Blender: Run the installer and follow the on-screen instructions to complete the installation. Linux users may need to extract the archive and run Blender directly from the extracted folder.
- Open Blender and Switch to Video Editing Layout: Upon launching Blender, switch to the Video Editing layout from the top menu to access the Video Sequence Editor (VSE).
- Configure Preferences: Before starting, it might be helpful to adjust the preferences. Go to Edit > Preferences to configure settings such as memory cache limit and audio scrubbing.
- Import Media: Use the Add menu in the VSE to import video clips, images, and audio files into your project.
- Explore the Interface: Familiarize yourself with the VSE interface, including the Preview area, Sequencer, and properties panels to efficiently navigate through video editing tools.
With Blender installed and the VSE ready, you can begin to explore its vast array of video editing features. Whether cutting and splicing clips, adding transitions, or working with audio, Blender offers a comprehensive environment for video editing projects.
Basic Video Editing Techniques with Blender
Blender, while primarily known for its 3D modeling and animation capabilities, also includes a robust video editing suite. For newcomers and those accustomed to other video editing software, mastering basic video editing techniques in Blender opens up a new realm of creative possibilities. Here\"s how to get started with basic video editing in Blender:
- Adding and Arranging Clips: Learn to import your video and audio clips into the timeline. Use the Sequencer to drag and drop clips, arranging them in the desired order.
- Trimming and Cutting: Use the cut tool to trim clips or split them at specific points. This allows you to remove unwanted parts or adjust the length of your clips.
- Adding Transitions: Blender offers several transition effects between clips. Explore the Add menu to incorporate cross fades, wipes, and other transitions to enhance the flow of your video.
- Adjusting Playback Speed: Slow down or speed up video clips by changing their playback speed. This effect can be applied for creative slow-motion or time-lapse effects.
- Adding Text and Titles: Utilize Blender\"s text tools to add titles, captions, or any textual elements to your video, enhancing viewer engagement and communication.
- Exporting Your Video: Once your video is edited to satisfaction, export it in your desired format. Blender supports a range of video formats and settings for optimization.
These basic techniques form the foundation of video editing in Blender, enabling creators to produce engaging and polished videos. As you become more familiar with Blender\"s interface and capabilities, you can start exploring more advanced features to further elevate your video projects.

Advanced Video Editing Features in Blender
Blender\"s Video Sequence Editor is not just for basic editing; it\"s also packed with advanced features that allow for sophisticated video production. For those looking to push their projects further, here\"s a glimpse into the more complex functionalities available within Blender:
- Color Grading and Correction: Utilize Blender\"s comprehensive color tools to adjust the mood and tone of your footage. This includes color curves, balance, and more for cinematic quality.
- Video Masking and Compositing: Create complex video compositions by masking out parts of the video. This is perfect for creating special effects or integrating multiple layers of footage.
- Visual Effects (VFX): With Blender, you can add various VFX to your videos, including simulations for smoke, fire, and fluids, enhancing the visual appeal of your projects.
- 3D Integration: One of Blender\"s unique features is the ability to integrate 3D objects into your video projects, opening up endless creative possibilities.
- Audio Spectrum Visualization: Generate visual representations of audio files within your video, perfect for music videos or podcasts.
- Animation Tools: Beyond traditional video editing, Blender offers animation tools for creating dynamic text animation and character animation within your video projects.
- Multi-Camera Editing: For projects with footage from multiple cameras, Blender supports multi-camera editing to easily switch between different camera angles.
These advanced features require a deeper understanding of Blender\"s functionalities but offer unparalleled control and creativity in video editing. Exploring these capabilities can elevate your video projects to a professional level.

_HOOK_
Audio Editing and Mixing in Blender
Blender\"s Video Sequence Editor (VSE) provides robust tools for audio editing and mixing, allowing users to synchronize sound with visuals seamlessly. Here\"s how to make the most of Blender\"s audio capabilities:
- Importing Audio: Easily add audio files to your project by importing them directly into the VSE, supporting a wide range of formats.
- Syncing Audio and Video: Blender allows for precise synchronization of audio with video clips, ensuring that sound matches the on-screen action perfectly.
- Audio Strips: Manage your project\"s audio using audio strips, which can be manipulated just like video clips for trimming, fading, and volume adjustment.
- Volume Control: Adjust the volume of individual audio strips directly in the VSE, or use the Graph Editor for more complex volume envelopes.
- Sound Effects: Apply various effects to your audio strips, such as fade in/out, to enhance the auditory experience of your video.
- Mixing Multiple Tracks: Blender supports mixing multiple audio tracks, enabling the creation of rich soundscapes by layering sound effects, music, and dialogue.
- Visualizing Audio: Use waveform displays to visualize audio tracks, making it easier to match sound with visual cues and edits.
With these audio editing and mixing features, Blender provides a comprehensive environment for achieving professional-quality sound in your video projects, complementing its powerful video editing toolkit.

Utilizing Blender for Color Grading and Correction
Color grading and correction are essential steps in video post-production, and Blender offers a suite of tools to enhance and adjust the color of your footage. These tools can transform the aesthetic and mood of your video, providing a polished, cinematic look. Here\"s how to utilize Blender for color grading and correction:
- Color Balance: Use the Color Balance tool to adjust the shadows, midtones, and highlights of your footage, altering the overall color scheme to fit your vision.
- Curves: The Curves tool allows for precise control over the brightness and contrast of your video, enabling you to fine-tune the luminance levels for each color channel.
- Lookup Table (LUT): Apply LUTs to your footage to quickly achieve professional color grading. LUTs can simulate the look of film stocks or adjust colors for consistency across shots.
- Color Wheels: Adjust the color balance using color wheels, a more intuitive method for making selective color adjustments to shadows, midtones, and highlights.
- Secondary Color Correction: Target and adjust specific colors in your footage without affecting the overall color balance, perfect for correcting skin tones or enhancing elements of the scene.
- Node-Based Compositing: For more advanced color grading, Blender\"s node-based compositing system allows for the layering of effects, giving you unlimited creative control over the final look of your video.
By mastering these color grading and correction tools, you can significantly improve the visual impact of your video projects in Blender, ensuring that your work stands out with a distinct and professional look.

Is Blender good for Video Editing
Software: Discover the endless possibilities of cutting-edge software development and innovation in this captivating video. Explore the latest trends and breakthroughs that will revolutionize the way you use technology every day. Tutorial: Dive into an engaging tutorial that will guide you through mastering a new skill or technique. Whether you\'re a beginner or an expert, this video will provide you with valuable knowledge and practical tips to enhance your expertise.
Blender 3D Beginner Video Editing Tutorial FREE Video Editor
Get 50% OFF your first bag of coffee with Trade Coffee when you click here http://cen.yt/TradeSouthernShotty and enter code ...
Adding Effects and Transitions in Blender
Blender\"s Video Sequence Editor (VSE) offers a plethora of effects and transitions to elevate the visual appeal of your projects. These tools are crucial for storytelling, helping to convey mood, passage of time, and enhancing narrative flow. Here\"s how to incorporate effects and transitions into your video editing workflow:
- Transitions: Blender provides basic transitions like wipes, fades, and crossfades. Add transitions between clips by overlapping them in the timeline and choosing the desired transition from the Add menu.
- Video Effects: Access a variety of video effects under the Add > Effects Strip menu. Options include adjustments for brightness, contrast, color, and more to enhance or alter the appearance of your footage.
- Animation Effects: Utilize Blender\"s animation capabilities to create dynamic effects, such as moving text or objects across the screen, by keyframing properties or using the animation nodes.
- Compositing: For more complex effects, dive into Blender\"s node-based compositing system. This allows for the layering of video clips, images, and effects in a non-destructive way, offering limitless creative potential.
- Custom Effects: Blender allows for the creation of custom effects using its powerful Python API. Script your own effects or transitions to meet specific needs or to automate repetitive tasks.
By mastering the use of effects and transitions in Blender, you can create compelling, visually engaging video content that captivates your audience and tells your story more effectively.
Animating Texts and Titles in Blender
Animating texts and titles in Blender adds a professional touch to your videos, making them more engaging and dynamic. Blender\"s powerful 3D capabilities allow for creative text animation beyond traditional video editing software. Follow these steps to animate texts and titles:
- Create Text Objects: Start by adding a text object to your scene. You can do this by selecting Add > Text in the 3D Viewport.
- Edit Text: Enter Edit Mode to change the default text. You can type your title or any text you wish to animate.
- Font and Style: In the Properties panel, customize your text\"s font, size, and style under the Object Data tab.
- Animation Techniques: Utilize keyframes to animate properties like location, rotation, and scale over time. This can be done in the Timeline or Graph Editor.
- Text Effects: Explore effects like extrusion and bevel to add depth to your text. This is particularly useful for creating 3D title effects.
- Materials and Lighting: Apply materials and adjust lighting to make your text visually striking. This step is crucial for integrating text seamlessly into your video.
- Camera Movement: Animate the camera to move around or towards the text, adding dynamism and emphasis to your titles or messages.
- Exporting: Once animated, render your scene or composite the text over your video in the Video Sequence Editor.
With Blender, the possibilities for animating texts and titles are vast, allowing for creative expressions that can elevate the quality of any video project.

Rendering and Exporting Your Video Projects
After you\"ve completed your video editing and post-production tasks in Blender, the next step is to render and export your project so it can be shared or published. Rendering is the process of generating a finished video from your edited sequences, which involves compiling all the edits, effects, and transitions into a single video file. Here\"s a comprehensive guide to help you through the rendering and exporting process in Blender:
- Choose the Right Output Settings: Before rendering, you need to decide on your video\"s resolution, frame rate, and format. Go to the Output Properties tab, where you can set these parameters. Common resolutions include 1080p and 4K, while frame rates vary from 24 to 60 fps depending on your project\"s needs. For formats, Blender supports a wide range, including AVI, MPEG, and H.264.
- Configure Rendering Settings: In the same tab, adjust the rendering settings such as the output quality and compression rate. For higher quality videos, increase the bitrate, but be mindful of the file size and rendering time.
- Select the Output Path: Specify where you want the rendered video to be saved on your computer. Ensure the output path is accessible and has sufficient storage space for the video file.
- Include Audio in Your Render: If your project includes audio, ensure the audio codec is set correctly in the output settings to include it in the final render. Blender allows you to choose from various audio codecs to match your video\"s requirements.
- Rendering Your Video: Once all settings are configured, go to the Render menu and select \"Render Animation\" or press Ctrl+F12. Blender will start processing your video, which can take some time depending on the complexity of the project and the performance of your computer.
- Review the Rendered Video: After rendering, it\"s important to review the video for any issues or errors. Check for audio sync, video quality, and ensure all effects and transitions are correctly applied.
- Exporting Your Video: If the rendered video meets your expectations, you\"re ready to export it. Blender automatically exports the video to the specified output path during rendering. You can now share or publish your video across various platforms or with your audience.
Remember, rendering and exporting are resource-intensive processes, so it might be beneficial to close other programs during rendering to allocate more resources to Blender. Additionally, consider rendering short sections of your video first to test settings and ensure everything is as expected before committing to rendering the entire project.
_HOOK_
READ MORE:
Learning Resources and Community Support
Embarking on the journey of video editing with Blender can be both exciting and daunting. Fortunately, a wealth of learning resources and a supportive community are available to help you master this powerful tool. Whether you\"re a beginner or looking to refine your skills, the following resources and platforms will guide you through your learning process:
- Official Blender Tutorials: The Blender Foundation offers comprehensive tutorials and guides on its website. These resources range from beginner to advanced levels, covering all aspects of Blender, including video editing, modeling, animation, and more.
- Blender Community Forums: Blender Artists and the official Blender community forums are great places to seek advice, share your work, and collaborate with others. Whether you have a specific question or are looking for project feedback, the community is incredibly welcoming and helpful.
- Online Courses and Workshops: Platforms like Udemy, Coursera, and LinkedIn Learning offer structured courses on Blender, including dedicated modules for video editing. These courses often provide a mix of video lectures, quizzes, and hands-on projects to enhance your learning experience.
- YouTube Tutorials: YouTube is a treasure trove of Blender video editing tutorials. Channels run by experienced Blender users publish tutorials that cater to all skill levels, from basic editing techniques to advanced visual effects and animation.
- Blender Documentation: The official Blender manual is an invaluable resource for understanding every feature and tool Blender offers. It\"s regularly updated with the latest versions and is an excellent reference for troubleshooting and learning new features.
- Blender Stack Exchange: A question and answer site for people who use Blender to create 3D graphics, animations, or games. It\"s a great place to find solutions to specific problems and learn from experienced Blender users.
- Meetups and Conferences: Participating in Blender meetups and conferences can provide networking opportunities, insights into the industry, and learn from seasoned professionals. The annual Blender Conference, for example, features workshops, talks, and showcases of work from the Blender community.
As you explore these resources, remember that practice and perseverance are key to mastering video editing in Blender. The Blender community is known for its generosity and willingness to help newcomers, so don\"t hesitate to engage and ask for help when needed. With the right resources and support, you\"ll be able to unleash your creative potential and bring your video projects to life.
Embrace the power of Blender 3D for video editing, from basic cuts to advanced effects. Unlock your creativity and elevate your projects with our comprehensive guide, supported by a vibrant community and resources.