Topic video editing using blender: Unlock the power of "Video Editing Using Blender" to transform your storytelling and visuals. This comprehensive guide will introduce you to the vast capabilities of Blender, making your creative journey both exciting and rewarding.
Table of Content
- How can I start video editing using Blender 2.8?
- Understanding Blender\"s Video Editing Capabilities
- Getting Started with Blender for Video Editing
- Essential Features for Video Editing in Blender
- Step-by-Step Tutorials for Beginners
- Advanced Video Editing Techniques in Blender
- Adding Effects and Transitions for Professional Edits
- YOUTUBE: Blender As A Video Editor - It\'s Actually Really Good!
- Audio Editing and Synchronization in Blender
- Color Grading and Correction Tools
- Exporting Your Edited Videos from Blender
- Resources for Further Learning and Mastery
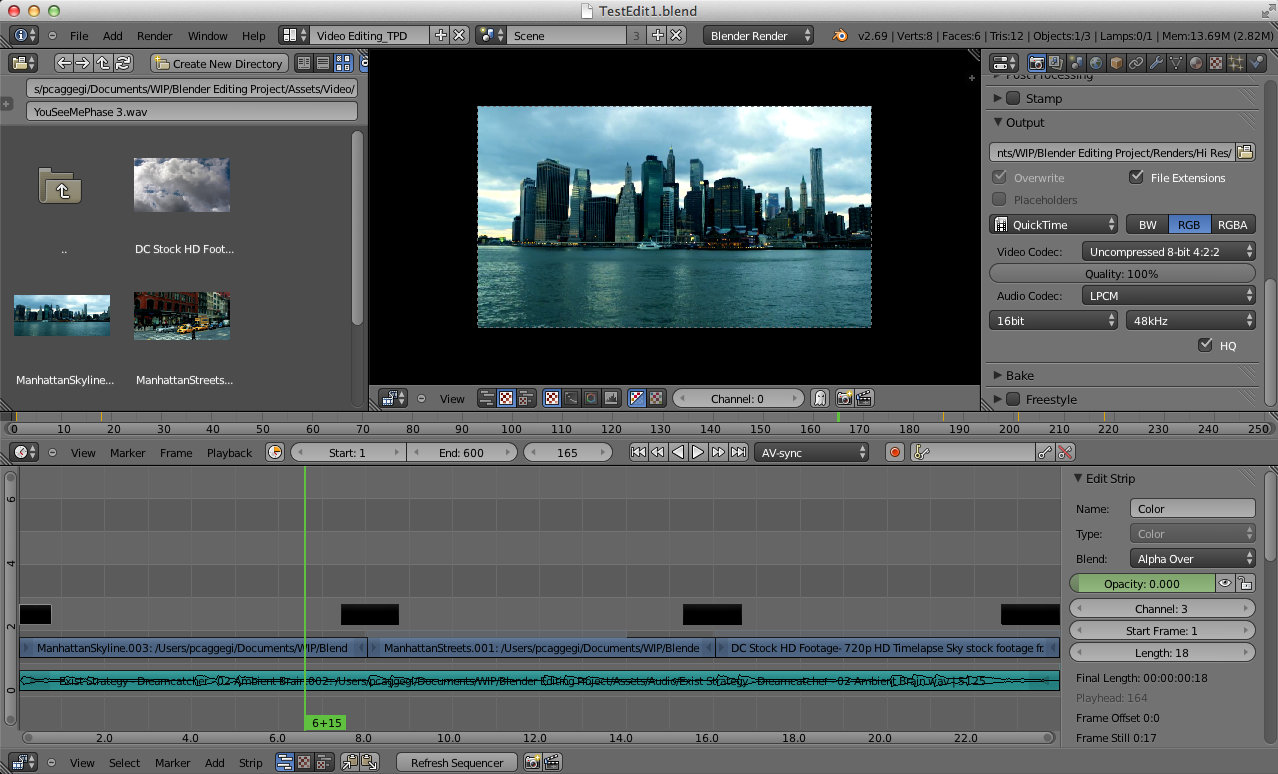
How can I start video editing using Blender 2.8?
To start video editing using Blender 2.8, follow these steps:
- Open Blender and select the Video Editing workspace.
- Import your video clips by clicking on \'Add\' > \'Movie\' and selecting the files you want to work with.
- Drag the video clips from the file browser into the sequencer timeline at the bottom of the screen.
- You can trim and cut your clips by using the shortcuts \'K\' to cut and \'X\' to delete the selected part.
- Arrange the clips in the desired order by clicking and dragging them within the timeline.
- Add transitions between clips by pressing \'Shift + A\' and selecting the desired transition effect from the menu.
- You can also add text, images, and effects by using the tools in the sequencer or by importing them as separate elements.
- Adjust the audio levels by selecting the audio strip and using the volume slider.
- Preview your video by pressing the \'Play\' button in the timeline to see how your edits look.
- Once you are satisfied with your edits, you can render the video by going to \'Output\' settings, selecting the format and quality settings, and clicking \'Render\'.
READ MORE:
Understanding Blender\"s Video Editing Capabilities
Blender\"s video editing suite is a powerful, yet often overlooked, feature that rivals dedicated video editing software. It\"s designed for a range of tasks from basic cutting and splicing to complex compositing and animation.
- Non-Linear Video Editing: Blender offers a non-linear editing system, allowing for flexible video editing workflows.
- Live Preview and Histogram Displays: Real-time preview, luma waveform, chroma vectorscope, and histogram displays enhance the editing process.
- Comprehensive Audio Editing: Features include audio mixing, syncing, scrubbing, and waveform visualization.
- Effects and Transitions: Blender supports a wide array of video effects and transitions for professional-grade video production.
- Advanced Features: Video masking, color grading, and speed control for dynamic video editing.
This section is just the beginning of what Blender can do in the realm of video editing. Whether you\"re a beginner looking to get started or an experienced editor seeking to expand your toolkit, Blender offers a robust set of tools to bring your videos to life.

Getting Started with Blender for Video Editing
Starting with video editing in Blender is a straightforward process that unlocks powerful editing capabilities. This section guides you through the initial steps to set up Blender for video editing, ensuring a smooth start for your video projects.
- Download and Install Blender: Ensure you have the latest version of Blender installed from the official Blender website to access all video editing features.
- Open the Video Editing Layout: When you launch Blender, choose the \"Video Editing\" layout from the top menu to switch to the Video Sequencer Editor.
- Importing Your Media: Use the \"Add\" menu in the Sequencer to import video clips, images, and audio files into your project.
- Understanding the Interface: Familiarize yourself with the sequencer, preview window, and properties panel to navigate Blender\"s video editing environment effectively.
- Basic Editing Functions: Learn how to cut, move, and splice your clips in the sequencer. Practice using the strip menu for operations like duplicate, mute, and delete.
- Adding Transitions and Effects: Explore how to add transitions between clips and apply effects using the effect strip options.
- Exporting Your Video: Once your edit is complete, use the properties panel to set your output properties and render your video project.
This basic workflow introduces you to video editing in Blender, from setting up your project to exporting the final video. As you become more comfortable, you can explore Blender\"s advanced features to enhance your video projects further.

Essential Features for Video Editing in Blender
Blender\"s comprehensive suite for video editing is packed with features that cater to both novices and professionals. Understanding these features can significantly enhance your video editing workflow. Here\"s a look at some of the essential features Blender offers for video editing:
- Sequencer: Blender\"s non-linear video sequencer allows for arranging scenes, video clips, audio, and effects in a time-based layout.
- Live Preview: View real-time playback of your edits and effects, including support for luma waveform, chroma vectorscope, and histogram displays.
- Audio Mixing: Comprehensive tools for audio editing including syncing, scrubbing, and waveform visualization.
- Transitions and Effects: A variety of transitions and video effects are available to enhance your video production.
- Color Grading: Advanced color correction and grading tools to improve the visual quality of your video.
- Speed Control: Easily adjust the playback speed of your video clips for slow motion or fast-forward effects.
- Text and Titles: Add text overlays and titles directly within your video projects.
- Video Masking and Layers: Create complex video compositions with masks and layers for advanced effects.
- Rendering and Output: Flexible rendering options to export your video projects in various formats and resolutions.
These features represent just the beginning of what\"s possible with Blender\"s video editing capabilities. By leveraging these tools, you can create professional-quality videos without the need for additional software.
Step-by-Step Tutorials for Beginners
Embarking on your journey of video editing with Blender can be exhilarating and, at times, challenging. To ease into this powerful software, we\"ve compiled a series of step-by-step tutorials tailored for beginners. These tutorials will guide you through the basics, ensuring a solid foundation for your video editing skills.
- Introduction to Blender\"s Interface: Familiarize yourself with Blender\"s layout, focusing on the Video Sequencer Editor.
- Basic Video Editing Techniques: Learn how to import your footage, perform cuts, and arrange your clips on the timeline.
- Adding and Editing Audio: Discover how to import audio files, sync them with your video, and adjust volume levels.
- Working with Transitions and Effects: Explore how to enhance your video with transitions between clips and apply basic effects.
- Color Correction Basics: Get started with color grading your video to improve its overall look and feel.
- Exporting Your Final Video: Learn the settings and steps required to export your edited video in the desired format.
Each tutorial is designed to build upon the skills learned in the previous one, gradually increasing your comfort and proficiency with Blender\"s video editing tools. By the end of this series, you\"ll be well-equipped to take on more complex projects and start experimenting with Blender\"s advanced features.

_HOOK_
Advanced Video Editing Techniques in Blender
Once you\"ve mastered the basics of video editing in Blender, it\"s time to explore the advanced techniques that can truly elevate your projects. This section delves into sophisticated editing methods, offering a pathway to creating more dynamic and visually appealing videos.
- Masking and Compositing: Learn how to use masks to hide, reveal, or blend different parts of your footage, and explore the power of compositing to combine various elements into a single scene.
- Color Grading: Dive deeper into color correction and grading to set the mood and improve the visual impact of your videos.
- Animation and Keyframing: Utilize Blender\"s animation tools to add motion to objects, including text and graphics, within your video clips.
- Visual Effects (VFX): Discover how to apply and customize VFX for creating illusions or enhancing the realism of your videos.
- 3D Integration: Blend 3D elements with your video footage to create immersive scenes or enhance storytelling.
- Audio Sync and Mixing: Master advanced techniques for syncing audio perfectly with your visuals and mixing multiple audio tracks effectively.
- Speed Ramping: Learn how to smoothly change the speed of your footage to emphasize moments or create dramatic effects.
These advanced techniques require patience and practice but can significantly enhance the quality and professionalism of your video projects. As you become more comfortable with Blender\"s interface and features, experimenting with these advanced methods will become both more intuitive and rewarding.

Adding Effects and Transitions for Professional Edits
Blender\"s video editing tools include a wide range of effects and transitions that can enhance your videos, giving them a professional touch. This section covers how to incorporate these elements into your projects effectively.
- Understanding Effects: Blender offers various effects like Gaussian Blur, Glow, and Color Correction. Learn how to apply and adjust these effects to enhance the visual appeal of your videos.
- Using Transitions Wisely: Transitions like wipes, fades, and crossfades can smoothly guide viewers from one scene to another. Discover when and how to use these transitions to maintain the flow of your narrative.
- Animating Effects: Go beyond static effects by animating properties over time for dynamic results. This can include changing the intensity of a blur or the color balance throughout a clip.
- Custom Effects with Nodes: For more control over your effects, Blender\"s node-based compositing allows for the creation of custom effects. Explore how to use nodes to build unique visual effects tailored to your project.
- Practical Tips for Transitions: Learn practical tips for applying transitions, such as timing considerations and how to choose the right transition to complement the mood and pace of your video.
Effectively adding effects and transitions requires practice and a good understanding of your video\"s narrative needs. Experiment with Blender\"s rich toolset to discover how best to enhance your video projects.

Blender As A Video Editor - It\'s Actually Really Good!
Software: \"Explore the exciting world of software development with our informative video! Learn about the latest trends and innovations that are shaping the digital landscape. Join us as we dive into the endless possibilities of software technology.\" Tutorial: \"Ready to upgrade your skills with our step-by-step tutorial video? Whether you\'re a beginner looking to learn the basics or an expert seeking advanced tips, our tutorial has you covered. Let\'s embark on a journey of discovery and growth together!\"
How To Edit Video with Blender 2.90 Basics Walkthrough Beginner
In this video I go over how to set up a new video edit project and the required settings, importing files, and the basics of cutting and ...
Audio Editing and Synchronization in Blender
Blender is not only powerful for video editing but also offers robust tools for audio editing and synchronization. This section explores how to manipulate audio within your video projects, ensuring your visuals and sound are perfectly aligned.
- Importing Audio: Learn how to import various audio formats into Blender and add them to your video timeline.
- Synchronizing Audio and Video: Techniques for aligning your audio tracks with video clips, ensuring they play in perfect harmony.
- Audio Mixing: Discover how to adjust volume levels, mix multiple audio tracks, and apply audio effects within Blender.
- Audio Effects and Filters: Explore the range of audio effects available in Blender, including how to enhance the audio quality or create specific soundscapes.
- Keyframing Audio Properties: Utilize keyframes to animate audio properties such as volume or pan, allowing for dynamic audio changes throughout your video.
- Lip-syncing for Animation: If you\"re working with animated characters, learn techniques for lip-syncing dialogue with character animations.
- Exporting Audio with Video: Finalize your project by exporting both video and audio tracks, ensuring your edited audio is properly included in your final video file.
With these audio editing and synchronization tools, Blender enables you to create professional-quality video projects with rich, well-balanced soundscapes that complement your visual storytelling.

Color Grading and Correction Tools
Blender\"s comprehensive suite for color grading and correction provides filmmakers and video editors with powerful tools to enhance their footage. Mastering these tools can dramatically improve the visual appeal of your projects.
- Basic Color Correction: Learn to adjust the basic color settings such as contrast, brightness, saturation, and gamma to correct any color imbalances in your footage.
- Color Grading: Explore advanced techniques for color grading to set the tone and mood of your videos. Blender offers a variety of color grading tools, including curves, color balance, and look-up tables (LUTs).
- Using Nodes for Color Work: Dive into node-based color correction and grading for more complex and precise adjustments. Nodes provide flexibility in the editing workflow, allowing for intricate effect layering and blending.
- Matching Shots: Discover methods to match the color and exposure between different shots, ensuring visual continuity across your video.
- Creating Cinematic Looks: Utilize Blender\"s color tools to emulate the look of film or to create a unique visual style for your video project.
- Workflow Tips: Efficient workflows for managing color correction and grading across multiple clips and scenes, ensuring a cohesive look throughout your project.
Blender\"s color grading and correction tools are essential for anyone looking to push their video projects to the next level. With practice, these tools can help you achieve professional-quality visual storytelling.

Exporting Your Edited Videos from Blender
Finalizing your video project in Blender involves exporting your creation so it can be shared or published. Understanding the export process is crucial for ensuring the highest quality output. Follow these steps to successfully export your edited videos from Blender:
- Choose the Output Format: Blender supports various formats including AVI, MPEG, and QuickTime. Select the format that best suits your project\"s needs.
- Set the Output Properties: In the Output properties tab, specify your video\"s resolution, frame rate, and aspect ratio to match your project requirements.
- Configure Encoding Settings: Adjust the encoding settings to choose the codec, bitrate, and audio settings. This step is crucial for balancing quality and file size.
- Specify Output Location: Choose where you want your exported file to be saved. Ensure the file path is accessible and has sufficient storage space.
- Render Your Project: Once all settings are configured, click the Render button and select \"Render Animation\" to start the export process. Rendering time will vary based on the complexity of your project and your system\"s capabilities.
After the rendering process completes, you\"ll find your video file in the specified location, ready for sharing or further processing. Exporting from Blender might seem daunting at first, but with practice, it becomes a straightforward part of your video editing workflow.

_HOOK_
READ MORE:
Resources for Further Learning and Mastery
To excel in video editing using Blender, a wealth of resources is at your disposal. From beginners to advanced users, these curated materials will guide you through every aspect of video editing, helping you to enhance your skills and creativity.
- Blender Official Documentation: The starting point for anyone serious about mastering Blender. It covers all aspects of Blender, including video editing.
- Blender Guru: Offers comprehensive tutorials that range from basic to advanced techniques, perfect for those who prefer structured learning paths.
- CG Cookie: A platform with a variety of Blender tutorials that cover a wide range of topics, including animation, modeling, and video editing.
- Blender Artists Community: An active forum where users share experiences, ask for advice, and showcase their work. A great place to learn from peers.
- YouTube: Home to countless tutorials, YouTube is an invaluable resource for visual learners. Channels like Blender Guru, CG Geek, and Darrin Lile offer tutorials for all skill levels.
- Online Courses: Platforms like Udemy, Coursera, and Skillshare feature courses on Blender that cater to different expertise levels and learning styles.
- Books: For those who prefer reading, books like \"Blender For Dummies\" and \"The Complete Guide to Blender Graphics\" are excellent resources.
With dedication and the right resources, mastering video editing in Blender is within your reach. Explore these resources to unlock your potential and start creating stunning video content.
Embark on your video editing journey with Blender and unleash your creative potential. This guide offers everything from basics to advanced techniques, ensuring you have the tools to bring your visions to life. Start exploring and create without limits.