Topic edit video blender: Discover how "Edit Video Blender" transforms your video projects into cinematic masterpieces with intuitive tools and features for creators of all levels. Start creating, editing, and animating with Blender today.
Table of Content
- What is Blender\'s built-in video sequence editor primarily used for?
- Understanding Blender\"s Interface and Basic Functions
- Step-by-Step Guide to Importing and Organizing Video Clips
- Essential Editing Techniques: Cutting, Moving, and Splicing
- Adding Effects and Transitions for Professional-Quality Videos
- Audio Editing and Synchronization Techniques in Blender
- Advanced Video Editing: Color Grading, Speed Adjustments, and More
- YOUTUBE: Blender As A Video Editor: It\'s Actually Really Good!
- Exporting Your Final Video: Formats, Settings, and Optimization
- Utilizing Blender for Motion Graphics and VFX
- Tips and Tricks for Efficient Video Editing Workflow
- Learning Resources: Where to Find Tutorials and Community Support
What is Blender\'s built-in video sequence editor primarily used for?
The built-in video sequence editor in Blender is primarily used for:
- Performing basic actions like video cuts and splicing.
- Arranging and editing video clips to create a cohesive sequence.
- Adding transitions, effects, and audio to enhance the video quality.
- Applying color correction and adjustments to achieve the desired look.
- Rendering the final edited video for output in various formats.
READ MORE:
Understanding Blender\"s Interface and Basic Functions
Blender\"s interface might seem daunting at first, but its efficient design caters to both beginners and professionals. This section will help you familiarize yourself with the essential aspects of Blender\"s video editing capabilities.
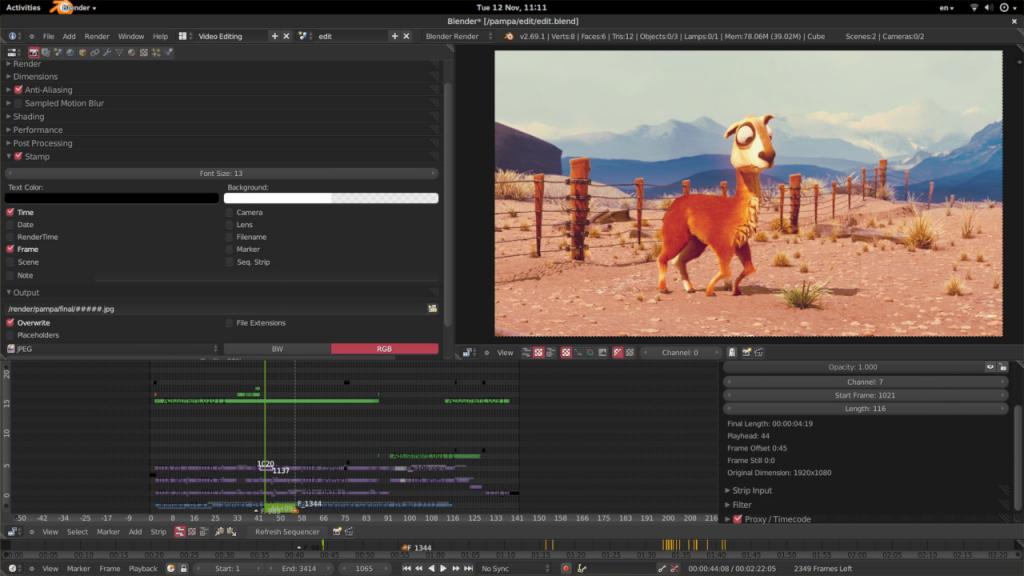
- Workspace Layout: Blender\"s interface is highly customizable. The default layout for video editing is the Video Editing workspace, which can be selected from the top menu. It includes areas for previewing video, editing timelines, and accessing various tools.
- Video Sequence Editor (VSE): The heart of Blender\"s video editing toolkit is the VSE, where clips can be added, cut, and arranged. The VSE includes several panels for adjusting properties, previewing video, and more.
- Properties Panel: Here, you can adjust render settings, including output format and resolution. It\"s also where you\"ll find options for video encoding.
- Timeline: The timeline at the bottom of the VSE allows for precise control over the timing of your video clips and effects. Keyframes for animation and effects can be added here.
- Preview Window: This area shows the current frame of the video you\"re editing. It\"s essential for reviewing your work.
- Adding Clips: You can add video clips to your project by dragging and dropping files into the VSE or using the Add menu. Blender supports a range of video formats.
- Editing Tools: Blender offers tools for cutting, splicing, and moving clips in the timeline. Use keyboard shortcuts like K (cut) and G (grab/move) to streamline your workflow.
- Effects and Transitions: Access a variety of effects and transitions from the Add menu to enhance your video. This includes color grading, transformations, and overlays.
By familiarizing yourself with these basic functions, you\"ll be well on your way to creating professional-quality videos with Blender. Experiment with different tools and settings to discover the full extent of what Blender can do for your video projects.

Step-by-Step Guide to Importing and Organizing Video Clips
Editing video in Blender starts with importing and organizing your clips. This process is straightforward and sets the foundation for your project. Follow these steps to efficiently manage your media.
- Open Video Editing Layout: Start Blender and switch to the Video Editing layout from the top menu to access the Video Sequence Editor (VSE).
- Importing Clips: To add video clips, go to the Add menu in the VSE and select Movie. Navigate to your video files, select them, and click Add Movie Strip(s) to import them into the timeline.
- Preview Your Clips: Use the Preview window in the VSE to play back your imported clips. This helps you verify the content before you begin editing.
- Arrange Your Clips: Click and drag your clips in the timeline to arrange them in your desired order. You can also cut and trim clips using the strip menu or shortcut keys.
- Organizing with Meta Strips: Group related clips together by selecting them and pressing Ctrl+G to create a Meta Strip. This simplifies your timeline and makes it easier to manage complex projects.
- Use Markers: Add markers to your timeline by pressing M while your playhead is at the desired location. Markers can help you identify key points in your video for editing or synchronization purposes.
- Save Your Project: Regularly save your project to prevent data loss. Use File > Save As to save your .blend file, which contains all your edits and references to your video clips.
By following these steps, you\"ll have a well-organized project that\"s ready for detailed editing. Remember, taking the time to properly import and organize your clips can greatly enhance your editing workflow in Blender.

Essential Editing Techniques: Cutting, Moving, and Splicing
Mastering the essential editing techniques in Blender is crucial for creating dynamic and engaging videos. Learn how to cut, move, and splice your clips to tell your story effectively.
- Cutting Clips: Use the \"Cut\" tool or press \"K\" in the Video Sequence Editor to split a clip at the playhead\"s position. This allows you to remove unwanted parts of a clip or to rearrange sections of your video.
- Moving Clips: To move a clip, simply click and drag it to a new position in the timeline. Holding down \"Shift\" while dragging will snap the clip to the nearest frame or marker, ensuring precise alignment.
- Splicing Clips: Splicing involves cutting two clips and then joining them together. After making cuts, select the ends of two different clips that you want to splice together and use the \"Shift+S\" shortcut to snap them together without any gaps.
- Adjusting Clip Properties: With a clip selected, you can adjust its properties in the Properties panel. This includes changing the clip\"s start and end points, altering its playback speed, and applying effects.
- Using the Razor Tool: The Razor tool can be used for more intuitive cutting. Activate it and click on the clip in the timeline where you want to make a cut, creating an instant split.
- Overlaying Clips: To overlay clips, simply place one clip above another in the timeline. You can use the opacity settings to blend them together or apply transition effects for a smoother change between clips.
By applying these techniques, you can edit your videos in Blender with precision and creativity, crafting stories that captivate your audience.

Adding Effects and Transitions for Professional-Quality Videos
Blender, while primarily known for its prowess in 3D modeling and animation, also offers a robust set of features for video editing. Adding effects and transitions to your videos can elevate the production value, making them more engaging and professional. Here\"s how to utilize Blender\"s capabilities for effects and transitions:
- Accessing the Video Editing Workspace: Start by opening Blender and switching to the Video Editing workspace. This will provide you with a timeline, preview window, and a plethora of editing tools.
- Adding Transitions: To add transitions between clips, place them next to each other on the timeline. Right-click to select the boundary between two clips, then choose \"Add Transition\" from the context menu. Blender offers various transition options such as Cross, Wipe, and Fade.
- Using the Effects Strip: For more complex effects, use the Add menu to insert an Effect Strip. This feature allows you to apply effects like Gaussian Blur, Color Correction, and Transform adjustments. Simply select the clips you want to affect, then choose the desired effect from the Add > Effect Strip menu.
- Customizing Effects: After adding an effect, you can customize its properties in the Effect Strip properties panel. Adjust parameters like intensity, duration, and blending modes to achieve the desired outcome.
- Animating Effects: To animate an effect over time, use the keyframing feature. Move the playhead to the frame where you want the effect to begin, change the effect parameters as desired, and press the keyframe button (a circle) next to the parameter. Move the playhead again, adjust the parameter for the end state, and add another keyframe.
- Previewing and Adjusting: Regularly preview your video by pressing the Play button in the timeline. This is crucial for ensuring that transitions and effects are timed correctly and blend smoothly.
- Speed Control: For speed ramping effects, add a Speed Control effect strip. This allows you to speed up or slow down footage, creating dynamic motion effects.
Remember, the key to mastering effects and transitions in Blender is experimentation. Try combining different effects and transitions to discover unique looks for your videos. With practice, you\"ll be able to add a professional polish to your video projects that captivates your audience.

_HOOK_
Audio Editing and Synchronization Techniques in Blender
Blender is not just a tool for visual creation but also offers features for audio editing and synchronization, making it a comprehensive solution for video production. Effective audio editing can greatly enhance the overall impact of your videos. Here\"s how to work with audio in Blender:
- Importing Audio: To add audio to your project, switch to the Video Editing workspace and use the \"Add\" menu to select \"Sound.\" Navigate to your audio file and import it into the sequencer. Your audio will appear as a waveform, allowing you to visually align it with your video clips.
- Synchronizing Audio with Video: To sync audio with video, you can use the waveform as a guide. Drag your audio strip to align it with the corresponding video clip. Use the playback feature to fine-tune the synchronization, ensuring the audio matches perfectly with the video actions or dialogue.
- Editing Audio Strips: Blender allows you to cut, move, and adjust audio strips just like video clips. Use the \"Cut\" tool to trim audio clips or split them into parts. You can also adjust the volume of audio clips directly in the sequencer by dragging the volume control line within the audio strip.
- Adding Fade In and Fade Out: For smooth audio transitions, you can add fade-in and fade-out effects. Select your audio strip, then go to the Strip Properties panel. Use the \"Volume\" animation property to create keyframes at the start and end of your audio strip, adjusting the volume to create a gradual fade effect.
- Mixing Audio Tracks: If your project includes multiple audio tracks, such as background music, dialogue, and sound effects, you can mix these effectively in Blender. Adjust the volume levels of each track to balance the audio, ensuring no track overpowers the others. You can also pan audio left or right for a stereo effect.
- Audio Effects and Filters: Blender supports various audio effects and filters. By accessing the modifiers panel, you can add effects like high-pass, low-pass filters, and more to enhance your audio. These tools can help in cleaning up audio or creating special audio effects for your project.
- Exporting Video with Audio: Once your audio editing is complete, ensure that the audio codec settings are correctly set in the output properties before exporting your video. Blender allows you to export your project with the audio perfectly synced and integrated.
By mastering these audio editing and synchronization techniques in Blender, you can create videos that not only look professional but sound professional too. Remember, audio is half the experience in video production, so give it the attention it deserves.

Advanced Video Editing: Color Grading, Speed Adjustments, and More
Advanced video editing techniques in Blender can transform a good video into a great one. From color grading to speed adjustments, these features allow you to enhance the visual appeal and narrative pace of your projects. Here’s how to leverage these advanced editing capabilities:
- Color Grading: Blender’s color grading tools are found in the Sequencer’s properties panel. Use the \"Strip\" tab to access color balance and correction options. Adjust the lift, gamma, and gain to alter the shadows, midtones, and highlights of your video. The \"Curves\" tool offers more precise control over color adjustments, enabling you to fine-tune the look and feel of your footage.
- Speed Adjustments: To change the playback speed of a clip, add a Speed Control effect strip. This can be done by selecting your video clip, then going to Add > Effect Strip > Speed Control. In the strip’s properties, you can adjust the speed factor to speed up or slow down the clip. This is especially useful for creating slow-motion or time-lapse effects.
- Creating Masks: Masks can be used to apply effects to specific parts of your video. Create a mask in the Movie Clip Editor, then apply it to your video clip using an adjustment layer in the Video Sequence Editor. This technique is perfect for highlighting areas, creating vignettes, or performing color correction on selective parts of the footage.
- Applying LUTs: Look-Up Tables (LUTs) are another powerful color grading tool. While Blender does not natively support LUTs, you can use the compositor to apply them to your footage. This requires loading your video into the compositor, applying the LUT, and rendering the footage before bringing it back into the Video Sequence Editor.
- Stabilization and Tracking: For footage that requires stabilization, Blender’s Movie Clip Editor provides tracking tools that can be used to stabilize shaky footage. Track points of motion in your clip, then apply stabilization to those tracks to smooth out the video.
- Chroma Keying: To remove backgrounds or perform green screen compositing, use the Chroma Key feature in Blender’s compositor. This allows you to key out specific colors, making it possible to overlay your subject onto different backgrounds or scenes.
- Exporting with Advanced Settings: When you’re ready to export your edited video, Blender offers advanced encoding settings to optimize your final output. Adjust bitrates, codecs, and container formats to suit your distribution needs, ensuring your video looks its best on any platform.
By mastering these advanced video editing techniques in Blender, you unlock a new realm of creative possibilities. Experiment with these tools to discover unique ways to enhance your storytelling and visual aesthetics.

Blender As A Video Editor: It\'s Actually Really Good!
Dive into the fascinating world of editing with this captivating video showcasing the power and artistry behind the editing process. Learn new techniques and be inspired to create your own masterpiece!
5 Blender Skills Video Editors Should Know
Enhance your skills and unleash your potential with this dynamic video focused on improving your capabilities. Discover practical tips and valuable insights to sharpen your skills and excel in your personal and professional life.
Exporting Your Final Video: Formats, Settings, and Optimization
After meticulously editing your video in Blender, the final step is to export it. This stage is crucial as it determines the quality and compatibility of your video across various devices and platforms. Understanding the right formats, settings, and optimization techniques is essential for delivering the best viewing experience. Here\"s how to export your video from Blender effectively:
- Choosing the Right Format: Blender supports several export formats, including AVI, MPEG, and QuickTime. However, for maximum compatibility and quality, H.264 in an MP4 container is often recommended. This format is widely supported across devices and offers a good balance between quality and file size.
- Setting the Output Properties: Navigate to the Output Properties panel to set your file’s resolution, frame rate, and aspect ratio. Ensure these settings match your project\"s settings to maintain the quality of your video.
- Configuring Encoding Settings: In the same panel, you\"ll find encoding options. Select H.264 as the video codec and choose your desired bitrate. A higher bitrate generally means better video quality but results in a larger file size. For web uploads, a bitrate between 5,000 to 10,000 kbps is a good starting point.
- Audio Export Settings: Don’t forget about your audio settings. Choose AAC as your audio codec for broad compatibility and good quality. Adjust the bitrate according to your needs; 192 kbps is typically sufficient for clear audio.
- Optimizing for Web or Broadcast: If you’re exporting for the web, consider reducing the resolution to 1080p or even 720p for faster upload times and streaming. For broadcast, adhere to the specific standards required by the platform or network.
- Testing Before Final Export: Before exporting the entire project, export a short segment to test the quality and settings. This can save you time and ensure that your settings are optimized without needing to re-export the entire video.
- Batch Rendering: For longer projects or multiple videos, consider using Blender’s batch rendering feature to automate the export process. This allows you to render multiple sequences or scenes consecutively without manual intervention.
Remember, exporting is the final step in showcasing your work. Take the time to review your export settings carefully to ensure your video looks and sounds as intended, regardless of where it\"s viewed. By following these guidelines, you can optimize your video for high quality and efficient distribution.

Utilizing Blender for Motion Graphics and VFX
Blender is not only a powerful tool for 3D modeling and animation but also for creating stunning motion graphics and visual effects (VFX). Its comprehensive suite of features allows creators to bring their visions to life, from simple text animations to complex 3D environments. Here\"s how you can utilize Blender for motion graphics and VFX:
- Creating Basic Motion Graphics: Start with Blender\"s text tool to create dynamic titles and graphics. You can animate text using keyframes for position, rotation, and scale under the Object properties. Apply materials and shaders for visual impact.
- Using Particles for Effects: Blender\"s particle system can create complex visual effects, such as smoke, fire, and explosions. You can control the behavior of particles with physics settings to simulate natural phenomena or abstract visuals.
- Incorporating 3D Objects into Video: Blender allows you to seamlessly integrate 3D objects into your video footage. Use the tracking features in the Movie Clip Editor to match the movement and perspective of your footage, allowing 3D objects to appear as if they\"re part of the scene.
- Applying Compositing for VFX: Blender’s node-based compositing system enables you to layer multiple elements, adjust colors, and apply effects non-destructively. Use it to create green screen effects, add motion blur, or composite different elements of your scene together.
- Simulating Physics for Realism: Utilize Blender’s physics engine for realistic simulations of cloth, fluids, and rigid bodies. This can add an extra layer of realism to your motion graphics, making them more dynamic and engaging.
- Animating Cameras and Lights: For dynamic scenes, animate cameras and lighting to mimic cinematic techniques. Keyframe camera movements to follow action or enhance the mood of your graphics. Lighting animation can simulate time of day changes or spotlight effects.
- Rendering for Final Output: Choose the appropriate rendering engine (Eevee for real-time rendering or Cycles for photorealism) based on your project needs. Adjust render settings for optimal quality and performance, considering factors like resolution, sampling, and denoising.
With Blender, the possibilities for motion graphics and VFX are nearly limitless. Whether you’re creating content for social media, film, or broadcast, Blender provides the tools you need to produce professional-level motion graphics and visual effects. Experimentation and practice are key to mastering these techniques and achieving your creative goals.

Tips and Tricks for Efficient Video Editing Workflow
Efficiency is key in video editing, especially when working with complex projects in Blender. A streamlined workflow can save you time and reduce the stress of meeting deadlines. Here are some tips and tricks to enhance your video editing workflow in Blender:
- Organize Your Assets: Before starting your project, organize your video clips, audio files, and other assets into folders. This makes it easier to find and import them into Blender, reducing clutter and saving time.
- Use Proxies for High-Resolution Footage: Editing high-resolution footage can be resource-intensive. Use Blender’s proxy feature to create lower-resolution copies of your clips for editing. This speeds up the playback and editing process, and you can switch back to the original high-resolution clips for the final render.
- Learn Keyboard Shortcuts: Blender has numerous keyboard shortcuts that can drastically speed up your editing process. Learning these shortcuts for cutting, moving strips, and adjusting properties can make your workflow much more efficient.
- Utilize Blender’s Templates: Blender allows you to save and load templates, which can include your preferred layout, settings, and even node setups for compositing. This is especially useful if you start your projects with a similar setup each time.
- Batch Processing for Repetitive Tasks: For repetitive tasks such as rendering multiple versions of a video, consider using Blender’s command line interface for batch processing. This can save a significant amount of time and effort.
- Use Color Labeling: Label your video and audio strips with different colors based on their type or role in the project. This visual organization helps you quickly navigate your timeline and manage complex edits.
- Regularly Save Versions: Save different versions of your project as you make significant changes. This not only acts as a backup but also allows you to experiment freely, knowing you can revert to an earlier version if needed.
- Customize Your Layout: Arrange Blender’s interface to suit your editing needs. You can customize the layout to have your video preview, timeline, and properties panels arranged for optimal access and efficiency.
- Preview Renders for Complex Effects: Before rendering the entire project, do preview renders of segments with complex effects or transitions. This ensures that everything looks as expected without wasting time on full-project renders.
By implementing these tips and tricks, you can create a more efficient video editing workflow in Blender. This not only makes the editing process more enjoyable but also allows you to focus on the creative aspects of your projects.
_HOOK_
READ MORE:
Learning Resources: Where to Find Tutorials and Community Support
Mastering Blender for video editing is an exciting journey, filled with endless possibilities for creativity. Fortunately, there is a wealth of learning resources available, ranging from tutorials to community support forums. Here are some recommendations to help you enhance your skills and connect with other Blender users:
- Official Blender Tutorials: The Blender Foundation offers a comprehensive series of tutorials on their official website and YouTube channel. These tutorials cover everything from the basics to advanced techniques, directly from the developers of Blender.
- Blender Artists Community: Blender Artists is an online forum where users from around the globe share their work, ask questions, and provide feedback to others. It’s a great place to seek advice on specific challenges or to find inspiration for your next project.
- Online Courses and Workshops: Platforms like Udemy, Coursera, and Skillshare feature detailed Blender courses taught by experienced instructors. These courses often include project-based learning, which can be more engaging and informative.
- YouTube Tutorials: YouTube is home to countless Blender tutorials covering a wide range of topics. Channels like Blender Guru, CG Geek, and Ducky 3D specialize in Blender tutorials and offer valuable insights and tips for users of all skill levels.
- Blender Network: For professional training and networking opportunities, the Blender Network connects you with certified trainers and studios. It’s ideal for those looking to take their Blender skills to a professional level.
- Books and eBooks: There are several comprehensive books and eBooks available that cover Blender’s video editing capabilities. These resources are perfect for those who prefer a structured learning approach.
- Blender Stack Exchange: A Q&A site for Blender users where you can ask specific questions and get answers from the community. It’s a great resource for troubleshooting and learning new techniques.
- Social Media Groups: Join Blender-related groups on social media platforms like Facebook, Reddit, and LinkedIn. These communities are active and offer a wealth of knowledge, tips, and project feedback.
Exploring these resources can significantly accelerate your learning process and improve your video editing skills in Blender. Remember, the Blender community is known for its willingness to help newcomers, so don’t hesitate to reach out for support or to share your own knowledge with others.
Embark on your video editing journey with Blender and unlock the full potential of your creative vision. With these insights, you\"re well-equipped to produce stunning visuals, compelling narratives, and professional-quality videos that captivate and inspire.