Topic blender video editor effects: Discover the transformative power of Blender Video Editor Effects to elevate your video projects with cutting-edge visual enhancements, comprehensive tools, and intuitive workflows designed for creators of all skill levels.
Table of Content
- What are the different effects available in the Blender video editor for enhancing videos?
- Understanding Blender\"s Video Editing Capabilities
- How to Get Started with Blender for Video Editing
- Comprehensive Effects Tutorial: Adding and Managing Effects in Blender
- Advanced Techniques: Color Grading and Compositing
- Speed Control and Frame Rate Conversion: Enhancing Your Video\"s Flow
- YOUTUBE: Blender Tutorial: How to Add Effects in Blender Video Editor
- Mastering Video Transitions for Professional-Looking Edits
- Audio Mixing and Syncing: Creating a Harmonious Audiovisual Experience
- Utilizing Blender\"s VFX for Stunning Visual Effects
- Motion Tracking and Camera Reconstruction in Blender
- Blender Video Editing Workflow Tips and Tricks
- Exporting and Sharing Your Final Video Project
What are the different effects available in the Blender video editor for enhancing videos?
In the Blender video editor, there are various effects available to enhance and improve your videos. Some of the different effects you can use include:
- Color Grading: Adjust the color and tone of your video to create a specific mood or look.
- Transitions: Smoothly move between different scenes or shots in your video.
- Filters: Apply filters to give your video a unique visual style or effect.
- Green Screen: Use chroma keying to remove backgrounds and replace them with different images or videos.
- Text Overlays: Add text, titles, and subtitles to your videos to provide information or enhance storytelling.
- Stabilization: Reduce shakiness in your videos to create a smoother viewing experience.
- Speed Control: Adjust the speed of your video clips for slow-motion or fast-motion effects.
READ MORE:
Understanding Blender\"s Video Editing Capabilities
Blender, an open-source 3D creation suite, offers powerful video editing capabilities that cater to both beginners and professionals. Its Video Sequence Editor (VSE) allows for a wide range of video editing and post-production tasks, including cutting and splicing, as well as more complex procedures like video masking and color grading.
- Live preview, luma waveform, chroma vectorscope, and histogram displays for precise editing.
- Audio mixing, syncing, scrubbing, and waveform visualization to enhance the auditory components of your projects.
- Support for up to 32 slots for adding video, images, audio, scenes, masks, and effects, providing vast creative possibilities.
- Speed control, adjustment layers, transitions, keyframes, filters, and more for comprehensive control over your video\"s playback and appearance.
Blender\"s integrated approach combines traditional video editing tools with its powerful 3D modeling, animation, and rendering capabilities, enabling unique visual effects and transitions that are not easily achievable in other software. Whether you\"re working on short films, animations, or simply enhancing video content, Blender provides a full suite of tools to bring your vision to life.
- Begin with importing your media into Blender\"s Video Sequence Editor.
- Utilize Blender\"s array of editing tools to cut, splice, and arrange your footage.
- Explore the effects and transitions available to add a professional touch to your projects.
- Adjust color, brightness, and contrast with Blender\"s color grading tools for the perfect look.
- Export your final project in a variety of formats, ready for distribution or further processing.
With Blender, the possibilities are endless, offering a flexible platform for creative exploration and professional-grade video production.

How to Get Started with Blender for Video Editing
Starting with Blender for video editing opens up a realm of creative possibilities. This powerful software, though initially overwhelming, can be mastered with a structured approach. Here\"s how to begin your journey into video editing with Blender, ensuring a smooth and efficient learning curve.
- Download and Install Blender: Ensure you have the latest version of Blender installed from the official website to access all the newest features and improvements.
- Familiarize Yourself with the Interface: Spend some time navigating Blender\"s interface. Identify key areas such as the timeline, preview window, and properties panel.
- Import Your Media: Learn how to import your video clips, images, and audio files into Blender. This is the first step in starting your video editing project.
- Explore Basic Editing Tools: Get to know the basic editing functionalities like cutting, trimming, and arranging your clips on the timeline.
- Add Effects and Transitions: Discover how to enhance your video by adding effects and transitions. Blender offers a wide range of options to elevate your video\"s visual appeal.
- Adjust Audio: Understand how to synchronize your audio with video clips, adjust volumes, and apply audio effects for a polished sound.
- Color Grading: Experiment with Blender\"s color grading tools to set the mood and tone of your video, improving its overall look.
- Render and Export: Finally, learn how to render your project and export it in the desired format for sharing or further processing.
Remember, practice and experimentation are key to mastering Blender for video editing. Take advantage of online tutorials and community forums to enhance your skills and solve any challenges you encounter.

Comprehensive Effects Tutorial: Adding and Managing Effects in Blender
Blender\"s Video Sequence Editor (VSE) is not only for splicing and editing video clips but also for adding and managing a wide array of effects. This tutorial will guide you through the process of enhancing your video projects with Blender\"s powerful effects tools.
- Understanding Effects in Blender: Blender offers various effects, including color correction, blurs, transitions, and more, to enhance the visual appeal of your videos.
- Adding Effects: Learn how to add effects to your video clips directly in the VSE. This involves navigating to the Add menu, selecting the effect, and applying it to your chosen clip or scene.
- Configuring Effects: Each effect has customizable parameters that allow you to adjust its properties to suit your video project. Familiarize yourself with the settings to achieve the desired outcome.
- Keyframing for Dynamic Effects: Discover how to use keyframes to animate effects over time, adding dynamism and interest to your video projects.
- Combining Effects: Learn the art of layering and combining effects to create complex visual aesthetics. This includes using the compositor for more advanced effects work.
- Managing Effects: Efficiently manage your effects within the timeline to ensure a smooth editing workflow. This includes renaming, grouping, and adjusting the order of effects.
- Rendering Effects: Understand the rendering options available in Blender to ensure your effects are properly included in the final video output.
With practice, you\"ll be able to harness the full potential of Blender\"s effects to create visually stunning video content. Remember, experimentation is key to discovering new and creative ways to use effects in your projects.
Advanced Techniques: Color Grading and Compositing
Blender\"s prowess extends far beyond basic video editing, offering advanced techniques like color grading and compositing that can dramatically elevate the quality of your video projects. This section delves into how to harness these powerful features.
- Color Grading: This crucial post-production process adjusts the color and contrast of your footage to evoke the desired mood and style. Blender\"s color grading tools, found within the Node Editor, allow for precise control over the look of your video.
- Using Nodes for Color Grading: Discover how to use Blender\"s node-based compositing system for color grading. Nodes like Color Balance, RGB Curves, and Hue/Saturation are essential for crafting your visual tone.
- Compositing for Visual Effects: Blender\"s compositor lets you combine multiple images or video clips into a single scene, creating complex visual effects. Learn to navigate the compositor and utilize its vast array of nodes for effects such as keying, tracking, and layering.
- Keying and Masking: Keying tools in Blender allow you to remove backgrounds, while masking tools help in isolating and modifying specific parts of your footage. Master these techniques to integrate various elements seamlessly.
- Tracking for Compositing: Understand how to use Blender\"s motion tracking features to matchmove your composited elements with the original footage, ensuring that everything aligns perfectly across your scenes.
- Rendering Your Composite: Finally, rendering settings in Blender can be adjusted to output your composite with the desired quality and file format. This step is crucial for achieving professional results.
By mastering color grading and compositing, you can unlock the full cinematic potential of your video projects in Blender, creating visually stunning and emotionally resonant pieces that captivate your audience.
_HOOK_
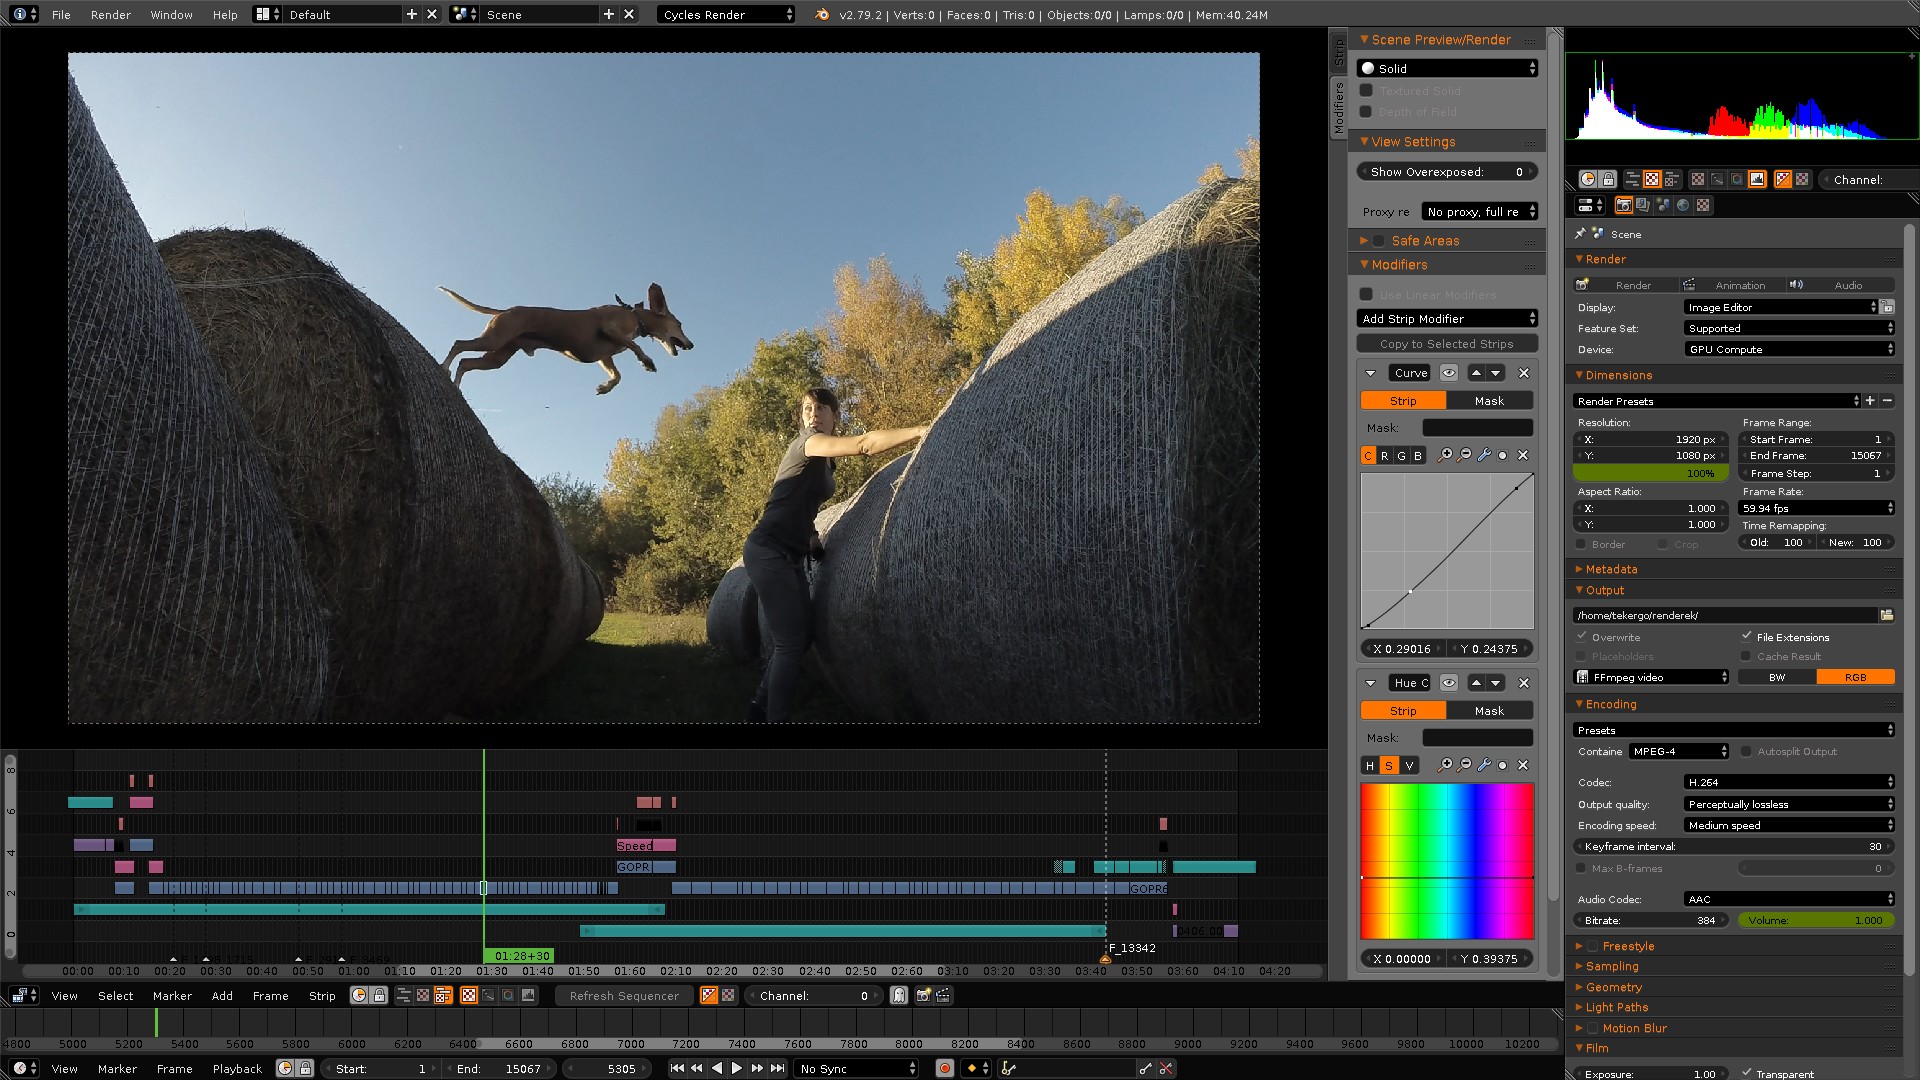
Speed Control and Frame Rate Conversion: Enhancing Your Video\"s Flow
Manipulating the speed of your video clips and converting frame rates are essential techniques in video editing that can dramatically impact the narrative and emotional pacing of your projects. Blender offers versatile tools to achieve precise control over these aspects, enhancing the flow and dynamism of your videos.
- Understanding Speed Control: Learn how to use Blender\"s speed control effect strip to speed up or slow down your video clips. This feature is crucial for creating slow-motion effects or speeding up a slow scene.
- Applying Speed Control: Discover the step-by-step process to apply speed control to your clips in the Video Sequence Editor (VSE), including adjusting the speed factor and length of the effect strip to match your desired timing.
- Frame Rate Conversion: Gain insights into converting the frame rate of your video footage to ensure compatibility with different playback standards or to achieve a specific visual style, such as the cinematic 24 fps look.
- Using the Frame Rate Conversion Tool: Explore how to change the frame rate of your project in Blender\"s properties panel, including interpolating frames for smoother motion in frame rate upconversion or removing frames for downconversion.
- Tips for Smooth Playback: Understand the importance of matching project frame rates with your source footage and output standards to avoid playback issues such as judder or motion blur.
By mastering speed control and frame rate conversion in Blender, you can create videos that flow beautifully and convey your creative vision more effectively, whether you\"re aiming for dramatic slow-motion effects or seamless frame rate transitions.

Blender Tutorial: How to Add Effects in Blender Video Editor
Tutorial: Discover a step-by-step tutorial that will guide you through mastering a new skill or technique. Get ready to embark on a learning journey filled with fun and excitement! Transitions: Explore the mesmerizing world of transitions and learn how to take your videos to the next level. Join us in exploring the art of seamless transitions and elevate your content creation game!
Blender 3.0 Video Editing Tutorial Ep.3 Transitions
full playlist: https://www.youtube.com/watch?v=1OpbKMSN61o&list=PLalVdRk2RC6qo7oHp5OO8e7RMe46nYdOY --- After ...
Mastering Video Transitions for Professional-Looking Edits
Transitions between video clips are pivotal in maintaining the flow of your video, guiding your audience through the narrative seamlessly. Blender\"s Video Sequence Editor provides a rich toolkit for creating and customizing transitions, allowing you to achieve professional-looking edits with ease.
- Types of Transitions: Explore the variety of transitions available in Blender, including cuts, fades, wipes, and more. Each type of transition can convey a different mood or pace, making your selection critical to the storytelling process.
- Creating Transitions: Learn the step-by-step process of adding transitions between clips in Blender. This includes simple cuts, which can be as straightforward as placing clips next to each other, to more complex crossfades and wipes that require additional steps.
- Customizing Transitions: Dive into the customization options for transitions in Blender, such as adjusting the duration and properties of a fade or wipe, to match the desired effect and timing of your edit.
- Advanced Transition Techniques: Uncover advanced techniques for creating unique transitions, such as using the compositor to design custom wipe patterns or employing animation nodes for dynamic effects.
- Tips for Smooth Transitions: Understand the importance of timing and pacing when applying transitions. Smooth transitions are key to maintaining viewer engagement and ensuring a professional feel to your edits.
By mastering the art of video transitions in Blender, you can elevate your video projects, ensuring a cohesive and engaging viewing experience that captivates your audience from start to finish.
Audio Mixing and Syncing: Creating a Harmonious Audiovisual Experience
Audio is a critical component of video production, contributing significantly to the overall impact and professionalism of your project. Blender\"s Video Sequence Editor offers tools for audio mixing and syncing, enabling you to create a harmonious audiovisual experience with precision and ease.
- Importing Audio: Start by importing your audio files into Blender. Supported formats include WAV, MP3, and more, allowing for flexibility in your audio sources.
- Syncing Audio with Video: Learn how to synchronize your audio tracks with video clips. This involves aligning audio cues with visual elements, ensuring that sound effects, dialogue, and music perfectly match the on-screen action.
- Audio Mixing: Explore Blender\"s audio mixing capabilities, adjusting levels, balance, and fades to create a dynamic sound landscape. This includes using the VSE to manage multiple audio tracks and applying keyframes to control volume changes over time.
- Adding Effects: Discover how to enhance your audio with effects such as reverb or echo to add depth and atmosphere to your project. Blender\"s audio effects can transform the auditory experience of your video.
- Exporting Your Project: Finalize your project by exporting the video with audio. Ensure that your export settings are optimized for the best quality audiovisual output, suitable for your distribution platform.
With these steps, you can leverage Blender\"s audio editing tools to create videos that not only look professional but also sound impeccable, engaging your audience fully through both sight and sound.

Utilizing Blender\"s VFX for Stunning Visual Effects
Blender is not just a video editing software; it\"s a comprehensive suite for creating breathtaking visual effects (VFX) that can take your video projects to the next level. With Blender, you have access to a range of VFX tools that cater to both novices and professionals.
- Introduction to Blender\"s VFX: Start by exploring Blender\"s VFX capabilities, including particle systems, smoke, fire, and fluid simulations. These tools allow you to add realistic environmental effects to your scenes.
- Creating Dynamic Simulations: Learn how to use Blender\"s physics engine to create dynamic simulations for more complex effects such as explosions, water, and cloth dynamics. Understanding these systems is key to incorporating lifelike motion into your VFX.
- Integrating 3D Models with Live Footage: Master the art of combining 3D models with live-action footage using Blender\"s tracking tools. This includes camera tracking to match the movement and perspective of the footage for seamless integration.
- Compositing Techniques: Dive into Blender\"s node-based compositing system for layering various elements and effects in your video. This is where you can fine-tune your VFX, adjust color grading, and apply finishing touches.
- Utilizing Blender\"s VFX Libraries: Take advantage of Blender\"s extensive libraries and presets for quick and effective VFX creation. These resources can significantly speed up your workflow.
By harnessing the power of Blender\"s VFX tools, you can create visually stunning effects that enhance storytelling, captivate your audience, and elevate the quality of your video projects.
Motion Tracking and Camera Reconstruction in Blender
Blender\"s motion tracking and camera reconstruction capabilities are robust tools that enable filmmakers and visual effects artists to integrate 3D elements seamlessly into live-action footage. These features open up a world of possibilities for creating realistic and immersive scenes.
- Introduction to Motion Tracking: Start by understanding the basics of motion tracking in Blender, which involves tracking the movement of objects and cameras in video footage. This is essential for adding 3D elements to real-world scenes.
- Setting Up Your Tracking Scene: Learn how to prepare your scene for tracking, including selecting the right tracking points and configuring the tracking settings for optimal results.
- Solving the Camera Movement: Dive into the process of solving the camera movement within your footage. This allows Blender to recreate the exact camera path taken during filming, ensuring that 3D elements align perfectly with your live-action scenes.
- Integrating 3D Elements: Once the camera movement is solved, discover how to add and position 3D elements within your scene. This includes adjusting lighting and shadows to match the live-action footage for a convincing blend.
- Refining the Track: Explore techniques for refining your track to correct any inaccuracies. This might involve adjusting tracking points, solving errors, and using masks to handle occlusions.
Mastering motion tracking and camera reconstruction in Blender can dramatically enhance your video projects, allowing for the creation of dynamic, effects-laden scenes that blend 3D and live-action footage seamlessly.

_HOOK_
Blender Video Editing Workflow Tips and Tricks
Blender\"s motion tracking and camera reconstruction capabilities are robust tools that enable filmmakers and visual effects artists to integrate 3D elements seamlessly into live-action footage. These features open up a world of possibilities for creating realistic and immersive scenes.
- Introduction to Motion Tracking: Start by understanding the basics of motion tracking in Blender, which involves tracking the movement of objects and cameras in video footage. This is essential for adding 3D elements to real-world scenes.
- Setting Up Your Tracking Scene: Learn how to prepare your scene for tracking, including selecting the right tracking points and configuring the tracking settings for optimal results.
- Solving the Camera Movement: Dive into the process of solving the camera movement within your footage. This allows Blender to recreate the exact camera path taken during filming, ensuring that 3D elements align perfectly with your live-action scenes.
- Integrating 3D Elements: Once the camera movement is solved, discover how to add and position 3D elements within your scene. This includes adjusting lighting and shadows to match the live-action footage for a convincing blend.
- Refining the Track: Explore techniques for refining your track to correct any inaccuracies. This might involve adjusting tracking points, solving errors, and using masks to handle occlusions.
Mastering motion tracking and camera reconstruction in Blender can dramatically enhance your video projects, allowing for the creation of dynamic, effects-laden scenes that blend 3D and live-action footage seamlessly.

READ MORE:
Exporting and Sharing Your Final Video Project
Completing your video project in Blender is a significant achievement, but it\"s the exporting and sharing phase that brings your work to the audience. This step is crucial for ensuring your video reaches viewers in the highest possible quality and format that\"s compatible across various devices and platforms.
- Selecting Output Format: Choose the right format for your project, considering the balance between quality and file size. Popular formats include MP4 for its wide compatibility and H.264 codec for its balance of quality and compression.
- Adjusting Output Settings: Fine-tune your resolution, frame rate, and bit rate according to your project needs. Higher bit rates and resolutions will enhance quality but increase file size.
- Incorporating Audio: Ensure your audio settings are properly configured, selecting the appropriate codec and bit rate to preserve sound quality.
- Rendering Your Video: Utilize Blender\"s rendering settings to finalize your video. Consider rendering in sections if your project is particularly large or complex to avoid losing progress in case of errors.
- Sharing on Platforms: Determine the best platforms for sharing your video, whether it\"s social media, video hosting sites, or professional portfolios. Each platform may have specific requirements or recommendations for video formats and settings.
By carefully navigating the exporting process and choosing the right platforms for sharing, you can ensure your Blender video projects are seen and appreciated by the widest possible audience, in the quality you intended.
Embrace the power of Blender to transform your video editing dreams into reality. With its vast array of effects and advanced features, Blender empowers creators at all levels to produce stunning visuals and captivating stories. Start your journey today!