Topic tutorial video editing blender: Embark on a journey to master video editing with Blender, where creativity meets efficiency. This tutorial will guide you from basic to advanced techniques, unlocking your potential to create stunning visuals.
Table of Content
- What is the best tutorial for video editing in Blender that covers all the essential aspects?
- Getting Started
- Basic Editing Techniques
- Advanced Editing Features
- Audio Editing and Synchronization
- Exporting Your Video
- Conclusion
- Basic Editing Techniques
- Advanced Editing Features
- Audio Editing and Synchronization
- YOUTUBE: Blender 3.0 Video Editing Tutorial Episode 1 Interface Output Timeline Import Render
- Exporting Your Video
- Conclusion
- Advanced Editing Features
- Audio Editing and Synchronization
- Exporting Your Video
- Conclusion
- Audio Editing and Synchronization
- Exporting Your Video
- Conclusion
- Exporting Your Video
- Conclusion
- Conclusion
- Introduction to Blender for Video Editing
- Setting Up Your Workspace in Blender
- Importing Media into Blender
- Basic Video Editing Techniques
- Advanced Video Editing Techniques
- Working with Audio in Blender
- Adding Effects and Transitions
- Color Correction and Grading
- Exporting Your Final Video
- Blender Video Editing Tips and Tricks
- Resources for Further Learning
What is the best tutorial for video editing in Blender that covers all the essential aspects?
One of the best tutorials for video editing in Blender that covers all essential aspects is the Complete Blender Video Editing Tutorial Series. This tutorial series provides a comprehensive overview of how to edit videos using Blender. Here is a breakdown of the key points covered in the tutorial:
- Introduction to Blender\'s video editing capabilities
- Setting up your project in Blender
- Understanding the directory structure for video editing
- Edit your project step by step
- Creating montages and transitions
This tutorial series will walk you through the entire process of video editing in Blender, from importing your footage to adding effects and exporting the final project. It is a great resource for beginners and experienced editors alike, as it covers all the essential aspects of video editing in Blender.
READ MORE:
Getting Started
- Introduction to Blender\"s video editing layout and tools.
- How to import your video clips into Blender.
- Understanding Blender\"s default setup and settings for video editing.

Basic Editing Techniques
- Cutting and trimming your clips to size.
- Adding transitions between clips for smooth changes.
- Using the timeline effectively for precise editing.

Advanced Editing Features
Explore advanced features in Blender that can bring your videos to the next level:
- Color grading and correction for professional-looking footage.
- Adding text and titles to your videos.
- Implementing special effects and filters.
- How to blur faces or objects for privacy.
- Speed control for creating slow-motion or fast-forward effects.

Audio Editing and Synchronization
Blender also provides tools for audio mixing and synchronization:
- Adding and editing audio tracks alongside your video.
- Synchronizing audio with video clips for perfect harmony.
- Adjusting audio levels and effects for clear sound.
_HOOK_
Exporting Your Video
Once your video is edited to perfection, learn how to export it:
- Understanding different video formats and which to choose.
- Configuring export settings for the best quality and file size.
- Tips for rendering your video efficiently.

Conclusion
Blender\"s video editing capabilities are robust, offering everything from basic trimming to complex special effects. With practice and exploration, you can unlock the full potential of your creativity and produce stunning videos.

Basic Editing Techniques
- Cutting and trimming your clips to size.
- Adding transitions between clips for smooth changes.
- Using the timeline effectively for precise editing.

Advanced Editing Features
Explore advanced features in Blender that can bring your videos to the next level:
- Color grading and correction for professional-looking footage.
- Adding text and titles to your videos.
- Implementing special effects and filters.
- How to blur faces or objects for privacy.
- Speed control for creating slow-motion or fast-forward effects.
Audio Editing and Synchronization
Blender also provides tools for audio mixing and synchronization:
- Adding and editing audio tracks alongside your video.
- Synchronizing audio with video clips for perfect harmony.
- Adjusting audio levels and effects for clear sound.
_HOOK_
Blender 3.0 Video Editing Tutorial Episode 1 Interface Output Timeline Import Render
Interface: \"Discover the sleek and user-friendly interface of our new software that will revolutionize the way you work. Watch our video to see how easy and intuitive it is to navigate!\" Beginner: \"Are you a beginner looking to learn a new skill? Our tutorial video breaks down complex concepts into simple, easy-to-follow steps. Let us guide you on your journey to mastering this subject!\"
How To Edit Video with Blender 2.90 Basics Walkthrough Beginner
In this video I go over how to set up a new video edit project and the required settings, importing files, and the basics of cutting and ...
Exporting Your Video
Once your video is edited to perfection, learn how to export it:
- Understanding different video formats and which to choose.
- Configuring export settings for the best quality and file size.
- Tips for rendering your video efficiently.

Conclusion
Blender\"s video editing capabilities are robust, offering everything from basic trimming to complex special effects. With practice and exploration, you can unlock the full potential of your creativity and produce stunning videos.
Advanced Editing Features
Explore advanced features in Blender that can bring your videos to the next level:
- Color grading and correction for professional-looking footage.
- Adding text and titles to your videos.
- Implementing special effects and filters.
- How to blur faces or objects for privacy.
- Speed control for creating slow-motion or fast-forward effects.
Audio Editing and Synchronization
Blender also provides tools for audio mixing and synchronization:
- Adding and editing audio tracks alongside your video.
- Synchronizing audio with video clips for perfect harmony.
- Adjusting audio levels and effects for clear sound.
Exporting Your Video
Once your video is edited to perfection, learn how to export it:
- Understanding different video formats and which to choose.
- Configuring export settings for the best quality and file size.
- Tips for rendering your video efficiently.
_HOOK_
Conclusion
Blender\"s video editing capabilities are robust, offering everything from basic trimming to complex special effects. With practice and exploration, you can unlock the full potential of your creativity and produce stunning videos.
Audio Editing and Synchronization
Blender also provides tools for audio mixing and synchronization:
- Adding and editing audio tracks alongside your video.
- Synchronizing audio with video clips for perfect harmony.
- Adjusting audio levels and effects for clear sound.
Exporting Your Video
Once your video is edited to perfection, learn how to export it:
- Understanding different video formats and which to choose.
- Configuring export settings for the best quality and file size.
- Tips for rendering your video efficiently.
Conclusion
Blender\"s video editing capabilities are robust, offering everything from basic trimming to complex special effects. With practice and exploration, you can unlock the full potential of your creativity and produce stunning videos.
Exporting Your Video
Once your video is edited to perfection, learn how to export it:
- Understanding different video formats and which to choose.
- Configuring export settings for the best quality and file size.
- Tips for rendering your video efficiently.
_HOOK_
Conclusion
Blender\"s video editing capabilities are robust, offering everything from basic trimming to complex special effects. With practice and exploration, you can unlock the full potential of your creativity and produce stunning videos.
Conclusion
Blender\"s video editing capabilities are robust, offering everything from basic trimming to complex special effects. With practice and exploration, you can unlock the full potential of your creativity and produce stunning videos.
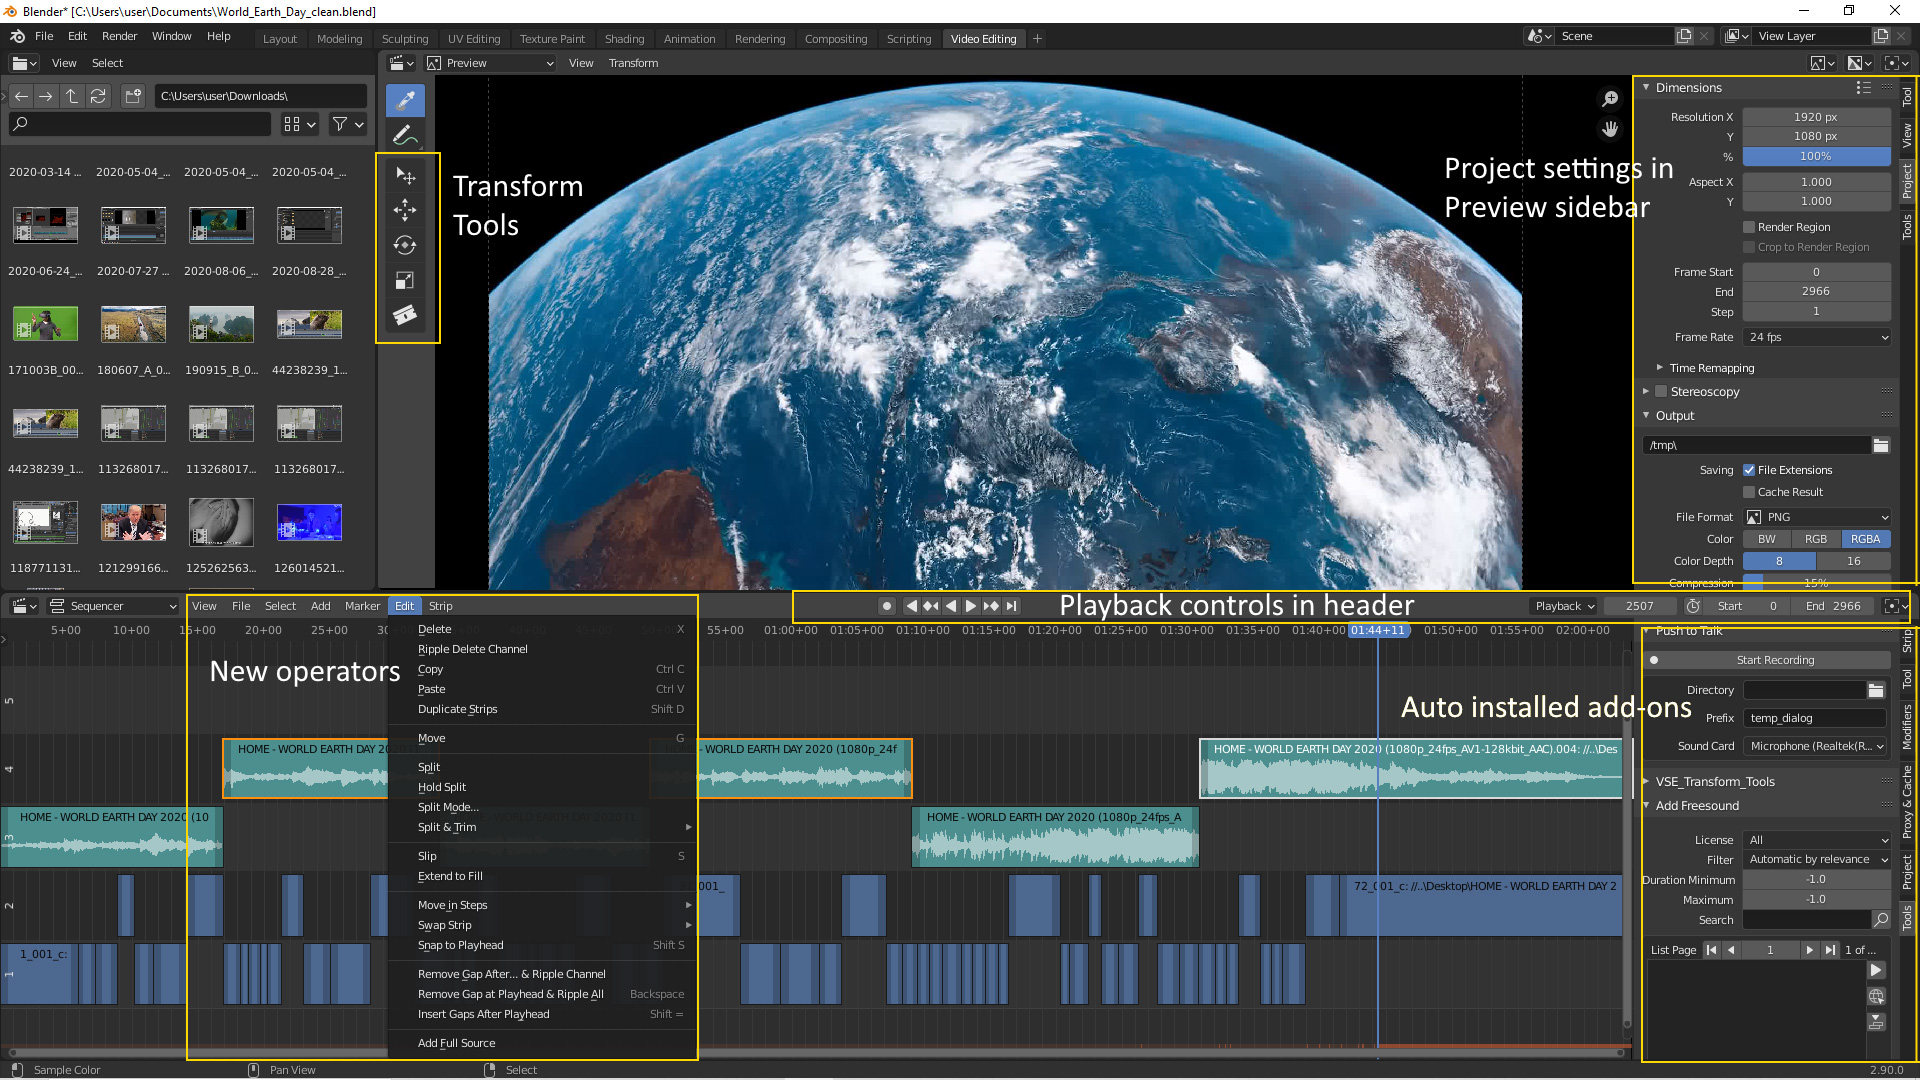
Introduction to Blender for Video Editing
Blender is not just a powerful 3D creation tool; it\"s also equipped with a full-featured video editor that\"s perfect for beginners and professionals alike. This section will introduce you to the fundamentals of using Blender for video editing, covering everything from navigating the interface to the key features that make Blender a versatile choice for your video editing projects.
- Navigating the Interface: Learn how to customize and navigate Blender\"s unique interface to optimize your video editing workflow.
- Understanding Blender\"s Video Editing Layout: Familiarize yourself with the Video Sequence Editor (VSE), where you\"ll spend most of your editing time.
- Importing Your Media: Discover how to import video clips, images, and audio files into Blender for editing.
- Basic Editing Tools: Get to know the essential tools for cutting, trimming, and arranging your clips on the timeline.
- Adding Effects and Transitions: Explore the variety of effects and transitions available in Blender to enhance your video projects.
- Working with Audio: Learn how to add and edit audio within your video projects, ensuring your visuals and sound are in perfect harmony.
- Exporting Your Final Product: Understand the various export options to ensure your finished project is of the highest quality and suitable for your intended audience.
By the end of this section, you\"ll have a solid foundation to start creating your own video projects in Blender, with the skills to explore more advanced features as you progress.
Setting Up Your Workspace in Blender
Creating an efficient workspace in Blender is crucial for a smooth video editing process. This guide will walk you through setting up your workspace, ensuring you have quick access to all the tools and features you need.
- Choosing the Right Layout: Start by selecting the Video Editing layout from the top menu to switch to a workspace tailored for video editing.
- Customizing the Interface: Learn how to adjust and save your workspace by resizing and docking panels to fit your workflow.
- Adding and Organizing Panels: Add necessary panels such as the Preview window, Sequencer, and Properties panel for easy access to editing tools.
- Keyboard Shortcuts: Familiarize yourself with Blender\"s keyboard shortcuts to speed up your editing process. Customize these shortcuts in the Preferences window to suit your editing style.
- Setting Up Properties: Adjust the properties panel to set your video\"s resolution, frame rate, and other important settings before you start editing.
With your workspace set up, you\"re now ready to start importing your media and diving into the creative process of video editing with Blender. Remember, a well-organized workspace can significantly enhance your efficiency and enjoyment of video editing.
Importing Media into Blender
Before you can begin editing, you need to import your media files into Blender. This section covers the steps to bring your video clips, images, and audio files into the Video Sequence Editor for editing.
- Accessing the Video Sequence Editor: Ensure you\"re in the Video Editing layout. The Video Sequence Editor (VSE) is where you\"ll import and manage your media.
- Importing Video and Images: Go to Add > Movie to import video files, or Add > Image for still images. Navigate to your files, select them, and click \"Add Movie Strip\" or \"Add Image Strip\".
- Importing Audio Files: To add audio, choose Add > Sound. Locate your audio file, select it, and click \"Add Sound Strip\" to import it into the timeline.
- Organizing Your Media: Once imported, you can click and drag your media strips to organize them on the timeline. Use the mouse scroll wheel to zoom in and out for finer adjustments.
- Adjusting Properties: With your media selected, you can adjust its properties in the right-hand panel, such as start frame, end frame, volume for audio, and more.
By following these steps, you\"ll have all your necessary media files imported into Blender, organized, and ready for editing. This foundational step is key to a seamless video editing workflow.
_HOOK_
Basic Video Editing Techniques
Mastering the basics is crucial for any video editor. This section will guide you through fundamental video editing techniques using Blender, ensuring you have a solid foundation to build upon.
- Cutting and Splitting Clips: Learn how to use the cut tool to split your video clips at specific points, allowing you to remove unwanted sections or rearrange clips in the timeline.
- Trimming Clips: Discover how to trim the start or end of your clips to fine-tune the length and timing of your video.
- Adding Transitions: Explore how to add transitions between clips to create smooth changes from one scene to another. Blender offers several transition effects like crossfade and wipe.
- Adjusting Clip Properties: Understand how to adjust properties such as the position, scale, and rotation of your clips directly in the Video Sequence Editor for better composition.
- Keyframing for Animation: Get introduced to keyframing, a technique that allows you to create simple animations by changing parameters over time, such as fading a clip in or out.
These basic techniques form the backbone of video editing in Blender. With practice, you\"ll be able to combine these skills to enhance your video projects creatively and professionally.
Advanced Video Editing Techniques
Mastering advanced video editing techniques in Blender can elevate your video projects to a professional level. Here\"s how to leverage Blender\"s powerful features for sophisticated edits:
- Color Grading with Nodes: Utilize the Node Editor for advanced color grading. Create a new adjustment layer in the Video Sequence Editor (VSE), then switch to the Compositing workspace. Use nodes like Color Balance, Hue Correct, and RGB Curves to fine-tune the mood and tone of your video.
- Masking for Effects and Transitions: Create masks to apply effects to specific parts of your footage. In the Movie Clip Editor, draw masks around the area you want to affect. Use these masks in the VSE to apply effects or in the Compositor for transitions or to combine multiple video clips creatively.
- Speed Control: Blender allows for precise speed adjustments. Add a Speed Control effect strip to your video strip in the VSE. Adjust the speed factor to slow down or speed up your footage, or use the frame number option to synchronize clips with audio precisely.
- Animation and Keyframes: Animate properties of video strips or effects for dynamic changes over time. Select a strip, move to the desired frame, change a property (like opacity, position, or volume), and insert a keyframe. Blender interpolates the values between keyframes for smooth transitions.
- Chroma Keying for Green Screen: Use the VSE or Compositor for chroma keying to replace green screen backgrounds. Add your footage and a background image or video. Use the Keying node in the Compositor to key out the green, fine-tune the edges, and blend it with your new background.
- Advanced Audio Editing: Blender\"s VSE includes tools for syncing, mixing, and enhancing audio. Use the waveform display for precise edits, add effects strips for fade in/out, and adjust the pitch or volume. For more complex audio work, consider using dedicated software and importing the final mix.
- 3D Objects in Video: Incorporate 3D objects into your video projects. In the 3D Viewport, create or import 3D models. Render these models with transparent backgrounds and import them as overlays in your video project for stunning effects and titles.
- Utilizing Proxies for Smooth Playback: For high-resolution footage, create proxy clips in Blender to ensure smooth playback while editing. In the VSE, select your footage, go to the strip menu, and choose to rebuild proxy and timecode indices. Adjust the proxy display size for optimal performance.
By mastering these advanced techniques, you can push the boundaries of your video editing projects, creating more engaging and visually stunning content with Blender.
Working with Audio in Blender
Blender is not just for video editing; it also offers robust tools for audio manipulation. Here\"s how you can enhance your video projects with sound:
- Importing Audio: To add audio to your project, go to the Video Sequence Editor (VSE) and select Add > Sound. Navigate to your audio file and import it. Blender supports various formats, including WAV, MP3, and OGG.
- Syncing Audio and Video: In the VSE, you can easily align your audio with video clips. Use the waveform display to match audio cues with visual elements. Drag the audio strip to adjust its position relative to the video.
- Editing Audio Strips: Blender allows for basic audio editing. Select your audio strip, and use the Strip menu to cut, duplicate, or mute sections. For more detailed edits, consider using an external audio editing software.
- Volume and Fade Controls: Adjust the volume of your audio clips directly in the VSE. Select the audio strip, then adjust the volume in the Strip Properties panel. Create fades by keyframing the volume at different points along the strip.
- Adding Effects: While Blender\"s audio effects are limited, you can add basic effects such as fade in and fade out. For advanced effects, use the Compositor to apply effects to the audio strip, or use external software for more complex manipulation.
- Audio Mixing: You can mix multiple audio tracks in Blender by simply adding them to the VSE. Use the Mixer panel to adjust the levels of each track, ensuring they blend well together without clipping.
- Animating Audio Properties: Blender allows you to animate audio properties such as volume and pitch. Insert keyframes for these properties to create dynamic audio effects that change over time.
- Exporting with Audio: When you\"re ready to export your final video, ensure the audio codec is set correctly in the Output Properties. Choose your preferred format and bitrate to get the best audio quality in your final project.
With these tools, Blender empowers you to integrate and manipulate audio, adding depth and emotion to your video projects. Whether it\"s syncing sound effects to action, adding a soundtrack, or mixing dialogue, Blender\"s audio capabilities are more than sufficient for most video editing needs.
Adding Effects and Transitions
Blender\"s Video Sequence Editor (VSE) is not just for cutting and splicing video clips; it\"s also a powerful tool for adding effects and transitions to enhance your video projects. Here\"s how to get creative with effects and transitions in Blender:
- Understanding the Effects Strip: Blender offers a variety of effects strips such as Gaussian Blur, Color Correction, and Speed Control. To add an effect, select your video or image strip in the VSE, then go to Add > Effect Strip and choose the desired effect.
- Adding Transitions: Blender provides simple transitions like Cross, Wipe, and Fade. To add a transition, place two video strips close to each other, select them both, and then go to Add > Effect Strip > Transition Type.
- Customizing Effects: After adding an effect strip, you can customize its properties in the Effect Strip Properties panel. Adjust parameters like blur size, color balance, or speed factor to get the desired outcome.
- Animating Effects: You can animate the properties of effects strips by inserting keyframes. Move to the frame where you want the effect to change, adjust the property value, and press I to insert a keyframe. This is great for creating dynamic changes over time.
- Using the Compositor for Advanced Effects: For more complex effects, switch to the Compositing layout. Here, you can use nodes to create sophisticated visual effects. Connect your video clip to various nodes like Blur, Color Ramp, and Glare to achieve unique results.
- Creating Custom Transitions: Go beyond the basic transitions by using the Compositor. You can create custom transitions with masks or animated nodes for unique effects between clips.
- Previewing and Adjusting Effects: Use the Preview window in the VSE to review your effects and transitions in real time. Adjust the settings as needed to ensure they blend smoothly with your footage.
- Exporting with Effects: Ensure all effects render correctly by setting the appropriate render settings before exporting your final video. Check the resolution, frame rate, and output format to ensure compatibility with your effects and transitions.
By incorporating effects and transitions, you can transform your video projects from simple edits to visually captivating stories. Blender\"s range of tools and features allows for endless creativity, so experiment with different effects and transitions to find what works best for your project.
Color Correction and Grading
Color correction and grading are crucial steps in video editing that enhance the visual impact of your footage. Blender offers powerful tools for both tasks, allowing you to adjust colors, contrast, and overall mood of your video. Here\"s how to perform color correction and grading in Blender:
- Accessing the Color Tools: Open your project in the Video Sequence Editor (VSE). For color correction and grading, switch to the Compositing workspace where you can use nodes to adjust your footage.
- Basic Color Correction: Start with basic color correction to ensure your footage has accurate colors. Use the Color Balance node to adjust the shadows, midtones, and highlights. The Brightness/Contrast node can adjust overall brightness and contrast.
- Using Curves for Advanced Correction: The RGB Curves node offers more control over the color correction process. You can individually adjust the red, green, and blue channels to fine-tune the color balance and contrast of your footage.
- Color Grading for Mood: After correcting your colors, move on to color grading to set the mood of your video. Use the Hue Correct node to subtly shift colors. The Color Balance node can also be used here to stylize your footage by manipulating colors in shadows, midtones, and highlights.
- Adding Filmic Look: To give your video a cinematic look, experiment with the Film node. This node can simulate the color grading of film stock, adding depth and richness to your colors.
- Previewing and Adjusting: Constantly preview your adjustments in the Image Editor. Use split screen or the backdrop feature in the Node Editor to compare the before and after. Adjust the nodes until you achieve the desired look.
- Applying LUTs: For quick and professional color grading, you can apply Look-Up Tables (LUTs). Import a LUT using the Color Lookup Table node to apply complex color grades instantly.
- Exporting Your Work: Once you\"re satisfied with the color correction and grading, ensure your export settings are optimized to preserve the quality of your color work. Choose a format that supports high color depth and proper color space.
By mastering color correction and grading in Blender, you can significantly enhance the visual storytelling of your projects. These steps will help you achieve professional-looking results, whether you\"re working on a film, a YouTube video, or any other video project.
_HOOK_
Exporting Your Final Video
After completing your video editing project in Blender, the final step is to export your video so it can be shared or published. Exporting your video correctly is crucial to maintain quality and ensure compatibility. Follow these steps to export your video from Blender:
- Choose the Output Format: Go to the Properties panel, then the Output tab. Here, you can select the file format for your video. Popular formats include MPEG, AVI, and QuickTime. For web uploads, H.264 in an MP4 container is widely recommended for its balance of quality and compatibility.
- Set the Resolution and Frame Rate: In the same Output tab, set your video\"s resolution and frame rate. Ensure these settings match your project\"s settings to avoid any quality loss or playback issues.
- Configure Video Encoding: Expand the Encoding section to configure your video\"s codec and quality settings. For H.264, you can adjust the bitrate or use the output quality slider for quick adjustments. Higher bitrates or quality settings will increase file size but improve video clarity.
- Audio Export Settings: Don\"t forget to configure the audio settings if your video includes sound. Select an audio codec like AAC for MP4 files, and adjust the bitrate to ensure clear audio playback.
- Check the Output Path: Verify the output path where your video file will be saved. You can change the destination by clicking on the folder icon and navigating to your desired output directory.
- Start the Export Process: Once all settings are configured, click on the Render menu at the top and select Render Animation or press Ctrl + F12. Blender will begin exporting your video, which could take some time depending on the length and complexity of your project.
- Review Your Exported Video: After the export is complete, locate your video file in the output directory and play it back to ensure everything looks and sounds as expected. This is the time to check for any issues before sharing or publishing your video.
By following these steps, you can export high-quality videos from Blender, ready for any platform or purpose. Remember, the right export settings depend on your project\"s needs and the platform you intend to use, so it may be worth experimenting with different settings to achieve the best results.
Blender Video Editing Tips and Tricks
Blender is a versatile tool for video editing, packed with features that can help you create professional-level video content. Here are some tips and tricks to enhance your video editing workflow in Blender:
- Use Proxies for Smooth Playback: High-resolution footage can slow down playback in the Video Sequence Editor (VSE). To avoid this, generate proxy clips of your footage for smoother editing. You can set this up in the properties panel under the Proxy / Timecode section.
- Keyboard Shortcuts: Learning Blender\"s keyboard shortcuts can significantly speed up your editing process. For example, K for cutting strips, G to grab/move strips, and Shift + D to duplicate strips are invaluable for efficient editing.
- Lock Strips to Avoid Accidental Moves: To prevent unintentionally moving important clips, you can lock them in place. Right-click on a strip and select Lock Strip from the context menu to secure it in position.
- Color Labeling: Organize your project by labeling your video, audio, and effect strips with different colors. This visual organization helps in managing complex projects by quickly identifying different types of strips.
- Use the Blender Compositor: For advanced effects and color grading, utilize Blender\"s compositor. It allows you to apply node-based effects that can take your video editing to the next level.
- Custom Transitions with Animation Nodes: Beyond the standard transitions in VSE, you can create custom transitions using the Animation Nodes addon. This approach offers more control and creativity in transitioning between clips.
- Batch Rendering: If you\"re working on multiple scenes or need to render several versions of your video, consider batch rendering. This can save time by automating the rendering process for multiple projects or settings.
- Audio Synchronization: For projects involving dialogue or music, precise audio synchronization is crucial. Use Blender\"s waveform display in the VSE to accurately align audio with your video clips.
- Save Versions and Incremental Saves: Regularly save different versions of your project to prevent data loss and to make it easier to revert to previous versions if needed. Blender\"s Save As feature can be used with the +/- keys to quickly increment your file names.
- Optimize Your Workspace: Customize Blender\"s layout to suit your video editing workflow. You can create a custom workspace that includes all the panels and windows you frequently use, saving time and making the editing process more efficient.
By incorporating these tips and tricks into your Blender video editing workflow, you can improve efficiency, creativity, and the overall quality of your video projects.
READ MORE:
Resources for Further Learning
To further enhance your video editing skills in Blender, a variety of resources are available. Whether you\"re a beginner looking to get started or an experienced editor aiming to refine your skills, these resources can provide valuable insights and techniques:
- Blender Official Documentation: The Blender Manual is an excellent starting point for understanding the fundamentals and advanced features of Blender. It covers everything from basic navigation to complex animation and rendering techniques.
- Blender Guru: An invaluable resource for Blender users, Blender Guru offers tutorials that range from beginner to advanced levels, focusing on both the artistic and technical aspects of Blender.
- CG Cookie: CG Cookie provides comprehensive Blender training courses. From modeling and texturing to video editing and compositing, their tutorials cater to various skill levels.
- BlenderNation: BlenderNation regularly posts articles, tutorials, and news about Blender, including tips for video editing. It\"s a great place to stay updated on the latest Blender developments and community projects.
- YouTube Channels: YouTube hosts a vast array of Blender tutorial channels. Channels like Blender Guru, CG Geek, and Ducky 3D offer tutorials on a wide range of topics, including video editing with Blender.
- Blender Artists Community: Blender Artists is an online community where Blender users share their work, ask for feedback, and discuss tips and tricks. It\"s a great place to learn from other artists and get inspired.
- Online Courses and Workshops: Websites like Udemy, Coursera, and Skillshare offer structured courses on Blender, including specific classes on video editing. These courses often provide a mix of video lectures, quizzes, and projects.
- Books: Several books have been published on Blender, covering various aspects from 3D modeling to animation and video editing. Titles like \"Blender For Dummies\" and \"The Complete Guide to Blender Graphics\" can be excellent resources for learning at your own pace.
By exploring these resources, you can continuously improve your video editing skills in Blender, keep up with the latest trends and techniques, and connect with a vibrant community of Blender users.
Unlock the full potential of your video projects with Blender, the free, open-source tool that brings professional video editing within your reach. Dive into our comprehensive guide and transform your creative ideas into stunning visual stories today.