Topic how to use blender video editor: Discover the art of video editing with Blender, a comprehensive guide that empowers you to create stunning visual content. This tutorial will transform your creative process.
Table of Content
- How can I begin editing videos using Blender\'s video editor?
- Getting Started with Blender Video Editor
- Understanding Blender\"s Interface for Video Editing
- Setting Up Your Project in Blender
- Basic Editing Techniques: Cutting, Splicing, and Assembling Clips
- Advanced Editing Features: Masks, Color Grading, and Effects
- YOUTUBE: Video Editing with Blender for Complete Beginners - Part 1
- Working with Audio: Syncing, Mixing, and Adding Effects
- Adding Transitions and Filters for Professional Touch
- Animating Text and Graphics within Your Video
- Speed Control and Frame Rate Adjustments
- Exporting Your Final Video: Formats, Compression, and Settings
- Resources and Tutorials for Further Learning
How can I begin editing videos using Blender\'s video editor?
To begin editing videos using Blender\'s video editor, follow these steps:
- Open Blender software on your computer.
- From the main screen, locate the top taskbar and click on \"File\".
- Choose \"New\" from the dropdown menu.
- Select \"Video Editing\" to open the video editor.
- You\'ll see a new workspace with different panels for editing.
- Import your video clips by clicking on \"Add\" and selecting the video files you want to edit.
- Arrange your clips in the Sequencer timeline for editing.
- You can cut, trim, splice, and add transitions to your video clips as needed.
- Explore the various editing tools and effects available in the video editor to enhance your project.
- Once you are satisfied with your edits, you can render your video by clicking on \"Render\" and selecting the output settings.
READ MORE:
Getting Started with Blender Video Editor
To begin with Blender Video Editor, first ensure you have the latest version of Blender installed. This powerful, free software offers a comprehensive suite of video editing tools suitable for both beginners and professionals.
- Download and Install Blender: Visit the official Blender website to download the latest version. Ensure your system meets the minimum requirements for a smooth editing experience.
- Open Blender and Choose the Video Editing Layout: When you launch Blender, select \"Video Editing\" from the layout dropdown menu. This configures Blender for video editing, showing the sequencer and preview window.
- Familiarize Yourself with the Interface: Spend some time getting to know the Video Sequence Editor (VSE). Key areas include the Preview window, the Sequencer, and the Properties panel.
- Import Your Media: To add video clips, images, or audio files to your project, use the \"Add\" menu in the sequencer. You can also drag and drop files directly into the sequencer.
- Basic Editing Functions: Learn how to perform basic edits such as cutting, moving, and trimming clips within the sequencer. Use the preview window to monitor your progress.
- Add Transitions and Effects: Explore the variety of transitions and effects available in Blender. From simple crossfades to more complex effects, Blender allows for creative video editing.
- Exporting Your Video: Once you\"re satisfied with your edit, it\"s time to export. Go to the Properties panel, find the Output properties, and choose your desired video format and settings.
Remember, practice is key to mastering Blender Video Editor. Experiment with different tools and features to discover the full potential of this powerful software.

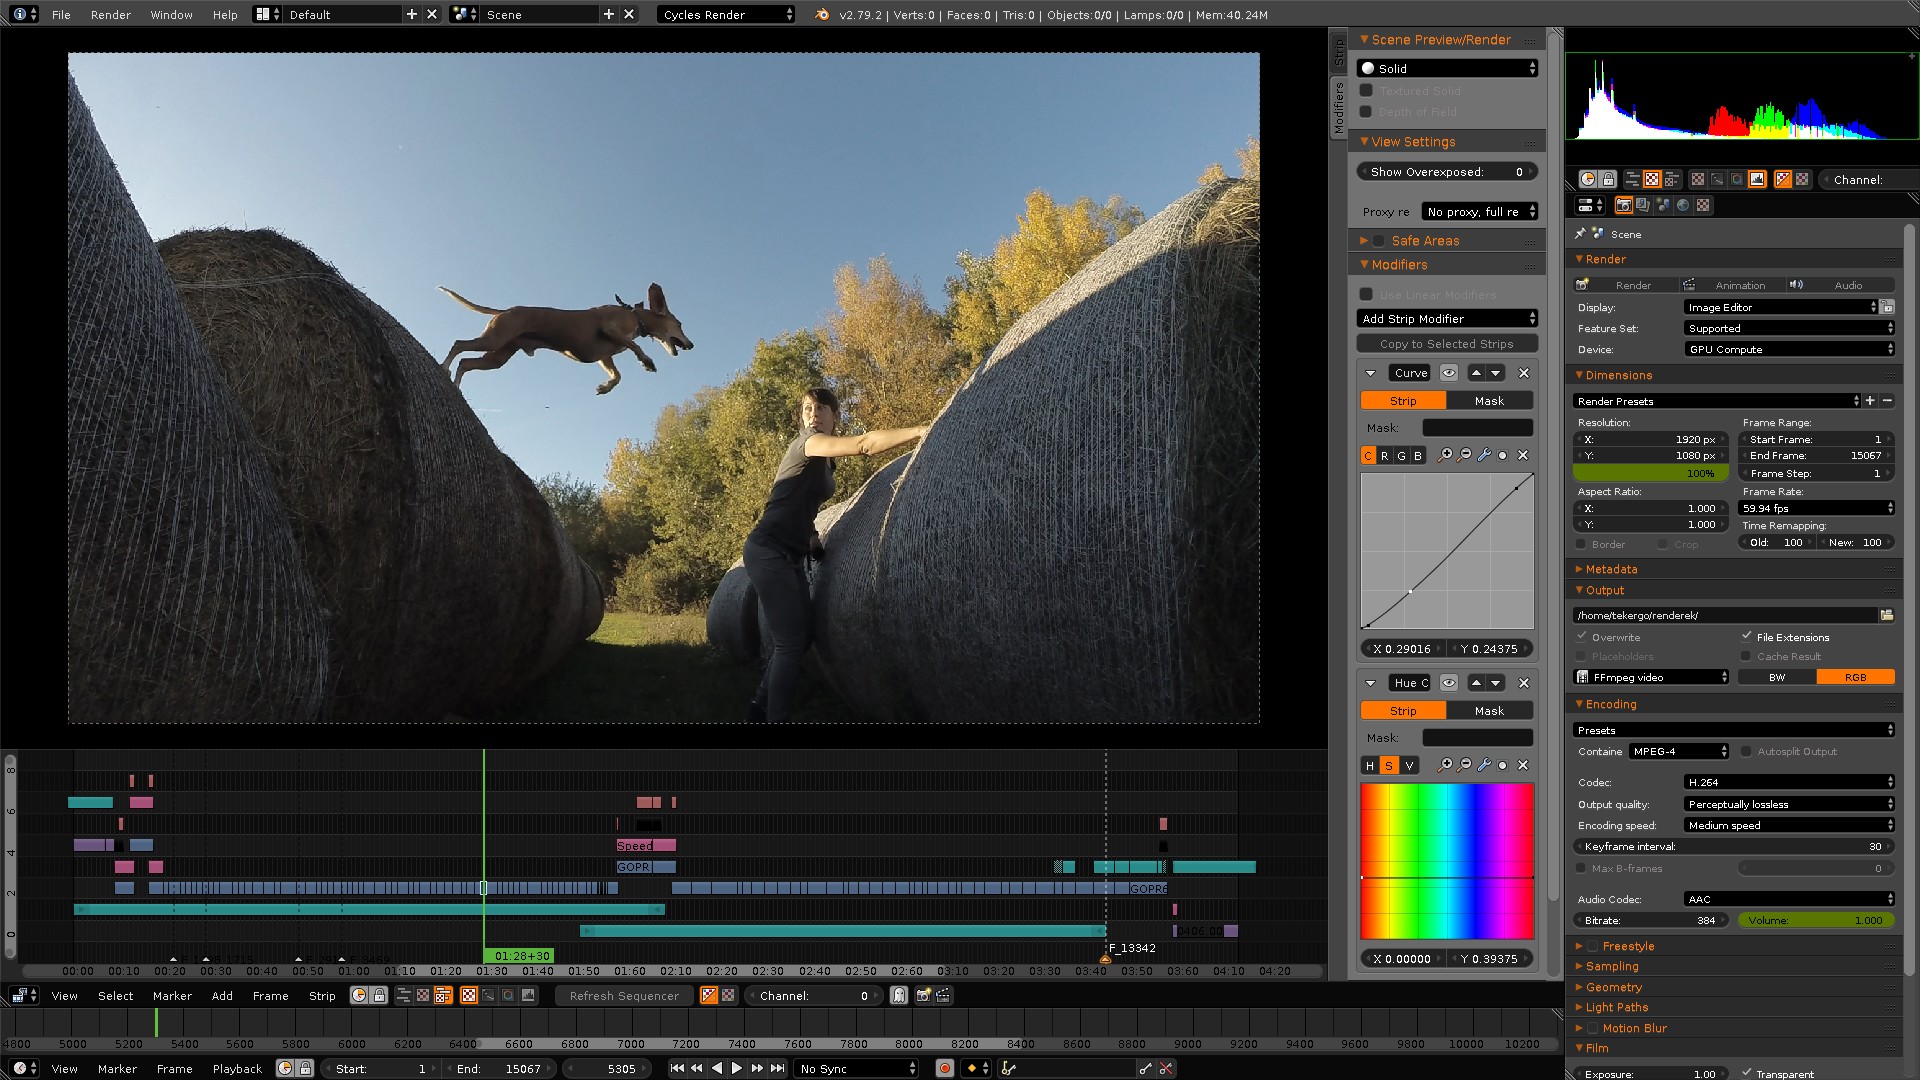
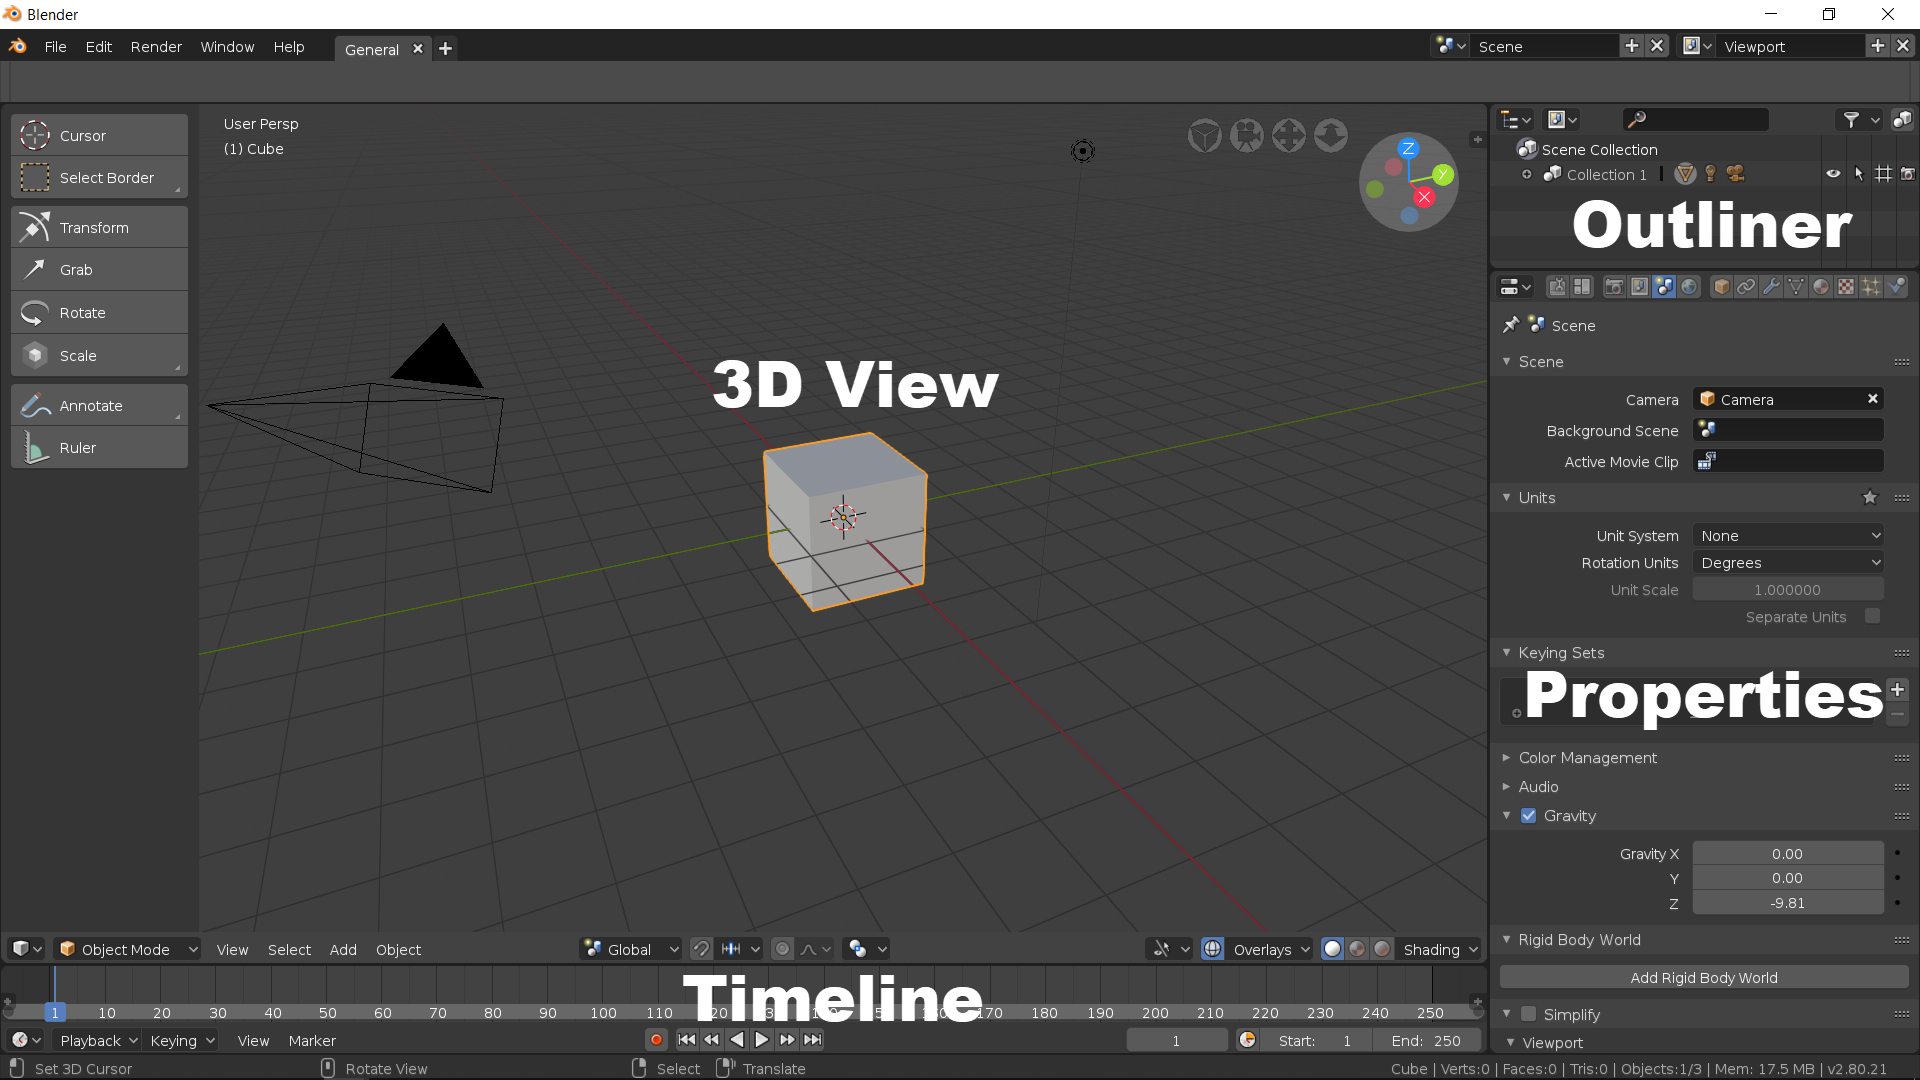
Understanding Blender\"s Interface for Video Editing
Blender\"s interface might seem daunting at first, but it\"s designed to offer a powerful suite of video editing tools. Let\"s break down the key components of Blender\"s Video Editing layout to get you comfortable with the workspace.
- Video Sequence Editor (VSE): The heart of Blender\"s video editing capabilities. It\"s where you\"ll spend most of your time arranging clips, adding effects, and previewing your work.
- Preview Window: This window shows you a live preview of your current sequence. You can play back your project, scrub through clips, and see the effects of your edits in real time.
- Properties Panel: Here, you can adjust the properties of your selected clips or effects. This includes transformation settings, effect parameters, and render settings.
- Timeline: Located at the bottom of the interface, the timeline allows you to navigate through your project, set keyframes, and manage the timing of your clips and effects.
- Toolbar: The toolbar provides quick access to tools for cutting, moving, and manipulating clips and effects in the VSE.
In addition to these main components, Blender\"s interface is highly customizable. You can rearrange windows, create new ones, and adjust the layout to fit your workflow. Spend some time experimenting with different configurations to find what works best for you.
- Customization Tips: You can drag and drop the borders between windows to resize them, or right-click for options to split or join windows.
- Shortcut Keys: Learning Blender\"s shortcut keys can greatly speed up your editing process. Many common actions, like cutting clips or setting keyframes, have dedicated shortcuts.
Understanding Blender\"s interface is the first step to mastering its powerful video editing tools. With practice, you\"ll find that Blender offers a flexible and efficient workflow for your video projects.

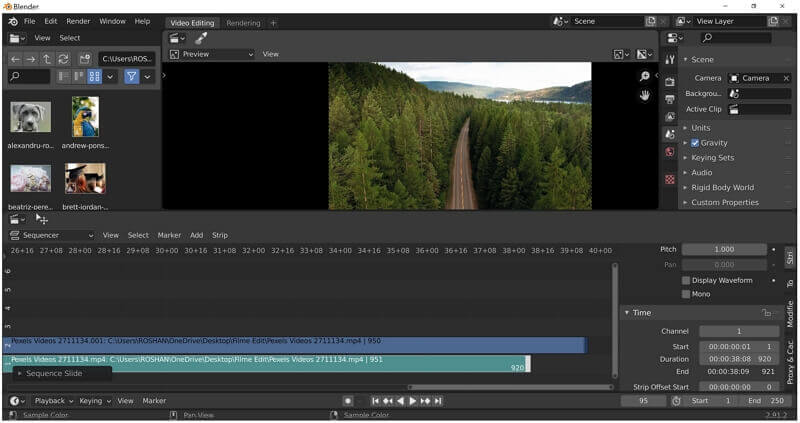
Setting Up Your Project in Blender
Before diving into editing, setting up your Blender project correctly is crucial for a smooth workflow. Here\"s how to start your video editing project on the right foot.
- Choose the Right Layout: Open Blender and select \"Video Editing\" from the layout dropdown menu to switch to the Video Sequencer Editor (VSE) layout.
- Set Project Settings: Go to the Properties panel, select the \"Output Properties\" tab, and adjust your resolution, frame rate, and aspect ratio according to your video\"s requirements.
- Import Your Media: Use the \"Add\" menu in the sequencer to import your video clips, images, and audio files. Alternatively, you can drag and drop files directly into the sequencer.
- Arrange Your Workspace: Customize the layout by adjusting window sizes or adding new windows for properties, preview, or file browser to suit your editing needs.
- Save Your Project: Before getting deep into editing, save your project by going to \"File\" > \"Save As\" and choose a location. Remember to periodically save your progress.
These initial steps are essential for creating a solid foundation for your video editing project in Blender. By setting up your project properly, you can ensure that your editing process is more efficient and your final product meets your desired specifications.

Basic Editing Techniques: Cutting, Splicing, and Assembling Clips
Mastering basic editing techniques in Blender\"s Video Editor lays the foundation for more complex projects. Here\"s how to efficiently cut, splice, and assemble your clips to tell a compelling story.
- Cutting Clips: Use the \"Cut\" tool (shortcut \"K\") to slice your clips at the desired points. You can make hard cuts to remove unwanted sections or to prepare clips for rearrangement.
- Splicing Clips Together: After cutting, move clips around in the timeline to splice them together. This can be done by dragging the clips to the desired location. Ensure there are no gaps between clips unless intended for stylistic purposes.
- Assembling Clips: To assemble your clips into a coherent sequence, use the timeline to arrange them in the desired order. Consider the flow of your narrative or the rhythm of your video when positioning clips.
- Trimming Clips: If a clip is too long or contains unnecessary content at its beginning or end, you can trim it by dragging the edges towards the center. This allows for tighter control over the narrative and pacing of your video.
- Adding Transitions: For smoother changes between clips, add transitions. In Blender, transitions can be added from the \"Add\" menu. Choose from wipes, fades, and more to enhance the visual appeal of your sequence.
These basic editing techniques are crucial for creating a polished video. Practice using these tools in Blender to develop your editing skills and enhance your projects.

_HOOK_
Advanced Editing Features: Masks, Color Grading, and Effects
Blender\"s Video Editor is not just for basic editing; it also offers advanced features that can enhance your video\"s visual appeal and storytelling. Let\"s dive into how to utilize masks, color grading, and effects.
- Creating and Using Masks: Masks allow you to hide or reveal parts of a clip. To create a mask, switch to the Movie Clip Editor, then use the \"Add\" menu to start shaping your mask. Masks can be used for transitions, to highlight elements, or for complex compositing.
- Color Grading: Color grading is essential for setting the tone and mood of your video. In the \"Color\" section of the Properties panel, use the color wheels, curves, and levels to adjust the colors. Experiment with different looks to enhance the visual storytelling of your project.
- Applying Effects: Blender includes a range of effects like blur, glow, and others that can be added via the \"Add Effect Strip\" option in the sequencer. Each effect has customizable parameters, allowing for a high degree of creative control.
- Utilizing Adjustment Layers: For applying effects or color grading to multiple clips simultaneously, use adjustment layers. Add an adjustment layer above your clips and apply effects or color grading to the layer.
- Advanced Compositing: For more complex editing tasks, such as combining elements from different scenes or creating special effects, switch to Blender’s Compositor. Here, you can use nodes to perform advanced compositing techniques.
By mastering these advanced features, you can elevate the quality of your videos, making them more engaging and visually striking. Practice and experimentation are key to harnessing the full potential of Blender\"s advanced video editing capabilities.
Video Editing with Blender for Complete Beginners - Part 1
Blender: \"Discover the amazing world of Blender and unleash your creativity with this powerful software! Watch our video to see how you can create stunning 3D animations and visuals effortlessly.\" Tutorial: \"Unlock your potential and master new skills with our easy-to-follow tutorial. Whether you\'re a beginner or looking to advance, our video will guide you through every step with clarity and expertise.\"
Blender 3.0 Video Editing Tutorial - Ep. 1 - Interface, Output, Timeline, Import, Render
full playlist: https://www.youtube.com/watch?v=1OpbKMSN61o&list=PLalVdRk2RC6qo7oHp5OO8e7RMe46nYdOY --- After ...
Working with Audio: Syncing, Mixing, and Adding Effects
Audio is a crucial element of video editing that can enhance the overall experience of your project. Blender\"s Video Editor offers tools for audio syncing, mixing, and adding effects to create a rich auditory landscape.
- Syncing Audio and Video: Start by importing your video and audio files into the sequencer. Use the waveform display to align the audio with the video manually. Enable AV-sync in the playback menu to ensure that audio and video play back in sync during editing.
- Mixing Audio Tracks: To mix multiple audio tracks, adjust the volume and balance using the strip properties. You can also mute individual tracks or lock them to prevent accidental changes while editing other elements.
- Adding Audio Effects: Blender allows you to add effects to audio tracks directly in the Video Editor. Right-click on an audio strip to access the effects menu, where you can apply filters like high-pass, low-pass, and reverb to enhance your audio.
- Keyframing Volume Changes: For dynamic audio editing, use keyframes to change the volume of audio tracks over time. This is useful for fading music in or out, or for adjusting the volume levels of dialogue and sound effects.
- Exporting with Audio: When you\"re ready to render your project, ensure that the audio codec is set correctly in the output settings. Blender supports a variety of audio formats, so choose the one that best suits your project\"s needs.
By carefully syncing, mixing, and adding effects to your audio, you can significantly improve the quality of your videos. These steps will help you achieve a professional-sounding audio track for your Blender projects.

Adding Transitions and Filters for Professional Touch
Transitions and filters are essential for enhancing the visual appeal of your videos in Blender. They can smooth the flow between clips and add stylistic effects to your project. Here\"s how to incorporate them for a professional touch.
- Understanding Transitions: Blender offers various transitions such as cross, wipe, and fade. Access these by selecting two clips and choosing \"Add\" > \"Effect Strip\" > \"Cross/Wipe/Fade\".
- Applying Filters: Filters can adjust the look and feel of individual clips or the entire video. To add a filter, select a clip and go to \"Add\" > \"Effect Strip\", then choose from options like blur, glow, or color correction.
- Customizing Transitions: After adding a transition, you can customize its duration and type from the strip properties panel. This allows for precise control over how and when the transition occurs.
- Enhancing Clips with Filters: With filters, you can adjust parameters such as intensity and hue. This is particularly useful for color grading or creating atmospheric effects within your video.
- Previewing Effects: Always preview your transitions and filters in the timeline to ensure they produce the desired effect. Adjustments can be made in real-time for instant feedback.
By thoughtfully adding transitions and filters, you can significantly elevate the production value of your videos, making them more engaging and visually compelling for your audience.
Animating Text and Graphics within Your Video
Animating text and graphics can significantly enhance your video\"s storytelling and visual appeal. Blender\"s powerful animation tools allow for dynamic integration of text and graphics. Here\"s how to bring your videos to life.
- Adding Text: To add text to your scene, switch to the 3D Viewport, then press \"Shift+A\" and select \"Text\". Enter edit mode (\"Tab\") to type your text.
- Converting Text to Mesh: For more complex animations, convert your text to a mesh (\"Alt+C\") which allows for more advanced manipulation and animation techniques.
- Animating Text: Use keyframes (\"I\") to animate properties like location, rotation, and scale over time. This can make text appear, disappear, or move across the screen.
- Adding Graphics: Import graphics as images or create them within Blender. Use the \"Add\" menu to include images or SVG graphics in your project.
- Animating Graphics: Similar to text, animate your graphics using keyframes. You can also apply effects like rotation, scaling, and opacity changes to create dynamic visuals.
- Using Animation Presets: Blender offers several animation presets in the Graph Editor, which can be applied to text and graphics for instant complex animations.
- Exporting Your Video: Ensure that both text and graphics are correctly positioned in your final video. Adjust the render settings to include all animations when exporting your project.
With practice, animating text and graphics in Blender can add a professional touch to your videos, making them more engaging and informative.

Speed Control and Frame Rate Adjustments
Adjusting the speed of your video clips and ensuring the correct frame rate are essential steps in video editing with Blender to achieve the desired pacing and smooth playback. Follow these steps for effective speed control and frame rate adjustments.
- Accessing Speed Control: To adjust the speed of a clip, first select it in the sequencer. Then, add a speed control effect strip by going to \"Add\" > \"Effect Strip\" > \"Speed Control\".
- Adjusting Speed: With the speed control strip selected, you can adjust the speed factor in the strip\"s properties panel to make the clip play faster or slower. A value greater than 1 increases speed, while a value less than 1 decreases it.
- Frame Rate Adjustments: For frame rate adjustments, go to the \"Output Properties\" tab in the Properties panel. Here, you can set the frame rate for your project to ensure consistent playback across all clips.
- Matching Clip Frame Rates: To avoid playback issues, ensure that all imported clips match the project\"s frame rate. Use external tools like Handbrake to convert clip frame rates if necessary.
- Using the Time Remapping Feature: For more granular control over timing, use Blender\"s time remapping feature in the \"Output Properties\". This allows you to stretch or compress the entire timeline.
By carefully managing speed and frame rate, you can enhance the visual storytelling of your video, creating dynamic sequences or ensuring smooth, natural motion. Remember, experimenting with these settings can yield creative results, so don\"t hesitate to explore different combinations.
_HOOK_
Exporting Your Final Video: Formats, Compression, and Settings
Finalizing your video project in Blender involves choosing the right export settings to balance quality and file size. This guide will navigate you through selecting formats, managing compression, and adjusting settings for optimal output.
- Selecting the Right Format: Blender supports various export formats, including AVI, MPEG, and MOV. Consider your distribution platform when choosing the format to ensure compatibility.
- Understanding Compression: Compression reduces file size but can affect video quality. Use the \"Output Properties\" tab to adjust the quality slider and bitrate settings to find a balance that suits your needs.
- Adjusting Output Settings: Within the \"Output Properties\", you can also set the resolution, frame rate, and aspect ratio. Ensure these settings match your project\"s requirements for the best playback experience.
- Audio Export Settings: Don\"t forget to configure the audio codec and bitrate. High-quality audio increases file size but improves the viewer\"s experience.
- Rendering and Exporting: Once you\"re satisfied with the settings, use the \"Render\" menu to render your animation. You can render the entire project or specific parts using the render animation button.
Exporting your project with the correct settings is crucial for the final presentation of your work. Take the time to experiment with different formats and compression rates to achieve the best result for your video.

READ MORE:
Resources and Tutorials for Further Learning
Expanding your skills in Blender\"s Video Editor requires access to comprehensive resources and tutorials. Whether you\"re a beginner or looking to advance your knowledge, here are valuable avenues for further learning.
- Official Blender Tutorials: The Blender Foundation offers an extensive range of tutorials on their official website and YouTube channel, covering basics to advanced techniques.
- Blender Artists Community: Join the Blender Artists forum to connect with other Blender users, share your projects, and get feedback and tips.
- Online Courses: Platforms like Udemy, Coursera, and LinkedIn Learning offer structured Blender courses, often with a focus on specific areas like video editing, animation, or 3D modeling.
- YouTube Tutorials: YouTube is a goldmine for Blender tutorials. Channels like Blender Guru, CG Geek, and Darrin Lile provide valuable insights and step-by-step guides for all levels.
- Books and eBooks: For those who prefer reading, there are several books and eBooks available that cover Blender in detail, from beginner guides to comprehensive references.
- Workshops and Webinars: Keep an eye out for workshops and webinars hosted by experienced Blender users. These can provide deep dives into specific features or workflows.
With the right resources, mastering Blender\"s Video Editor can be both enjoyable and rewarding. Dedicate time to practice and don\"t hesitate to explore different tutorials and learning paths to enhance your video editing skills.
Embarking on your Blender Video Editor journey opens a world of creative possibilities. With patience and practice, you\"ll transform your visual stories into captivating masterpieces. Start exploring, creating, and sharing your unique visions today!