Topic how to create text in blender: Discover the art of creating 3D text in Blender with our comprehensive guide. From beginners to pros, learn how to add dynamic, customized text to your projects, enhancing their visual appeal and communication.
Table of Content
- What are the steps to create text in Blender?
- Getting Started with 3D Text in Blender
- Customizing Your Text
- Converting Text to Mesh
- Animating Your Text
- Customizing Your Text
- YOUTUBE: Creating 3D Text in Blender 3.5
- Converting Text to Mesh
- Animating Your Text
- Converting Text to Mesh
- Animating Your Text
- Animating Your Text
- Introduction to 3D Text in Blender
- Step-by-Step Guide to Adding Text
- Customizing Text Appearance
- Fonts and Typography in Blender
- Extruding and Beveling Text
- Animating Text for Impact
- Converting Text to Mesh for Advanced Editing
- Applying Materials and Textures to Text
- Lighting and Rendering 3D Text
- Integrating Text into 3D Scenes
- Tips and Tricks for Professional Text Effects
- Common Issues and How to Solve Them
What are the steps to create text in Blender?
To create text in Blender, follow these steps:
- Open Blender and make sure you are in the 3D Viewport.
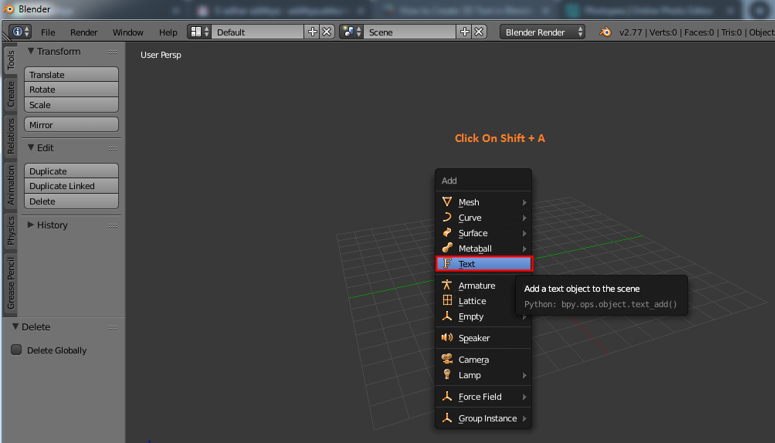
- Press Shift + A to bring up the Add menu.
- Select \"Text\" from the menu to add a blank text object to your scene.
- Alternatively, you can also click on the \"Add\" menu at the top and choose \"Text\" from there.
- You will see a new text object added to your scene with the default text \"Text\".
- To edit the text, go to the Object Data properties tab (it looks like an uppercase \"A\") in the Properties panel.
- Under the \"Text\" section, you can edit the text content, font, alignment, size, spacing, and more.
- You can also switch to Edit Mode by pressing the Tab key to edit the text directly in the 3D Viewport.
- Once you are done editing the text, you can position and scale it as needed in your scene.
- Remember to save your work regularly to avoid losing any changes.
READ MORE:
Getting Started with 3D Text in Blender
- Open Blender and delete the default cube by right-clicking it and selecting \"Delete\" or pressing the \"X\" key.
- Press \"Shift+A\" to open the Add menu, and select \"Text\" to add a text object to the scene.
- With the text object selected, press \"Tab\" to enter Edit Mode, where you can type your desired text.

Customizing Your Text
Blender offers a variety of options to customize your text, including font selection, extrusion, and beveling.
Changing the Font
- With your text object selected, go to the Font properties panel.
- Click the \"Open Font\" button to choose a font from your computer.
Extruding and Beveling
- In the Geometry section of the Text properties, adjust the \"Extrude\" value to give your text depth.
- Modify the \"Bevel Depth\" to round the edges of your text for a smoother look.

Converting Text to Mesh
For more complex modifications or to integrate text into 3D meshes, convert your text object into a mesh.
- With the text selected, press \"Alt+C\" and choose \"Mesh from Curve/Meta/Surf/Text\" to convert the text into a mesh object.
- This allows for further editing and sculpting using Blender\"s mesh tools.
Animating Your Text
Blender also enables you to animate your text, making it possible to create dynamic titles and effects for your projects.
- Use the keyframe system to animate properties like location, rotation, and scale over time.
- Experiment with the Graph Editor and Dope Sheet to fine-tune your animations.
By following these steps, you can effectively create and customize 3D text in Blender for your projects, whether for motion graphics, 3D printing, or any other application.

_HOOK_
Customizing Your Text
Blender offers a variety of options to customize your text, including font selection, extrusion, and beveling.
Changing the Font
- With your text object selected, go to the Font properties panel.
- Click the \"Open Font\" button to choose a font from your computer.
Extruding and Beveling
- In the Geometry section of the Text properties, adjust the \"Extrude\" value to give your text depth.
- Modify the \"Bevel Depth\" to round the edges of your text for a smoother look.

Creating 3D Text in Blender 3.5
Animation: Dive into a world of creativity and imagination with our captivating animation video! Experience the magic of storytelling brought to life through vibrant visuals and dynamic characters. Let your imagination run wild as you join us on this exciting adventure! Rendering: Experience the beauty of stunning visuals and realistic graphics in our mesmerizing rendering video. Explore the intricate details and lifelike textures that bring our digital creations to life in vibrant and breathtaking clarity. Join us on a visual journey like no other!
Converting Text to Mesh
For more complex modifications or to integrate text into 3D meshes, convert your text object into a mesh.
- With the text selected, press \"Alt+C\" and choose \"Mesh from Curve/Meta/Surf/Text\" to convert the text into a mesh object.
- This allows for further editing and sculpting using Blender\"s mesh tools.
Using Text in Blender Tutorial
𝗪𝗮𝘁𝗰𝗵 𝘁𝗵𝗲 𝗡𝗲𝘄 𝗨𝗽𝗱𝗮𝘁𝗲𝗱 𝗧𝘂𝘁𝗼𝗿𝗶𝗮𝗹: https://youtu.be/sSpem6jHXak In this tutorial I will show you how to ...
Animating Your Text
Blender also enables you to animate your text, making it possible to create dynamic titles and effects for your projects.
- Use the keyframe system to animate properties like location, rotation, and scale over time.
- Experiment with the Graph Editor and Dope Sheet to fine-tune your animations.
By following these steps, you can effectively create and customize 3D text in Blender for your projects, whether for motion graphics, 3D printing, or any other application.
Converting Text to Mesh
For more complex modifications or to integrate text into 3D meshes, convert your text object into a mesh.
- With the text selected, press \"Alt+C\" and choose \"Mesh from Curve/Meta/Surf/Text\" to convert the text into a mesh object.
- This allows for further editing and sculpting using Blender\"s mesh tools.

Animating Your Text
Blender also enables you to animate your text, making it possible to create dynamic titles and effects for your projects.
- Use the keyframe system to animate properties like location, rotation, and scale over time.
- Experiment with the Graph Editor and Dope Sheet to fine-tune your animations.
By following these steps, you can effectively create and customize 3D text in Blender for your projects, whether for motion graphics, 3D printing, or any other application.

_HOOK_
Animating Your Text
Blender also enables you to animate your text, making it possible to create dynamic titles and effects for your projects.
- Use the keyframe system to animate properties like location, rotation, and scale over time.
- Experiment with the Graph Editor and Dope Sheet to fine-tune your animations.
By following these steps, you can effectively create and customize 3D text in Blender for your projects, whether for motion graphics, 3D printing, or any other application.

Introduction to 3D Text in Blender
Creating 3D text in Blender opens a world of possibilities for digital artists and designers. Whether you\"re looking to add dynamic titles to your animations, create logos, or incorporate text into your 3D scenes, Blender\"s text tool offers a flexible and powerful solution. This section will guide you through the basics of adding and manipulating text in Blender, setting the foundation for more advanced techniques.
- Starting with Blender: Understand the interface and where to find the text tool.
- Adding Text: Learn how to insert text into your scene and adjust its basic properties.
- Editing Text: Tips on editing text, including changing the font, size, and alignment.
- Text Customization: Explore how to customize your text with extrusion, beveling, and materials to make it stand out.
- Animating Text: An introduction to animating your text for dynamic effects.
By the end of this section, you\"ll have a solid understanding of how to work with text in Blender, from the initial creation to basic customization, setting the stage for more complex manipulations and integration into your 3D projects.
Step-by-Step Guide to Adding Text
Adding text in Blender is a straightforward process that can significantly enhance the visual appeal of your 3D projects. Follow these detailed steps to insert and begin customizing text in your scenes.
- Open Blender: Start by launching Blender. Ensure you have a clean workspace by removing any default objects that you won\"t be using.
- Delete the Default Cube: Select the default cube by clicking it with the left mouse button and press \"X\" or \"Delete\" to remove it from the scene.
- Add Text: Press \"Shift + A\" to open the add menu, navigate to \"Text\", and click it to add a text object to your scene.
- Edit Text: With the text object selected, press \"Tab\" to enter Edit Mode. Here, you can type your desired text.
- Customize Font: To change the font, go to the Font properties section in the right-hand panel. Click on the folder icon next to the font name to select a new font from your files.
- Adjust Text Properties: Within the same properties panel, you can adjust other settings like size, alignment, and spacing to fit your design needs.
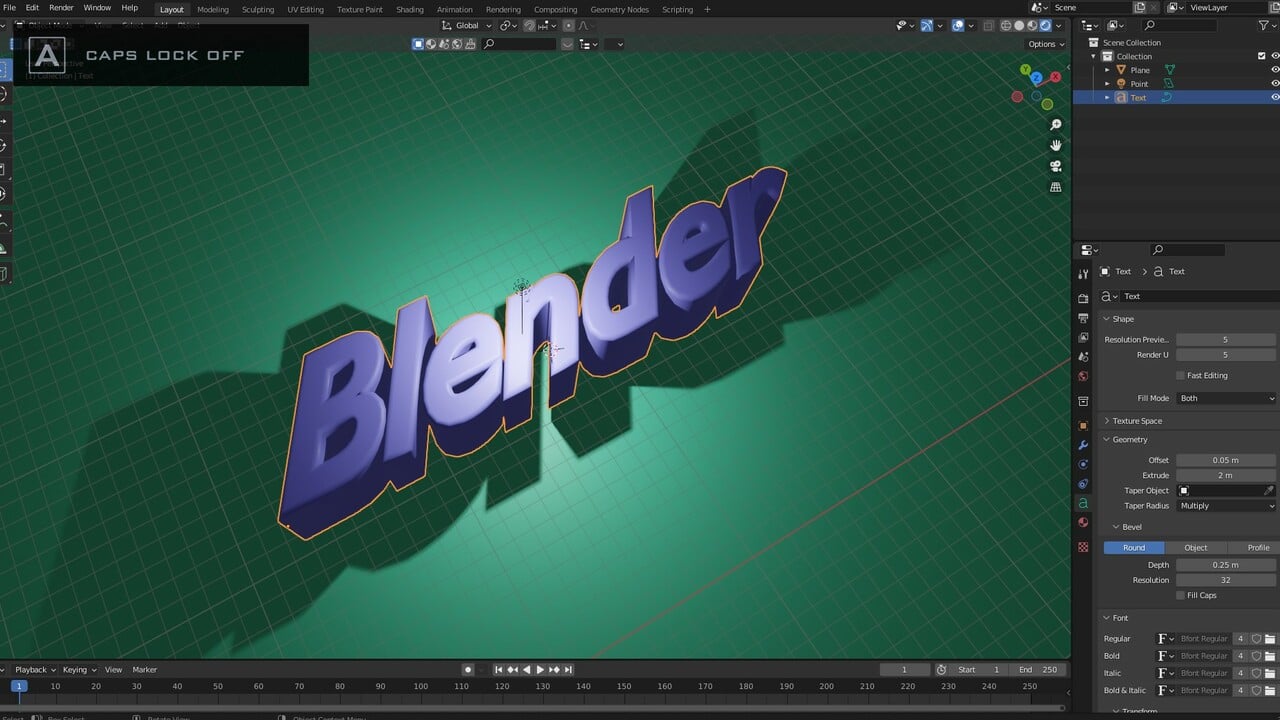
- Extrude Text: To give your text depth, go to the Geometry tab under Font properties and increase the \"Extrude\" value.
- Bevel the Edges: For smoother edges, adjust the \"Bevel Depth\" in the Geometry tab to add a bevel to your text.
- Convert to Mesh: If you need more complex customization, you can convert your text to a mesh by pressing \"Alt + C\" and selecting \"Mesh from Curve/Meta/Surf/Text\". This allows you to edit the text as a 3D object.
By following these steps, you\"ll be able to add and start customizing text in Blender, making it a valuable skill for any 3D project.
Customizing Text Appearance
Once you\"ve added text to your Blender project, the next step is to customize its appearance to match your vision. Blender\"s comprehensive set of text customization tools allows for a wide range of stylistic adjustments, from basic font changes to advanced texturing and material application. Follow these steps to begin transforming your text into a unique element of your 3D scene.
- Selecting Your Font: In the Properties panel, navigate to the Font section to choose a font from your system or downloaded fonts.
- Adjusting Text Geometry: Use the Geometry tab within the Font settings to extrude your text, giving it depth, and to apply bevel for rounded edges.
- Setting Text Materials: Materials can be applied to your text to create different textures and colors. Go to the Material properties tab and select or create a new material.
- Modifying Text Color: Within the Material settings, you can change the color and add various effects like emission for glowing text.
- Animating Text: Text can be animated by keyframing properties such as location, rotation, and scale. This is done in the Object properties panel.
- Advanced Effects: For more advanced effects, consider converting your text to a mesh for detailed sculpting, or use modifiers for effects like bending or twisting.
Through these customization options, your text can fully embody the creative direction of your project, enhancing both its aesthetic and narrative impact.
Fonts and Typography in Blender
Understanding fonts and typography is essential for creating compelling 3D text in Blender. This section delves into how to select and manipulate fonts and typography within your Blender projects, enabling you to convey the right message and tone through your text.
- Choosing Fonts: Blender allows you to import any TrueType (TTF) or OpenType (OTF) font. Access this option in the Font properties panel, where you can select \"Open Font\" to browse and load your desired font.
- Text Size and Alignment: Adjust the size of your text for the appropriate scale within your scene. Alignment options such as left, center, and right are available to position your text precisely.
- Spacing Adjustments: Control the spacing between characters (kerning), between words, and between lines to improve readability and aesthetic appeal.
- Styling Text: Explore italic, bold, and underline options to emphasize parts of your text. These options can be found in the Font properties panel.
- 3D Typography Techniques: Experiment with extrusion and beveling to add depth and dimension to your text, making it stand out in your 3D scene.
- Advanced Typography: For more complex typographic designs, consider converting your text to a mesh to apply further modifications using Blender\"s modeling tools.
By mastering fonts and typography in Blender, you can enhance the visual impact of your 3D text, making it a powerful element in your digital creations.
_HOOK_
Extruding and Beveling Text
Extruding and beveling are essential techniques in Blender to give your text a 3D appearance and a polished look. These steps will guide you through the process of adding depth and smooth edges to your text, making it stand out in your project.
- Extruding Text: Select your text object and go to the Text properties panel. Under the Geometry tab, find the \"Extrude\" setting. Increase this value to add depth to your text, transforming it from a flat shape into a 3D model.
- Beveling Edges: Still in the Geometry tab, locate the \"Bevel\" section. Adjust the \"Bevel Depth\" to create rounded edges on your text. This not only adds to the realism of your 3D text but also enhances its aesthetic appeal by giving it a softer look.
- Adjusting Bevel Resolution: For finer control over the smoothness of the bevel, modify the \"Bevel Resolution\". Increasing this value will add more subdivisions to the bevel, making the edges smoother.
- Experimenting with Settings: The key to mastering extrusion and beveling in Blender is experimentation. Play with different values to see how they affect the appearance of your text and find the right balance for your project.
By carefully adjusting the extrude and bevel settings, you can create visually striking 3D text that enhances the overall quality of your scenes in Blender.
Animating Text for Impact
Animating text in Blender can bring your projects to life, adding a dynamic element that captures the viewer\"s attention. Whether you\"re creating an intro for a video, enhancing a presentation, or adding emphasis to a scene, animation can significantly increase the impact of your text. This guide will walk you through the basics of animating text in Blender.
- Setting Up Your Text: Begin with the text you\"ve created and customized in Blender. Ensure it\"s positioned and styled exactly as you need.
- Inserting Keyframes: With your text selected, move to the frame where you want the animation to start. Insert a keyframe (I-key) for the properties you wish to animate (e.g., location, rotation, scale).
- Animating Properties: Move the timeline to another frame, change the property (e.g., move the text), and insert another keyframe. Blender will interpolate the movement between these keyframes, creating animation.
- Adjusting the Animation Curve: Use the Graph Editor to fine-tune the animation curve for smoother or more dynamic motion.
- Adding Effects: Consider adding effects such as fade-in/out by animating the material\"s opacity or using the video sequence editor for more complex effects.
- Preview and Render: Preview your animation by scrubbing through the timeline or playing it back. Adjust as necessary, then render your project to include the animated text.
Animating text in Blender not only enhances the visual appeal but also the storytelling aspect of your projects, making your messages more engaging and memorable.
Converting Text to Mesh for Advanced Editing
Converting text to mesh in Blender is a powerful technique that enables more advanced editing capabilities. This process allows you to apply complex modifications, sculpting, and apply modifiers that are not possible with text objects directly. Follow these steps to convert your text into a mesh for intricate editing.
- Prepare Your Text: Finalize your text, making sure it\"s exactly as you want it to appear because once converted to mesh, editing the text content directly is not possible.
- Select the Text Object: Click on your text object to select it. Ensure it\"s the active object in your scene.
- Convert to Mesh: With the text object selected, press \"Alt+C\" (or go to the Object menu > Convert To) and select \"Mesh from Curve/Meta/Surf/Text\". Your text object will now be converted into a mesh.
- Edit the Mesh: Once converted, you can enter Edit Mode (\"Tab\" key) with the mesh selected to access all the standard mesh editing tools. You can now add modifiers, sculpt, or manually edit the vertices, edges, and faces.
- Apply Modifiers: Explore Blender\"s modifiers to add effects such as smooth, subdivide, or boolean operations to your text mesh for unique effects.
Converting text to mesh opens up a new realm of creative possibilities, allowing you to integrate text into your 3D models and scenes with unprecedented control and flexibility.
Applying Materials and Textures to Text
Applying materials and textures to text in Blender can dramatically change its appearance and make it blend seamlessly into your 3D scene or stand out as a focal point. This section will guide you through the process of enhancing your text with materials and textures.
- Accessing Material Properties: With your text object selected, go to the Material Properties tab in the Properties panel. Click the \"New\" button to create a new material.
- Choosing a Material: You can either use the default material as a starting point or select from a wide range of presets. Customize the material\"s color, specular highlights, and more to fit your vision.
- Applying Textures: To add a texture to your material, switch to the Texture tab in the Properties panel. Click \"New\" to create a new texture. You can choose from various texture types, such as Image or Video, to apply to your text.
- Mapping Textures: In the Mapping section, adjust how the texture is projected onto your text. Options like UV, Projection, and Cube are available to achieve the desired effect.
- Adjusting Texture Settings: Fine-tune the texture\"s appearance by adjusting settings like Scale, Offset, and Rotation to get the perfect look.
- Previewing and Adjusting: Always preview your changes in the 3D Viewport to ensure your text looks exactly how you want it. Adjust the lighting and camera angle to see how the material and texture interact with the environment.
By carefully selecting and applying materials and textures, you can create text that is not only visually appealing but also fully integrated into the thematic and aesthetic elements of your Blender project.
Lighting and Rendering 3D Text
Proper lighting and rendering are crucial for showcasing your 3D text in Blender, making it look more professional and appealing. This section covers how to effectively light and render your text, ensuring it looks its best in the final output.
- Setting Up the Scene Lighting: Start by adding lights to your scene. Use a combination of point, sun, and spotlights to highlight your text from different angles, creating depth and contrast.
- Adjusting Light Properties: Experiment with the color, intensity, and distance of each light source to achieve the desired effect. Soft shadows can be created by adjusting the light\"s size and softness settings.
- Applying Materials: Ensure your text material reflects light appropriately. You may want to use a slightly reflective or glossy material to make the text pop against the background.
- Camera Setup: Position your camera to capture the text at the best angle. Consider the rule of thirds for a more dynamic composition.
- Rendering Settings: In the Render Properties tab, select your render engine (e.g., Eevee or Cycles) and adjust the settings for quality, such as resolution, samples, and light bounces.
- Post-Processing Effects: Use Blender’s Compositor to add effects such as glare, bloom, or color correction to enhance the visual appeal of your rendered text.
- Exporting Your Work: Once satisfied with the lighting and rendering, export your scene. Choose an appropriate file format based on your project\"s needs, such as PNG for images or an animation file format for video.
By carefully lighting and rendering your 3D text in Blender, you can create stunning visuals that capture the viewer\"s attention and convey your message with impact.
_HOOK_
Integrating Text into 3D Scenes
Integrating text into your 3D scenes in Blender is not just about adding words but about making the text a cohesive part of the visual storytelling. This requires attention to detail in terms of placement, scale, and interaction with other elements in the scene. Follow these steps to ensure your text not only looks good but also fits perfectly within your 3D environment.
- Consider the Composition: Think about where the text will be placed in the scene. It should be positioned in a way that complements the overall composition, without obstructing important elements.
- Adjust the Scale: Scale the text appropriately to ensure it is neither too dominant nor too insignificant compared to other objects in the scene.
- Match the Lighting: The lighting on the text should match the rest of the scene. This may involve adjusting the material properties of the text or the scene\"s lighting setup.
- Use Depth of Field: Applying depth of field effects can help integrate the text more naturally into the scene, especially if it is meant to appear as part of the background or foreground.
- Interact with the Environment: For text that needs to interact with the environment (e.g., sitting on a surface or casting shadows), ensure proper physics and collision settings are applied.
- Animate If Necessary: If the scene is dynamic, consider animating the text as well. This could be as simple as a fade-in or as complex as moving along a path.
By carefully considering these aspects, you can integrate text into your 3D scenes in Blender in a way that enhances the overall impact and narrative of your project.
Tips and Tricks for Professional Text Effects
Creating professional text effects in Blender involves more than just adding text; it requires a blend of creativity, technical skills, and attention to detail. Here are some expert tips and tricks to help you elevate your text effects to a professional level.
- Use High-Quality Fonts: Choose fonts that align with the theme of your project. High-quality fonts can significantly impact the final look of your text.
- Experiment with Lighting: Lighting can dramatically change the mood and visibility of your text. Experiment with different lighting setups to highlight your text effectively.
- Apply Textures Wisely: Textures can add depth and realism to your text. Consider the material and surface properties your text should mimic and apply textures accordingly.
- Incorporate 3D Effects: Utilize Blender’s extrusion and beveling tools to add depth and dimension to your text for a more dynamic appearance.
- Animation for Emphasis: Animate your text to bring attention to specific words or phrases. Simple animations like scaling, rotation, or position changes can make a big impact.
- Play with Particle Systems: For more creative text effects, consider using particle systems in Blender. This can create effects like disintegrating text or text revealing through a cloud of particles.
- Use Compositing for Final Touches: After rendering, use Blender’s compositing features to add final touches like glow, blur, or color correction to your text.
By applying these tips and tricks, you can create text effects in Blender that are both visually stunning and professionally polished, making your 3D projects stand out.
READ MORE:
Common Issues and How to Solve Them
Working with text in Blender can sometimes present challenges, especially for those new to 3D modeling or Blender itself. Here are some common issues users encounter when creating text in Blender, along with solutions to help overcome them.
- Text Not Showing Up: If your text isn\"t visible after adding it, ensure you\"re in Object Mode and not Edit Mode. Also, check the text\"s location in the 3D viewport to ensure it\"s not positioned behind other objects or outside the camera view.
- Difficulty Editing Text: To edit text, you must be in Edit Mode. Press \"Tab\" with the text object selected to switch modes. If the text still isn\"t editable, confirm that it is indeed a text object and not converted to a mesh.
- Problems with Extrusion and Beveling: If extrusion or beveling doesn\"t work as expected, check the Geometry section in the Text properties panel. Make sure you\"ve entered positive values for extrusion and bevel depth. Zero or negative values will not produce the desired 3D effect.
- Fonts Not Loading: If a font isn\"t appearing correctly, ensure the file path to the font is correct and that the font file isn\"t corrupted. Blender supports TrueType (.ttf) and OpenType (.otf) fonts, so verify the font format is supported.
- Texturing and Material Issues: For materials or textures not applying correctly to text, ensure you\"re in the Material Properties panel. Apply the material to the text object specifically, and adjust the material settings as needed for the desired effect.
- Animating Text Problems: When animating text, ensure you\"ve inserted keyframes for the specific properties you want to animate (e.g., location, rotation, scale). If the animation doesn\"t play, check the timeline to ensure your keyframes are properly set and that you\"re in the correct frame range.
By troubleshooting these common issues, you can more effectively work with text in Blender and achieve the creative results you desire.
Mastering text creation in Blender unlocks endless possibilities for your 3D projects. Embrace these techniques to elevate your work, bringing depth, emotion, and professionalism to your creations. Start experimenting today to discover your own unique style.