Topic blender texture nodes: Discover the power of Blender texture nodes and revolutionize your 3D creations with unparalleled detail and creativity. Learn to master this essential tool for any aspiring digital artist or designer.
Table of Content
- What are some examples of texture nodes available in Blender for creating different types of textures?
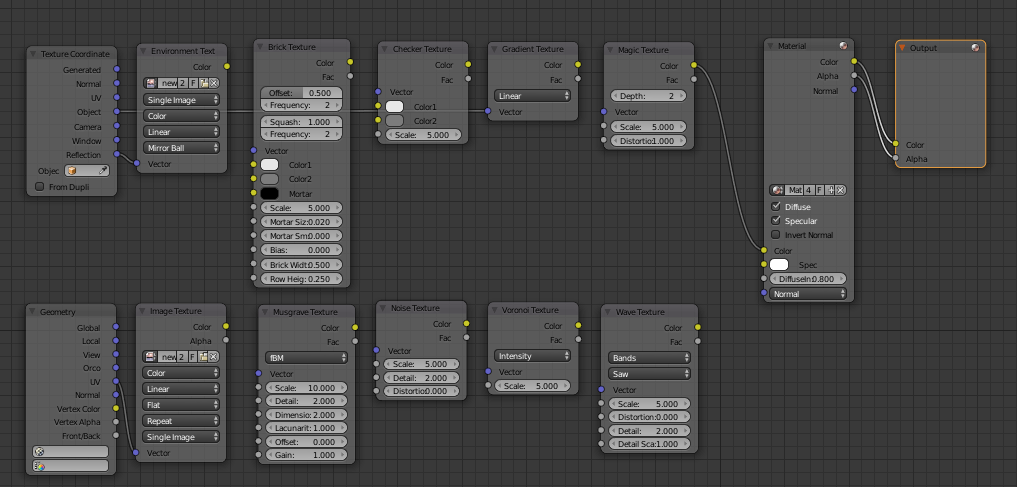
- Types of Texture Nodes
- Utilizing Texture Nodes
- Creating Procedural Textures
- Texture Libraries
- Conclusion
- Utilizing Texture Nodes
- Creating Procedural Textures
- Texture Libraries
- Conclusion
- YOUTUBE: Explaining all 80+ Blender material nodes in under 30 minutes
- Creating Procedural Textures
- Texture Libraries
- Conclusion
- Texture Libraries
- Conclusion
- Conclusion
- Introduction to Blender Texture Nodes
- Understanding Different Types of Texture Nodes
- Step-by-Step Guide to Using Texture Nodes in Blender
- Advantages of Using Procedural Textures
- Creating Complex Textures with Node Combinations
- Tips and Tricks for Optimizing Texture Node Workflows
- Exploring Texture Libraries and Resources
- Real-World Applications of Blender Texture Nodes
- Advanced Techniques and Creative Uses of Texture Nodes
- Community and Learning Resources for Blender Texture Nodes
- Conclusion: The Future of Texturing in Blender
What are some examples of texture nodes available in Blender for creating different types of textures?
Some examples of texture nodes available in Blender for creating different types of textures are:
- Blend Node
- Clouds Node
- Distorted Noise Node
- Magic Node
- Marble Node
- Musgrave Node
- Noise Node
- Stucci Node
- Voronoi Node
- Wood Node
Texture nodes in Blender can be used to add various textures and details to objects, enhancing the overall appearance of the scene.
READ MORE:
Types of Texture Nodes
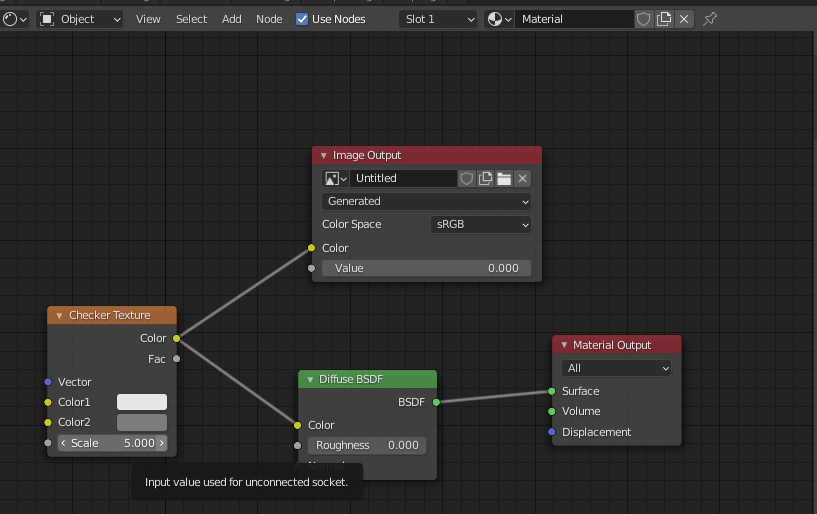
- Brick Texture Node
- Checker Texture Node
- Gradient Texture Node
- IES Texture Node
- Image Texture Node
- Magic Texture Node
- Musgrave Texture Node
- Noise Texture Node
- Point Density Node
- Voronoi Texture Node
- Wave Texture Node
- White Noise Texture Node
Utilizing Texture Nodes
To effectively use texture nodes, open Blender and navigate to the Node Editor. In the Node Editor\"s area header, you\"ll find access to texture nodes, which will display a list of textures available in your document. This setup is crucial for creating and managing complex textures.
Scaling and Manipulating Textures
For tasks such as scaling an image texture, use the UV editor alongside a 3D viewport. Enter edit mode, select all components, and then scale the UV map to adjust the texture\"s appearance on your model.
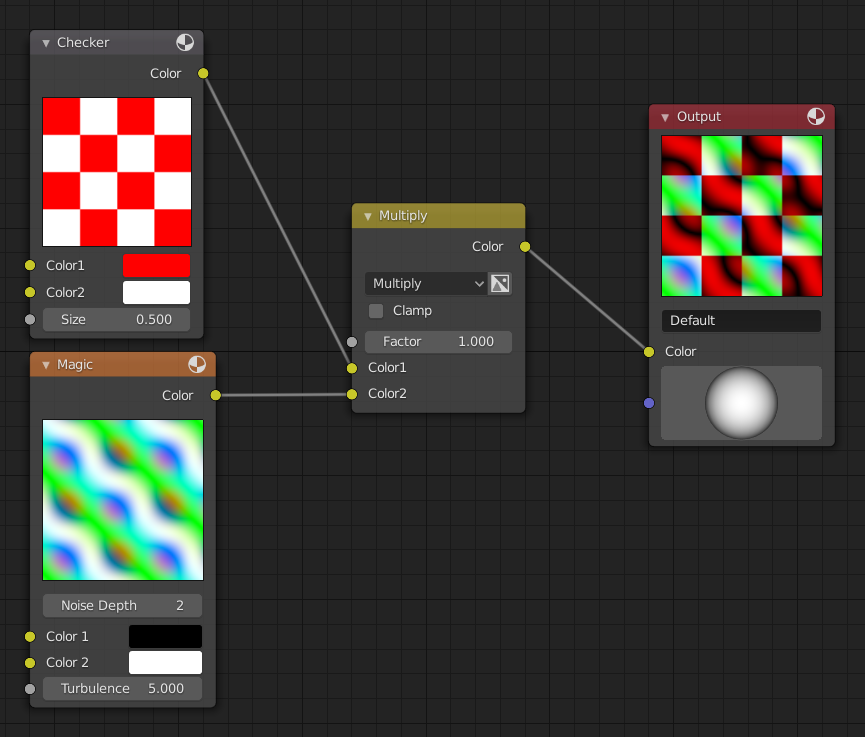
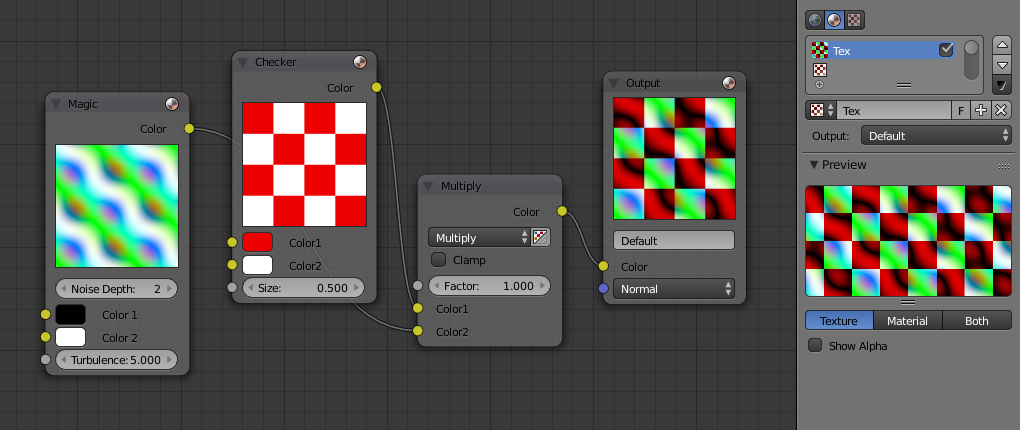
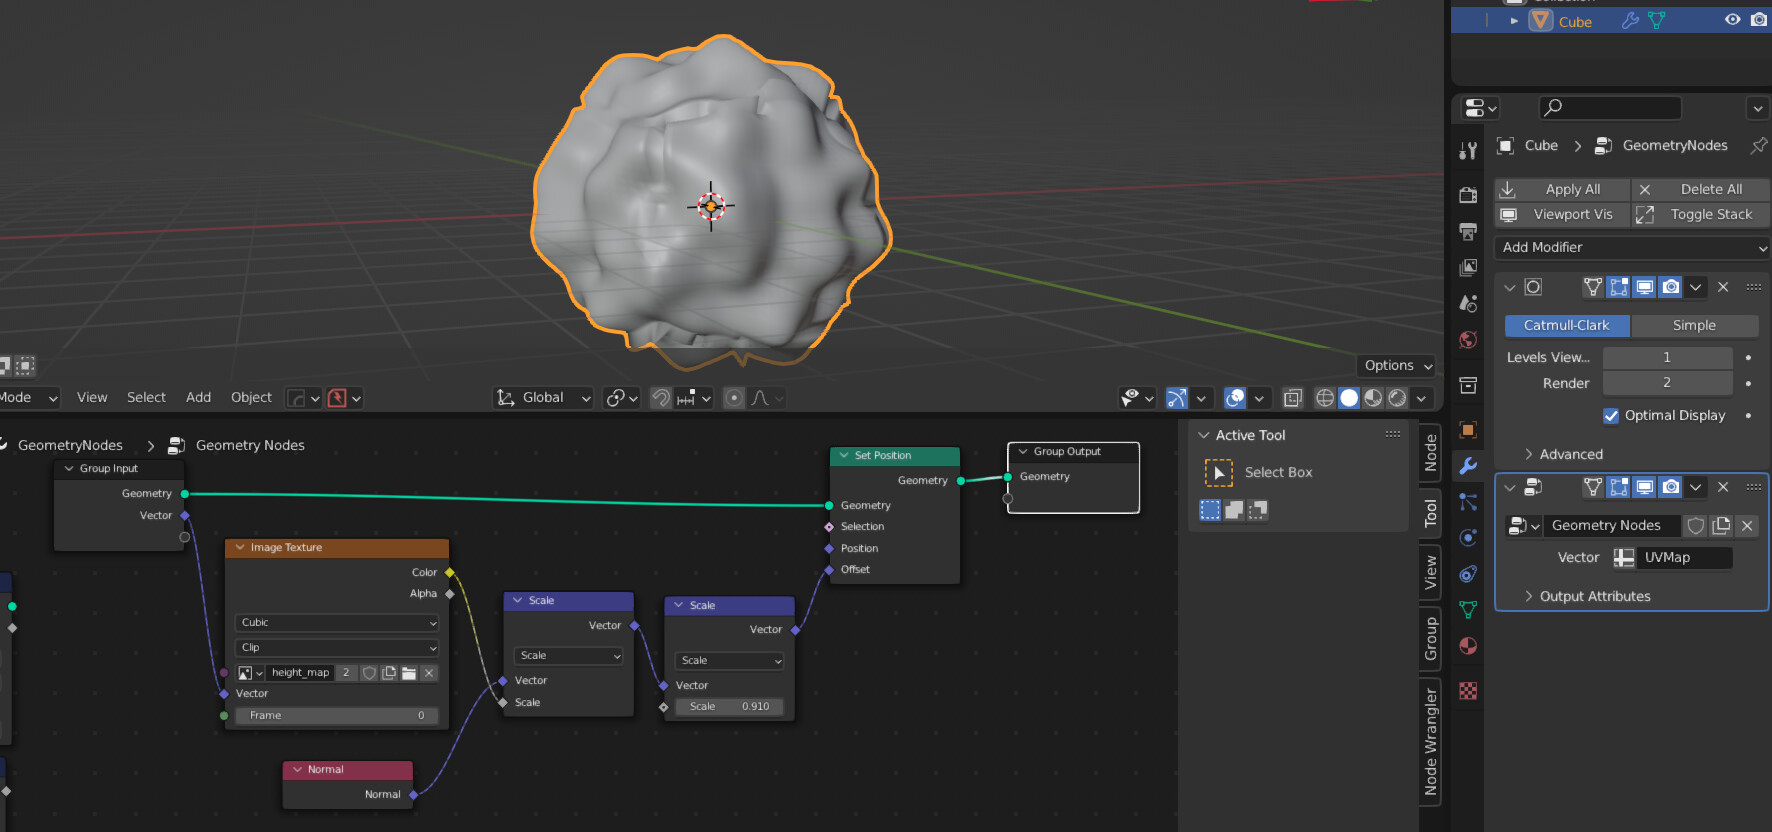
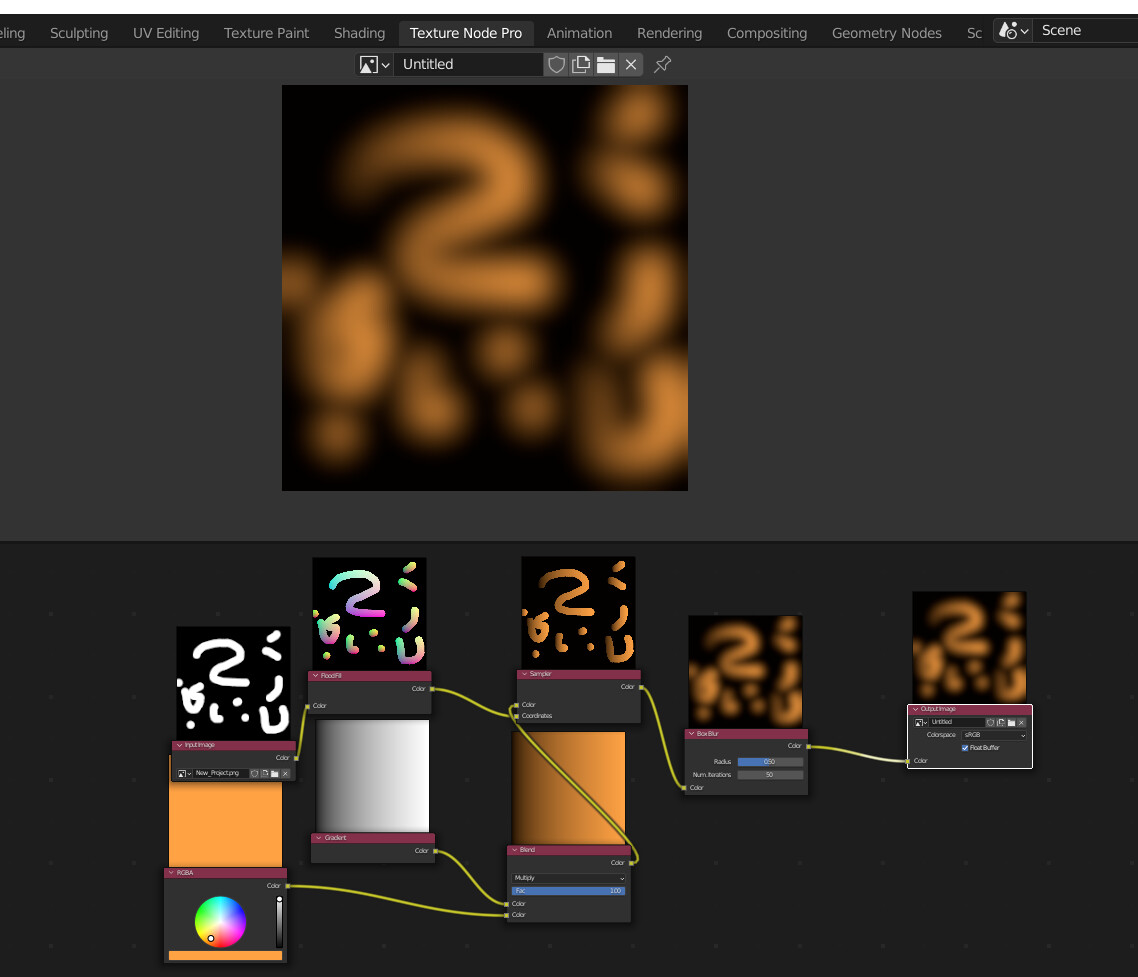
Creating Procedural Textures
Procedural textures in Blender are made by manipulating shader nodes. This approach allows for the creation of textures like wood, which can be achieved without overly complex shaders. Navigate to the Shading Workspace and create a new texture by arranging shader nodes appropriately.
Texture Libraries
For artists seeking textures, Blender supports high-quality, free texture libraries such as AmbientCG, CGBookcase, Polyhaven, and TextureNinja. These resources provide a vast array of textures suitable for any project.
_HOOK_
Conclusion
Blender\"s texture nodes offer limitless possibilities for 3D artists, from creating simple textures to developing highly complex and detailed materials. By mastering these nodes, artists can significantly enhance the visual quality of their 3D models.

Utilizing Texture Nodes
To effectively use texture nodes, open Blender and navigate to the Node Editor. In the Node Editor\"s area header, you\"ll find access to texture nodes, which will display a list of textures available in your document. This setup is crucial for creating and managing complex textures.
Scaling and Manipulating Textures
For tasks such as scaling an image texture, use the UV editor alongside a 3D viewport. Enter edit mode, select all components, and then scale the UV map to adjust the texture\"s appearance on your model.
Creating Procedural Textures
Procedural textures in Blender are made by manipulating shader nodes. This approach allows for the creation of textures like wood, which can be achieved without overly complex shaders. Navigate to the Shading Workspace and create a new texture by arranging shader nodes appropriately.
Texture Libraries
For artists seeking textures, Blender supports high-quality, free texture libraries such as AmbientCG, CGBookcase, Polyhaven, and TextureNinja. These resources provide a vast array of textures suitable for any project.
Conclusion
Blender\"s texture nodes offer limitless possibilities for 3D artists, from creating simple textures to developing highly complex and detailed materials. By mastering these nodes, artists can significantly enhance the visual quality of their 3D models.
_HOOK_
Explaining all 80+ Blender material nodes in under 30 minutes
Tutorial: Discover step-by-step guidance in our tutorial video, making learning engaging and straightforward. Unleash your potential by gaining new skills and knowledge through our informative and user-friendly tutorial content. Creating: Unleash your creativity and watch our video on creating exciting and innovative projects. Get inspired and learn how to bring your ideas to life with expert tips and techniques. Let\'s start creating something amazing together!
Top 6 Blender Nodes To Create Any Material in Blender
Grab your FREE copy of Press Start | Your first Blender Project - https://b3d.cgcookie.com/6nodes-ps CG Cookie ...
Creating Procedural Textures
Procedural textures in Blender are made by manipulating shader nodes. This approach allows for the creation of textures like wood, which can be achieved without overly complex shaders. Navigate to the Shading Workspace and create a new texture by arranging shader nodes appropriately.

Texture Libraries
For artists seeking textures, Blender supports high-quality, free texture libraries such as AmbientCG, CGBookcase, Polyhaven, and TextureNinja. These resources provide a vast array of textures suitable for any project.
Conclusion
Blender\"s texture nodes offer limitless possibilities for 3D artists, from creating simple textures to developing highly complex and detailed materials. By mastering these nodes, artists can significantly enhance the visual quality of their 3D models.
_HOOK_
Conclusion
Blender\"s texture nodes offer limitless possibilities for 3D artists, from creating simple textures to developing highly complex and detailed materials. By mastering these nodes, artists can significantly enhance the visual quality of their 3D models.
Introduction to Blender Texture Nodes
Blender texture nodes offer a versatile system for creating and manipulating textures within the 3D modeling software, Blender. This functionality is integral to both the Cycles and Eevee rendering engines, allowing artists to achieve detailed and complex textures for their models. Texture nodes can be applied in various ways, including for procedural textures, image-based textures, and hybrid methods that combine multiple techniques for innovative results.
Texture nodes in Blender are part of a broader node system that includes shading, compositing, and lighting nodes, each with its specific applications and workflows. The focus here, however, is on texture nodes, which enable the creation of rich, detailed materials that can enhance the realism and artistic quality of 3D projects.
- Procedural Textures: These are generated mathematically within Blender and offer endless customization options. Procedural textures can simulate natural materials like wood, marble, or clouds without relying on external images.
- Image-based Textures: By using photographs or painted images, artists can apply real-world textures to their models. Blender\"s texture nodes allow for the manipulation of these images in various ways to fit the 3D objects perfectly.
- Hybrid Textures: Combining procedural and image-based methods can produce highly detailed and unique textures. This approach often involves layering different textures and manipulating them with nodes to achieve the desired effect.
Understanding and mastering Blender texture nodes can significantly enhance the visual quality of 3D models, providing artists with the tools to create more immersive and visually appealing projects. The system\"s flexibility and depth make it an essential aspect of the Blender 3D modeling software, catering to a wide range of artistic and technical requirements.
Understanding Different Types of Texture Nodes
Blender offers a wide range of texture nodes, each designed to fulfill specific texturing needs for 3D models. These nodes enable artists to create everything from simple, flat textures to complex, layered materials with depth and realism. Understanding the function and application of each type of node is crucial for effectively using Blender\"s texturing capabilities.
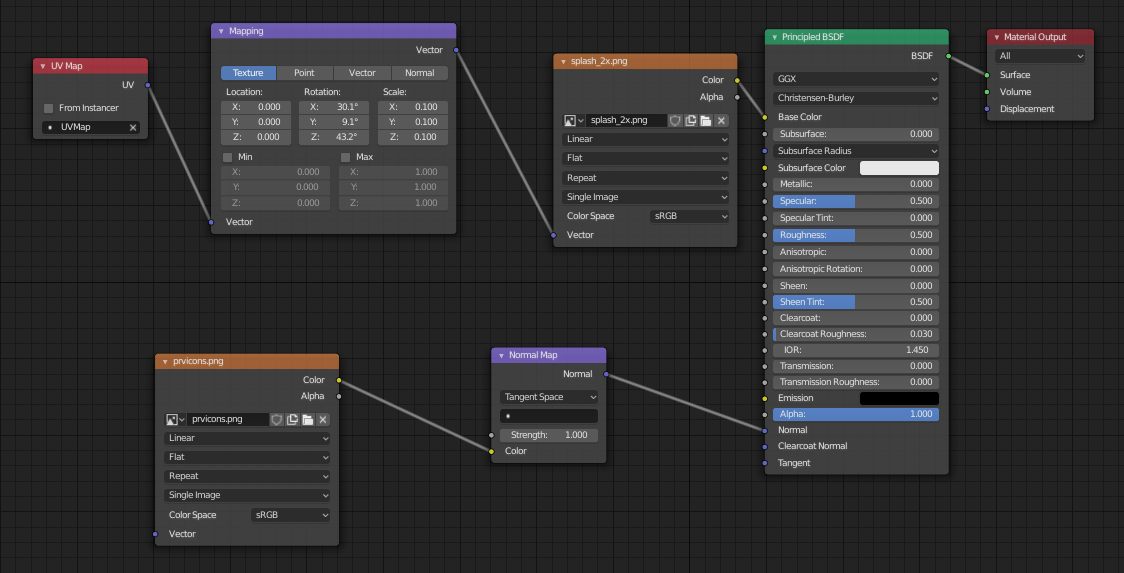
- Image Texture Node: Allows for the application of image files as textures. It\"s versatile, supporting various formats and manipulation options.
- Noise Texture Node: Generates procedural textures based on noise algorithms, useful for creating organic variations such as clouds or marble.
- Gradient Texture Node: Creates smooth transitions between colors, ideal for creating gradients or soft shading effects.
- Voronoi Texture Node: Produces a procedural texture based on the Voronoi algorithm, great for creating cracked or cellular patterns.
- Musgrave Texture Node: Another procedural generator that offers more control over the produced texture, suitable for landscapes or abstract surfaces.
- Brick Texture Node: Simulates brick or tile patterns, with extensive customization options for size, mortar thickness, and color variation.
- Wave Texture Node: Generates sine wave patterns, which can be used to create water ripples, wood grains, or other wavy textures.
- Point Density Texture Node: Uses particle systems or vertex groups to create textures, useful for simulating star fields, smoke, or fire.
Each of these nodes can be combined and manipulated within Blender\"s node editor, offering endless possibilities for texture creation. By understanding the strengths and applications of each type of texture node, artists can more effectively achieve their desired results, whether working on realistic projects or stylized creations.
Step-by-Step Guide to Using Texture Nodes in Blender
- Open Blender and Create Your Scene: Start by launching Blender and creating or opening the 3D model you wish to texture.
- Access the Node Editor: With your model selected, switch to the shading layout to access the Node Editor. This area allows you to work with textures, shaders, and lighting.
- Understanding the Node Editor: The Node Editor is divided into sections for different types of nodes. For texturing, you\"ll primarily use the Shader Nodes section.
- Add a Texture Node: Press Shift+A in the Node Editor to open the Add menu, and navigate to Texture to see available texture nodes. Select the type of texture node you need, such as an Image Texture or Noise Texture.
- Configure Your Texture Node: Once added, you can configure the texture node\"s properties. For an Image Texture Node, you\"ll need to load an image. For procedural textures like Noise, you can adjust parameters to achieve the desired effect.
- Connect Nodes: Texture nodes must be connected to material output nodes to affect the model\"s appearance. Drag from the output socket of your texture node to the input socket of a shader node, like the Principled BSDF, to apply the texture.
- Adjust Texture Settings: With the texture node connected, you can further adjust settings and parameters to fine-tune the texture\"s appearance on your model. This includes scaling, rotation, and mapping options.
- Preview Your Texture: Use the viewport shading mode to preview how your texture looks on the model. Adjust the lighting and camera angle as needed for the best view.
- Refine and Iterate: Texturing is an iterative process. Continue to tweak your texture nodes, add additional nodes for complexity, and refine the material until you achieve the desired result.
- Save Your Project: Don\"t forget to regularly save your Blender project to prevent loss of work. Saving also allows you to revisit and adjust your textures in the future.
This step-by-step guide provides a foundation for using texture nodes in Blender, enabling both beginners and experienced users to enhance their 3D models with detailed and dynamic textures. With practice and exploration, you can unlock the full potential of Blender\"s texturing capabilities.
Advantages of Using Procedural Textures
Procedural textures in Blender offer a range of benefits for 3D artists, from flexibility and control to efficiency and realism. These textures are generated through algorithms within Blender, allowing for dynamic and customizable materials that can greatly enhance the visual appeal of 3D models.
- Unlimited Resolution: Procedural textures are not limited by resolution, meaning they can be scaled up or down without loss of quality. This is particularly advantageous for projects that may be viewed at different resolutions or require close-up detail.
- Flexibility and Customization: Since procedural textures are generated based on parameters, they can be easily adjusted to achieve a wide range of effects. This allows artists to tweak textures until they perfectly match their vision.
- Reduced Memory Usage: Unlike image-based textures that can consume significant amounts of memory, procedural textures are generated on-the-fly, using less memory and potentially improving render times.
- Seamlessness: Procedural textures naturally tile without visible seams, making them ideal for surfaces that need to appear continuous, such as landscapes, walls, and floors.
- Dynamic Effects: Some procedural textures can react to scene lighting or viewer perspective, adding a level of interactivity and realism not easily achieved with static image textures.
These advantages make procedural textures a powerful tool in the Blender artist\"s toolkit, offering a blend of technical efficiency and artistic freedom. Whether creating vast landscapes, detailed character models, or abstract visuals, procedural textures can significantly enhance the depth and realism of 3D projects.
_HOOK_
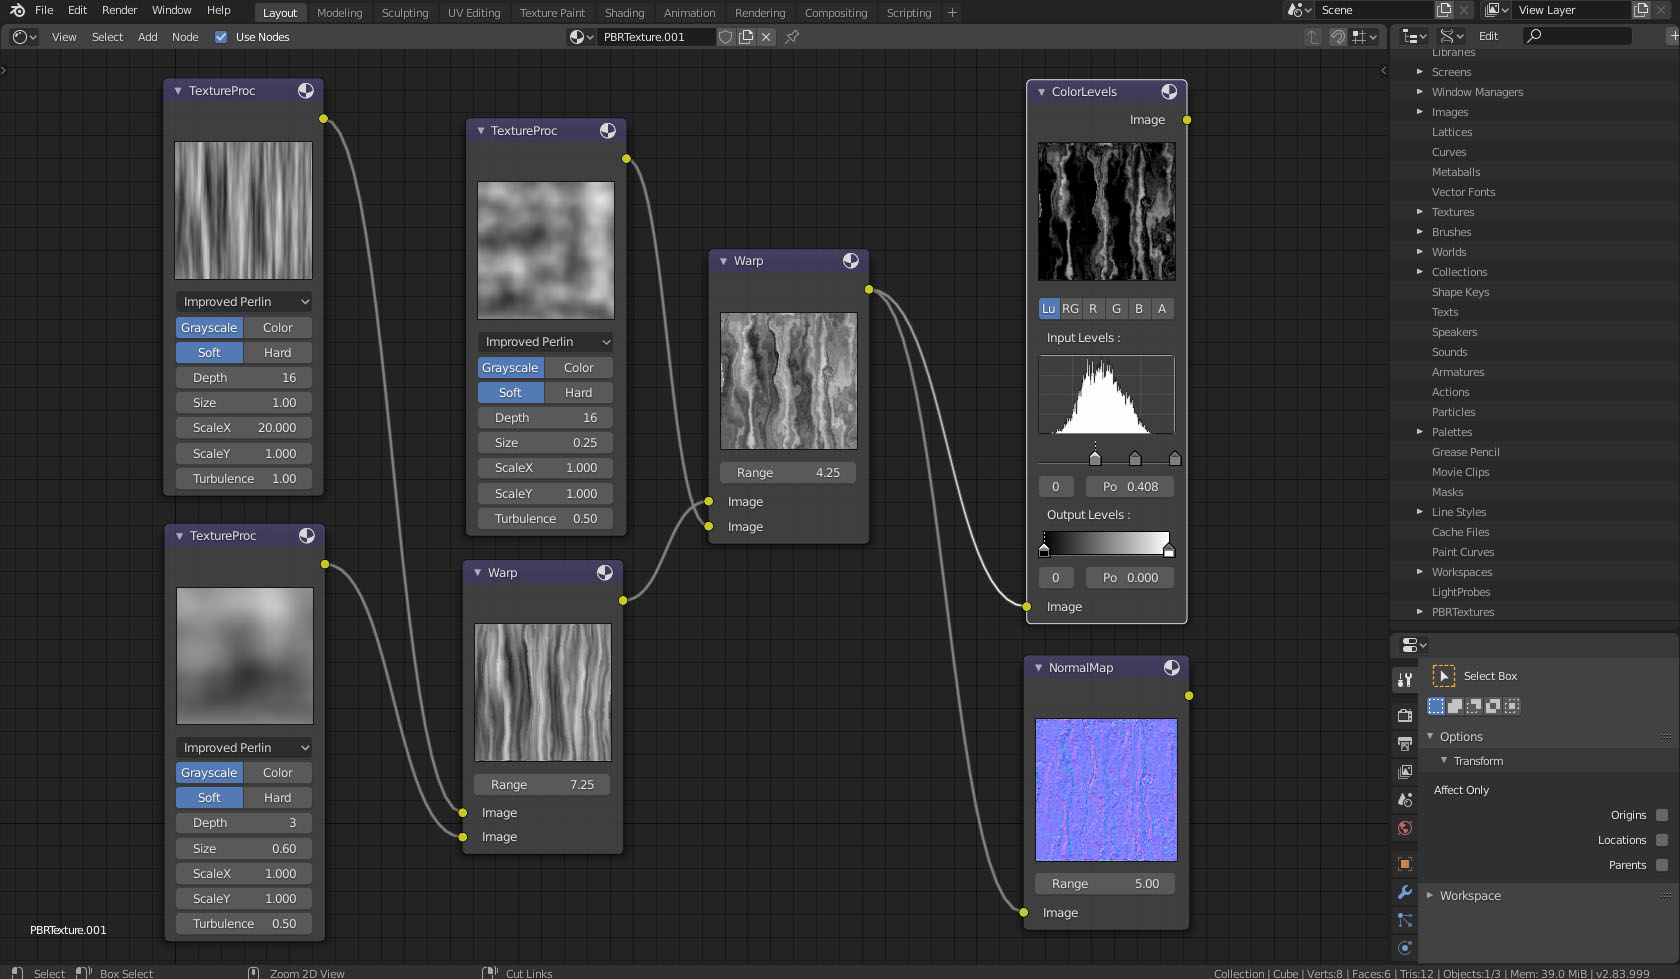
Creating Complex Textures with Node Combinations
Blender\"s powerful node system allows for the creation of complex textures by combining different nodes. This process involves layering and manipulating various texture nodes to achieve rich, detailed materials for 3D models. The ability to combine procedural and image-based textures through node networks provides artists with a high degree of creative freedom and precision.
- Start with a Base Texture: Begin by adding a simple texture node, such as a Noise or Image Texture node, to serve as the base layer of your material.
- Add Variation with Procedural Nodes: Incorporate procedural nodes like Musgrave or Voronoi to add complexity and detail to the base texture. These can introduce organic patterns or specific effects like wood grain or marble.
- Use Color Nodes for Adjustment: Utilize color adjustment nodes, such as RGB Curves or Hue/Saturation, to modify the colors of your textures. This step is crucial for matching the texture\"s colors to your project\"s palette.
- Blend Textures with Mix Nodes: Combine multiple textures using MixRGB or Mix Shader nodes. This allows for the blending of different textures to create nuanced materials.
- Control Placement with Mapping Nodes: Use Mapping and Texture Coordinate nodes to control the placement and orientation of your textures on the 3D model. This is essential for achieving the desired scale and alignment.
- Refine with Math and Converter Nodes: Employ Math and Converter nodes to further manipulate texture properties and values. These nodes can adjust aspects like brightness, contrast, and detail levels.
- Finalize with a Shader Node: Connect your texture node network to a shader, such as the Principled BSDF, to integrate the texture with Blender\"s lighting and rendering system.
This methodical approach to combining texture nodes in Blender enables the creation of materials that can range from realistic to fantastical. By mastering node combinations, artists can push the boundaries of what\"s possible in 3D texturing, bringing unparalleled depth and realism to their work.
Tips and Tricks for Optimizing Texture Node Workflows
Optimizing texture node workflows in Blender can significantly enhance your texturing process, making it more efficient and effective. Here are several tips and tricks to help you streamline your workflow and achieve better results with texture nodes.
- Organize Your Node Setup: Use frame nodes to group related nodes together. This not only keeps your node editor tidy but also makes it easier to understand and modify your texture setups.
- Utilize Node Groups: For textures or setups you use frequently, create node groups. This allows for easy reuse in different projects or within the same project, saving time and effort.
- Experiment with Custom Nodes: Blender allows for the creation of custom nodes. If you find yourself repeatedly using a specific configuration of nodes, consider creating a custom node for more streamlined workflows.
- Master Shortcut Keys: Blender\"s node editor has several shortcut keys that can speed up your work. For example, Shift+A brings up the Add menu, while Ctrl+Shift+Left Click on a node lets you preview its effect directly.
- Use the Node Wrangler Add-on: Node Wrangler is a built-in Blender add-on that provides numerous tools for faster node editing. Activating it can significantly speed up your texturing process.
- Opt for Procedural Textures When Possible: Procedural textures are often more versatile and resource-efficient than image textures. They can be easily adjusted without affecting the project\"s performance.
- Leverage Blender’s Texture Libraries: Instead of creating every texture from scratch, use Blender\"s extensive libraries or third-party resources to find high-quality textures that can be modified to fit your needs.
Implementing these strategies can greatly improve your proficiency with Blender\"s texture nodes, enabling you to create complex and high-quality textures more efficiently. Always stay open to new tips and techniques that can further enhance your texturing workflow.
Exploring Texture Libraries and Resources
Finding the right textures for your Blender projects can be a crucial step in achieving the desired look and feel of your 3D models. Fortunately, there are numerous free and paid texture libraries available that offer high-quality materials for any project. Exploring these resources can significantly enhance your texturing workflow in Blender.
- AmbientCG: Offers a wide range of high-quality, public domain (CC0) textures that are particularly useful for PBR workflows.
- CGBookcase: Another great source for free textures, CGBookcase provides a variety of textures, including fabrics, liquids, and nature elements.
- Polyhaven: Known for its high-quality HDRIs and textures, Polyhaven is a go-to resource for artists looking for free assets to elevate their work.
- TextureNinja: A resourceful site for textures, TextureNinja offers numerous options ranging from urban to natural textures, all available for free.
- Poliigon: For those looking for premium textures, Poliigon offers an extensive collection of high-resolution textures, alongside models and brushes.
- Quixel Megascans: A comprehensive library of photorealistic textures and 3D assets, ideal for projects requiring the highest level of realism.
Utilizing these libraries can save time and improve the quality of your projects. Whether you need specific materials, environmental textures, or just inspiration, these resources provide valuable assets for any Blender artist. Remember to check the licensing of each resource to ensure compliance with your project\"s needs.
Real-World Applications of Blender Texture Nodes
Blender texture nodes are not just a tool for creating digital art; they have a wide range of real-world applications across various industries. From game development to film production, architectural visualization to product design, texture nodes play a crucial role in bringing projects to life with realistic details and materials.
- Game Development: In the gaming industry, texture nodes are used to create the detailed textures needed for game environments, characters, and assets, enhancing the gaming experience with realistic and immersive visuals.
- Film and Animation: Texture nodes contribute to the creation of detailed and lifelike scenes and characters in movies and animations, adding depth and realism to the visual storytelling process.
- Architectural Visualization: Architects and designers use texture nodes to simulate materials and finishes in 3D models, helping clients visualize the final look of buildings and spaces before construction begins.
- Product Design: In product design, texture nodes help in visualizing product prototypes with accurate materials and textures, allowing for design adjustments before the manufacturing process.
- Virtual Reality (VR) and Augmented Reality (AR): For VR and AR applications, texture nodes are essential in creating immersive environments that users can interact with, making the experience as realistic as possible.
- Educational and Training Simulations: Texture nodes are used in simulations for educational and training purposes, creating realistic scenarios that help in learning or training in various fields.
The versatility and power of Blender texture nodes make them an invaluable asset in the toolbox of professionals across a broad spectrum of disciplines. By mastering these tools, creators and designers can push the boundaries of what\"s possible in their fields, bringing their visions to life with unprecedented detail and realism.
Advanced Techniques and Creative Uses of Texture Nodes
Blender\"s texture nodes are not just for creating straightforward materials; they also enable the execution of advanced techniques and creative uses that can transform your 3D models into works of art. By leveraging the power of these nodes, artists can achieve effects that are both complex and unique.
- Layering Textures for Depth: Use multiple texture nodes in layers to create complex surfaces with depth. This technique is perfect for simulating natural elements like bark, soil, or multilayered paint.
- Animating Textures: By animating the values within texture nodes, you can create dynamic materials that change over time. This is ideal for creating effects like flowing water, flickering flames, or shifting sands.
- Creating Procedural Landscapes: Combine various noise and gradient textures to generate endless, unique landscapes. This technique is invaluable for background scenes or expansive environments.
- Simulating Wear and Tear: Use texture nodes to add realistic wear and tear to objects, simulating effects such as scratches, dents, and rust. This adds realism to objects, making them appear used and aged.
- Custom Shaders for Unique Effects: Advanced users can combine texture nodes with custom shaders to create unique visual effects, such as holograms, iridescent surfaces, or supernatural glows.
- Environmental Effects: Texture nodes can be used to create environmental effects like fog, rain on surfaces, or snow accumulation, enhancing the realism of scenes.
These advanced techniques showcase the versatility of Blender\"s texture nodes, offering artists the tools to push the boundaries of digital art and 3D modeling. With creativity and experimentation, the possibilities are virtually limitless.
_HOOK_
Community and Learning Resources for Blender Texture Nodes
The Blender community offers a wealth of resources for learning and mastering texture nodes. From online tutorials and courses to forums and communities, there are numerous avenues to enhance your skills and share your experiences with others. Here\"s a roundup of some key resources:
- Blender Artists Forum: A vibrant community where you can ask questions, share your work, and find answers on everything related to Blender, including texture nodes.
- Blender Stack Exchange: A Q&A site for Blender users to seek help and advice on specific problems, including complex node setups.
- Blender Network: Connect with professionals and enthusiasts in the Blender community for collaboration, learning, and networking.
- YouTube Tutorials: There are countless tutorials available on YouTube covering every aspect of Blender, including detailed guides on texture nodes. Channels like Blender Guru, CG Cookie, and Ducky 3D offer excellent tutorials for all skill levels.
- Udemy and Coursera: These platforms offer structured courses on Blender, including comprehensive lessons on shading, texturing, and using nodes effectively.
- BlenderNation: Provides daily news, articles, tutorials, and showcases from the Blender community, including tips on texture nodes.
- Blender Documentation: The official Blender manual is an invaluable resource for understanding every feature in Blender, including texture nodes.
Engaging with these resources and the Blender community can significantly accelerate your learning process, helping you to master texture nodes and apply them creatively in your projects. Whether you\"re a beginner looking to understand the basics or an experienced artist seeking advanced techniques, the Blender community has something for everyone.
READ MORE:
Conclusion: The Future of Texturing in Blender
As Blender continues to evolve, the future of texturing within the platform looks promising and exciting. The development team is constantly working on enhancing Blender\"s capabilities, including the texture node system, to support more advanced and efficient workflows. With the introduction of new features and improvements, artists and designers will find it increasingly easier to achieve realistic and complex textures.
Moreover, the Blender community plays a significant role in shaping the future of texturing in Blender. Through community feedback, shared resources, and collaborative projects, users have a direct impact on the development of new tools and features. This symbiotic relationship ensures that Blender remains at the forefront of 3D creation technology.
Looking ahead, we can anticipate further integration of AI and machine learning technologies to streamline texture creation and manipulation processes, making them more intuitive and powerful. Additionally, as virtual and augmented reality technologies continue to grow, Blender\"s texture node system will adapt to meet the needs of these new mediums, offering artists unprecedented ways to create immersive environments.
In conclusion, the future of texturing in Blender is bright, with ongoing enhancements aimed at improving functionality, efficiency, and creativity. As the platform continues to develop, it will undoubtedly remain a key tool for artists around the world, pushing the boundaries of what\"s possible in digital art and 3D modeling.
Embrace the limitless possibilities of Blender texture nodes to transform your 3D artistry. Dive into this powerful tool for unparalleled creativity, where every texture brings your visions closer to reality. The future of digital artistry awaits.