Topic how to put text in blender: Discover the essentials of adding and customizing text in Blender, enhancing your 3D projects with captivating typography, even if you"re a complete beginner. This guide will kickstart your journey towards mastering 3D text in Blender effortlessly.
Table of Content
- How can I add text to a scene in Blender and manipulate it?
- Adding Text to Your Scene
- Editing Your Text
- Customizing Text Appearance
- Advanced Text Effects
- Conclusion
- Editing Your Text
- Customizing Text Appearance
- Advanced Text Effects
- Conclusion
- Customizing Text Appearance
- Advanced Text Effects
- YOUTUBE: How to Use Text in Blender Tutorial
- Conclusion
- Advanced Text Effects
- Conclusion
- Conclusion
- Introduction to Adding Text in Blender
- Step-by-Step Guide to Adding Text
- Editing Text Properties for Customization
- Advanced Text Effects and Animations
- Changing Fonts and Text Appearance
- Adding Depth and Dimension to Your Text
- Animating Text for Dynamic Projects
- Common Troubleshooting Tips
- Conclusion and Further Resources
How can I add text to a scene in Blender and manipulate it?
To add text to a scene in Blender and manipulate it, follow these steps:
- Open Blender and select the 3D view by clicking on the relevant icon in the top-left corner.
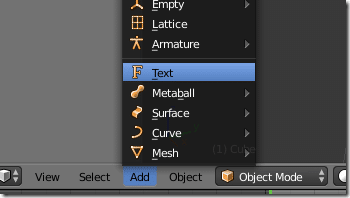
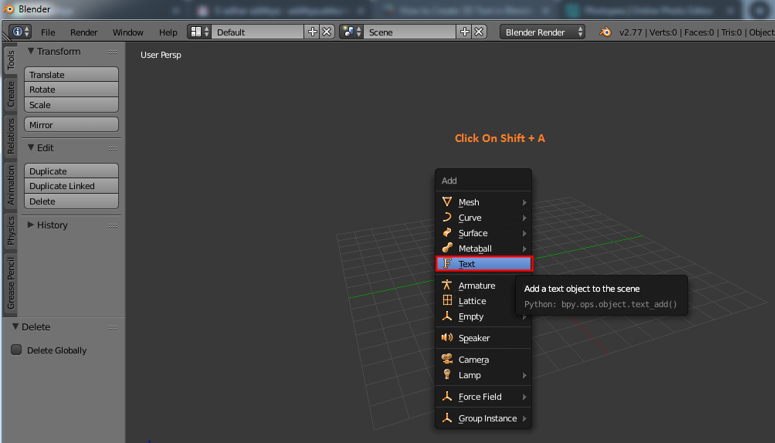
- Press Shift + A to open the Add menu and select Text from the list.
- A text object will appear in the scene. You can edit the text by entering the desired text in the Text panel in the Properties window.
- To manipulate the text, you can use the Move, Rotate, and Scale tools located in the toolbar on the left side of the viewport.
- You can also customize the appearance of the text by modifying the Font, Size, and Alignment options in the Text panel.
- To further manipulate the text, you can convert it to a mesh or curve object by selecting the text object, pressing Alt + C, and choosing Mesh or Curve from the menu.
- Once converted, you can apply materials to the text, adjust its geometry, and make other changes using the tools available in Blender.
READ MORE:
Adding Text to Your Scene
- Delete the default cube by selecting it with the left mouse button and pressing \"X\" to delete.
- To add text, press \"Shift + A\" in the 3D viewport, then select the \"Text\" option to bring a default text object into the scene.
- Alternatively, you can choose \"Add\" from the top menu and select \"Text\" to add a text object to your scene.

Editing Your Text
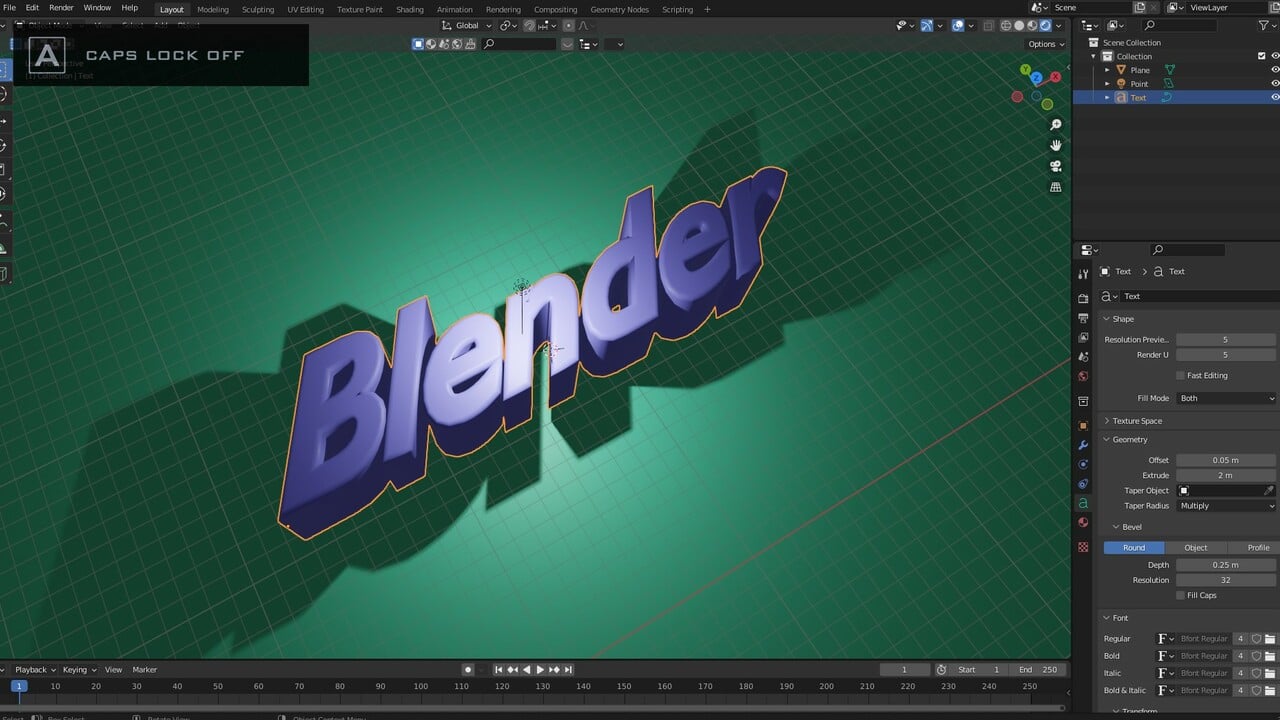
- To edit the text, enter Edit Mode by pressing \"Tab\". You can now type your desired text.
- To change the font, look for the Font settings in the Properties panel under the \"F\" tab.
- Adjust the Extrude setting under the Geometry tab to give your text depth.
- For smoother edges, increase the Bevel Depth and Resolution in the Geometry settings.

Customizing Text Appearance
- To change the text\"s font, navigate to the Font section in the Properties panel and select your desired font.
- Modify the Extrude and Bevel settings to add depth and smoothness to your text.
- Use the Resolution setting under the Geometry tab to control the smoothness of the bevel, but note that very high values may not significantly enhance the result.

Advanced Text Effects
Blender allows for an endless variation of text effects and animations. You can explore different modifications to create unique and visually appealing text for your projects.
_HOOK_
Conclusion
With these steps, you can easily add and customize text in your Blender projects, whether for 3D modeling, animation, or other creative endeavors. Experiment with different settings and effects to achieve the desired look for your text.

Editing Your Text
- To edit the text, enter Edit Mode by pressing \"Tab\". You can now type your desired text.
- To change the font, look for the Font settings in the Properties panel under the \"F\" tab.
- Adjust the Extrude setting under the Geometry tab to give your text depth.
- For smoother edges, increase the Bevel Depth and Resolution in the Geometry settings.

Customizing Text Appearance
- To change the text\"s font, navigate to the Font section in the Properties panel and select your desired font.
- Modify the Extrude and Bevel settings to add depth and smoothness to your text.
- Use the Resolution setting under the Geometry tab to control the smoothness of the bevel, but note that very high values may not significantly enhance the result.

Advanced Text Effects
Blender allows for an endless variation of text effects and animations. You can explore different modifications to create unique and visually appealing text for your projects.
Conclusion
With these steps, you can easily add and customize text in your Blender projects, whether for 3D modeling, animation, or other creative endeavors. Experiment with different settings and effects to achieve the desired look for your text.

_HOOK_
Customizing Text Appearance
- To change the text\"s font, navigate to the Font section in the Properties panel and select your desired font.
- Modify the Extrude and Bevel settings to add depth and smoothness to your text.
- Use the Resolution setting under the Geometry tab to control the smoothness of the bevel, but note that very high values may not significantly enhance the result.
Advanced Text Effects
Blender allows for an endless variation of text effects and animations. You can explore different modifications to create unique and visually appealing text for your projects.
How to Use Text in Blender Tutorial
Placement: Watch this exciting video showcasing the importance of strategic placement in achieving success. Learn how proper placement can make all the difference in reaching your goals and maximizing your potential. Creation: Dive into the world of creativity and inspiration with this captivating video on the art of creation. Explore the power of imagination and innovation as you witness the beauty that arises from the act of creating something new.
How to Make a 3D Text in Blender 3.5
Click the link to access my paid courses 🔗 https://nicholaspena.tentary.com/
Conclusion
With these steps, you can easily add and customize text in your Blender projects, whether for 3D modeling, animation, or other creative endeavors. Experiment with different settings and effects to achieve the desired look for your text.
Advanced Text Effects
Blender allows for an endless variation of text effects and animations. You can explore different modifications to create unique and visually appealing text for your projects.
Conclusion
With these steps, you can easily add and customize text in your Blender projects, whether for 3D modeling, animation, or other creative endeavors. Experiment with different settings and effects to achieve the desired look for your text.
_HOOK_
Conclusion
With these steps, you can easily add and customize text in your Blender projects, whether for 3D modeling, animation, or other creative endeavors. Experiment with different settings and effects to achieve the desired look for your text.
Introduction to Adding Text in Blender
Blender, a powerful free and open-source 3D creation suite, offers extensive features for creating detailed and dynamic 3D models, animations, and visual effects. Among its many capabilities, adding and customizing 3D text stands out as a fundamental skill for designers, animators, and 3D artists. This section will guide you through the basics of adding text in Blender, providing a solid foundation for your 3D projects.
- Starting with Blender: Understanding the interface and preparing your workspace for adding text.
- Adding Text: A step-by-step process to introduce text objects into your scene.
- Editing Text: How to enter edit mode, allowing you to type or modify your text directly in the viewport.
- Font Selection: Tips for choosing the right font from Blender\"s vast library or importing custom fonts for a unique touch.
- Text Properties: An overview of the text properties panel where you can adjust size, alignment, and other attributes to fine-tune your text.
- 3D Text Features: Enhancing your text by exploring extrusion, beveling, and converting text to mesh for more complex edits.
By following these steps, you\"ll be well on your way to incorporating dynamic text into your Blender projects, whether for artistic, commercial, or educational purposes. The ability to add and manipulate text opens up countless creative avenues, from titling and branding to creating entire scenes centered around typography.
Step-by-Step Guide to Adding Text
Adding text in Blender is a simple yet powerful way to enhance your 3D projects. Whether you\"re creating logos, titles, or integrating text into your 3D scenes, follow these steps to get started:
- Prepare Your Scene: Open Blender and start with a new project. Remove any default objects if necessary by selecting them and pressing \"X\" to delete.
- Add Text: Press \"Shift + A\" to open the Add menu in the 3D viewport, then select \"Text\" to add a 3D text object to your scene. Initially, it will display the word \"Text\".
- Edit Your Text: With the text object selected, press \"Tab\" to enter Edit Mode, allowing you to type or modify the text. Use the text box to input your desired words or phrases.
- Customize Font and Style: In the Properties panel, under the Font settings, you can change the font type, size, and style. Blender supports importing custom fonts, offering endless creative possibilities.
- Adjust Text Properties: Explore the Geometry tab within the Font settings to extrude your text, adding depth, and adjust the bevel to create rounded edges for a more three-dimensional look.
- Position Your Text: Use the Transform tools to position, rotate, and scale your text within the scene, ensuring it fits perfectly with your 3D model or environment.
This step-by-step guide provides a foundation for adding and customizing text in Blender. Experiment with different settings and effects to create unique and engaging 3D text for your projects.
Editing Text Properties for Customization
Customizing text in Blender goes beyond simply changing its content. The real power lies in adjusting its properties to perfectly fit your creative vision. This section delves into the key text properties you can edit to customize your text for any project.
- Extrusion: Give your text depth by increasing the \"Extrude\" value under the Geometry tab in the Text properties panel. This makes your text pop out as a 3D object.
- Bevel: Soften the edges of your text by adjusting the \"Bevel Depth\" and \"Resolution\". This adds a smooth, rounded effect to the edges, enhancing the text\"s 3D appearance.
- Font Selection: Blender allows you to choose from a variety of fonts or import your own to give your text a unique style. Access the Font tab in the Text properties panel to select or import a font.
- Text Alignment: Align your text to fit your scene or design needs. You can adjust the alignment settings under the Paragraph tab, choosing from left, center, right, or justify.
- Spacing: Modify letter and word spacing to achieve the desired text density and readability. These adjustments are found under the Character and Word spacing options in the Paragraph tab.
- Material and Color: Apply materials and colors to your text to match the aesthetic of your project. This is done in the Material properties tab, where you can select or create a new material for your text.
By mastering these customization options, you\"ll be able to create text that not only adds informational value to your projects but also contributes to the overall aesthetic, making your creations more engaging and visually appealing.
Advanced Text Effects and Animations
Blender\"s capabilities extend far beyond basic text creation, offering a plethora of advanced text effects and animations that can truly bring your projects to life. Here\"s how to leverage Blender\"s tools to create stunning text animations and effects:
- Text Animation: Animate your text by keyframing the location, rotation, and scale properties. Access the Timeline, select your frame, press \"I\" and choose the property to animate. Create dynamic movements across frames for engaging animations.
- Shape Keys for Text Morphing: Use shape keys to smoothly transition your text between different states. This is perfect for creating complex animations where text morphs from one shape to another.
- Particles and Physics: Incorporate particle systems or physics simulations with your text for unique effects. This can include having text disintegrate, form from particles, or interact with other objects dynamically.
- Text as Mesh: Convert your text to a mesh for more advanced editing and effects. This allows for deformations, sculpting, and detailed modifications not possible with the default text object.
- Using Modifiers: Apply modifiers to text objects for effects like bending, twisting, or applying wave motions. This can add a creative flair to titles or emphasize certain parts of your animation.
- Material and Lighting Effects: Enhance your text with advanced material settings and lighting to create atmospheric effects, such as neon glow, reflective surfaces, or translucent materials.
Exploring these advanced techniques will open up new possibilities in your 3D projects, allowing you to create more intricate and visually appealing text effects and animations in Blender.
_HOOK_
Changing Fonts and Text Appearance
Blender provides extensive options for changing the appearance of text, allowing for a high degree of customization. Here are steps and tips to help you modify fonts and the overall look of your text to better suit your project\"s aesthetic:
- Selecting Fonts: Access the Font properties in the right-side Properties panel. Here, you can change the font by clicking on the folder icon next to the font name to browse and select a new font file from your computer.
- Font Size: Adjust the size of your text for the appropriate scale in your scene directly from the Font properties panel.
- Style Adjustments: Utilize the style options to make your text bold, italic, or underlined, providing emphasis or distinction where needed.
- Character Spacing: Modify character spacing to control the distance between letters, improving readability or achieving a specific visual effect.
- Word and Line Spacing: Adjust word and line spacing to affect how tightly or loosely grouped your words and lines are, which can significantly impact the layout of your text within the scene.
- Alignment: Set the alignment of your text (left, center, right, or justified) in the Paragraph tab, allowing you to fit text neatly into different parts of your scene or design.
- Materials and Colors: Change the color and material of your text in the Material properties tab to match your scene\"s color scheme or to make your text stand out.
By exploring these options, you can dramatically alter the appearance of your text, making it blend seamlessly with your project or stand out as a focal point. Whether you\"re aiming for subtle elegance or bold flair, Blender\"s text customization tools have you covered.
Adding Depth and Dimension to Your Text
One of the key features that sets 3D text apart in Blender is the ability to add depth and dimension, transforming flat text into something that truly stands out. Follow these steps to give your text body and presence in your scene:
- Extruding Your Text: Select your text object and navigate to the Geometry tab in the Text properties panel. Increase the \"Extrude\" value to add depth to your text, making it pop out from the background.
- Adjusting Bevel: To soften the edges of your extruded text and add sophistication, adjust the \"Bevel Depth\". Experiment with different values to see how it affects the appearance of your text.
- Bevel Resolution: For even smoother edges, modify the \"Bevel Resolution\". A higher resolution will make the bevel appear more refined but be mindful of the performance impact on your project.
- Text Depth and Complexity: Combining extrusion and bevel adjustments allows for complex text shapes and forms. This is particularly useful for logos, titles, and any project where text is a focal point.
By mastering these techniques, you can elevate the visual impact of your text in Blender, making it an integral part of your 3D designs and animations.
Animating Text for Dynamic Projects
Animating text in Blender adds a dynamic layer to your visual projects, making them more engaging and interactive. Whether for intros, explainer videos, or digital art, animated text can significantly enhance your work. Here’s how to bring your text to life:
- Basic Animation Principles: Start by learning the basics of animation in Blender, including keyframing and the animation timeline.
- Keyframe Animation: Select your text object, and in the Properties panel, insert keyframes for the properties you wish to animate (such as location, rotation, scale) at different points on your timeline to create movement.
- Text Effects: Utilize Blender’s physics and particle systems to add effects to your text, such as making it appear or disappear in creative ways.
- Shape Keys for Morphing: Use shape keys to smoothly transition your text from one form to another, adding a complex animation effect with minimal effort.
- Using Modifiers: Apply modifiers like Wave, Build, or Displace to animate your text in unique ways without manually keyframing each change.
- Material and Light Animation: Animate materials and lighting to change the color, texture, or brightness of your text over time, adding depth to your animation.
By following these steps and exploring Blender’s vast animation tools, you can create captivating text animations that elevate your projects from static to extraordinary.
Common Troubleshooting Tips
Working with text in Blender can sometimes present challenges. Here are some common issues and their solutions to help you overcome obstacles and keep your project moving forward:
- Text Not Appearing: If your text isn\"t showing up, check to ensure you\"re in Object Mode when adding it. Also, zoom out or reposition the view to make sure it\"s not placed off-screen.
- Editing Issues: Can\"t edit your text? Make sure you\"ve selected the text object and pressed \"Tab\" to enter Edit Mode. This is where you can modify the text content.
- Font Problems: If a font isn\"t displaying correctly, verify the font file\"s compatibility with Blender or try importing a different font. Ensure the font path is correctly linked in the Font properties.
- Extrusion and Bevel Not Working: Ensure you\"re adjusting the correct properties under the Geometry tab in the Text properties panel. Incorrect values or mixing up settings can lead to unexpected results.
- Text Orientation: If your text is facing the wrong direction, use the rotation tools in Object Mode to adjust its orientation.
- Materials and Colors Not Applying: Make sure you\"ve selected the text object and properly assigned a material under the Materials tab. Incorrect assignment can lead to the text not displaying the intended colors or materials.
These tips address the most common issues encountered when adding and customizing text in Blender. With patience and practice, you\"ll be able to solve most problems and achieve the desired outcome for your text-based projects.
READ MORE:
Conclusion and Further Resources
Adding and animating text in Blender provides a vast array of possibilities for enhancing your 3D projects. From creating simple titles to integrating complex text animations into your scenes, the flexibility and power of Blender\"s text tools are unparalleled. By following the guidelines and tips provided, you can start to unlock the creative potential of 3D text in your work.
For those looking to dive deeper into Blender\"s capabilities, consider exploring:
- Official Blender Tutorials and Documentation for in-depth learning.
- Online forums and communities such as Blender Artists and Reddit\"s r/blender for support and inspiration.
- Advanced tutorials on YouTube and Blender-specific learning platforms to master more complex techniques.
Continuously experimenting with Blender\"s text features will not only improve your skills but also open up new avenues for creative expression in your 3D modeling and animation projects.
Unlock the full potential of your 3D projects with Blender\"s text tools. From dazzling animations to intricate designs, mastering text in Blender opens a world of creative possibilities. Start exploring today and transform your ideas into reality.
_HOOK_