Topic how to apply textures in blender: Discover the art of texturing in Blender and elevate your 3D models with ease. This guide will walk you through applying textures step-by-step, unlocking endless creativity in your digital creations.
Table of Content
- Initial Setup
- Unwrapping and Mapping Textures
- Adjusting the Texture Display
- Conclusion
- Unwrapping and Mapping Textures
- Adjusting the Texture Display
- How can I add textures to objects in Blender?
- Conclusion
- YOUTUBE: Add A Texture to An Object Blender Tutorial
- Adjusting the Texture Display
- Conclusion
- Conclusion
- Introduction to Texturing in Blender
- Preparing Your Model for Texturing
- Understanding Blender\"s Material and Texture Workflow
- Importing and Applying Image Textures
- UV Mapping and Texture Unwrapping Techniques
- Adjusting Textures in the Shader Editor
- View Modes for Texture Previewing
- Advanced Texturing Techniques: Bump and Normal Mapping
- Optimizing Textures for Performance
- Common Texturing Pitfalls and How to Avoid Them
- Resources for Free Textures and Learning Materials
- Conclusion: Next Steps in Blender Texturing
Initial Setup
Start by preparing your Blender scene. Remove unnecessary items and add a new mesh, such as a cube, which will serve as your texture\"s canvas. Ensure you\"re in a workspace that allows for texture viewing, like the Material Preview mode, which offers a more accurate representation of how textures will look on your model.
Creating and Assigning Materials
- Materials are essential for texturing; they act as a bridge between the 3D model and its textures. If your object lacks a material, create a new one in the Material tab and assign it to your object.
- Rename the material for easy identification.
Importing Image Textures
To apply an image as a texture, navigate to the Base Color option in the Materials tab and select Image Texture. Import your desired image file here. This step is pivotal for the texture to appear on your model in Blender.

READ MORE:
Unwrapping and Mapping Textures
For textures to accurately fit your model, unwrapping your object is a crucial step. It translates the 3D surface into a 2D map, allowing the texture to cover the model correctly. Use UV Editing for simple unwrapping or Smart UV Project for more complex models.

Adjusting the Texture Display
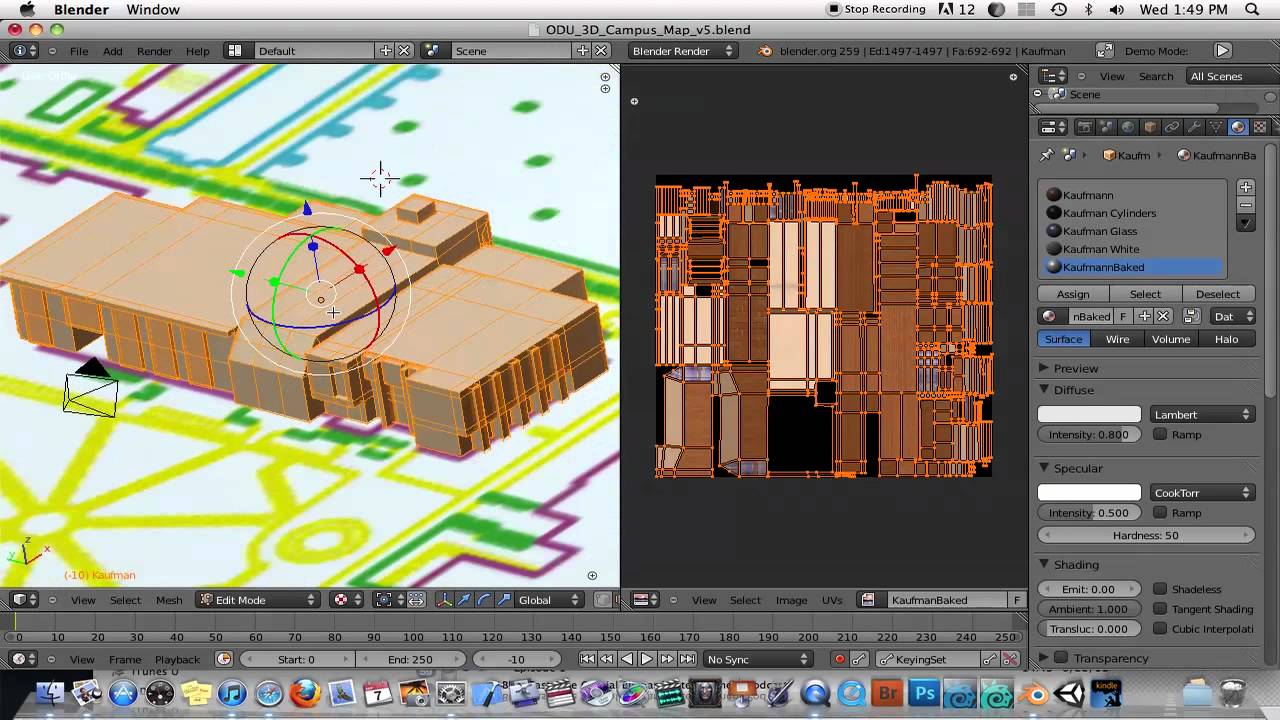
Adjust how textures are displayed on your model by switching between different view modes, like Material Preview and Rendered. These modes help visualize how textures and materials interact with lighting and other scene elements in Blender.
Finalizing Texture Application
Once the texture is applied, you might need to adjust its positioning or scale. Use the UV Editor for fine-tuning the texture\"s placement. Additionally, the Shader Editor allows for more advanced adjustments, like adding and configuring mapping nodes to achieve the desired effect.
Conclusion
Applying textures in Blender is a skill that significantly enhances the visual appeal of your projects. By following these steps, you can create detailed and immersive 3D models for any purpose. Experiment with different textures, materials, and mapping techniques to discover the full potential of your creative vision in Blender.

Unwrapping and Mapping Textures
For textures to accurately fit your model, unwrapping your object is a crucial step. It translates the 3D surface into a 2D map, allowing the texture to cover the model correctly. Use UV Editing for simple unwrapping or Smart UV Project for more complex models.

_HOOK_
Adjusting the Texture Display
Adjust how textures are displayed on your model by switching between different view modes, like Material Preview and Rendered. These modes help visualize how textures and materials interact with lighting and other scene elements in Blender.
Finalizing Texture Application
Once the texture is applied, you might need to adjust its positioning or scale. Use the UV Editor for fine-tuning the texture\"s placement. Additionally, the Shader Editor allows for more advanced adjustments, like adding and configuring mapping nodes to achieve the desired effect.

How can I add textures to objects in Blender?
To add textures to objects in Blender, follow these steps:
- Open Blender and select the object you want to apply the texture to.
- Switch to the \"Shading\" workspace or go to the \"Shader Editor\" in the \"Layout\" workspace.
- Click on the \"New\" button in the \"Shader Editor\" to create a new material.
- Click on the \"Principled BSDF\" node and press Shift + A to add a \"Texture\" node.
- Choose the type of texture you want to add (Image Texture, Noise Texture, etc.) and connect it to the \"Base Color\" or other input of the \"Principled BSDF\" node.
- If you\'re using an Image Texture, click on the \"Open\" button in the node properties to load your texture image.
- You can adjust the scale, rotation, and other properties of the texture node to customize how the texture appears on the object.
- Preview the texture by switching to the \"Material Preview\" or \"Rendered\" view.
- Once you are satisfied with the texture placement and appearance, you can further tweak the material settings to achieve the desired look.
- Remember to save your Blender project to keep the textures linked to your objects.
Conclusion
Applying textures in Blender is a skill that significantly enhances the visual appeal of your projects. By following these steps, you can create detailed and immersive 3D models for any purpose. Experiment with different textures, materials, and mapping techniques to discover the full potential of your creative vision in Blender.
Add A Texture to An Object Blender Tutorial
Texture: Explore the mesmerizing world of textures in our video as we delve into the intricate details and diverse forms that add depth and dimension to various objects and surfaces. Witness the magic of texture come to life! Blender: Step into the realm of creativity and innovation with our video showcasing the endless possibilities of Blender. From 3D modeling to animation, unlock the power of this versatile tool and be inspired to create your own masterpiece.
How to add a texture in Blender 3.3.1 Blender Tutorial Beginner
Welcome, are you interested in adding a texture in blender 3.3.1? In this tutorial I will be demonstrating how to add this simple ...
Adjusting the Texture Display
Adjust how textures are displayed on your model by switching between different view modes, like Material Preview and Rendered. These modes help visualize how textures and materials interact with lighting and other scene elements in Blender.
Finalizing Texture Application
Once the texture is applied, you might need to adjust its positioning or scale. Use the UV Editor for fine-tuning the texture\"s placement. Additionally, the Shader Editor allows for more advanced adjustments, like adding and configuring mapping nodes to achieve the desired effect.

Conclusion
Applying textures in Blender is a skill that significantly enhances the visual appeal of your projects. By following these steps, you can create detailed and immersive 3D models for any purpose. Experiment with different textures, materials, and mapping techniques to discover the full potential of your creative vision in Blender.

_HOOK_
Conclusion
Applying textures in Blender is a skill that significantly enhances the visual appeal of your projects. By following these steps, you can create detailed and immersive 3D models for any purpose. Experiment with different textures, materials, and mapping techniques to discover the full potential of your creative vision in Blender.

Introduction to Texturing in Blender
Texturing in Blender opens up a world of creativity and realism for your 3D models. It is a critical skill for anyone looking to enhance the visual quality of their projects. Whether you\"re aiming for photorealism or stylized graphics, Blender\"s comprehensive texturing tools and workflows can help you achieve your desired results. This section will introduce you to the fundamentals of applying textures in Blender, guiding you through the initial steps to get started.
- Understanding Materials: Before applying textures, you need to create or assign a material to your object. Materials serve as the foundation for textures, determining how they interact with light and the environment.
- Image Textures: Learn how to import and apply image textures to your materials to add color, detail, and realism to your models.
- UV Mapping: Discover the importance of UV mapping in texturing. UV maps tell Blender how to wrap a 2D image texture around your 3D model, ensuring that textures are displayed correctly.
- Shader Editor: The Shader Editor is a powerful tool for adjusting textures and creating complex material effects. You\"ll learn how to use nodes to control textures, color, transparency, and more.
- Previewing Textures: Blender offers various view modes for previewing textures as you work. This ensures that you can see the effects of your texturing efforts in real-time, allowing for immediate adjustments.
By the end of this section, you\"ll have a solid understanding of the basics of texturing in Blender, setting the stage for more advanced techniques and creative exploration.
Preparing Your Model for Texturing
Preparing your model for texturing in Blender is a crucial step towards achieving a realistic or stylized look for your 3D projects. This process involves several key steps, ensuring your textures apply correctly and look their best. From optimizing your image for UV mapping to understanding the fundamentals of UV maps and texture application, each phase is designed to enhance the final appearance of your model.
- Start by importing your image into Blender and preparing it for UV mapping. This may involve editing the image to ensure it fits your model\"s surface appropriately, considering factors like resolution and image format.
- Unwrap your model to create a UV map. This step is critical for mapping your 2D image texture onto the 3D model accurately. Blender offers various unwrapping methods to suit different model complexities and texturing needs.
- Edit your UV map in the UV/Image Editor, where you can adjust the positioning, scale, and rotation of UV islands to match your texture image. Efficient UV layout is essential to avoid texture stretching and ensure a seamless appearance.
- Apply your texture by connecting an Image Texture node in the Shader Editor to your material, adjusting the texture preview in different view modes to ensure it aligns perfectly with your model.
- Address common UV mapping issues such as texture stretching, overlapping UVs, and visible seams. Techniques like average islands scale adjustment, UV island separation, and strategic seam placement can help resolve these problems.
By following these steps, you can prepare your Blender model for texturing effectively, setting a solid foundation for applying and adjusting textures to achieve the desired outcome in your 3D projects.
Understanding Blender\"s Material and Texture Workflow
Blender\"s material and texture workflow is integral to achieving realistic or stylized looks for 3D models. This process involves mapping textures to an object\"s surface and defining the material properties that dictate how those textures interact with light.
- Creating a Material: Start by assigning a new material to your object. This material acts as a base for your texture, allowing for color, reflectivity, and more to be adjusted.
- UV Mapping: UV mapping is essential for applying 2D textures to 3D objects. It involves unwrapping the object to create a flat projection, which can then be painted over or have images applied.
- Importing Textures: Import your desired texture into Blender. This can be done by dragging and dropping an image file into the Shader Editor or by manually adding it through the editor\"s menu.
- Adjusting the Texture: Connect your texture to the material using the Shader Editor. You\"ll likely link it to the Base Color input of the Principled BSDF node for starters.
- Texture Mapping Types: Explore different mapping types like Box, Generated, or Object coordinates for procedural textures or UV mapping for image textures.
- Previewing Textures: Utilize Blender\"s Material Preview and Rendered View modes to see how your textures look in different lighting and environments.
Each step allows for extensive customization, from the texture\"s appearance on the model to how it interacts with light and shadow, enabling artists to create highly detailed and realistic or stylized 3D artwork.
Importing and Applying Image Textures
Applying textures in Blender involves a series of steps to ensure that your model not only receives a texture but also displays it accurately and realistically. This guide will walk you through importing and applying image textures, adjusting their properties, and optimizing their appearance for rendering.
Preparing Your Model
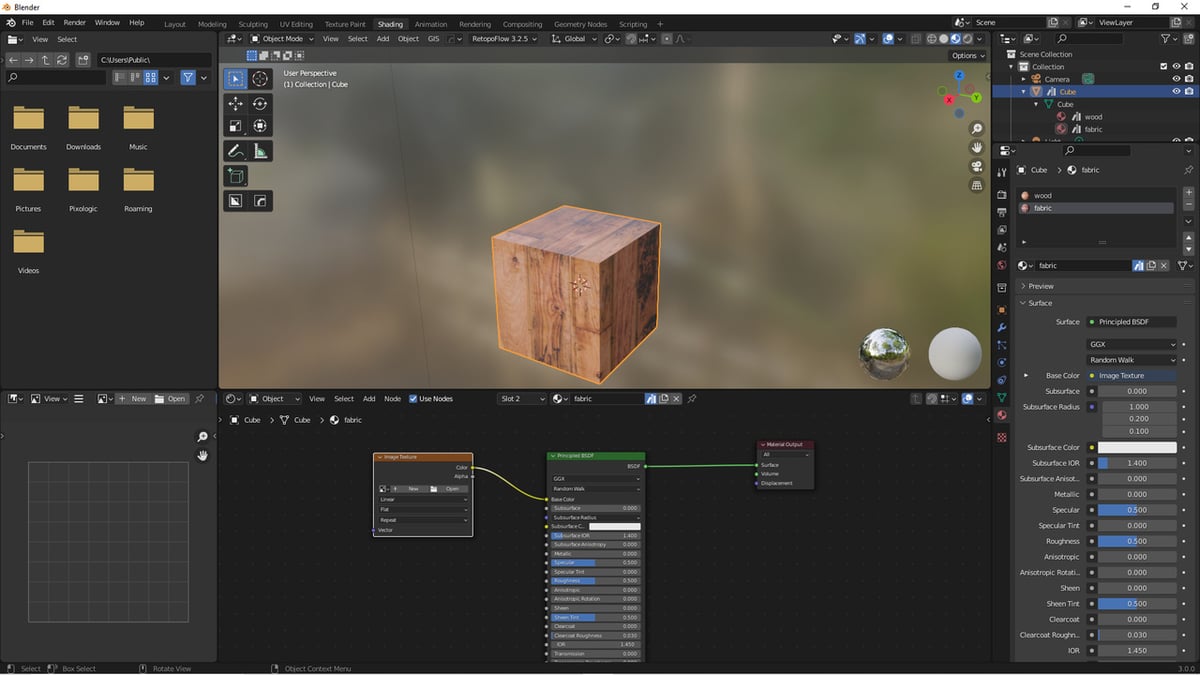
Before applying any textures, make sure your model is ready. This includes deleting unnecessary objects from your scene and adding a new cube mesh as a starting point. Open the Material tab in the Properties window and create a new material, naming it appropriately.
Switching View Modes
To see the texture effects on your model, switch from the \"Solid\" viewport shading to \"Material Preview\". This change is crucial for visualizing how textures affect your model\"s appearance.
Applying Base Color and Image Textures
The Base Color property in the material settings should be set to white to ensure the texture\"s colors are not influenced by the material\"s color. Next, add an Image Texture by selecting the yellow dot next to the \"Base Color\" option and choosing \"Image Texture\". Load your texture file to apply it to the model.
Importing Textures
Import your texture images into Blender by either dragging and dropping them into the shader editor or by manually adding an Image Texture node and browsing for your image. Connect the Image Texture node\"s color output to the \"Base Color\" input of the Principled BSDF node to apply the texture to your model.
Adjusting Texture Properties
To properly scale and align your textures, use the Texture Coordinate and Mapping nodes. Adjusting the scale and rotation values in the Mapping node ensures that the texture fits your model correctly. Remember to connect the Mapping node to all relevant Image Texture nodes.
Viewing and Rendering
You can view textures in either Material or Rendered view modes. Material view offers a consistent look regardless of the rendering engine, while Rendered view provides a more accurate representation of how textures will appear in the final render. Use the view modes in the top right corner of the 3D viewport to switch between different previews.
Resources for Textures
- ambientCG: Offers a wide variety of free textures, perfect for Blender projects.
- Poliigon: Provides professionally crafted texture maps, with both free and subscription-based access.
- Textures.com: A great source for high-quality PBR texture maps, offering a credit-based access system.
- Free PBR: Focuses on high-quality, free textures, ideal for those looking to download multiple textures quickly.
By following these steps and utilizing these resources, you can effectively apply textures to your models in Blender, enhancing their realism and detail.
_HOOK_
UV Mapping and Texture Unwrapping Techniques
UV Mapping and texture unwrapping in Blender are essential skills for applying textures accurately to your 3D models. This section will guide you through the process of UV mapping, from understanding seams to using various unwrapping methods and optimizing your UV layout.
Understanding Seams in Blender
Seams define where the mesh will be split when unwrapped into a 2D UV map. They are marked by selecting edges in edit mode and using the \"Mark Seam\" option. Proper seam placement is crucial for minimizing texture stretching and creating an efficient UV layout.
Unwrapping Methods
- Unwrap: Utilizes marked seams to unfold the mesh into a UV map, aiming to minimize stretching.
- Smart UV Project: Ideal for hard-surface models, this method automatically unwraps the mesh based on angle thresholds.
- Lightmap Pack: Creates a UV map optimized for light mapping, spacing UV islands evenly.
- Project from View: Unwraps the mesh based on the current view in the 3D viewport, useful for specific projection needs.
Adjusting UV Islands
After unwrapping, you might need to adjust the scale and arrangement of UV islands. The \"Average Island Scale\" and \"Pack Islands\" operators are tools that help normalize island scale and efficiently pack them within the UV space, ensuring optimal texture utilization.
Tips for Efficient UV Mapping
- Unwrap your model in stages, selecting and unwrapping parts of the mesh separately to utilize the most appropriate unwrapping method for each section.
- Consider alternative mapping methods like box mapping for simpler geometries, which can save time and effort in certain situations.
- Use add-ons like UV Squares and UV Packmaster Pro to align and pack your UV islands efficiently, maximizing texture detail.
- Export your UV layout for use in texture creation, allowing for precise alignment of textures to your model\"s geometry.
Optimizing Your UV Layout
Once your UV map is created, use the UV editor to scale, rotate, and translate UV islands to better fit the texture space. This can involve aligning edges, ensuring even distribution of texture detail, and avoiding texture stretching or distortion.
Understanding and applying these UV mapping and unwrapping techniques in Blender will significantly enhance the quality and realism of your textures, leading to more visually appealing 3D models.
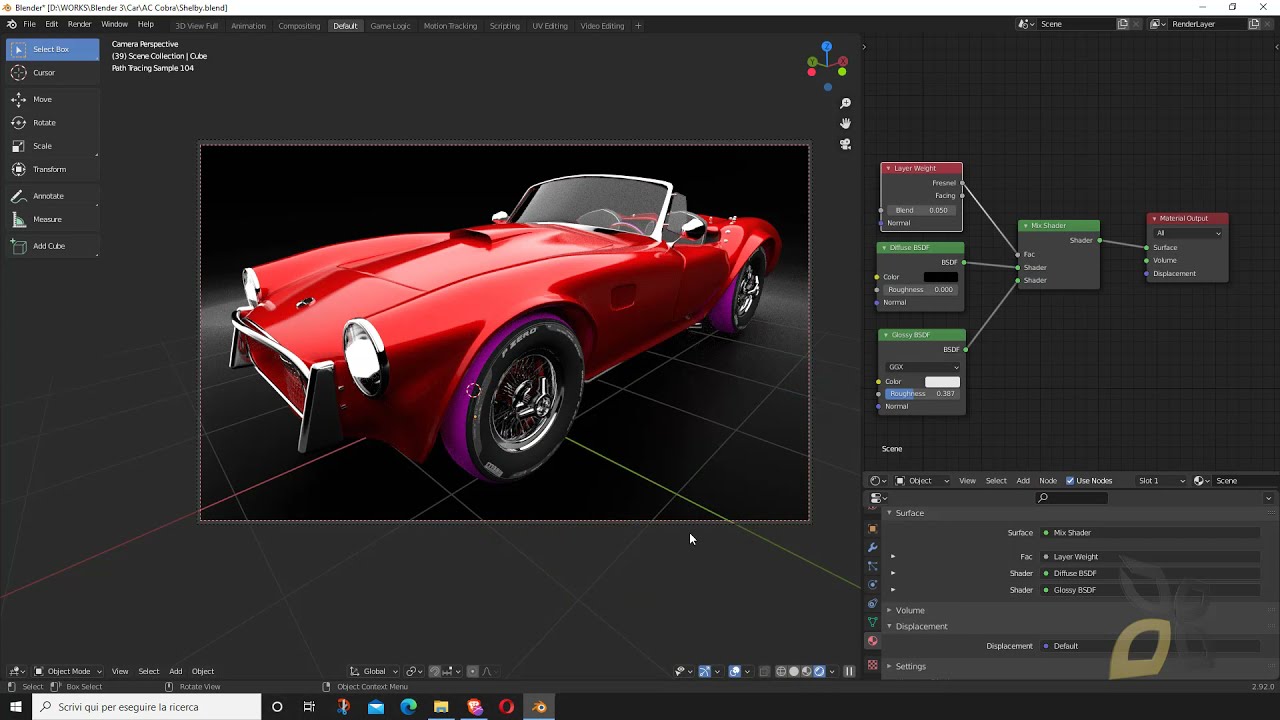
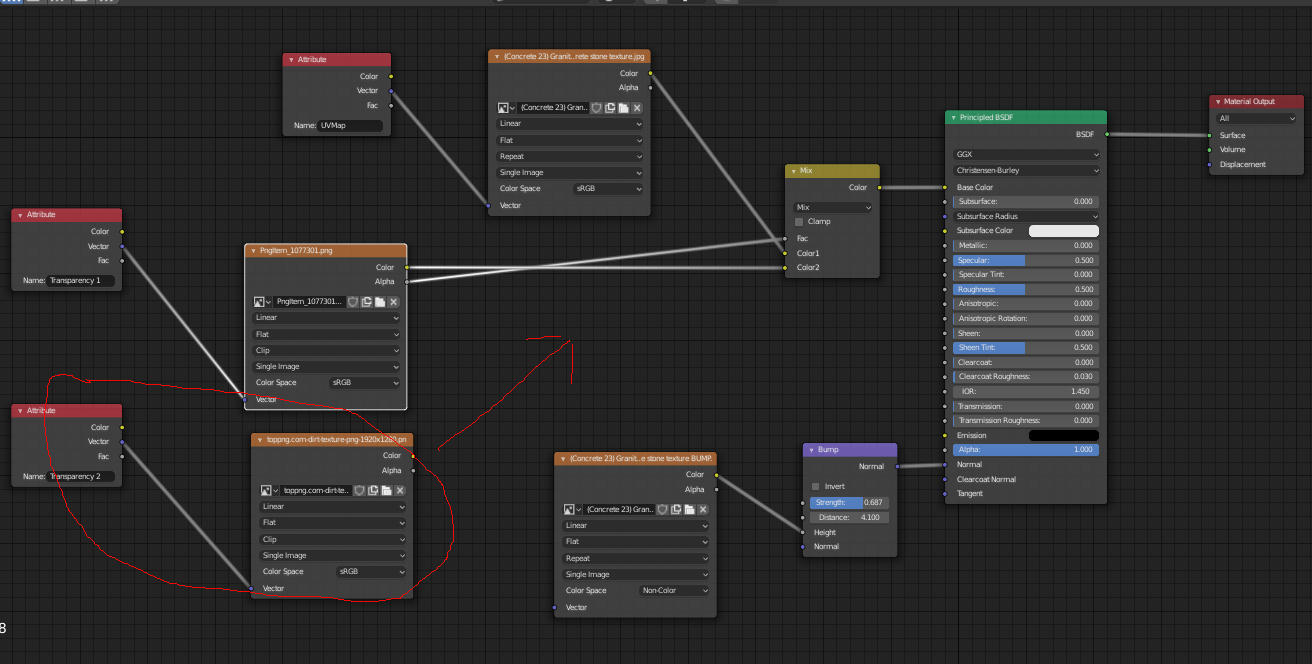
Adjusting Textures in the Shader Editor
Adjusting textures in Blender\"s Shader Editor involves using various nodes to manipulate texture properties such as scale, rotation, and mapping. The Shader Editor provides a visual interface for connecting nodes, allowing for complex material creation and texture adjustments.
Scaling Textures
To scale textures, you can use the Mapping Node in conjunction with the Texture Coordinate Node. First, add a Mapping Node and a Texture Coordinate Node, connecting the UV output of the Texture Coordinate Node to the Vector input of the Mapping Node. Then, link the Vector output of the Mapping Node to the Vector input of your Image Texture Node. Adjust the scale values in the Mapping Node to resize your texture without altering the original UV map.
Creating Shader Groups
For reusability and efficiency, you can group nodes into Shader Groups. Select the nodes you wish to group, press Ctrl+G to create a group, and save it for use in other projects. This approach simplifies working with complex shaders and promotes consistency across your work.
Utilizing Pre-made Shaders and Materials
Blender also supports the integration of pre-made shaders and materials, including those from Redshift, with specific compatibility for nodes like BL Color Ramp and BL Vector Curves. To adjust these materials, it\"s recommended to use the Shader Editor, where individual nodes offer additional parameters for fine-tuning.
Applying Glossy Effects and Textures
For adding reflections or glossy effects, use the Glossy BSDF node. Connect it to the Material Output node to apply it to your object. To add textures, use the Image Texture node, selecting your desired image. This setup allows for detailed texture adjustments and is essential for realistic material creation.
Combining Shaders with Mix Shader
To blend different shaders, add a Mix Shader node between your shader nodes and the Material Output. This method enables the combination of textures and effects, such as mixing glossy and diffuse shaders to achieve desired surface properties.
Gradient Textures
For gradient effects, use the ColorRamp and Gradient Texture nodes. Connect these nodes to create smooth transitions between colors. Adjusting the position and scale of gradients can be achieved by adding a Mapping and a UV Map node, allowing for precise control over the gradient\"s appearance.
Through the Shader Editor, Blender offers vast possibilities for texture adjustment, enabling artists to craft detailed and realistic materials for their 3D models.
View Modes for Texture Previewing
Blender offers several view modes for previewing textures on your models, ensuring you can accurately assess and adjust your textures in different lighting and material conditions. Understanding these modes is crucial for effective texture application and visualizing how your models will appear in various environments.
Solid View
The default view mode in Blender is Solid View, which provides a basic visualization of your model without any textures or materials applied. It\"s primarily used for modeling and sculpting, offering a simplified view that\"s fast to render.
Material Preview (Lookdev)
Material Preview, formerly known as Lookdev, is the mode where you can start to see your applied textures. This mode offers a more detailed preview, including lighting and materials, allowing for a closer approximation of how textures will look in the final render. It\"s particularly useful for assessing the appearance of materials and textures without performing a full render.
Rendered View
Rendered View mode provides the most accurate preview of your textures and materials, simulating the final render\"s lighting, shadows, and reflections. This mode utilizes the current rendering engine (Eevee by default) to give a real-time preview of how your model will look once rendered. Switching between workspaces doesn\"t affect your ability to change view modes, enabling you to quickly toggle through different previews as you work.
Texture Editor
For detailed texture editing and application, the Texture Editor in Blender allows you to open and configure textures directly. Here, you can choose texture types, such as Image or Noise, and customize their properties to fit your needs, from adjusting colors and brightness to mapping the textures onto your models more precisely.
Additional Resources
For textures, websites like Poliigon, textures.com, and Free PBR offer a wide variety of high-quality options, from photo-scanned maps to digitally designed textures. These resources can provide the necessary materials to enhance the realism and detail of your models.
Learning about UV mapping and texture unwrapping techniques is also recommended to fully leverage Blender\"s texturing capabilities. This knowledge will allow you to map textures accurately to the complex geometries of your 3D models.
Advanced Texturing Techniques: Bump and Normal Mapping
Bump and normal mapping are advanced texturing techniques used in Blender to add realism to 3D models by simulating the intricacies of surface textures. These methods allow for the creation of complex surfaces without the need for high-polygon models, enhancing the visual depth and detail of textures.
Bump Mapping
Bump mapping involves using grayscale images where each shade of gray represents the height of the texture at that point, creating the illusion of depth and detail on a surface. It modifies the surface normals based on the grayscale values of the bump map, simulating bumps and dents.
- Create or obtain a grayscale bump map image.
- In the Shader Editor, add the bump map image as an Image Texture node.
- Connect this node to a Bump node\"s Height input.
- Finally, connect the Bump node\"s Normal output to the Normal input of the shader (like Principled BSDF) used for your material.
Normal Mapping
Normal mapping is a technique used to fake the lighting of bumps and dents on textures. It provides a more detailed simulation of surface irregularities by using an RGB image to directly alter the surface normals.
- Obtain or create a normal map. Note that Blender uses OpenGL by default, so you may need to invert the green channel for DirectX maps.
- Add the normal map image to your shader setup using an Image Texture node, setting the color space to Non-Color.
- Use a Normal Map node to convert the color data to normal data and connect this to the Normal input of your material\"s shader.
- Adjust the strength of the normal effect using the Normal Map node\"s strength parameter.
Tips for Effective Mapping
- Ensure your 3D model has a proper UV unwrap to accurately map textures.
- For best results, use high-quality, seamless textures to avoid visible seams and tiling issues.
- Combine bump and normal mapping judiciously to balance detail and performance.
Both techniques, when used correctly, can significantly enhance the realism of 3D models by adding surface complexity that reacts dynamically to lighting conditions in Blender.
Optimizing Textures for Performance
Optimizing textures in Blender is crucial for maintaining good performance, especially in complex scenes or when working on lower-end hardware. By following best practices for texture optimization, you can ensure your projects run smoothly without sacrificing visual quality.
Choosing the Right Texture Resolution
The resolution of your textures significantly impacts Blender\"s performance. High-resolution textures can create realistic details but may also slow down your project. It\"s essential to balance quality and performance by selecting a resolution that suits the size and detail level of your object. Consider using lower resolutions for objects that are far away or less important in the scene.
Using Texture Compression
Texture compression can reduce file sizes and improve loading times while maintaining acceptable quality. Blender supports various compressed texture formats that can help optimize performance. Experiment with different compression settings to find the best balance between quality and performance for your project.
Implementing Mipmaps
Mipmaps are smaller, lower-resolution versions of your textures that Blender can use when an object is far away or seen at a lower detail level. By using mipmaps, you can significantly reduce the rendering load without impacting the visual quality of your scene from a distance. Enable mipmapping in Blender\"s texture settings to take advantage of this optimization technique.
Limiting the Number of Textures
Each additional texture you add to a scene increases the memory usage and potentially slows down performance. Where possible, limit the number of unique textures by reusing materials or combining multiple textures into a single image file, using UV mapping techniques to apply different parts of the image to various objects.
Utilizing Baking Techniques
Texture baking can drastically improve performance by pre-calculating complex shading and lighting effects into simpler textures. This method is particularly useful for static objects where dynamic lighting is not required. Baked textures can replace more complex procedural materials or dynamic lighting effects, significantly reducing computational load during rendering.
By following these guidelines, you can optimize textures in Blender for better performance, ensuring your projects run smoothly while still looking great. Remember, the key is to find the right balance between visual quality and performance to suit your specific needs and hardware capabilities.
_HOOK_
Common Texturing Pitfalls and How to Avoid Them
Applying textures in Blender can be a straightforward process, but several common pitfalls can affect the final outcome of your project. Recognizing and avoiding these pitfalls can significantly improve the quality and realism of your textures.
Incorrect UV Mapping
One of the most common issues arises from incorrect UV mapping, leading to textures that appear stretched or misplaced. Ensure your object is properly unwrapped and the UV map accurately represents the surface geometry. Utilize Blender\"s UV editing tools to adjust the map as needed.
Ignoring Texture Resolution
Using textures with inappropriate resolutions can result in pixelation or unnecessarily large file sizes. Choose texture resolutions that balance quality and performance, especially for objects that are seen up close or are a focal point in your scene.
Misusing Texture Types
Blender offers various texture types, such as Image or Noise. Selecting the wrong type for your needs can lead to unrealistic results. Familiarize yourself with the properties of each texture type and select the one that best fits your project requirements.
Overlooking Texture Properties
Each texture in Blender comes with customizable properties like color, brightness, and scale. Overlooking these settings can result in textures that don\"t blend well with your scene. Adjust these properties to ensure your textures contribute to the overall realism of the scene.
Not Optimizing Textures for Rendering
High-quality textures can impact rendering times and performance. Optimize your textures by considering compression, using mipmaps for distant objects, and baking textures when possible to reduce computational load during rendering.
Forgetting to Set Texture Coordinates
A common mistake is forgetting to set the texture coordinates to UV after unwrapping an object. This step is crucial for applying the texture correctly to the object. Always double-check the Texture Properties tab to ensure the Coordinates option is set to UV.
By being mindful of these common texturing pitfalls and applying best practices, you can enhance the visual quality of your Blender projects while ensuring efficient workflow and performance.
Resources for Free Textures and Learning Materials
Finding high-quality textures and learning materials for Blender can significantly enhance your 3D modeling projects. Below are recommended resources that provide free textures and educational content to help you master texturing in Blender.
Free Texture Websites
- Poliigon: Offers a wide range of photo-scanned and digitally created textures. Poliigon is the brainchild of Blender Guru, Andrew Price, and provides both free and premium textures. Visit Poliigon for more details.
- Textures.com: A leading website for downloading PBR texture maps, offering a variety of high-quality textures. Signing up grants you access to free credits daily, with options for premium subscriptions. Check out Textures.com for a vast texture library.
- Free PBR: Dedicated to providing high-quality, free PBR textures. The site offers a straightforward way to download textures, and you can even purchase the entire library for a nominal fee for faster access. Visit Free PBR for more information.
Learning Materials and Guides
Understanding the technicalities of texturing and UV mapping is crucial for effectively applying textures. Here are some guides and tutorials to get you started:
- Artisticrender.com provides a comprehensive guide on adding textures, covering everything from box mapping to material configuration. It’s an excellent resource for beginners to get acquainted with the basics of texturing in Blender.
- GameDev Academy offers an insightful tutorial on applying textures in Blender. It walks you through the process from creating a new material to exporting your textured model for game engines.
- CG Bookcase focuses on using PBR textures in Blender, offering detailed instructions on applying various maps like normal, roughness, and metallic maps to achieve realistic materials.
- Blender Base Camp emphasizes the importance of using albedo maps and adjusting texture resolutions to ensure your textures are seamless and optimized for your projects.
These resources are invaluable for both novice and experienced Blender users, providing the tools and knowledge needed to create visually stunning and realistic models.
READ MORE:
Conclusion: Next Steps in Blender Texturing
Mastering texturing in Blender opens up vast possibilities for enhancing the realism and visual appeal of your 3D models. Whether you\"re a beginner or looking to refine your skills, there\"s always room to explore and learn in the world of texturing. Here are some next steps to consider in your texturing journey:
Experiment with Advanced Mapping Techniques
Dive deeper into box mapping, tri-planar projection, and explore how generated and object coordinates can affect the appearance of your textures. Each method offers unique advantages for different scenarios and object types.
Utilize PBR Textures
Physically Based Rendering (PBR) textures provide a more accurate representation of how materials interact with light. Experiment with various PBR maps like normal, roughness, and metallic to achieve more realistic results.
Master UV Unwrapping and Editing
UV mapping is critical for accurately applying textures to your models. Practice creating efficient UV layouts that minimize stretching and maximize texture detail.
Explore Procedural Texturing
Blender\"s procedural textures offer endless possibilities for creating complex materials without the need for image textures. Learn to manipulate nodes in the Shader Editor to generate unique textures dynamically.
Practice with Real-world Projects
Apply your texturing skills to real-world projects to understand the challenges and solutions in various contexts. This practice will help solidify your knowledge and inspire creative solutions.
Stay Updated with Blender\"s Latest Features
Blender is continuously updated with new features and improvements. Stay informed about the latest developments in texturing tools and techniques by following Blender\"s official channels and community forums.
Texturing in Blender is a skill that combines creativity with technical knowledge. By exploring the resources mentioned, practicing regularly, and engaging with the Blender community, you can enhance your texturing skills and bring your 3D models to life with stunning detail and realism.
Embark on a journey to elevate your 3D models in Blender with our comprehensive guide on applying textures. Unlock the secrets to realism, depth, and stunning visual appeal, ensuring your creations stand out in the digital world.