Topic adding textures in blender: Unlock the full potential of your 3D models by adding textures in Blender, transforming them into lifelike masterpieces with depth and realism that captivate any audience.
Table of Content
- Basic Steps for Adding Textures
- Advanced Texture Mapping
- Creating Realistic Materials
- Tips for Better Texturing
- Resources for Textures
- Advanced Texture Mapping
- Creating Realistic Materials
- What is the process for adding textures in Blender?
- Tips for Better Texturing
- YOUTUBE: How to Add a Texture in Blender 3.3.1 Beginner
- Resources for Textures
- Creating Realistic Materials
- Tips for Better Texturing
- Resources for Textures
- Tips for Better Texturing
- Resources for Textures
- Resources for Textures
- Introduction to Texture Mapping in Blender
- Step-by-Step Process for Adding Basic Textures
- Understanding UV Mapping for Texture Application
- Advanced Techniques for Realistic Texturing
- Utilizing Blender\"s Node Editor for Complex Materials
- Best Practices and Tips for Effective Texturing
- Recommended Resources for Free and High-Quality Textures
- Common Issues and Solutions in Texture Mapping
- Case Studies: Real-World Examples of Texture Application
- Conclusion: Maximizing Impact with Textures in Your Projects
Basic Steps for Adding Textures
- Create a new material for your object by selecting it and navigating to the Materials tab.
- Add a texture by clicking on the New button in the Texture tab, next to the Materials tab.
- Select your texture type and upload the image or movie you want to use as a texture.

READ MORE:
Advanced Texture Mapping
For more control over how textures are applied, Blender offers advanced mapping options:
- UV Mapping: Manually adjust the way textures wrap around your model for precise alignment.
- Projection Mapping: Use various projection modes like Flat, Cube, or Sphere to project textures onto the object.
Creating Realistic Materials
Blender\"s node-based material system allows for the creation of complex and realistic materials. Combine different textures using Mix Shader nodes to achieve effects such as wear and tear or varying surface properties.
Texture Mixing Techniques
- Use a Principled BSDF node as a base for material creation.
- Mix textures with the Mix Shader node, using factors like Fresnel or Layer Weight for realism.

Tips for Better Texturing
- Always start with high-quality texture images to avoid blurriness or pixelation.
- Experiment with different blending modes and opacity levels to create unique effects.
- Use Blender\"s painting tools to manually adjust textures or add details directly on the model.
Resources for Textures
Find free high-quality textures from online libraries such as AmbientCG, CGBookcase, and TextureNinja. These sites offer a wide range of textures suitable for various modeling projects.
_HOOK_
Advanced Texture Mapping
For more control over how textures are applied, Blender offers advanced mapping options:
- UV Mapping: Manually adjust the way textures wrap around your model for precise alignment.
- Projection Mapping: Use various projection modes like Flat, Cube, or Sphere to project textures onto the object.
Creating Realistic Materials
Blender\"s node-based material system allows for the creation of complex and realistic materials. Combine different textures using Mix Shader nodes to achieve effects such as wear and tear or varying surface properties.
Texture Mixing Techniques
- Use a Principled BSDF node as a base for material creation.
- Mix textures with the Mix Shader node, using factors like Fresnel or Layer Weight for realism.

What is the process for adding textures in Blender?
To add textures in Blender, you can follow these steps:
- Open Blender and select the object you want to add a texture to.
- Go to the \"Shader Editor\" by clicking on the \"Shader Editor\" tab at the top of the screen.
- Click on the \"Add\" button on the header or use the shortcut \"Shift + A\" to add a new node.
- Hover over \"Texture\" in the menu that appears and select the type of texture you want to add (e.g., Image Texture, Noise Texture, etc.).
- Connect the texture node to the appropriate input on the Shader node (e.g., Base Color, Normal, Roughness).
- Open the texture properties by clicking on the texture node and adjusting the settings as needed (e.g., selecting an image, adjusting scale).
- Repeat the process to add more textures or adjust existing ones to achieve the desired look.
- Make sure to switch to the \"Material Preview\" or \"Rendered\" view to see how the textures are applied to your object.
Tips for Better Texturing
- Always start with high-quality texture images to avoid blurriness or pixelation.
- Experiment with different blending modes and opacity levels to create unique effects.
- Use Blender\"s painting tools to manually adjust textures or add details directly on the model.
How to Add a Texture in Blender 3.3.1 Beginner
Tutorial: Join us in this engaging and informative tutorial video where you\'ll learn valuable skills and insider tips on how to master a new craft or technique. Get ready to be inspired and create something amazing! Import: Dive into the world of imports with our insightful video that showcases the process of bringing in unique goods from around the globe. Discover the exciting journey of how products make their way to your doorstep.
Import Textures to Your Scene in Blender
In today\'s tutorial, I will be showing you how to download, import and apply textures to your meshes or objects in Blender 2.9.
Resources for Textures
Find free high-quality textures from online libraries such as AmbientCG, CGBookcase, and TextureNinja. These sites offer a wide range of textures suitable for various modeling projects.
_HOOK_
Creating Realistic Materials
Blender\"s node-based material system allows for the creation of complex and realistic materials. Combine different textures using Mix Shader nodes to achieve effects such as wear and tear or varying surface properties.
Texture Mixing Techniques
- Use a Principled BSDF node as a base for material creation.
- Mix textures with the Mix Shader node, using factors like Fresnel or Layer Weight for realism.
Tips for Better Texturing
- Always start with high-quality texture images to avoid blurriness or pixelation.
- Experiment with different blending modes and opacity levels to create unique effects.
- Use Blender\"s painting tools to manually adjust textures or add details directly on the model.
Resources for Textures
Find free high-quality textures from online libraries such as AmbientCG, CGBookcase, and TextureNinja. These sites offer a wide range of textures suitable for various modeling projects.
_HOOK_
Resources for Textures
Find free high-quality textures from online libraries such as AmbientCG, CGBookcase, and TextureNinja. These sites offer a wide range of textures suitable for various modeling projects.
Introduction to Texture Mapping in Blender
Texture mapping in Blender is a transformative process that elevates the visual realism of 3D models by applying images or patterns to their surfaces. This fundamental technique enables artists to create intricate details and lifelike textures on models, ranging from simple objects to complex environments.
- Start by selecting your object and assigning it a new material in the Materials tab.
- Proceed to the Texture tab to add a new texture, choosing from various types such as Image or Movie, and select your desired image.
- Utilize Blender\"s powerful UV mapping tools to accurately map the texture onto your object, ensuring it wraps around the model precisely for a realistic effect.
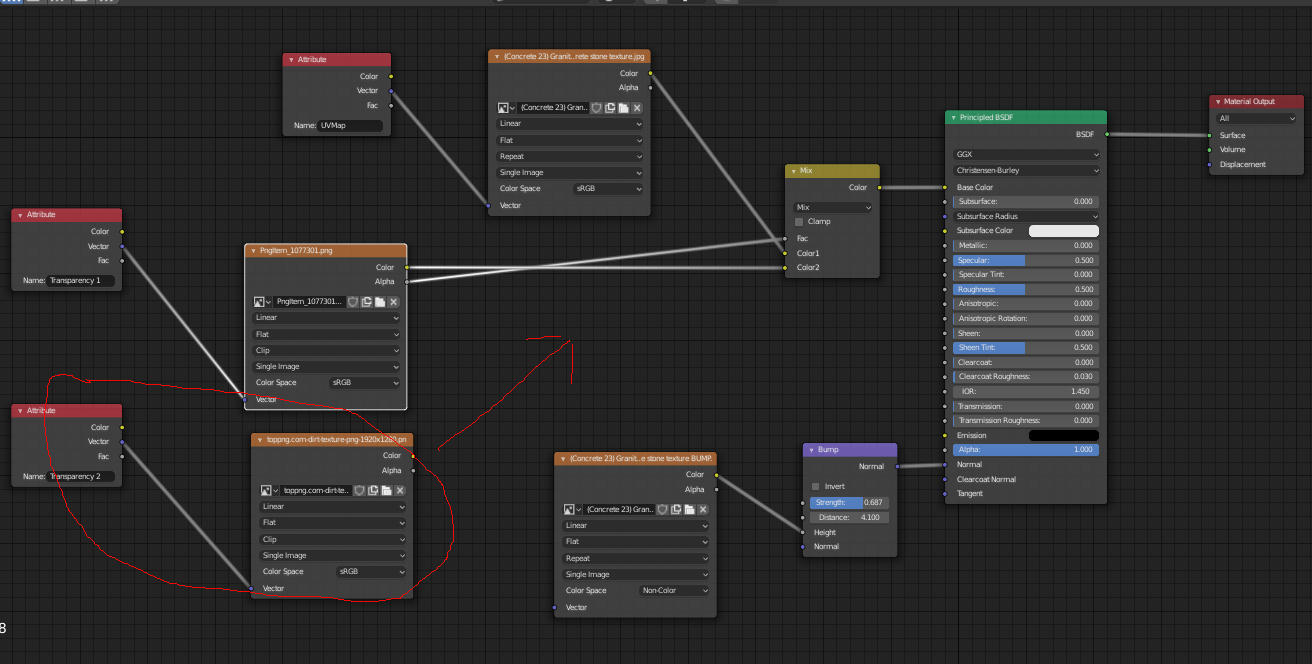
Advanced texture mapping techniques involve using Blender\"s node editor for more complex material creation, allowing for the blending of multiple textures, adjusting transparency, and adding special effects like bump mapping for enhanced surface detail.
- UV Mapping: Essential for aligning textures on complex shapes.
- Shader Nodes: Combine different textures and effects using Blender\"s node-based material system.
- Texture Painting: Directly paint textures onto your 3D models for unique customizations.
Texture mapping in Blender is not just about applying images; it\"s about breathing life into your 3D creations, making them more dynamic, realistic, and engaging for any project.
Step-by-Step Process for Adding Basic Textures
Adding textures to your Blender models is a straightforward process that can significantly enhance the realism and visual appeal of your projects. Follow these steps to apply basic textures:
- Select Your Object: Begin by selecting the object you wish to texture in your scene.
- Create a New Material: In the Materials tab, click the plus icon to add a new material to your selected object.
- Add a Texture: Switch to the Texture tab, then click \"New\" to create a new texture. Choose the type of texture you want, such as Image or Movie, and upload your texture file.
- Adjust Mapping Settings: To ensure the texture aligns correctly on your object, adjust the mapping settings. UV mapping is the most common method for precise texture placement.
- Tweak Texture Settings: Modify the texture’s properties such as scale, rotation, and influence to get the desired effect on your material.
- Preview Your Texture: Use the rendered view in Blender to preview how your texture looks on the model. Make any necessary adjustments to achieve the perfect look.
With these steps, you can add basic textures to any object in Blender, giving it more depth and detail. Experiment with different textures and settings to discover the vast possibilities of texturing in Blender.
Understanding UV Mapping for Texture Application
UV Mapping in Blender is a critical technique for accurately applying textures to 3D models. It involves unfolding a model\"s surface into a 2D image to ensure textures wrap around the 3D object correctly. Key components include marking seams to guide how the model is unwrapped, selecting unwrapping methods that Blender offers, such as Smart UV Project or Unwrap for different needs, and understanding how to manage UV maps for multiple objects. Seams are essential for minimizing texture stretching by indicating where the mesh should be split during unwrapping.
- Mark seams on your model to define the edges where the unwrap should split the mesh.
- Choose an unwrapping method based on your project\"s needs, with Unwrap being the most common for utilizing seams.
- Adjust unwrap settings, such as fill holes and margin, to optimize texture distribution and avoid overlap.
Proper UV mapping ensures that textures look realistic and are free from stretching or distortion, enhancing the overall quality of the 3D model.
Advanced Techniques for Realistic Texturing
Mastering realistic texturing in Blender involves a blend of technical skills and creative vision. By diving into advanced techniques, you can push the boundaries of realism and detail in your 3D models.
- Node-Based Material and Texture Effects: Utilize Blender\"s Node Editor for layering textures and adjustments. Start by adding a new material and exploring the Shading Workspace to build complex texture networks.
- Projection Methods and Texture Mapping: Experiment with different projection methods to minimize texture stretching. Techniques like spherical and cubic projection are vital for matching textures to your model\"s geometry.
- Seamless Texture Blending: Achieve seamless blends by aligning textures closely and using subdivision surfaces to smooth out transitions. Utilize Blender\"s clone brush tool for direct painting and blending modes for subtle transitions.
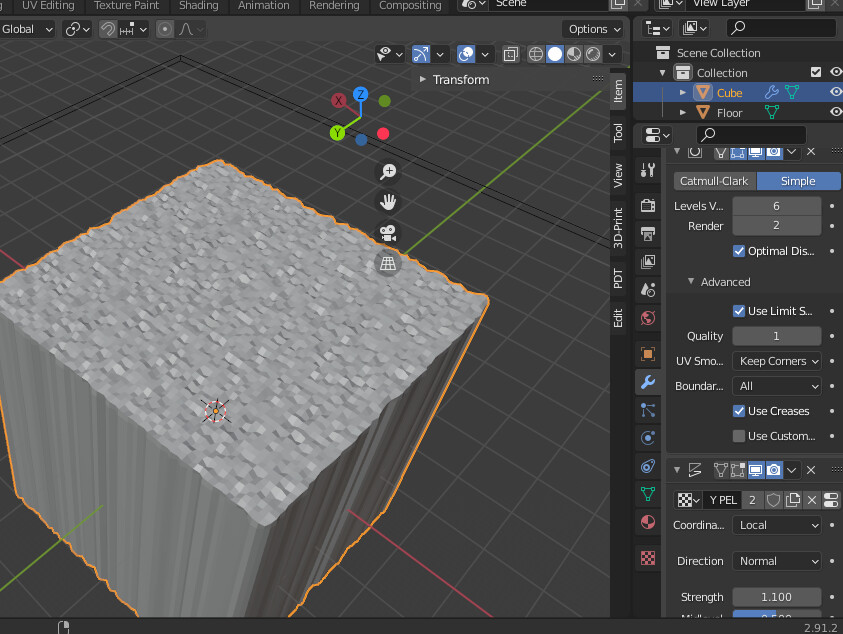
- Displacement Maps for Added Detail: Use displacement maps to add depth and detail, simulating realistic surface features like scales or fabric weaves. Manipulate grayscale images in the Shader Editor for precise control.
- Layered Material Techniques: Combine noise textures, image textures, and procedural textures for realistic surface details. Techniques like using a Texture Coordinate node are essential for controlling texture mapping on the object\"s surface.
- Texture Painting and Customization: Leverage texture painting for direct model surface detailing. Utilize brushes and masks in Texture Paint mode to add depth and realism to textures.
- Lighting and Rendering for Realism: Adjust lighting and rendering settings to enhance material realism. Experiment with area lights, spotlights, and HDR environment maps to achieve the desired effect.
By integrating these advanced techniques, you can create materials that accurately simulate real-world surfaces, adding unparalleled depth and realism to your Blender projects.
_HOOK_
Utilizing Blender\"s Node Editor for Complex Materials
Blender\"s Node Editor is a powerful tool for creating intricate and realistic materials. This section will guide you through the process of using the Node Editor to enhance your 3D models with complex materials.
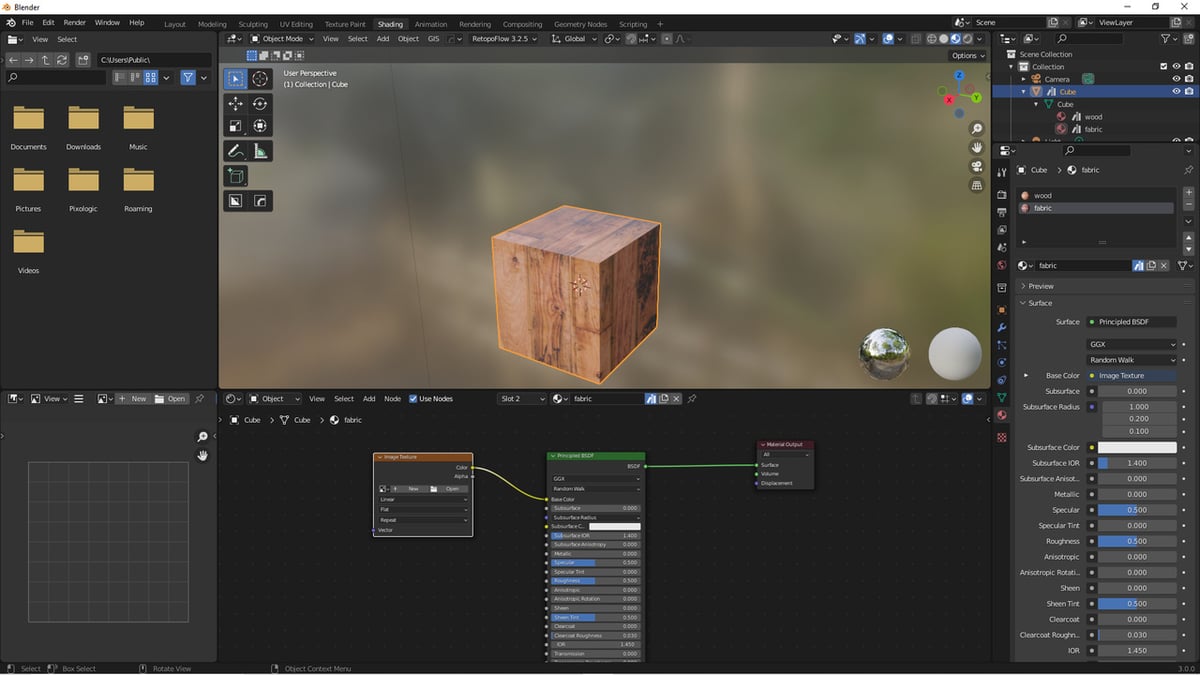
- Access the Node Editor: Open the Shader Editor from the workspace switcher. This is where you can create and manage your material nodes.
- Create a New Material: If your object doesn’t have a material, add one by selecting the object, going to the Material Properties tab, and clicking \"New\".
- Explore Nodes: Use the \"Shift + A\" shortcut to add nodes. Start with a Principled BSDF node, which is a versatile shader for creating a wide range of materials.
- Adjust Material Properties: Connect texture nodes (e.g., Image Texture) to the Principled BSDF node to define the material\"s appearance. Adjust settings like Base Color, Roughness, and Metallic to achieve the desired look.
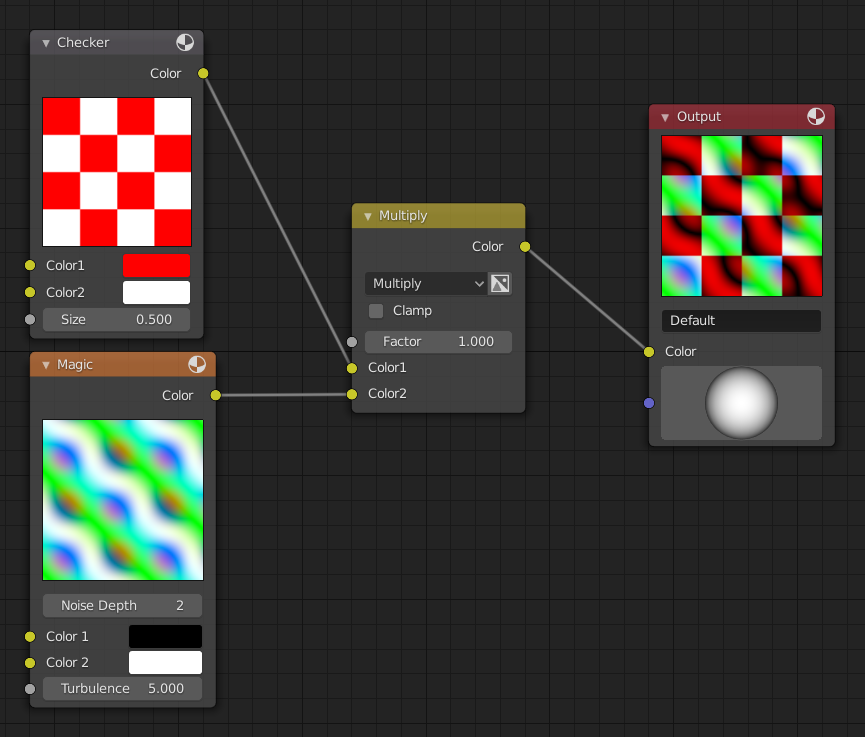
- Utilize Textures: For more detail, add textures to your material. Use nodes like Image Texture for bitmap textures or Noise Texture for procedural textures.
- Combine Nodes: For advanced effects, combine different nodes using Mix Shader or Add Shader nodes. This allows for layering and blending of materials.
- Preview Your Material: Use the rendered viewport shading mode to preview how your material looks in a lit environment.
Experimenting with the Node Editor can unlock endless possibilities for material creation. From subtle surfaces to complex, layered materials, mastering the Node Editor is essential for any Blender artist looking to push the boundaries of their creative work.
- Tip: Organize your nodes by grouping them (Ctrl + G) and using frame nodes (Ctrl + J) to keep your workspace tidy.
- Advanced Technique: Explore vector displacement and bump mapping for even more detailed textures.
With practice, the Node Editor becomes an indispensable tool for achieving realistic and complex materials in Blender, enhancing the visual appeal of your 3D projects.
Best Practices and Tips for Effective Texturing
To achieve effective texturing in Blender, a combination of techniques and understanding of the software\"s capabilities is essential. Here are some consolidated best practices and tips:
- Understand different mapping techniques like box mapping for tri-planar projection and use generated or object coordinates for procedural textures.
- Ensure your model has a UV map and a material assigned to it for texturing.
- Use the Shader Editor for importing image textures by drag-and-drop or through the add menu for a more controlled setup.
- Connect your textures correctly in the Node Editor, especially the image texture node to the Principled BSDF\"s base color input for visible effects.
- For procedural textures, experiment with noise, Musgrave, and Voronoi textures, and control their placement with texture coordinate nodes.
These practices leverage Blender\"s powerful texturing capabilities for creating visually compelling 3D models.
Recommended Resources for Free and High-Quality Textures
Finding the right textures for your 3D projects in Blender can significantly impact the realism and quality of your work. Below are some highly recommended resources offering free and high-quality textures that cater to a wide range of needs, from architectural visualization to game development.
- Poly Haven: Offers HDRIs, textures, and models all under a CC0 license, ensuring you can use them for any purpose without restrictions. Known for its high-quality, photoscanned seamless PBR materials at least 8k resolution.
- ambientCG: Provides a vast collection of over 1700 free PBR materials, all available under the Creative Commons CC0 Public Domain License, making them suitable for commercial use without any restrictions. Materials are available in up to 8K resolution and include accurate displacement maps.
- cgbookcase.com: Offers PBR textures with all the map types needed to create photorealistic materials, completely free and without restrictions. The site is managed by Dorian Zgraggen, who aims to make 3D rendering more accessible by providing these resources.
- FreePBR.com: Features a library of over 500 free PBR textures and counting, catering to a wide variety of categories such as cloth & fabric, metals, rocks & stones, and more. These 2K texture maps can be utilized across various 3D, Game Design, and CAD solutions.
These resources are invaluable for 3D artists looking to elevate their work without the constraints of licensing or cost. They provide a wealth of options for enhancing your projects with textures that range from the ultra-realistic to the stylized.
Common Issues and Solutions in Texture Mapping
Texture mapping in Blender can sometimes present challenges, but many common issues have straightforward solutions. Here are some of the most frequently encountered problems and how to address them:
- UV Maps Not Displaying: Ensure all vertices, edges, or faces are selected in the 3D viewport. Enable \"Show Overlays\" in the UV Editor and make sure an image is actively linked in the UV Editor.
- Image Texture Not Visible in UV Editor: The image texture must be manually selected in the UV Editor, even if it\"s already linked to your material shaders.
- UV Editor Background is White: This could be due to many overlapping faces. You can adjust the UV opacity in the overlay menu or repack your UVs to reduce overlap.
- Incorrect Proportions Between Faces and UV Map: Before unwrapping, apply the scale of your object in object mode with Ctrl+A. Incorrect proportions often result from non-uniform scaling.
- UV Map Overlapping: Use UV map packing or select individual UV islands for manual adjustment. Overlapping UVs can be problematic, especially when baking textures.
- Texture Appears as a String of Colors: This issue indicates stretched UVs. Select the affected faces, and re-unwrap them to correct the mapping.
- Straightening UVs: For curved surfaces like cylinders that require straightened UVs, utilize the \"Follow Active Quad\" method after straightening one quad to align the rest.
- Scaling and Stretching Textures: Adjust the scale of textures by manipulating the UV map scale or using the Mapping node in the shader editor for more precise control.
Understanding the basics of procedural texturing and the various types of texture mapping Blender offers, such as UV, Generated, Object, and Camera Mapping, is essential for troubleshooting and effectively applying textures.
By familiarizing yourself with these common issues and their solutions, you can streamline your texturing workflow and achieve better results in your Blender projects.
Case Studies: Real-World Examples of Texture Application
Exploring photorealistic renders in Blender reveals the immense potential of texture application in achieving lifelike visuals. Examples include detailed snowflakes mimicking real snow, lush green woods that challenge the boundaries between digital and reality, and interiors so meticulously crafted they could be mistaken for photographs. These case studies demonstrate not only the technical prowess required but also the artistic vision to utilize textures in a way that breathes life into 3D models, making them indistinguishable from the real world.
_HOOK_
READ MORE:
Conclusion: Maximizing Impact with Textures in Your Projects
Textures enrich 3D models with realism and depth, transforming them from mere shapes into lifelike representations. The key to maximizing impact with textures in Blender projects lies in understanding the tools at your disposal, from UV mapping to procedural texturing, and applying them creatively to mimic the complexities of the real world. By leveraging high-quality textures, experimenting with layering, and fine-tuning settings, artists can create compelling visuals that engage and inspire. Remember, the best textures not only look good but also tell a story and enhance the overall narrative of your project.
Unlock the full potential of your 3D projects by mastering the art of adding textures in Blender, enhancing realism and creativity. Dive into our comprehensive guide to transform your visions into breathtaking realities.