Topic blender rigging: Discover the art of Blender rigging, from basics to advanced techniques, through this comprehensive guide. Learn how to bring your characters to life with step-by-step instructions, expert tips, and insights into future trends.
Table of Content
- Key Features of Blender Rigging
- Getting Started with Rigging in Blender
- Resources for Learning Blender Rigging
- Getting Started with Rigging in Blender
- Resources for Learning Blender Rigging
- How can I improve my rigging skills in Blender?
- Resources for Learning Blender Rigging
- YOUTUBE: Rigging a Character in Blender in 5 Minutes
- Introduction to Blender Rigging
- Understanding the Basics of Rigging
- Advanced Rigging Techniques in Blender
- Tools and Add-ons for Efficient Rigging
- Step-by-Step Guide to Rigging Your First Character
- Tips and Best Practices for Successful Rigging
- Common Rigging Problems and How to Solve Them
- Case Studies: Real-World Examples of Blender Rigging
- Future Trends in Rigging with Blender
- Future Trends in Rigging with Blender
Key Features of Blender Rigging
- Envelope, skeleton, and automatic skinning for flexible rig setups.
- Easy weight painting for precise control over mesh deformation.
- Mirror functionality to expedite the rigging process of symmetrical models.
- Bone layers and colored groups for organized rig management.
- B-spline interpolated bones for smoother deformations.
- Comprehensive constraint system to control object properties dynamically.

READ MORE:
Getting Started with Rigging in Blender
Rigging is not just for animation but also crucial for simulations. It involves creating a bone structure for a model, which can be manipulated to animate the model. The rigging process in Blender allows for intricate control, enabling animators to bring their characters to life with realistic movements.
Beginner\"s Guide to Rigging
- Understanding the basics of rigging and the importance of a well-constructed skeleton.
- Step-by-step tutorials on creating your first rig, focusing on simple characters.
- Advanced techniques for more complex rigs, including facial rigging and muscle simulation.
Resources for Learning Blender Rigging
Blender provides various resources for learning rigging, from official tutorials to community-driven content. Engaging with these resources can significantly enhance your rigging skills.
Recommended Tutorials and Courses
- Blender\"s official rigging intro series, covering fundamentals to advanced concepts.
- Online courses focused on Blender rigging, offering structured learning paths from basic to advanced animation techniques.
- Community forums and YouTube tutorials, where experienced users share their rigging workflows and tips.
By exploring these rigging features and resources, users can effectively animate their 3D models in Blender, creating dynamic and engaging animations.

Getting Started with Rigging in Blender
Rigging is not just for animation but also crucial for simulations. It involves creating a bone structure for a model, which can be manipulated to animate the model. The rigging process in Blender allows for intricate control, enabling animators to bring their characters to life with realistic movements.
Beginner\"s Guide to Rigging
- Understanding the basics of rigging and the importance of a well-constructed skeleton.
- Step-by-step tutorials on creating your first rig, focusing on simple characters.
- Advanced techniques for more complex rigs, including facial rigging and muscle simulation.

Resources for Learning Blender Rigging
Blender provides various resources for learning rigging, from official tutorials to community-driven content. Engaging with these resources can significantly enhance your rigging skills.
Recommended Tutorials and Courses
- Blender\"s official rigging intro series, covering fundamentals to advanced concepts.
- Online courses focused on Blender rigging, offering structured learning paths from basic to advanced animation techniques.
- Community forums and YouTube tutorials, where experienced users share their rigging workflows and tips.
By exploring these rigging features and resources, users can effectively animate their 3D models in Blender, creating dynamic and engaging animations.
_HOOK_
How can I improve my rigging skills in Blender?
To improve your rigging skills in Blender, you can follow these steps:
- Study Tutorials: Start by watching tutorials on rigging in Blender. There are plenty of resources available online that can help you understand the basics and advanced techniques.
- Practice Regularly: The more you practice rigging in Blender, the better you will get at it. Work on simple rigs first and gradually move on to more complex ones.
- Experiment: Don\'t be afraid to experiment with different rigging techniques and tools in Blender. Sometimes, the best way to learn is through trial and error.
- Join Blender Communities: Join online forums, groups, or communities where Blender users share their rigging experiences and tips. This can help you stay updated on the latest trends in rigging.
- Take Courses: Consider taking online courses or workshops specifically focused on rigging in Blender. Structured learning can help you grasp concepts more effectively.
Resources for Learning Blender Rigging
Blender provides various resources for learning rigging, from official tutorials to community-driven content. Engaging with these resources can significantly enhance your rigging skills.
Recommended Tutorials and Courses
- Blender\"s official rigging intro series, covering fundamentals to advanced concepts.
- Online courses focused on Blender rigging, offering structured learning paths from basic to advanced animation techniques.
- Community forums and YouTube tutorials, where experienced users share their rigging workflows and tips.
By exploring these rigging features and resources, users can effectively animate their 3D models in Blender, creating dynamic and engaging animations.

Rigging a Character in Blender in 5 Minutes
Character: Dive into a world where vibrant characters come to life, each with their own unique traits and personalities. Watch as they navigate through captivating storylines that will keep you hooked till the end. Workflow: Explore the seamless and efficient workflow of professionals as they tackle complex tasks with ease and precision. Witness the innovative methods and tools they use to streamline processes and boost productivity.
My New Rigging Workflow Tutorial in Blender
In this tutorial we\'ll be rigging two different things! One is a six legged creature, and the other is a hand. We\'ll be using Inverse ...
Introduction to Blender Rigging
Rigging in Blender is a foundational skill for animators, allowing the creation of a flexible framework for characters and objects. This process involves setting up a skeleton, or armature, that moves parts of a model. Blender\"s rich toolset supports this with features like envelope, skeleton, and automatic skinning; easy weight painting; mirror functionality; bone layers and colored groups; and B-spline interpolated bones. Mastering rigging is essential for animating characters in a natural and realistic manner.
Starting with rigging requires preparing your model correctly. Ensuring normals face the right direction and combining models into a single mesh are preliminary steps. Adjusting the model\"s position in the scene for symmetry expedites the rigging process. Creating an armature, the skeleton for your 3D model, is the first step in the rigging process. This involves adding bones and setting up a hierarchy to control the model\"s movements effectively.
Understanding the fundamentals of rigging is crucial. It encompasses the creation of controls and deformation structures to animate 3D models. Beginners are guided through basics such as bone creation, parenting, space, armature modifiers, and bone constraints. Addressing common rigging problems and mastering weight painting are key skills to ensure your animations move as intended.
For those new to Blender or looking to refine their rigging skills, comprehensive guides and courses offer step-by-step instructions. They cover everything from simple rig setups to advanced techniques, helping users to create fully usable rigs based on different underlying techniques. Through hands-on practice, animators can learn to rig anything from humanoid characters to complex non-human shapes, laying a strong foundation for all future animation projects.
Understanding the Basics of Rigging
Rigging in Blender is a crucial step in bringing 3D models to life, allowing for realistic animations by creating a skeleton that the mesh can move with. This process involves several key steps, starting from preparing the model for rigging, to creating the armature (skeleton), and then binding the mesh to the armature with weight painting for smooth deformations.
Before starting the rigging process, it is essential to ensure the model is ready. This includes checking the normals of the model to ensure they are facing the correct direction and positioning the model correctly within the scene. Preparing the model involves combining all parts into a single mesh and ensuring the normals are recalculated to face outward.
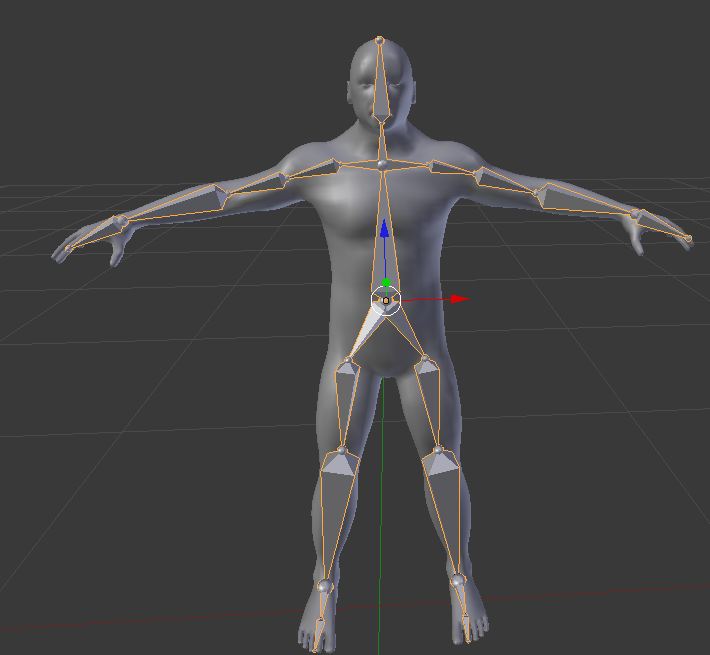
The actual rigging process begins with the creation of an armature. An armature is essentially a skeleton made up of bones that will drive the movement of the model. The initial step involves adding a central root bone, which serves as the main structure from which other bones will branch out to form the skeletal structure necessary for animating the model. This structure includes bones for the torso, limbs, and possibly fingers and toes, depending on the level of detail required.
After the armature is created, it is crucial to position it correctly within the model and enable X-ray mode to ensure all bones are correctly placed inside the mesh. The bones are then connected to form a hierarchical structure that mimics the natural movement of the body or object being rigged.
Once the armature is in place, the next step is to bind the mesh to the armature. This is typically done through a process called weight painting, which defines how different parts of the mesh are influenced by the movement of individual bones. After the mesh and armature are properly linked, the model is ready for animation, allowing for realistic movements based on the rig.
Rigging can be a complex process, but understanding the basics lays the foundation for creating dynamic and lifelike animations in Blender. It involves not only technical skills in setting up bones and weight painting but also an artistic understanding of how to achieve natural movements.
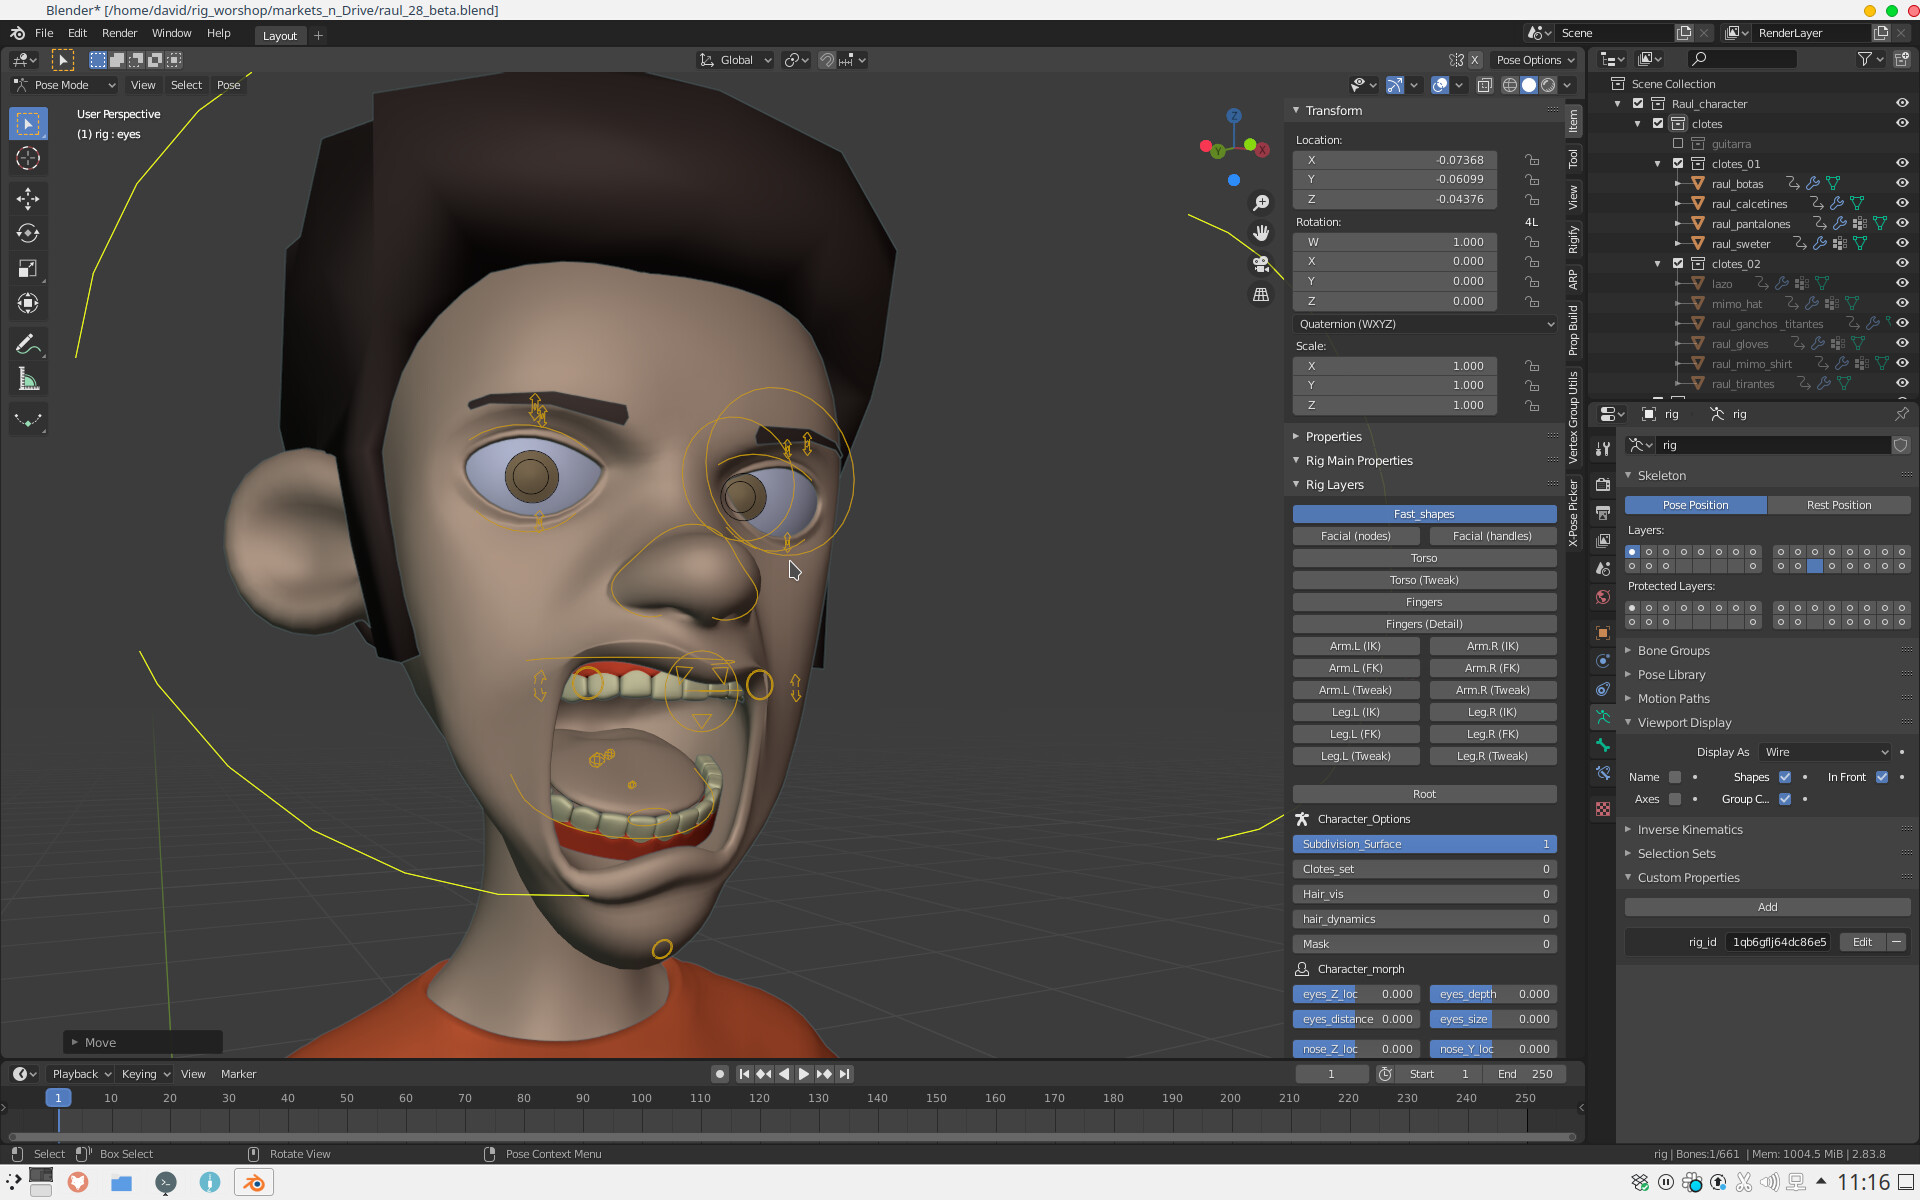
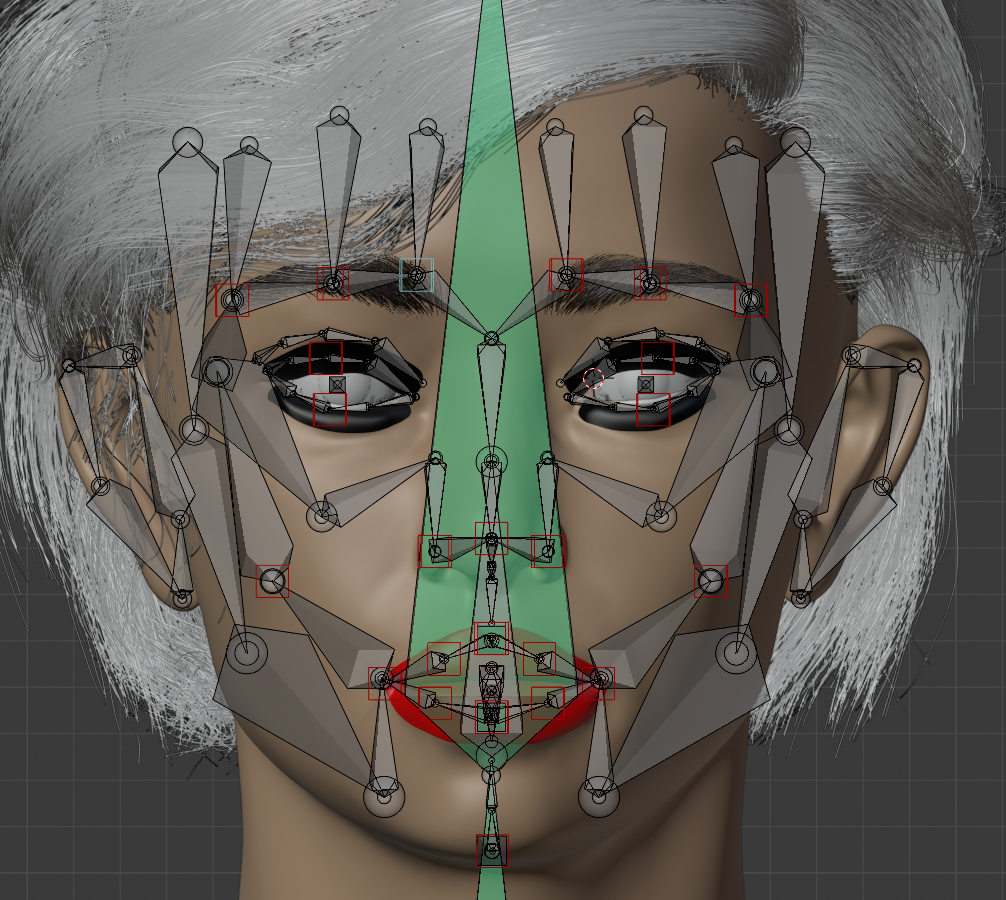
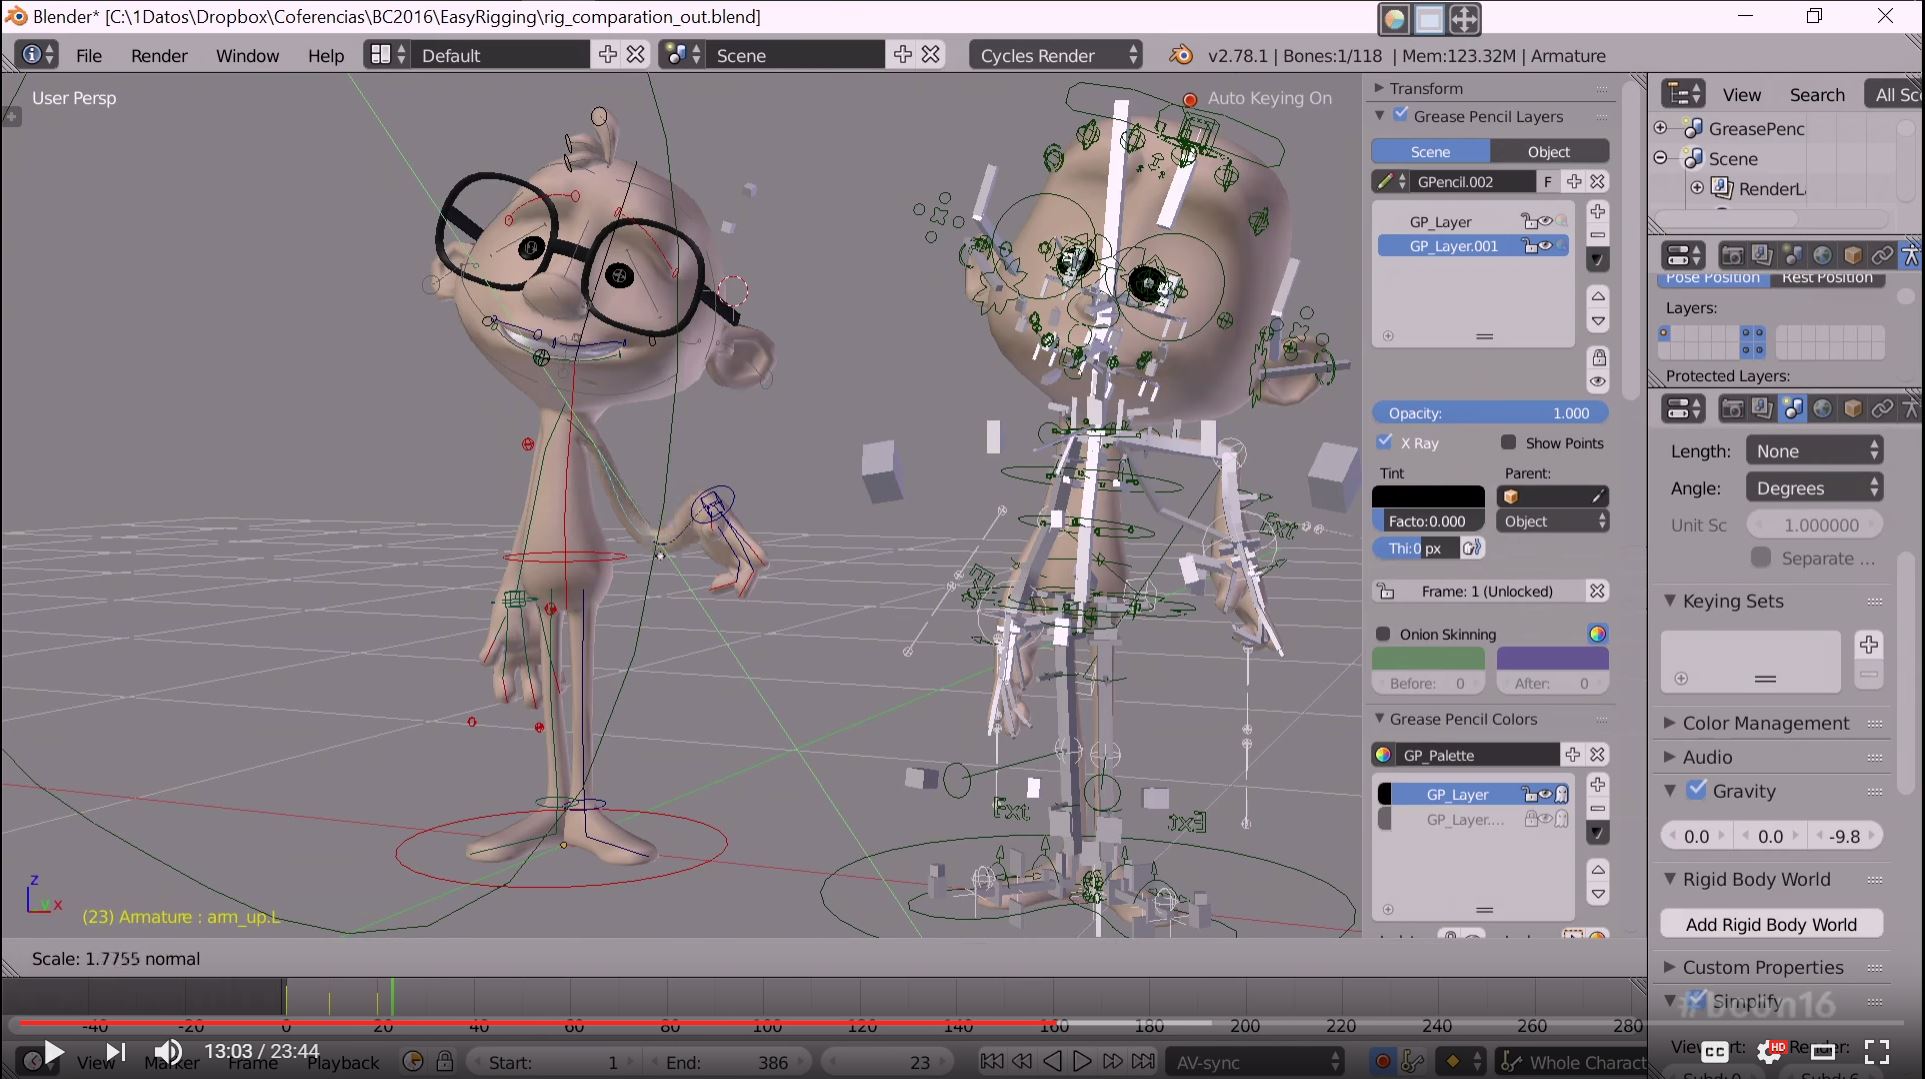
Advanced Rigging Techniques in Blender
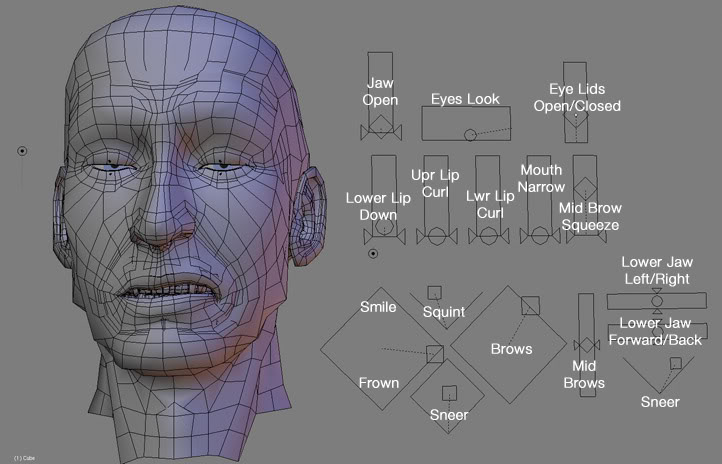
Advanced rigging in Blender involves complex techniques that go beyond basic rigging, aiming to achieve more realistic and expressive character animations. These techniques include the use of corrective shape keys, advanced weight painting, and complex control systems like inverse kinematics (IK) and forward kinematics (FK), among others.
Corrective shape keys are essential for addressing deformation issues that occur during animation. By creating and blending these shape keys, animators can fix problematic deformations for smoother and more natural movements. This technique is particularly useful for areas like shoulders, where deformation can often appear unnatural.
Weight painting plays a critical role in how bones influence the vertices of a mesh. Fine-tuning the weight distribution allows for more precise control over the deformation of the character\"s body parts, ensuring that movements look realistic and are correctly influenced by the respective bones.
Blender\"s IK and FK systems offer flexibility in animation. IK simplifies the animation of chain structures like arms and legs by allowing animators to manipulate the end effector to control the entire chain. FK, on the other hand, provides control over individual bones, which is ideal for animating fingers or facial expressions. A combination of both IK and FK can be used for optimal results, leveraging the strengths of each system depending on the animation requirements.
Modifiers and constraints in Blender further enhance rigging capabilities. Modifiers like the Subdivision Surface modifier improve the mesh\"s appearance and deformation, while constraints can restrict bone movements for more realistic interactions. For example, the Limit Distance constraint can ensure that body parts maintain a natural relationship with each other during movement.
Advanced rigging setups, such as BlenRig 5, offer predefined body deformation systems and facial rigs, enabling animators to achieve production-level character animations. These setups are designed to be user-friendly, allowing animators of all skill levels to create high-quality rigs.
Understanding anatomy and movement is crucial when applying these advanced techniques. Observing real-life movements and studying the work of experienced animators can provide valuable insights, helping to apply these advanced rigging techniques more effectively in Blender.
By mastering these advanced techniques, animators can create more dynamic, expressive, and realistic animations, bringing their characters to life with greater detail and nuance.

_HOOK_
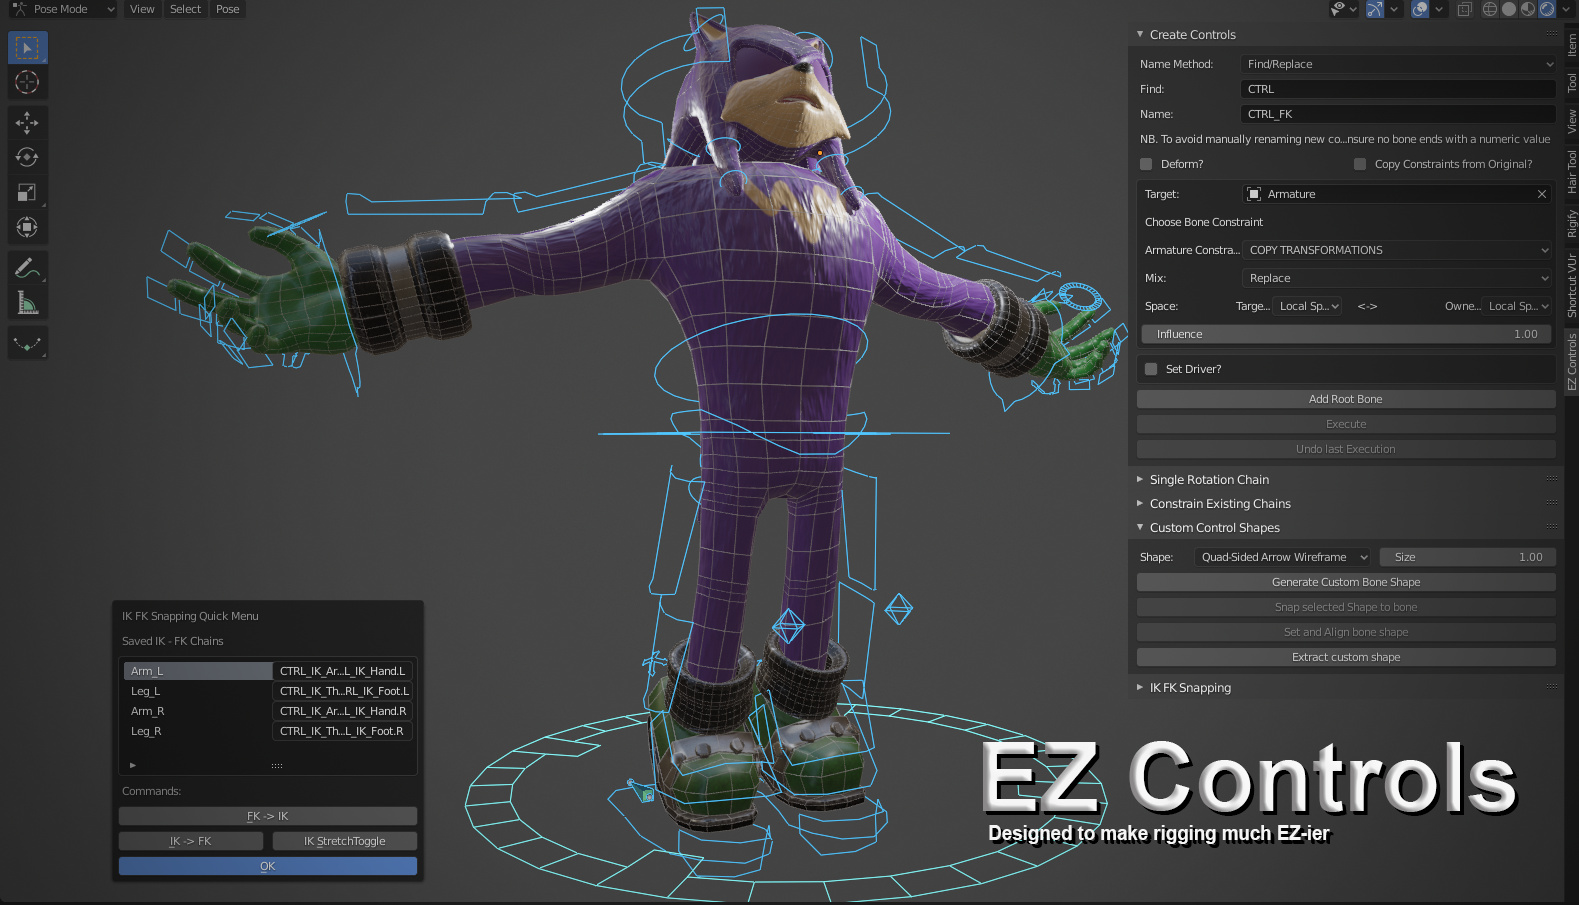
Tools and Add-ons for Efficient Rigging
Blender\"s ecosystem is enriched with numerous tools and add-ons designed to streamline the rigging process, making it more efficient and user-friendly. These tools cater to a wide range of rigging needs, from character animation to vehicle rigging, enhancing Blender\"s functionality and efficiency.
- Car Rig Pro: An addon for rigging various types of vehicles, offering features like realistic suspension simulation and automatic ground detection. It\"s tailored for animators focusing on vehicle animation.
- COA Tools: This addon facilitates Cut Out Animation with sprites, streamlining the animation process with an easy-to-use panel that offers all necessary tools in one place.
- RigFlex: Aimed at improving the movement of characters with soft body parts like antennas or tails, RigFlex adds simple lag actions to enhance animations.
- Vehicles Rig Factory: A comprehensive solution for rigging various vehicle types, featuring advanced options for wheel rotation, suspension properties, and more, supporting a broad range of vehicles from motorcycles to trucks.
- Shape Key Manager Pro: This addon simplifies the shape key rigging workflow, allowing for efficient duplication, mirroring of shape keys, and retargeting their drivers, ideal for facial animations and symmetry.
- Ragdoll Tools: Specializes in generating ragdolls for Blender, facilitating the creation of hitboxes and enabling easy editing of rigid body settings for dynamic animations.
- Freeik: Transforms basic armatures into animation-ready rigs, featuring intuitive posing and animation controls, and supports splitting rigs into parts for modular characters.
- BlenRig: An auto-rigging and skinning system that offers high-quality rigs with an advanced facial system, designed mainly for biped characters.
- Voxel Heat Diffuse Skinning: Overcomes the limitations of traditional heat map diffuse skinning, especially useful for characters composed of non-seamless parts.
- RigUI: Allows the creation of custom pickers within Blender, enhancing the rigging workflow for complex character animations.
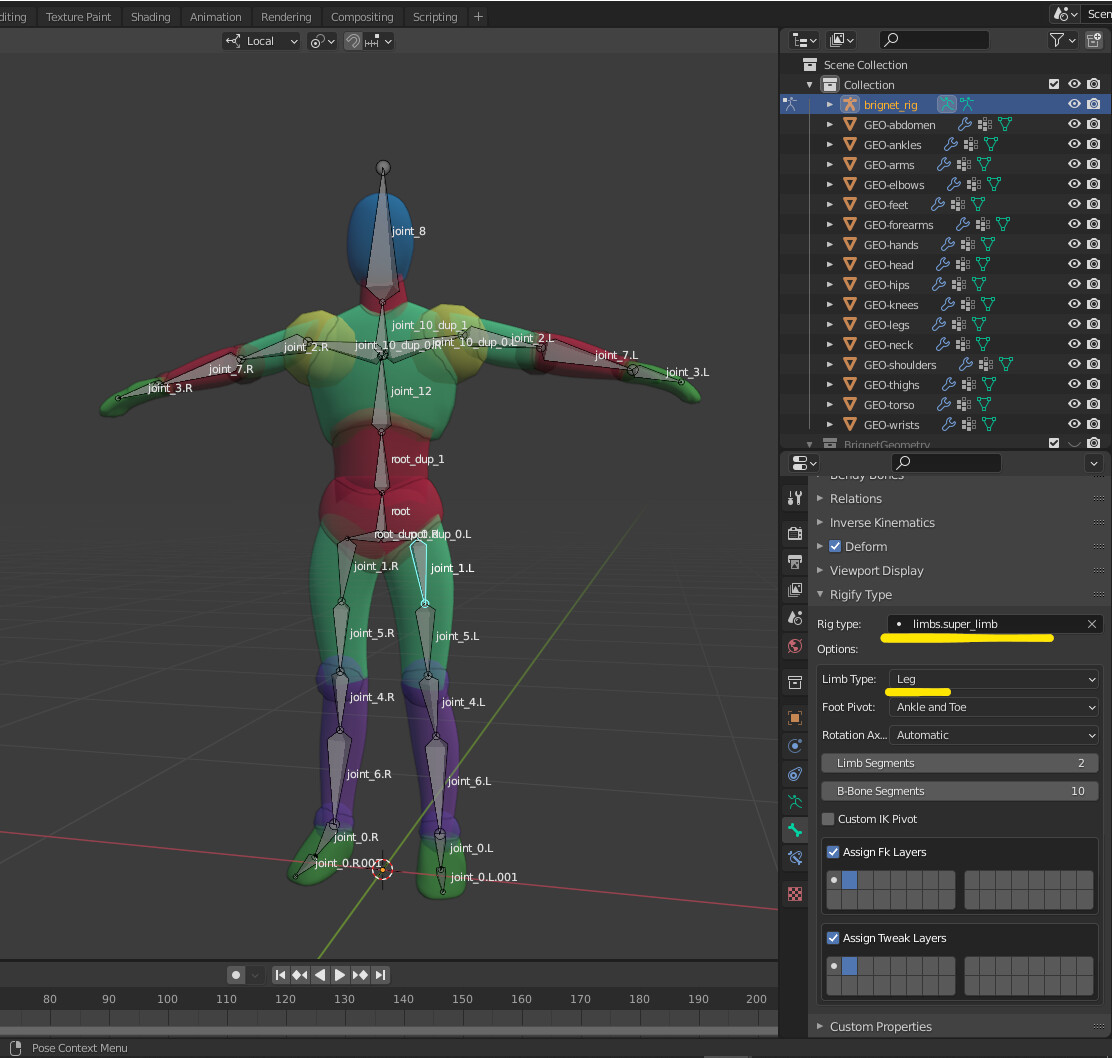
- Rigify: Known for its simplicity and efficiency, Rigify automates the rigging process, enabling quick and artistic rigging for characters.
- Auto-Rig Pro: Offers comprehensive features for character rigging, animation retargeting, and export to game engines, supporting a wide range of deformations and advanced control mechanisms.
These tools not only cater to the rigging of humanoid characters but also extend their capabilities to vehicles, soft body simulations, and complex facial animations, ensuring Blender users have access to a versatile and powerful rigging toolkit.

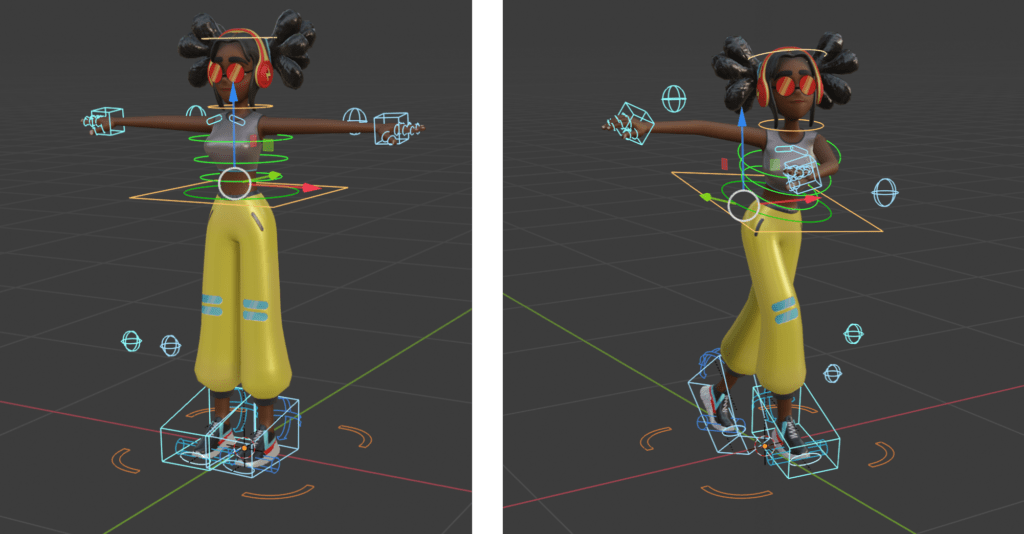
Step-by-Step Guide to Rigging Your First Character
Rigging your first character in Blender is an exciting step into the world of 3D animation. This guide will walk you through the process, from preparing your model to the final rigging, ensuring you have a solid foundation for your animation journey.
- Prepare Your Model: Before rigging, ensure your model\"s normals are facing outward. Combine all model parts into a single mesh if necessary and position the model correctly within the scene. Set the origin of your model to a logical point, like the base of the feet, for easier animation.
- Create the Armature: Start by adding an armature, which serves as the skeleton for your model. Position the first bone at the center of the model\"s torso and enable X-ray mode to make the bones visible through the mesh.
- Extrude Bones: Use the extrusion method to create a hierarchical bone structure, starting from the main root bone and extending to the limbs. Name your bones logically (e.g., spine, arms, legs) for easier identification and manipulation.
- Adjust Bone Placement: Position the bones correctly according to your character’s anatomy. Ensure the bones for arms and legs are placed and rotated accurately to match natural human movements.
- Mirror Bones for Symmetry: After setting up one side of the body, duplicate and mirror the bones to the other side for symmetrical characters, ensuring both sides are correctly named and aligned.
- Parent Mesh to Armature: With the armature complete, select both the mesh and the armature and parent them using the \"Armature Deform with Automatic Weights\" option. This step binds your model to the armature, allowing the bones to control the mesh.
- Test and Adjust Weights: Enter pose mode to test the rigging by rotating the bones. Adjust the weight painting as necessary to ensure smooth and realistic deformations of the mesh.
Remember, rigging can be complex, and patience is key. Don\"t hesitate to experiment with bone placement and weight painting to achieve the best results for your character\"s unique movements.
Tips and Best Practices for Successful Rigging
To ensure successful rigging in Blender, following a set of best practices can significantly enhance the quality and efficiency of your work. These tips are curated to assist beginners and experienced users alike in navigating the complexities of rigging in Blender.
- Understand Your Model: Before starting the rigging process, thoroughly understand your model\"s anatomy or mechanical structure. This understanding is crucial for placing bones accurately and ensuring natural movement.
- Start with a Clean Topology: A clean, well-organized topology facilitates easier and more efficient weight painting and deformation. Ensure your mesh is free of unnecessary vertices and properly mirrored.
- Use Mirror Functionality: When rigging symmetrical models, utilize Blender\"s mirror functionality to save time and ensure consistency between both sides of the model.
- Keep Bone Layers Organized: Use bone layers and colored groups to manage and organize your rig better. This practice helps in maintaining clarity, especially with complex rigs involving numerous bones.
- Employ Envelope and Automatic Skinning: These tools can serve as a starting point for skinning your character, which you can then refine with weight painting for more precise control over mesh deformation.
- Master Weight Painting: Weight painting is an art that requires practice. It controls how the mesh deforms in relation to the bones. Spend time learning how to weight paint effectively for smoother animations.
- Utilize Rigging and Animation Tools: Blender offers a comprehensive set of tools for rigging and animation, including forward/inverse kinematics, a character animation pose editor, and sound synchronization capabilities.
- Implement Constraints Wisely: Constraints can be powerful for controlling object properties. Use them to create more dynamic and controlled animations, taking advantage of Blender\"s robust constraint system.
- Explore Shape Keys for Detailed Deformations: Shape keys are perfect for creating detailed facial animations or other complex deformations. They allow for fine control over the mesh\"s final appearance.
- Practice and Patience: Rigging is both a technical and artistic process that improves with practice. Be patient with yourself as you learn and develop your skills in rigging and animation.
Blender\"s rigging and animation capabilities are vast and can accommodate a wide range of creative needs. By adhering to these best practices, you can leverage Blender\"s full potential to bring your characters and models to life with realistic and expressive animations.
Common Rigging Problems and How to Solve Them
Rigging in Blender can sometimes lead to challenges that frustrate both beginners and seasoned users alike. Here, we cover some common rigging issues and their solutions to help streamline your workflow and improve your rigging outcomes.
- Improper Bone Orientation: Incorrect bone alignment can lead to unnatural movements. To solve this, ensure that bones are correctly oriented along the intended axis of rotation. Use the bone roll feature in edit mode to adjust their alignment.
- Weight Painting Woes: Difficulty in controlling mesh deformation often stems from inaccurate weight painting. To address this, switch to weight paint mode and manually adjust the weights. Utilize the subtract and add brushes to refine the influence of each bone.
- Automatic Weights Failing: Sometimes, Blender\"s automatic weights function doesn\"t work as expected, leaving parts of the mesh unbound or incorrectly weighted. A workaround is to manually assign vertices to bones in edit mode or use the vertex groups panel for finer control.
- IK Constraints Issues: Inverse Kinematics (IK) constraints can sometimes cause unpredictable behavior. Ensure that your IK chains are not too long and that pole targets are positioned correctly to avoid flipping or erratic movements.
- Mesh Distortion During Animation: Mesh distortion can occur if the armature modifier is not correctly applied or if the bone weights are uneven. Make sure the armature modifier is at the top of the modifier stack and review your weight painting for consistency.
Remember, rigging is a complex process that requires patience and practice. By addressing these common problems with the solutions provided, you\"ll be well on your way to creating more effective and dynamic rigs in Blender.
Case Studies: Real-World Examples of Blender Rigging
Exploring real-world case studies of Blender rigging showcases the versatility and power of Blender\"s rigging tools, as evidenced by various projects and user experiences.
Blender\"s comprehensive rigging capabilities are crucial for animators and artists in creating dynamic, lifelike animations. Features such as character animation pose editor, non-linear animation (NLA), forward/inverse kinematics, and sound synchronization enable artists to bring their characters to life with intricate movements and expressions.
One notable example involves the CloudRig system, utilized in productions like CoffeeRun and Sprite Fright. CloudRig, a Rigify feature set, simplifies the rigging process, allowing for customizable rigging setups that cater to the specific needs of a project. This tool is especially valued for its ability to enhance workflow efficiency and animation quality.
Users have shared positive feedback on the impact of CloudRig and related tools on their projects. For instance, animators have successfully transitioned their workflows from other software to Blender, highlighting CloudRig\"s role in facilitating this shift. The community\"s response underscores the significance of continuous development and user support in evolving Blender\"s rigging tools.
Moreover, the Pose Shape Keys add-on exemplifies Blender\"s commitment to providing solutions for complex rigging challenges, such as facial animation and muscle deformation. This tool demonstrates Blender\"s capability to offer detailed control over shape deformation, crucial for achieving realistic character animations.
The success stories from the Blender community not only illustrate the practical applications of Blender\"s rigging tools but also inspire innovation and collaboration among artists worldwide. These case studies reflect the ongoing evolution of Blender as a comprehensive platform for 3D creation, animation, and rigging.
_HOOK_
Future Trends in Rigging with Blender
The
READ MORE:
Future Trends in Rigging with Blender
The future of rigging with Blender is poised for significant advancements, underscored by the community\"s ambitious plans and the Blender Foundation\"s ongoing development efforts. Blender\"s Animation 2025 project outlines a comprehensive overhaul of character rigging and animation tools, aiming to introduce a new era of efficiency, flexibility, and creativity in animation workflows.
Key highlights include the introduction of a new animation layer system, the development of a 3D onion skinning system, and major improvements to the NLA editor to facilitate easier and more intuitive layered animation. These innovations promise to make the animation process not just technically possible, but also a pleasure for artists.
Further, the project plans to introduce a new animation data-block structure, enabling more sophisticated and flexible animation data handling. This structure is expected to replace the current Action data-block that has been in use for over two decades, marking a significant shift towards modernizing Blender\"s core animation infrastructure.
Blender\"s focus on enhancing the user interface and experience, such as visualizing constraints directly in the 3D Viewport and introducing example-based drivers, reflects a broader trend towards making the software more intuitive and adaptable to individual workflows. These improvements are designed to simplify complex rigging tasks and empower animators with tools that foster creativity and experimentation.
The roadmap for Blender\"s animation and rigging tools extends beyond 2025, with plans to continually integrate feedback from the community and adapt to the evolving needs of animators and rig developers. This collaborative approach ensures that Blender remains at the forefront of open-source animation technology, catering to both current trends and future demands in the animation industry.
As Blender ventures into these new developments, it reinforces its commitment to providing a powerful, user-friendly platform that supports the creative endeavors of animators and artists worldwide. The future of rigging with Blender is not just about new features and tools but also about building a more inclusive, collaborative, and innovative animation community.
Discover the future of Blender rigging, where cutting-edge advancements and community-driven innovation converge to redefine animation workflows. Join us on this exciting journey and unlock your creative potential with Blender\"s evolving rigging tools.