Topic blender baking textures: Discover the secrets of Blender baking textures to elevate your 3D projects. This guide unlocks efficient workflows, tips, and techniques for creating stunning visuals and realistic effects that captivate your audience.
Table of Content
- Understanding Texture Baking
- What are the steps to bake textures in Blender for beginners?
- YOUTUBE: How to Bake Textures in Blender Under 3 Minutes - Beginner Tutorial
- Introduction to Texture Baking in Blender
- Why Bake Textures? Advantages and Use Cases
- Preparing Your 3D Model for Baking
- Step-by-Step Process for Baking Textures
- Understanding Different Types of Baking in Blender
- Optimizing Your Workflow for Efficient Baking
- Troubleshooting Common Baking Issues
- Advanced Techniques and Tips for Professional Results
- Software and Tools to Complement Blender Baking
- Real-World Applications of Baked Textures
- Conclusion: Enhancing Your 3D Projects with Baked Textures
Understanding Texture Baking
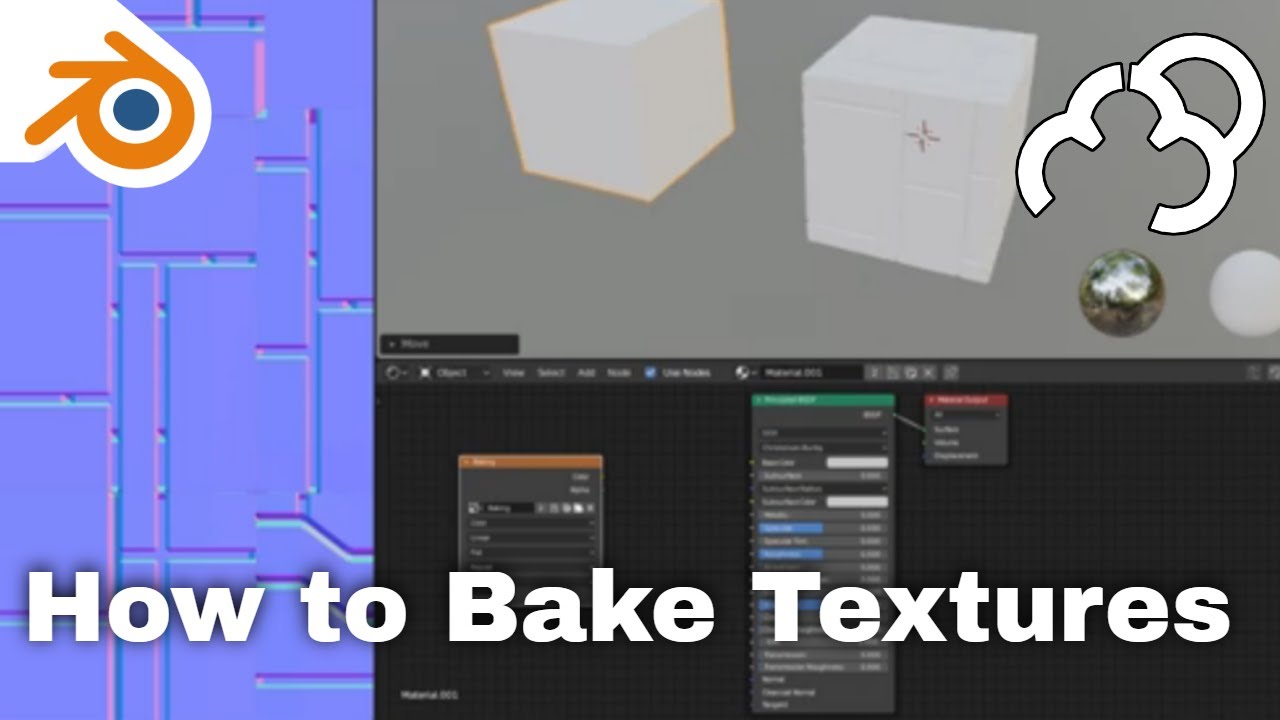
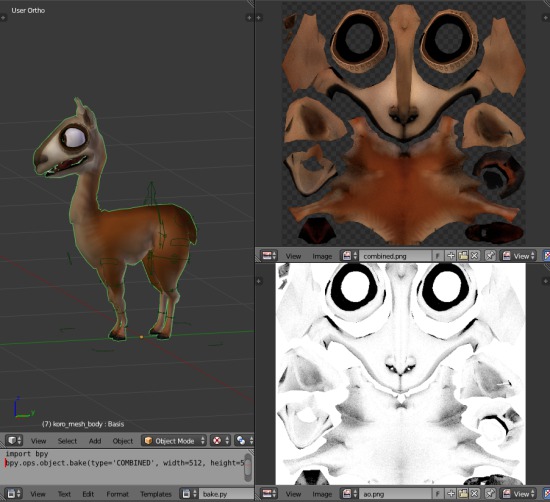
Texture baking is the process of transferring details from a high-poly model to a texture map on a low-poly model. This method is essential for optimizing 3D models for performance without sacrificing visual fidelity.
Steps for Baking Textures
- Select Cycles as your render engine for optimal results.
- Add an image texture node to your material and create a new texture, ideally with square dimensions like 512x512 or 1024x1024.
- Ensure to add a UV map node to the duplicated material to specify the UV map used for texture mapping.
- Go to Bake settings, select your bake type such as Diffuse, and make sure only the desired contributions like Color are enabled before baking.
Tools and Add-ons for Enhanced Baking
Several tools and add-ons can simplify the baking process in Blender:
- Simple Bake: A must-have plug-in that streamlines the baking process into a few clicks, suitable for frequent baking tasks.
- Texture Baking Assistant: An add-on designed to optimize and simplify the texture baking workflow, automating many of the steps involved.
Why Bake Textures?
Baking textures can significantly reduce the computational load during rendering, making it a preferred method for creating lightweight models for gaming, VR, and real-time applications.
| Step | Description |
| 1. Preparation | Setup your 3D model with high and low-poly versions and ensure proper UV mapping. |
| 2. Baking Process | Use Blender\"s baking feature to transfer the details from the high-poly model to the low-poly model\"s texture. |
| 3. Finalizing | Adjust the baked textures as needed and apply them to your low-poly model for rendering or game use. |
Baking textures in Blender is a powerful technique that combines efficiency with the capability to produce high-quality visual content. By following the outlined steps and considering the recommended tools and add-ons, artists can significantly enhance their 3D modeling and rendering workflows.

READ MORE:
What are the steps to bake textures in Blender for beginners?
To bake textures in Blender for beginners, follow these steps:
- Open Blender and import the 3D model you want to bake textures for.
- Go to the \"UV Editing\" workspace and unwrap the model to create UV maps for texturing.
- Select the object you want to bake textures for and switch to the \"Render\" tab in the Properties panel.
- Scroll down to the \"Bake\" section and choose the type of texture you want to bake (e.g., base color, normal map, ambient occlusion).
- Adjust baking settings such as margin, resolution, and bake type according to your preferences.
- Click on the \"Bake\" button to start the baking process. Blender will generate the baked textures based on the settings you specified.
- Once the baking is complete, save the baked textures to use them in your 3D projects or export them to game engines.
How to Bake Textures in Blender Under 3 Minutes - Beginner Tutorial
Blender: Dive into the exciting world of 3D animation with Blender! Create stunning visual effects, realistic characters, and immersive environments in this powerful software. Unleash your creativity and bring your ideas to life with Blender. Textures: Enhance the visuals of your projects with captivating textures! From rough and weathered to sleek and futuristic, textures add depth and realism to your designs. Learn how to apply textures seamlessly and elevate your creations to the next level.
Introduction to Texture Baking in Blender
Texture baking in Blender is a powerful technique used by 3D artists to enhance the visual quality and efficiency of their projects. This process involves transferring details from various materials and lighting effects onto texture maps, enabling more complex visuals without the need for high computational power during rendering.
The primary reason for baking textures is to improve real-time performance in games and interactive applications, where rendering speed is crucial. It also allows for the preservation of high-quality details in models that need to be displayed on less powerful hardware.
- Choosing the Right Render Engine: Blender supports different render engines like Cycles and Eevee, each offering unique baking capabilities.
- Preparing Your Model: Ensure your model has a UV map, as this will define how the texture wraps around the object.
- Setting Up Materials: Apply materials and shaders to your model. These will influence the appearance of the baked texture.
- Baking Process: Choose the type of bake you need, such as diffuse, normal, or ambient occlusion, and configure the bake settings accordingly.
- Finalizing the Bake: Once baking is complete, the texture can be applied to the model, significantly reducing rendering times while maintaining visual quality.
Baking textures in Blender can be particularly useful for artists working on projects that require detailed textures without the overhead of real-time calculations for lighting and shadows. With proper setup and execution, texture baking can greatly enhance the workflow and output quality for both game developers and visual artists.
Why Bake Textures? Advantages and Use Cases
Baking textures in Blender offers a myriad of advantages, making it an essential technique for 3D artists and developers. It not only enhances the visual fidelity of models but also significantly reduces the computational load during real-time rendering. Here\"s why baking textures is beneficial:
- Improved Performance: Baking textures can drastically reduce rendering times, making it ideal for real-time applications like video games and interactive simulations.
- Consistency in Lighting: Baked textures capture lighting and shadow details, ensuring consistent lighting across different viewing conditions.
- Efficiency on Low-power Devices: By pre-calculating complex visual details, baked textures allow detailed models to be viewed smoothly on devices with lower processing power.
- Workflow Optimization: Artists can work more efficiently by baking procedural or high-poly details onto lower-poly models, speeding up the workflow without compromising on detail.
Use cases for texture baking in Blender extend across various industries:
- Video Games: For optimizing assets to run smoothly on a range of hardware while maintaining high visual quality.
- Virtual Reality (VR) and Augmented Reality (AR): To ensure models look realistic without taxing the limited processing capabilities of VR and AR devices.
- Architectural Visualization: To pre-calculate lighting and materials for realistic renders of architectural models, enhancing presentations and walkthroughs.
- Film and Animation: For detailed assets that require consistent lighting but must be rendered efficiently to meet production deadlines.
Texture baking in Blender streamlines the production process, from game development to film-making, by ensuring high-quality visuals are both achievable and practical.
Preparing Your 3D Model for Baking
Before diving into the baking process in Blender, preparing your 3D model is crucial to ensure successful and efficient texture baking. Here\"s how to set your model up for baking:
- Select the Correct Render Engine: Switch to Cycles since it offers comprehensive baking options that are not available in Eevee.
- UV Unwrapping: Properly unwrap your model to ensure the baked textures accurately map onto the model\"s surface. This step is vital for achieving realistic results.
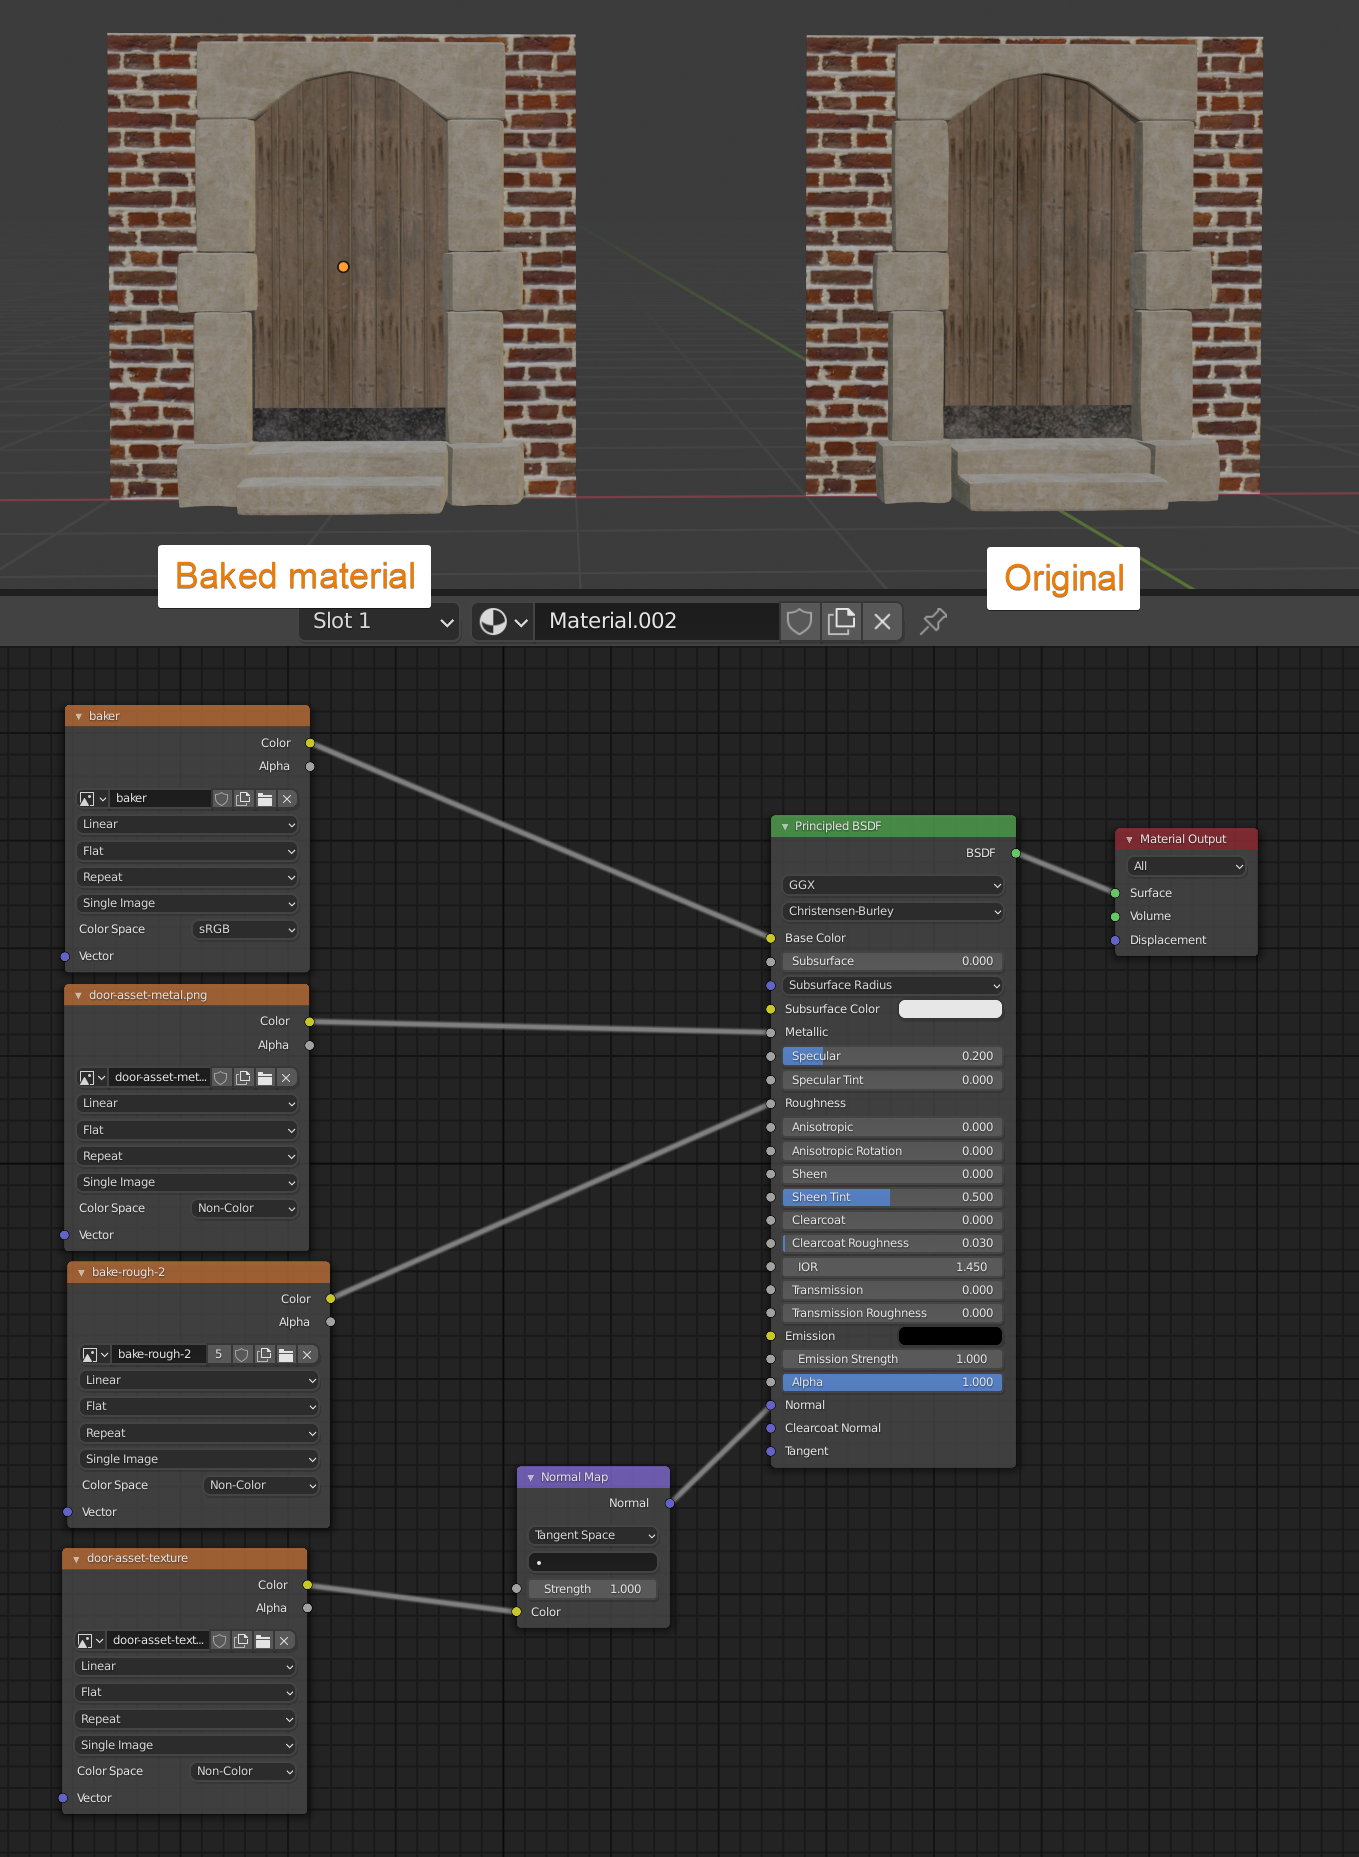
- Apply Materials and Textures: Assign materials to your model. If your model uses procedural textures or shaders, these need to be baked into image textures for use in game engines or other applications that don\"t support Blender\"s procedural textures.
- Set Up Lighting: Although baking captures details like shadows and light, setting up your scene\"s lighting can impact the final bake, especially for ambient occlusion or light maps.
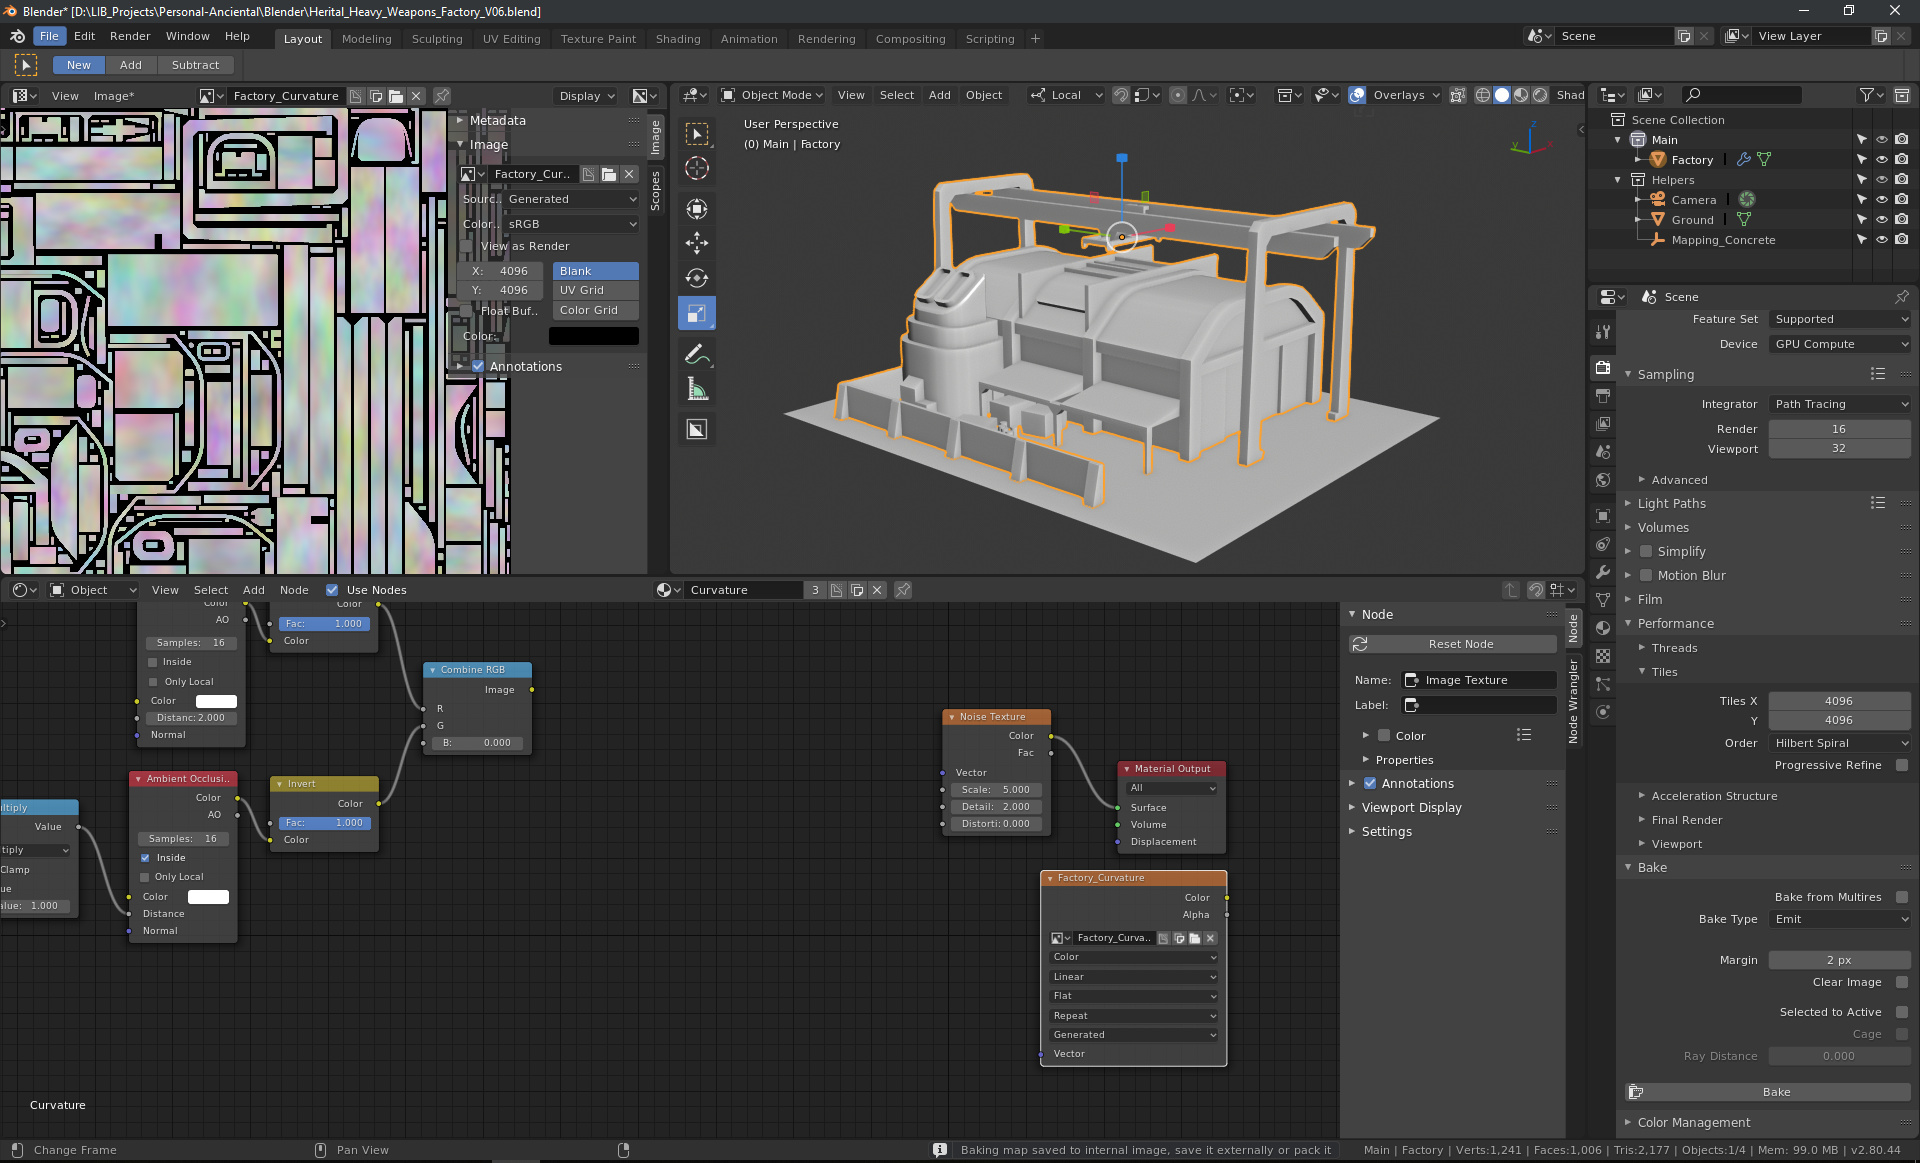
- Create a New Image Texture for Baking: In the Shader Editor, add an Image Texture node and create a new image. This image will be the target for the baked texture data.
- Configure Baking Settings: Choose the appropriate bake type (e.g., Diffuse, Normal, Ambient Occlusion) depending on the details you want to capture in your bake.
Following these steps will prepare your 3D model for a successful baking process, capturing the necessary texture details and ensuring your model looks as intended in any environment.
_HOOK_
Step-by-Step Process for Baking Textures
Baking textures in Blender streamlines the creation of detailed and efficient 3D models. Follow this step-by-step guide to achieve perfect baked textures:
- Choose Your Render Engine: Select Cycles as your render engine for its advanced baking capabilities.
- Prepare Your Model: Ensure your model is UV unwrapped and has all necessary materials and textures applied.
- Create a New Image Texture: In the Shader Editor, add an Image Texture node and create a new image. This will be the target for your baked texture.
- Configure Bake Settings: In the Render Properties panel, find the Bake section. Select the bake type (e.g., Diffuse, Normal, Ambient Occlusion) you need based on the details you wish to capture.
- Set Baking Parameters: Adjust the margin size to avoid artifacts at the edges of the UV islands and set the resolution of your image texture based on your project\"s needs.
- Perform the Bake: With your object selected, click on the Bake button in the Bake section. Blender will start the baking process, transferring the details from the materials and lighting onto the image texture.
After baking, you can apply the newly created texture to your model, significantly improving its performance in real-time applications while maintaining high visual quality. This process is crucial for game development, VR experiences, and any scenario where rendering efficiency is paramount.
Understanding Different Types of Baking in Blender
Blender offers several types of texture baking, each serving different purposes and contributing uniquely to the final visual quality of 3D projects. Knowing when and how to use each type is essential for achieving optimal results.
- Diffuse Baking: Captures color and texture details from the surface, excluding any lighting or shadow information.
- Normal Baking: Records the details of the surface\"s normals, useful for adding texture and depth to flat surfaces.
- Displacement Baking: Transfers the displacement of high-resolution models to a texture, allowing the detail to be applied to lower-resolution models.
- Ambient Occlusion Baking: Provides a shadow map that represents how exposed each point in a scene is to ambient lighting, adding depth and realism.
- Emissive Baking: Captures the glow or self-illumination of materials, useful for objects like screens or lights.
- Specular Baking: Records the specular highlights of materials, simulating the way light reflects from surfaces.
Each baking type is chosen based on the specific needs of the project, such as the level of realism required, the performance considerations for real-time applications, or the complexity of the materials being simulated. Understanding these baking options allows artists to precisely control the appearance of their models in any environment.
Optimizing Your Workflow for Efficient Baking
Optimizing your Blender workflow for texture baking is key to achieving faster, more efficient results without sacrificing quality. Here are some strategies to streamline your baking process:
- Use Low-Resolution Meshes: Start with a low-resolution mesh for baking to reduce computation time. High-resolution details can be captured in the baked textures.
- Optimize UV Layouts: Efficiently unwrapped UVs with minimal wasted space can significantly improve the quality of the bake and reduce texture artifacts.
- Batch Bake Multiple Objects: Whenever possible, bake textures for multiple objects at once to save time. Blender\"s batch baking features can automate this process.
- Choose Appropriate Bake Settings: Adjusting settings like ray distance and margin can prevent common baking issues like bleeding or missing details.
- Utilize Baking Add-ons: Explore add-ons designed to streamline the baking process, offering features like automatic setting adjustments and error correction.
- Test with Lower Resolution: Before finalizing your bake, test with lower resolution textures to quickly identify and fix potential issues.
- Automate Repetitive Tasks: Use Blender\"s scripting capabilities to automate repetitive tasks like setting up bake settings or applying baked textures.
By implementing these optimization techniques, you can significantly enhance your baking workflow in Blender, leading to quicker iterations and higher quality results.

Troubleshooting Common Baking Issues
Encountering problems during the baking process in Blender is common, especially for beginners. Here are solutions to some frequent issues:
- Black or Blank Textures: This can occur due to a circular dependency error. Ensure the image texture node used for baking isn\"t accidentally linked to the material\"s node tree.
- Texture Stretching: Incorrect UV mapping often causes this. Ensure your UV maps are correctly unwrapped and optimized for your object\"s geometry.
- Unexpected Results with Normal Maps: Use correct settings for normal maps, such as setting the image to non-color data and ensuring it\"s connected to the right shader node.
- High Memory Usage: Large textures can consume significant memory. Optimize by using appropriate texture resolutions and consider baking in parts if possible.
- Pink Textures: Missing texture files usually cause pink textures. Re-link any missing textures or re-bake if necessary.
These solutions address common baking pitfalls, enhancing your workflow and helping you achieve better results with fewer headaches.
Advanced Techniques and Tips for Professional Results
Unlock the full potential of Blender\"s texture baking capabilities with advanced techniques and tips designed for professional-quality results. From managing procedural textures to leveraging add-ons for efficiency, these insights will enhance your 3D projects.
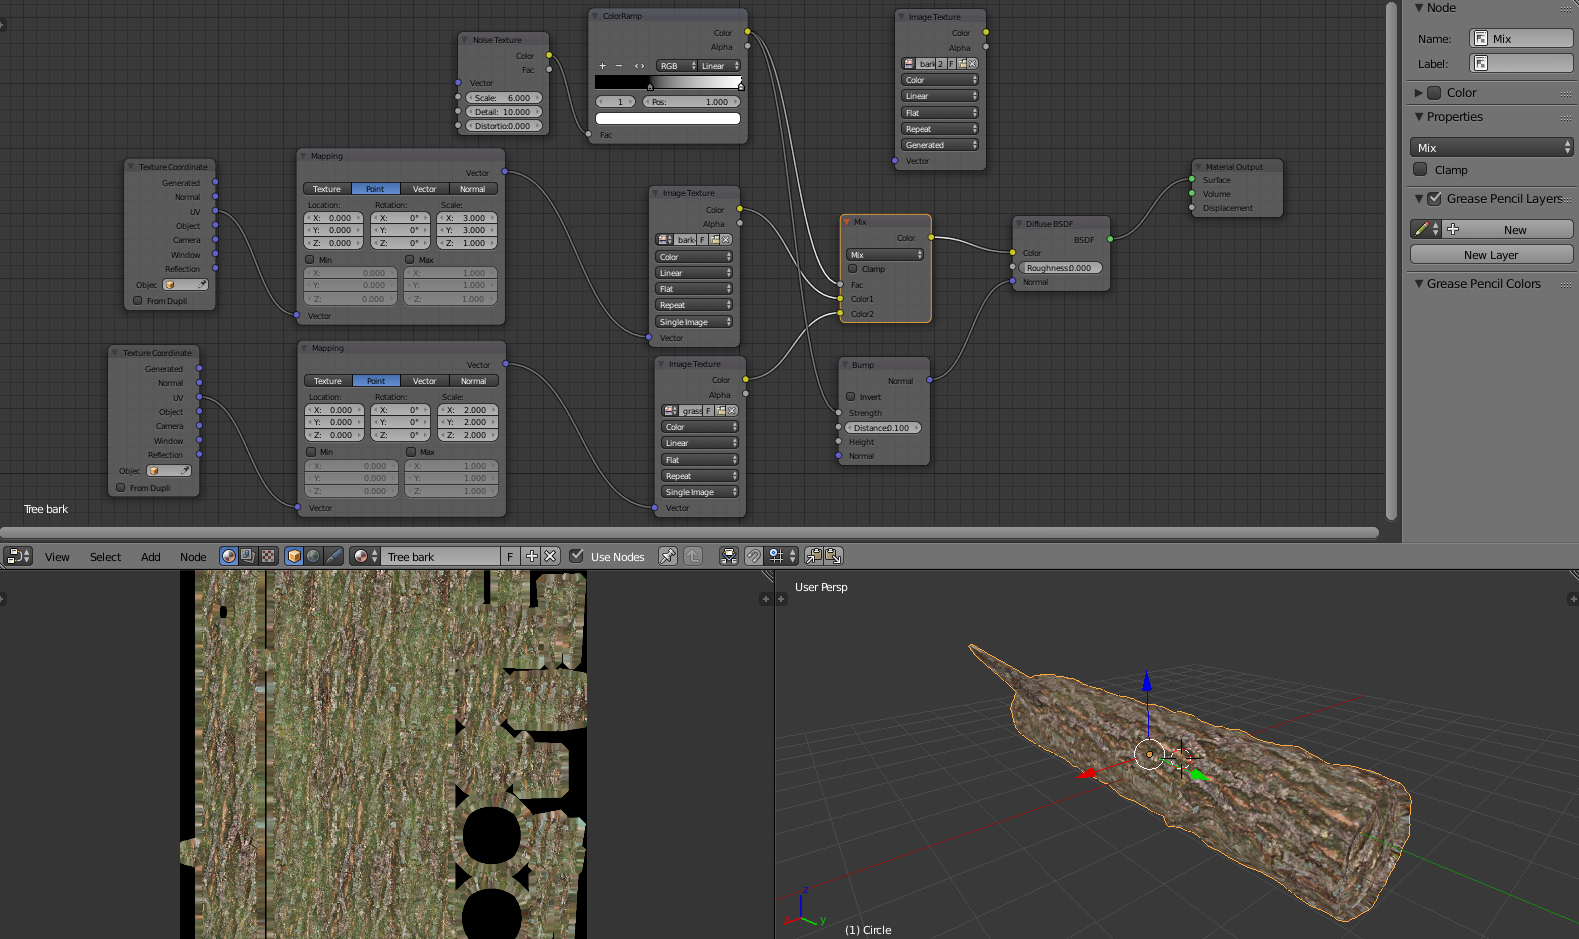
- Procedural Texture Baking: Dive deep into procedural textures by adjusting parameters like color, scale, and distortion in the Shader Editor. Ensure your render properties are correctly set before baking to capture the desired effects on your UV map.
- Optimizing the Baking Process: For faster results, consider lowering texture resolution for preliminary tests, utilizing GPU rendering if available, and ensuring your UV maps are non-overlapping to avoid baking issues.
- Utilizing SimpleBake: Simplify your baking workflow with the SimpleBake add-on, offering features like PBR texture baking, flexible channel packing, and batch baking. Its integration with platforms like Sketchfab and user-friendly interface make it an invaluable tool.
- Combining Textures: Enhance realism by layering multiple procedural textures. Utilize Blender\"s node system to create complex textures that can mimic real-world materials with precision.
- Custom Textures for Specific Needs: Tailor your procedural textures to fit specific models or scenes. Experiment with different node settings to create unique textures that elevate your project\"s visual storytelling.
By adopting these advanced techniques, you\"ll not only streamline your workflow but also achieve textures that bring your 3D models to life with stunning detail and realism.
_HOOK_
Software and Tools to Complement Blender Baking
Enhance your Blender baking workflow with these essential software and tools, carefully selected to improve efficiency, quality, and versatility in your 3D projects.
- BetterBaking: Designed to simplify the baking process, this add-on introduces an intuitive panel for easy access, supporting common PBR texture types and offering custom settings for material and bake configurations.
- BakeTool: A comprehensive tool for streamlining texture baking, enabling multi-pass baking with one click, automatic UV unwrapping, and support for PBR and ID maps, among other advanced features.
- Texture Baking Assistant: This add-on focuses on improving texture organization and baking processes, including OpenEXR texture support, enhanced folder organization, and a progress bar feature for monitoring baking progress.
- TexTools for Blender: Offers a professional set of UV and texture tools, including UV layout optimization, texture baking modes, and texel density tools, enhancing the precision and quality of your UV mapping and baking.
- Principled-Baker: Allows for one-click baking of all your PBR maps, featuring auto-detection of necessary bakes based on inputs and auto-creation of new materials with image texture nodes.
Integrating these tools into your Blender workflow can significantly reduce baking times, increase texture quality, and provide more control over the baking process, making your 3D texturing more efficient and effective.
Real-World Applications of Baked Textures
Baked textures in Blender have a wide range of real-world applications, significantly enhancing the visual quality of digital projects while optimizing performance. Here are some practical uses:
- Game Development: Baked textures are crucial for game assets, providing detailed visuals without taxing real-time rendering resources. They allow for the inclusion of complex lighting, shadows, and material effects on models within game engines.
- Animation and Simulation: In animation, baking simplifies complex systems like character rigs, enabling smoother playback and rendering. It\"s also used in baking physical simulations like cloth or fire, making them manageable and reusable.
- Architectural Visualization: For architectural scenes, baking light and shadow into textures can significantly reduce rendering times, making it easier to create realistic and immersive environments.
- Virtual Reality (VR) and Augmented Reality (AR): VR and AR applications benefit from baked textures due to the high demand for real-time performance. Baked lighting and details maintain visual quality without overloading the system.
- Visual Effects (VFX): Baked textures are used in VFX for integrating CGI with live-action footage, ensuring that the digital elements match the lighting and environmental conditions of the real-world scenes.
- Product Design and Prototyping: Designers use baked textures to simulate real-world materials, finishes, and lighting on 3D models of products, enhancing the realism of prototypes and presentations.
These applications showcase the versatility and efficiency of using baked textures in Blender, across various industries and project types, enabling artists and developers to achieve high-quality visuals with optimized performance.
READ MORE:
Conclusion: Enhancing Your 3D Projects with Baked Textures
Mastering the art of texture baking in Blender is a game-changer for 3D artists seeking to elevate the visual quality of their projects while optimizing performance. This comprehensive guide has walked you through the essentials of baking textures, from the basics to advanced techniques, utilizing both Blender\"s capabilities and powerful add-ons like SimpleBake.
- Efficiency and Quality: Baking textures streamlines your workflow, allowing for complex shading and lighting effects to be captured directly onto your models. This process not only enhances the visual appeal of your projects but also significantly reduces rendering times and improves performance in real-time applications.
- Advanced Techniques: By incorporating advanced baking techniques and leveraging add-ons, you unlock new possibilities for texture detail and realism. Tools like SimpleBake simplify the process, making it accessible even for beginners, and offer a wealth of features to explore, including PBR baking and flexible channel packing.
- Adaptability: The skills and tools presented here are versatile, catering to a wide range of projects from gaming and VR to architectural visualization. Whether you\"re working on intricate character models or expansive environments, the principles of texture baking remain a crucial part of your toolkit.
In conclusion, embracing texture baking in Blender opens up a world of creativity and efficiency. The combination of Blender\"s built-in functionality and the streamlined process offered by add-ons like SimpleBake provides a robust foundation for any 3D artist looking to push the boundaries of their work. As you continue to explore and experiment with these techniques, you\"ll find that the only limit to what you can achieve is your imagination.
Embrace the power of Blender baking textures to transform your 3D projects, enhancing visual quality and efficiency. This guide illuminates the path for artists at any level to achieve stunning, realistic effects with ease and creativity.