Topic blender weight paint tutorial: Unlock the secrets of Blender"s weight painting with our comprehensive tutorial, designed to elevate your rigging and animation skills to the next level. Start mastering this essential tool today!
Table of Content
- Are there any step-by-step Blender weight paint tutorials available online for beginners?
- Understanding Weight Painting Basics
- Setting Up Your Blender Project for Weight Painting
- Mastering the Weight Paint Tools in Blender
- Adjusting Weight Paint Settings for Precise Control
- Techniques for Effective Weight Painting
- Common Weight Painting Problems and Solutions
- YOUTUBE: Blender 2.82: Weight Painting In 5 Minutes (Complete Lesson)
- Advanced Weight Painting Tips and Tricks
- Integrating Weight Paint with Rigging and Animation
- Optimizing Your Workflow for Faster Weight Painting
- Case Studies: Real-World Examples of Weight Painting
- Resources for Further Learning and Exploration
Are there any step-by-step Blender weight paint tutorials available online for beginners?
Yes, there are several step-by-step Blender weight paint tutorials available online for beginners. Here is a general outline of the process:
- Open Blender and make sure your model is ready for weight painting.
- Select the armature that you want to use for weight painting.
- Go to the \"Object Data Properties\" tab in the Properties panel.
- Under the Vertex Groups section, select the vertex group you want to paint weights for.
- Switch to Weight Paint mode by selecting it from the mode dropdown menu at the top of the 3D Viewport.
- Choose the brush you want to use for painting weights. Different brushes have different effects.
- Start painting weights on your model. You can adjust the weight value using the slider on the right side of the screen.
- Use the tools like Normalize, Smooth, and Blur to refine and adjust the weights as needed.
- Continue painting weights until you are satisfied with the deformation of your model.
- Once you are done, you can test the rig by moving the bones to see how the weights affect the mesh.
READ MORE:
Understanding Weight Painting Basics
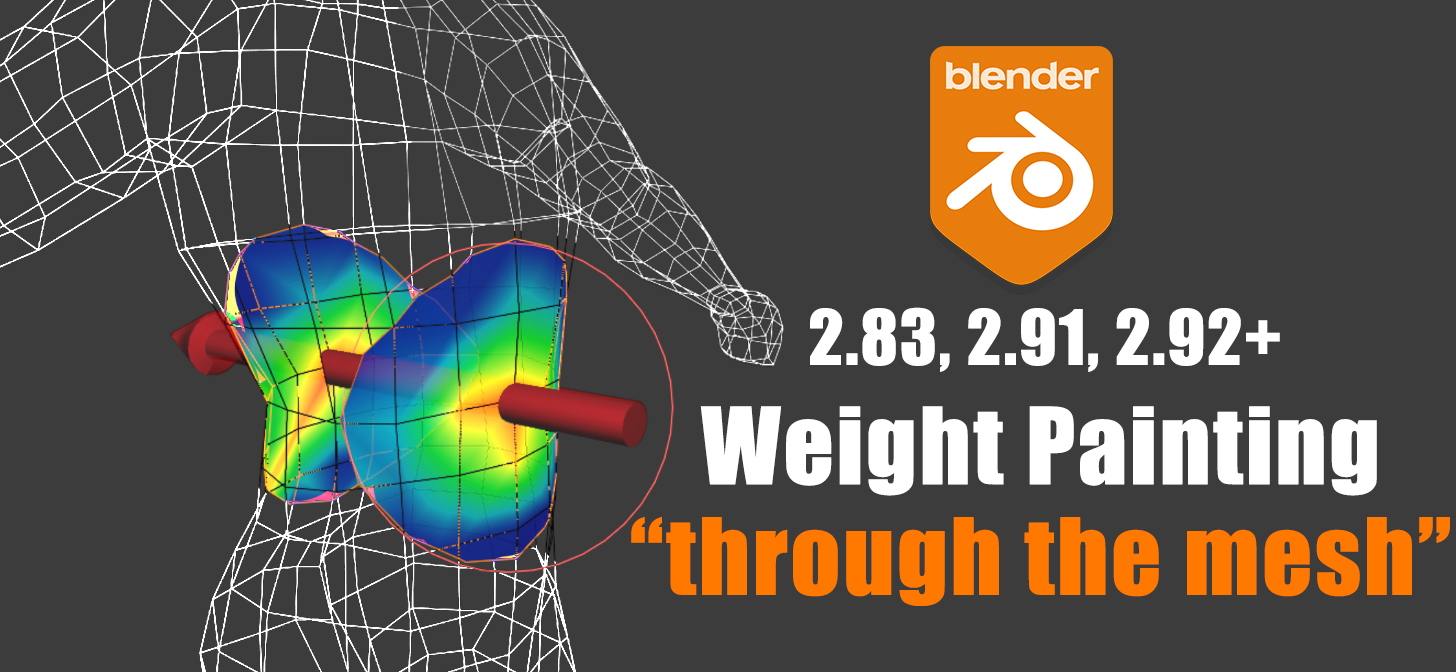
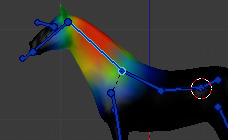
Weight painting in Blender is a critical technique for animators and modelers, allowing for precise control over how a mesh deforms in relation to bones in a rig. It assigns a weight, from 0 to 1, to each vertex, indicating how much influence a particular bone has over the vertex. This fundamental process ensures smooth and realistic movements in animated characters and objects.
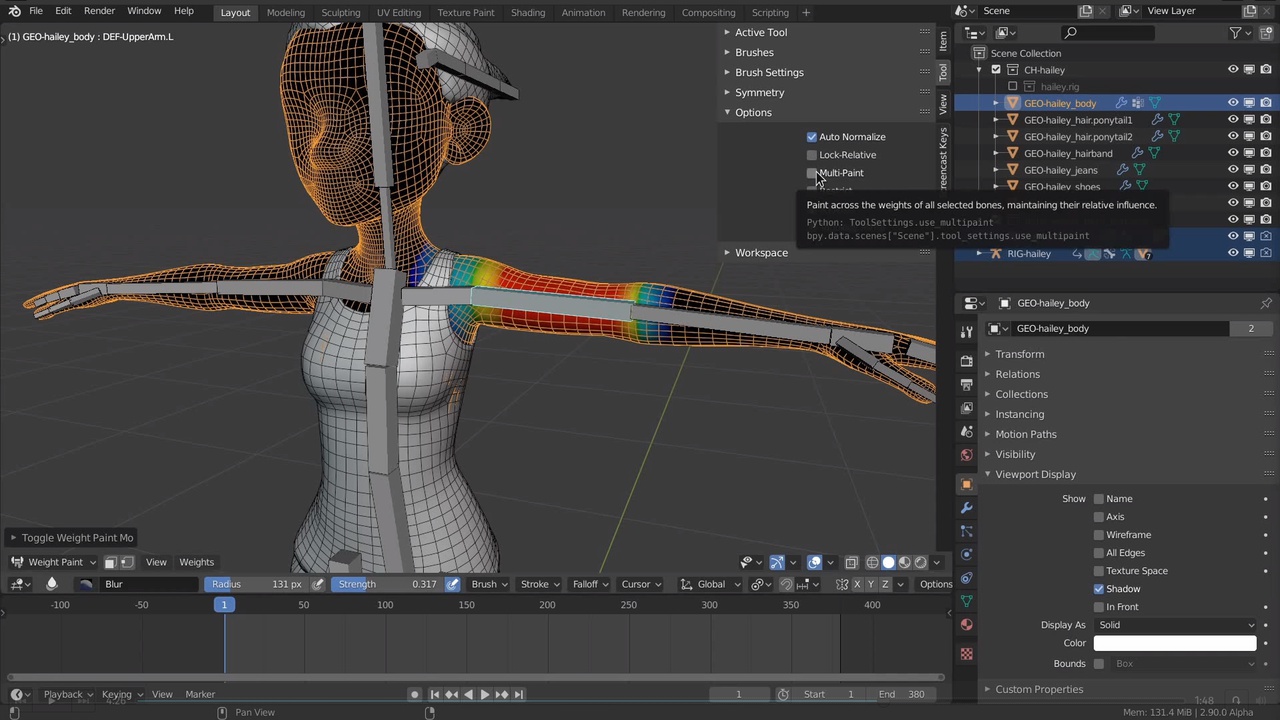
- Accessing Weight Paint Mode: Begin by selecting your mesh, then switch to Weight Paint mode via the mode menu in the 3D viewport.
- Understanding the Color Gradient: Blender uses a color gradient from blue (no influence) to red (full influence) to visually represent the weight of each vertex.
- Selecting Bones for Weighting: Select the bone you wish to paint weights for in the armature. The mesh will display the weight influence for the selected bone.
- Applying Weights: Use the brush tools to paint weights directly onto the mesh. Adjust brush size and strength for finer control.
- Weight Smoothing: Use the Smooth brush to even out weight distributions for more natural deformations.
- Automatic Weighting: For initial weighting, you can use the automatic weights feature, which Blender calculates based on the proximity of the mesh to the bones.
- Testing Deformations: Regularly pose your armature to test how the weights affect mesh deformations, making adjustments as necessary.
Understanding these basics is the first step to mastering weight painting, setting the foundation for more advanced rigging and animation techniques in Blender.

Setting Up Your Blender Project for Weight Painting
Proper setup is crucial for a smooth weight painting process in Blender. This setup ensures that your model and rig are ready for weight painting, optimizing your workflow and preventing common issues.
- Model Preparation: Ensure your model is complete and UV unwrapped if necessary. Clean geometry with good topology promotes better weight painting results.
- Armature Creation: Build your armature (skeleton) inside Blender. Each bone should correspond to a part of the mesh that needs independent movement.
- Parenting Mesh to Armature: With your mesh selected, shift-select the armature, then use Ctrl+P to parent the mesh to the armature. Choose \"With Automatic Weights\" for initial weight mapping, which can later be refined in weight paint mode.
- Layer Organization: Organize your project layers to keep the armature and mesh separate, facilitating easier selection and manipulation during the weight painting process.
- Test Pose: Before starting weight painting, pose your armature to ensure it deforms the mesh in a basic, expected manner. This test can highlight any major issues with the initial automatic weights.
- Save Your Project: Always save your project before starting weight painting to prevent data loss.
By following these steps, you\"ll create a solid foundation for your weight painting work, allowing for more efficient adjustments and ultimately, a more lifelike animation.
Mastering the Weight Paint Tools in Blender
Blender offers a suite of tools within Weight Paint mode to help you precisely control how your mesh deforms in relation to the armature. Mastering these tools is essential for creating realistic and controlled animations.
- Brush Tool: The primary tool for painting weights. You can adjust its size, strength, and weight to apply the desired influence on the mesh.
- Subtract Brush: Reduces the weight influence on selected vertices, allowing for finer control over the mesh deformation.
- Add Brush: Increases the weight influence, useful for expanding the area a bone affects.
- Blur Brush: Smoothens the transition between different weight values, creating more natural movements.
- Gradient Tool: Allows for the application of weight values across a gradient, perfect for gradual transitions.
- Auto Normalize: This feature automatically adjusts the weights so that the total influence for each vertex equals 1, ensuring realistic deformations.
- Weight Smoothing: Smoothens out weight distributions across your mesh, essential for avoiding sharp or unrealistic deformations.
- Mirror Weighting: When working on symmetrical models, this tool mirrors weights from one side to the other, saving time and ensuring consistency.
By understanding and utilizing these tools, you can effectively paint weights on your mesh, ensuring that your animations move smoothly and realistically.

Adjusting Weight Paint Settings for Precise Control
For achieving the most accurate and controlled deformation effects in Blender, fine-tuning your weight paint settings is crucial. These adjustments allow for more precise manipulation of how the mesh reacts to the armature\"s movements.
- Brush Strength and Size: Adjust the brush strength for lighter or more intense weight application. Modifying the brush size helps target larger or more specific areas of the mesh.
- Weight Gradient: Use the weight gradient to create smooth transitions between different weight zones. This is particularly useful for areas like joints or where different materials meet.
- Auto Normalize: Enable auto normalize to ensure the sum of weights for each vertex remains constant, preventing unexpected mesh deformations.
- Mirror Painting: For symmetrical models, activate mirror painting to simultaneously apply weights to both sides, ensuring uniformity and saving time.
- Face Selection Masking: This feature allows you to isolate and work on specific parts of the mesh without affecting the rest, ideal for detailed weight adjustments.
- Topological Masking: Adjust settings to consider mesh topology during painting, which can help in maintaining consistent weight distribution across complex geometries.
- Vertex Group Limiting: Limit weight painting to specific vertex groups to protect areas that have already been weighted or should not be affected by the current bone.
By carefully adjusting these settings, you can achieve a high level of precision in your weight painting, leading to more realistic and controlled animations.
_HOOK_
Techniques for Effective Weight Painting
Effective weight painting in Blender requires a combination of technical skill and artistic insight. These techniques can help ensure your characters and objects deform in a realistic and controlled manner.
- Start with Automatic Weights: Use Blender\"s automatic weight assignment as a starting point, then manually refine for precision.
- Layer Your Weights: Build up weights gradually. Start with broad strokes to establish the primary influences, then refine with smaller, more precise adjustments.
- Use the Blur Brush for Smooth Transitions: The blur brush is invaluable for smoothing out harsh transitions between weight zones, creating more natural movements.
- Focus on Critical Areas: Pay special attention to areas with complex movements, such as joints, ensuring weights are distributed for maximum realism.
- Test Movements Frequently: Regularly pose your model during the painting process to see how the weights affect deformation, adjusting as necessary.
- Maintain Balance with Mirror Weighting: For symmetrical models, use mirror weighting to maintain balance and ensure consistent deformation on both sides.
- Utilize Vertex Groups: Assign vertices to groups for easier management and to limit the influence of specific bones, enhancing control over deformation.
- Experiment with Weight Transfer: Transfer weights from other objects or earlier versions of your model to save time and ensure consistency across different assets.
Implementing these techniques will enhance your weight painting process, leading to more lifelike and responsive animations in Blender.

Common Weight Painting Problems and Solutions
Even experienced Blender users can encounter issues with weight painting. Identifying common problems and knowing how to address them can save time and frustration.
- Uneven Deformations: If your mesh deforms unevenly, use the smooth or blur brush to even out weight distribution, focusing on the transition areas between different weight zones.
- Overlapping Weights: When multiple bones affect a single area too strongly, reduce the influence of less important bones using the subtract brush or adjust the weight manually in the vertex group panel.
- Insufficient Influence: If parts of your mesh are not moving as expected, increase the weight in those areas. Ensure that every vertex is assigned to at least one bone with a significant weight.
- Automatic Weights Fail: Sometimes, Blender\"s automatic weights may not work perfectly, especially with complex meshes. In such cases, manually assign weights or use the weight gradient tool for more control.
- Weight Painting on Non-deforming Meshes: Ensure your mesh is properly parented to the armature with automatic weights or manually create vertex groups corresponding to each bone.
- Mirroring Issues: For symmetrical models, ensure the armature\"s mirror modifier is correctly set up before weight painting. Use the mirror weight painting option to correct any discrepancies.
Understanding these problems and their solutions will help you navigate the complexities of weight painting, leading to more polished and professional animations.

Blender 2.82: Weight Painting In 5 Minutes (Complete Lesson)
Dive into the world of weight painting and bring your 3D models to life! Master the art of detailing and fine-tuning the weight distribution for realistic movements. Get ready to enhance your skills by watching the informative video.
Blender 2.82: Weight Painting In 5 Minutes (Complete Lesson)
Dive into the world of weight painting and bring your 3D models to life! Master the art of detailing and fine-tuning the weight distribution for realistic movements. Get ready to enhance your skills by watching the informative video.
Advanced Weight Painting Tips and Tricks
For those looking to refine their weight painting skills in Blender, incorporating advanced techniques can significantly enhance the realism and efficiency of your workflow.
- Custom Brushes: Explore creating custom brushes for specific effects, like mimicking muscle tension or cloth folds, to add realism to your models.
- Data Transfer Modifier: Use the Data Transfer modifier to copy weights from one mesh to another, ideal for similar models with slight variations. This can save considerable time and ensure consistency.
- Vertex Masking: Utilize vertex masking to isolate specific areas for detailed weight painting. This is especially useful when working on intricate parts of a model.
- Weight Painting Layers: Experiment with creating layers of weight maps for complex rigs. This allows for non-destructive editing and easier adjustments of weights.
- Using the Pose Mode for Real-time Feedback: Adjust weights while in Pose Mode to see real-time feedback on how changes affect the mesh deformation. This is crucial for tweaking weights to perfection.
- Corrective Shape Keys: After weight painting, use shape keys to correct any undesirable deformations that occur during animation. This allows for precise adjustments to specific poses.
- Utilizing Scripts and Add-ons: There are several Blender add-ons designed to enhance the weight painting process, offering tools for batch operations, weight mirroring across meshes, and more.
These advanced techniques will help you push the boundaries of what\"s possible with weight painting in Blender, leading to more dynamic and believable animations.
Integrating Weight Paint with Rigging and Animation
Effectively integrating weight painting with rigging and animation in Blender is essential for creating lifelike and responsive characters and objects. This integration ensures seamless movements and enhances the overall quality of your projects.
- Rig Setup Before Weight Painting: Ensure your rig is correctly set up and tested for basic movements before starting weight painting. This helps identify the key areas that will require more detailed weight adjustments.
- Linking Meshes and Armatures: Properly parent your mesh to the armature using the \"With Automatic Weights\" option as a starting point, then refine the weights manually for better control.
- Weight Painting for Animation: Focus on areas of your model that will be most affected by animation, such as joints and facial expressions. Adjust weights to allow for smooth transitions and natural movements.
- Testing and Tweaking: Continuously test your animations as you paint weights. Pose your character in extreme positions to see how the mesh deforms and make necessary adjustments.
- Corrective Shape Keys: After weight painting, use corrective shape keys for fine-tuning deformations during specific animations. This is particularly useful for facial expressions and joint movements.
- Dynamic Weight Adjustment: Utilize Blender\"s pose-to-pose animation workflow to adjust weights dynamically. This approach allows for adjustments based on the specific needs of each pose within an animation sequence.
- Utilizing Non-linear Animation (NLA) Editor: After rigging and weight painting, leverage the NLA Editor for layering and blending different animations, ensuring weights work well across all movements.
By closely integrating weight painting with rigging and animation, you ensure a more dynamic and believable character that responds naturally to its virtual environment.
Optimizing Your Workflow for Faster Weight Painting
Maximizing efficiency in weight painting within Blender not only saves time but also enhances the quality of your work. Implementing workflow optimizations can significantly speed up the weight painting process.
- Keyboard Shortcuts: Familiarize yourself with Blender\"s keyboard shortcuts for weight painting tools. Quick access to brushes and settings can drastically reduce the time spent navigating menus.
- Use the Simplify Brush: The Simplify Brush can quickly adjust complex areas by evening out weights, which is particularly useful for large meshes or detailed areas.
- Batch Operations with Python Scripts: For repetitive tasks, consider using or writing Python scripts to automate processes like mirroring weights or applying uniform adjustments across multiple vertices.
- Layer Management: Organize your weight painting tasks into layers, allowing you to focus on specific areas without affecting the rest of the model. This method also facilitates easier revisions and tweaks.
- Mirror Modifier: Utilize the Mirror Modifier for symmetrical models to halve the weight painting workload. Paint one side and automatically replicate the weights to the other.
- Dynamic Topology: Enable dynamic topology in your brush settings to automatically adjust the mesh\"s topology for more detailed weight painting where needed, without manually editing the mesh.
- Predefine Vertex Groups: Predefining vertex groups for specific parts of the mesh can streamline the weight painting process by allowing you to focus on one segment at a time.
- Custom Brush Presets: Save your most used brush settings as presets for quick access in future projects, ensuring consistency and speeding up your workflow.
By adopting these strategies, you can make your weight painting process in Blender more efficient, allowing for more time to focus on creativity and quality.

_HOOK_
Case Studies: Real-World Examples of Weight Painting
Examining real-world examples of weight painting in Blender provides valuable insights into the practical application of techniques and the problem-solving process. These case studies showcase the versatility and power of weight painting in various projects.
- Character Rigging for Animation: An in-depth look at a professional animator\"s process for rigging a complex character model. This case study focuses on achieving realistic muscle deformation and facial expressions through precise weight painting.
- Dynamic Cloth Simulation: How weight painting influences cloth simulation in Blender. It explores techniques for ensuring cloth behaves naturally when interacting with moving characters.
- Mechanical Rigging for Machinery: Demonstrates the use of weight painting to rig mechanical parts, ensuring smooth operation and interaction between components with different weight distributions.
- Game Asset Creation: A detailed breakdown of creating a game asset with multiple moving parts, highlighting the role of weight painting in ensuring these parts move convincingly in a game engine.
- Facial Rigging for Expressive Characters: Examines the challenges of facial rigging and how weight painting can be used to create highly expressive characters, focusing on the subtleties of facial muscles and skin.
These case studies not only demonstrate the technical skills involved in weight painting but also underscore the creative problem-solving that brings digital creations to life.
READ MORE:
Resources for Further Learning and Exploration
Advancing your skills in Blender\"s weight painting requires access to quality resources. Below is a curated list of tutorials, courses, and communities to help you deepen your knowledge and refine your techniques.
- Official Blender Tutorials: Start with Blender\"s own learning portal for comprehensive tutorials on weight painting and rigging, directly from the creators of Blender.
- Online Courses and Workshops: Platforms like Udemy, Coursera, and CGCookie offer in-depth courses on Blender, covering everything from basics to advanced weight painting strategies.
- YouTube Tutorials: YouTube hosts a wealth of free tutorials from experienced Blender artists. Channels like Blender Guru, CG Geek, and Darrin Lile offer step-by-step guides for all levels.
- Blender Community Forums: Join forums such as Blender Artists and the Blender subreddit to connect with other users, share your work, get feedback, and find answers to specific questions.
- Books and eBooks: There are several detailed guides and books available, such as \"Blender 3D Cookbook\" and \"Learning Blender: A Hands-On Guide to Creating 3D Animated Characters,\" which include sections on weight painting.
- Workshops and Meetups: Participating in local and online Blender workshops and meetups can provide hands-on experience and personalized feedback from experienced instructors and peers.
Utilizing these resources can significantly accelerate your learning process, helping you to master weight painting in Blender and apply it effectively in your projects.
Embark on a journey to master Blender\"s weight painting, unlocking the full potential of your 3D creations. Elevate your skills through practice and exploration, and watch your animations come to life with unprecedented realism and fluidity.