Topic blender rigging basics: Unlock the secrets of Blender rigging basics to breathe life into your 3D models. This guide will help you master the fundamentals of rigging, ensuring your animations move smoothly and realistically.
Table of Content
- Understanding Rigging
- Advanced Techniques
- Practical Exercises
- Resources and Further Learning
- Advanced Techniques
- What are the basic concepts of rigging in Blender that beginners should understand?
- YOUTUBE: Blender - Completely Rigging A Character in 5 Minutes
- Practical Exercises
- Resources and Further Learning
- Practical Exercises
- Resources and Further Learning
- Resources and Further Learning
- Introduction to Blender Rigging
- Understanding the Rigging Process
- Setting Up Your First Rig
- Positioning and Adjusting Bones
- Weight Painting and Vertex Groups
- Using Inverse Kinematics for Natural Movement
- Advanced Rigging Techniques
- Animating Your Rig
- Troubleshooting Common Rigging Issues
- Resources for Further Learning
Understanding Rigging
Rigging is the process of creating a skeleton for a 3D model so that it can be animated. This involves positioning bones within the mesh and setting up constraints for how they move relative to each other.
Starting with the Basics
- Ensure your model is positioned correctly in the scene, ideally with its feet on the ground plane for stability.
- Use the \"Add Armature\" option to create the base bone of your rig, typically at the center of the torso.
- Enable X-ray mode to clearly see the bones inside the mesh.
Bone Placement and Adjustment
Begin by adding a bone at the shoulder and adjust its size and rotation to fit inside the arm, ensuring it ends where the arm meets the torso. The arm rig generally consists of three main bones: the upper arm, forearm, and hand.
Symmetry and Mirroring
After setting up one side of the rig, you can duplicate and mirror it to the other side, ensuring symmetry in your character\"s movements.

READ MORE:
Advanced Techniques
Using Rigify for Automation
Rigify is an add-on that simplifies the rigging process by providing pre-made rigs that can be easily customized for your model.
IK (Inverse Kinematics) and FK (Forward Kinematics)
Blender supports both IK and FK for controlling the movement of the rig, allowing for more natural and complex animations.
Practical Exercises
Practice rigging with multiple exercises, ranging from simple to complex models, to reinforce your understanding and skillset in rigging.

Resources and Further Learning
Explore online tutorials, courses, and Blender\"s official documentation to deepen your knowledge and mastery of rigging in Blender.

Advanced Techniques
Using Rigify for Automation
Rigify is an add-on that simplifies the rigging process by providing pre-made rigs that can be easily customized for your model.
IK (Inverse Kinematics) and FK (Forward Kinematics)
Blender supports both IK and FK for controlling the movement of the rig, allowing for more natural and complex animations.
_HOOK_
What are the basic concepts of rigging in Blender that beginners should understand?
When it comes to rigging in Blender, there are some basic concepts that beginners should understand:
- Armatures: Armatures are the skeleton of your character or object. They are made up of interconnected bones that define the structure and movement of the model.
- Bone Weighting: Bone weighting is the process of assigning influence of each bone to specific vertices of the model. This determines how the model deforms when the bones are moved.
- Constraints: Constraints are rules that you can apply to bones to control their movement or behavior. This can include limiting rotation, copying the transformation of one bone to another, or creating advanced behaviors like inverse kinematics.
- Parenting: Parenting is the relationship between bones where one bone controls the movement of another. This hierarchical structure is essential for creating complex animations.
- Inverse Kinematics (IK): IK is a technique where the movement of the end of a chain of bones controls the positioning of the entire chain. It is especially useful for creating natural-looking movements, like walking or reaching.
Blender - Completely Rigging A Character in 5 Minutes
Character rigging: Dive into the fascinating world of character rigging in this captivating video! Learn how to bring your characters to life with intricate movements and expressions. Unlock the secrets behind creating fluid and lifelike animations that will mesmerize and inspire you. Beginners tutorial: Embark on your creative journey with this beginner\'s tutorial video that will set you on the path to success. Explore the essential basics and learn valuable techniques to kickstart your skills and unleash your artistic potential. Join us as we guide you through step-by-step instructions to help you master the fundamentals of your craft.
Character Rigging for Beginners - Blender Tutorial
Check out Blendergrid: (Affiliated Link) ➡️ https://blendergrid.com/start/ryankingart In this beginner tutorial I will show you how to ...
Practical Exercises
Practice rigging with multiple exercises, ranging from simple to complex models, to reinforce your understanding and skillset in rigging.

Resources and Further Learning
Explore online tutorials, courses, and Blender\"s official documentation to deepen your knowledge and mastery of rigging in Blender.

_HOOK_
Resources and Further Learning
Explore online tutorials, courses, and Blender\"s official documentation to deepen your knowledge and mastery of rigging in Blender.

Introduction to Blender Rigging
Rigging in Blender is a fundamental step in the animation process, allowing animators to transform static 3D models into dynamic, moveable characters. This essential phase involves creating a skeleton, or \"armature\", that drives the movements of the model\"s mesh. By setting up bones in a hierarchy, riggers can simulate realistic motions that are crucial for bringing characters to life.
At its core, rigging is about establishing a control structure for animation. It includes various techniques such as envelope, skeleton, and automatic skinning, easy weight painting, mirror functionality, and the organization of bone layers and colored groups. Blender\"s rigging tools are designed to be accessible, enabling both beginners and experienced users to achieve sophisticated results.
Understanding the rigging process begins with positioning the model correctly in the scene. This involves adjusting the model to ensure symmetry and proper alignment, which are critical for effective rigging. The next steps include creating an armature, positioning it at the center of the model, and enabling X-ray mode to visualize the bones through the mesh. From there, bones are added and connected to form the skeleton structure that will control the model\"s movements.
For those new to Blender, rigging might seem daunting due to its technical nature. However, with practice and guidance, it becomes a highly rewarding skill. Learning to rig effectively in Blender opens up endless possibilities for animation, allowing for the creation of complex, lifelike characters and movements. Whether you\"re looking to animate humanoids, animals, or fantastical creatures, mastering rigging is an essential step on the path to becoming a skilled animator.
Understanding the Rigging Process
The rigging process in Blender involves several crucial steps designed to transform static models into animate-able entities. It starts with the creation of an armature, essentially a digital skeleton, that acts as the framework for movement. Each bone in the armature is strategically placed to correspond with the natural joints and parts of the model to be animated.
- Creation of Bones: The first step is adding bones to the 3D model. These bones are the basic components of the rig, determining how the model will move. Bones can be added manually or through mirroring to ensure symmetry for bipedal characters.
- Defining Bone Hierarchy: Once the bones are in place, they are parented to each other to establish a hierarchy. This hierarchy dictates how movements propagate through the rig, from parent bones to their children, allowing for complex motions.
- Positioning and Adjusting Bones: Correctly positioning bones is crucial for natural movement. Bones must be aligned with the model’s geometry, paying close attention to areas of rotation like joints.
- Weight Painting: After bones are positioned, weight painting determines how much influence each bone has over parts of the mesh. This step is critical for smooth deformations during animation.
- Setting Inverse Kinematics (IK): IK simplifies the animation process by allowing for more intuitive control over limbs and other parts. Setting up IK constraints makes animating characters more straightforward and realistic.
- Testing and Refinement: Rigging is an iterative process. Testing the rig through animation allows the rigger to identify and correct issues, ensuring the rig behaves as expected.
Understanding the rigging process is foundational for successful animation. Each step builds upon the last to create a functional, responsive rig that can be animated with precision. With practice and attention to detail, riggers can achieve realistic and expressive movements, bringing their characters to life.
Setting Up Your First Rig
Setting up your first rig in Blender is an exciting step towards bringing your 3D models to life through animation. This process involves several key stages, from creating your armature to skinning your model. Follow these detailed steps to establish a solid foundation for your rigging endeavors.
- Start with a Model: Ensure your model is ready for rigging. It should be properly modeled and textured. A clean topology with quads is recommended for smoother deformations.
- Create an Armature: Go to the Add menu, select Armature, and place the first bone at the base of your model. This will serve as the root bone from which all other bones will extend.
- Edit Mode for Bone Placement: Enter Edit Mode to add and position bones according to your model’s anatomy. Use extrusion (E key) to extend new bones from the existing ones, creating a hierarchical structure that mirrors the skeletal framework of your character or object.
- Name Your Bones: Properly naming bones is crucial for organization and future animation work. Follow a logical naming convention, such as “Arm.L” for the left arm, to make the rig easier to understand and manipulate.
- Parenting Mesh to Armature: With your armature in place, select your mesh, then shift-select the armature and use Ctrl+P to parent the mesh to the armature. Choose “With Automatic Weights” for Blender to attempt an initial skinning based on bone proximity.
- Adjust Weight Paint: Enter Weight Paint mode to fine-tune the influence each bone has on the mesh. Areas painted red have maximum influence, while blue areas have none. This step is critical for achieving realistic deformations.
- Test the Rig: Pose your rig by selecting the armature and switching to Pose Mode. Try moving and rotating bones to see how the mesh responds. Make adjustments as necessary to ensure smooth movements.
- Save Your Work: Regularly save your progress. Rigging can be complex, and maintaining backups allows you to experiment without losing your work.
Setting up your first rig may seem daunting, but by following these steps, you can achieve a functional and responsive armature. Practice and patience are key, as rigging is a skill honed over time. Happy rigging!
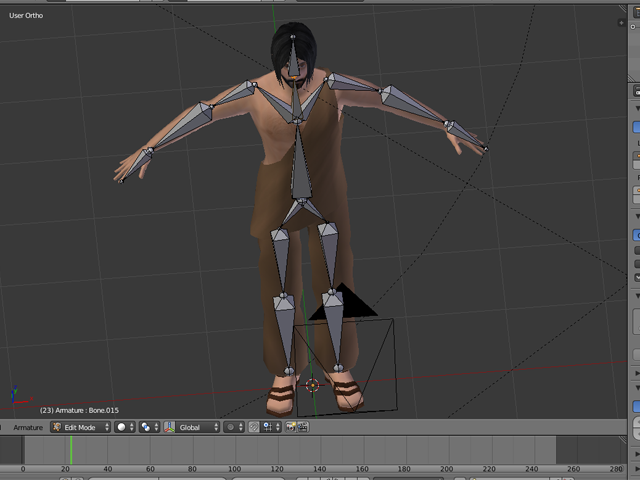
Positioning and Adjusting Bones
Positioning and adjusting bones in Blender rigging involves creating a skeleton that defines how your model moves. The process starts with setting up a basic structure, then refining the placement of bones for natural motion. Here\"s how to approach it step by step:
- Starting with the Spine: Begin by placing the first bone at the base of the spine, dragging it up to the bottom of the chest area. Rename this bone to \"spine\" as it serves as the foundation for additional bones.
- Adding Upper Body Bones: Continue adding bones for the chest, neck, and head, ensuring they align with your model\"s anatomy. For humanoid models, keep these bones in a straight line, maintaining basic proportions.
- Creating Arm Bones: Position the cursor at the shoulder to start arm bones. Insert a new bone and adjust its placement to match the model\"s shoulder. Rotate and scale the bone to fit the arm\"s length and position correctly. Add bones for the upper arm, forearm, and hand, ensuring they end at the elbow, wrist, and base of the fingers, respectively.
- Duplicating and Flipping for Symmetry: Once one arm is rigged, duplicate the arm bones and use scaling and mirroring to position them for the opposite arm. Ensure the naming convention reflects the side (right or left) for easy identification.
- Adjusting for Correct Alignment: Utilize the X-ray mode to see bones through the mesh, ensuring accurate placement within the model. Use the \"recalculate\" function to correct any normals issues that may affect rigging and animation.
- Setting Up Legs and Feet: Similar to arms, start from the hip and add bones down to the feet. Ensure proper alignment and naming for easy animation and manipulation.
Throughout the process, take advantage of Blender\"s mirroring and snapping tools to ensure symmetry and proper alignment. Remember, the goal is to create a rig that allows for natural and realistic movement, so patience and precision are key.
_HOOK_
Weight Painting and Vertex Groups
Weight painting and managing vertex groups are crucial steps in Blender rigging to ensure models deform naturally when animated. Here\"s a guide to effectively use these features:
- Entering Weight Paint Mode: To start weight painting, select your model and switch to Weight Paint mode. This mode visualizes the model\"s weight distribution, with blue indicating no influence (weight of 0) and red indicating full influence (weight of 1).
- Adjusting Paint Settings: Use the Weight, Radius, and Strength settings to control the intensity and area of your weight painting. Select different vertex groups from the Properties > Mesh Data panel to paint specific areas influenced by corresponding bones.
- Automatic Weights: After parenting your model to the armature, use the Automatic Weights feature to let Blender attempt an initial weight distribution. This can be a great starting point, which you can then refine manually.
- Manual Weight Assignment: For precise control, manually adjust weights in Edit Mode. Select vertices and assign them to vertex groups (corresponding to bones) with specific weights through the Vertex Weights panel.
- Selecting Bones in Weight Paint Mode: To streamline the process, select bones directly in Weight Paint mode to highlight the associated vertex group, making it easier to paint or adjust weights for specific bones.
- Correcting Automatic Weights: Automatic weight painting might not always be perfect. Use Edit Mode to select vertices and remove them from unwanted vertex groups to correct deformations.
- Normalization and Averaging: Normalize weights to ensure no vertex has a combined weight over 1, maintaining balanced deformations. Blender automatically averages the influence of overlapping vertex groups on a single vertex.
Understanding and applying these techniques will enhance your rigging workflow, enabling more realistic and controlled movements in your animated models.
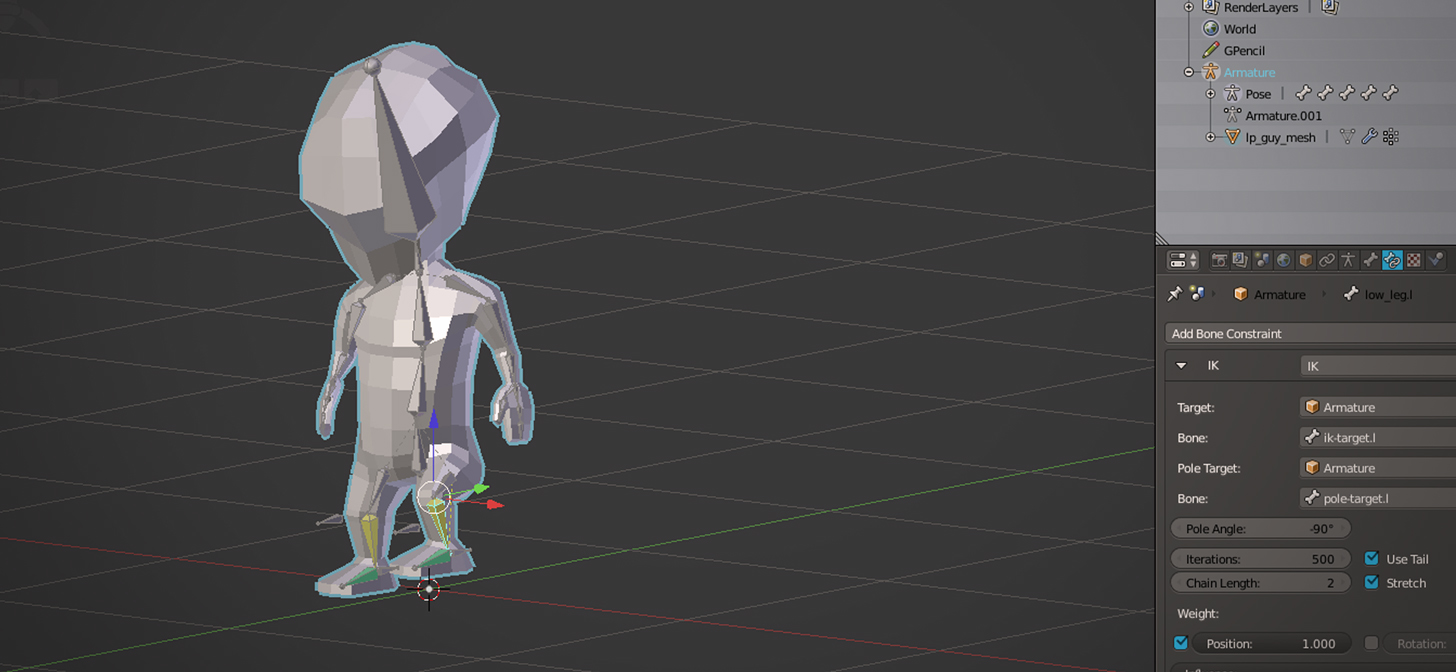
Using Inverse Kinematics for Natural Movement
Inverse Kinematics (IK) is a powerful technique in Blender that allows for more natural and intuitive control over the animation of characters or objects. It simplifies the animation process by enabling you to manipulate fewer bones to achieve realistic movements. Here\"s a step-by-step guide to implementing IK in your Blender projects:
- Understanding IK: IK is used to animate complex joint chains, such as arms and legs, by manipulating a single control point or target. This method is opposed to Forward Kinematics (FK), where each bone is rotated individually.
- Adding IK Constraints: To use IK, you need to add an IK constraint to the bone at the end of the bone chain you wish to control. This bone then targets a specific object or bone, pulling the chain towards it.
- Setting up the Target: Create an empty object or use an existing bone as the target for the IK constraint. This target controls the movement of the entire bone chain.
- Adjusting Chain Length: In the IK constraint settings, you can specify the chain length, which determines how many bones back up the chain the IK effect will influence.
- Configuring Pole Target: For better control over the bending direction of the IK chain, you can specify a pole target. This is especially useful for limbs to ensure they bend naturally.
- Tweaking IK Parameters: Blender offers various parameters within the IK constraint to fine-tune the behavior, such as stiffness and IK limits, which can help achieve more realistic animations.
By incorporating IK into your rigging workflow, you can significantly enhance the realism and efficiency of your animations, making it easier to achieve complex movements with less effort.
Advanced Rigging Techniques
Advanced rigging in Blender encompasses a wide range of techniques and tools designed to create more complex and realistic character movements. By leveraging Blender\"s powerful rigging framework, including BlenRig 5, animators and riggers can achieve high-quality results regardless of their expertise level. Here\"s a deep dive into some advanced rigging techniques:
- BlenRig 5: BlenRig 5 is an auto-rigging and skinning system that simplifies the rigging process, offering predefined body deformation systems and an advanced facial rig to deliver production-level characters.
- Tail and Spine Controls: Advanced tail controls include using Inverse Kinematics (IK) and Spline IK constraints for creating realistic tail movements. Similarly, spine and torso controls can be enhanced through the use of shape keys and drivers for more dynamic animations.
- Deformation and Controls: Combining inverse kinematics (IK) and forward kinematics (FK) provides flexibility in animating characters, allowing for natural movements of limbs and fine-tuning of smaller parts like fingers. Modifiers and constraints can smooth mesh deformation and limit bone movements for realistic interactions.
Understanding and mastering these advanced techniques requires not only technical knowledge but also an artistic sense to mimic real-life movements and anatomy accurately. Experimentation and continuous learning are key to utilizing Blender\"s full rigging capabilities effectively.
Animating Your Rig
Animating a rig in Blender transforms your models from static to dynamic, breathing life into them through movement. This process is facilitated by Blender\"s comprehensive animation toolset, which supports a wide range of animation techniques from basic keyframing to complex walk cycles. Here\"s an overview of how to get started with animating your rig:
- Understanding Blender\"s Animation Toolset: Blender offers a rich set of features for animating rigs, including a character animation pose editor, Non Linear Animation (NLA) for blending movements, forward/inverse kinematics for quick posing, and sound synchronization for matching animations with audio.
- Keyframing: The foundation of animation in Blender, keyframing, allows you to define specific poses at certain points in time. Blender automatically interpolates the frames in between, creating smooth transitions between poses.
- Non-Linear Animation (NLA): For more complex animations, NLA can be used to layer and blend different actions. This is particularly useful for creating animations that require repetitive actions like walking or running.
- Forward/Inverse Kinematics: Use forward kinematics to animate each bone in a chain individually, or inverse kinematics to move the entire chain by positioning the end effector. This makes posing characters more intuitive and efficient.
- Shape Keys: For facial animations or any deformation that cannot be achieved through bones alone, shape keys are invaluable. They allow you to morph the mesh into different shapes, which can be keyframed to create animations.
- Constraints and Drivers: Use constraints to control the properties of objects based on other objects or conditions. Drivers can automate property changes based on various inputs, adding complexity and realism to your animations.
For anyone starting their journey in animation, practicing with basic actions and gradually moving to more complex sequences is essential. Tutorials and courses, such as those offered by CG Cookie, can be incredibly helpful in mastering Blender\"s animation tools and techniques. Additionally, exploring specific animation projects, like walk cycles or facial animations, can provide practical experience and insight into the process.
Remember, animation is both an art and a science. Understanding the tools and techniques is just the beginning; creativity and practice will bring your characters to life.
Troubleshooting Common Rigging Issues
Rigging in Blender is a complex process that can sometimes lead to unexpected issues. Here are common problems encountered during rigging and their solutions:
- Issue with Rig Size: If the generated rig is too large or too small compared to your model, apply all transforms to your model by pressing Ctrl + A and selecting \"All Transforms\".
- Accessories Not Following Rig: For accessories that don\"t move correctly with the rig, remove any existing Armature modifiers from them, then parent them directly to the relevant bone using \"Set Parent to Bone\".
- Bones Bending Incorrectly: If limbs bend in the wrong direction, delete the rigging, adjust the positioning of the knee or elbow slightly forward, and regenerate the rig.
- Mesh Distortion: When the mesh doesn\"t follow the rigging properly, use weight painting to correct the influence each bone has on the mesh.
In addition to these specific fixes, Blender Studio\"s CloudRig adds a troubleshooting panel to the armature UI for metarigs, which can detect and help fix issues quickly. Understanding the fundamentals of rigging and common pitfalls can also prepare you to address problems more efficiently. For a practical step-by-step approach to rigging, including how to set up and adjust bones properly, tutorials like those on Instructables offer detailed guidance.
Rigging is both a technical and artistic process that improves with practice and patience. Utilize Blender\"s community resources, tutorials, and forums to further refine your skills and solve any rigging challenges you encounter.
_HOOK_
READ MORE:
Resources for Further Learning
Embarking on the journey of mastering Blender rigging requires access to comprehensive learning resources. Here\"s a curated list of platforms and content creators dedicated to teaching Blender rigging, animation, and much more:
- CG Cookie: This platform offers a course titled \"Fundamentals of Rigging - Learn How to Rig in Blender,\" which is perfect for beginners and those looking to solve common rigging problems. Wayne Dixon, a seasoned animator, leads this course, ensuring learners grasp the technical art of rigging through hands-on exercises.
- 3D Blendered: Discover specialized tutorials by creators like Luciano Muñoz and Gurlal Deep Singh, focusing on production techniques, hard surface modeling, rigging, and more. These resources are beneficial for beginner animators and professionals seeking to incorporate Blender into their toolkit.
- Blender Studio: Access a wealth of knowledge through the \"Blender 2.8 Fundamentals\" series, which covers everything from rigging basics to advanced topics. This official video series is free and updated, making it a valuable resource for learners at all levels.
- Curtis Holt: For those looking for both free and paid content, Curtis Holt provides an overview of various resources, including detailed tutorials by Alimayo Arango and Steven Scott, and a comprehensive paid course by Pierrick on effective rigging.
- Blender Foundation Certified Trainer, Nathan Vegdahl: Explore \"Humane Rigging,\" a training series packed with approximately 6 hours of video content. Nathan Vegdahl\"s friendly and humorous teaching style makes learning about designing user-friendly rigs in Blender engaging and informative.
Whether you\"re a beginner or looking to refine your rigging skills, these resources provide a solid foundation and deep dive into Blender\"s rigging capabilities.
Embark on your Blender rigging journey with our comprehensive guide, designed to demystify the basics and elevate your skills. Dive into a world where creativity meets technical prowess, unlocking the full potential of your 3D models. Start transforming static meshes into dynamic characters today!


