Topic blender add texture: Discover the transformative power of adding textures in Blender, a pivotal skill that elevates your 3D models from mundane to mesmerizing, unlocking endless creative possibilities in digital art and visualization.
Table of Content
- How to add a texture to an object in Blender?
- Step 1: Assign a Material
- Step 2: Add Texture
- Step 3: Configure Texture Settings
- Step 4: Fine-tuning
- Additional Tips
- Conclusion
- Step 2: Add Texture
- YOUTUBE: Add A Texture to An Object Blender Tutorial
- Step 3: Configure Texture Settings
- Step 4: Fine-tuning
- Additional Tips
- Conclusion
- Step 3: Configure Texture Settings
- Step 4: Fine-tuning
- Additional Tips
- Conclusion
- Step 4: Fine-tuning
- Additional Tips
- Conclusion
- Additional Tips
- Conclusion
- Conclusion
- Introduction to Texturing in Blender
- Preparing Your Model for Texturing
- Step-by-Step Process to Add Textures
- Using Image Textures for Realism
- Exploring Procedural Textures for Creativity
- UV Mapping Techniques for Complex Models
- Adjusting Texture Settings for Perfect Fit
- Advanced Texturing Techniques with Nodes
- Tips and Tricks for Efficient Texturing
- Common Pitfalls to Avoid in Texturing
- Resources for Learning More about Texturing
- Conclusion: Unleashing Creativity with Textures
How to add a texture to an object in Blender?
To add a texture to an object in Blender, follow these steps:
- Open Blender and select the object you want to add the texture to.
- Go to the \"Material Properties\" tab, which is represented by a little globe icon near the bottom of the screen.
- Click on the \"Add New Material\" button to create a new material for the object.
- Scroll down to the \"Surface\" section and click on the \"Base Color\" bar to open the color picker.
- Click on the small circle next to the color swatch and choose \"Image Texture\" from the dropdown menu.
- Click on the \"Open\" button and select the image texture you want to apply to the object from your computer.
- Adjust the mapping of the texture if needed by going to the \"Mapping\" section and changing the coordinates or projection type.
- You can further refine the look of the texture by adjusting parameters like scale, rotation, and offset in the \"Mapping\" section.
- Once you are satisfied with the placement of the texture, you can render the object to see the final result.
READ MORE:
Step 1: Assign a Material
Before adding texture, a material must be assigned to the object. This is done by selecting the object, navigating to the Materials tab, and creating a new material.

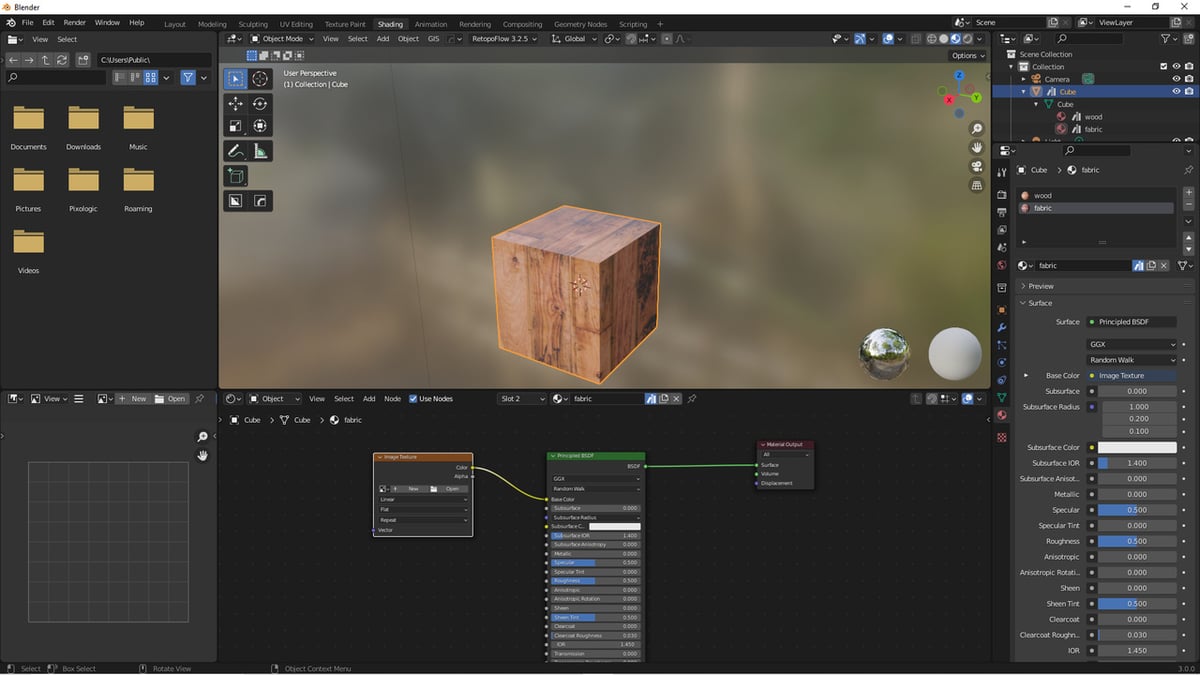
Step 2: Add Texture
With the material assigned, proceed to the Texture tab to add a new texture. You can choose from various texture types, such as Image or Noise, depending on your requirements.
Using Image Textures
To use an image as a texture, select \"Image or Movie\" in the texture type and upload your desired image. Adjust the mapping settings to define how the texture is projected onto the object.
Procedural Textures
For procedural textures, select the desired procedural pattern from the texture type. These textures are generated mathematically and offer endless customization.
Step 3: Configure Texture Settings
Adjust the texture settings such as scaling, rotation, and mapping coordinates to ensure the texture aligns correctly with your object\"s surface.

Step 4: Fine-tuning
Further refine the texture\"s appearance by modifying properties in the shader editor, such as the Principled BSDF node for realistic material effects.
_HOOK_
Additional Tips
- Utilize UV mapping for complex objects to accurately wrap textures.
- Experiment with blending modes and opacity settings for layered textures.
- Use texture nodes in the shader editor for advanced texture control and effects.

Conclusion
Adding textures in Blender is a crucial step in 3D modeling to achieve realistic or stylized looks for objects. By following these steps and exploring Blender\"s vast texturing tools, artists can greatly enhance the visual appeal of their models.
Step 2: Add Texture
With the material assigned, proceed to the Texture tab to add a new texture. You can choose from various texture types, such as Image or Noise, depending on your requirements.
Using Image Textures
To use an image as a texture, select \"Image or Movie\" in the texture type and upload your desired image. Adjust the mapping settings to define how the texture is projected onto the object.
Procedural Textures
For procedural textures, select the desired procedural pattern from the texture type. These textures are generated mathematically and offer endless customization.
Add A Texture to An Object Blender Tutorial
Tutorial: Dive into an exciting world of learning with our engaging tutorial video! Discover new skills, gain knowledge, and unleash your creativity. Don\'t miss out on this opportunity to enhance your expertise! Blender: Step into the world of 3D animation and design with our captivating Blender video. Explore the endless possibilities of this powerful software and unleash your imagination. Get ready to be amazed!
Step 3: Configure Texture Settings
Adjust the texture settings such as scaling, rotation, and mapping coordinates to ensure the texture aligns correctly with your object\"s surface.
Step 4: Fine-tuning
Further refine the texture\"s appearance by modifying properties in the shader editor, such as the Principled BSDF node for realistic material effects.

_HOOK_
Additional Tips
- Utilize UV mapping for complex objects to accurately wrap textures.
- Experiment with blending modes and opacity settings for layered textures.
- Use texture nodes in the shader editor for advanced texture control and effects.

Conclusion
Adding textures in Blender is a crucial step in 3D modeling to achieve realistic or stylized looks for objects. By following these steps and exploring Blender\"s vast texturing tools, artists can greatly enhance the visual appeal of their models.
Step 3: Configure Texture Settings
Adjust the texture settings such as scaling, rotation, and mapping coordinates to ensure the texture aligns correctly with your object\"s surface.
Step 4: Fine-tuning
Further refine the texture\"s appearance by modifying properties in the shader editor, such as the Principled BSDF node for realistic material effects.
Additional Tips
- Utilize UV mapping for complex objects to accurately wrap textures.
- Experiment with blending modes and opacity settings for layered textures.
- Use texture nodes in the shader editor for advanced texture control and effects.
_HOOK_
Conclusion
Adding textures in Blender is a crucial step in 3D modeling to achieve realistic or stylized looks for objects. By following these steps and exploring Blender\"s vast texturing tools, artists can greatly enhance the visual appeal of their models.
Step 4: Fine-tuning
Further refine the texture\"s appearance by modifying properties in the shader editor, such as the Principled BSDF node for realistic material effects.
Additional Tips
- Utilize UV mapping for complex objects to accurately wrap textures.
- Experiment with blending modes and opacity settings for layered textures.
- Use texture nodes in the shader editor for advanced texture control and effects.
Conclusion
Adding textures in Blender is a crucial step in 3D modeling to achieve realistic or stylized looks for objects. By following these steps and exploring Blender\"s vast texturing tools, artists can greatly enhance the visual appeal of their models.
Additional Tips
- Utilize UV mapping for complex objects to accurately wrap textures.
- Experiment with blending modes and opacity settings for layered textures.
- Use texture nodes in the shader editor for advanced texture control and effects.
_HOOK_
Conclusion
Adding textures in Blender is a crucial step in 3D modeling to achieve realistic or stylized looks for objects. By following these steps and exploring Blender\"s vast texturing tools, artists can greatly enhance the visual appeal of their models.
Conclusion
Adding textures in Blender is a crucial step in 3D modeling to achieve realistic or stylized looks for objects. By following these steps and exploring Blender\"s vast texturing tools, artists can greatly enhance the visual appeal of their models.
Introduction to Texturing in Blender
Texturing in Blender is a fundamental skill for any 3D artist, allowing you to bring your models to life with realistic details or stylized appearances. It involves mapping a 2D image onto a 3D object to give it color, depth, and texture. Whether you\"re aiming for photorealism or crafting a fantasy scene, mastering texturing is key to enhancing the visual impact of your projects.
Blender offers a versatile set of tools for texturing, from traditional image mapping to advanced procedural textures. Understanding these tools and techniques is essential for creating detailed and immersive 3D art. This section will guide you through the basics of adding textures in Blender, setting the foundation for more complex texturing work.
- Understanding the Texture Workflow: Learn how to navigate Blender\"s texturing workflow, including material setup, texture assignment, and mapping techniques.
- Image Textures vs. Procedural Textures: Explore the differences between image-based textures and procedural textures, and when to use each type.
- UV Mapping Essentials: Discover the importance of UV mapping in texturing, allowing you to accurately apply 2D images to the complex surfaces of your 3D models.
- Texture Adjustment and Fine-tuning: Gain insights into adjusting textures within Blender, including scaling, rotation, and blending modes for the perfect look.
By the end of this section, you\"ll have a solid understanding of the texturing process in Blender, ready to apply textures to your own models and bring your 3D creations to the next level.
Preparing Your Model for Texturing
Preparing your model for texturing is a crucial step in the 3D modeling process in Blender. It ensures that textures will be accurately and effectively applied to your model, enhancing its visual appeal. This preparation involves several key steps:
- Clean Up Your Model: Ensure your model is free of unnecessary vertices, faces, and edges. A clean geometry will make UV mapping easier and more accurate.
- Apply Necessary Modifiers: Before texturing, apply any modifiers that might affect the geometry of your model. This step is essential for maintaining the integrity of your textures upon rendering.
- Mark Seams for UV Unwrapping: Identify and mark the seams where you want your model to be \"cut\" for UV unwrapping. Proper seam placement is crucial for minimizing texture stretching and making texture application easier.
- UV Unwrap Your Model: Once seams are marked, unwrap your model to lay out its 3D surface in a 2D space. This UV map is where you\"ll apply your textures. Adjust the UV layout to minimize distortion and make the most efficient use of your texture space.
- Check Normals: Ensure that all normals are facing the correct direction. Inconsistent normals can cause issues with texture application and lighting.
- Set Up the Material: Assign a material to your model if you haven\"t already. This material will serve as the \"canvas\" for your textures.
By carefully preparing your model for texturing, you create a solid foundation for the next steps in the texturing process. This preparation ensures that your textures will look as intended, bringing your 3D model to life with depth, realism, or any artistic style you choose to pursue.
Step-by-Step Process to Add Textures
Adding textures in Blender is a critical skill for enhancing the visual appeal of your 3D models. Follow this detailed step-by-step process to apply textures effectively:
- Material Assignment: Select your object and go to the Materials tab to create a new material. This material acts as a base for the texture.
- Texture Selection: Navigate to the Texture tab and click \"New\" to add a texture. You can choose from different types such as Image or Procedural.
- Image Textures: For image textures, click \"Open\" to select the image file you want to use. Adjust the mapping settings to correctly project the texture onto the model.
- Procedural Textures: Select a procedural texture type and customize its settings to achieve the desired effect without using image files.
- UV Unwrapping: For complex models, use UV mapping to unwrap the model, creating a 2D representation for accurate texture mapping.
- Texture Settings: Adjust the texture’s scale, rotation, and mapping coordinates to fit your model perfectly. Use the shader editor for more advanced adjustments.
- Preview and Adjust: Continuously preview your texture on the model and make necessary adjustments to ensure it looks as intended.
This process allows for the precise application of textures, ensuring your 3D models look detailed, realistic, or stylized according to your vision.
_HOOK_
Using Image Textures for Realism
Image textures are a powerful tool in Blender for achieving realistic visuals in 3D models. They allow artists to apply photographic details to their creations, simulating real-world materials like wood, metal, fabric, and more. Here\"s how to effectively use image textures for realism:
- Choosing High-Quality Textures: The foundation of realism lies in the quality of the textures. Opt for high-resolution, seamless images that closely match the material you\"re simulating.
- Editing Textures: Pre-edit your textures in an image editor to adjust color, contrast, and brightness to fit your scene\"s lighting and mood.
- Mapping Techniques: Use UV mapping for complex objects to accurately project textures onto their surfaces. For simpler shapes, projection mapping may suffice.
- Layering Textures: For added depth and detail, layer multiple textures. Use masks and blending modes to combine them seamlessly.
- Bump and Normal Maps: Utilize bump and normal maps to add surface detail and depth without increasing the polygon count of your model.
- Reflectivity and Glossiness: Adjust the reflectivity and glossiness settings to match the physical properties of the material being simulated. This step is crucial for metals, glass, and other reflective surfaces.
- Environmental Interaction: Consider how the environment interacts with your material. Use reflection probes and HDRIs to accurately simulate environmental reflections.
By carefully selecting and manipulating image textures, you can achieve a high level of realism in Blender. This process not only enhances the visual appeal of your models but also brings them to life by mimicking the complexity of real-world materials.
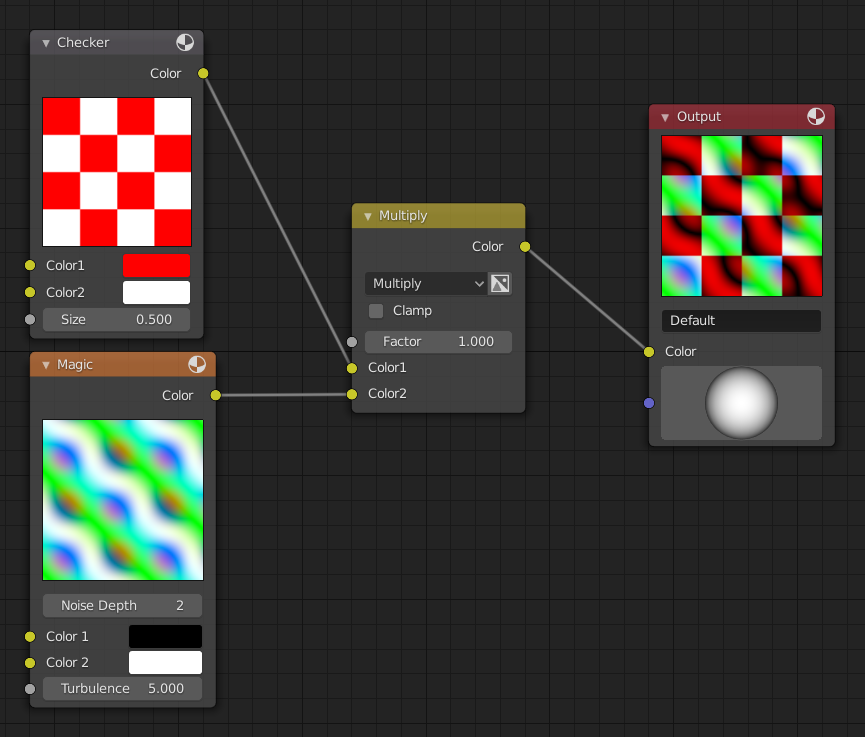
Exploring Procedural Textures for Creativity
Procedural textures in Blender offer a unique avenue for creativity, allowing artists to generate textures mathematically within the software. Unlike image textures, procedural textures are not based on external images, providing endless possibilities for customization and detail without the need for high-resolution texture files. Here\"s how to leverage procedural textures for your creative projects:
- Understand the Basics: Procedural textures are created using mathematical algorithms, offering control over patterns, colors, and details directly within Blender.
- Select a Procedural Texture: Blender includes a variety of procedural textures, such as Noise, Voronoi, and Musgrave. Each has unique properties and settings for customization.
- Adjust Texture Settings: Experiment with the settings of your chosen procedural texture. Parameters like scale, detail, and distortion can drastically change the appearance of your texture.
- Combine Textures: For more complex effects, consider layering multiple procedural textures using Blender’s node system. This can create sophisticated surfaces that respond dynamically to light and shadow.
- Use in Various Applications: Procedural textures are not just for surfaces. They can also drive displacement, influence animations, or simulate environmental effects like fog or clouds.
- Non-Destructive Workflow: A major advantage of procedural textures is their non-destructive nature. You can adjust parameters at any stage without losing quality or starting over.
Embracing procedural textures opens up a realm of creativity and experimentation. With practice, you can create intricate and dynamic textures that breathe life into your 3D models, all from within Blender\"s powerful suite of tools.
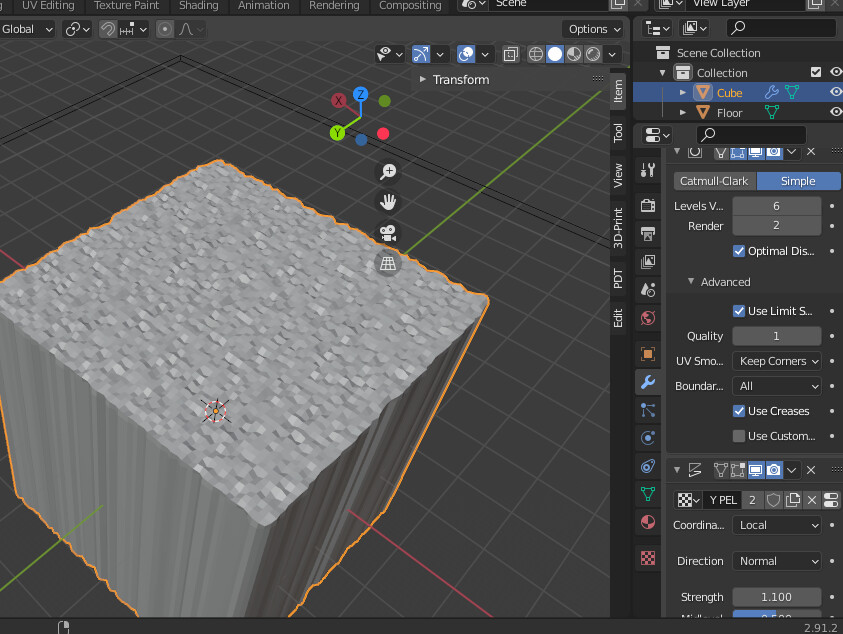
UV Mapping Techniques for Complex Models
UV Mapping in Blender is a critical process for texturing complex models, enabling artists to project 3D models onto a 2D plane for texture application. The process involves marking seams on your model to guide the unwrapping process, ensuring textures are applied accurately without stretching. Seams act as the edges where the model is \"cut\" to lay flat. The UV Editor, paired with Edit Mode, is where most of the UV mapping work is done, allowing for detailed adjustments and precise control over how textures map onto the model.
Several unwrapping methods are available in Blender, each suited for different types of models and texturing needs:
- Unwrap: Utilizes marked seams to lay out the UV map, minimizing stretching.
- Smart UV Project: Ideal for hard surface models, using angle data to automatically cut the mesh for unwrapping.
- Lightmap Pack: Designed for game assets, unwraps each face individually to maximize UV space usage.
- Follow Active Quads: Useful for creating square UV grids, based on an active quad guide.
- Cube, Cylinder, and Sphere Projection: Projection methods tailored for unwrapping specific primitive shapes, taking the view angle into account.
Effectively utilizing these techniques requires an understanding of Blender\"s tools and the specific needs of your project. Marking seams and selecting the appropriate unwrapping method are crucial first steps in achieving a well-textured model.
Adjusting Texture Settings for Perfect Fit
Adjusting texture settings in Blender ensures your textures fit perfectly on your 3D models, enhancing realism and visual appeal. This process involves manipulating UV maps, scaling, and choosing the right mapping nodes to achieve the desired effect.
To scale textures for a perfect fit, you can adjust the UV map scale directly in the UV editor. Scaling can be done uniformly or along a single axis to avoid stretching. Additionally, setting the pivot point for scaling allows for more precise control over how textures are applied.
For image textures, adding a mapping node in the shader editor lets you scale the texture without altering the UV map. This method is especially useful when you need to apply different textures at various scales on the same object. It involves connecting a texture coordinate node to a mapping node, and then to your image texture node, allowing you to scale textures by adjusting the X and Y values in the mapping node.
Procedural textures, being 3D or 4D, offer additional scaling options in the Z and W directions, enabling infinite detail without loss of quality as you scale. For these textures, using generated or object coordinates can affect how the texture is projected onto the model, similar to choosing different pivot points for scaling.
When textures appear stretched, adjusting the scale uniformly or ensuring the mapping node settings match the object surface can fix the issue. This may involve changing the UV map or the parameters within the mapping node to achieve a uniform texture application.
Moreover, the choice between UV mapping, box mapping, generated coordinates, and object coordinates can significantly impact how textures fit and appear on your models. Each method has its advantages, depending on the complexity of the model and the texture\"s characteristics.
Understanding these techniques and tools in Blender allows for greater flexibility and creativity in texturing, ensuring your models look their best with perfectly fitting textures.
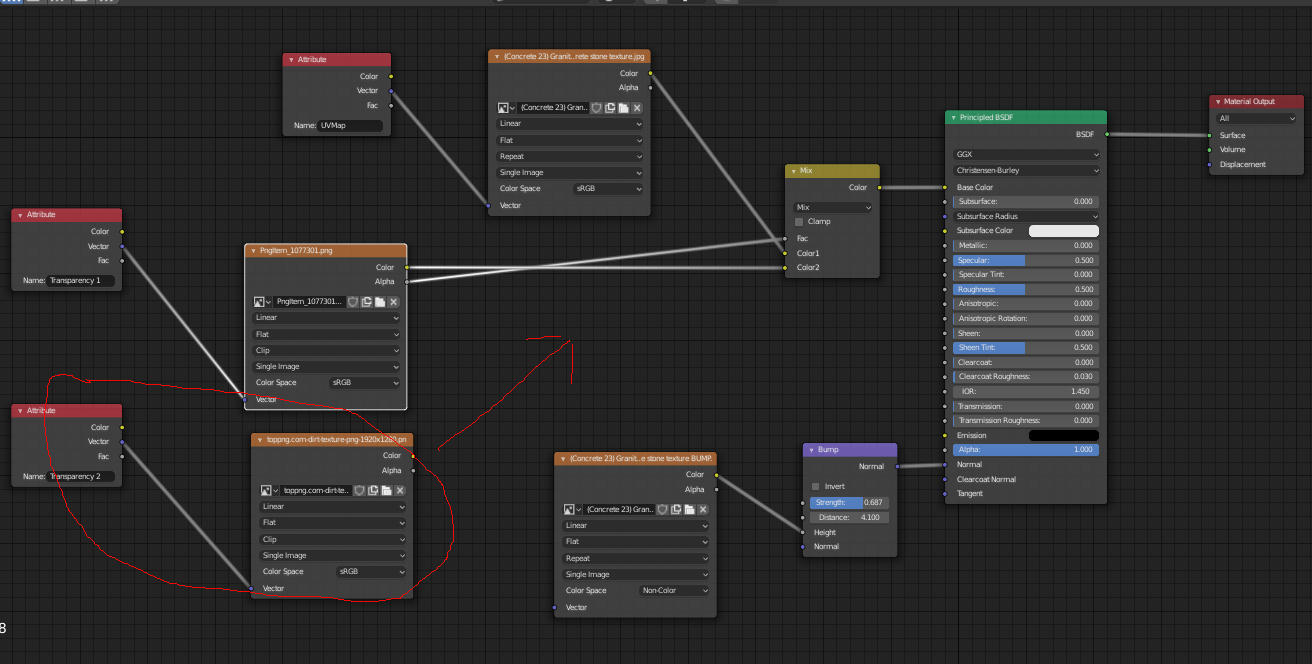
Advanced Texturing Techniques with Nodes
Advanced texturing in Blender utilizes nodes to create complex, realistic textures through a layered material approach. This method combines multiple texture layers, each with its own properties, to simulate materials like wood, metal, and fabric. By adjusting parameters and layering textures, artists can achieve highly detailed and visually appealing results.
Key components in advanced texturing include the Mix Shader node for blending shaders and the Texture Coordinate node for mapping textures onto objects. Layered techniques allow for the simulation of surface properties such as roughness and color variation, enhancing the material\"s realism.
Procedural texturing, a vital part of advanced techniques, leverages nodes like noise textures (Voronoi, Musgrave) to create surface details and imperfections. Image textures can add color and patterns, while procedural textures like the Wave texture simulate dynamic effects.
Texture painting in Blender opens up creative possibilities, allowing artists to add fine details directly onto models. Layered materials, combined with procedural and image textures, create rich, detailed surfaces. The node-based material editor is crucial for crafting these complex materials, offering a vast array of functions and adjustments to fine-tune the final look.
Advanced UV mapping techniques in Blender help optimize texture placement on complex models, minimizing distortion and enhancing realism. Techniques such as strategic seam placement, UV island scaling and rotation, and efficient UV island packing are essential for detailed texturing work.
Overall, advanced texturing with nodes in Blender empowers artists to create intricate materials that breathe life into their 3D models. Experimenting with these techniques and exploring the node editor will take your texturing skills to the next level, unlocking endless creative possibilities.
_HOOK_
Tips and Tricks for Efficient Texturing
Efficient texturing in Blender involves a combination of technical knowledge and creative approaches to achieve realistic and visually appealing results. Here are some tips and tricks to enhance your texturing workflow:
- Understand Your Material: Begin by thoroughly studying the material you aim to replicate. Pay attention to its unique characteristics such as color, texture, and reflectivity to make your 3D models more lifelike.
- Use Reference Images: Collect high-quality reference images that accurately represent the material\"s nuances under different lighting conditions and angles. This will assist in achieving more accurate texturing results.
- Experiment with Blender\"s Node Editor: Utilize Blender\"s node-based material editor to create complex materials by connecting different nodes. This allows for detailed control over properties like color, texture, and transparency.
- Layer Your Textures: For added realism, consider layering multiple textures such as bump, normal, and image textures. This helps simulate surface details like scratches and imperfections, adding authenticity to your material.
- Adjust Lighting: Lighting significantly affects the appearance of materials. Experiment with various lighting setups to highlight the textures and details of your materials.
- Utilize Procedural Textures: Blender\"s procedural textures offer an array of patterns and effects to add complexity to your materials. They can simulate effects like noise, scratches, and fabric weaves without using external image textures.
- Focus on Reflectivity and Roughness: Fine-tune the reflectivity and roughness of your materials based on your reference images to mimic real-world properties accurately. Adjust these parameters to control how light interacts with your material.
- Add Imperfections: Realistic materials often contain imperfections. Adding details such as fingerprints, dust, or smudges can make your materials appear more authentic and lived-in.
By applying these techniques, you can enhance the realism and quality of your materials in Blender. Remember, creating realistic materials is a blend of art and science, requiring both technical skills and an artistic eye. Experimentation and practice are key to mastering efficient texturing in Blender.
Common Pitfalls to Avoid in Texturing
Texturing in Blender is an essential skill for achieving realism in 3D models, but several common pitfalls can hinder the process. Awareness and avoidance of these pitfalls are crucial for efficient and effective texturing:
- Ignoring UV Mapping Practices: UV mapping is foundational to texturing, enabling textures to align correctly with 3D models. Neglecting proper UV unwrapping or utilizing default UV maps without adjustments can lead to texture stretching and misalignment.
- Overlooking Texture Resolution: Using textures with resolutions that don\"t match the scale of your project can result in blurred or pixelated images. Ensure that texture resolutions are appropriate for the object size and intended level of detail.
- Avoiding Texture Variation: Repeating the same texture across large surfaces can create a monotonous and unrealistic appearance. Use variations, such as mixing different textures or modifying them with procedural effects, to enhance realism.
- Misusing Scale in Textures: Incorrectly scaled textures can disrupt the perceived size and distance of objects. Scale textures appropriately to maintain consistency and believability within the scene.
- Neglecting Material Properties: Real-world materials have unique characteristics like reflectivity, roughness, and bumpiness. Failing to incorporate these properties into your textures can result in flat and unconvincing materials.
- Forgetting Lighting Effects: Lighting significantly impacts the appearance of textures. Testing textures under various lighting conditions ensures they maintain their realism and integrate well with the overall scene.
Overcoming these pitfalls involves diligent practice, a keen eye for detail, and a deep understanding of both Blender\"s texturing tools and the properties of real-world materials. By paying attention to UV mapping, texture resolution, variation, scale, material properties, and lighting effects, you can create more convincing and visually appealing textures for your 3D projects.
Resources for Learning More about Texturing
Enhancing your Blender models with textures is a skill that can add realism and depth to your creations. Whether you\"re a beginner or an experienced artist, there are countless resources available to help you improve your texturing techniques. Here are some valuable resources to consider:
- Official Blender Tutorials: The Blender Foundation offers a range of tutorials covering all aspects of Blender, including texturing. These tutorials are tailored to different skill levels and cover both basic and advanced texturing techniques.
- Online Courses and Workshops: Websites like Udemy, Coursera, and Skillshare feature comprehensive courses on Blender, including detailed sections on texturing. These courses often include project-based learning, which can be very effective.
- YouTube Channels: Many experienced Blender artists share their knowledge on YouTube, providing free tutorials that cover texturing in great detail. Channels such as Blender Guru, CG Cookie, and Darrin Lile offer tutorials ranging from beginner to advanced levels.
- Books and E-Books: There are several books available that focus on Blender, including specific chapters or sections dedicated to texturing. \"Blender 3D Cookbook\" and \"Learning Blender: A Hands-On Guide to Creating 3D Animated Characters\" are examples of books that provide valuable insights into texturing.
- Forums and Community Groups: Blender has a strong and supportive community. Forums like Blender Artists and the Blender subreddit are great places to ask questions, share your work, and learn from other artists’ experiences.
- BlenderNation: BlenderNation regularly posts articles, tutorials, and news related to Blender, including texturing techniques and project showcases. It\"s a great source for inspiration and learning new tricks.
As you explore these resources, remember that practice is key to mastering texturing in Blender. Experiment with different techniques, textures, and tools to discover what works best for your projects. Happy texturing!
READ MORE:
Conclusion: Unleashing Creativity with Textures
Mastering the art of adding textures in Blender is a journey that opens up endless possibilities for creativity and innovation. Through the exploration of both image and procedural textures, artists can bring unparalleled realism and artistic flair to their 3D models. The process, from UV mapping to adjusting texture settings, requires patience and practice, but the results can be truly transformative.
Remember, the key to successful texturing lies in experimentation and continuous learning. By leveraging the rich array of resources available, from tutorials to community forums, you can continually expand your skillset and push the boundaries of what\"s possible in Blender. Texturing is not just about applying surfaces; it\"s about bringing your creations to life, imbuing them with character and depth.
As you grow more comfortable with Blender\"s texturing tools, challenge yourself with more complex projects. Experiment with different techniques and settings to see how they affect the final look of your model. Share your work with the community to get feedback and learn from others.
In conclusion, adding textures in Blender is a powerful way to enhance your 3D models. It\"s an essential skill that combines technical knowledge with artistic expression, allowing you to unleash your creativity in ways you\"ve never imagined. So, dive in, explore, and let the world of texturing in Blender inspire your next masterpiece.
Embracing textures in Blender opens a world of creativity, transforming your models with realism and depth. Dive into texturing to unleash your artistic potential and bring your digital creations to life with unparalleled detail and vibrancy.