Topic how to merge meshes in blender: Discover the art of merging meshes in Blender, a pivotal skill for enhancing your 3D modeling projects. This guide offers essential tips and step-by-step instructions to streamline your workflow and bring your creative visions to life.
Table of Content
- How can I merge meshes in Blender?
- Methods to Merge Meshes
- Key Considerations
- Additional Tips
- Key Considerations
- Additional Tips
- Additional Tips
- Understanding the Basics of Mesh Merging
- YOUTUBE: How to Combine Objects into One Mesh in Blender with Sub Surf Modifier and Remesh
- Step-by-Step Instructions for Joining Meshes
- Using the Boolean Modifier to Merge Meshes
- Edge Connect Technique for Mesh Merging
- Common Pitfalls and How to Avoid Them
- Advanced Techniques: Multi-Object Editing
- Splitting Merged Meshes: Techniques and Tips
- FAQs: Addressing Common Questions on Mesh Merging
- Best Practices for Efficient Workflow
- Conclusion: Enhancing Your 3D Modeling Skills
How can I merge meshes in Blender?
To merge meshes in Blender, you can follow these steps:
- Select all the meshes you wish to merge by clicking on each one while holding down the Shift key.
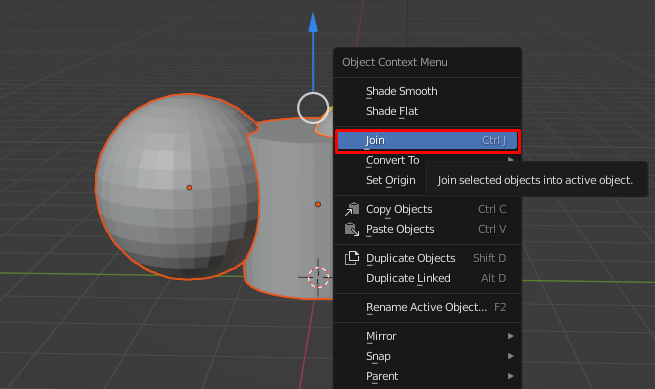
- Once all the meshes are selected, press the Ctrl + J keys on your keyboard to join them together into a single mesh.
- You can then go into Edit mode to further refine and adjust the merged mesh as needed.
READ MORE:
Methods to Merge Meshes
- Join Command: Use Ctrl + J to join selected meshes into a single object. This method is straightforward but requires that the meshes are mesh-based objects.
- Edge Connect: A more nuanced approach involves deleting opposing faces of objects, selecting edges, and creating a new face from edges to unify the meshes.
- Boolean Modifier: Add a Boolean modifier to one mesh and select the other as the object for the Boolean operation. This method combines meshes into a unified shape.

Key Considerations
- Ensure meshes use the same coordinate system for a successful merge.
- Avoid combining overly complex meshes to prevent issues with Boolean operations.
- Ensure there are no overlapping faces between meshes to avoid unexpected results.
Splitting Merged Meshes
If you need to split previously merged meshes, Blender provides options like the Undo feature (Ctrl + Z) or the Separate option (P) to manually select and separate parts of the mesh.

Additional Tips
- Grouping Objects: To group objects in Blender, use Shift to select multiple objects and M to move them to a new collection.
- Vertex Groups: Create vertex groups by accessing the object data tab and using the plus sign to add a new vertex group.
- Selecting Multiple Objects: Use Ctrl + H to make all objects visible, then A to select or deselect all objects in the scene.
Merging meshes in Blender enhances your 3D modeling capabilities, allowing for the creation of complex and detailed models. Remember to experiment with different methods and considerations to find what works best for your project.
Key Considerations
- Ensure meshes use the same coordinate system for a successful merge.
- Avoid combining overly complex meshes to prevent issues with Boolean operations.
- Ensure there are no overlapping faces between meshes to avoid unexpected results.
Splitting Merged Meshes
If you need to split previously merged meshes, Blender provides options like the Undo feature (Ctrl + Z) or the Separate option (P) to manually select and separate parts of the mesh.
_HOOK_
Additional Tips
- Grouping Objects: To group objects in Blender, use Shift to select multiple objects and M to move them to a new collection.
- Vertex Groups: Create vertex groups by accessing the object data tab and using the plus sign to add a new vertex group.
- Selecting Multiple Objects: Use Ctrl + H to make all objects visible, then A to select or deselect all objects in the scene.
Merging meshes in Blender enhances your 3D modeling capabilities, allowing for the creation of complex and detailed models. Remember to experiment with different methods and considerations to find what works best for your project.

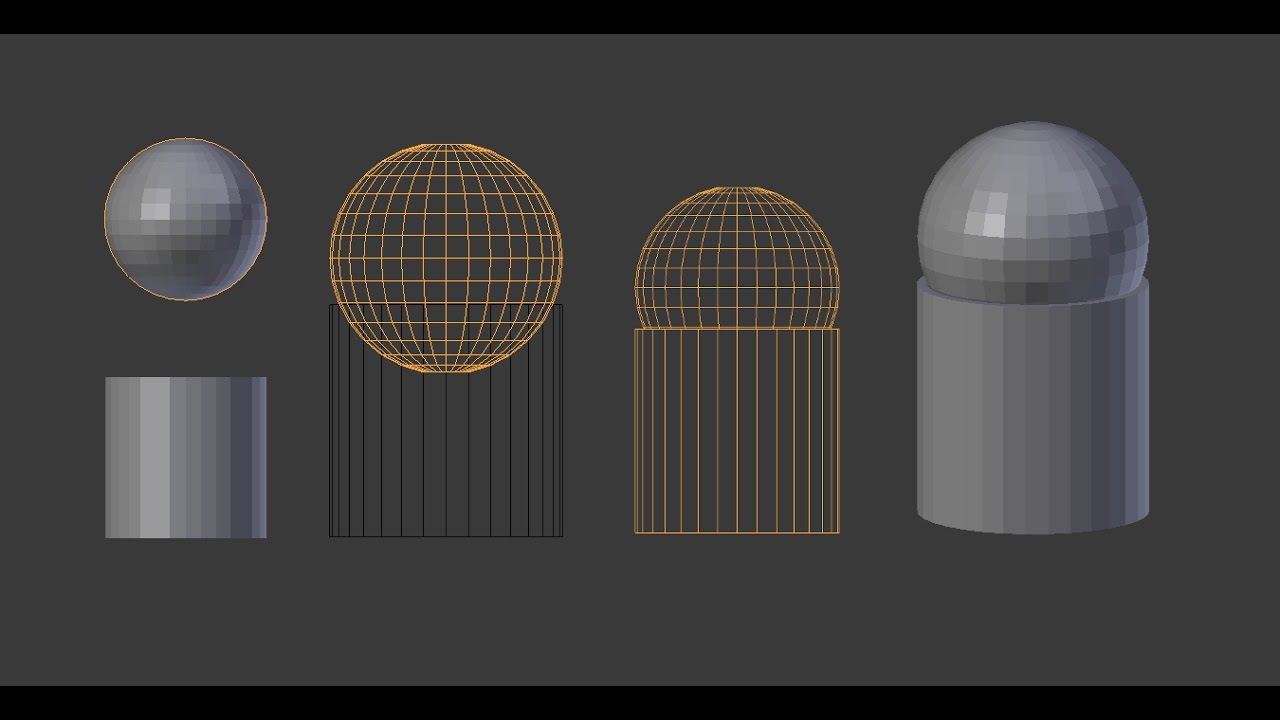
Understanding the Basics of Mesh Merging
Merging meshes in Blender is a fundamental technique for creating complex and visually appealing 3D models. It involves combining separate mesh objects into a cohesive whole, allowing for intricate details and smooth transitions. This process is essential for ensuring the model behaves as a single object when applying modifications or animations.
To begin merging meshes, select the mesh objects you want to combine. This can be done in Object mode by selecting an object and then holding the \"Shift\" key to select additional objects. Once your objects are selected, you can merge them using the \"Ctrl + J\" shortcut to join them into a single mesh. This method is straightforward and is particularly useful for quickly combining specific mesh objects without needing intricate topology adjustments.
- Boolean Modifier: For more precise merging results, especially with complex shapes, the Boolean modifier can be used. This involves adding a Boolean modifier to one of the meshes and setting the operation to \"Union,\" then selecting the other mesh as the object to perform the Boolean operation on. This method is effective for combining meshes without overlapping faces, ensuring a clean merge.
- Sculpting Tools: For creating more organic shapes, Blender\"s sculpting tools can be employed. Using brushes like the Clay brush or the Smooth brush allows for seamless blending of separate meshes, ideal for realistic characters or creatures.
It\"s crucial to ensure that the coordinate systems of the meshes are the same to avoid misalignment or distortion. Also, be aware of the complexity of the meshes; more intricate shapes may require additional computation time or could result in unexpected outcomes. Before attempting any mesh merging, backing up your files is advisable to prevent any loss of work.
Successfully merging meshes can lead to visually appealing shapes that appear seamless and cohesive. Paying attention to details and employing the appropriate techniques during the merging process will allow you to create 3D objects with smooth transitions and intricate details, enhancing the overall aesthetics of your models.
How to Combine Objects into One Mesh in Blender with Sub Surf Modifier and Remesh
Merge: Discover the magic of combining two worlds into one with this captivating video on the art of merging. Let your imagination run wild as you witness the seamless blend of ideas and creativity. Blender: Step into the world of endless possibilities with this mesmerizing video showcasing the power of a blender. Watch as ingredients transform into culinary masterpieces, igniting your passion for cooking.
How to Combine Objects in Blender 2.8 Eevee using Boolean, Sub Surf Modifier, and Remesh
Today, I show you how to combine objects and meshes into ONE solid mesh - using the boolean modifier , a few subsurf modifiers ...
Step-by-Step Instructions for Joining Meshes
- Select the mesh objects you wish to join. Ensure you are in Object Mode, then click on the first mesh. Hold down the \"Shift\" key and click on additional mesh objects you want to merge.
- Join the selected meshes. With all desired meshes selected, press \"Ctrl + J\" to join them into a single mesh object. This action combines the mesh geometries into one object, allowing for easier manipulation and editing as a unified entity.
- Check the merged mesh. After joining the meshes, enter Edit Mode (\"Tab\" key) to inspect the new, unified mesh. Verify that all vertices, edges, and faces have merged correctly. Pay special attention to areas where the meshes have been combined to ensure there are no gaps or overlapping faces.
- Adjust and refine the merged mesh. Use the various tools available in Edit Mode to adjust vertices, edges, and faces for a seamless transition between the merged parts. This may involve moving vertices to eliminate visible seams or using the \"Smooth\" tool to soften any harsh edges.
- Save your work. It\"s important to periodically save your Blender project to prevent any loss of progress. After successfully merging and refining your mesh objects, save your file to secure the changes you\"ve made.
Following these steps will allow you to efficiently combine multiple mesh objects into a single entity, facilitating the creation of complex models with greater ease. Remember, practice and experimentation with these tools will enhance your proficiency in mesh manipulation and model creation in Blender.

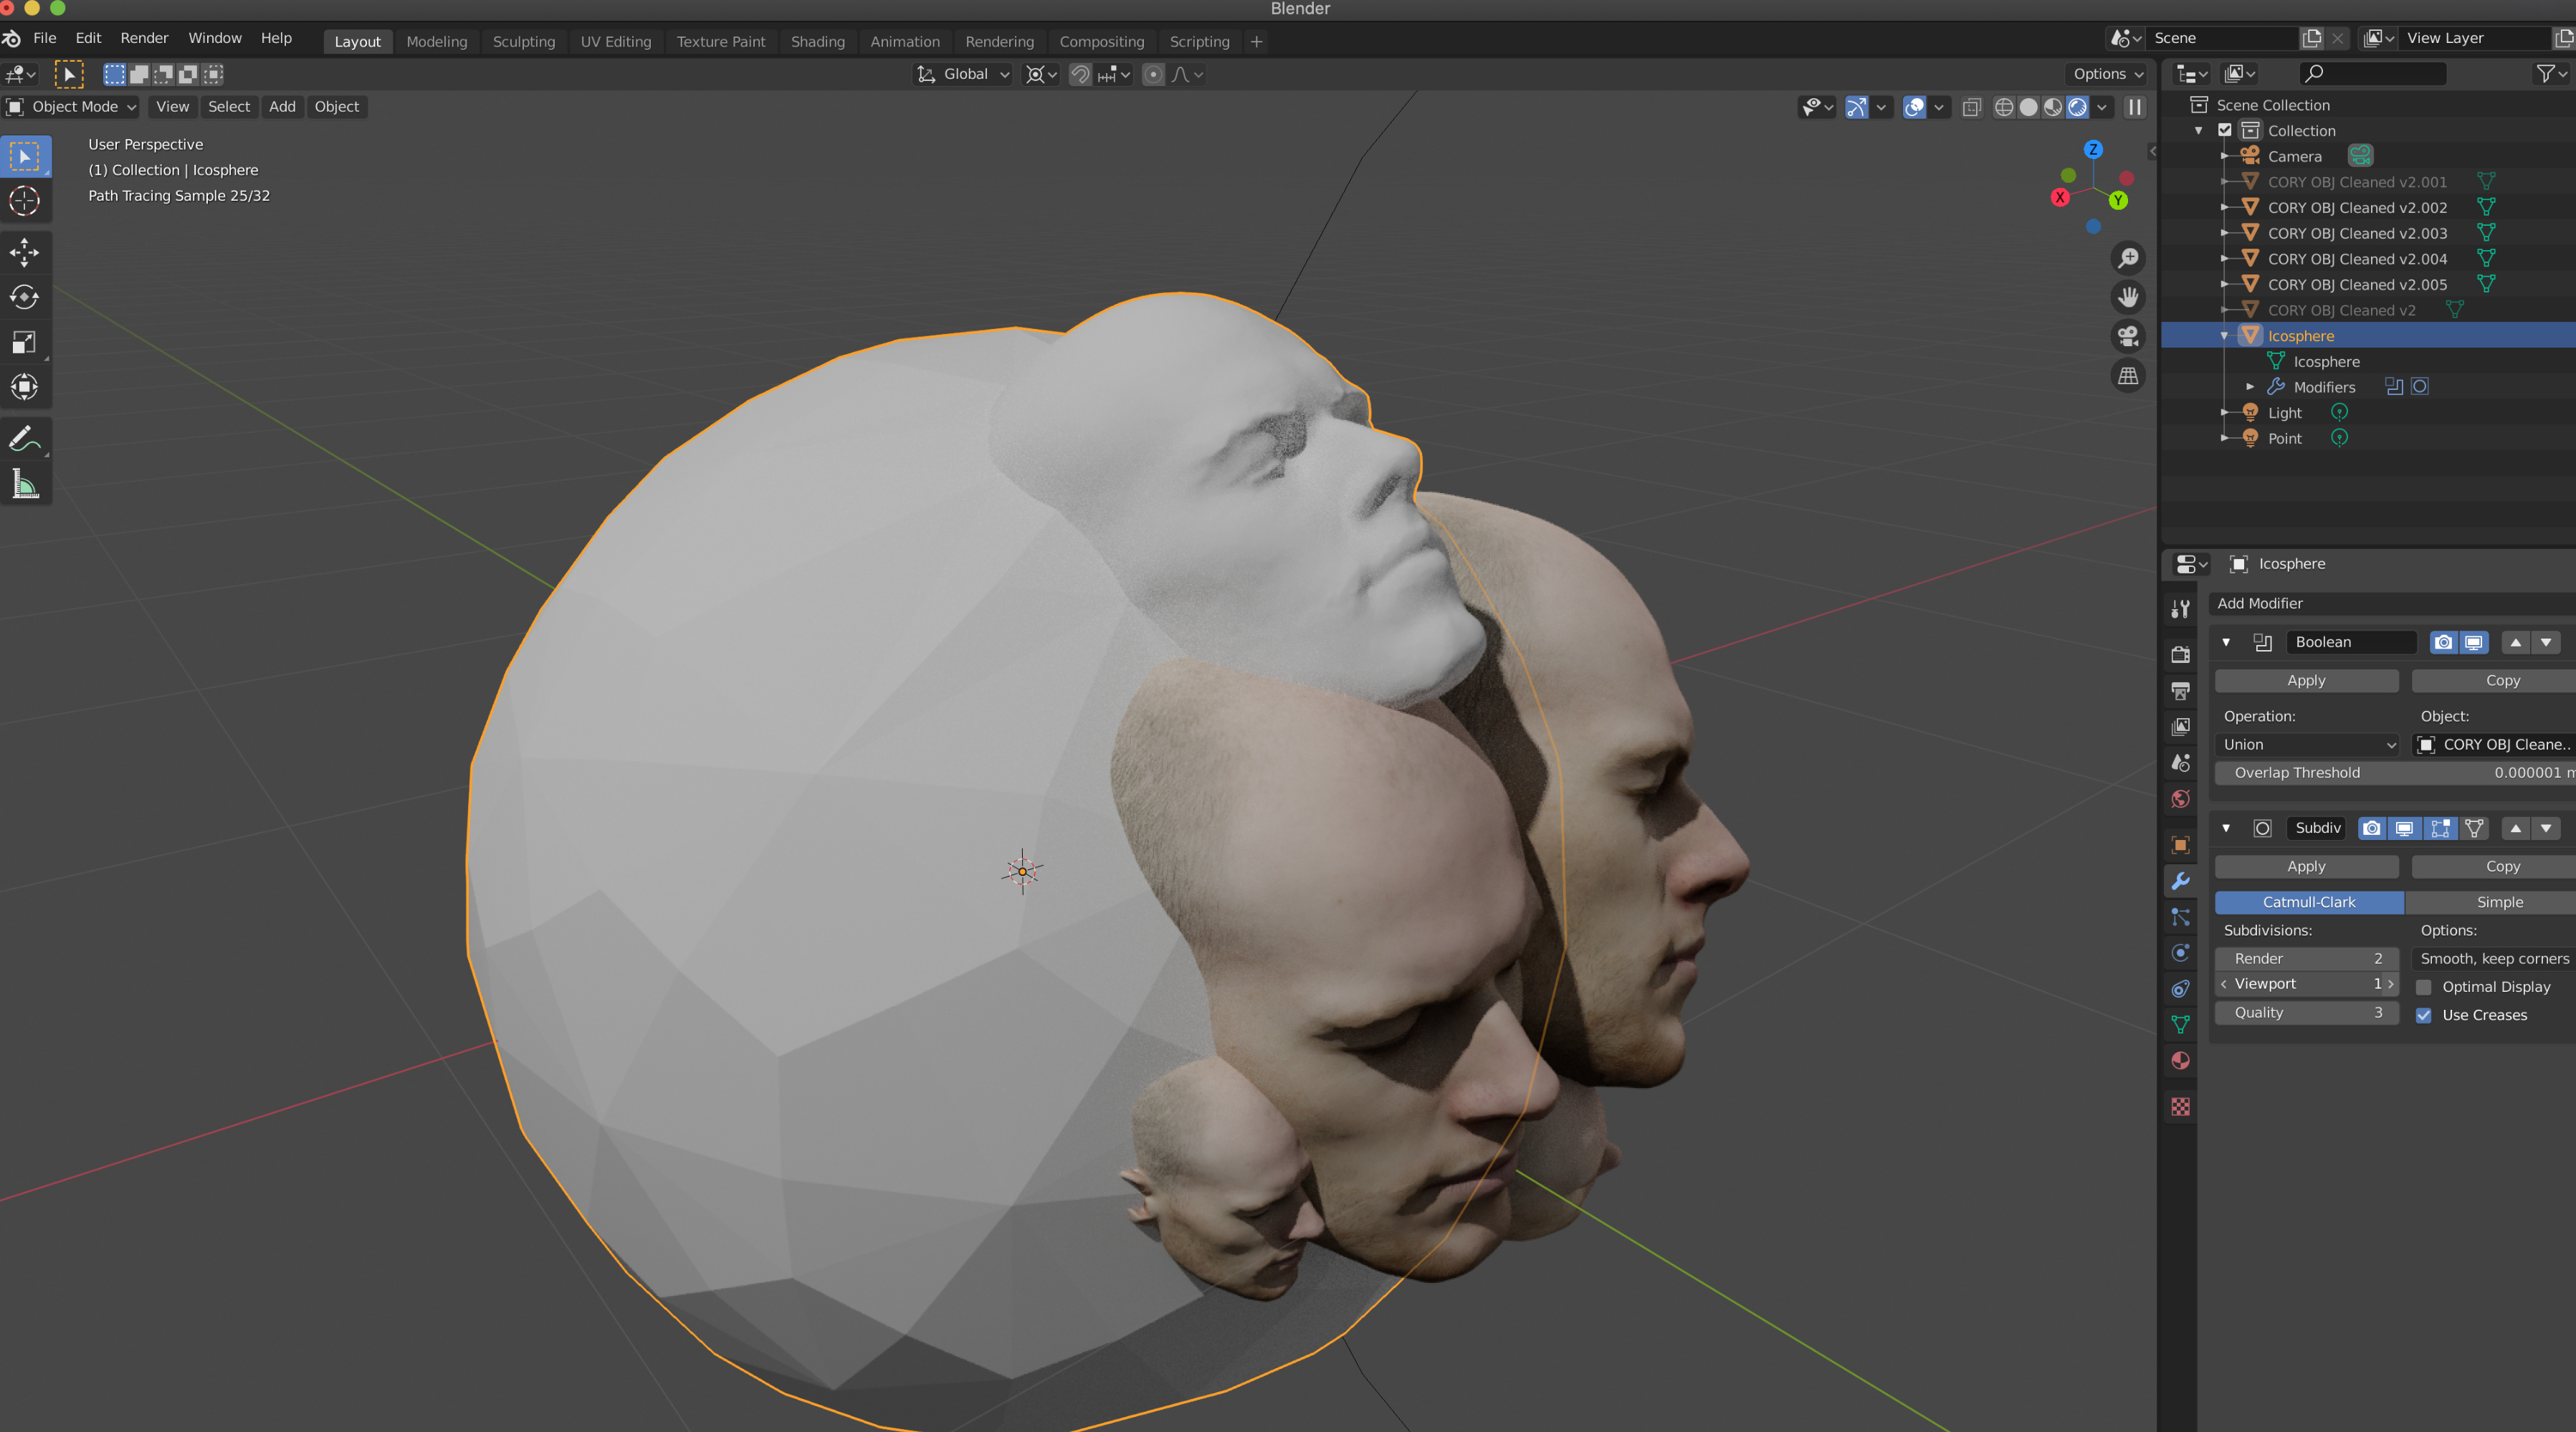
Using the Boolean Modifier to Merge Meshes
- Select the primary mesh object that you will apply the Boolean modifier to. This mesh will remain visible in the viewport, while the second mesh will be used to merge or subtract from the primary mesh.
- Ensure the second mesh object, which you intend to merge with the first, is positioned correctly in relation to the first mesh. Adjust the position, rotation, and scale as needed to get the desired outcome from the merge.
- With the primary mesh selected, go to the Modifiers tab in the Properties panel. Click \"Add Modifier\" and select \"Boolean\" from the list of modifiers.
- In the Boolean modifier settings, set the Operation to \"Union\" for merging the meshes together. Other options include \"Difference\" and \"Intersect,\" depending on the desired result.
- Click the eyedropper tool next to the \"Object\" field in the Boolean modifier settings, then click on the second mesh object in the viewport. This sets the second mesh as the target for the Boolean operation.
- Apply the Boolean modifier by clicking \"Apply\" in the modifier\"s settings. Once applied, the two meshes will be merged according to the operation specified. Note: Applying the modifier makes the operation permanent, so ensure everything is as desired before applying.
- Inspect the merged mesh. Enter Edit Mode to see the results of the merge operation. Adjust any vertices, edges, or faces as necessary to refine the merged mesh.
Using the Boolean modifier for merging meshes in Blender allows for precise control over how objects are combined, enabling complex shapes and designs to be created. Remember to consider the topology of your meshes and the impact of the Boolean operation on the resulting geometry for optimal results.
_HOOK_
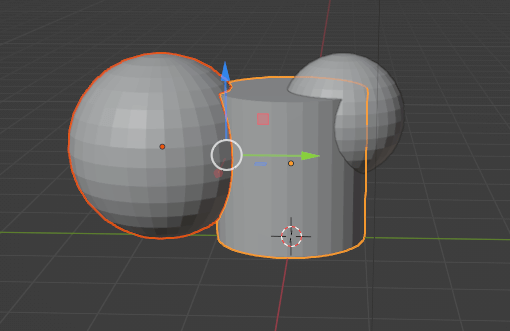
Edge Connect Technique for Mesh Merging
- Prepare your mesh objects. Ensure that the meshes you intend to merge are properly aligned next to each other in your 3D viewport. This is crucial for a seamless merge.
- Enter Edit Mode. Select one of the meshes you wish to merge, then switch to Edit Mode by pressing \"Tab.\" You may need to perform the following steps separately for each mesh if they are not part of the same object.
- Delete faces that will be merged. In Edit Mode, select the faces where the two meshes will connect and delete them by pressing \"X\" and choosing \"Delete Faces.\" This creates an open edge on both meshes where they can be joined.
- Bridge the edge loops. Select the open edges of the two meshes you wish to merge. You can do this by holding \"Shift\" and right-clicking on the edge loops. Then, use the \"Bridge Edge Loops\" tool found in the Edge menu or by searching for it using the \"F3\" search function. This will create faces between the two edge loops, effectively merging the meshes at the edges.
- Adjust the merged mesh. After bridging the edge loops, you may need to adjust the vertices, edges, or faces for a smoother transition between the merged meshes. Use various mesh editing tools in Blender, such as \"Grab,\" \"Scale,\" or \"Rotate,\" to refine the merge.
- Inspect the merger. Carefully inspect the merged area in both Object and Edit Modes to ensure the merge has been successful and there are no gaps or unwanted artifacts.
This Edge Connect Technique is particularly useful for merging meshes that are meant to connect at specific points or lines, allowing for precise control over the merging process. By carefully preparing your meshes and using Blender\"s mesh editing tools, you can achieve a seamless merge between different mesh objects.
Common Pitfalls and How to Avoid Them
- Non-Manifold Edges: Non-manifold edges can occur during mesh merging, leading to issues with modeling and rendering. To avoid this, ensure that all vertices are merged correctly, with no extra vertices lying on top of each other. Use the \"Remove Doubles\" or \"Merge by Distance\" feature to clean up any duplicate vertices.
- Inconsistent Normals: After merging meshes, the normals of the new mesh might not be uniform, causing shading issues. To fix this, select the entire mesh in Edit Mode and recalculate the normals by pressing \"Shift+N\".
- Geometry Overlaps: Overlapping geometry can create rendering artifacts. Before merging, make sure the meshes are properly aligned and overlapping vertices are merged. Utilize the \"Boolean\" modifier for complex merges, and carefully adjust the meshes to avoid overlaps.
- Scale and Rotation Issues: Applying transformations to individual objects before merging can lead to unexpected results. Always apply scale and rotation (Ctrl+A) to each object before merging to ensure uniform transformations.
- Loss of Detail: Merging highly detailed meshes can sometimes result in loss of detail. To mitigate this, consider simplifying the meshes before merging or use the \"Decimate\" modifier to reduce complexity while preserving as much detail as possible.
- Improper Use of Modifiers: Applying modifiers in the wrong order or at the wrong time can lead to issues. Plan your modifier stack carefully and apply any necessary modifiers before performing a merge that could be affected by them.
By being aware of these common pitfalls and applying the suggested solutions, you can ensure a smoother workflow and higher quality results when merging meshes in Blender. Always take the time to inspect your meshes thoroughly after any operation to catch and correct any issues early in your modeling process.
Advanced Techniques: Multi-Object Editing
Multi-object editing in Blender is a powerful feature that allows you to simultaneously edit multiple objects, streamlining the modeling process and enabling more complex edits with ease. This technique is particularly useful for mesh merging and editing tasks involving multiple parts of a model.
- Selecting Multiple Objects: Begin by selecting the objects you wish to edit together. Shift-click to select multiple objects in Object Mode, or use the \"B\" key to box select.
- Entering Multi-Object Edit Mode: With multiple objects selected, press \"Tab\" to enter Edit Mode. You will now see the vertices, edges, and faces of all selected objects, allowing you to edit them as if they were a single object.
- Merging Vertices Across Objects: To merge vertices from different objects, first select them. Use the \"M\" key to open the merge options and choose your preferred merge method, such as \"At Center\" or \"By Distance.\"
- Using Modifiers on Multiple Objects: Modifiers can be applied to multiple objects at once by selecting the objects and choosing the desired modifier from the Modifier tab. This can greatly enhance efficiency when applying uniform modifications to a set of objects.
- Linking Object Data: For objects that share the same geometry, you can link their data blocks to edit them simultaneously. Right-click on the selected objects and choose \"Link Object Data\" to make their geometry data identical. This is useful for instances where multiple objects should have the same shape and size.
This advanced technique of multi-object editing not only accelerates the modeling process but also opens up new possibilities for creative and complex designs. By leveraging Blender\"s robust toolset, you can achieve precise and efficient edits, significantly improving your workflow and productivity.
Splitting Merged Meshes: Techniques and Tips
- Using the Edit Mode: Enter Edit Mode (\"Tab\") with the merged mesh selected. This mode allows you to manipulate individual vertices, edges, and faces.
- Selecting Geometry to Split: Use various selection tools (\"A\" to select all, \"B\" for box select, \"C\" for circle select, etc.) to highlight the part of the mesh you wish to separate. You can also use \"L\" to select linked vertices when hovering over a part of the mesh.
- Splitting the Mesh: Once you have selected the portion you wish to split off, press \"P\" to open the Separate menu. You can choose to separate by selection, by material, or by loose parts, depending on your needs. \"By selection\" will split the selected vertices into a new object.
- Cleaning Up: After splitting, you may need to clean up the vertices, edges, and faces of both the original and the newly created mesh. This might involve merging vertices (\"M\") or filling holes (\"F\").
- Repositioning and Adjusting: Once split, switch back to Object Mode (\"Tab\") to reposition and adjust the new mesh object independently from the original.
Splitting merged meshes is a common task in 3D modeling, allowing for greater flexibility and modification of complex structures. By carefully selecting the parts to split and using Blender\"s built-in tools, you can effectively manage and refine your 3D models for your projects.
FAQs: Addressing Common Questions on Mesh Merging
- How do I group objects in Blender?To group objects, select all objects you intend to group, press \"Shift\" to select multiple objects, then right-click on the selected group, press \"M\" and choose \"New Collection\" to create a new set of collections.
- How do I group vertices within Blender?Grouping vertices is straightforward: click on the object, go to the object data tab, expand the vertex group selection, and click on the plus sign to add a vertex group. This creates a new vertex group.
- How do I select multiple objects in Blender?To select multiple objects, ensure visibility of all objects with \"Ctrl + H,\" then press \"A\" to select everything in the scene. Press \"A\" twice to deselect everything if needed.
- How do you connect two meshes?Connecting two meshes can be done by adding a vertex at the intersection point and connecting them with an edge, splitting one mesh at the intersection and connecting the edges, or cutting one mesh along a line that intersects both meshes and connecting the resulting edges.
- How do you join two pieces in Blender?Joining two pieces can be achieved using the Join command in the Object menu, which combines selected objects into a single object, using the Boolean modifier for union, difference, or intersection operations, or using sculpting tools to merge them into a single piece.
These FAQs provide guidance on common mesh merging questions, helping both beginners and professionals work more effectively with mesh objects in Blender.
_HOOK_
Best Practices for Efficient Workflow
- Plan Your Project: Before starting, sketch a rough idea of your final model. Planning helps in organizing your workflow and deciding which parts of the model can be merged or need to be kept separate.
- Organize Your Scene: Use collections and naming conventions for your objects and meshes. This makes it easier to find and manipulate objects later in your project.
- Use Modifiers Wisely: Modifiers like Boolean, Mirror, and Array can save time. Apply them non-destructively to maintain flexibility in editing until you\"re sure of the final shape.
- Keep a Clean Topology: When merging meshes, aim for a clean topology to avoid issues with texturing and animating later. Use tools like \"Merge by Distance\" to remove duplicate vertices.
- Master Shortcuts: Learning and using Blender\"s keyboard shortcuts can drastically speed up your workflow. Shortcuts for merging, splitting, and selecting can save valuable time.
- Regularly Save and Version Your Work: Save your work frequently and use a versioning system (either manual or with Blender\"s built-in features) to keep track of changes and experiment without losing progress.
- Use Layers and Visibility: Organize your work using layers and control visibility to focus on specific parts of your project without distractions from other elements.
- Optimize Your Meshes: Before merging, ensure that your meshes are optimized for the purpose they serve. Reducing unnecessary geometry can make future edits easier and reduce rendering times.
Following these best practices can help create an efficient workflow in Blender, making the process of merging meshes and overall 3D modeling more streamlined and effective.
READ MORE:
Conclusion: Enhancing Your 3D Modeling Skills
Merging meshes in Blender is more than just a technique; it\"s a pathway to elevating your 3D modeling skills. By mastering mesh merging, you unlock new possibilities in design, animation, and rendering. Here are key takeaways to continue enhancing your skills:
- Practice Regularly: Like any skill, proficiency in 3D modeling comes with regular practice. Challenge yourself with projects that push your boundaries.
- Explore Blender\"s Features: Blender is a powerful tool with an extensive feature set. Dive into its sculpting, texturing, and animation tools to broaden your skill set.
- Join the Community: Blender has a vibrant community of artists and developers. Participate in forums, attend workshops, and collaborate on projects to learn from others.
- Keep Up with Updates: Blender is constantly evolving. Stay updated with the latest features and improvements to make the most out of the software.
- Experiment: Don\"t be afraid to experiment with different techniques and workflows. Innovation often comes from trial and error.
- Share Your Work: Sharing your work can open up feedback from others, helping you identify areas for improvement and new techniques to explore.
In conclusion, merging meshes in Blender is a foundational skill that serves as a stepping stone to advanced 3D modeling techniques. By continuously learning, practicing, and engaging with the community, you can significantly enhance your 3D modeling skills and create more complex, high-quality models.
Mastering mesh merging in Blender opens a world of creativity, enhancing your 3D models with precision and efficiency. Dive into the art of merging meshes to bring your imaginative visions to life, and elevate your 3D modeling journey to new heights.