Topic how to use text in blender: Discover the secrets of utilizing text in Blender to elevate your 3D projects, from basic additions to advanced animations, in this comprehensive guide to mastering 3D typography.
Table of Content
- What are the basic steps for using text in Blender?
- Adding Text to Your Scene
- Editing and Customizing Text
- Animating Text
- Converting Text to Mesh
- Editing and Customizing Text
- YOUTUBE: How to Use Text in Blender Tutorial
- Animating Text
- Converting Text to Mesh
- Animating Text
- Converting Text to Mesh
- Converting Text to Mesh
- Introduction to Adding and Manipulating Text in Blender
- Step-by-Step Instructions for Adding Text Objects to Your Scene
- Editing Text: Font Selection, Size, and Alignment
- Customizing Text Appearance: Extrusion, Bevel, and Materials
- Animating Text for Dynamic Effects
- Advanced Techniques: Converting Text to Mesh for Further Manipulation
- Texturing and Shading Text for Realistic or Stylized Looks
- Practical Applications: Using Text in 3D Projects and Animations
- Troubleshooting Common Issues with Text in Blender
- Conclusion: Unleashing Creativity with Text in Blender
What are the basic steps for using text in Blender?
To use text in Blender, follow these basic steps:
- Open Blender and create a new project or open an existing one.
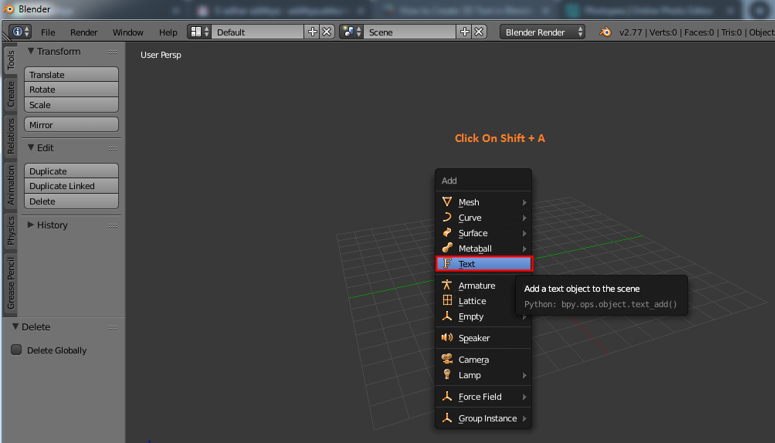
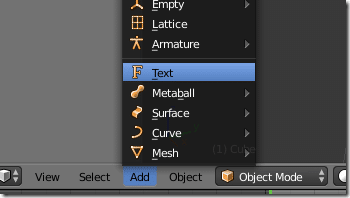
- To add text to your project, press Shift + A to open the Add menu.
- In the Add menu, select \"Text\" to add a blank text object to your scene.
- Alternatively, you can click on the \"Add\" button and choose \"Text\" to add text to your scene.
- With the text object selected, you can now edit the text by entering the desired text in the Text Editor panel.
- You can also manipulate the text\'s appearance, font, size, alignment, and other properties in the Text Object Data tab in the Properties panel.
- To position the text in your scene, use the Move, Rotate, and Scale tools to place it where you want.
- You can further customize the text by adding materials, textures, and other effects to enhance its visual appeal.
- Finally, you can animate the text by adding keyframes to create dynamic text effects in your Blender project.
By following these steps, you can effectively use text in Blender to create titles, labels, subtitles, and other text elements in your 3D projects.
READ MORE:
Adding Text to Your Scene
- Press Shift+A in the 3D viewport and select Text to add a text object.
- Enter edit mode by pressing Tab, allowing you to erase the default text and type your desired content.

Editing and Customizing Text
Once you have your text in the scene, you can customize its appearance to fit your project\"s needs.
Modifying Text Properties
- To change the font, look for the font settings in the properties panel under the Font tab.
- Adjust the size and alignment of your text from the same panel to make it fit perfectly in your scene.
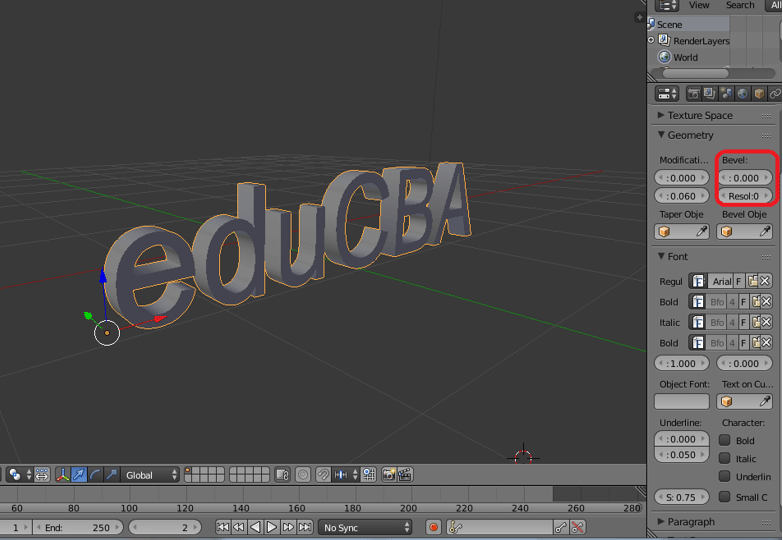
Adding Depth and Dimensions
- Increase the text\"s Extrude value under the Geometry tab to give it thickness.
- Modify the Bevel settings to add rounded edges for a more polished look.

Animating Text
Blender also allows you to animate text to add dynamics to your projects.
- Use keyframes to animate properties like location, rotation, and scale over time.
- Experiment with shape keys to create complex text animations that can enhance your animations.
Converting Text to Mesh
For further manipulation or to integrate text with other 3D objects, you might want to convert text to mesh.
- Select your text object and press Alt+C to open the conversion menu.
- Choose Mesh from Curve/Meta/Surf/Text to convert the text into a mesh object, allowing for more complex modifications.
With these techniques, you can fully harness the power of text in Blender to create engaging and dynamic 3D scenes and animations.

_HOOK_
Editing and Customizing Text
Once you have your text in the scene, you can customize its appearance to fit your project\"s needs.
Modifying Text Properties
- To change the font, look for the font settings in the properties panel under the Font tab.
- Adjust the size and alignment of your text from the same panel to make it fit perfectly in your scene.
Adding Depth and Dimensions
- Increase the text\"s Extrude value under the Geometry tab to give it thickness.
- Modify the Bevel settings to add rounded edges for a more polished look.
How to Use Text in Blender Tutorial
Tutorial: Explore this informative tutorial video that will guide you step by step to master a new skill or learn something exciting. Start your learning journey now and unlock your full potential! Everything: Dive into this captivating video that covers everything you need to know about a fascinating topic. From A to Z, this video has it all - don\'t miss out on gaining a comprehensive understanding.
Animating Text
Blender also allows you to animate text to add dynamics to your projects.
- Use keyframes to animate properties like location, rotation, and scale over time.
- Experiment with shape keys to create complex text animations that can enhance your animations.
3D Text in Blender Everything You Need to Know
This is a beginner\'s tutorial to 3D text in Blender. Add text, edit text and understand the text settings in Blender. I\'ll cover the ...
Converting Text to Mesh
For further manipulation or to integrate text with other 3D objects, you might want to convert text to mesh.
- Select your text object and press Alt+C to open the conversion menu.
- Choose Mesh from Curve/Meta/Surf/Text to convert the text into a mesh object, allowing for more complex modifications.
With these techniques, you can fully harness the power of text in Blender to create engaging and dynamic 3D scenes and animations.
Animating Text
Blender also allows you to animate text to add dynamics to your projects.
- Use keyframes to animate properties like location, rotation, and scale over time.
- Experiment with shape keys to create complex text animations that can enhance your animations.

Converting Text to Mesh
For further manipulation or to integrate text with other 3D objects, you might want to convert text to mesh.
- Select your text object and press Alt+C to open the conversion menu.
- Choose Mesh from Curve/Meta/Surf/Text to convert the text into a mesh object, allowing for more complex modifications.
With these techniques, you can fully harness the power of text in Blender to create engaging and dynamic 3D scenes and animations.

_HOOK_
Converting Text to Mesh
For further manipulation or to integrate text with other 3D objects, you might want to convert text to mesh.
- Select your text object and press Alt+C to open the conversion menu.
- Choose Mesh from Curve/Meta/Surf/Text to convert the text into a mesh object, allowing for more complex modifications.
With these techniques, you can fully harness the power of text in Blender to create engaging and dynamic 3D scenes and animations.
Introduction to Adding and Manipulating Text in Blender
Adding and manipulating text in Blender opens up a world of creative possibilities for your 3D projects. Whether you\"re looking to create titles, annotations, or integrate text into your scenes for artistic effect, Blender\"s powerful text tools make it straightforward. This section will guide you through the initial steps of adding text to your scene, editing it, and customizing its appearance to fit your vision.
- To start, press Shift+A in the 3D viewport to open the Add menu, and select Text to add a new text object to your scene.
- With the text object selected, press Tab to switch to Edit Mode, where you can delete the default text and enter your own.
- Text objects in Blender are based on curves, offering flexibility in editing and transforming them into various shapes and forms.
Understanding these foundational aspects of text manipulation in Blender sets the stage for more advanced techniques, including text animation, adding materials, and converting text into mesh for further editing. By mastering these basics, you can start to explore the full potential of text in your 3D designs.
Step-by-Step Instructions for Adding Text Objects to Your Scene
Blender\"s text tool allows you to easily add text objects to your 3D scene, providing a simple yet powerful way to incorporate 3D typography into your projects. Follow these detailed steps to get started:
- Open Blender and navigate to your 3D viewport.
- Press Shift+A to open the Add menu, then select Text to create a new text object.
- The new text object will appear in your scene. Press Tab to switch to Edit Mode, allowing you to type or edit your text.
- While in Edit Mode, you can use the backspace key to delete the default \"Text\" and enter your desired text.
- To adjust the position of your text object, switch back to Object Mode (Tab key), then use the move (G), rotate (R), and scale (S) tools to place it as needed.
These steps provide a basic framework for adding text to your Blender scenes. From here, you can explore further customization options, such as changing the font, adjusting the size, and applying materials to your text.
Editing Text: Font Selection, Size, and Alignment
Customizing your text in Blender is crucial for achieving the desired impact in your projects. This involves selecting the right font, adjusting the size, and aligning the text to fit your scene\"s aesthetics. Follow these steps to edit your text like a pro:
- Select your text object and go to the Properties panel.
- Under the Font tab, click on the folder icon next to the font name to open the file browser and select a new font from your computer.
- To adjust the size of your text, find the Size option in the same Font tab and use the slider or enter a value manually.
- For alignment, look for the Alignment options within the Font tab. You can choose from left, center, and right alignment to position your text within its bounding box.
Additionally, Blender offers advanced text editing features such as letter spacing, line spacing, and text boxes for more control over the layout of your text. Experimenting with these settings can help you create visually appealing and well-integrated 3D text elements for your scenes.
Customizing Text Appearance: Extrusion, Bevel, and Materials
After adding text to your Blender scene, the next step is to enhance its appearance to match your project\"s aesthetic or thematic requirements. Blender provides various tools for customizing text, including extrusion, beveling, and the application of materials. Follow these steps to make your text stand out:
- Select your text object and navigate to the Object Data Properties panel.
- To add depth to your text, find the Geometry section and increase the Extrude value. This will give your text a 3D appearance.
- For rounded edges, adjust the Bevel depth under the same section. You can also modify the Bevel Resolution to control the smoothness of the bevel.
- To apply materials, switch to the Material Properties tab. Click the New button to create a new material and customize its properties, such as color, specular, and roughness, to achieve the desired look for your text.
By adjusting these settings, you can create text that perfectly fits within your 3D scene, from bold and impactful titles to subtle and intricate labels. Experiment with different combinations of extrusion, bevel, and materials to discover the full range of stylistic options available for your text in Blender.
_HOOK_
Animating Text for Dynamic Effects
Animating text in Blender can add an extra layer of polish and dynamism to your projects, making your scenes more engaging. Blender\"s animation tools allow you to bring text to life through various effects, such as movement, scaling, and rotation. Here\"s how to start animating your text:
- Select your text object and ensure you\"re in Object Mode.
- Move to the frame where you want the animation to start and insert a keyframe by pressing I. Choose the attribute you want to animate (e.g., Location, Rotation, Scale).
- Navigate to another frame in the timeline where you want the animation to end or change, adjust the text object\"s position, rotation, or scale, and insert another keyframe.
- Use the Graph Editor or Dope Sheet to refine your animation by adjusting the keyframe handles and timing to create smooth transitions.
- For more complex animations, consider using shape keys to deform text in creative ways. This is particularly useful for creating text that changes shape or appearance over time.
By following these steps, you can create captivating text animations that enhance the visual appeal and storytelling of your Blender projects. Whether it\"s simple movement or complex transformations, animating text can significantly contribute to the overall impact of your scene.
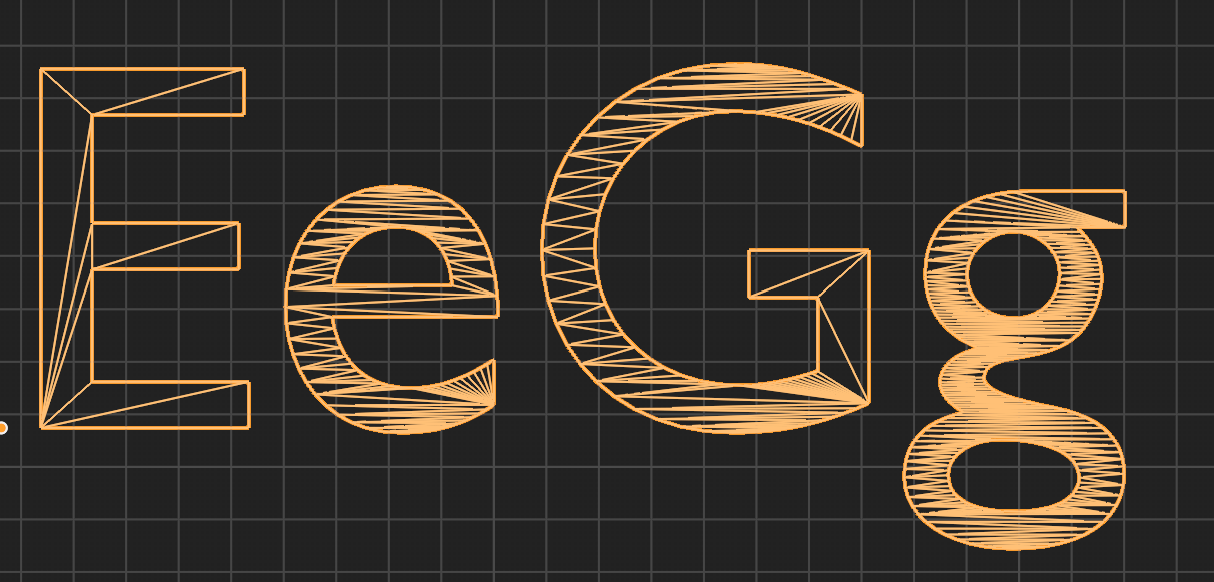
Advanced Techniques: Converting Text to Mesh for Further Manipulation
Converting text to a mesh in Blender is a powerful technique that unlocks advanced manipulation capabilities, allowing for more complex edits that aren\"t possible with standard text objects. This process transforms text into editable geometry, enabling detailed modeling, sculpting, and integration with other 3D elements. Here\"s how to convert text into a mesh:
- Select your text object in the 3D viewport.
- Press Alt+C (or go to the Object menu > Convert To) to open the convert options.
- Select Mesh from Curve/Meta/Surf/Text from the list. Your text object will now be converted into a mesh, allowing for vertex-level editing.
- With the text converted to mesh, you can now use Blender\"s vast array of modeling tools to edit the text geometry. This includes extruding individual letters, adding modifiers for complex effects, or combining your text with other mesh objects.
Converting text to mesh is particularly useful for creating custom logos, intricate designs, or when you need to apply specific deformations to text for artistic purposes. By mastering this technique, you can significantly expand the creative potential of text within your Blender projects.
Texturing and Shading Text for Realistic or Stylized Looks
Applying textures and shaders to text in Blender can dramatically change its appearance, allowing you to achieve both realistic and stylized looks. This process involves using Blender\"s powerful material and shading system to enhance the visual appeal of your text. Follow these steps to apply textures and shaders to your text:
- Select your text object and go to the Material Properties tab.
- Click the New button to create a new material. Here, you can adjust the base color, specular intensity, roughness, and more to start shaping the appearance of your text.
- To add a texture, scroll down to the Textures section and click New. Choose the type of texture you want to use, such as Image Texture if you have a specific image in mind.
- In the Shader Editor, you can further customize how the material and texture interact with your text. Use nodes to create complex materials that can include metallic effects, transparency, or even emission for glowing text.
- Experiment with different lighting setups in your scene to see how the text material reacts under various lighting conditions, enhancing the realism or stylization of your project.
By carefully selecting materials and textures, and by mastering the use of the Shader Editor, you can create text that perfectly matches the look and feel of your Blender projects, whether you\"re aiming for a photo-realistic finish or a completely unique, artistic style.
Practical Applications: Using Text in 3D Projects and Animations
Integrating text into 3D projects and animations can significantly enhance their impact and message. From titling and branding to narrative storytelling, the applications are vast and varied. Here’s how text can be effectively used in your Blender projects:
- Titling and Credits: Use text for dynamic title sequences and end credits in animations and films, applying animations to make them more engaging.
- Branding and Logo Design: Create unique logos by converting text to mesh and then manipulating it into custom shapes, perfect for branding projects.
- Annotations and Diagrams: Add explanatory text to educational materials, tutorials, or presentations to convey information clearly.
- Environmental Text: Incorporate text into scenes as part of the environment, such as street signs, billboards, or product labels, to add realism or thematic elements.
- Artistic Expressions: Experiment with text as an artistic element in abstract art or to convey thematic messages within your 3D art and animations.
These practical applications showcase the versatility of text in 3D projects, allowing creators to communicate more effectively and creatively with their audience. Whether for functional or aesthetic purposes, understanding how to use text in Blender opens up new possibilities for your 3D creations.
Troubleshooting Common Issues with Text in Blender
Working with text in Blender is generally straightforward, but you may occasionally encounter issues that can hinder your progress. Here are solutions to some common problems users face when adding and manipulating text in Blender:
- Text Not Appearing: If your text isn\"t visible after adding it to the scene, check the viewport\"s layer and camera view. Ensure the text object is not on a hidden layer or outside the camera\"s view.
- Difficulty Editing Text: Make sure you are in Edit Mode (Tab key) to edit the text. If you\"re unable to type or edit, verify that your keyboard layout or input method is compatible with Blender.
- Fonts Not Loading: When a specific font does not appear correctly, ensure the font file is correctly linked in the Font properties panel. If issues persist, try converting the font to a compatible format or reinstalling it on your system.
- Text Looks Pixelated: This can happen with very thin or small text. Increase the resolution in the Font properties panel or adjust the viewport shading settings to smooth out the appearance.
- Animations Not Working: If text animations aren\"t playing back as expected, check the keyframes and animation curves in the Graph Editor. Ensure that you\"ve set keyframes for the correct properties and that the animation timeline is correctly configured.
These tips should help you overcome the most common hurdles encountered when working with text in Blender, allowing you to focus on the creative aspects of your project.
_HOOK_
READ MORE:
Conclusion: Unleashing Creativity with Text in Blender
Throughout this guide, we\"ve explored the versatile world of text in Blender, covering everything from adding and editing text to animating and integrating it into your 3D projects. The power of Blender\"s text tools lies not just in their technical capabilities but in the creative potential they unlock for artists and designers. Whether you\"re creating titles, logos, or incorporating text into your 3D scenes, the possibilities are as limitless as your imagination.
Remember, the key to mastering text in Blender is experimentation. Don\"t hesitate to try new techniques, play with settings, and push the boundaries of what\"s possible with 3D typography. With practice, you\"ll find new and innovative ways to use text to enhance your projects, convey messages, and express your creative vision.
In closing, we encourage you to continue exploring, learning, and creating with Blender. The journey of discovery with 3D design is ongoing, and each project presents an opportunity to learn something new. Happy blending!
Unlock the full potential of your 3D projects with Blender\"s text tools. Dive into a world where creativity meets practicality, and elevate your designs with dynamic, captivating 3D typography that leaves a lasting impression.