Topic how to use blender on ipad: Discover the innovative ways to use Blender on your iPad, transforming it into a powerful tool for 3D creativity and design, anytime and anywhere.
Table of Content
- How can I use Blender on my iPad for creating 3D graphics on the go?
- Understanding the Basics
- Setting Up Your iPad for Blender
- Enhancing Your Experience
- Conclusion
- Setting Up Your iPad for Blender
- Enhancing Your Experience
- YOUTUBE: Use Your iPad as a Drawing Tablet For Any PC with Blender
- Conclusion
- Enhancing Your Experience
- Conclusion
- Conclusion
- Introduction to Blender on iPad
- Exploring Remote Desktop and Screen Mirroring Solutions
- Recommended Apps for Blender on iPad
- Step-by-Step Setup Guide
- Optimizing Your Workflow with External Accessories
- Advanced Tips and Tricks for Efficient Use
- Navigating Blender’s Interface on iPad
- Common Challenges and Solutions
- Creating Your First Project on iPad
- Conclusion: Unleashing Creative Potential
How can I use Blender on my iPad for creating 3D graphics on the go?
To use Blender on your iPad for creating 3D graphics on the go, you can follow these steps:
- Check if Blender is available on the App Store by searching for it directly.
- If Blender is not available on the App Store, consider alternative methods such as using SideCar with a MacBook Pro.
- Another option is to explore third-party apps that allow you to mirror Blender from a computer to your iPad.
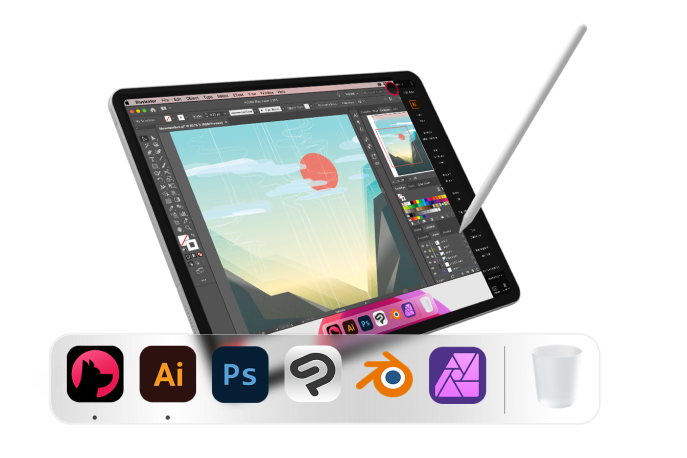
- Ensure that you have a good stylus or Apple Pencil for precise control while working with 3D graphics on your iPad.
- Experiment with different setups to find the one that works best for your workflow and creative needs.
READ MORE:
Understanding the Basics
Blender is a powerful 3D creation suite that requires significant computing power, which iPads may not natively provide for running Blender directly. However, through screen mirroring and remote desktop apps, you can effectively use Blender on your iPad.
Required Tools
- Astropad Studio
- Duet Display
- External keyboards and styluses for enhanced control
Setting Up Your iPad for Blender
To begin using Blender on your iPad, install a screen mirroring or remote desktop application such as Astropad Studio or Duet Display. These apps allow your iPad to display and interact with Blender running on a desktop computer, providing a portable solution to use Blender.
Steps for Installation and Use
- Download and install your chosen app on both your iPad and desktop computer.
- Connect your iPad to your computer via Wi-Fi or a USB cable.
- Launch the app on both devices to start mirroring the desktop\"s display to your iPad.
- Use an external keyboard and stylus for a more traditional Blender control experience.
Enhancing Your Experience
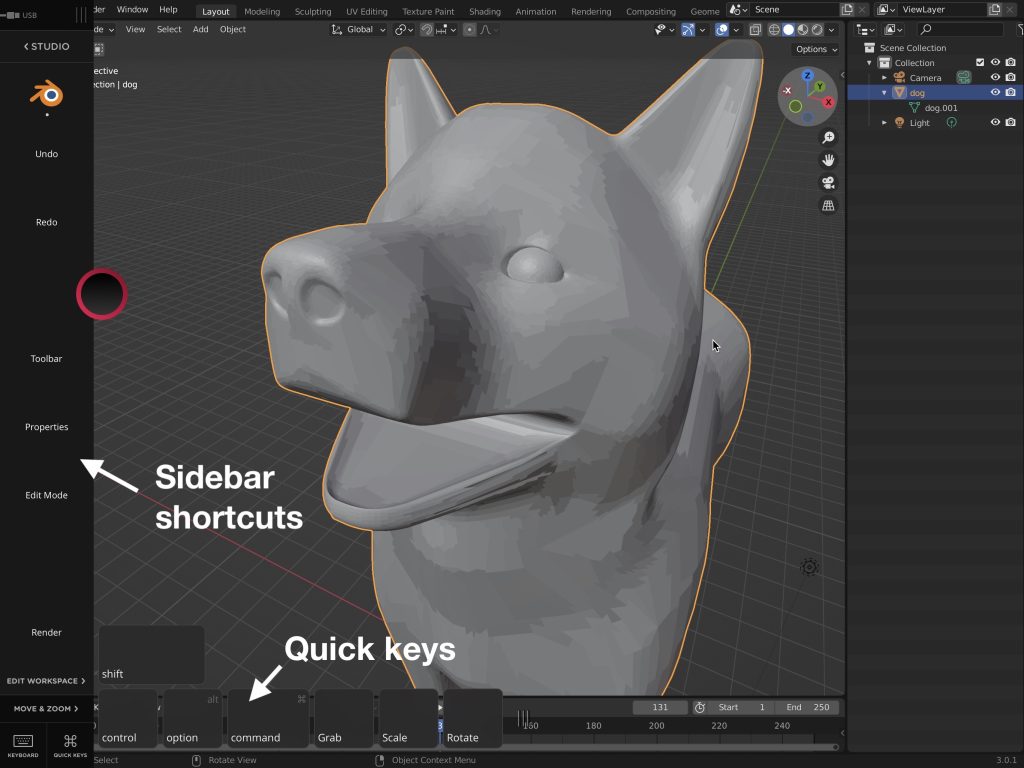
For an optimal experience, familiarize yourself with the gesture controls and shortcuts provided by your mirroring application. These can include gestures for zooming, panning, and rotating your view in Blender, as well as using quick keys for tools and actions.
Tips for Smooth Operation
- Ensure your iPad and desktop computer are adequately charged and connected to prevent interruptions.
- Adjust the settings in your mirroring app to optimize performance and responsiveness.
- Practice using Blender with the stylus and external keyboard to become proficient with the setup.
Conclusion
Though directly using Blender on an iPad may not be officially supported, the combination of screen mirroring apps and external accessories provides a viable and efficient way to enjoy Blender\"s full capabilities on your iPad. With the right setup, you can create 3D art anytime, anywhere.
_HOOK_
Setting Up Your iPad for Blender
To begin using Blender on your iPad, install a screen mirroring or remote desktop application such as Astropad Studio or Duet Display. These apps allow your iPad to display and interact with Blender running on a desktop computer, providing a portable solution to use Blender.
Steps for Installation and Use
- Download and install your chosen app on both your iPad and desktop computer.
- Connect your iPad to your computer via Wi-Fi or a USB cable.
- Launch the app on both devices to start mirroring the desktop\"s display to your iPad.
- Use an external keyboard and stylus for a more traditional Blender control experience.
Enhancing Your Experience
For an optimal experience, familiarize yourself with the gesture controls and shortcuts provided by your mirroring application. These can include gestures for zooming, panning, and rotating your view in Blender, as well as using quick keys for tools and actions.
Tips for Smooth Operation
- Ensure your iPad and desktop computer are adequately charged and connected to prevent interruptions.
- Adjust the settings in your mirroring app to optimize performance and responsiveness.
- Practice using Blender with the stylus and external keyboard to become proficient with the setup.

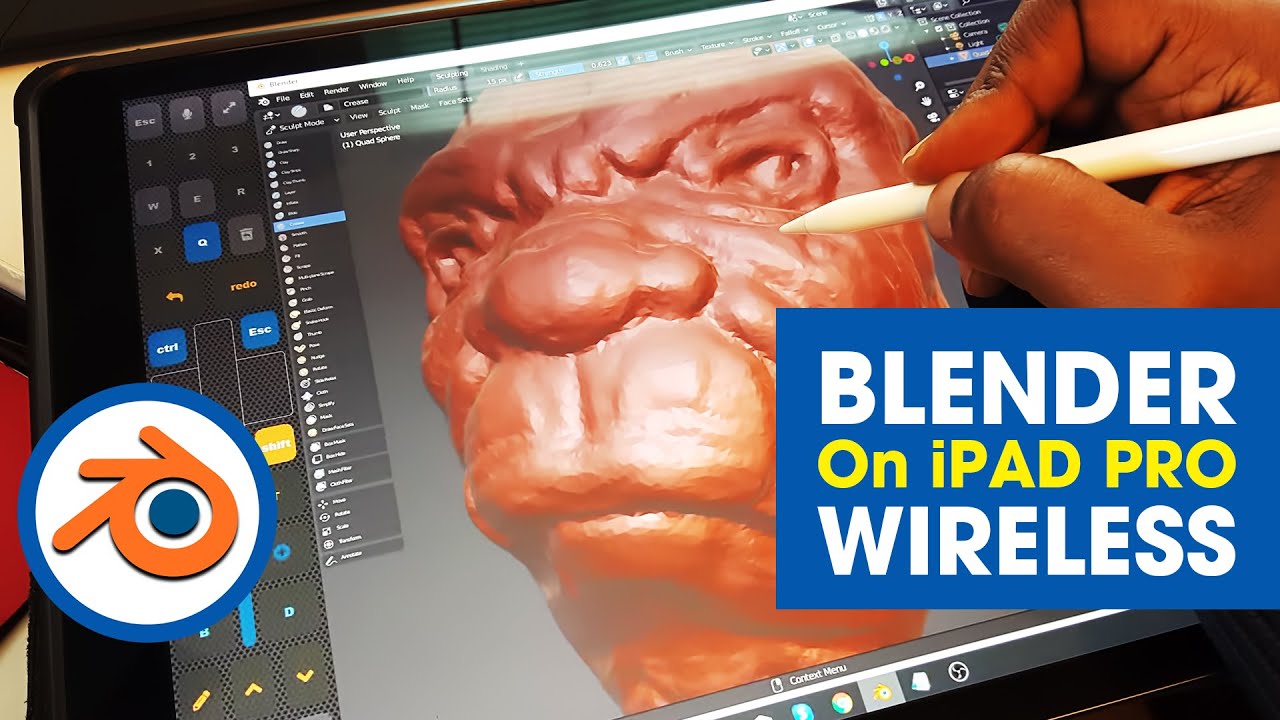
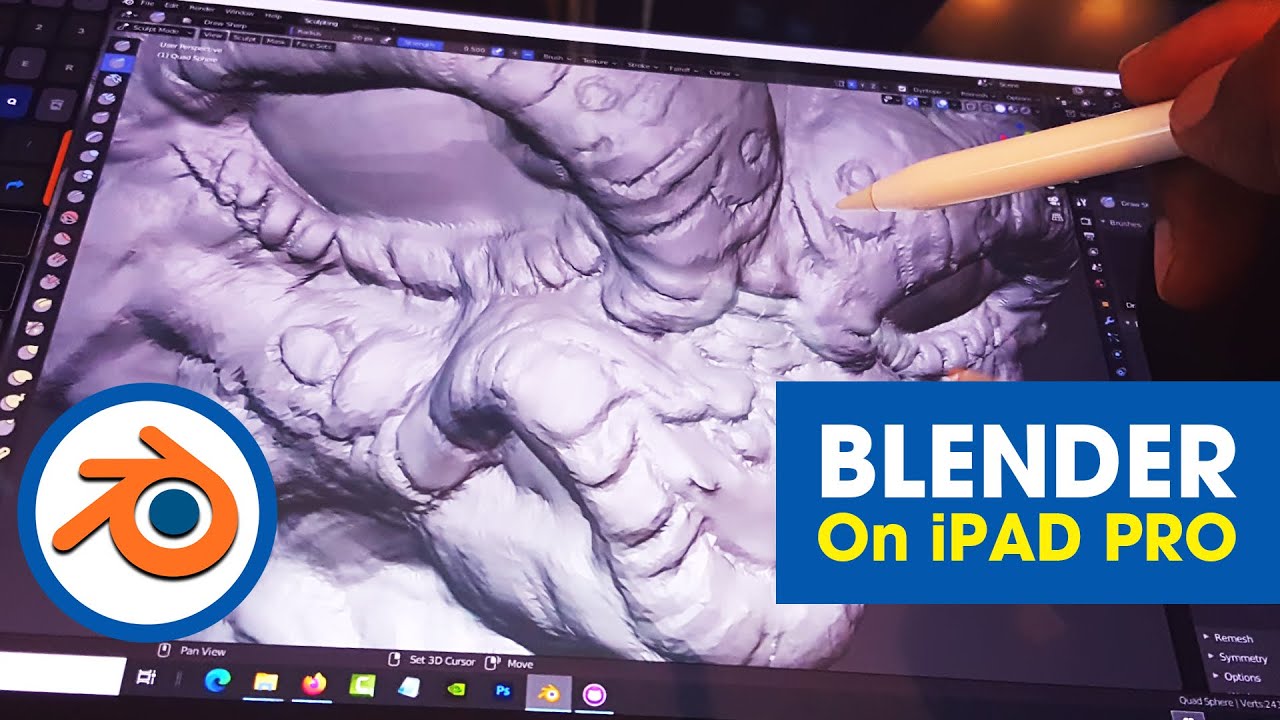
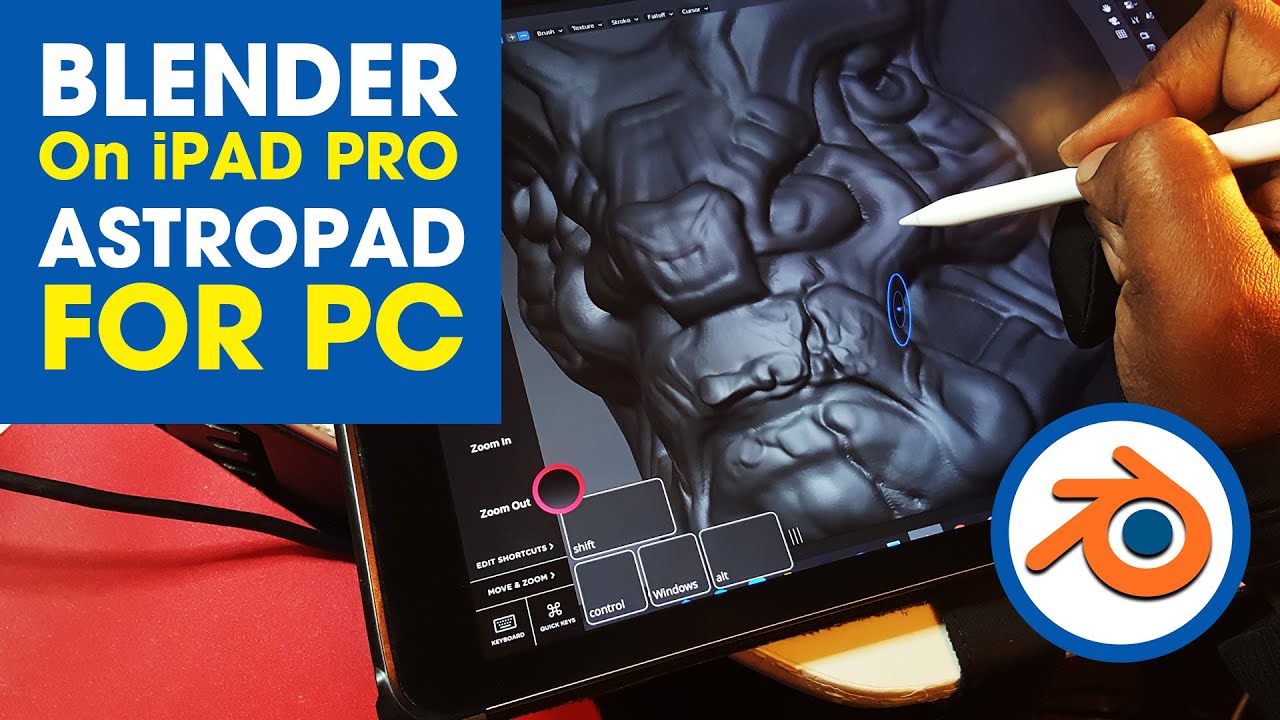
Use Your iPad as a Drawing Tablet For Any PC with Blender
Explore the captivating world of drawing with our video tutorial! Witness the magic of pencil strokes bringing art to life. Unleash your inner creativity and get inspired today!
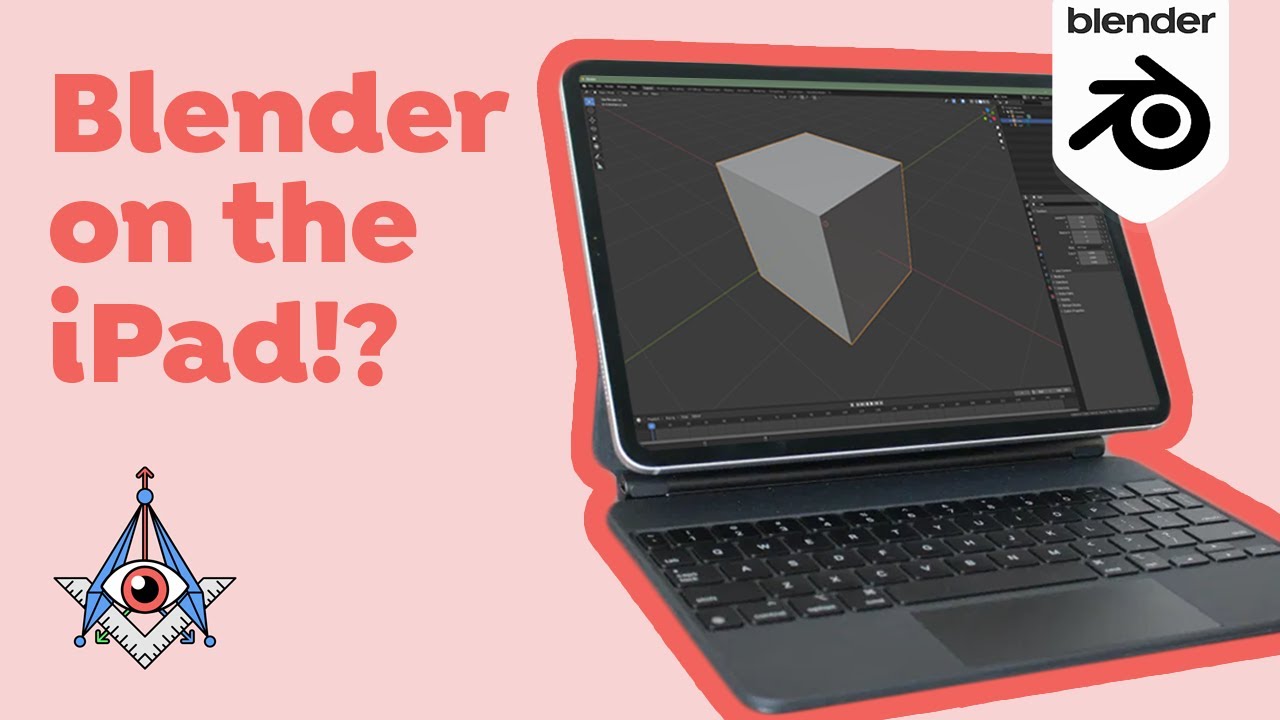
How to Use Blender on an iPad Pro
Dive into the realm of professional techniques and skills in our exclusive video for aspiring artists. Learn from the best to enhance your talents and take your art to the next level!
Conclusion
Though directly using Blender on an iPad may not be officially supported, the combination of screen mirroring apps and external accessories provides a viable and efficient way to enjoy Blender\"s full capabilities on your iPad. With the right setup, you can create 3D art anytime, anywhere.
Enhancing Your Experience
For an optimal experience, familiarize yourself with the gesture controls and shortcuts provided by your mirroring application. These can include gestures for zooming, panning, and rotating your view in Blender, as well as using quick keys for tools and actions.
Tips for Smooth Operation
- Ensure your iPad and desktop computer are adequately charged and connected to prevent interruptions.
- Adjust the settings in your mirroring app to optimize performance and responsiveness.
- Practice using Blender with the stylus and external keyboard to become proficient with the setup.
Conclusion
Though directly using Blender on an iPad may not be officially supported, the combination of screen mirroring apps and external accessories provides a viable and efficient way to enjoy Blender\"s full capabilities on your iPad. With the right setup, you can create 3D art anytime, anywhere.
_HOOK_
Conclusion
Though directly using Blender on an iPad may not be officially supported, the combination of screen mirroring apps and external accessories provides a viable and efficient way to enjoy Blender\"s full capabilities on your iPad. With the right setup, you can create 3D art anytime, anywhere.

Introduction to Blender on iPad
Using Blender on an iPad opens up a world of 3D modeling and animation to creatives seeking flexibility and mobility. While Blender is traditionally desktop software, innovative solutions enable its use on iPads, offering a unique blend of convenience and power.
This section explores how to bridge the gap between Blender\"s comprehensive features and the iPad\"s portability. Through remote desktop applications and screen mirroring technologies, users can enjoy the full capabilities of Blender on their iPad, making it possible to work on 3D projects from anywhere.
- Understanding the limitations and advantages of using Blender on an iPad.
- Choosing the right applications for screen mirroring or remote access.
- Setting up your iPad and desktop computer for seamless Blender integration.
- Tips for optimizing your workflow and making the most of Blender\"s features on a touch screen.
By following these guidelines, you can transform your iPad into a powerful tool for 3D modeling, texturing, animation, and rendering, breaking free from the constraints of traditional desktop-based workflows.
Exploring Remote Desktop and Screen Mirroring Solutions
To use Blender on an iPad effectively, leveraging remote desktop and screen mirroring solutions is essential. These technologies allow you to access and control Blender installed on a desktop computer from your iPad, offering a seamless experience.
- Astropad Studio: Tailored for creative professionals, Astropad Studio transforms your iPad into a high-end graphics tablet for your Mac, making it ideal for Blender use.
- Duet Display: This app extends your desktop computer\"s screen to your iPad, providing a responsive and high-quality display for using Blender.
- Splashtop: A versatile remote desktop application that offers high performance and real-time access to your desktop from the iPad, suitable for Blender.
These solutions not only replicate your computer\"s display on your iPad but also support input from the iPad\"s touch interface and styluses, enabling a dynamic and interactive Blender experience.
- Choose and install a remote desktop or screen mirroring application on your iPad and computer.
- Ensure both devices are on the same network (for Wi-Fi connections) or directly connect them via USB (for Duet Display).
- Follow the application\"s setup instructions to connect your iPad to your desktop.
- Once connected, launch Blender on your desktop to begin using it on your iPad.
By following these steps, you can effectively use Blender on your iPad, combining the convenience and portability of the iPad with the power of Blender\"s full desktop version.
Recommended Apps for Blender on iPad
For an optimal Blender experience on iPad, utilizing specific apps can significantly enhance your workflow and productivity. These apps facilitate a smooth connection between your iPad and your desktop, where Blender is running, thereby extending the powerful capabilities of Blender to your portable device.
- Astropad Studio: Designed for creative professionals, Astropad Studio offers a high-quality, customizable experience, making your iPad a professional graphics tablet for Mac.
- Duet Display: This app extends your workspace by turning your iPad into a second display for your computer, perfect for multitasking and enhancing your Blender projects.
- Splashtop Remote Desktop: Known for its high performance and support for stylus input, Splashtop allows you to remotely access your desktop Blender application from your iPad.
- Jump Desktop: Jump Desktop offers a reliable and easy-to-use remote desktop solution, ensuring a seamless connection to Blender on your desktop.
These apps are highly recommended for their reliability, performance, and compatibility with Blender. By choosing the right app, you can transform your iPad into a dynamic tool for 3D modeling, animation, and rendering, enjoying the full power of Blender wherever you go.
Step-by-Step Setup Guide
Setting up Blender on your iPad via remote desktop or screen mirroring applications can seem daunting, but with the right steps, it becomes straightforward. Follow this guide to start using Blender on your iPad.
- Select a Remote Desktop or Screen Mirroring App: Choose an app like Astropad Studio, Duet Display, or Splashtop based on your needs and whether you\"re using a Mac or PC.
- Install the App on Both Devices: Download and install the chosen app on your iPad and your desktop computer. Follow the installation prompts to ensure proper setup.
- Connect Your iPad to Your Computer: Use a Wi-Fi network or a USB cable for a direct connection. If using Wi-Fi, ensure both devices are on the same network.
- Configure the App Settings: Open the app on both your iPad and computer. Follow the in-app instructions to establish a connection between the two devices.
- Launch Blender on Your Desktop: Once the devices are connected, open Blender on your desktop computer. It should now be mirrored or extended to your iPad\"s display.
- Customize Your Setup: Adjust the app\"s settings on your iPad to optimize the display and input controls. Familiarize yourself with the touch gestures and keyboard shortcuts for Blender.
- Start Creating: With everything set up, you\"re ready to use Blender on your iPad. Begin with simple projects to get accustomed to the new setup.
This guide aims to make the process of using Blender on an iPad as seamless as possible, merging the powerful features of Blender with the versatility of the iPad.
_HOOK_
Optimizing Your Workflow with External Accessories
Enhancing your Blender on iPad experience with external accessories can significantly improve efficiency and comfort. Here\"s how to optimize your workflow.
- Styluses: A high-precision stylus like the Apple Pencil provides finer control over Blender\"s tools and features, making it ideal for sculpting, texturing, and painting.
- External Keyboards: An external keyboard allows for quick access to Blender\"s shortcuts, speeding up your workflow and making navigation easier.
- Mouse or Trackpad: For precision editing and easier navigation, pairing a Bluetooth mouse or trackpad with your iPad adds another layer of control.
- Adjustable Stands: Using an adjustable stand can help maintain a comfortable viewing angle, reducing strain during long Blender sessions.
Integrating these accessories into your Blender setup on the iPad not only enhances your control over the software but also makes the creative process more enjoyable and productive.
Advanced Tips and Tricks for Efficient Use
Maximizing efficiency while using Blender on an iPad involves a combination of software tweaks, hardware optimization, and personal workflow adjustments. Here are advanced strategies to enhance your Blender projects.
- Customize Interface for Touch: Adjust Blender\"s interface within your remote desktop app to better suit touch interactions. Enlarge buttons and simplify menus for easier access.
- Use Shortcuts and Gesture Controls: Many remote desktop apps allow you to set up gesture controls and keyboard shortcuts. Customize these for common Blender actions to save time.
- Optimize Performance Settings: In both Blender and your mirroring app, adjust the performance settings to suit your iPad\"s capabilities, reducing lag and improving responsiveness.
- External Keyboard and Stylus: Utilize an external keyboard for shortcuts and a stylus for precision, mimicking a more traditional Blender experience.
- Regularly Save Projects: To avoid losing progress, regularly save your work. Consider using cloud storage for easy access across devices.
- Explore Blender Add-ons: Some add-ons can streamline tasks and are worth exploring for their iPad compatibility and utility.
By integrating these tips into your Blender usage on the iPad, you\"ll not only enhance your productivity but also enjoy a more fluid and intuitive creative process.
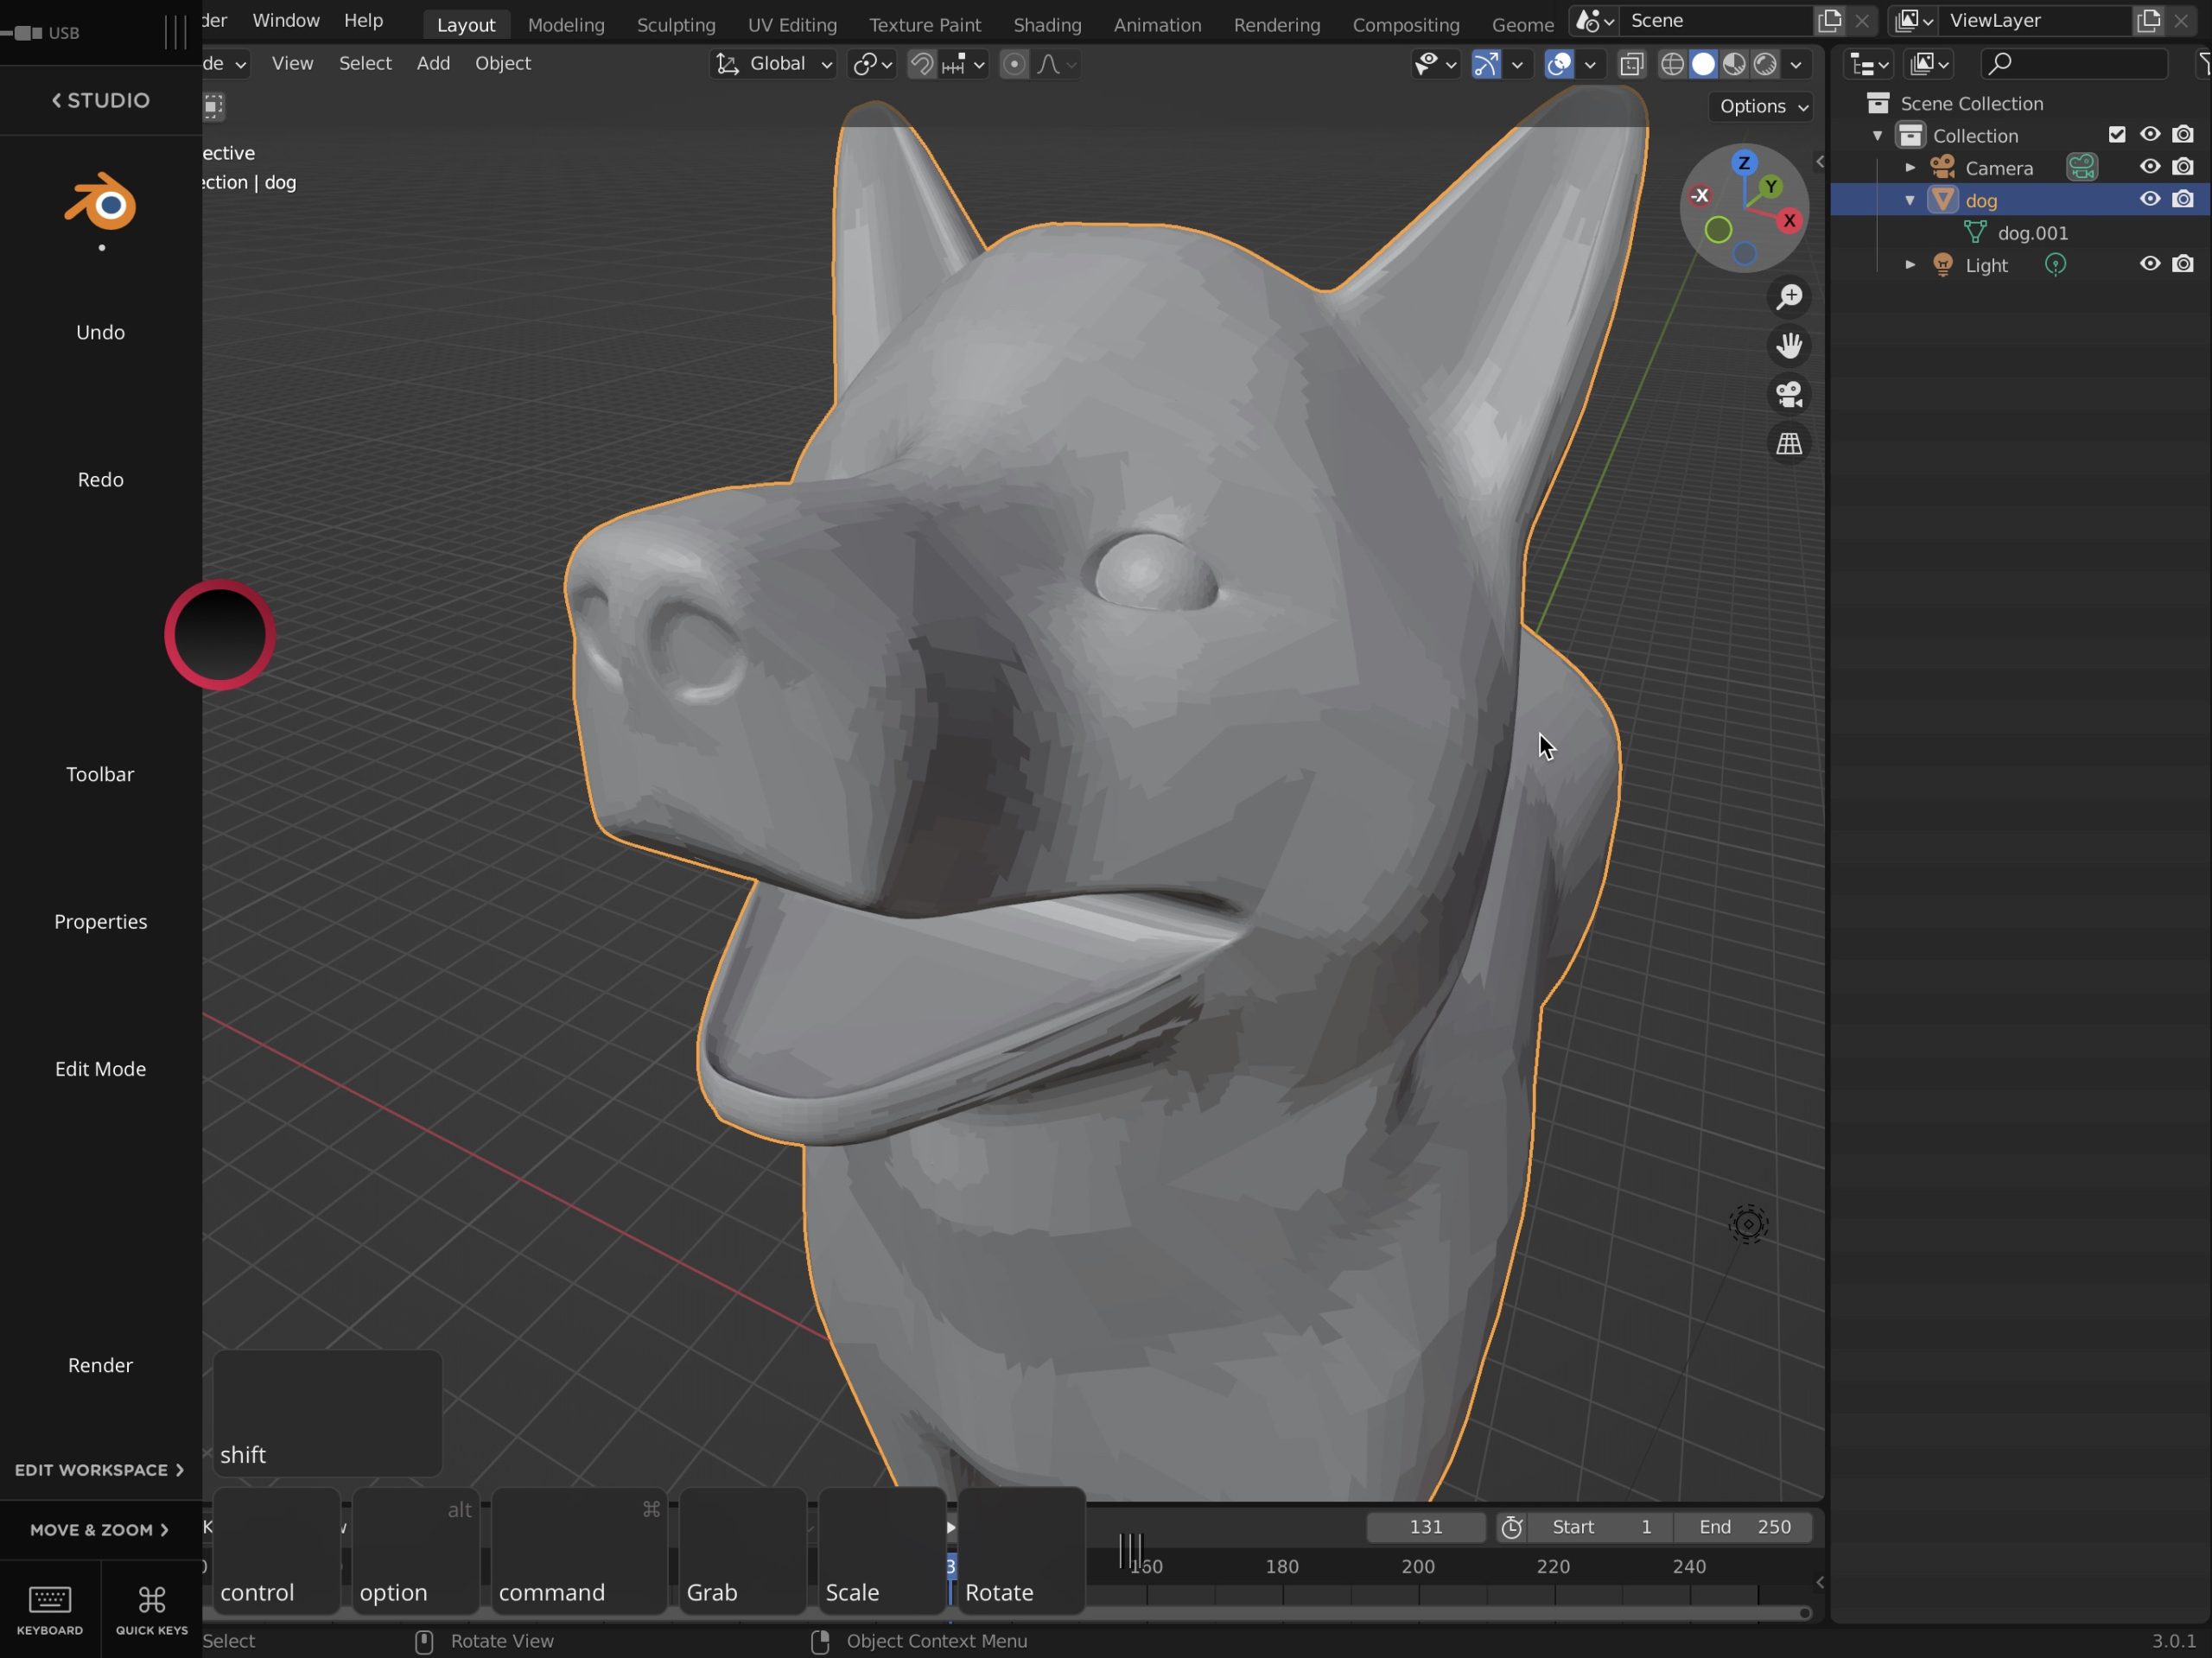
Navigating Blender’s Interface on iPad
Navigating Blender\"s comprehensive interface on an iPad via remote desktop or screen mirroring apps can be a unique experience. Understanding how to effectively maneuver through the interface can enhance your productivity and creative expression.
- Understanding Blender\"s Layout: Familiarize yourself with Blender\"s default layout, including areas like the 3D viewport, timeline, and properties panel. Knowing where tools and features are located is key.
- Customizing the Interface: Blender allows for extensive customization. Consider simplifying the interface to include tools you use most frequently, making them easier to access on the iPad\"s touch screen.
- Using Touch Gestures: Learn how your remote desktop app translates touch gestures into Blender commands. Pinching to zoom, dragging to pan, and tapping to select can become intuitive with practice.
- Keyboard Shortcuts via External Keyboard: If you have connected an external keyboard, use Blender’s keyboard shortcuts to speed up your workflow. Many shortcuts that you\"re accustomed to on the desktop will work seamlessly.
- Stylus for Precision: A stylus can offer precision control, especially for sculpting, texturing, and painting in Blender. Pressure sensitivity can also be utilized for more dynamic control over brush strokes.
By adopting these strategies, you can navigate Blender’s interface on your iPad with greater ease and efficiency, making the most of your 3D modeling, animation, and rendering projects.
Common Challenges and Solutions
Using Blender on an iPad presents unique challenges, but with the right strategies, these can be effectively overcome. Here’s a look at common issues and their solutions.
- Performance Lag: Experiencing delays? Ensure your Wi-Fi connection is stable and strong. Additionally, adjust the quality settings in your remote desktop app to balance performance and visual fidelity.
- Complex Interface Navigation: Simplify Blender’s interface through customization options and use gestures efficiently. Familiarize yourself with the layout and practice using touch controls or an external stylus for better precision.
- Difficulty with Precision: A stylus can greatly enhance your control for detailed work. Adjust stylus settings for sensitivity and use Blender\"s snap tools for precise positioning.
- Shortcut Limitations: If your remote desktop app supports custom shortcuts, configure them to match Blender’s most used functions. An external keyboard can also replicate the desktop shortcut experience.
- Connection Issues: For a stable connection, opt for a direct USB connection where possible. If using Wi-Fi, minimize network congestion by limiting the use of other devices on the same network.
By addressing these common challenges with practical solutions, you can enjoy a smoother, more productive experience using Blender on your iPad.
Creating Your First Project on iPad
Embarking on your first Blender project on an iPad can be an exciting venture. Here’s a step-by-step guide to get you started on creating your first 3D model.
- Set Up Your Workspace: Ensure your iPad is connected to your desktop via your chosen screen mirroring or remote desktop app. Arrange your workspace for comfort and efficiency.
- Choose a Simple Project: Start with a straightforward project, such as a basic object or simple scene. This will help you get familiar with Blender\"s tools and features without being overwhelming.
- Model Your Object: Use Blender\"s modeling tools to create your object. Begin with adding a mesh, such as a cube, and then modify it using edit mode. Use extrude, scale, and rotate tools to shape your object.
- Add Materials and Textures: Once your model is shaped, add materials to define its color and texture. This can greatly enhance the appearance of your project.
- Lighting and Camera Setup: Set up lighting to highlight your model effectively. Add a camera and position it to capture the best view of your project.
- Render Your Scene: With everything in place, render your scene to see the final product. Adjust render settings as necessary to achieve the desired quality.
By following these steps, you can successfully complete your first Blender project on your iPad, opening the door to more complex creations in the future.
_HOOK_
READ MORE:
Conclusion: Unleashing Creative Potential
As we reach the conclusion of our comprehensive guide on mastering Blender on the iPad, it\"s clear that the fusion of Blender\"s robust 3D modeling capabilities with the portability and intuitive interface of the iPad opens up a world of creative possibilities. While Blender itself may not be natively available on the iPad, the innovative use of remote desktop and screen mirroring solutions provides a seamless bridge to harness Blender\"s full power on your iPad.
The journey of using Blender on an iPad may begin with exploring remote desktop applications and setting up your workspace, but it blossoms into a workflow that is both efficient and enjoyable. With the recommended apps and accessories, such as styluses and external keyboards, the intricacies of Blender\"s interface become more accessible, allowing for precision and ease of use.
Adapting to this setup not only enhances your ability to create stunning 3D models, animations, and artwork on-the-go but also encourages continuous learning and experimentation. The advanced tips and tricks shared in this guide aim to streamline your workflow, enabling you to overcome common challenges and make the most out of Blender\"s extensive features.
Creating your first project on an iPad is a milestone that marks the beginning of a journey filled with endless possibilities. Each step in this guide, from the initial setup to navigating Blender’s interface and optimizing your workflow, is designed to empower you to unleash your creative potential.
Embrace the challenges and solutions presented as opportunities to grow and innovate. With dedication and the right tools, your iPad transforms into a powerful 3D studio, capable of bringing your most ambitious projects to life. Let this be the beginning of a thrilling adventure in 3D modeling, where your creativity knows no bounds.
In conclusion, mastering Blender on the iPad is not just about adapting to a new platform; it\"s about embracing a new way of creating. As you continue to explore and create with Blender on your iPad, remember that each project is a step forward in your creative journey. The potential is limitless, and the future of 3D modeling and animation is bright for those willing to explore it. So, take your creativity to new heights and let your imagination soar.
Embrace the power of Blender on your iPad, unlocking a realm where creativity meets mobility. This guide lights the path to transforming your ideas into reality, wherever you are. Dive in and let your creative journey unfold.