Topic blender freeze transform: Discover the power of Blender"s Freeze Transform feature, a game-changer for 3D artists seeking precision and control in their modeling and animation projects.
Table of Content
- What is the process for freezing transforms in Blender?
- Freeze Transform in Blender
- Clearing Transforms in Blender
- Applying Transformations
- Clearing Transforms in Blender
- YOUTUBE: Switching From Maya to Blender 2.8 Freeze Transformations
- Applying Transformations
- Applying Transformations
- Understanding Freeze Transform in Blender
- How to Use Freeze Transform Add-on
- Benefits of Freezing Transformations
- Clearing Transforms in Blender: A Quick Guide
- Applying vs. Clearing Transforms: What\"s the Difference?
- Practical Applications of Freeze Transform in Workflows
- Hotkeys and Shortcuts for Efficient Transform Management
- Common Issues and Solutions with Freeze Transform
- Freeze Transform in Animation and Rigging
- Advanced Techniques and Tips for Using Freeze Transform
What is the process for freezing transforms in Blender?
To freeze transforms in Blender, follow these steps:
- Select the object you want to freeze transforms on.
- Go to the Modify menu.
- Choose the \"Freeze Transforms\" option.
- Click on the option box next to the menu entry to access additional options for which transforms to freeze.
- Review and confirm the selected transforms you want to freeze.
READ MORE:
Freeze Transform in Blender
The Freeze Transform add-on for Blender enables saving the current object transformations, including position, rotation, and scale. This feature allows for temporary modifications to an object with the ability to easily revert to the saved state. It is particularly useful for preserving an object\"s original state while experimenting with changes. The add-on supports a range of Blender versions and integrates seamlessly into the 3D Viewport interface.
Key Features:
- Saving and restoring world transformations for selected objects.
- Applicability to both single and multiple selected objects.
- Easy access through the N panel in the 3D Viewport window.

Clearing Transforms in Blender
Clearing transforms in Blender offers a way to reset object transformations to their default values without altering the object\"s actual position, rotation, or scale in the scene. This function is accessible through the object menu in the header of the 3D viewports and includes options to clear location, rotation, scale, and object origin individually.
Accessing Clear Options:
- Navigate to the object menu in the 3D viewport\"s header.
- Select \"Clear\" to access options for location, rotation, scale, and object origin.
Using Hotkeys for Quick Access:
- Alt + G to clear location.
- Alt + R to clear rotation.
- Alt + S to clear scale.
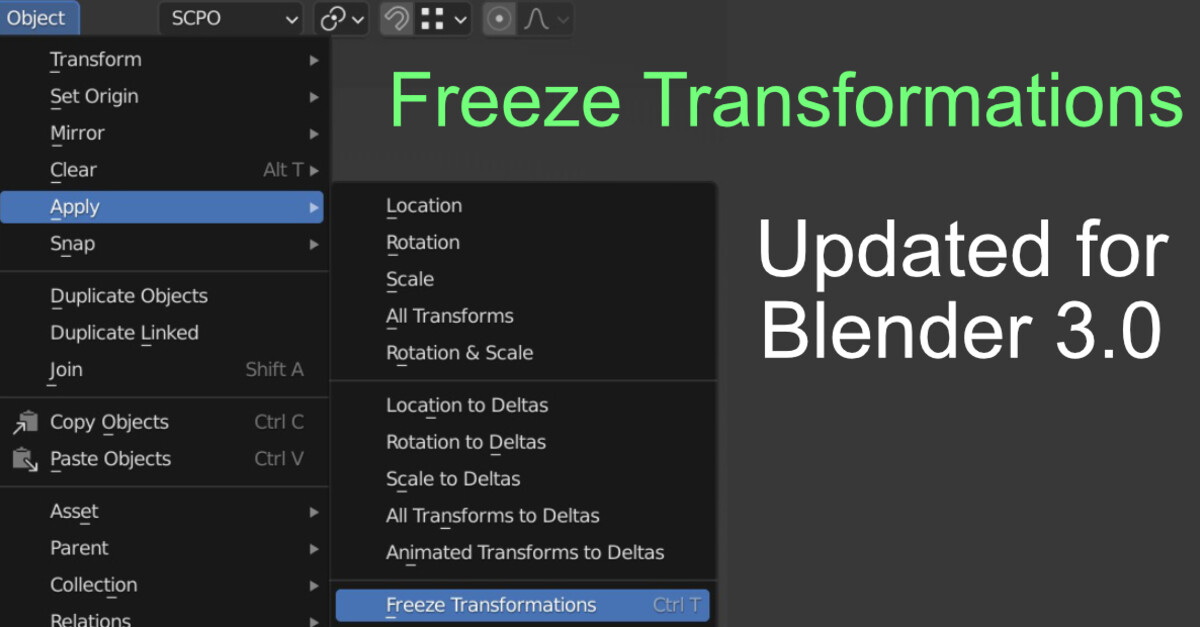
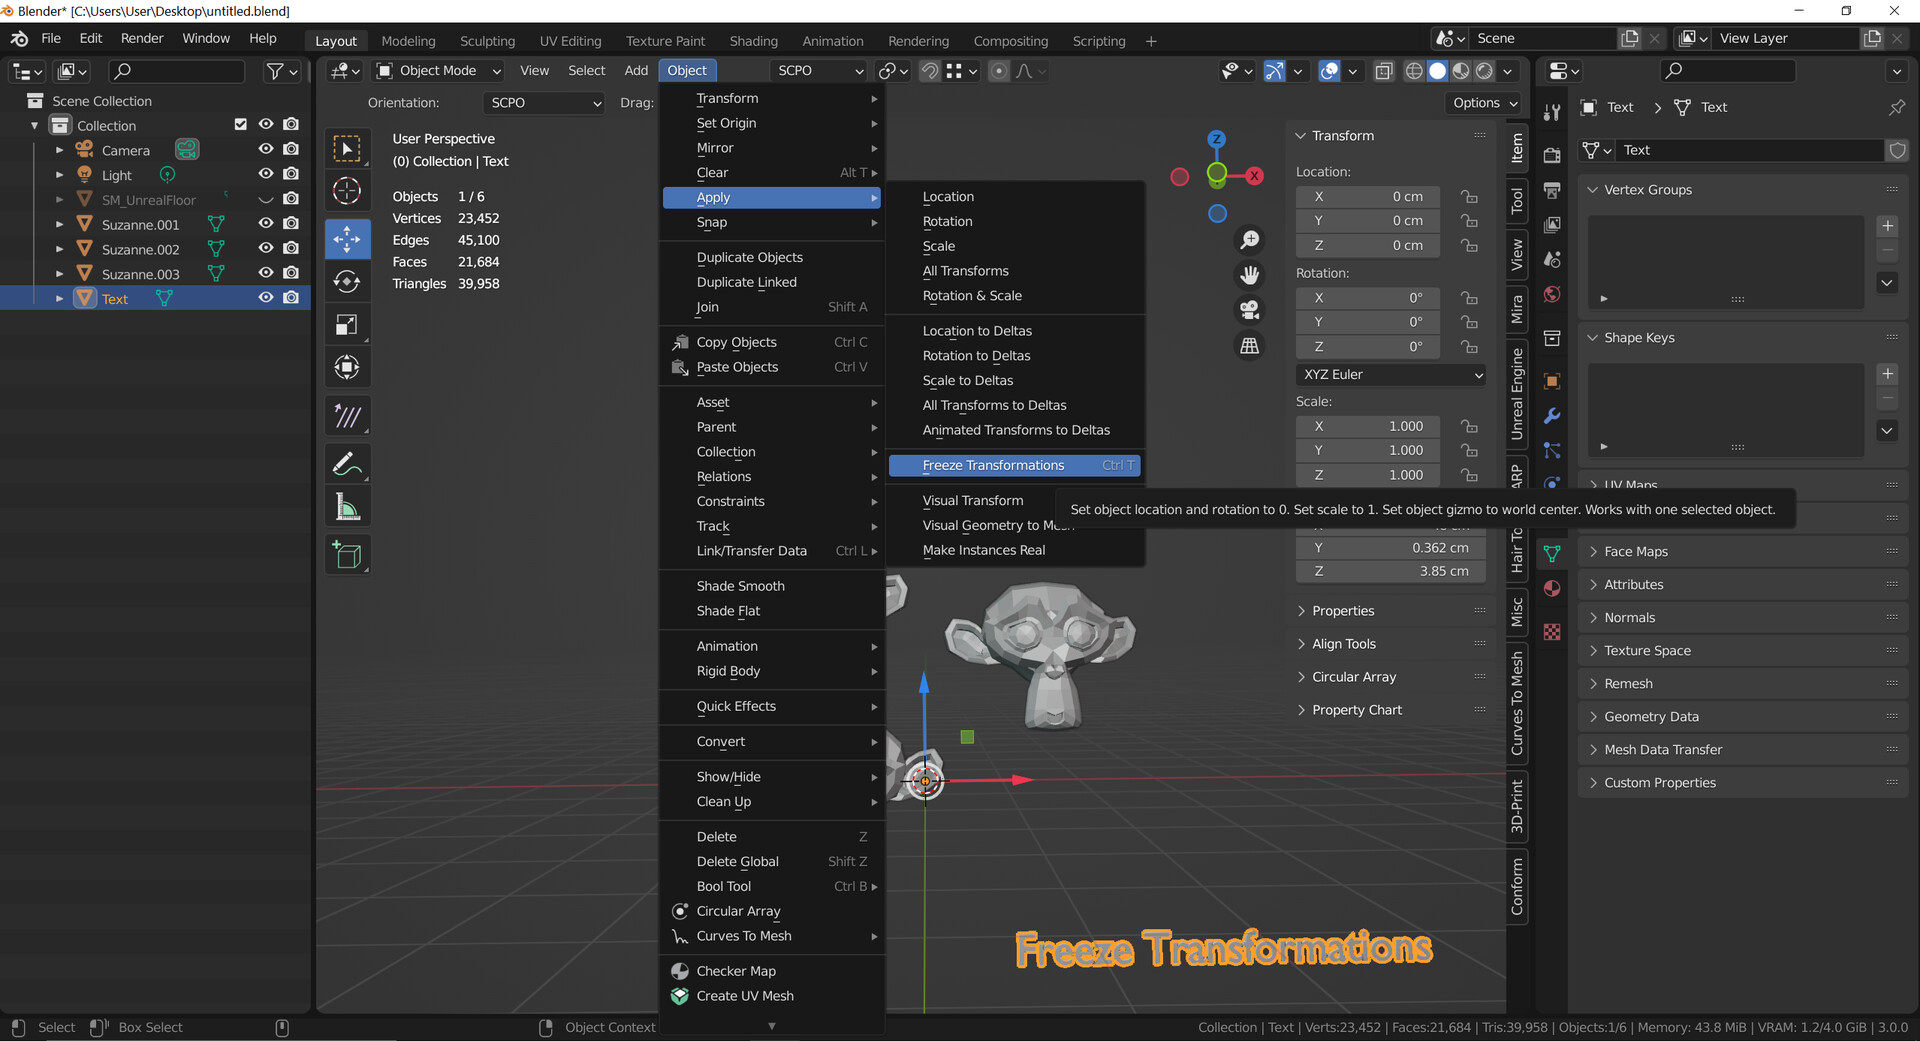
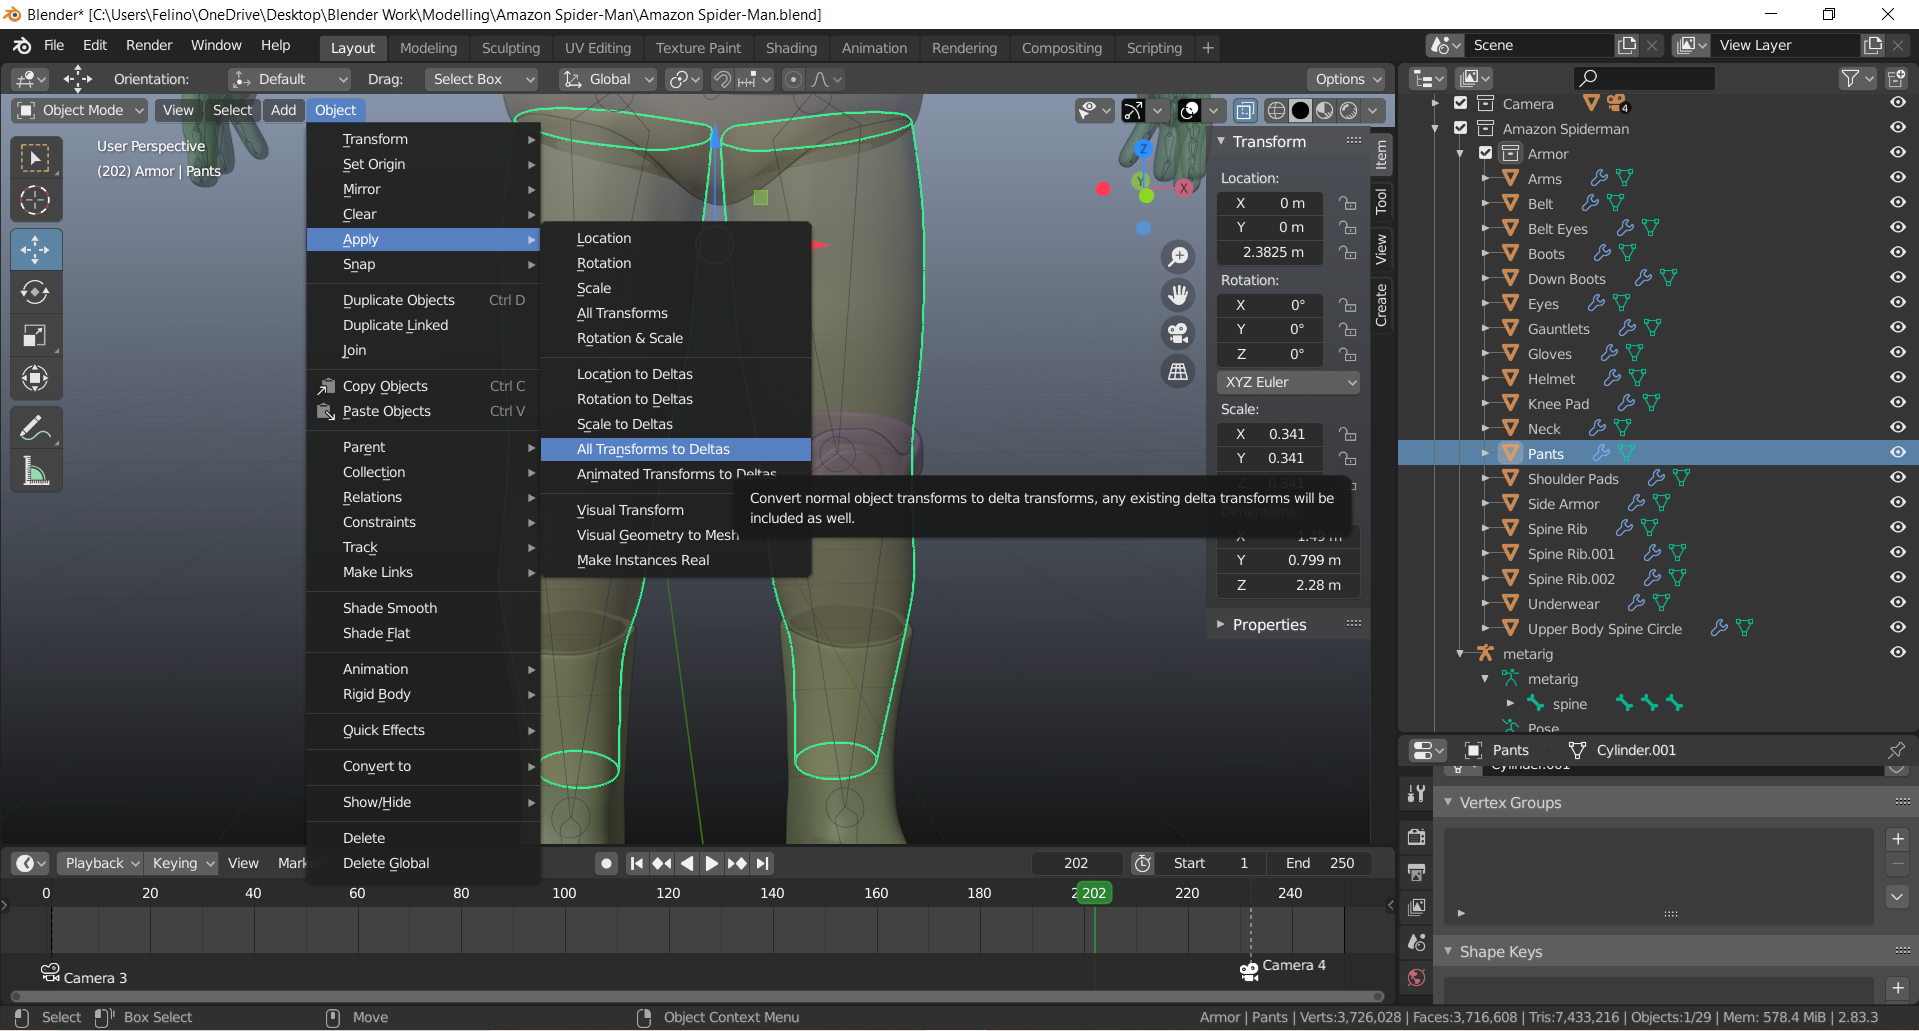
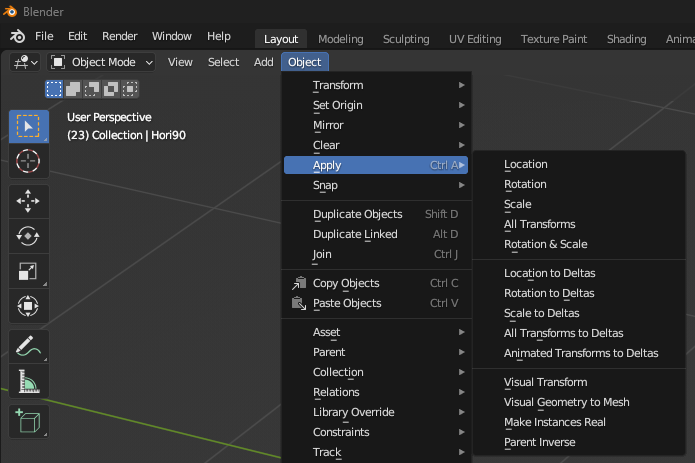
Applying Transformations
In Blender, applying transformations effectively \"freezes\" an object\"s current state by making its transformed position, rotation, or scale the new default. This is achieved using the CTRL+A shortcut, which opens a pop-up menu for applying the desired transformation. This process is crucial for maintaining consistency in the object\"s orientation and scale, especially when exporting models for use in other applications or game engines.
Benefits:
- Ensures object consistency across different scenes or projects.
- Facilitates the export and import process between Blender and other software.
Mastering these transformation tools in Blender enhances workflow efficiency, allowing for more precise control over object states and simplifying the 3D modeling and animation process.
Clearing Transforms in Blender
Clearing transforms in Blender offers a way to reset object transformations to their default values without altering the object\"s actual position, rotation, or scale in the scene. This function is accessible through the object menu in the header of the 3D viewports and includes options to clear location, rotation, scale, and object origin individually.
Accessing Clear Options:
- Navigate to the object menu in the 3D viewport\"s header.
- Select \"Clear\" to access options for location, rotation, scale, and object origin.
Using Hotkeys for Quick Access:
- Alt + G to clear location.
- Alt + R to clear rotation.
- Alt + S to clear scale.

_HOOK_
Switching From Maya to Blender 2.8 Freeze Transformations
\"Experience the seamless Transition of scenes in our video, each frame flowing effortlessly into the next. Get ready to be captivated by the smooth and dynamic changes that will keep you engaged from start to finish.\"
Applying Transformations
In Blender, applying transformations effectively \"freezes\" an object\"s current state by making its transformed position, rotation, or scale the new default. This is achieved using the CTRL+A shortcut, which opens a pop-up menu for applying the desired transformation. This process is crucial for maintaining consistency in the object\"s orientation and scale, especially when exporting models for use in other applications or game engines.
Benefits:
- Ensures object consistency across different scenes or projects.
- Facilitates the export and import process between Blender and other software.
Mastering these transformation tools in Blender enhances workflow efficiency, allowing for more precise control over object states and simplifying the 3D modeling and animation process.

New Freeze Transformations Function from Autodesk Maya for Latest Stable Blender 2.93.4 LTS
\"Discover the perfect Compatibility of elements in our video as they come together to create a harmonious and impactful visual experience. Witness the magic that happens when everything aligns just right.\"
Applying Transformations
In Blender, applying transformations effectively \"freezes\" an object\"s current state by making its transformed position, rotation, or scale the new default. This is achieved using the CTRL+A shortcut, which opens a pop-up menu for applying the desired transformation. This process is crucial for maintaining consistency in the object\"s orientation and scale, especially when exporting models for use in other applications or game engines.
Benefits:
- Ensures object consistency across different scenes or projects.
- Facilitates the export and import process between Blender and other software.
Mastering these transformation tools in Blender enhances workflow efficiency, allowing for more precise control over object states and simplifying the 3D modeling and animation process.
Understanding Freeze Transform in Blender
Freeze Transform in Blender refers to the process of saving the current state of an object\"s transformations - which include position, rotation, and scale - allowing users to modify the object further with the option to revert to the saved transformation state at any time. This functionality is crucial for Blender users who wish to experiment with different transformations without permanently altering the original state of the object.
The Freeze Transform add-on for Blender introduces a straightforward way to manage object transformations. Users can press a designated \"Freeze Transform\" button to save the current world transformations of a selected object. Subsequently, any modifications made to the object\"s position, rotation, or scale can be undone by pressing the \"To Frozen\" button, which reverts the object to its previously saved transformation state. This feature is particularly useful in workflows that require frequent adjustments to object transformations, as it provides a safety net that allows for easy correction of mistakes or exploration of different design choices without risk.
The add-on supports a range of Blender versions, including 2.83, 2.90, 2.91, 2.92, 2.93, 3.0, and 3.1, ensuring wide accessibility for users of different Blender versions. It integrates seamlessly into the Blender interface, accessible through the \"3D Viewport\" window\"s N panel under the \"Freeze Transform\" tab.
Such functionality enhances efficiency in various Blender projects, from animation and rigging to modeling and scene layout, by enabling a non-destructive approach to transformation management. The ability to save and return to specific transformation states simplifies the creative process, allowing artists and designers to focus more on creativity and less on the technical constraints of their tools.
How to Use Freeze Transform Add-on
The Freeze Transform add-on in Blender is designed to facilitate the management of object transformations, such as position, rotation, and scale, by allowing users to save and revert to specific states. This guide outlines the steps to use the Freeze Transform add-on effectively.
- Ensure your Blender version is compatible. The add-on supports Blender versions 2.83, 2.9x, and 3.x.
- Install the Freeze Transform add-on. You can purchase and download it from the Blender Market. After downloading, install the add-on in Blender via the Preferences menu.
- To use the add-on, first select the object you wish to apply transformations to in the 3D viewport.
- Press the \"Freeze Transform\" button to save the current world transformations of the selected object. This action captures the object\"s position, rotation, and scale at this moment.
- After saving the state, you are free to move, scale, or rotate the object as needed. If you wish to revert the object back to its saved state, press the \"To Frozen\" button. The object will return to its previously saved transformation parameters.
- The add-on provides keyboard shortcuts for efficiency: use ctrl+shift+f to activate \"Freeze Transform\" and ctrl+alt+f to revert to the frozen state, \"To Frozen\".
- This functionality works both with individual objects and multiple selected objects, allowing for versatile manipulation within your Blender projects.
This add-on is especially useful for those who need a reliable way to experiment with different transformations without permanently altering the original state of their objects, enhancing the workflow for animation, modeling, and other 3D creation processes.

Benefits of Freezing Transformations
Freezing transformations in Blender, through the use of the Freeze Transform add-on, offers several benefits that enhance the workflow and efficiency of 3D modeling and animation projects. This process involves saving the current state of an object\"s position, rotation, and scale, enabling users to experiment with transformations and easily revert to the saved state if needed.
- Non-Destructive Editing: Allows for modifications without permanently altering the original state of the object. This is crucial for iterative design processes where changes need to be evaluated and adjusted frequently.
- Workflow Efficiency: By saving transformation states, users can streamline their workflow, reducing the time and effort required to manually reset or adjust objects to their original state.
- Enhanced Creativity: Encourages experimentation with object positioning, scaling, and rotation by removing the fear of making irreversible changes. This can lead to more creative outcomes and innovative solutions.
- Multiple Object Management: The add-on\"s functionality applies not only to individual objects but also to all selected objects, facilitating the management of complex scenes with numerous elements.
- Animation and Rigging: In animation and rigging workflows, freezing transformations can be particularly useful for setting initial states before animation or for ensuring consistency in object positioning across different scenes or frames.
The add-on supports a wide range of Blender versions, making it accessible to a broad audience of Blender users. Its integration into the Blender interface, specifically within the \"3D Viewport\" window\"s N panel under the \"Freeze Transform\" tab, ensures that the tool is readily available and easy to use during the modeling and animation process.

_HOOK_
Clearing Transforms in Blender: A Quick Guide
Clearing transforms in Blender is a straightforward process that allows you to reset the location, rotation, or scale of your objects to their default values. This guide will walk you through the steps to access and use the clear transform options, along with explaining the key differences between clearing and applying transforms.
How To Access The Clear Menu?
To access the clear menu, navigate to the object menu in the header of the 3D viewports and select the clear option. This menu allows you to clear the location, rotation, scale, or object origin individually for your objects. Unlike applying transforms, there\"s no default hotkey for accessing the clear menu directly; it must be accessed through the 3D viewport\"s header bar.
Using Hotkeys To Access Specific Tools
- Clear Location: Use the hotkey Alt + G to reset the location values of your selected object to 0,0,0.
- Clear Rotation: Use the hotkey Alt + R to reset the rotation values to 0,0,0.
- Clear Scale: Use the hotkey Alt + S to reset the scale values to 1,1,1.
Note that in some versions of Blender, these hotkeys might not function as expected, particularly for the clear rotation tool. In such cases, revert to using the options from the clear menu directly.
How Do The Clear Tools Work?
Using any of the clear tools will revert the selected transform(s) of an object to its default state, affecting both the transform parameters and the object\"s appearance in the viewport. Clearing the location, for example, will reset its coordinates to the global origin (0,0,0), while clearing the rotation and scale will reset their values to default (0,0,0 for rotation and 1,1,1 for scale).
The Difference Between Applying and Clearing a Transform
Both applying and clearing transforms reset their parameters in the side panel. However, applying transforms sets the current state as the new default, while clearing transforms resets them to the Blender defaults. For instance, applying a scale transform makes the current scale the new default, whereas clearing it reverts the object to its original scale.

Applying vs. Clearing Transforms: What\"s the Difference?
In Blender, managing object transformations is crucial for efficient workflow and accurate modeling. Transformations include changes in an object\"s location, rotation, and scale. Blender offers two primary methods for handling these transformations: applying and clearing. Understanding the difference between these two actions is essential for any Blender user.
Applying Transforms
Applying transformations means making the current location, rotation, and scale of an object its new defaults. When you apply a transformation:
- The object\"s transformation data is reset to the default (location to 0,0,0, rotation to 0,0,0, and scale to 1,1,1), but the visual appearance of the object in the 3D viewport remains unchanged.
- This is particularly useful when you\"ve scaled or rotated an object in Object Mode and want to ensure that modifiers or physics simulations interact with the object as expected, considering its transformed state as its \"default\" state.
Clearing Transforms
Clearing transformations, on the other hand, resets an object\"s location, rotation, or scale values back to their defaults without changing the object\"s base data:
- Clear Location (Alt + G) sets an object\"s position back to the world origin (0,0,0).
- Clear Rotation (Alt + R) resets an object\"s rotation to 0 degrees on all axes.
- Clear Scale (Alt + S) sets the scale of an object back to 1 on all axes, effectively removing any scale transformation.
Key Differences
The key difference lies in how these actions affect the object:
- Applying a transform alters the object\"s data block, making its current state the new default without changing its appearance in the viewport.
- Clearing a transform resets the object\"s transformation parameters to Blender\"s default, potentially altering its appearance in the viewport if the object had been moved, rotated, or scaled away from these defaults.
Practical Applications of Freeze Transform in Workflows
Freezing transforms in Blender is an essential technique used across various stages of the 3D modeling and animation process. It offers numerous practical applications that streamline workflows, enhance accuracy, and improve the overall efficiency of projects. Here are some key applications:
- Animation Preparation: Before animating objects or characters, freezing transforms can ensure that their initial state is set as a baseline. This simplifies the animation process, allowing animators to revert to this baseline state at any point.
- Modeling and Sculpting: In modeling, freezing transforms allows artists to work on objects at any scale or orientation and then reset their transforms without affecting the model\"s geometry. This is particularly useful when preparing objects for sculpting or detailed modifications.
- Scene Setup: For complex scenes, freezing transforms helps maintain the correct scale, position, and rotation of objects relative to each other. This ensures consistency throughout the scene, crucial for architectural visualization and environment design.
- Rigging and Skinning: In rigging, freezing transforms on bones and control objects ensures that their initial positions are recognized as the default by the system. This is critical for the correct deformation of the mesh during animation.
- Game Development: When exporting models to game engines, freezing transforms can prevent common issues related to object orientation and scale, ensuring that assets appear as intended within the game environment.
- Workflow Integration: Freezing transforms can facilitate smoother workflow integration between Blender and other software by ensuring that object transformations are correctly interpreted across platforms.
These applications highlight the versatility of the Freeze Transform feature in Blender, making it an indispensable tool for professionals and hobbyists alike in the field of 3D design and animation.
Hotkeys and Shortcuts for Efficient Transform Management
Blender offers a comprehensive set of hotkeys and shortcuts designed to streamline the transform management process. These shortcuts allow users to quickly manipulate objects within the 3D viewport, enhancing productivity and workflow efficiency. Here are some of the most essential hotkeys:
- G - Grab/Move: Pressing G allows you to move the selected object freely in the 3D viewport.
- R - Rotate: Pressing R enables rotation of the selected object around its origin point.
- S - Scale: Pressing S will scale the selected object up or down.
- CTRL + A - Apply Transform: This shortcut opens a menu to apply the current location, rotation, and scale of the selected object as the default state.
- ALT + G - Clear Location: Resets the selected object\"s location to the origin (0,0,0).
- ALT + R - Clear Rotation: Resets the selected object\"s rotation to zero degrees on all axes.
- ALT + S - Clear Scale: Resets the selected object\"s scale to 1, making it its original size.
- SHIFT + D - Duplicate: Creates a copy of the selected objects and immediately grabs it for positioning.
- CTRL + M - Mirror: Followed by pressing X, Y, or Z to mirror the selected object along the corresponding axis.
These hotkeys are the foundation for efficient transform management in Blender, enabling rapid manipulation of objects to achieve desired positions, rotations, and scales. Mastering these shortcuts can significantly speed up your 3D modeling and animation workflows.
Common Issues and Solutions with Freeze Transform
Working with Blender\"s Freeze Transform feature can sometimes lead to confusion or issues, especially for beginners or those transitioning from other 3D software. Here are some common problems and their solutions:
- Issue: Unexpected Object Behavior After Freezing Transform
- Solution: This often occurs when transforms are frozen without understanding their impact on parent-child relationships or constraints. To resolve, ensure you understand the hierarchy and dependency of your objects before applying freeze transforms. Use Blender\"s documentation to learn about these relationships.
- Issue: Unable to Freeze Transform for Multiple Objects
- Solution: Blender allows freezing transforms for multiple objects simultaneously, but this can sometimes lead to unexpected results if objects have different transform values. To mitigate this, try applying the transforms individually or ensure that all objects are correctly aligned before freezing transforms.
- Issue: Freeze Transform Does Not Work as Expected with Rigged Models
- Solution: When dealing with rigged models, freezing transforms can sometimes disrupt the rig. It\"s crucial to freeze transforms before rigging. If you must freeze transforms on a rigged model, consider applying the transforms to the mesh only and not the armature, or consult Blender forums for specific rig-related advice.
- Issue: Loss of Original Transform Data
- Solution: Before freezing transforms, it\"s a good practice to duplicate your object (Shift+D) and keep the duplicate hidden as a backup. This way, you retain the original transform data if needed later.
- Issue: Confusion Between Freezing and Applying Transforms
- Solution: Understanding the difference is crucial. Freezing transforms temporarily alters the object\"s transform values for editing convenience without changing the object\"s data. Applying transforms makes these changes permanent. Review Blender\"s official documentation to clarify these concepts.
For detailed guides and troubleshooting, the Blender community forums and official documentation are invaluable resources. They offer a wealth of knowledge from experienced users and the developers themselves.
_HOOK_
Freeze Transform in Animation and Rigging
Freezing transforms in Blender is a critical step in both animation and rigging workflows, ensuring that objects and characters behave predictably during animation. This process involves setting the current position, rotation, and scale of an object as its new default state. Here\"s how it benefits both domains:
- Preparation for Rigging:
- Before rigging a character or object, it\"s essential to freeze its transforms. This establishes a neutral starting point for the rig, ensuring that any transformations applied during rigging and animation are calculated from this baseline state. It helps in avoiding unexpected deformations and makes the rig more manageable.
- Animation Workflow:
- In animation, freezing transforms allows animators to reset objects or characters back to their original state at any point without losing their work. This is particularly useful for iterative tweaking of animations, where subtle adjustments can significantly impact the final outcome.
- Integrating Assets into Scenes:
- When adding rigged characters or objects to a new scene, freezing transforms ensures that they retain their intended size, orientation, and position relative to other scene elements. This consistency is vital for maintaining the integrity of the animation and avoiding scale or orientation mismatches.
- Maintaining Consistency Across Scenes:
- For characters and objects that appear across multiple scenes or shots, freezing transforms guarantees that their base state remains unchanged, ensuring continuity and consistency in the visual storytelling.
- Streamlining Collaboration:
- In a collaborative environment, freezing transforms before sharing assets ensures that they appear as intended, regardless of the recipient\"s scene setup. This standardization is crucial for efficient teamwork and prevents the need for repetitive adjustments.
Utilizing the Freeze Transform feature in Blender\"s animation and rigging workflows not only enhances the control over the creative process but also significantly reduces the potential for errors, making it an indispensable practice for professionals in the field.
READ MORE:
Advanced Techniques and Tips for Using Freeze Transform
Mastering the Freeze Transform feature in Blender can significantly enhance your 3D modeling and animation workflow. Here are some advanced techniques and tips:
- Non-Uniform Scaling:
- When working with non-uniform scaling, freezing transforms can prevent distortion during animation or when applying modifiers. Scale objects uniformly to avoid issues, then use Freeze Transform to lock in those changes.
- Combining Freeze Transform with Modifiers:
- Before applying certain modifiers, such as Mirror or Array, freezing transforms ensures that these modifiers behave predictably. This step is crucial for maintaining the intended geometric relationships.
- Animation and Dynamics:
- For objects involved in physics simulations or complex animations, freezing transforms can establish a stable starting point. This helps in achieving more consistent and realistic motion and interactions within the scene.
- Workflow Efficiency:
- Develop a habit of freezing transforms as part of your standard workflow, especially before exporting models to other software. This ensures that your object\"s position, rotation, and scale are correctly interpreted by different applications.
- Use of Scripts and Add-ons:
- Explore scripts and add-ons that automate freezing transforms for multiple objects or across different properties. This can save time in complex scenes or when preparing large numbers of assets for animation.
- Resetting Frozen Transforms:
- If you need to reset an object\"s transforms after freezing, consider duplicating the object beforehand or using Blender\"s Delta Transform properties to adjust relative transformations without affecting the frozen state.
By incorporating these advanced techniques and tips, you can leverage the full potential of Blender\"s Freeze Transform feature to streamline your 3D modeling and animation projects, ensuring a more efficient and error-free workflow.
Unlock the full potential of your 3D projects in Blender with the Freeze Transform feature, a pivotal tool for mastering the art of transformation management. Whether you\"re animating, rigging, or fine-tuning your models, these insights will elevate your workflow, ensuring precision and efficiency. Dive into the world of Blender and transform your creative visions into reality with confidence and flair.