Topic blender 3d printing toolbox: Discover the Blender 3D Printing Toolbox, your ultimate guide to transforming digital art into tangible masterpieces. This toolbox opens up a world of possibilities for artists and creators eager to bring their visions to life.
Table of Content
- What are the steps to enable the Blender 3D Printing Toolbox add-on?
- Features of the 3D Printing Toolbox
- How to Enable the 3D Printing Toolbox
- Utilizing the Toolbox
- How to Enable the 3D Printing Toolbox
- Utilizing the Toolbox
- Utilizing the Toolbox
- YOUTUBE: 3D Print Toolbox for Beginners | Blender 2.93 for 3D Printing Design
- Introduction to Blender 3D Printing Toolbox
- Key Features and Benefits
- Installing and Enabling the Toolbox
- Understanding the Toolbox Interface
- How to Analyze and Prepare Your Models for Printing
- Advanced Tips for Optimizing 3D Print Designs
- Common Issues and How to Solve Them
- Case Studies: Successful Projects Using the Toolbox
- Future Updates and Community Contributions
- Resources and Further Reading
What are the steps to enable the Blender 3D Printing Toolbox add-on?
To enable the Blender 3D Printing Toolbox add-on, follow these steps:
- Open Blender on your computer.
- Go to the Preferences menu.
- Click on the Add-ons tab.
- Look for the Mesh category.
- Find the 3D Print Toolbox add-on within the Mesh category.
- Check the box next to the 3D Print Toolbox add-on to enable it.
READ MORE:
Features of the 3D Printing Toolbox
- Analysis of mesh errors that could affect printing
- Measurement tools for model dimensions and wall thickness
- Identification and correction of non-manifold edges
- Export options tailored for 3D printing
How to Enable the 3D Printing Toolbox
- Navigate to Edit > Preferences > Add-ons.
- Search for \"3D Print Toolbox\" in the search bar.
- Check the box next to the add-on to enable it.
Utilizing the Toolbox
Once enabled, the 3D Printing Toolbox can be accessed from the sidebar in the 3D viewport by pressing the N key. From there, users can perform checks on their models, such as analyzing for thin walls, non-manifold edges, and other potential issues, ensuring their designs are optimized for 3D printing.
Preparing Your Model
- Use the toolbox to check for and fix any errors.
- Measure and adjust your model\"s dimensions as necessary.
- Export your model in a 3D printing-friendly format, such as STL.
The Blender 3D Printing Toolbox is a powerful tool that simplifies the preparation of models for 3D printing, making it an invaluable resource for both beginners and experienced users in the 3D printing community.
How to Enable the 3D Printing Toolbox
- Navigate to Edit > Preferences > Add-ons.
- Search for \"3D Print Toolbox\" in the search bar.
- Check the box next to the add-on to enable it.
_HOOK_
Utilizing the Toolbox
Once enabled, the 3D Printing Toolbox can be accessed from the sidebar in the 3D viewport by pressing the N key. From there, users can perform checks on their models, such as analyzing for thin walls, non-manifold edges, and other potential issues, ensuring their designs are optimized for 3D printing.
Preparing Your Model
- Use the toolbox to check for and fix any errors.
- Measure and adjust your model\"s dimensions as necessary.
- Export your model in a 3D printing-friendly format, such as STL.
The Blender 3D Printing Toolbox is a powerful tool that simplifies the preparation of models for 3D printing, making it an invaluable resource for both beginners and experienced users in the 3D printing community.
3D Print Toolbox for Beginners | Blender 2.93 for 3D Printing Design
Beginner: \"Are you new to this hobby? Don\'t worry, this video is perfect for beginners like you! Learn step-by-step guidance and tips to kickstart your journey and become a pro in no time.\" Add-On: \"Looking to enhance your experience? Discover the exciting world of add-ons through this video! Unlock new features, tools, and capabilities to take your hobby to a whole new level. Watch now!\"
Introduction to Blender 3D Printing Toolbox
The Blender 3D Printing Toolbox is a powerful add-on designed to bridge the gap between digital 3D modeling and physical 3D printing. By integrating this toolbox into your workflow, you can prepare, analyze, and optimize your models for 3D printing directly within Blender, a leading open-source 3D modeling software. This add-on provides a suite of tools that address common challenges in 3D printing, such as detecting non-manifold edges, measuring model thickness, and ensuring that your designs are ready for the printing process.
- Mesh Analysis: Identifies potential issues with your model that could affect the printability, including non-manifold edges, overhangs, and wall thickness.
- Model Repair: Offers tools to fix common mesh problems, ensuring your model is solid and ready for printing.
- Export: Simplifies the process of exporting your models in formats compatible with 3D printers, primarily STL, but also others depending on your needs.
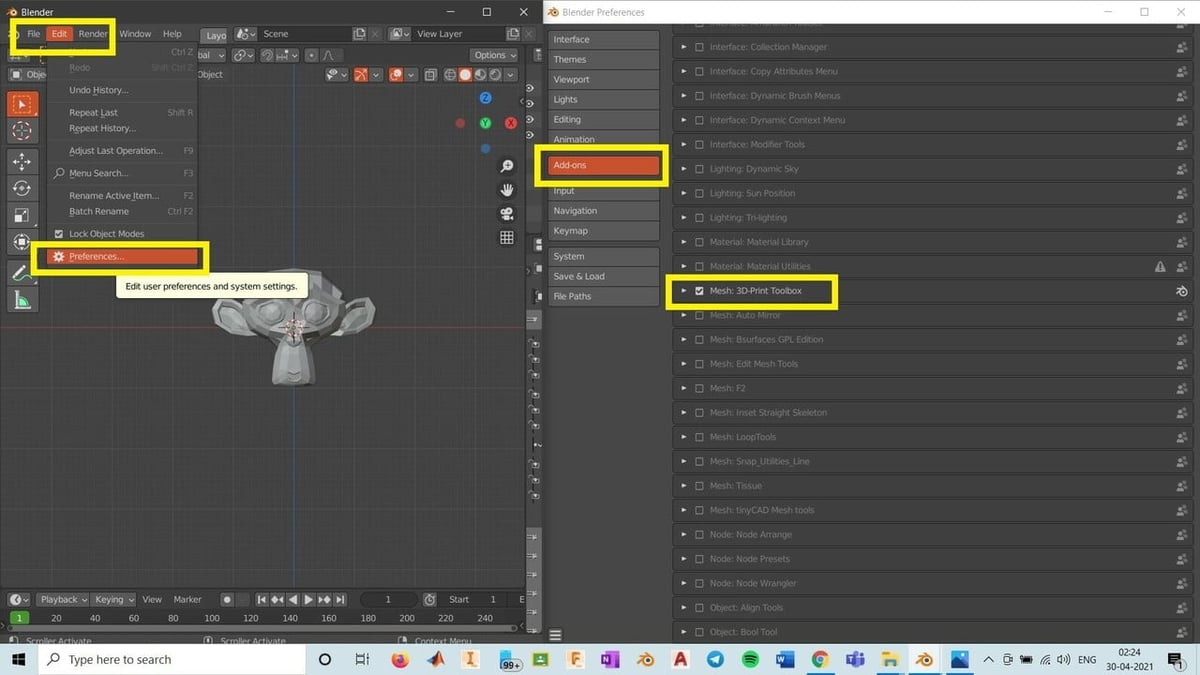
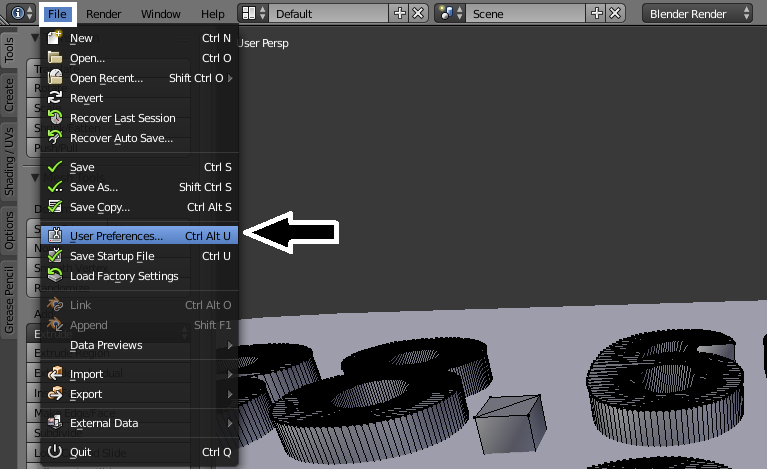
To enable the 3D Printing Toolbox in Blender, navigate to Edit > Preferences > Add-ons, and search for \"3D Print Toolbox\". Once found, tick the checkbox to enable it. This simple activation process integrates the toolbox into Blender\"s UI, offering a dedicated panel within the 3D viewport for easy access to its features. The toolbox\"s intuitive design makes it accessible for both beginners and professionals, streamlining the workflow from digital model to physical print.
- Open Blender and go to Edit > Preferences > Add-ons.
- In the search bar, type \"3D Print Toolbox\" and locate the add-on in the list.
- Check the box to enable the toolbox and close the Preferences window to apply changes.
The introduction of the 3D Printing Toolbox has significantly enhanced Blender\"s capabilities, making it a versatile tool for 3D printing enthusiasts and professionals alike. By providing essential tools for pre-printing preparation and analysis, it ensures that models are optimized for a successful printing process, saving time and resources.

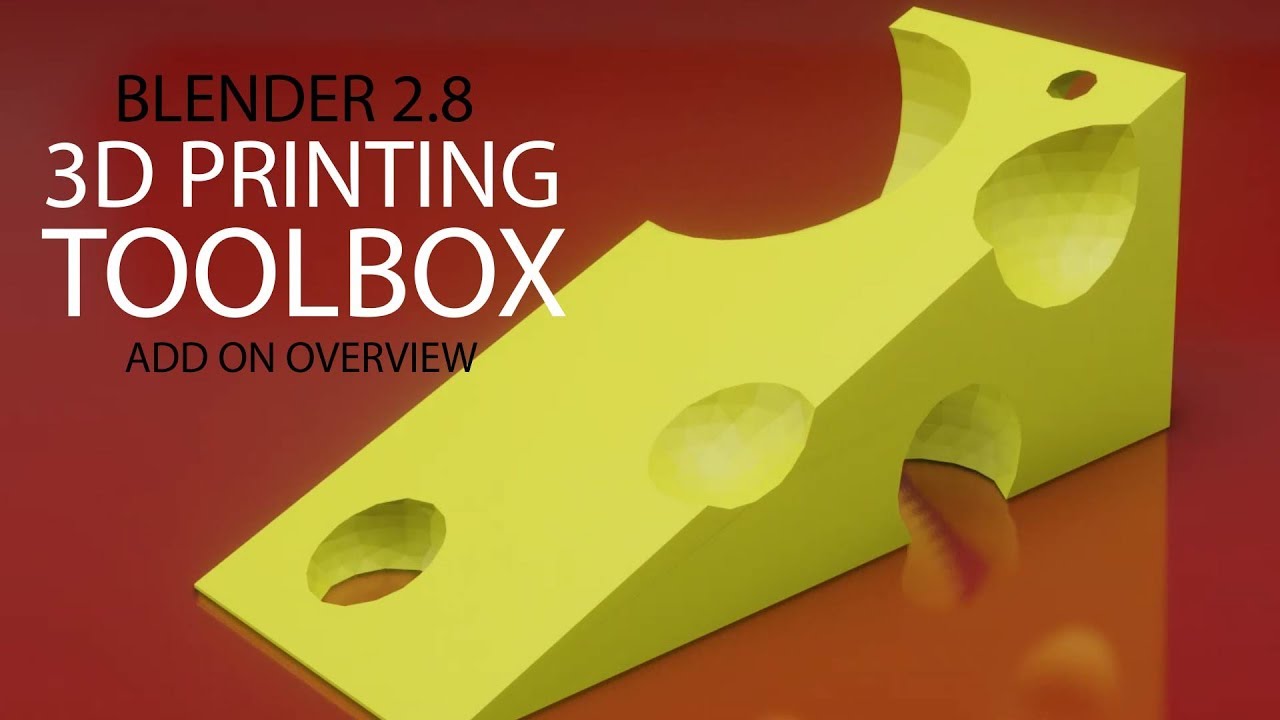
3D Printing Toolbox - Blender 2.8 Add On Overview - 3D Design for 3D Print
Download Blender Starter Pack: https://printthatthing.us/ Learn Blender for 3D printing design quickly. Watch FULL Playlists: ...
Key Features and Benefits
The Blender 3D Printing Toolbox is equipped with a variety of features designed to optimize your 3D printing workflow. From model preparation to the final export, this toolbox ensures that your designs are print-ready, high-quality, and free of common errors that could impact the printing process.
- Analysis Tools: Comprehensive tools to analyze your model\"s geometry for errors such as non-manifold edges, inverted normals, and thin walls that could affect the print\"s integrity.
- Repair Functions: Automated and manual tools to repair issues detected during analysis, ensuring your models are solid and manifold.
- Measurement Features: Measure the dimensions, wall thickness, and angles within your model to adhere to your printer\"s capabilities and material requirements.
- Export Options: Directly export your models in STL format, the standard file type for 3D printing, ensuring compatibility with most 3D printers.
These features not only streamline the process of preparing models for 3D printing but also significantly reduce the time and effort required to ensure models are print-ready. By providing real-time feedback and corrections, the Blender 3D Printing Toolbox minimizes the risk of print failures, saving both resources and frustration. Moreover, its integration within Blender\"s user-friendly interface makes these powerful tools accessible to users of all skill levels, from hobbyists to professionals.

Installing and Enabling the Toolbox
Getting the Blender 3D Printing Toolbox up and running is a straightforward process that integrates seamlessly into your existing Blender workflow. This section guides you through the installation and activation steps to ensure you can start optimizing your 3D models for printing without delay.
- Open Blender: Launch Blender on your computer to get started.
- Access Preferences: Navigate to Edit > Preferences from the top menu to open the Blender Preferences window.
- Find the Toolbox: In the Preferences window, click on the Add-ons tab and use the search bar to find the \"3D Print Toolbox\".
- Enable the Add-on: Check the box next to the 3D Print Toolbox to enable it. The toolbox will now be available in Blender\"s UI.
- Access the Toolbox: You can access the 3D Printing Toolbox from the 3D Viewport by pressing the N key to open the sidebar, then selecting the \"3D Print\" tab.
This add-on is included with Blender, so there\"s no need for a separate download. Enabling it adds a powerful set of tools directly into Blender, designed specifically for preparing models for 3D printing. With the toolbox activated, you can immediately start utilizing its features to analyze, repair, and export your models in a print-ready format.
_HOOK_
Understanding the Toolbox Interface
The Blender 3D Printing Toolbox is integrated directly into the Blender interface, making it easily accessible and intuitive to use for those familiar with Blender\"s environment. This section provides an overview of the toolbox interface and how to navigate its features effectively.
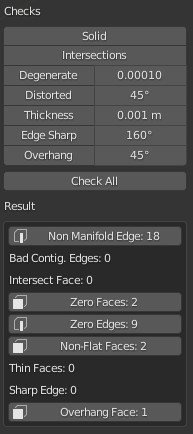
- Accessing the Toolbox: Once enabled, the toolbox can be found in the 3D Viewport\"s sidebar, which can be toggled by pressing the \"N\" key. Within the sidebar, the \"3D Print\" tab houses the toolbox.
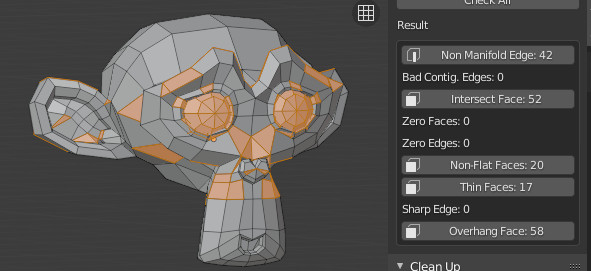
- Analysis Tools: The Analysis section offers various tools to check your model for print readiness, including checks for thickness, overhangs, and non-manifold edges.
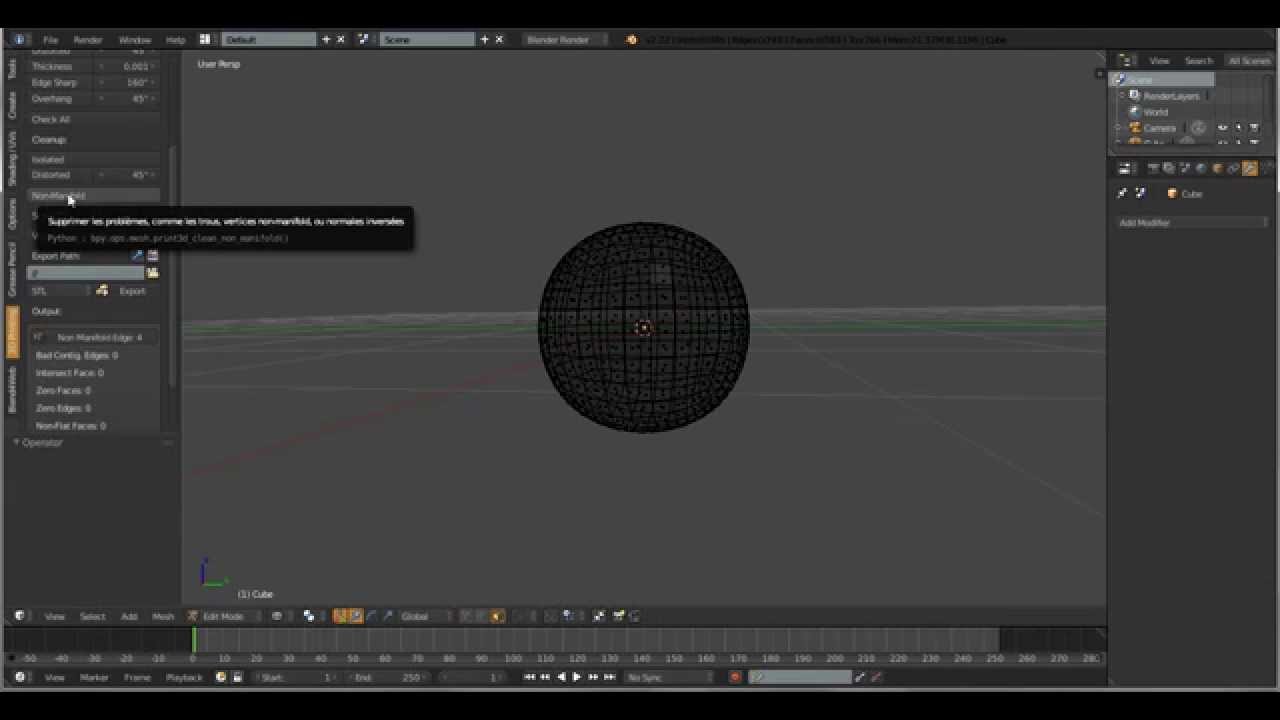
- Cleanup Options: Under the Cleanup section, you\"ll find tools designed to fix common issues detected during the analysis phase, such as making the mesh manifold or fixing inverted normals.
- Export for Print: The Export section provides a straightforward interface to export your cleaned and analyzed model in a 3D printer-friendly format, typically STL.
- Additional Features: Other notable features include the ability to measure parts of your model directly within the toolbox, aiding in ensuring your model meets specific size and volume requirements.
Each section within the toolbox is designed with a specific step of the 3D printing preparation process in mind, guiding users from initial analysis to final export. The toolbox\"s layout is straightforward, with clear labels and buttons for each function, making it user-friendly for both new and experienced Blender users. By familiarizing yourself with the toolbox interface, you can streamline your 3D printing workflow and ensure your models are optimally prepared for printing.
How to Analyze and Prepare Your Models for Printing
Preparing your models for 3D printing with Blender\"s 3D Printing Toolbox is a critical step in the 3D printing process. This section outlines how to use the toolbox to analyze and prepare your models to ensure they are ready for printing, highlighting key functions and steps for optimization.
- Access the Toolbox: With the 3D Printing Toolbox enabled, access it by pressing \"N\" in the 3D Viewport to open the sidebar, then select the \"3D Print\" tab.
- Analyze Your Model: Use the analysis tools within the toolbox to check for common printing issues such as non-manifold edges, thin walls, and overhangs. This step helps identify areas that may require correction before printing.
- Correct Detected Issues: Utilize the toolbox\"s cleanup functions to address any issues detected during analysis. This may include fixing non-manifold edges, adjusting wall thickness, and correcting inverted normals.
- Measure Your Model: Ensure your model\"s dimensions are suitable for your 3D printer\"s capabilities. Use the measurement tools to check size, volume, and area, adjusting as necessary.
- Export for Printing: Once your model has been analyzed and corrected, use the toolbox\"s export function to save your model in a 3D printing-friendly format, typically STL, ensuring it is ready for your 3D printer or slicing software.
Following these steps will help ensure your models are optimized for 3D printing, reducing the risk of printing errors and improving the overall quality of your prints. The Blender 3D Printing Toolbox makes it easier to prepare complex models for printing, streamlining the process from digital design to physical object.
Advanced Tips for Optimizing 3D Print Designs
Optimizing your 3D models for printing is crucial for achieving high-quality prints. The Blender 3D Printing Toolbox offers several advanced techniques to enhance your designs further. These tips focus on improving printability while maintaining the integrity of your designs.
- Optimize Wall Thickness: Ensure your model\"s walls are thick enough to be printed but not so thick that they waste material. Use the toolbox to measure and adjust wall thickness accordingly.
- Reduce Mesh Complexity: Simplify your model\"s mesh without compromising detail, using decimation tools within Blender. This reduces printing time and potential errors.
- Ensure Watertight Models: Use the toolbox to identify and repair any holes in your model, ensuring it is completely solid (watertight), which is essential for successful printing.
- Use Support Structures Wisely: Strategically add support structures to your design if necessary, but do so in a way that minimizes post-processing work.
- Consider Print Orientation: Analyze your model\"s orientation for printing to reduce supports, decrease printing time, and improve surface quality. Adjust the model\"s position in your slicing software accordingly.
By applying these advanced tips, you can significantly improve the efficiency of your 3D printing process and the quality of your final prints. The Blender 3D Printing Toolbox makes it easier to implement these optimizations, ensuring your designs are not only creative but also print-ready.
Common Issues and How to Solve Them
When using Blender\"s 3D Printing Toolbox, users may encounter a variety of common issues that can affect the quality and success of their 3D prints. Below are some of these issues along with practical solutions to help ensure your projects turn out as intended.
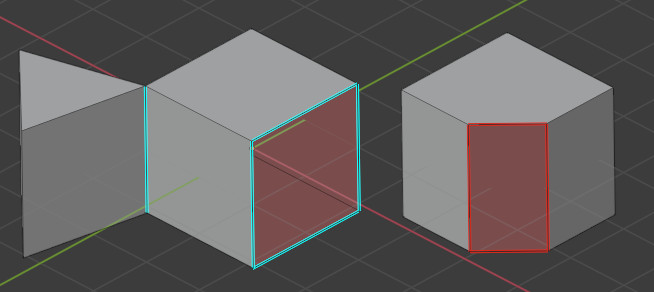
- Non-Manifold Edges: These occur when an edge is connected to more than two faces. Solve this by using the \"Make Manifold\" option in the toolbox to automatically correct these errors.
- Thin Walls: Parts of your model might be too thin to print. Use the toolbox\"s thickness analysis to identify these areas and adjust your model accordingly.
- Overhangs Without Support: Overhangs can cause parts of the model to droop or fail. Use the toolbox to identify overhangs and add support structures in Blender or your slicing software.
- Inverted Normals: Inverted normals can cause the wrong side of your model to be exposed. The toolbox provides a feature to recalculate normals outside to fix this issue.
- Incorrect Model Scale: Ensuring your model is correctly scaled is crucial. Use Blender\"s measurement tools alongside the toolbox to verify dimensions before exporting.
By addressing these common issues with the Blender 3D Printing Toolbox, you can improve the reliability and quality of your 3D prints. These solutions not only help in troubleshooting but also in optimizing your models for a successful printing process.
Case Studies: Successful Projects Using the Toolbox
The Blender 3D Printing Toolbox has been instrumental in the success of numerous 3D printing projects. These case studies highlight how the toolbox\"s features have been applied to create detailed, high-quality prints across various disciplines.
- Architectural Models: Architects have utilized the toolbox to create detailed models of buildings and structures, ensuring accuracy in dimensions and solidity of the models for physical presentations.
- Custom Jewelry Design: Jewelry designers have leveraged the toolbox to refine intricate details and ensure the printability of complex designs, resulting in stunning pieces of wearable art.
- Prototype Development: Product designers and inventors have found the toolbox invaluable for prototyping. It allows for rapid iteration of designs, ensuring each version is optimized for printing before final production.
- Educational Projects: Teachers and students in educational settings have used the toolbox to bring historical artifacts, scientific models, and geometric shapes into the physical world, enhancing learning experiences.
- Art and Sculpture: Artists exploring digital sculpture have used the toolbox to prepare their creations for 3D printing, bridging the gap between digital art and physical sculpture.
These case studies demonstrate the versatility of the Blender 3D Printing Toolbox in supporting a wide range of projects. By providing tools for analysis, repair, and optimization, the toolbox ensures that models are not only printable but also meet the high-quality standards required for professional and personal projects alike.
_HOOK_
Future Updates and Community Contributions
The Blender 3D Printing Toolbox is continuously evolving, with future updates and enhancements driven by community feedback and contributions. This collaborative approach ensures the toolbox remains at the forefront of 3D printing technology, offering new features and improvements to streamline the 3D printing process even further.
- Upcoming Features: Future updates are expected to introduce more sophisticated analysis tools, enhanced model repair capabilities, and improved user interface for an even smoother workflow.
- Community Contributions: Blender’s open-source nature encourages users to contribute their own improvements and custom tools, fostering a rich ecosystem of resources for 3D printing enthusiasts.
- Integration with New Technologies: As 3D printing technology advances, the toolbox will adapt to incorporate support for emerging printing methods and materials, ensuring compatibility with the latest innovations.
- Education and Tutorials: The community regularly updates and provides new tutorials and guides to help users maximize the potential of the 3D Printing Toolbox, catering to both beginners and advanced users.
Staying connected with the Blender community through forums, social media, and official Blender websites is the best way to keep up to date with the latest developments and contribute to the toolbox’s growth. This collective effort not only enhances the toolbox but also strengthens the global Blender community’s capability in the realm of 3D printing.
READ MORE:
Resources and Further Reading
To deepen your understanding of the Blender 3D Printing Toolbox and enhance your 3D printing skills, several resources are available. These materials range from tutorials and courses to community forums, providing valuable insights for both beginners and advanced users.
- Blender Studio: Offers comprehensive guides and tutorials on using Blender for 3D printing, suitable for all skill levels.
- All3DP: Features articles and tutorials on the 3D Print Toolbox, explaining its functionalities in detail for improving 3D printing workflows.
- Udemy Courses: Hosts courses like \"3D Printing from Zero to Hero in Blender,\" providing an in-depth look at 3D modeling and printing using Blender.
- Blender Community Forums: A place to share experiences, get advice, and discuss with fellow 3D printing enthusiasts and Blender users.
- GitHub: For those looking to contribute to the development of the 3D Print Toolbox or explore custom modifications made by the community.
These resources not only offer guidance on the technical aspects of 3D printing with Blender but also inspire creativity and innovation within the community. Whether you\"re just starting out or looking to refine your skills, the wealth of available information can help you achieve your 3D printing goals.
Embrace the power of the Blender 3D Printing Toolbox to bring your creative visions to life. This comprehensive tool simplifies the journey from digital model to physical print, unlocking endless possibilities for creators and innovators alike.