Topic blender add bones: Discover the art of bringing your Blender models to life with our comprehensive guide on how to add bones, enabling intricate animations and dynamic poses that captivate and inspire.
Table of Content
- What is the process for adding bones to a mesh or body in Blender 2.8?
- Getting Started
- Creating Bones
- Naming and Organizing Bones
- Parenting Bones to Mesh
- Moving and Posing
- Creating Bones
- Naming and Organizing Bones
- Parenting Bones to Mesh
- YOUTUBE: Quick Rigging Tutorial in Blender for Impatient Users
- Moving and Posing
- Naming and Organizing Bones
- Parenting Bones to Mesh
- Moving and Posing
- Parenting Bones to Mesh
- Moving and Posing
- Moving and Posing
- Introduction to Bone Structure in Blender
- Step-by-Step Guide to Adding Your First Bone
- Understanding Armature and Bone Properties
- Techniques for Extruding and Connecting Bones
- Naming Conventions for Effective Rigging
- Parenting Mesh to Armature for Deformation
- Weight Painting for Precise Control
- Advanced Bone Manipulation Techniques
- Troubleshooting Common Bone Setup Issues
- Resources for Further Learning
What is the process for adding bones to a mesh or body in Blender 2.8?
To add bones to a mesh or body in Blender 2.8, you can follow these steps:
- Select the mesh or body you want to add bones to by right-clicking on it.
- Switch to the \"Object Mode\" by pressing the \'Tab\' key.
- Press \'Shift + A\' to open the \"Add\" menu and choose \"Armature\" to add an armature to the scene.
- Position the armature in the desired location relative to the mesh.
- Select the mesh and then shift-select the armature to make the armature the active object.
- Switch to \"Edit Mode\" by pressing \'Tab\' again.
- Select a bone in the armature and position it near the mesh where you want it to deform.
- To create a new bone connected to the selected bone, press \'E\' to extrude.
- Repeat the extrusion process to add more bones as needed.
- Once you have added all the necessary bones, you can adjust their size, rotation, and position to fit the mesh.
- Exit \"Edit Mode\" by pressing \'Tab\' to see the armature deforming the mesh.
- You can now continue to rig and animate the mesh using the added bones in Blender.
READ MORE:
Getting Started
- Toggle between \"wireframe\" and \"solid\" mode with Z to see armatures clearly.
- Use \"X-Ray\" mode for armatures to view through other objects.

Creating Bones
Add a single bone in Object Mode using Shift + A → Armature → Single Bone. Adjust its position and size within your model.
Extruding New Bones
Extrude from an existing bone to create new connected bones, shaping your armature to fit the model\"s structure.

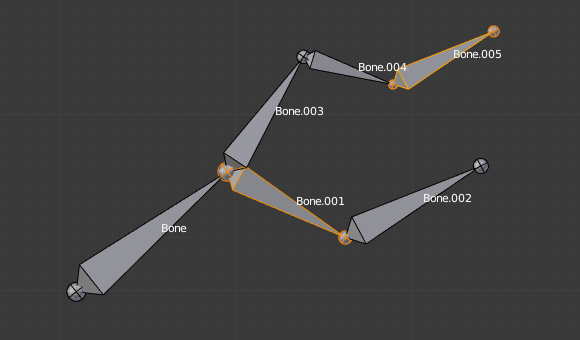
Naming and Organizing Bones
Name bones for clarity and ease of animation. Use the Outliner and Properties window to rename selected bones.

Parenting Bones to Mesh
Parent your armature to the mesh with Ctrl + P and choose \"Armature Deform\" with automatic weights for natural movement.
_HOOK_
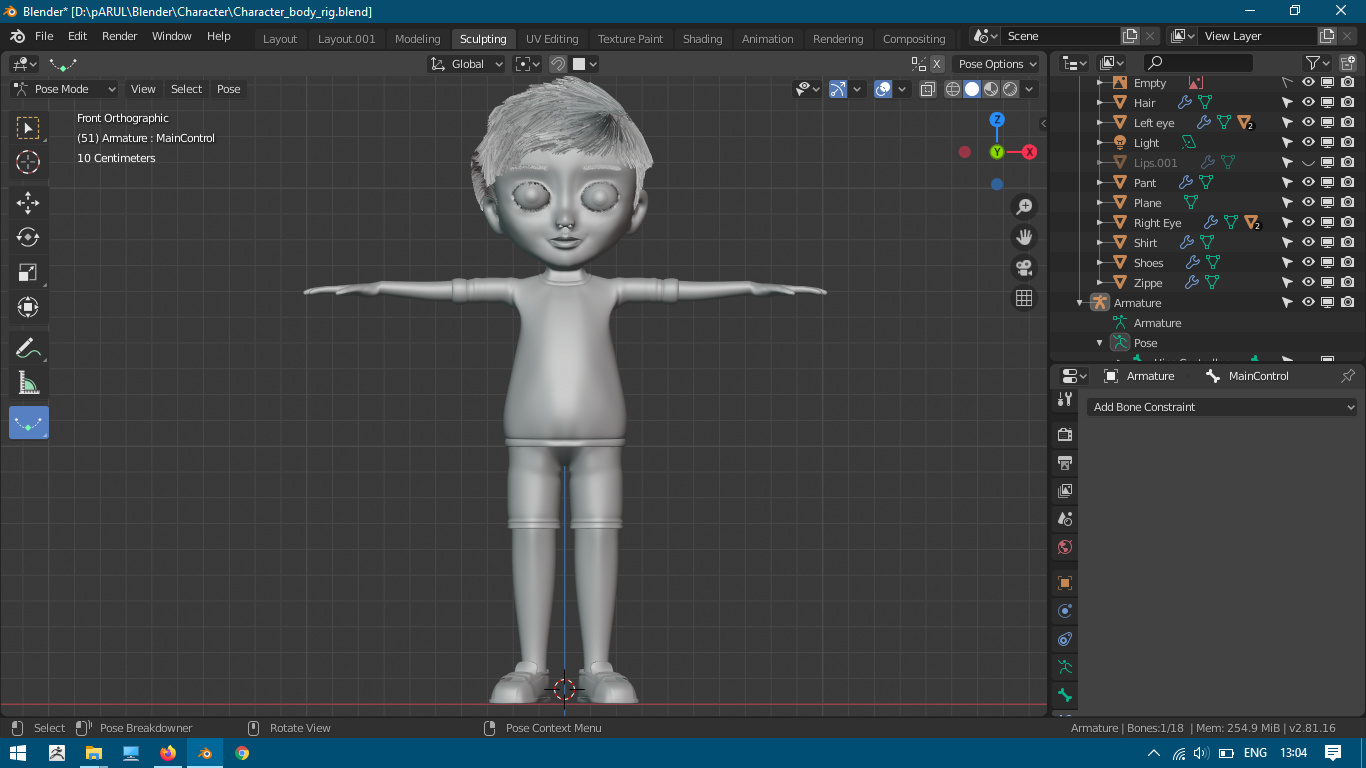
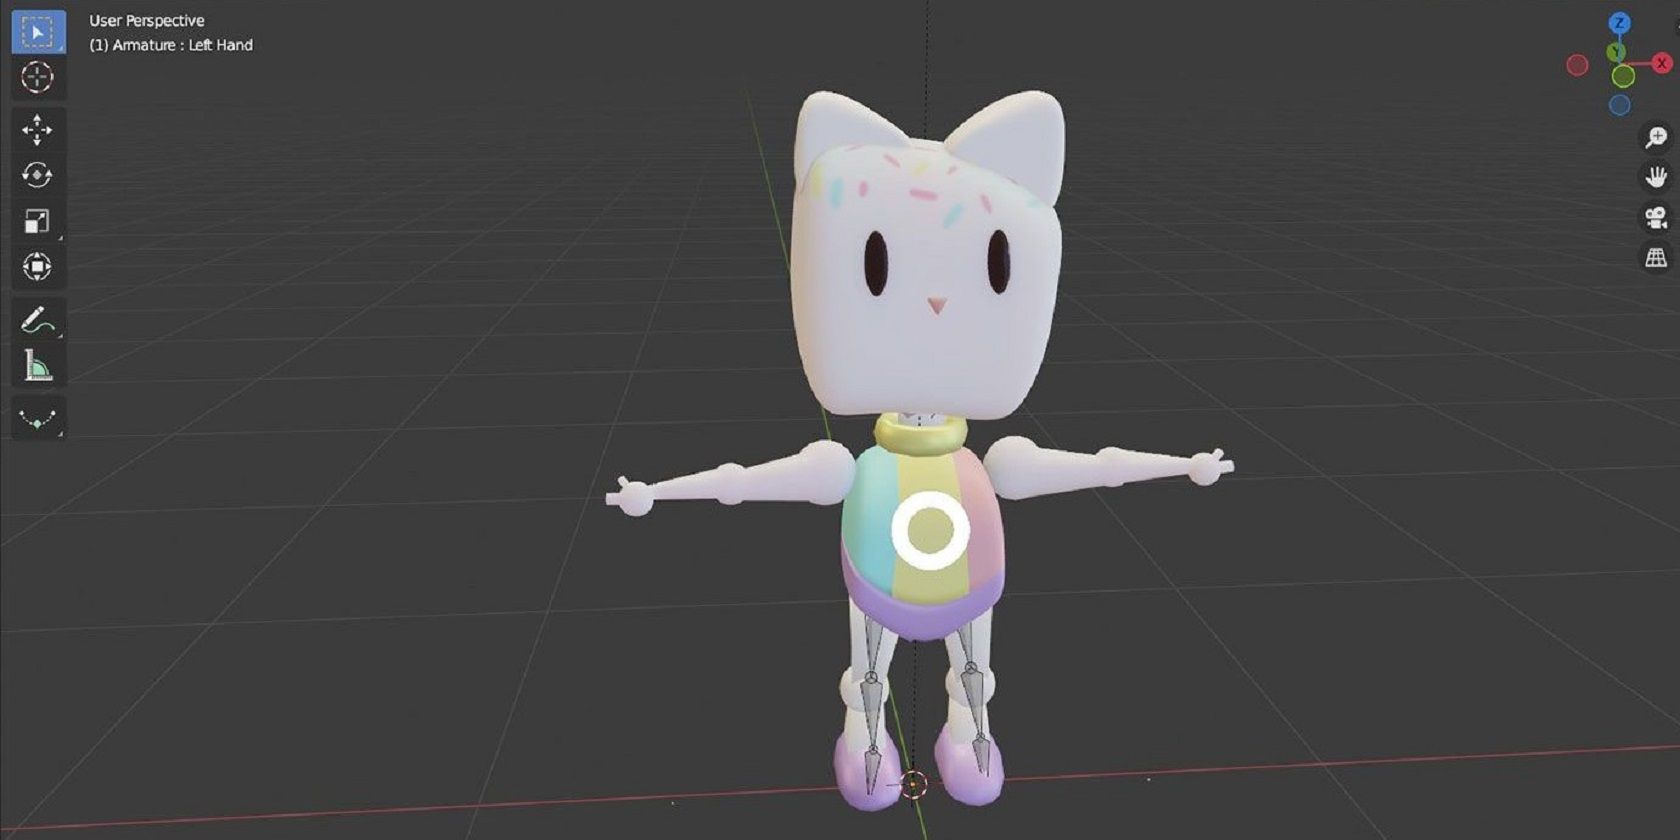
Moving and Posing
Switch to Pose Mode to move individual bones and pose your character. Adjust bone influence for accurate mesh deformation.
Advanced Bone Control
Adjust vertex groups for precise control over mesh deformation by bones, including adding or removing mesh parts from bone influence.

Creating Bones
Add a single bone in Object Mode using Shift + A → Armature → Single Bone. Adjust its position and size within your model.
Extruding New Bones
Extrude from an existing bone to create new connected bones, shaping your armature to fit the model\"s structure.
Naming and Organizing Bones
Name bones for clarity and ease of animation. Use the Outliner and Properties window to rename selected bones.
Parenting Bones to Mesh
Parent your armature to the mesh with Ctrl + P and choose \"Armature Deform\" with automatic weights for natural movement.
Quick Rigging Tutorial in Blender for Impatient Users
Efficiency: Discover the secret to maximizing your productivity and accomplishing more in less time by watching this captivating video on efficiency tips and tricks. Unlock the key to reaching your goals effortlessly! Basics: Dive into the fundamentals of the topic and build a strong foundation of knowledge with this engaging video that covers all the basics you need to know. Perfect for beginners looking to grasp essential concepts.
Introduction to Rigging a Character\'s Armature in Blender 3.0
YouTube is something I do in my spare time, so in order for me to do this full time, support the channel and brand by joining any of ...
Moving and Posing
Switch to Pose Mode to move individual bones and pose your character. Adjust bone influence for accurate mesh deformation.
Advanced Bone Control
Adjust vertex groups for precise control over mesh deformation by bones, including adding or removing mesh parts from bone influence.
_HOOK_
Naming and Organizing Bones
Name bones for clarity and ease of animation. Use the Outliner and Properties window to rename selected bones.

Parenting Bones to Mesh
Parent your armature to the mesh with Ctrl + P and choose \"Armature Deform\" with automatic weights for natural movement.
Moving and Posing
Switch to Pose Mode to move individual bones and pose your character. Adjust bone influence for accurate mesh deformation.
Advanced Bone Control
Adjust vertex groups for precise control over mesh deformation by bones, including adding or removing mesh parts from bone influence.
_HOOK_
Moving and Posing
Switch to Pose Mode to move individual bones and pose your character. Adjust bone influence for accurate mesh deformation.
Advanced Bone Control
Adjust vertex groups for precise control over mesh deformation by bones, including adding or removing mesh parts from bone influence.
Introduction to Bone Structure in Blender
In the world of 3D modeling and animation, Blender stands out as a powerful tool capable of bringing characters to life through rigging and animation. At the heart of this process is the concept of \"bones,\" which are fundamental for rigging models to animate them. Bones in Blender are used to create a skeleton, or armature, that can be manipulated to animate a character or object. This introduction aims to demystify the bone structure in Blender, guiding you through the basics of adding bones to your models and explaining their significance in the rigging process.
Starting with bones in Blender involves understanding that bones are essentially the skeletal framework of your animation. They act like the real bones in a body, providing a structure that can be moved and manipulated to animate a character or object. When you add a bone to Blender, you\"re beginning the process of creating an armature. An armature is a collection of bones arranged in a hierarchy, mimicking the skeletal structure of living beings or mechanical joints of objects.
- To add your first bone, you\"ll typically start in Object Mode, using the Shift + A shortcut to add an Armature, which introduces a single bone into your scene.
- This initial bone can be positioned, scaled, and rotated to fit the part of the model you wish to animate, laying the groundwork for further skeletal structure development.
- By switching to Edit Mode, you can select the ends of the bone and use extrusion (E) to create new bones that extend from the original, allowing for a complex and functional armature to be developed piece by piece.
Understanding bone properties and how they interact with the mesh is crucial. For instance, bones can be set to display in X-Ray mode, allowing them to be visible through the model for easier manipulation. Additionally, naming your bones effectively is vital for keeping track of your armature structure and ensuring that animation processes are as smooth as possible.
As you delve deeper into the world of Blender bones, you\"ll learn about techniques for extruding and connecting bones, parenting meshes to armatures for deformation, and using weight painting for precise control over how your model deforms in response to bone movements. This foundational knowledge is key to mastering the art of rigging and animation in Blender, enabling you to bring your digital creations to life with realistic movements and poses.
Step-by-Step Guide to Adding Your First Bone
- Starting in Object Mode: Open Blender and select the object you wish to rig. Ensure you are in Object Mode for the initial step.
- Adding the First Bone: To add your first bone, press Shift + A to open the Add menu. Navigate to Armature > Single Bone. A single bone will appear at the object\"s origin point.
- Positioning the Bone: Switch to Edit Mode by pressing Tab. Select the bone and position it inside your model where you want the rigging to start. Typically, this is at a major joint or the base of the model.
- Adjusting Bone Length: In Edit Mode, select the tip (head or tail) of the bone. You can move it by pressing G or scale the bone by selecting both ends and pressing S. Adjust the bone to match the size of the part it\"s meant to control.
- Renaming the Bone: It\"s crucial to name your bones for easier identification. With the bone selected, go to the Bone Properties tab on the right panel, find the \"Name\" field, and enter a descriptive name for the bone.
- Extruding New Bones: To create more bones from the initial one, select the end of the bone and press E to extrude a new bone. This is useful for creating chains of bones like limbs.
- Setting Parent-Child Relationships: If you have multiple bones, you may need to set parent-child relationships between them. Select the child bone, then Shift select the parent bone, and press Ctrl + P. Choose \"Keep Offset\" to maintain the bones\" positions relative to each other.
- Assigning Bones to Mesh: Switch back to Object Mode, select your mesh, then Shift select the armature. Press Ctrl + P and choose \"With Automatic Weights\" to bind the mesh to the bones.
- Testing the Rig: Enter Pose Mode by selecting the armature and switching to Pose Mode. Select a bone and move it around with G or rotate it with R to see how the mesh deforms.
Following these steps will help you add bones to your Blender project, creating a basic armature for rigging and animation. Remember, practice and experimentation are key to mastering bone addition and rigging in Blender.
Understanding Armature and Bone Properties
In Blender, armatures and bones are essential for creating and managing skeletal structures that control the animation of characters and objects. Understanding their properties is crucial for effective rigging and animation. Armatures act as the skeleton framework, while bones are the individual parts that make up the armature. Each has a set of properties that influence how they behave and interact with the mesh they control.
- Armature Properties: The armature object has properties that affect the entire skeleton. These include layers, which organize bones into manageable groups; display options, such as X-Ray view for seeing bones through the mesh; and deformation settings, which control how the armature influences the mesh during animation.
- Bone Properties: Each bone within an armature has its own set of properties. These include transformation properties (location, rotation, scale), which determine the bone\"s position and orientation; parent-child relationships, which establish hierarchy within the armature; and weight, which influences how much a bone affects the vertices of the mesh it controls.
- Custom Properties: Both armatures and bones can have custom properties added to them. These properties can be used to control custom rigging setups, animation effects, or to interface with scripts for advanced functionalities.
- Influence and Weight Painting: Weight painting is a technique used to visually assign how much influence a bone has on various parts of the mesh. This is critical for achieving realistic deformations during animations. The weight of a bone\"s influence on the mesh can be adjusted through weight painting mode.
- Constraints and IK: Bones can have constraints applied to them to limit or automate their behavior. Inverse Kinematics (IK) constraints are particularly useful for creating more natural movements by allowing bones to calculate their positions based on the position of an IK target.
By mastering the properties of armatures and bones, animators and riggers can create more complex and lifelike animations in Blender. Experimentation and practice with these properties will help in understanding their impact on rigging and animation workflows.
Techniques for Extruding and Connecting Bones
Creating a functional armature in Blender involves more than just adding individual bones; it requires understanding how to effectively extrude and connect these bones to mimic the natural movements of a character or object. This section delves into the techniques that facilitate the creation of complex rigs through the extrusion and connection of bones, ensuring your models are ready for animation.
- Extruding Bones: To extrude a new bone from an existing one, select the bone in Edit Mode, then press E. This action creates a new bone that extends from the selected end of the original bone, allowing you to build the skeletal structure limb by limb.
- Directional Extrusion: After pressing E to extrude, move your mouse to position the new bone. Click to set its position. Use G for general movement, R for rotation, and S for scaling to adjust the bone\"s orientation and size.
- Connecting Bones: To connect a new bone to a previously created bone, ensure the parent bone is selected, then press E to extrude. The new bone will automatically be connected and parented to the existing bone.
- Adjusting Parent-Child Relationships: In complex rigs, you may need to adjust the parent-child relationships between bones. To set a bone as the parent of another, select the child bone, then Shift select the parent bone and press Ctrl+P, choosing \"Connected\" to ensure they move in unison.
- Using the Armature Modifier: For bones to affect a mesh, you must use the Armature Modifier. Select your mesh, go to the Modifiers tab, and add an Armature Modifier. Choose your armature from the list to bind the mesh to the bones.
- Automatic Weights: When connecting a mesh to an armature for deformation, use the \"With Automatic Weights\" option after selecting both the mesh and armature and pressing Ctrl+P. This automatically assigns vertex groups and weights based on the proximity to the bones.
Understanding and applying these techniques will enable you to construct detailed and functional armatures. Experimentation and practice are key to mastering the extrusion and connection of bones, leading to more natural and realistic animations.
_HOOK_
Naming Conventions for Effective Rigging
Adhering to a consistent naming convention when rigging in Blender is crucial for organization, efficiency, and collaboration. Proper naming conventions make the rigging process smoother, especially for complex models, and facilitate easier animation and editing. Below are key practices for naming bones and armatures effectively:
- Use Descriptive Names: Name bones based on their location and function, such as \"Arm_L\" for the left arm and \"Foot_R\" for the right foot. This clarity aids in identifying bones quickly within the rig.
- Left and Right Suffixes: Always append \"_L\" or \"_R\" at the end of bone names to denote the left or right side of the model. This is crucial for symmetry and for scripts or tools that automatically mirror actions across the model.
- Prefix for Bone Types: Use prefixes to categorize bones by their type or function, such as \"DEF_\" for deformation bones, \"MCH_\" for mechanic bones (used in constraints but not deforming mesh), and \"CTL_\" for control bones that animators will interact with directly.
- Hierarchy and Parenting: Reflect the bone hierarchy in naming by incorporating parent names for child bones where applicable, such as \"Arm_L_Forearm_L\" for a forearm bone that is a child of the left arm bone.
- Consistency Across Models: Maintain consistent naming conventions across all models in a project. This standardization supports reusability of rigs, scripts, and animations.
- Specialized Bones Naming: For bones that serve specific roles such as IK targets or pole targets, include this in their name, e.g., \"IK_hand_L\" or \"pole_elbow_L\".
By following these naming conventions, riggers and animators can ensure a high level of organization and efficiency in their workflow, making the rigging process more intuitive and manageable, especially for collaborative projects.
Parenting Mesh to Armature for Deformation
Parenting a mesh to an armature is a crucial step in the rigging process, allowing the bones within the armature to control and deform the mesh during animation. This process transforms a static model into a dynamic character or object that can be animated. The following steps guide you through the process of parenting a mesh to an armature for deformation in Blender, ensuring a smooth and effective rigging outcome.
- Selecting Your Mesh and Armature: First, ensure that both your mesh and the armature are correctly positioned relative to each other. Select the mesh by clicking on it, then hold down Shift and click on the armature to select them both.
- Parenting With Automatic Weights: With both the mesh and armature selected (armature last), press Ctrl+P to open the parenting menu. Choose \"With Automatic Weights\" from the options. Blender will automatically calculate weights for each bone, influencing the mesh\"s deformation based on their proximity and influence.
- Testing the Deformation: After parenting, switch to Pose Mode by selecting the armature, then changing to Pose Mode from the mode menu. Select a bone and use R to rotate it. The mesh should deform accordingly, showing the effect of the armature\"s bones.
- Adjusting Weights Manually: In some cases, the automatic weights might not provide the desired deformation. You can manually adjust these weights by selecting the mesh, switching to Weight Paint Mode, and using the brush tools to increase or decrease the influence of selected bones.
- Using Vertex Groups for Precise Control: For more detailed control over deformation, you can assign vertices of the mesh to specific bone vertex groups manually. In Edit Mode, select the vertices you wish to assign, find the Vertex Groups panel, select the desired bone group, and click Assign.
Parenting your mesh to an armature with proper weight distribution is key to achieving natural and realistic animations. This process may require iteration and fine-tuning to perfect the deformations for complex models or movements. Experimentation and practice are essential to mastering this fundamental aspect of character rigging in Blender.
Weight Painting for Precise Control
Weight painting in Blender is a critical technique for achieving precise control over how bones influence the vertices of a mesh during animation. This process allows animators to fine-tune the deformation of a mesh by assigning specific weights to vertices in relation to the bones of an armature. Below is a step-by-step guide to effective weight painting.
- Entering Weight Paint Mode: Select your mesh and switch to Weight Paint Mode. You can do this by selecting the mesh, then changing the mode from Object Mode to Weight Paint Mode in the interaction mode menu.
- Selecting Bones for Weight Painting: With the mesh in Weight Paint Mode, select a bone by right-clicking on it. The mesh will display a heatmap indicating the influence of the selected bone on the mesh. Colors range from blue (no influence) to red (maximum influence).
- Adjusting Weights: Use the brush tools available in Weight Paint Mode to adjust the influence of the selected bone on the mesh. Painting with a red brush increases influence, while painting with a blue brush decreases influence. Adjust the brush size and strength for finer control.
- Using Auto Normalize: Enable the Auto Normalize option in the tool settings to ensure that the total weight of all bones influencing a vertex always sums up to 1. This prevents any unintended deformation by maintaining a balanced distribution of weights.
- Weight Gradient Tools: For more complex models, use gradient tools to smoothly transition weights across a surface. This is particularly useful for creating natural-looking deformations in areas like joints.
- Testing Deformations: Regularly switch back to Pose Mode to test how the mesh deforms with the applied weights. Adjust as necessary until you achieve the desired movement and deformation.
- Correcting Weight Distribution: If certain areas deform unexpectedly, return to Weight Paint Mode to correct the weight distribution. This iterative process ensures precise control over mesh deformation.
Weight painting is an essential skill for animators looking to achieve realistic and controlled animations in Blender. By carefully assigning weights to the vertices of a mesh, you ensure that the movements of your characters and objects are both natural and believable.
Advanced Bone Manipulation Techniques
Advanced bone manipulation in Blender goes beyond basic rigging to refine animations and interactions within your models. Mastering these techniques allows for more dynamic and realistic character movements.
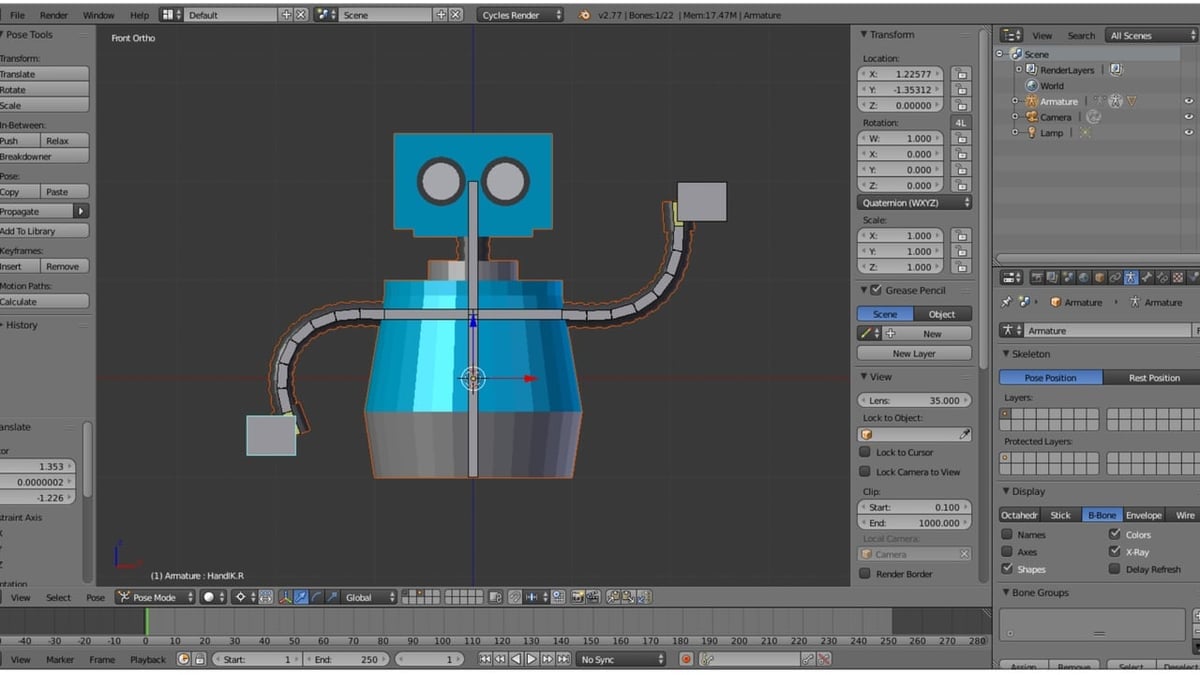
- Utilize X-Ray and Wireframe Modes: For better visibility while placing armatures inside your models, toggle between \"solid\" and \"wireframe\" modes using the Z key. Additionally, activating the \"X-Ray\" option under the armature\"s display settings in the properties panel allows armatures to be visible through other objects, facilitating precise placement and adjustments.
- Armature Editing with Plugins: Tools like Edgy Bone Tools extend Blender\"s native capabilities for bone manipulation. This plugin supports adding and configuring UE4 IK bones, deleting bones for asymmetrical edits, and mirroring them for efficiency. Such tools are instrumental in tweaking bone hierarchies and orientations, crucial for maintaining compatibility with standards like those of the Unreal Engine.
- Per-Bone Editing Features: When in edit mode, per-bone editing tools allow for flipping and rotating bones along axis-aligned planes. This is particularly useful for adjusting bone orientations, ensuring that animations translate correctly across different software.
- Armature Transfer Techniques: Copying rotations from one armature to another corrects discrepancies between software like Maya and Blender. This ensures that skeletons look correct in Blender and animations behave as expected when transferred to game engines.
- Envelope Display Mode: In situations where mesh deformation does not align well with bones, adjusting the bone\"s \"envelope\" can improve how the mesh responds to bone movements. This involves increasing the bone\"s area of influence to ensure all relevant mesh parts are affected by bone animations.
These advanced techniques enhance the realism and functionality of your models by allowing for more detailed and precise control over bone manipulation. Practicing these methods will significantly improve your rigging and animation workflows in Blender.
Troubleshooting Common Bone Setup Issues
Setting up bones in Blender can sometimes lead to unexpected issues that hinder your rigging process. Below are common problems encountered during bone setup and how to resolve them:
- Visibility Issues During Rig Overwriting: Ensure the rig is visible and not hidden when overwriting it. If it\"s hidden, you may encounter bugs that break the rig, reducing it to just a root bone.
- Armature Deform and Automatic Weights: When connecting a mesh to a rig with automatic weights, ensure any pre-existing vertex groups are not locked to avoid accidental overwrites. If Blender generates an error at this stage, scaling the mesh and the armature together may resolve the issue, especially for complex models or those with unmerged vertices.
- Weight Painting Troubles: Issues with automatic weight painting can arise from missing bones, triangulated meshes, shape keys, or unconnected mesh parts. Manually adjusting weight paint or using pre-existing vertex groups can mitigate these problems. Ensure to clean up after automatic weight painting to correct overreaching vertex group influences.
- Handling Mesh and Clothing: For meshes composed of separate parts like bandages or armor, consider manually assigning weight or using the Transfer Mesh Data feature for better control over deformation.
- CloudRig Rigify Log: The CloudRig add-on introduces a Rigify Log panel for metarigs that detects and helps fix simple issues detected during rig generation, streamlining the troubleshooting process.
By addressing these common setup issues, you can improve the rigging process in Blender, leading to more effective and efficient animation workflows.
_HOOK_
READ MORE:
Resources for Further Learning
To deepen your understanding and skills in adding bones in Blender, exploring a variety of resources is essential. Here are some highly recommended avenues for further learning:
- Blender 3D: Noob to Pro - An extensive tutorial series available on Wikibooks. It covers everything from basics to advanced topics, including detailed instructions on adding bones, rigging, and more.
- GameDev Academy - Offers a beginner\"s guide to rigging in Blender. This guide walks you through the process of preparing your model, creating armatures, and more, with an emphasis on humanoid character rigging.
- Blender Official Tutorials - Blender.org provides a wide range of tutorials for all levels, from beginners to advanced users. Topics include geometry nodes, modeling, sculpting, Python scripting, and more. This is a great place to learn directly from the creators of Blender.
Engaging with these resources will help you build a solid foundation in Blender\"s bone and armature system, enabling you to rig characters and objects for animation effectively.
Embark on your Blender journey to master adding bones for animation, enhancing your 3D creations with precision and creativity. This comprehensive guide ensures you have the tools and knowledge to bring your visions to life.