Topic blender benchmark scenes: Discover the power of Blender benchmark scenes to enhance your 3D rendering efficiency and performance, unlocking new levels of creativity and productivity in your projects.
Table of Content
- What are some example scenes used for benchmarking in Blender?
- Understanding Blender Benchmark Scenes
- Top Blender Benchmark Scenes for Testing Your System
- How to Use Blender Benchmark for Performance Testing
- Comparing CPU vs GPU Rendering in Blender Benchmarks
- Insights from Blender Open Data and Benchmark Results
- Optimizing Your System for Blender Rendering
- YOUTUBE: Blender Benchmark with Asus ROG Strix RTX 3090
- Blender Benchmark Scenes: From Basics to Advanced Uses
- Future Developments in Blender Benchmarks
- Community Contributions and How to Get Involved
What are some example scenes used for benchmarking in Blender?
Some example scenes used for benchmarking in Blender are:
- Classroom: A scene with various objects, textures, and lighting to test rendering performance.
- Coffee Shop: This scene includes complex materials, multiple light sources, and reflections.
- Barbershop: A scene that tests hair simulation, complex shaders, and lighting effects.
- Car Render: A scene featuring a detailed car model with reflections and shadows to assess GPU performance.
- Architecture Visualization: A scene with intricate architectural elements, lighting setups, and textures.
READ MORE:
Understanding Blender Benchmark Scenes
Blender benchmark scenes are designed to test and measure the performance of different hardware setups using Blender, a popular open-source 3D creation suite. These scenes are complex 3D models or environments that push the limits of your computer\"s CPU and GPU, providing valuable insights into how well your system can handle various 3D tasks.
- Why Use Benchmark Scenes: Benchmark scenes help users compare the efficiency of different hardware configurations, understand performance bottlenecks, and make informed decisions when upgrading their systems.
- Types of Benchmark Scenes: There are various benchmark scenes available, each designed to test specific aspects of your system\"s performance, such as rendering speed, material processing, and lighting effects.
- How to Access and Use Blender Benchmarks: Blender benchmarks can be accessed through the official Blender website or community forums. Users can download these scenes and run them on their systems to collect performance data.
Benchmarking your system with these scenes can provide a baseline for measuring performance improvements and identifying potential issues with your setup. It\"s an essential step for professionals and enthusiasts alike to optimize their 3D rendering workflows.
Top Blender Benchmark Scenes for Testing Your System
Blender benchmark scenes are designed to test and measure the performance of different hardware setups using Blender, a popular open-source 3D creation suite. These scenes are complex 3D models or environments that push the limits of your computer\"s CPU and GPU, providing valuable insights into how well your system can handle various 3D tasks.
- Why Use Benchmark Scenes: Benchmark scenes help users compare the efficiency of different hardware configurations, understand performance bottlenecks, and make informed decisions when upgrading their systems.
- Types of Benchmark Scenes: There are various benchmark scenes available, each designed to test specific aspects of your system\"s performance, such as rendering speed, material processing, and lighting effects.
- How to Access and Use Blender Benchmarks: Blender benchmarks can be accessed through the official Blender website or community forums. Users can download these scenes and run them on their systems to collect performance data.
Benchmarking your system with these scenes can provide a baseline for measuring performance improvements and identifying potential issues with your setup. It\"s an essential step for professionals and enthusiasts alike to optimize their 3D rendering workflows.

How to Use Blender Benchmark for Performance Testing
Blender Benchmark is a comprehensive tool designed for evaluating the performance of your computer system using Blender. Whether you\"re assessing CPU or GPU capabilities for rendering, the Blender Benchmark provides a straightforward way to test and compare your system\"s performance. Here\"s a step-by-step guide on how to use Blender Benchmark for performance testing.
- Download the Blender Benchmark Tool: Start by downloading the Blender Benchmark application from the official Blender website. Ensure you select the version compatible with your operating system.
- Install and Launch the Application: Once downloaded, run the installer and follow the on-screen instructions to install the application. After installation, launch the Blender Benchmark tool.
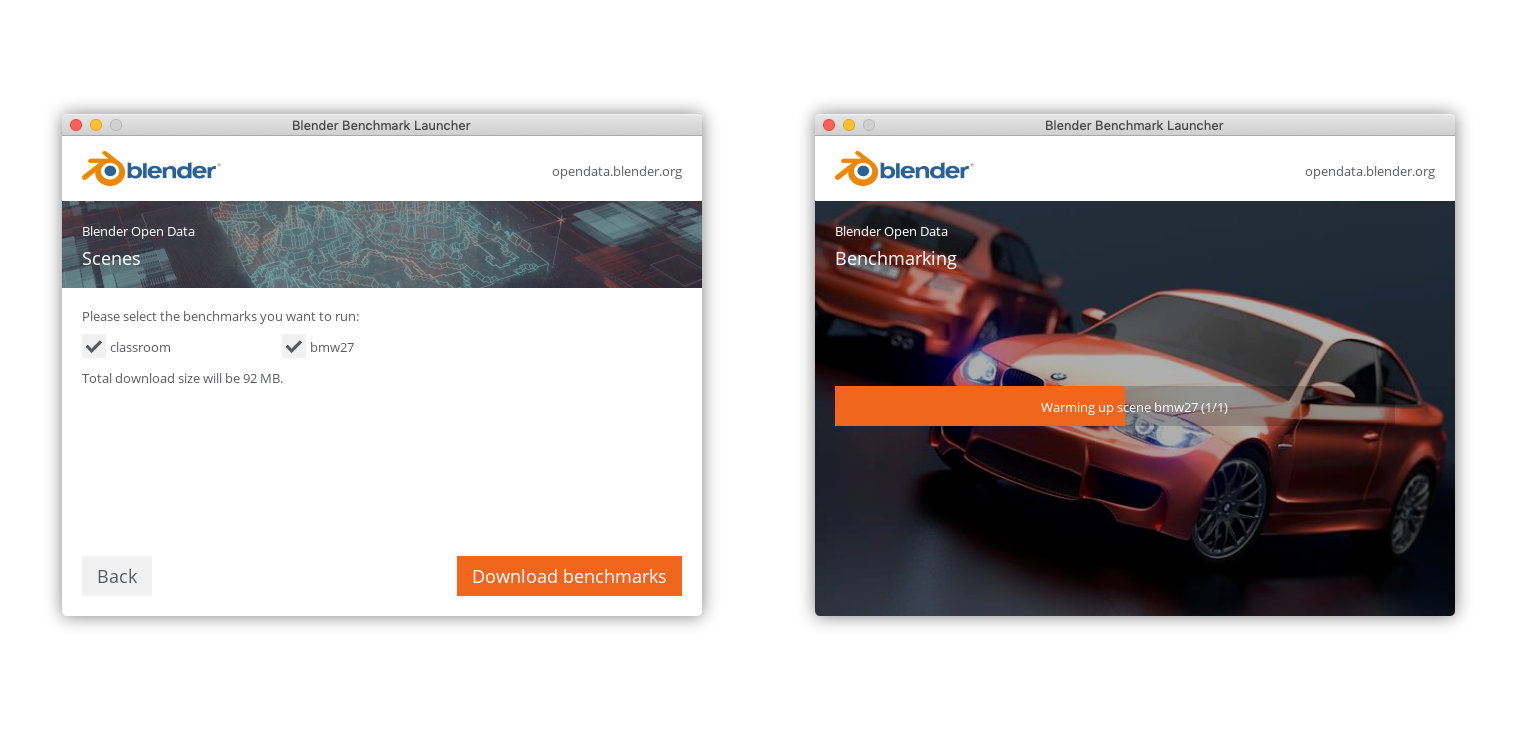
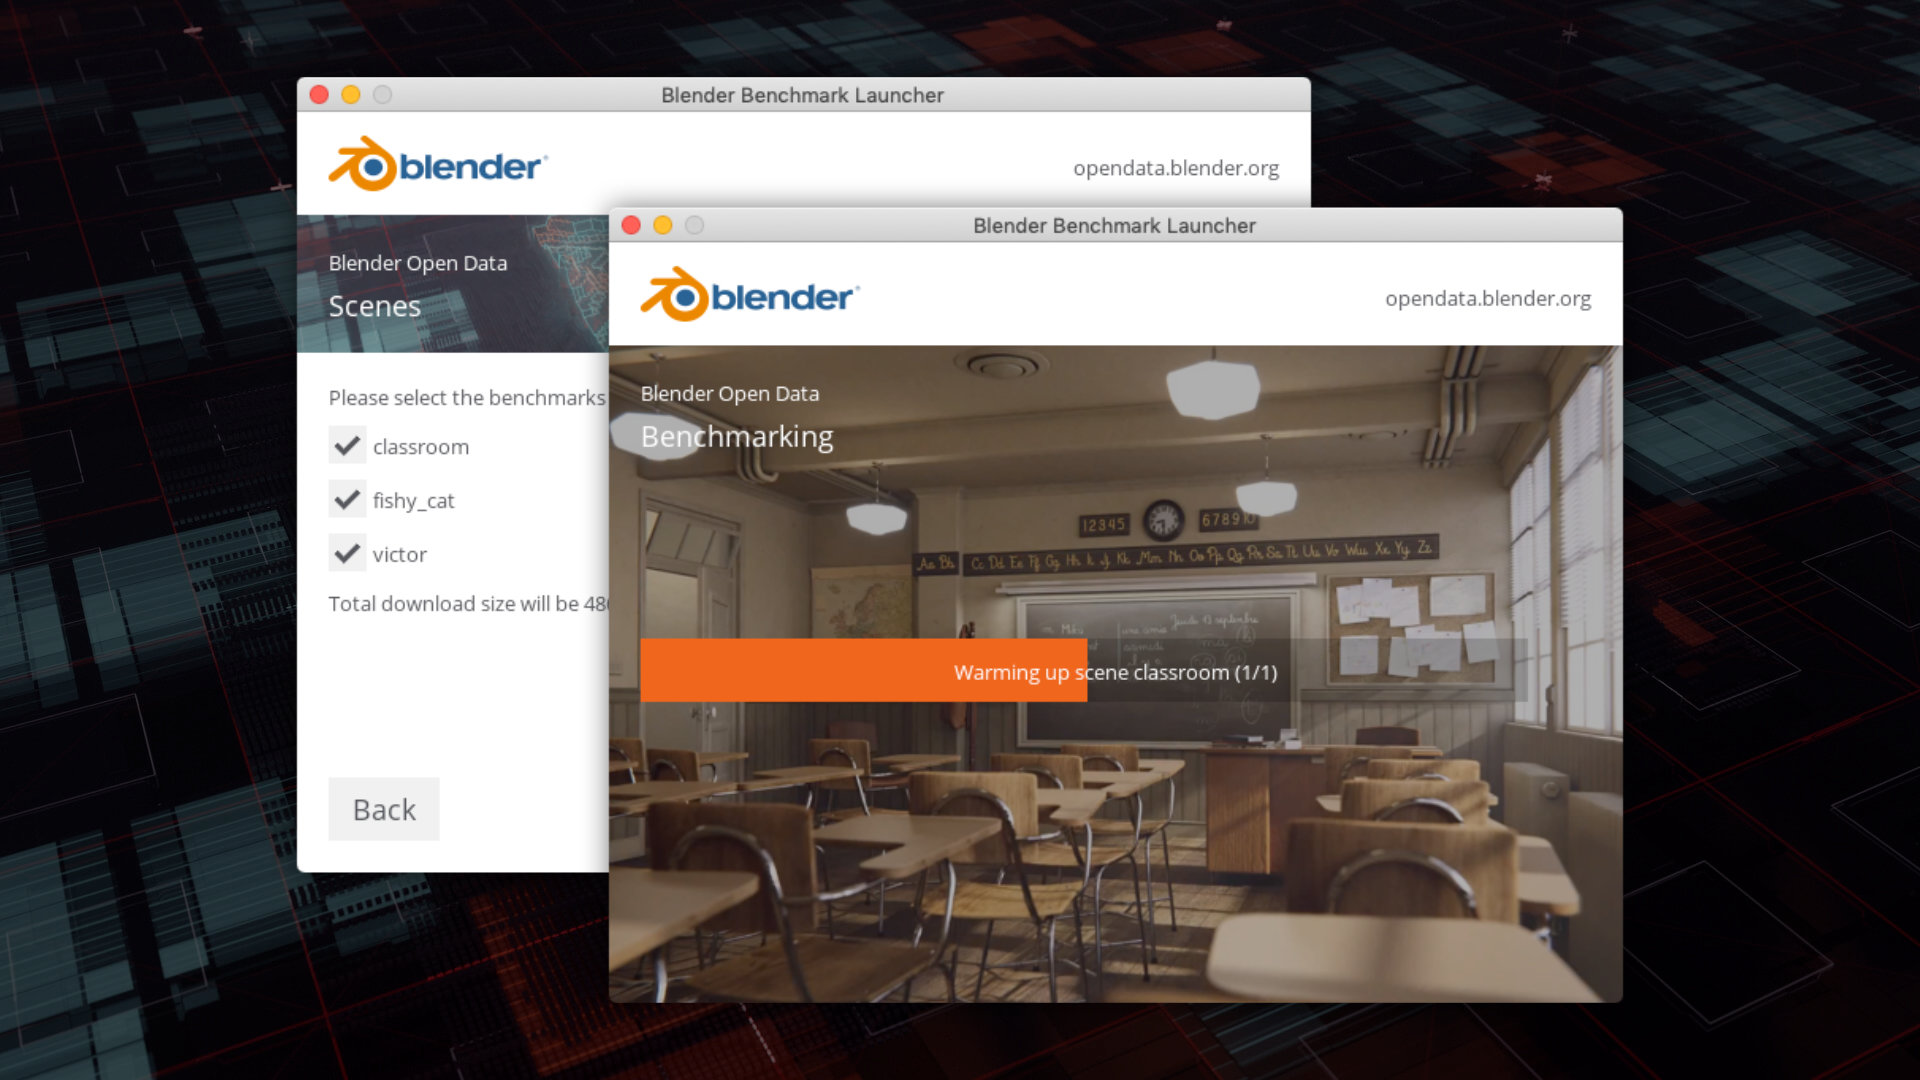
- Choose Benchmark Tests: The application allows you to select specific tests or scenes you wish to run. These tests can range from simple to complex scenes designed to push your system\"s hardware to its limits.
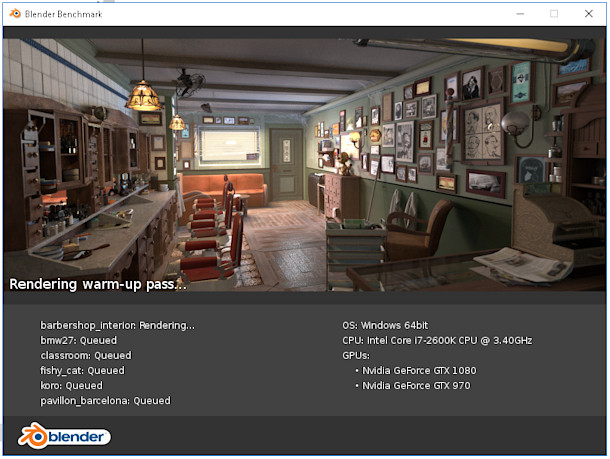
- Run the Benchmark: With your tests selected, proceed to run the benchmark. During this process, Blender Benchmark will render the selected scenes, utilizing your system\"s CPU or GPU based on the test configuration.
- Review Results: Upon completion of the benchmark, the application will display your system\"s performance results. This includes detailed metrics such as render times and scores, which can be compared against other systems.
- Share and Compare Results: Optionally, you can choose to share your benchmark results with the Blender Open Data platform. This allows you to compare your system\"s performance with that of other users worldwide, providing insights into where your system stands in terms of rendering capabilities.
Utilizing Blender Benchmark for performance testing is not only beneficial for evaluating your current system\"s capabilities but also for making informed decisions on hardware upgrades or settings optimizations for improved rendering performance. By following these steps, you can effectively gauge your system\"s performance and identify potential areas for improvement.
Comparing CPU vs GPU Rendering in Blender Benchmarks
In the world of 3D rendering with Blender, understanding the differences between CPU and GPU rendering is crucial for optimizing render times and efficiency. Blender benchmarks offer a way to compare the performance of these two processing units under various conditions. Here\"s an in-depth look at how to compare CPU vs. GPU rendering in Blender benchmarks.
- Understanding CPU and GPU Rendering:
- CPU Rendering utilizes the central processing unit of a computer, excelling in tasks that require complex calculations and are capable of handling a high number of threads simultaneously. It is traditionally used for rendering scenes that are highly detailed or involve complex physics simulations.
- GPU Rendering, on the other hand, leverages the graphics processing unit and is generally faster for rendering images due to its ability to process many tasks in parallel. It is ideal for real-time rendering and large-scale scenes with less complex calculations.
- Setting Up Benchmark Tests: To compare CPU vs. GPU rendering, select benchmark scenes that are designed to test both types of rendering. Ensure that the benchmark tool is configured to test each rendering mode separately, allowing for a direct comparison of their performance.
- Running the Benchmarks: Perform the benchmarks by running the same scene(s) using both CPU and GPU rendering modes. It\"s important to run these tests under similar conditions to ensure accurate comparisons.
- Analyzing Results:
- Compare the render times for each mode. GPU rendering is often faster, but the difference can vary depending on the scene complexity and the specific capabilities of the CPU and GPU.
- Evaluate the quality of the rendered images. In some cases, the rendering quality may differ slightly between CPU and GPU due to the way each processor handles textures, shadows, and light calculations.
- Considering Hardware Configurations: The comparison between CPU and GPU rendering is also influenced by the hardware configuration of your system. High-end GPUs typically offer significant speed advantages over CPUs for rendering, but the best choice may vary based on the specific hardware and the type of scenes being rendered.
- Making an Informed Decision: Use the results of your benchmarks to make informed decisions about whether to use CPU or GPU rendering for your projects. Consider factors such as render speed, image quality, and the specific requirements of your scenes.
Comparing CPU vs. GPU rendering through Blender benchmarks provides valuable insights into how different hardware affects rendering performance. By understanding these differences, you can optimize your workflow, reduce render times, and improve overall productivity in Blender.
_HOOK_
Insights from Blender Open Data and Benchmark Results
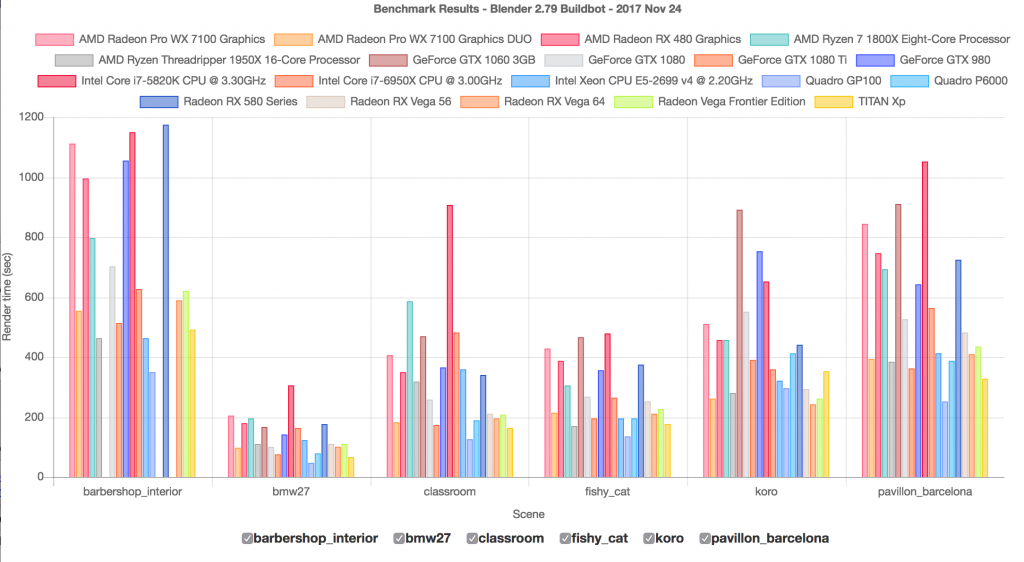
Blender Open Data provides a wealth of information gathered from Blender benchmarks submitted by users around the globe. Analyzing this data offers valuable insights into the performance of various hardware configurations and how they handle different rendering tasks. Here are some key insights derived from Blender Open Data and benchmark results that can help users optimize their Blender projects.
- Performance Trends:
- High-end GPUs generally outperform CPUs in rendering tasks, significantly reducing render times for complex scenes.
- There is a notable performance difference between different generations and models of GPUs and CPUs, with newer models providing substantial improvements in efficiency and speed.
- Optimal Hardware Configurations: The data highlights the best-performing CPUs and GPUs for Blender rendering, guiding users in choosing the right hardware for their needs, balancing budget and performance.
- Impact of System Configurations: Insights into how system memory, storage speed, and other factors influence rendering performance, offering guidance on system upgrades and configuration tweaks.
- Efficiency of Rendering Techniques: Analysis of benchmark results shows the efficiency of different rendering techniques, such as ray tracing and rasterization, across various hardware setups.
- Software Optimization: The data suggests how different versions of Blender and its rendering engines (Cycles, Eevee) perform, helping users select the most efficient software setup for their projects.
- Community Contributions: The vast collection of benchmark submissions underscores the value of community contributions to Blender\"s development, highlighting common performance bottlenecks and areas for software optimization.
Overall, Blender Open Data serves as a powerful tool for the community, offering deep insights into rendering performance across a wide range of hardware configurations. By leveraging this data, users can make informed decisions on hardware purchases, optimize their Blender settings, and contribute to the collective knowledge base, enhancing the Blender experience for all.

Optimizing Your System for Blender Rendering
Optimizing your system for Blender rendering can significantly improve your workflow and reduce render times. Whether you\"re working on complex animations or high-resolution 3D models, a well-optimized system can make a substantial difference. Here are key strategies to enhance your system\"s performance for Blender rendering.
- Upgrade Your Hardware:
- GPU: Invest in a high-performance GPU, as Blender\"s Cycles engine can leverage GPU rendering for faster performance.
- CPU: A powerful CPU can improve performance, especially for tasks that are not easily parallelized.
- Memory: Increase your RAM to handle larger scenes and more complex simulations without slowing down.
- Storage: Use SSDs for faster data access and loading times, which can be crucial for large projects.
- Optimize Blender Settings:
- Adjust render settings in Blender to balance between quality and render time. Lowering samples and resolution can speed up test renders.
- Enable GPU acceleration in Blender\"s settings if you have a supported GPU.
- Utilize Blender\"s denoising features to reduce the need for high sample counts, improving render times without significant quality loss.
- Manage Your Projects Efficiently:
- Organize your scenes and assets to minimize clutter and unused data, which can affect performance.
- Use layers and collections to manage visibility and render only what\"s necessary.
- Stay Updated: Keep Blender and your device drivers up to date to benefit from the latest performance improvements and bug fixes.
- Consider Overclocking: If you\"re comfortable with the risks, overclocking your CPU or GPU can offer performance boosts, but ensure your cooling system can handle the increased heat output.
- Participate in the Blender Community: The Blender community is a great resource for tips and tricks on system optimization and rendering efficiency. Engage with forums and user groups to learn from experienced users.
By following these strategies, you can optimize your system for better performance with Blender rendering. Remember, the best setup depends on the specific demands of your projects, so be prepared to adjust settings and hardware configurations as needed to find the perfect balance for your workflow.
Blender Benchmark with Asus ROG Strix RTX 3090
Performance: \"Experience breathtaking performance like never before with our latest video showcasing the power and speed of our cutting-edge technology. Witness the seamless performance that will elevate your user experience to new heights!\" Specifications: \"Discover all the incredible features and specifications of our product in our engaging video presentation. From the innovative design to the advanced functionalities, this video will showcase everything you need to know!\"
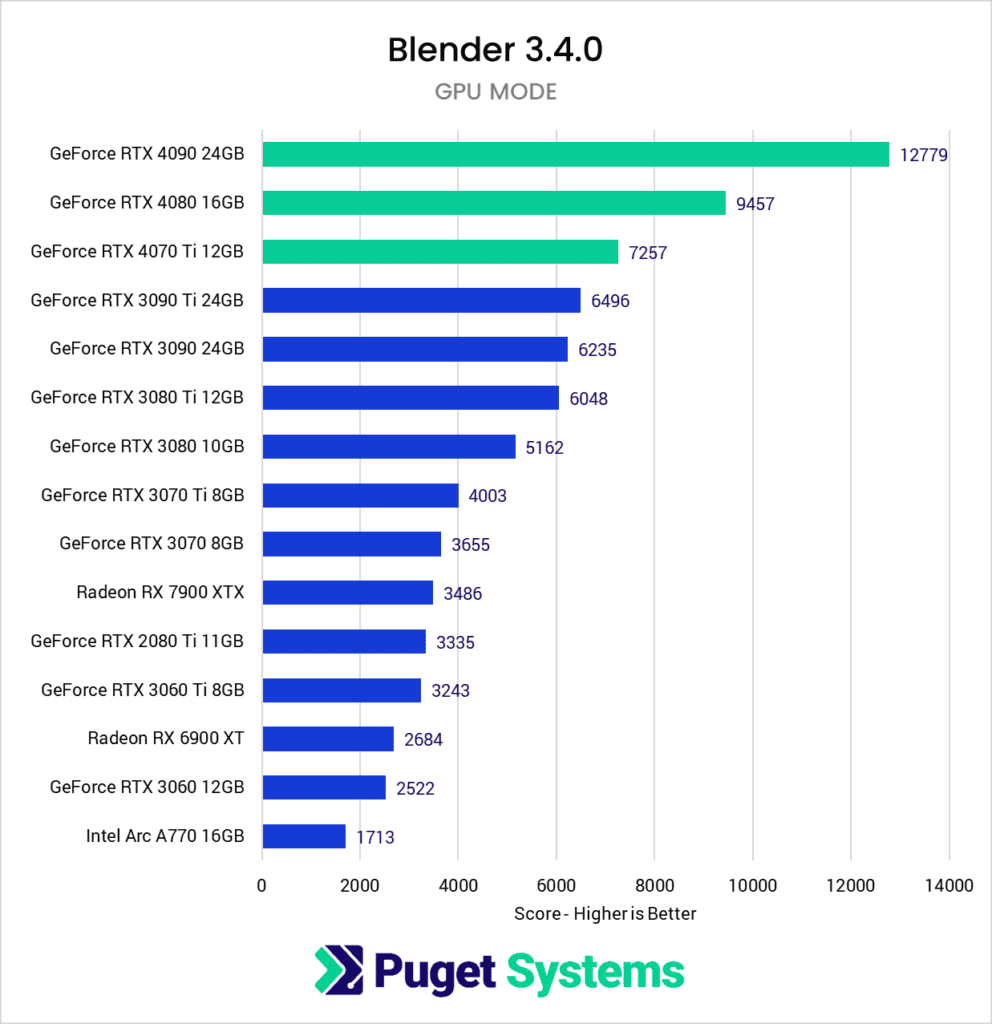
Technical Overview Blender GPU Benchmark
If its been sometime between GPU upgrades, what sort of performance improvement can one expect in a Blender Cycles render?
Blender Benchmark Scenes: From Basics to Advanced Uses
Blender benchmark scenes are essential tools for evaluating and enhancing the performance of computer systems for 3D rendering tasks. These scenes range from simple models to complex environments, allowing users to test various aspects of their system\"s rendering capabilities. Understanding how to utilize these benchmarks from basic to advanced levels can significantly impact your rendering efficiency and system optimization. Here\"s a guide to navigating Blender benchmark scenes effectively.
- Introduction to Benchmark Scenes:
- Start with basic scenes to assess your system\"s fundamental rendering capabilities. These scenes typically include simple geometries and lighting setups.
- Basic scenes help identify the baseline performance of your CPU or GPU in rendering tasks.
- Intermediate Scenes:
- Intermediate benchmark scenes introduce more complexity, such as advanced materials, textures, and lighting effects. They\"re designed to test rendering engines under moderately challenging conditions.
- These scenes are useful for evaluating performance differences between different hardware configurations and settings optimizations.
- Advanced Benchmark Scenes:
- Advanced scenes are highly detailed and designed to push your system to its limits. They include complex geometries, high-resolution textures, and sophisticated lighting and effects.
- Use these scenes to test the upper limits of your hardware and to benchmark performance for professional-grade projects.
- Custom Scenes:
- Beyond pre-designed benchmarks, consider creating custom scenes tailored to your specific project needs. This allows you to test and optimize for the exact types of tasks you\"ll be undertaking.
- Custom scenes can help simulate real-world projects, providing insights into how your system performs under similar conditions.
- Utilizing Benchmark Results:
- Analyze benchmark results to identify potential bottlenecks and areas for improvement in your hardware or Blender settings.
- Compare your results with those from the Blender Open Data platform to see how your system stacks up against others.
- Learning from the Community:
- Engage with the Blender community to learn from others\" benchmarking experiences and insights.
- Sharing your own results and findings can contribute to the collective knowledge and help improve Blender\"s performance for everyone.
From basic to advanced uses, Blender benchmark scenes are invaluable for anyone looking to assess and enhance their system\"s rendering performance. By methodically working through these levels of complexity, you can gain a comprehensive understanding of your system\"s capabilities and how to optimize it for your rendering needs.

Future Developments in Blender Benchmarks
The realm of Blender benchmarks is constantly evolving, with new developments aimed at providing more accurate, comprehensive, and user-friendly tools for performance testing. As Blender continues to grow in popularity and capability, the benchmarking tools and scenes are also expected to advance. Here are some anticipated future developments in Blender benchmarks.
- More Complex and Varied Benchmark Scenes:
- Future benchmarks are likely to include a wider variety of scenes, from ultra-realistic environments to highly detailed characters, to test the limits of hardware and rendering algorithms.
- This diversity allows users to more accurately gauge performance across different types of rendering tasks.
- Integration of New Rendering Technologies:
- As new rendering technologies and algorithms are developed, benchmarks will be updated to include these advancements, offering insights into their performance impacts.
- This includes testing for features like real-time ray tracing and AI-driven denoising.
- Improved User Interface and Usability:
- The benchmarking tool itself is expected to see improvements in user interface design, making it easier and more intuitive for users to select, run, and compare different benchmark tests.
- Enhanced Data Analysis and Sharing Capabilities:
- Future versions may offer more sophisticated analysis tools for users to understand their benchmark results, including detailed breakdowns of performance bottlenecks and recommendations for improvement.
- Enhanced sharing capabilities will facilitate community engagement, allowing users to more easily compare results and share insights.
- Custom Benchmark Creation:
- Tools for creating and sharing custom benchmark scenes may become available, enabling users to tailor benchmarks to their specific needs and share these with the Blender community.
- Official Certifications and Competitions:
- Blender may introduce official benchmark certifications or competitions, encouraging the development of optimized hardware and software configurations for Blender rendering.
The future of Blender benchmarks promises exciting developments that will enhance the utility and accuracy of performance testing for users. By staying abreast of these advancements, Blender enthusiasts and professionals can continue to optimize their workflows and contribute to the ongoing enhancement of Blender as a powerful tool for 3D rendering and animation.
READ MORE:
Community Contributions and How to Get Involved
The Blender community plays a pivotal role in the development and enhancement of Blender benchmarks. Through community contributions, Blender continues to evolve, offering more comprehensive and accurate tools for performance testing. Whether you\"re a seasoned Blender user or new to the platform, there are numerous ways to get involved and contribute to the community. Here\"s how you can participate and make a difference.
- Submitting Benchmark Results:
- One of the easiest ways to contribute is by running Blender benchmarks on your system and submitting the results to the Blender Open Data platform.
- This data helps build a comprehensive performance database, aiding others in understanding how different hardware configurations perform.
- Creating and Sharing Custom Scenes:
- If you have the skills, consider creating custom benchmark scenes that challenge specific aspects of Blender\"s rendering capabilities.
- Sharing these scenes with the community allows others to test and optimize their systems in new ways.
- Participating in Forums and Discussions:
- Blender forums and social media groups are great places to share your benchmark results, discuss optimization strategies, and help others with their questions.
- Contributing to Blender Development:
- For those with programming skills, contributing to the development of Blender itself, including its benchmarking tools, can be incredibly impactful.
- Contributions can range from developing new features, improving existing ones, or fixing bugs.
- Providing Feedback and Suggestions:
- The Blender team values user feedback. Share your thoughts on how to improve benchmark scenes and tools through official Blender communication channels.
- Engaging in Educational Content Creation:
- Creating tutorials, guides, and videos on how to use Blender benchmarks effectively can help newcomers and enhance the community\"s overall knowledge.
Community contributions are the backbone of Blender\"s success. By getting involved, you not only help improve Blender benchmarks for everyone but also grow as part of an innovative and supportive community. Whether through submitting data, sharing knowledge, or direct development contributions, every effort counts towards making Blender a more powerful and accessible tool for 3D rendering and animation.
Dive into the world of Blender benchmark scenes to unlock your system\"s full potential, contribute to a vibrant community, and stay ahead in the evolving landscape of 3D rendering. Begin your journey today and transform your Blender experience.
_HOOK_