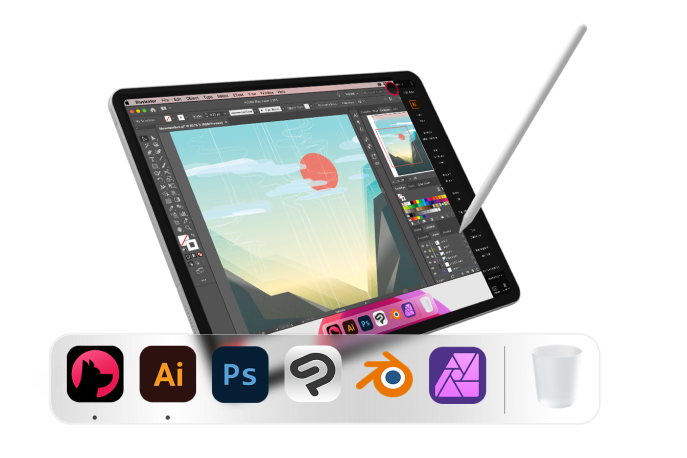
Topic keyboard shortcuts for blender: Unlock the full potential of Blender and elevate your 3D modeling skills with our essential guide to keyboard shortcuts for Blender, designed to boost your efficiency and creativity.
Table of Content
- What are the most commonly used keyboard shortcuts for Blender according to Google search results?
- General Shortcuts
- Viewport Navigation
- Object Manipulation
- Editing Mode
- Textures and Materials
- Animation
- Rendering
- Customizing Shortcuts
- Viewport Navigation
- YOUTUBE: How to Customize the Shortcut Keys in Blender Tutorial
- Object Manipulation
- Editing Mode
- Textures and Materials
- Animation
- Rendering
- Customizing Shortcuts
- Object Manipulation
- Editing Mode
- Textures and Materials
- Animation
- Rendering
- Customizing Shortcuts
- Editing Mode
- Textures and Materials
- Animation
- Rendering
- Customizing Shortcuts
- Textures and Materials
- Animation
- Rendering
- Customizing Shortcuts
- Animation
- Rendering
- Customizing Shortcuts
- Rendering
- Customizing Shortcuts
- Customizing Shortcuts
- Introduction to Blender Keyboard Shortcuts
- General Shortcuts for Everyday Use
- Viewport Navigation Shortcuts
- Object Manipulation and Transformation Shortcuts
- Shortcuts for Edit Mode and Mesh Editing
- Texture and Material Shortcuts
- Animation and Timeline Control Shortcuts
- Rendering and Camera View Shortcuts
- Customizing and Creating Your Own Shortcuts
- Using Quick Favorites for Efficient Workflow
- FAQs and Troubleshooting Common Issues
- Conclusion: Enhancing Your 3D Modeling Efficiency
What are the most commonly used keyboard shortcuts for Blender according to Google search results?
According to Google search results, the most commonly used keyboard shortcuts for Blender are:
- Ctrl + Backspace and Ctrl + Delete - to delete words.
- Shift + Select - for selecting while holding the key and moving the cursor.
- Ctrl + A - for select all.
- Ctrl + O - for opening a file.
- Ctrl + S - for saving a file.
- Ctrl + N - for creating a new file.
- Ctrl + Z - for undoing an action.
- Shift + Ctrl + Z - for redoing an action.
- Ctrl + Q - for quitting Blender.
- F1 - for accessing context-sensitive help.
READ MORE:
General Shortcuts
- Ctrl + N: New File
- Ctrl + S: Save File
- Ctrl + Z: Undo
- Ctrl + Shift + Z: Redo
- Spacebar: Play/Pause Animation
- Ctrl + Q: Quit Blender

Viewport Navigation
- Middle Mouse: Orbit Viewport
- Shift + Middle Mouse: Pan Viewport
- Scroll Wheel: Zoom In/Out
- Numpad .: Center View on Selection
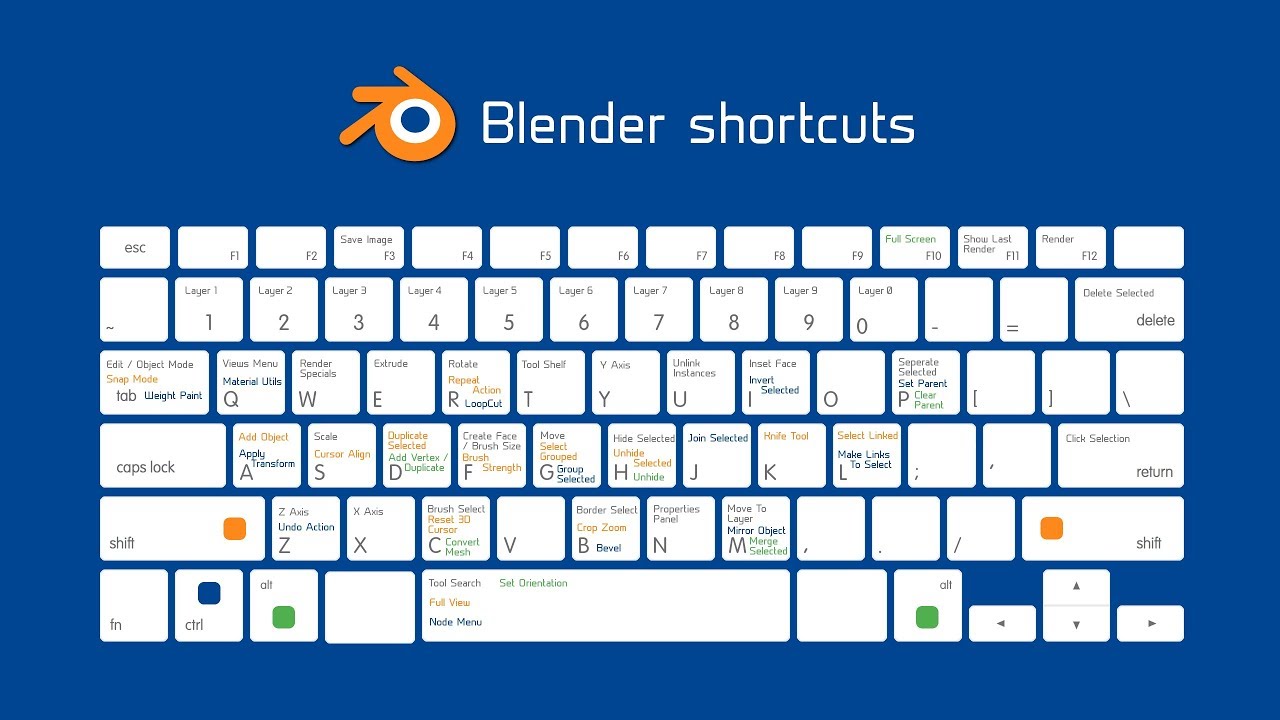
Object Manipulation
- G: Grab/Move
- R: Rotate
- S: Scale
- Shift + D: Duplicate
Editing Mode
- Tab: Toggle Edit/Object Mode
- Ctrl + R: Loop Cut
- E: Extrude
- Alt + M: Merge Vertices
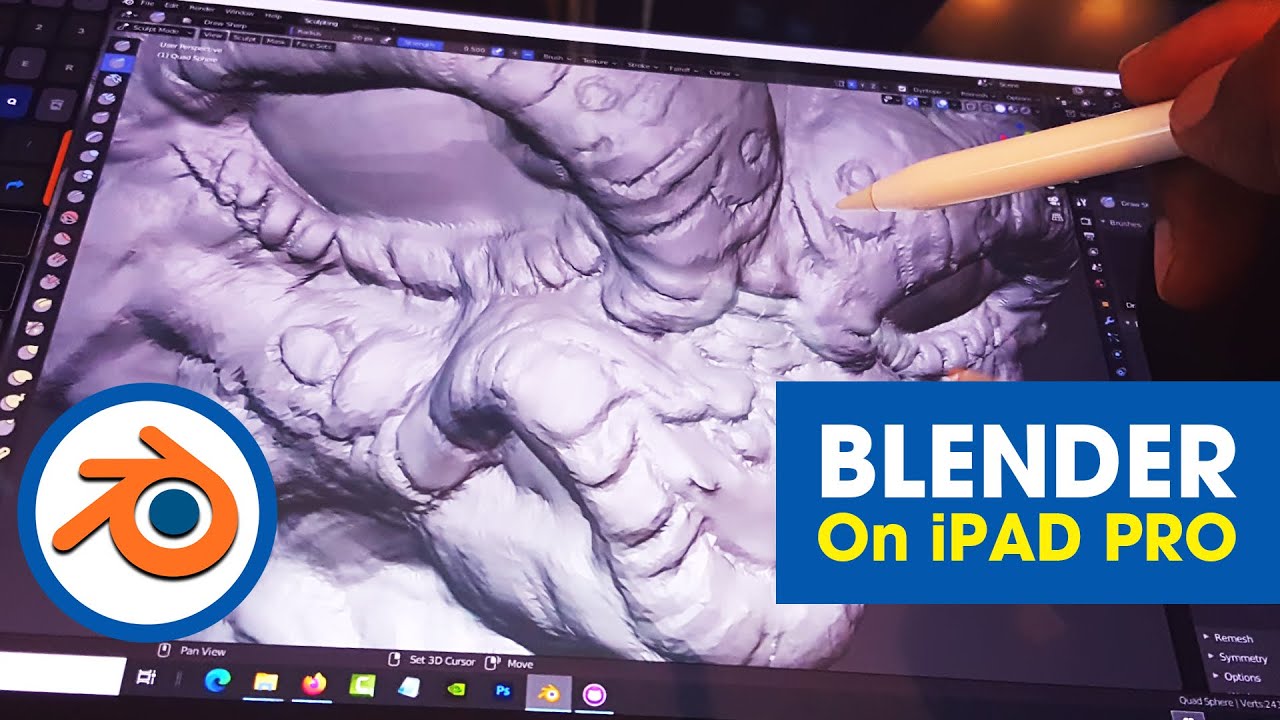
_HOOK_
Textures and Materials
- Shift + A: Add New Texture
- U: UV Unwrap
- Ctrl + T: Texture Paint

Animation
- I: Insert Keyframe
- Spacebar: Play Animation
Rendering
- F12: Render Image
- Ctrl + F12: Render Animation

Customizing Shortcuts
To personalize your workflow, navigate to Edit > Preferences > Keymap to create or modify keyboard shortcuts.
Creating Your Own Keyboard Shortcut
For tools without assigned shortcuts, right-click the tool name and select assign shortcut to add a new key combination.
Accessing Your Favorites Using The Shortcut Menu
Press the Q key to access your quick favorites menu and streamline your workflow.

Viewport Navigation
- Middle Mouse: Orbit Viewport
- Shift + Middle Mouse: Pan Viewport
- Scroll Wheel: Zoom In/Out
- Numpad .: Center View on Selection
_HOOK_
How to Customize the Shortcut Keys in Blender Tutorial
Customization: Dive into a world of endless possibilities with our video showcasing the art of customization. See how you can make your own unique creations and take your creativity to the next level. Navigation: Take a journey with us as we explore the ins and outs of effective navigation in our expertly crafted video. Learn how to efficiently navigate through any task with ease.
Part 1 Blender Beginner Tutorial Basic Navigation Shortcut Keys
Watch the New Updated Beginner Tutorial Series: https://youtu.be/sgMfEq3pDE0 Make ...
Object Manipulation
- G: Grab/Move
- R: Rotate
- S: Scale
- Shift + D: Duplicate
Editing Mode
- Tab: Toggle Edit/Object Mode
- Ctrl + R: Loop Cut
- E: Extrude
- Alt + M: Merge Vertices
Textures and Materials
- Shift + A: Add New Texture
- U: UV Unwrap
- Ctrl + T: Texture Paint
Animation
- I: Insert Keyframe
- Spacebar: Play Animation
Rendering
- F12: Render Image
- Ctrl + F12: Render Animation
_HOOK_
Customizing Shortcuts
To personalize your workflow, navigate to Edit > Preferences > Keymap to create or modify keyboard shortcuts.
Creating Your Own Keyboard Shortcut
For tools without assigned shortcuts, right-click the tool name and select assign shortcut to add a new key combination.
Accessing Your Favorites Using The Shortcut Menu
Press the Q key to access your quick favorites menu and streamline your workflow.
Object Manipulation
- G: Grab/Move
- R: Rotate
- S: Scale
- Shift + D: Duplicate
Editing Mode
- Tab: Toggle Edit/Object Mode
- Ctrl + R: Loop Cut
- E: Extrude
- Alt + M: Merge Vertices
Textures and Materials
- Shift + A: Add New Texture
- U: UV Unwrap
- Ctrl + T: Texture Paint
Animation
- I: Insert Keyframe
- Spacebar: Play Animation
_HOOK_
Rendering
- F12: Render Image
- Ctrl + F12: Render Animation
Customizing Shortcuts
To personalize your workflow, navigate to Edit > Preferences > Keymap to create or modify keyboard shortcuts.
Creating Your Own Keyboard Shortcut
For tools without assigned shortcuts, right-click the tool name and select assign shortcut to add a new key combination.
Accessing Your Favorites Using The Shortcut Menu
Press the Q key to access your quick favorites menu and streamline your workflow.
Textures and Materials
- Shift + A: Add New Texture
- U: UV Unwrap
- Ctrl + T: Texture Paint
Animation
- I: Insert Keyframe
- Spacebar: Play Animation
Rendering
- F12: Render Image
- Ctrl + F12: Render Animation
_HOOK_
Customizing Shortcuts
To personalize your workflow, navigate to Edit > Preferences > Keymap to create or modify keyboard shortcuts.
Creating Your Own Keyboard Shortcut
For tools without assigned shortcuts, right-click the tool name and select assign shortcut to add a new key combination.
Accessing Your Favorites Using The Shortcut Menu
Press the Q key to access your quick favorites menu and streamline your workflow.
Animation
- I: Insert Keyframe
- Spacebar: Play Animation
Rendering
- F12: Render Image
- Ctrl + F12: Render Animation
Customizing Shortcuts
To personalize your workflow, navigate to Edit > Preferences > Keymap to create or modify keyboard shortcuts.
Creating Your Own Keyboard Shortcut
For tools without assigned shortcuts, right-click the tool name and select assign shortcut to add a new key combination.
Accessing Your Favorites Using The Shortcut Menu
Press the Q key to access your quick favorites menu and streamline your workflow.
Rendering
- F12: Render Image
- Ctrl + F12: Render Animation
_HOOK_
Customizing Shortcuts
To personalize your workflow, navigate to Edit > Preferences > Keymap to create or modify keyboard shortcuts.
Creating Your Own Keyboard Shortcut
For tools without assigned shortcuts, right-click the tool name and select assign shortcut to add a new key combination.
Accessing Your Favorites Using The Shortcut Menu
Press the Q key to access your quick favorites menu and streamline your workflow.
Introduction to Blender Keyboard Shortcuts
Blender, an open-source 3D modeling and animation software, offers a vast array of tools and features that can be accessed quickly through keyboard shortcuts. Learning these shortcuts can significantly enhance your workflow, allowing for faster and more efficient project creation. Whether you\"re sculpting, texturing, animating, or rendering, mastering these keyboard commands will elevate your Blender skills to the next level.
Keyboard shortcuts in Blender are designed to minimize your reliance on the mouse, streamline common actions, and make it easier to access frequently used functions. From basic navigation within the 3D viewport to complex modeling and editing techniques, shortcuts provide a seamless and intuitive way to interact with Blender\"s comprehensive toolset.
- General Navigation: Learn shortcuts for moving around in the 3D viewport, switching views, and selecting objects.
- Modeling and Sculpting: Discover key combinations for mesh editing, sculpting tools, and quick transformations.
- Animation and Rigging: Use shortcuts to efficiently animate characters and objects, manage keyframes, and control timelines.
- Rendering and Compositing: Explore shortcuts that speed up the rendering process, switch between camera views, and adjust lighting settings.
- Customization: Blender allows you to customize or create new shortcuts, tailoring the software to fit your personal workflow.
By incorporating these keyboard shortcuts into your daily use of Blender, you\"ll not only save time but also gain a deeper understanding of the software\"s capabilities, allowing for more creative freedom and precision in your 3D art and animations.
General Shortcuts for Everyday Use
Blender\"s general shortcuts are designed to streamline your workflow, making navigation and basic operations more efficient. Here\"s a list of essential shortcuts that every Blender user should know:
- Ctrl + N: Create a new file, offering a fresh start for your projects.
- Ctrl + O: Open an existing project, allowing you to continue where you left off.
- Ctrl + S: Save your current project, ensuring that all your hard work is securely stored.
- Ctrl + Z: Undo your last action, a vital tool for correcting mistakes.
- Ctrl + Shift + Z: Redo an action, helping you to navigate through your edit history.
- Spacebar: Play or pause the animation, key for reviewing your animation projects.
- Ctrl + Q: Quit Blender, ensuring a smooth exit from your current session.
These shortcuts are just the beginning of optimizing your Blender experience. As you become more familiar with Blender\"s interface and tools, integrating these shortcuts into your workflow will become second nature, significantly boosting your productivity and creativity.
Viewport Navigation Shortcuts
Mastering the viewport navigation in Blender is essential for efficient 3D modeling. Here are the key shortcuts to help you navigate the 3D viewport with ease:
- Rotate View: Middle Mouse Button (MMB) drag - This allows you to orbit around your scene.
- Pan View: Shift + Middle Mouse Button (MMB) drag - Use this to move the view horizontally or vertically.
- Zoom View: Scroll Wheel or Ctrl + Middle Mouse Button (MMB) drag - This helps you to zoom in or out of the scene.
- Zoom to Object: Select an object and press Numpad . (period) - This centers the view on the selected object.
- View Selected: Numpad . (period) - Focuses the viewport on the selected object or objects.
- View All: Home or Ctrl + Middle Mouse Button click - This adjusts the view to fit all objects in the scene into the viewport.
- Switch to Front View: Numpad 1 - Shows the front view of the scene.
- Switch to Side View: Numpad 3 - Shows the side view of the scene.
- Switch to Top View: Numpad 7 - Shows the top view of the scene.
- Toggle Perspective/Orthographic View: Numpad 5 - This switches between perspective and orthographic view modes.
- Camera View: Numpad 0 - Switches to the active camera\"s view.
- Walk/Fly Mode: Shift + ` (grave accent) - This mode allows for a first-person navigation style within the viewport.
- View Layer: Use the number keys (1 to 0) while holding down the `Alt` key to quickly switch between view layers.
Remember, practicing these shortcuts will significantly speed up your workflow and enhance your 3D modeling experience in Blender.
_HOOK_
Object Manipulation and Transformation Shortcuts
Mastering object manipulation and transformation in Blender is essential for efficient 3D modeling. Here are the key shortcuts to help you work more effectively:
- G: Grab/Move an object.
- R: Rotate the selected object.
- S: Scale the selected object.
- Alt + G: Clear any translations (moves) applied to the object.
- Alt + R: Reset rotations to zero.
- Alt + S: Reset scales to 1, returning the object to its original size.
- Shift + D: Duplicate objects.
- Ctrl + J: Join multiple selected objects into a single object.
- Ctrl + P: Make selected objects the child of the last selected object (Parenting).
- Ctrl + Shift + A: Apply the object\"s rotation, scale, and location.
- Ctrl + A: Open the Apply menu for more options.
These shortcuts are fundamental for manipulating objects within your scenes quickly. By combining these keys, you can enhance your workflow and focus more on the creative aspects of your 3D projects.
Shortcuts for Edit Mode and Mesh Editing
Blender\"s Edit Mode is a powerful tool for mesh editing, allowing for the detailed manipulation of vertices, edges, and faces. Here are essential shortcuts to enhance your mesh editing workflow:
- Tab: Toggle between Edit Mode and Object Mode.
- Ctrl + Tab: Open the mesh select mode menu to switch between vertex, edge, or face selection.
- A: Select all/unselect all. Press A twice if everything is already selected to deselect everything.
- B: Box select. Drag to select multiple elements.
- C: Circle select. Click and drag to paint-select elements.
- L: Select linked elements under the cursor.
- Ctrl + L: Select all elements linked to the currently selected element(s).
- P: Separate the selected elements into a new object.
- E: Extrude selected elements.
- I: Insert faces. Use to create an inset on a selected face.
- R: Rotate selected elements.
- S: Scale selected elements.
- G: Grab/move selected elements.
- X, DEL: Delete selected elements with options for vertices, edges, or faces.
- Ctrl + R: Loop cut and slide. Adds a loop cut around selected elements.
- Shift + R: Repeat the last action.
- F: Make face/edge. Creates a face or edge from selected vertices or edges.
- M: Merge. Options for merging selected elements.
- Alt + M: Split. Detach selected elements into separate components.
- Ctrl + E: Edge menu. Provides additional edge-specific options like mark seam, clear seam, etc.
- Ctrl + F: Face menu. Access to various face-related operations like shade smooth/flat.
- Ctrl + V: Vertex menu. Offers vertex-specific options such as smooth vertices, blend colors, etc.
These shortcuts are crucial for anyone looking to efficiently edit meshes in Blender. By incorporating these into your workflow, you can significantly speed up your modeling process and achieve more precise edits.
Texture and Material Shortcuts
Textures and materials are essential components of 3D modeling in Blender, allowing you to add realism and detail to your creations. Efficiently managing these elements can significantly speed up your workflow. Here are some key shortcuts for working with textures and materials:
- Shift + A: Add a new texture.
- Ctrl + T: Open the texture options in Texture Paint mode.
- Shift + Ctrl + T: Access texture options within the Node Editor for more complex material creations.
- Alt + Click: Sample a color from an image, enabling you to quickly pick and apply colors directly from your textures.
- Ctrl + Shift + C: Copy data paths for materials and textures, which can be used for scripting or creating drivers.
- I: Insert keyframes for animated textures. This is useful for creating dynamic materials that change over time.
- Alt + I: Delete keyframes for a texture, allowing you to remove animation from your materials.
- E: Eyedropper tool to pick colors or materials from within your Blender project, making it easy to reuse existing materials.
These shortcuts help streamline the process of applying and editing textures and materials in your Blender projects, making it easier to achieve the desired look and feel for your 3D models.
Animation and Timeline Control Shortcuts
Animating your creations in Blender can be made efficient and intuitive with the use of specific keyboard shortcuts. These shortcuts allow for quick access to animation controls and timeline navigation, significantly speeding up the animation process. Here\"s a guide to some of the most useful animation and timeline control shortcuts:
- Spacebar: Play or pause the animation. This is a fundamental shortcut for quickly previewing your animation work.
- Right Arrow / Left Arrow: Step forward or backward in the timeline one frame at a time, giving you fine control over the playback position.
- Shift + Right Arrow / Shift + Left Arrow: Skip to the next or previous keyframe. This is useful for quickly navigating through key points in your animation.
- Alt + A: Play the animation from the start. This shortcut is handy for reviewing your animation from the beginning.
- I: Insert keyframe menu. This brings up the menu to insert various types of keyframes, such as location, rotation, scale, and more, depending on the currently selected object and mode.
- Shift + I: Insert keyframe for selected channels only. This allows for more precise control over which properties are animated.
- Ctrl + C / Ctrl + V: Copy and paste selected keyframes in the timeline. This feature is essential for reusing animations or creating repetitive sequences.
- Alt + I: Clear keyframes. Use this to remove keyframes for the selected property or properties.
- Shift + E: Set keyframe interpolation type. This allows you to change how Blender interpolates between keyframes, giving you control over the animation\"s smoothness or sharpness.
These shortcuts are the backbone of efficient animation workflow in Blender, helping to streamline the process of creating and refining animations.
Rendering and Camera View Shortcuts
Rendering and camera view are crucial components in the 3D modeling and animation workflow in Blender. Utilizing keyboard shortcuts for these functions can greatly enhance your efficiency and speed. Here are some key shortcuts to help streamline your rendering and camera view operations:
- F12: Render the current frame. This is the most direct way to see the final result of the current view or scene.
- Ctrl + F12: Initiate rendering of the animation based on the defined start and end frames in your timeline settings.
- F11: Display the last rendered image. This is useful for quickly referring back to your last render without having to re-render.
- Shift + Z: Toggle rendered view in the viewport. This shortcut allows you to switch between your work view and a rendered preview, providing a quick look at how lighting, materials, and textures affect your scene.
- Ctrl + Alt + Num 0: Set the active camera to the current view. This shortcut is particularly useful for aligning the camera with your viewport\"s perspective.
- NumPad 0: Switch to the active camera\"s view. This gives you the camera\"s perspective, which is essential for framing your scenes correctly.
- NumPad 1, 3, 7: Switch to front, right, and top views respectively. These shortcuts provide quick navigation to standard orthogonal views in your 3D scene.
- Ctrl + Alt + NumPad 1, 3, 7: Access the opposite orthogonal views: back, left, and bottom.
Mastering these shortcuts can significantly reduce the time spent navigating and rendering within Blender, allowing you to focus more on the creative aspects of your projects.
_HOOK_
Customizing and Creating Your Own Shortcuts
Customizing and creating your own shortcuts in Blender can significantly enhance your workflow and efficiency. Blender\"s highly customizable interface allows you to tailor the software to fit your specific needs and preferences. Here\"s a step-by-step guide on how to customize and create your own keyboard shortcuts:
- Access the Preferences Window: Open Blender and go to Edit > Preferences. In the Preferences window, navigate to the Keymap tab.
- Search for Existing Shortcuts: Use the search bar in the Keymap tab to find specific functions or tools you want to assign a new shortcut to. This is useful for modifying existing shortcuts.
- Create a New Shortcut: To create a new shortcut, navigate to the category (e.g., 3D View, Mesh) where you want the new shortcut to be. Right-click on the function or tool and select \"Add New Shortcut.\" Press the key combination you want to assign.
- Modify an Existing Shortcut: If you want to change an existing shortcut, find the command in the list, click on the shortcut key sequence displayed, and press the new key combination you want to assign.
- Export and Import Keymap Configurations: Once you have customized your shortcuts, you can export your keymap configuration by clicking on the \"Export Key Configuration\" button at the bottom of the Keymap tab. To use your custom keymap on another system, click \"Import Key Configuration\" and select your saved file.
- Use the Quick Favorites Menu: For frequently used tools that you don\"t want to assign a permanent shortcut to, you can add them to the Quick Favorites menu by right-clicking on the tool in the toolbar and selecting \"Add to Quick Favorites.\" Access this menu by pressing Q in the relevant context.
Remember, while customizing shortcuts can make your work faster and more intuitive, it\"s important to choose key combinations that don\"t conflict with existing shortcuts used by Blender or your operating system. Test your new shortcuts thoroughly to ensure they work as expected.
Using Quick Favorites for Efficient Workflow
Blender\"s Quick Favorites menu is a powerful feature that allows you to streamline your workflow by providing easy access to frequently used tools and functions. This customizable menu can be a significant time-saver, especially in complex projects. Here\"s how to make the most of Quick Favorites for an efficient workflow:
- Add Tools to Quick Favorites: To add a tool or operation to the Quick Favorites menu, simply right-click on the tool in the toolbar or menu and select \"Add to Quick Favorites.\" This can be done in any of Blender\"s modes or panels where the tool appears.
- Accessing Quick Favorites: Press Q to open the Quick Favorites menu. The menu will display a list of all the tools you\"ve added. This menu is context-sensitive, meaning it will adapt to show the relevant tools based on the mode you\"re in (e.g., Object Mode, Edit Mode).
- Organizing Quick Favorites: While Blender does not natively support organizing the Quick Favorites menu into categories or custom ordering, keeping the list curated to include only the most used tools can help maintain efficiency. Regularly review and update your Quick Favorites to reflect your current workflow needs.
- Removing Tools from Quick Favorites: If you find that a tool is no longer necessary or you accidentally added a tool, you can easily remove it by opening the Quick Favorites menu, right-clicking on the tool, and selecting \"Remove from Quick Favorites.\"
- Using Quick Favorites Across Sessions: Blender automatically saves your Quick Favorites, making them available across sessions. This ensures that your personalized setup is always ready, allowing you to dive straight into your work with your favorite tools at your fingertips.
By effectively utilizing the Quick Favorites menu, you can significantly reduce the time spent searching for tools and increase your focus on the creative aspects of your projects. This feature is particularly useful for Blender users of all levels, from beginners to advanced, as it promotes a smoother, more personalized workflow.
FAQs and Troubleshooting Common Issues
Blender users often have questions and encounter common issues while working with the software. Here are some frequently asked questions and their answers to help you navigate through common hurdles:
- Are the shortcuts applicable to all versions of Blender? - Yes, the shortcuts provided are applicable to most versions of Blender, though there might be slight variations in some cases.
- Can I use custom-made shortcuts from the internet? - Yes, Blender allows you to import custom shortcut configurations, provided they are compatible with your version of the software.
- Are there any shortcuts for sculpting in Blender? - Absolutely! Blender offers a variety of shortcuts tailored for sculpting, enabling artists to shape their creations intuitively.
- Do these shortcuts work on a Mac computer? - Yes, the majority of Blender shortcuts work the same on both Windows and Mac computers.
- Can I use Blender shortcuts in other 3D modeling software? - While some shortcuts might be similar, it\"s essential to customize them according to the specific requirements of the other software.
For troubleshooting common issues, remember that practice and familiarization with Blender\"s interface and shortcuts will enhance your efficiency. Customizing shortcuts according to your workflow can significantly improve your productivity. Additionally, consider exploring the vast library of add-ons available within Blender to enhance your 3D modeling experience.
READ MORE:
Conclusion: Enhancing Your 3D Modeling Efficiency
Mastering keyboard shortcuts in Blender is a significant step towards enhancing your 3D modeling efficiency. By integrating these shortcuts into your daily workflow, you can speed up your modeling process, reduce the time spent navigating through menus, and focus more on the creative aspects of your projects. Remember, the key to proficiency in any software, Blender included, is practice and customization.
- Start by memorizing the most frequently used shortcuts to streamline your workflow.
- Customize shortcuts based on your personal workflow and project needs to make your work even more efficient.
- Explore Blender\"s vast array of features and tools, using shortcuts to access them quickly.
- Stay updated with the latest versions of Blender, as new features and shortcuts are regularly introduced.
- Join Blender communities and forums to learn from experienced users and share tips and tricks, including shortcuts that can enhance your 3D modeling efficiency.
In conclusion, the journey to mastering Blender is ongoing. Continuous learning, experimenting with new techniques, and personalizing your shortcuts will not only enhance your 3D modeling efficiency but also make the process more enjoyable and fulfilling. Embrace the power of Blender\"s keyboard shortcuts to unlock your full creative potential.
Mastering Blender\"s keyboard shortcuts is a game-changer for 3D artists, significantly enhancing modeling efficiency and creative workflow. Embrace these shortcuts to transform your Blender experience, unlocking a new level of productivity and artistic expression.