Topic shortcuts of blender: Discover the power of Blender and streamline your 3D modeling and animation workflow with our expert guide to mastering Blender"s essential shortcuts.
Table of Content
- What are some important shortcuts of Blender that users commonly utilize?
- General Shortcuts
- Viewport Navigation
- Object Manipulation
- Editing Mode
- Creating Textures
- Animating
- Rendering
- Viewport Navigation
- Object Manipulation
- Editing Mode
- YOUTUBE: Blender 3.5 Short Cut Keys Tips For Beginners
- Creating Textures
- Animating
- Rendering
- Object Manipulation
- Editing Mode
- Creating Textures
- Animating
- Rendering
- Editing Mode
- Creating Textures
- Animating
- Rendering
- Creating Textures
- Animating
- Rendering
- Animating
- Rendering
- Rendering
- Introduction to Blender Shortcuts
- General Shortcuts for Everyday Use
- Viewport Navigation Shortcuts
- Object Manipulation Shortcuts
- Editing Mode and Precision Tools
- Texturing and Material Shortcuts
- Animation and Timeline Control
- Rendering and Output Shortcuts
- Customizing Your Own Blender Shortcuts
- Tips for Memorizing and Utilizing Shortcuts
- Conclusion and Further Learning Resources
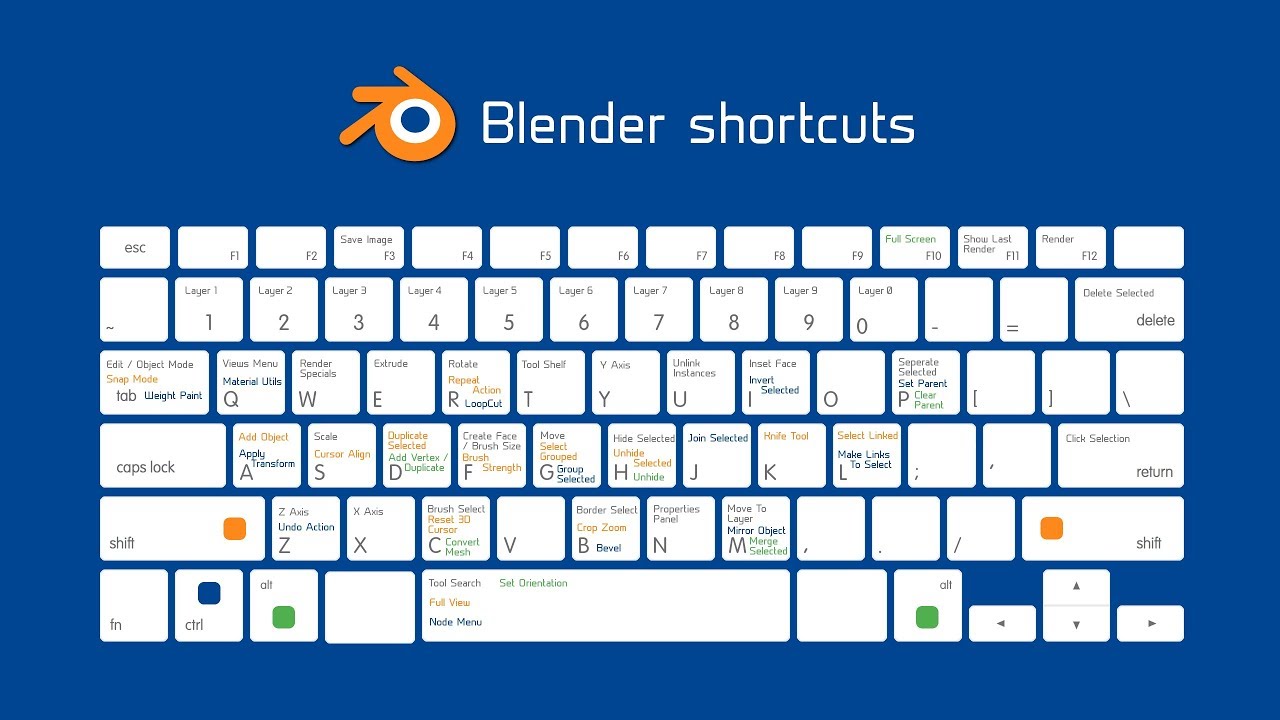
What are some important shortcuts of Blender that users commonly utilize?
Some important shortcuts of Blender that users commonly utilize are:
- I: Insert a keyframe
- Alt + I: Clear the keyframe
- Shift + Alt + I: Clear all keyframes (removing all F-Curves)
- Ctrl + D: Assign a duplicate of the current object/selection
- Ctrl + O: Open file
- Ctrl + S: Save file
- Ctrl + N: New file
- Ctrl + Z: Undo
- Shift + Ctrl + Z: Redo
- Ctrl + Q: Quit
- F1: Help (context sensitive)
READ MORE:
General Shortcuts
- Ctrl + N: New File
- Ctrl + S: Save File
- Ctrl + Z: Undo
- Ctrl + Shift + Z: Redo
- Ctrl + C: Copy
- Ctrl + V: Paste
- Spacebar: Play/Pause Animation
Viewport Navigation
- Shift + Middle Mouse: Pan Viewport
- Scroll Wheel: Zoom In/Out
- Numpad 1/3/7: Front/Right/Top View

Object Manipulation
- G: Grab/Move
- R: Rotate
- S: Scale
Editing Mode
- Tab: Toggle Edit/Object Mode
- E: Extrude
- Ctrl + B: Bevel
_HOOK_
Creating Textures
- Shift + A: Add New Texture
- U: Unwrap UV

Animating
- I: Insert Keyframe
- Spacebar: Play Animation
Rendering
- F12: Render Image
- Ctrl + F12: Render Animation
Personalizing Your Workflow
Blender allows for customization of shortcuts through Edit > Preferences > Keymap, catering to your unique workflow needs.

Viewport Navigation
- Shift + Middle Mouse: Pan Viewport
- Scroll Wheel: Zoom In/Out
- Numpad 1/3/7: Front/Right/Top View
Object Manipulation
- G: Grab/Move
- R: Rotate
- S: Scale

_HOOK_
Editing Mode
- Tab: Toggle Edit/Object Mode
- E: Extrude
- Ctrl + B: Bevel
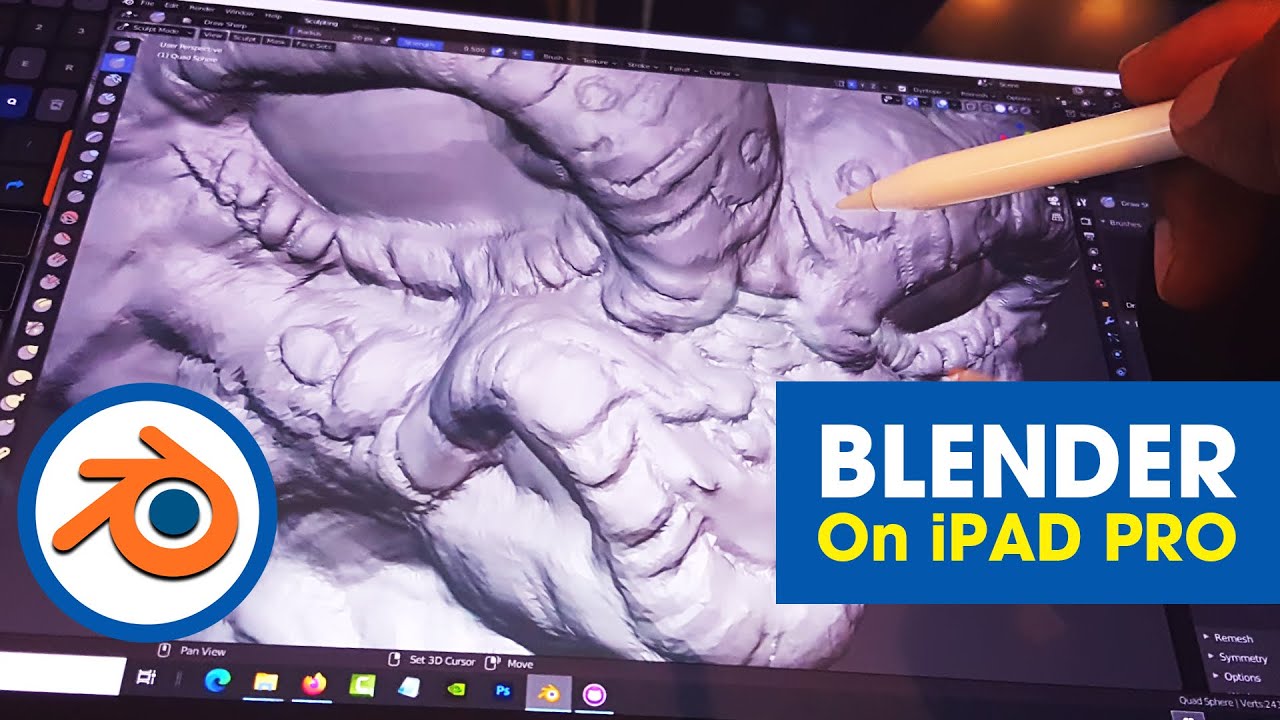
Blender 3.5 Short Cut Keys Tips For Beginners
\"Shortcuts\" - Discover time-saving tips and tricks with our video on shortcuts. Learn how to navigate through tasks efficiently and increase productivity with these easy-to-follow techniques. Watch now and streamline your workflow! \"Navigation\" - Dive into the world of seamless navigation with our expert guidance in this video. Uncover helpful tools and strategies to easily find your way around any platform or application. Enhance your user experience and gain confidence in your digital exploration by watching now.
Blender Beginner Tutorial Basic Navigation Shortcut Keys
Watch the New Updated Beginner Tutorial Series: https://youtu.be/sgMfEq3pDE0 Make ...
Creating Textures
- Shift + A: Add New Texture
- U: Unwrap UV
Animating
- I: Insert Keyframe
- Spacebar: Play Animation
Rendering
- F12: Render Image
- Ctrl + F12: Render Animation
Personalizing Your Workflow
Blender allows for customization of shortcuts through Edit > Preferences > Keymap, catering to your unique workflow needs.
Object Manipulation
- G: Grab/Move
- R: Rotate
- S: Scale
_HOOK_
Editing Mode
- Tab: Toggle Edit/Object Mode
- E: Extrude
- Ctrl + B: Bevel
Creating Textures
- Shift + A: Add New Texture
- U: Unwrap UV
Animating
- I: Insert Keyframe
- Spacebar: Play Animation
Rendering
- F12: Render Image
- Ctrl + F12: Render Animation
Personalizing Your Workflow
Blender allows for customization of shortcuts through Edit > Preferences > Keymap, catering to your unique workflow needs.
Editing Mode
- Tab: Toggle Edit/Object Mode
- E: Extrude
- Ctrl + B: Bevel
_HOOK_
Creating Textures
- Shift + A: Add New Texture
- U: Unwrap UV
Animating
- I: Insert Keyframe
- Spacebar: Play Animation
Rendering
- F12: Render Image
- Ctrl + F12: Render Animation
Personalizing Your Workflow
Blender allows for customization of shortcuts through Edit > Preferences > Keymap, catering to your unique workflow needs.
Creating Textures
- Shift + A: Add New Texture
- U: Unwrap UV
Animating
- I: Insert Keyframe
- Spacebar: Play Animation
_HOOK_
Rendering
- F12: Render Image
- Ctrl + F12: Render Animation
Personalizing Your Workflow
Blender allows for customization of shortcuts through Edit > Preferences > Keymap, catering to your unique workflow needs.
Animating
- I: Insert Keyframe
- Spacebar: Play Animation
Rendering
- F12: Render Image
- Ctrl + F12: Render Animation
Personalizing Your Workflow
Blender allows for customization of shortcuts through Edit > Preferences > Keymap, catering to your unique workflow needs.
Rendering
- F12: Render Image
- Ctrl + F12: Render Animation
Personalizing Your Workflow
Blender allows for customization of shortcuts through Edit > Preferences > Keymap, catering to your unique workflow needs.
Introduction to Blender Shortcuts
Blender is a powerful, open-source 3D computer graphics software that is widely used by artists, designers, and animators for creating animated films, visual effects, art, 3D-printed models, and video games. Mastering keyboard shortcuts in Blender is crucial for enhancing efficiency and workflow in 3D modeling. These shortcuts enable users to navigate through the software more quickly, manipulate objects with ease, and access a variety of features without having to navigate through menus.
General shortcuts in Blender include actions for creating new files, opening and saving projects, undoing and redoing actions, copying, cutting, pasting, playing animations, and accessing user preferences. For example, Ctrl + N is used to create a new file, while Ctrl + Z and Ctrl + Shift + Z are used for undoing and redoing actions, respectively.
Viewport navigation is made easier with shortcuts that allow users to orbit, pan, and zoom in the viewport, switch between different views, and center the view on selected objects. Object manipulation shortcuts provide quick access to moving, rotating, scaling, duplicating, and deleting objects, which are essential for efficient 3D modeling.
Editing mode shortcuts facilitate precision work, allowing users to toggle between edit and object modes, select vertices, edges, faces, extrude geometry, and apply loop cuts. Additionally, Blender offers shortcuts for creating realistic textures, animating with ease, rendering projects, and even customizing the workflow by personalizing shortcuts.
Learning and practicing these shortcuts can significantly boost productivity and creativity, enabling users to leverage Blender\"s full potential. Whether you are a beginner or a seasoned professional, incorporating these keyboard shortcuts into your workflow is a game-changer for 3D modeling and animation projects.
_HOOK_
General Shortcuts for Everyday Use
Blender\"s general shortcuts are designed to streamline your workflow, making it easier and faster to perform common tasks. These shortcuts cover everything from file management to editing and object manipulation, providing a solid foundation for any Blender user. Mastering these shortcuts will significantly boost your productivity and enhance your 3D modeling experience.
- Ctrl + N: Create a new file.
- Ctrl + O: Open an existing file.
- Ctrl + S: Save the current file.
- Ctrl + Z: Undo the last action.
- Ctrl + Shift + Z: Redo the previously undone action.
- Ctrl + C: Copy selected objects or elements.
- Ctrl + X: Cut selected objects or elements.
- Ctrl + V: Paste copied or cut objects or elements.
- Ctrl + P: Play animation.
- Spacebar: Play or pause the animation.
- Ctrl + Alt + U: Open User Preferences.
- Ctrl + Q: Quit Blender.
These shortcuts are just the beginning. As you become more familiar with Blender, you\"ll discover even more shortcuts that will help you navigate the interface, manipulate objects, and execute commands with speed and precision. Remember, the key to mastering Blender is practice and exploration, so don\"t hesitate to experiment with these shortcuts to find what works best for your creative process.
Viewport Navigation Shortcuts
Navigating the 3D viewport in Blender is essential for efficiently working on your projects. The viewport is your window into the 3D world of Blender, and mastering its navigation shortcuts allows you to quickly move, zoom, and rotate your view to better sculpt, model, and animate. Here are the key shortcuts to improve your viewport navigation:
- Middle Mouse Button (Drag): Orbit around your scene.
- Shift + Middle Mouse Button (Drag): Pan the view horizontally or vertically.
- Scroll Wheel (Up/Down): Zoom in or out of the scene.
- Numpad . (Period): Center the view on the selected object or edit.
- Numpad 1, 3, 7: Switch to Front, Right, or Top view respectively.
- Numpad 2, 4, 6, 8: Rotate the view (Up, Left, Right, Down).
- Numpad 5: Toggle between Perspective and Orthographic view.
- Numpad 0: Switch to the active camera view.
These shortcuts form the basis of navigating Blender\"s 3D viewport, enabling you to efficiently inspect your models from any angle. Practicing these will significantly speed up your workflow, allowing you to focus more on creating rather than navigating.
Object Manipulation Shortcuts
Efficiently manipulating objects in Blender is vital for 3D modeling and animation. The following shortcuts are designed to help you quickly move, rotate, scale, and perform other essential object manipulation tasks. Mastering these shortcuts will significantly enhance your speed and efficiency when working in Blender.
- G: Grab/Move an object.
- R: Rotate an object.
- S: Scale an object.
- Alt + G: Clear the object\"s location, resetting it to its original position.
- Alt + R: Clear the object\"s rotation, resetting it to its original orientation.
- Alt + S: Clear the object\"s scale, resetting it to its original size.
- Shift + D: Duplicate an object.
- Ctrl + J: Join selected objects into one.
- Ctrl + P: Make an object the parent of another.
- Ctrl + Shift + A: Apply the object\"s rotation, scale, and location.
- Ctrl + A: Open the Apply menu for more options.
These shortcuts provide the foundation for object manipulation in Blender, enabling you to work with greater speed and precision. Remember, practice is key to becoming proficient with these commands, so incorporate them into your regular Blender workflow to become more effective.
Editing Mode and Precision Tools
Blender\"s Editing Mode and Precision Tools are essential for detailed 3D modeling and sculpting. This section covers key shortcuts and techniques that enable you to refine your models with accuracy. Understanding how to leverage these tools can greatly enhance your modeling workflow and the quality of your final projects.
- Tab: Toggle between Object Mode and Edit Mode. Edit Mode allows for the manipulation of individual vertices, edges, and faces.
- Ctrl + Tab: Open the mesh select mode menu to switch between vertex, edge, or face selection.
- Ctrl + R: Add a loop cut. Click and drag to position, then left-click to confirm.
- E: Extrude selected vertices, edges, or faces.
- I: Insert faces. Useful for creating additional geometry within a face.
- Shift + R: Repeat the last action. This is a powerful shortcut for applying the same transformation or operation multiple times.
- Ctrl + B: Bevel edges or vertices to create rounded edges and corners.
- Alt + M: Merge vertices. A crucial tool for cleaning up geometry or creating specific shapes.
- P: Separate selection into a new object. This is useful for breaking down complex models into more manageable parts.
- Shift + S: Snap menu. Offers various snapping options such as cursor to selected, selection to grid, or selection to cursor.
These shortcuts and tools form the backbone of Blender\"s editing capabilities, allowing for precise control over the geometry of your models. Practice using these shortcuts to become more efficient in your modeling projects.
Texturing and Material Shortcuts
Creating realistic textures and materials is a key part of 3D modeling in Blender. This section outlines the essential shortcuts that streamline the process of applying, editing, and managing textures and materials in your projects. By mastering these shortcuts, you can enhance the visual quality of your models with efficiency and ease.
- Shift + A: Open the Add menu in the Shader Editor to create new nodes, including texture and material nodes.
- Ctrl + Shift + T: With a Principled BSDF shader selected, this shortcut allows you to quickly add PBR (Physically Based Rendering) textures. It opens a file browser to select and automatically connect all relevant maps to the shader.
- U: Unwrap selected mesh to lay out its UV map, essential for accurate texturing.
- Shift + Z: Toggle Rendered view in the 3D viewport, allowing you to preview textures and materials in real-time.
- Alt + Z: Toggle Material Preview mode, providing a quick way to view material assignments without full rendering.
- F12: Render the current frame, useful for checking the final appearance of textures and materials.
Understanding and utilizing these shortcuts will significantly speed up your texturing workflow in Blender, allowing for more time to focus on creative aspects of your 3D projects. As always, practice is key to internalizing these shortcuts and making them a natural part of your modeling process.
_HOOK_
Animation and Timeline Control
Animation and timeline control in Blender are pivotal for creating dynamic scenes and characters. Utilizing shortcuts for these functions can significantly speed up the animation process, allowing for more time to focus on creativity and detail. This section highlights essential shortcuts that every animator should know to efficiently navigate and manipulate the animation timeline in Blender.
- Spacebar: Play or pause the animation.
- Right Arrow: Move forward one frame.
- Left Arrow: Move back one frame.
- Up Arrow: Jump forward ten frames.
- Down Arrow: Jump back ten frames.
- Shift + Right Arrow: Jump to the end of the timeline.
- Shift + Left Arrow: Jump to the start of the timeline.
- I: Insert a keyframe for the selected object. A menu will appear to choose the type of keyframe (location, rotation, scale, etc.).
- Alt + I: Remove keyframe at the current frame.
- Shift + D: Duplicate selected keyframes in the timeline.
- G: Grab and move selected keyframes.
- S: Scale selected keyframes, allowing for stretching or compressing the timing of animations.
Mastering these shortcuts can greatly enhance your animation workflow in Blender, making the process of keyframing, playback, and timeline navigation both faster and more intuitive. With practice, these shortcuts will become second nature, allowing you to focus more on the creative aspects of animation.
Rendering and Output Shortcuts
Rendering and output shortcuts in Blender are crucial for efficiently finalizing your projects. These shortcuts help streamline the rendering process, saving time and allowing for quicker iterations. Whether you\"re rendering a single image or an entire animation, these shortcuts can enhance your productivity and workflow.
- F12: Render the current frame. This shortcut is essential for quickly previewing your work without going through the full render process.
- Ctrl + F12: Render animation. Use this shortcut to start rendering your animation based on the frame range specified in the timeline.
- Shift + Z: Toggle rendered viewport shading. This shortcut allows you to preview your scene with render settings directly in the viewport.
- Ctrl + B: Set render border. Draw a rectangle in the camera view to specify a specific area for rendering. This is useful for focusing on a particular part of your scene.
- Ctrl + Alt + B: Clear render border. Removes any render border you\"ve set, reverting back to rendering the full scene.
- F11: View the last rendered image. This shortcut is handy for comparing changes between renders without having to re-render the scene.
- Ctrl + S (in Render Window): Save the rendered image. This allows you to quickly save out your rendered shots without navigating through menus.
Mastering these rendering shortcuts can greatly speed up your Blender workflow, allowing you to focus more on the creative aspects of your projects. Remember, rendering is a complex process, and these shortcuts are just the beginning. Experimenting with Blender\"s rendering settings and understanding how to optimize them for your specific needs is key to achieving the best results.
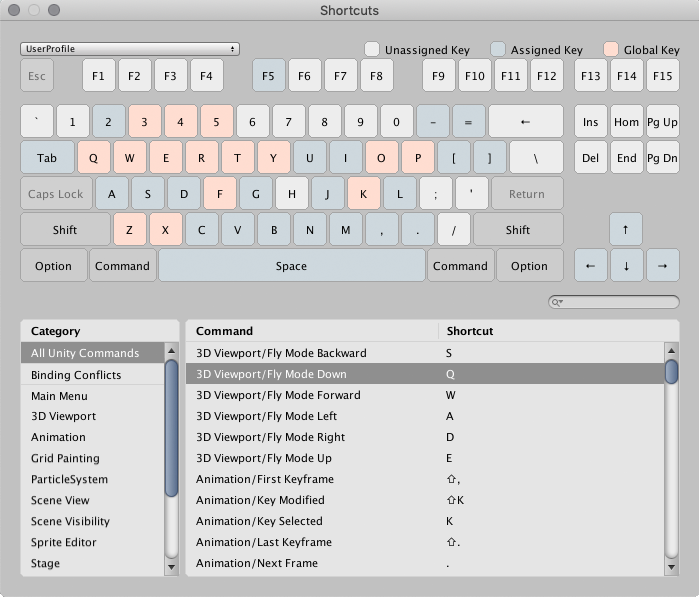
Customizing Your Own Blender Shortcuts
Blender\"s flexibility allows users to customize their own keyboard shortcuts, tailoring the software to fit their workflow and increase efficiency. This personalization can significantly enhance your productivity by aligning Blender\"s vast array of tools with your unique preferences and needs. Here\"s how you can start customizing your own Blender shortcuts.
- Access the Preferences: Open Blender and navigate to Edit > Preferences. In the Preferences window, select the Keymap tab.
- Explore Existing Shortcuts: Use the search function within the Keymap tab to find existing shortcuts. This allows you to see how Blender is currently configured and identify any shortcuts you may want to change.
- Modify or Add Shortcuts: To change an existing shortcut, click on the command you wish to modify and press the new key combination. To add a new shortcut, find the action you want to assign a shortcut to and click on the Add New button, then define the key combination.
- Save Your Custom Keymap: After customizing your shortcuts, ensure you save your keymap. You can do this by clicking on the Save Preferences button at the bottom of the Preferences window. This ensures that your customizations are retained for future Blender sessions.
Customizing your own shortcuts in Blender can greatly improve your modeling, animation, or rendering workflows by providing quicker access to frequently used tools and functions. Remember, the goal is to make the software work for you, enhancing your ability to create without being hindered by default settings that may not align with your preferences.
Tips for Memorizing and Utilizing Shortcuts
Memorizing and utilizing shortcuts in Blender, or any software, can seem daunting at first. However, with the right strategies, you can significantly enhance your efficiency and workflow. Here are some tips to help you master Blender shortcuts:
- Start Small: Begin by memorizing a handful of the most frequently used shortcuts. Gradually incorporate more shortcuts into your workflow as you become comfortable.
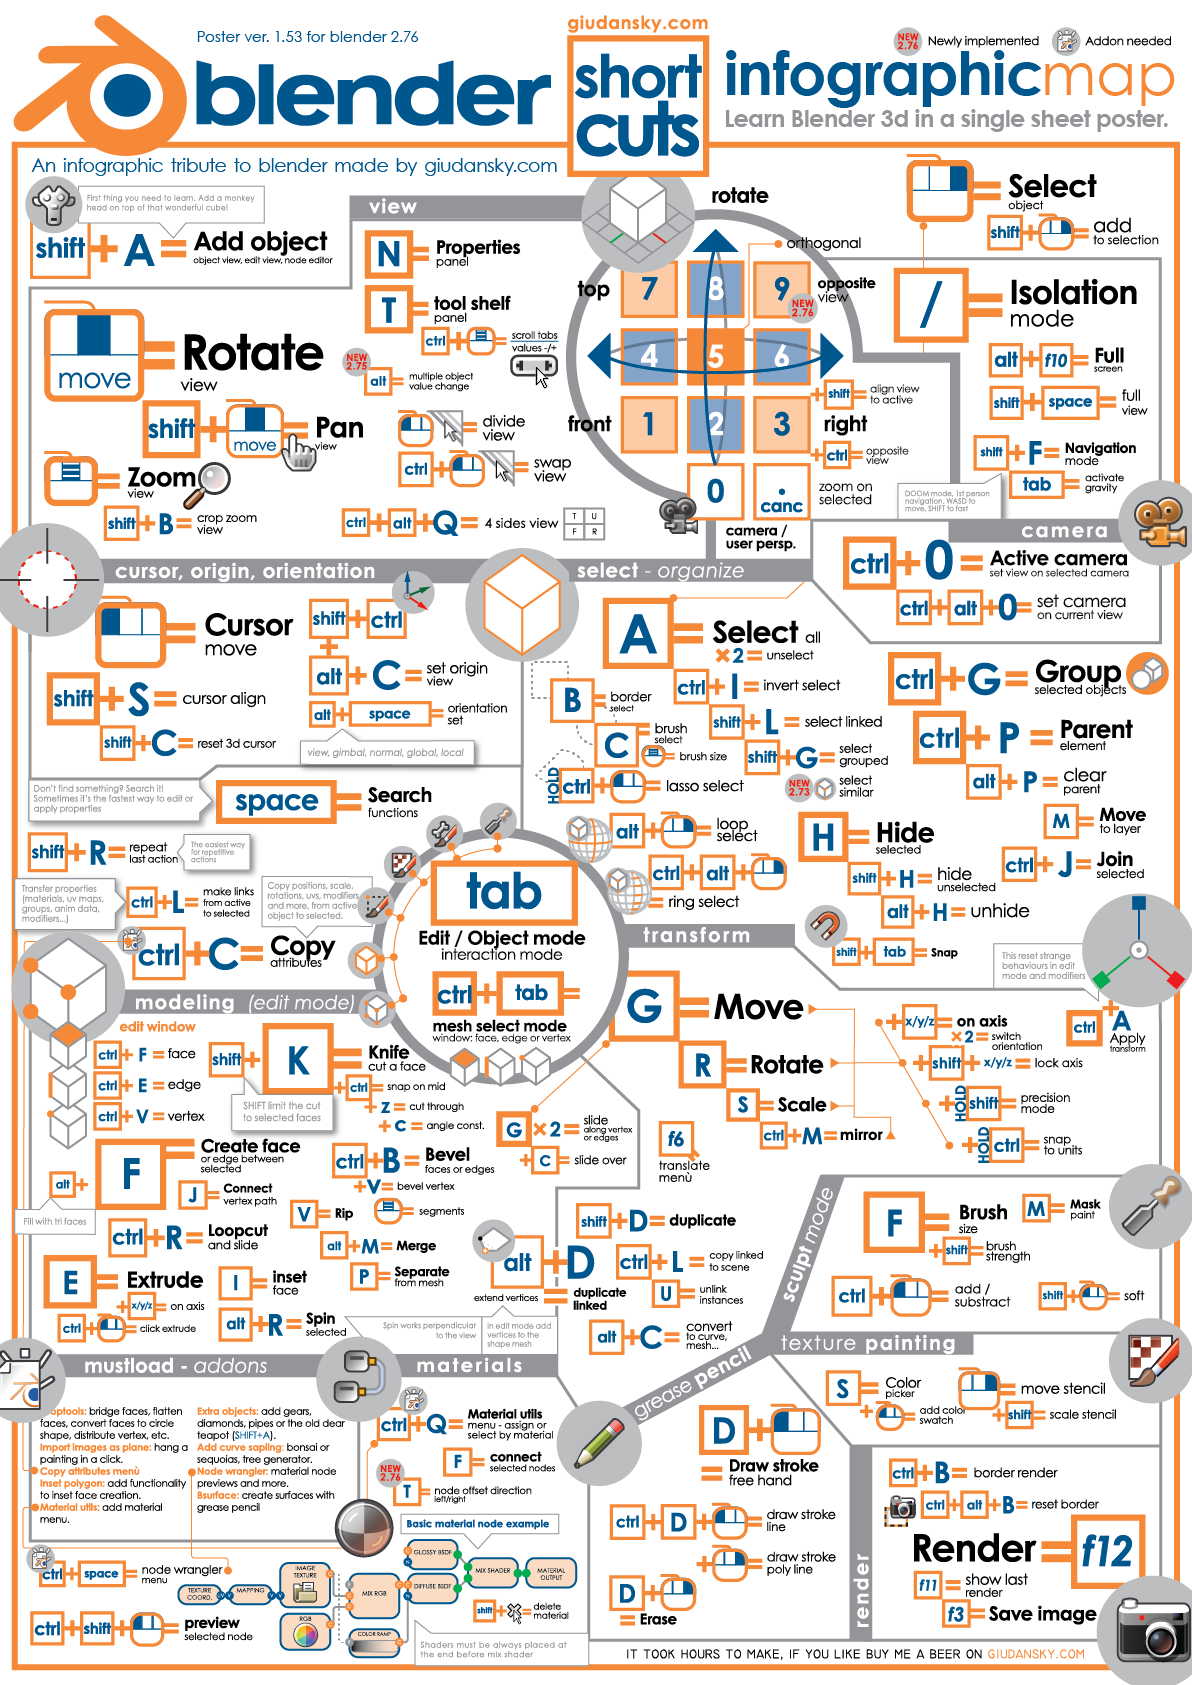
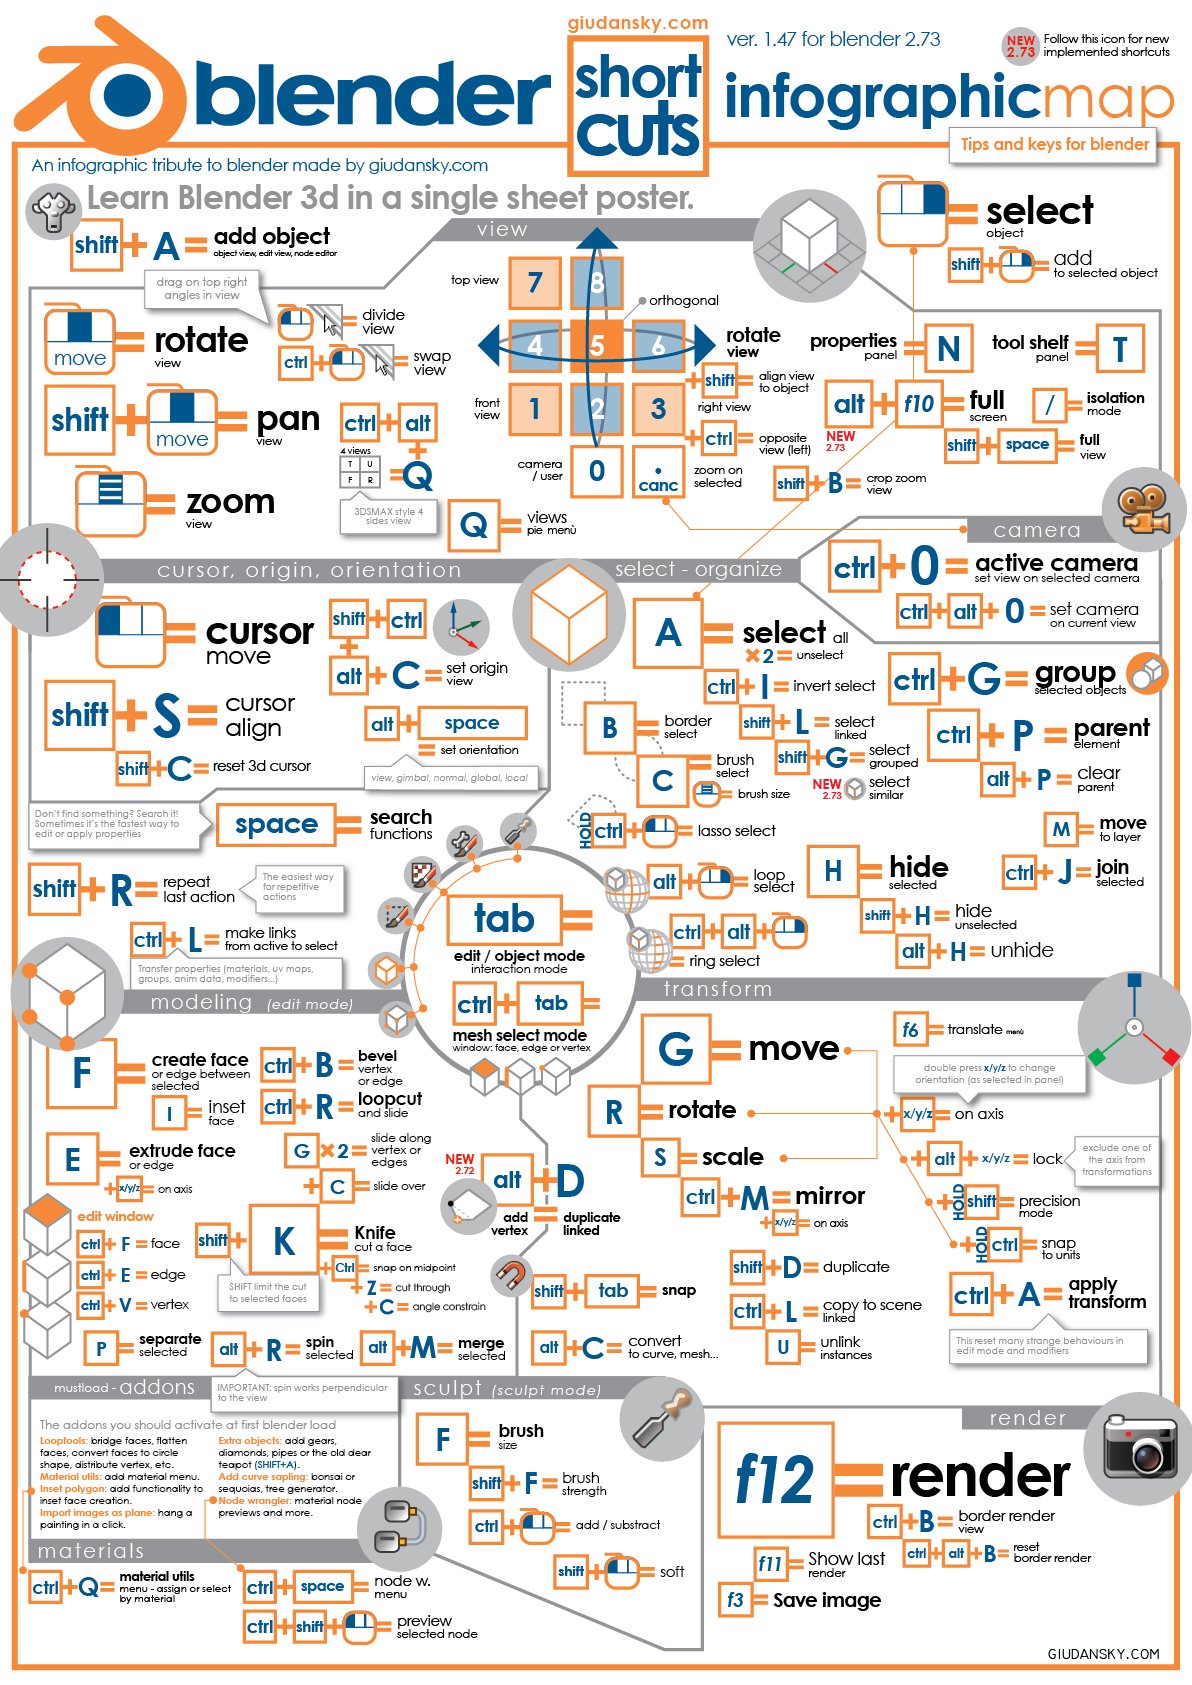
- Use Cheat Sheets: Keep a cheat sheet of Blender shortcuts handy. Visual aids can be incredibly effective for quick reference until you memorize the shortcuts.
- Practice Regularly: Regular use is key to memorization. Try to use shortcuts as often as possible in your projects to reinforce your memory.
- Customize Shortcuts: Blender allows you to customize shortcuts. Tailoring shortcuts to your liking can make them easier to remember and use.
- Create Associations: Associating certain shortcuts with their actions visually or conceptually can help in memorizing them. For example, associating the shortcut \"G\" for grab/move with the action of grabbing and moving an object in your mind.
- Engage in Challenges: Set challenges for yourself to use only keyboard shortcuts for certain tasks. This can be a fun and effective way to practice.
- Teach Others: Sharing knowledge with others can reinforce your own learning. Teach shortcuts to friends or colleagues to improve your mastery.
Remember, mastering shortcuts takes time and practice. Be patient with yourself and consistently apply these tips to integrate shortcuts into your daily workflow, enhancing your productivity and creative potential in Blender.
READ MORE:
Conclusion and Further Learning Resources
Mastering Blender shortcuts is a journey that can significantly enhance your productivity and creativity. By incorporating these shortcuts into your workflow, you can streamline your process, allowing more time for artistic exploration and refinement. Remember, the key to proficiency in any software is practice, patience, and a willingness to continually learn and adapt.
For further learning, consider exploring the following resources:
- Blender Official Documentation: A comprehensive resource for all Blender functionalities, including a detailed section on shortcuts.
- Online Tutorials and Courses: Platforms like Blender Guru, CG Cookie, and Udemy offer tutorials ranging from beginner to advanced levels.
- Community Forums: Blender Artists and the Blender subreddit are great places to ask questions, share knowledge, and learn from the experiences of other Blender users.
- Practice Projects: Applying what you\"ve learned in real-world projects is invaluable. Challenge yourself with projects that push your boundaries and implement the shortcuts and techniques you\"ve learned.
- Blender Add-ons: Explore add-ons that can further streamline your workflow or add new functionalities to Blender.
As you continue to develop your skills in Blender, remember that learning is an ongoing process. The Blender community is vast and supportive, offering a wealth of knowledge to help you grow as an artist. Embrace the challenges and opportunities that come with mastering this powerful tool, and let your creativity soar.
Unlock the full potential of Blender and elevate your 3D modeling, animation, and rendering skills with our comprehensive guide on shortcuts. Embrace efficiency and creativity by mastering these essential techniques, designed to transform your workflow and inspire your next masterpiece.
_HOOK_