Topic how to install blender on windows 11: Embark on your creative journey with Blender on Windows 11! This guide offers a seamless installation process, paving the way for endless possibilities in 3D modeling, animation, and more. Start shaping your ideas into reality today.
Table of Content
- How do I install Blender on Windows 11?
- System Requirements
- Installation Steps
- Launching Blender
- Installation Steps
- Launching Blender
- Launching Blender
- Introduction to Blender Installation on Windows 11
- YOUTUBE: How To Install Blender On Windows 11
- System Requirements for Installing Blender
- Step-by-Step Installation Process
- Tips for First-Time Blender Users on Windows 11
- Customizing the Blender Interface for Optimal Use
- Understanding Blender\"s Features and Tools
- Resources for Learning Blender
- Troubleshooting Common Installation Issues
- Enhancing Your Blender Experience with Add-ons
- Conclusion: Starting Your Creative Journey with Blender
How do I install Blender on Windows 11?
To install Blender on Windows 11, you can follow these steps:
- Visit the official Blender website by typing \"Blender download\" into your web browser.
- Once on the Blender website, click on the \"Download\" button to get the latest version of Blender for Windows.
- Select the Windows operating system option and choose either the 64-bit or 32-bit installation depending on your system.
- After the download is complete, locate the downloaded installer file (typically in your Downloads folder) and double-click on it to start the installation process.
- Follow the on-screen instructions in the installation wizard to complete the installation.
- Once installed, you can open Blender by searching for it in the Windows search bar or by accessing it from the Start menu.
That\'s it! You have successfully installed Blender on your Windows 11 system. You can now start creating amazing 3D content and animations using Blender.
READ MORE:
System Requirements
- Operating System: Windows 8.1 or later
- Processor: 64-bit quad-core CPU
- RAM: Minimum 8 GB, Recommended 32 GB
- Graphics Card: OpenGL 4.3 with 2 GB RAM minimum, 8 GB RAM recommended
- Display: 1920×1080 minimum, 2560×1440 recommended
- Free Hard Disk: 1 GB minimum, 2 GB recommended

Installation Steps
- Visit Blender\"s official website and navigate to the \"Download\" section.
- Select the version suitable for Windows and click the download button.
- Once downloaded, locate the installer file, usually in the Downloads folder.
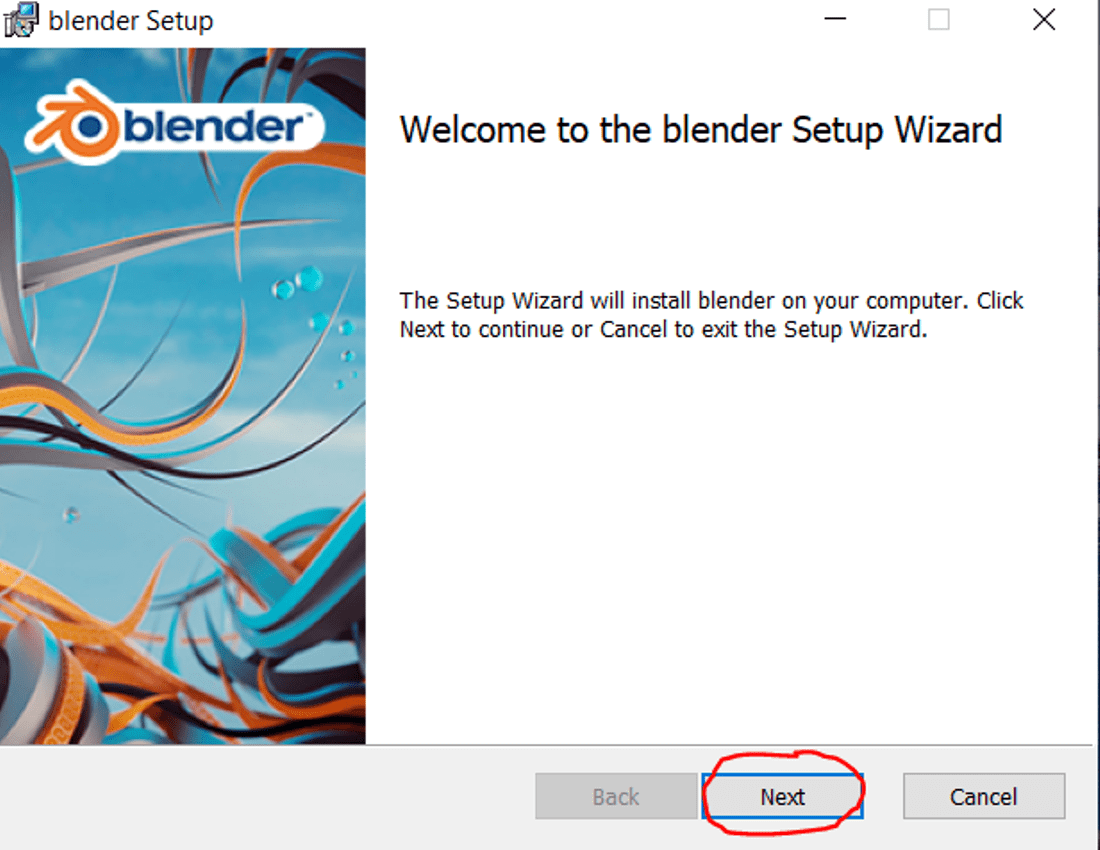
- Double-click on the installer file to start the setup wizard.
- Follow the instructions in the installation wizard, accept the license agreement, and choose the installation directory.
- Click on the Install button to start the installation process.
- After installation, click Finish to close the setup wizard.

Launching Blender
To open Blender, use the desktop shortcut or search for it in the Start menu. Familiarize yourself with Blender\"s interface to start your projects. For new users, it\"s recommended to check out tutorials and documentation available on Blender\"s website or through community resources like YouTube for learning how to use the software effectively.
Tips
- Blender has a steep learning curve, but exploring tutorials and experimenting with different features can enhance your skills.
- Customizing the Blender interface and using hotkeys can improve your workflow and efficiency.
Blender is an open-source, free 3D graphics software toolset that supports the entire 3D pipeline. With patience and practice, you can create stunning visuals and animations on your Windows 11 system.
Installation Steps
- Visit Blender\"s official website and navigate to the \"Download\" section.
- Select the version suitable for Windows and click the download button.
- Once downloaded, locate the installer file, usually in the Downloads folder.
- Double-click on the installer file to start the setup wizard.
- Follow the instructions in the installation wizard, accept the license agreement, and choose the installation directory.
- Click on the Install button to start the installation process.
- After installation, click Finish to close the setup wizard.
_HOOK_
Launching Blender
To open Blender, use the desktop shortcut or search for it in the Start menu. Familiarize yourself with Blender\"s interface to start your projects. For new users, it\"s recommended to check out tutorials and documentation available on Blender\"s website or through community resources like YouTube for learning how to use the software effectively.
Tips
- Blender has a steep learning curve, but exploring tutorials and experimenting with different features can enhance your skills.
- Customizing the Blender interface and using hotkeys can improve your workflow and efficiency.
Blender is an open-source, free 3D graphics software toolset that supports the entire 3D pipeline. With patience and practice, you can create stunning visuals and animations on your Windows 11 system.
Introduction to Blender Installation on Windows 11
Welcome to the exciting world of Blender on Windows 11! Blender is a versatile and powerful 3D graphics software used by professionals and hobbyists alike to create stunning visuals, animations, and simulations. This guide will walk you through the process of downloading and installing Blender on your Windows 11 system, ensuring you\"re ready to start your creative projects with ease.
- First, navigate to the official Blender website at blender.org. Here, you\"ll find the download button prominently displayed. Clicking this button takes you to the download page, where you can select the version of Blender that\"s compatible with Windows 11.
- After clicking the download button for the Windows version, the file will start downloading. Wait for the download to complete before proceeding to the next step.
- Locate the downloaded installer file, typically found in your system\"s Downloads folder. Double-click on this file to initiate the installation process.
- The Blender Setup Wizard will guide you through the installation. You\"ll be prompted to accept the license agreement. After doing so, you can choose the installation directory. If you\"re unsure, the default location is typically a safe choice.
- Continue following the prompts, and click on the \"Install\" button to begin the installation. The process may take a few minutes, depending on your system\"s specifications.
- Once the installation is complete, click \"Finish\" to close the installer. Blender is now installed on your Windows 11 computer and ready for use!
To launch Blender, simply search for it in the Start menu or double-click the desktop shortcut if one was created. Upon starting, you\"ll be greeted with Blender\"s user interface, ready to embark on your 3D modeling and animation journey.
For those new to Blender, it\"s recommended to explore online tutorials and resources to get familiar with the software. The Blender community is vast and supportive, offering countless tutorials for users of all skill levels. Remember, practice and exploration are key to mastering Blender.
Happy creating!

How To Install Blender On Windows 11
Installation: \"Discover the simple and stress-free installation process that will have you up and running in no time. Watch our step-by-step guide to ensure a seamless and successful setup!\" Windows: \"Explore the world of Windows and all the amazing features it has to offer. From customization options to productivity tools, this video will showcase how Windows can enhance your digital experience.\"
System Requirements for Installing Blender
Before you embark on your journey with Blender, ensuring your Windows 11 system meets the necessary specifications is crucial for a smooth experience. Below are the minimum and recommended system requirements for running Blender effectively.
| Requirement | Minimum | Recommended |
| Operating System | Windows 8.1 and later | Windows 11 |
| Processor | 64-bit dual-core 2Ghz CPU with SSE4.2 support | 64-bit quad-core CPU |
| Memory | 4 GB RAM | 16 GB RAM or more |
| Graphics Card | 1 GB RAM, OpenGL 4.3 | 4 GB RAM, OpenGL 4.5 |
| Display | 1280×768 display | 1920×1080 display |
| Mouse | Standard | Three-button mouse or pen+tablet |
| Storage | 500 MB free hard disk space | SSD with 2 GB free space |
Adhering to these requirements will not only facilitate a smoother installation process but also ensure that you can fully explore Blender\"s capabilities without experiencing significant performance issues. Whether you\"re a beginner or an experienced 3D artist, preparing your system accordingly will set the foundation for a rewarding creative journey with Blender on Windows 11.
Step-by-Step Installation Process
- Begin by opening your preferred web browser and navigating to the official Blender website, which is www.blender.org. Here, you\"ll find the latest version of Blender available for download.
- Once on the Blender website, locate the \"Download\" button. This is usually prominently displayed on the homepage. Clicking this button will redirect you to the download page, where you can select the version of Blender suitable for Windows 11.
- Click on the \"Download Blender\" button corresponding to the latest version. The website might automatically detect your operating system, but if it doesn’t, ensure you select the Windows version.
- After clicking the download button, the Blender installer file will begin to download to your computer. Wait for the download to complete before proceeding to the next step.
- Find the downloaded installer file in your computer\"s Downloads folder or wherever your downloads are typically saved. The file should have a \".msi\" or \".exe\" extension.
- Double-click on the installer file to start the installation process. You might receive a security prompt from Windows asking for permission to run the installer. Click \"Yes\" or \"Run\" to continue.
- The Blender Installation Wizard will now start. Follow the on-screen instructions. You will be asked to accept the license agreement. After reviewing the agreement, select \"I Agree\" to proceed.
- Next, you will be prompted to choose the installation directory. You can select the default directory suggested by the installer or click \"Browse\" to choose a different location on your hard drive.
- After selecting the installation directory, click \"Next\" or \"Install\" to begin the installation process. The installation may take a few minutes, depending on your system’s performance.
- Once the installation is complete, click \"Finish\" to close the installer. Blender should now be installed on your Windows 11 computer.
To start Blender, look for its icon on your desktop or search for it in the Start menu. Double-click the icon to launch Blender and begin exploring its vast array of features for 3D modeling, animation, and more.
Remember, Blender is a complex tool with a steep learning curve, so don’t hesitate to look up tutorials and resources to help you get started. Happy blending!
_HOOK_
Tips for First-Time Blender Users on Windows 11
- Start with Basics: Begin your Blender journey by familiarizing yourself with the basic functionalities. Explore the user interface, understand the navigation controls, and learn how to manipulate objects. Starting with simple projects can help you build confidence.
- Use Blender Tutorials: There\"s a vast amount of tutorials available for Blender users. Official Blender tutorials, YouTube channels dedicated to Blender training, and Blender community forums are excellent resources to learn from.
- Customize Your Workspace: Blender allows you to customize your workspace according to your needs. Experiment with different layouts and find what works best for your workflow. Windows 11 offers excellent multitasking features that can complement your workspace setup.
- Experiment with Add-ons: Blender supports numerous add-ons that can extend its functionality. Explore the add-ons available within Blender and consider installing those that seem beneficial to your projects.
- Practice Regularly: Like any sophisticated tool, mastering Blender requires practice. Dedicate time to experimenting with different features and tools within Blender. Practice building various models to understand the depths of what Blender offers.
- Join the Blender Community: Being part of the Blender community can provide support, inspiration, and feedback. Engage with forums, attend Blender meetups if possible, and participate in online communities to learn from other users.
- Keyboard Shortcuts: Learning Blender\"s keyboard shortcuts can significantly speed up your workflow. Familiarize yourself with the most common shortcuts and use them regularly to become more efficient.
- Stay Updated: Blender is constantly being updated with new features and improvements. Keep your software up to date to take advantage of the latest tools and functionalities.
- Explore Different Disciplines: Blender is not just for 3D modeling; it\"s also capable of animation, rendering, compositing, and more. Exploring these different disciplines can help you discover new interests and expand your skill set.
- Save Frequently: Like any software, it\"s crucial to save your work frequently to avoid losing progress. Make use of Blender\"s auto-save feature and consider saving iterations of your projects to track changes or revert if necessary.
Remember, the key to becoming proficient in Blender is patience and persistence. Enjoy the learning process and don\"t hesitate to experiment with your creative ideas.
Customizing the Blender Interface for Optimal Use
Blender\"s interface is highly customizable, allowing you to tailor the workspace to fit your specific needs and workflow. Here\"s how you can optimize Blender\"s interface on Windows 11 for a more efficient and personalized experience:
- Understand the Default Layout: Start by getting familiar with Blender\"s default layout. Identify the areas such as the 3D viewport, timeline, outliner, and properties panel. Knowing what each area does will help you customize the interface effectively.
- Adjust the Layout: You can drag the borders between areas to resize them or click and drag the corner of an area to split it into two. This allows you to have multiple views open simultaneously, such as having the 3D Viewport and UV/Image editor side by side.
- Change Editor Types: Each area in Blender can be set to display different types of editors, like the Node Editor, Text Editor, or Movie Clip Editor. Click on the editor type selector in the corner of an area to switch between different editors based on your task.
- Save Custom Layouts: Once you\"ve arranged Blender\"s interface to your liking, you can save this layout for future use. Go to the top menu, select \"Window\" > \"Workspaces\" > \"Duplicate\", and give your new layout a name. This allows you to switch between custom layouts quickly.
- Use Workspaces: Blender comes with predefined workspaces tailored for different tasks, such as sculpting, animation, or compositing. You can customize these workspaces or create new ones to suit your workflow.
- Configure Add-ons: Add-ons can add new functionalities and tools to your interface. Install add-ons through the Preferences window and enable them for your current project. Some add-ons may add new panels or options to your interface.
- Customize Keymaps: Blender allows you to customize keymaps, which can be particularly useful if you\"re transitioning from another 3D software or have specific preferences. Access the Keymap settings in the Preferences window to adjust keybindings.
- Adjust Themes and Colors: You can also customize the look of Blender\"s interface by changing themes and colors. This is done in the Preferences window under the \"Themes\" tab, where you can adjust colors for different elements of the interface.
Customizing the Blender interface not only makes your workflow more efficient but also helps create a more enjoyable and personalized 3D creation experience. Don\"t be afraid to experiment with different layouts and settings to find what works best for you.
Understanding Blender\"s Features and Tools
Blender is a powerful and versatile 3D creation suite that provides a wide range of tools and features for artists, animators, and creators. Whether you\"re new to 3D modeling or an experienced professional, understanding Blender\"s capabilities is crucial for leveraging its full potential. Here\"s an overview of key features and tools within Blender:
- 3D Modeling: At its core, Blender is renowned for its robust 3D modeling capabilities. It offers a comprehensive set of tools for creating complex models, including sculpting, retopology, and modifiers.
- Texturing and Shading: Blender allows you to create detailed textures and sophisticated materials using its built-in shaders. With support for both procedural textures and image-based texturing, you can achieve realistic or stylized looks for your models.
- Animation: Blender comes equipped with a full-fledged animation toolset, allowing for the creation of intricate animations. It includes features for rigging, keyframe animation, inverse kinematics, and shape keys.
- Simulation: Blender supports a variety of simulations, including fluids, smoke, fire, soft bodies, and cloth. These tools enable you to add dynamic effects and realism to your scenes.
- Rendering: With its powerful rendering engines, Cycles and Eevee, Blender provides high-quality rendering capabilities. Whether you need realistic ray-traced images or real-time viewport previews, Blender has you covered.
- Compositing and Post-Processing: Blender includes a fully integrated compositor within its interface, allowing you to perform post-processing tasks and add visual effects directly within the software.
- Video Editing: Blender also features a non-linear video editor, enabling you to perform video editing tasks, including video cuts, splicing, and color grading, without leaving the application.
- Scripting: For those looking to automate tasks or develop custom tools, Blender offers extensive scripting capabilities using Python. This allows for the creation of scripts and addons to extend Blender\"s functionality.
These features merely scratch the surface of what Blender can do. Its versatility makes it suitable for a wide range of projects, from simple 3D models to complex animations and visual effects. The key to mastering Blender lies in exploring its tools, experimenting with different techniques, and continually learning through projects and community resources.
Resources for Learning Blender
Embarking on the journey of learning Blender is an exciting endeavor. Fortunately, a wealth of resources is available to guide beginners through the basics and assist advanced users in mastering complex techniques. Here\"s a list of essential resources for learning Blender:
- Blender Official Website: The official Blender website (www.blender.org) hosts a variety of tutorials, ranging from beginner to advanced levels. It\"s a great starting point for official documentation and learning materials.
- Blender Guru: One of the most well-known Blender tutorial creators, Blender Guru, offers extensive tutorials on various aspects of Blender, including the famous \"Donut\" tutorial for beginners.
- CG Cookie: CG Cookie provides a wide range of Blender tutorials and courses, catering to different skill levels. While some content is free, a subscription offers access to their entire library.
- YouTube: YouTube is a treasure trove of Blender tutorials. Channels like Blender Guru, CG Geek, and Darrin Lile offer tutorials on everything from basic modeling to complex animations.
- Blender Artists Community: The Blender Artists forum (blenderartists.org) is a vibrant community where users share their work, ask questions, and provide feedback to others. It\"s a great place to learn from real-world projects and challenges.
- BlenderNation: BlenderNation (www.blendernation.com) keeps you updated with Blender news, tutorials, art, and more, serving as a comprehensive resource for all things Blender.
- Books: There are several excellent books on Blender that cover a wide range of topics. \"Blender For Dummies\" is a popular choice for beginners, while \"The Complete Guide to Blender Graphics\" is suited for those seeking to deepen their knowledge.
- Online Courses: Platforms like Udemy, Coursera, and Skillshare feature courses on Blender. These courses often include structured learning paths and projects to work on.
With dedication and practice, utilizing these resources will significantly enhance your Blender skills, whether you\"re sculpting your first model or animating a complex scene. Remember, the Blender community is supportive and welcoming to newcomers, so don\"t hesitate to reach out for help or advice.
Troubleshooting Common Installation Issues
Installing Blender on Windows 11 should be a straightforward process, but sometimes users may encounter issues. Here are some common problems and solutions to help ensure a smooth installation:
- Installation File Won\"t Run: If the Blender installer won\"t run, ensure that you\"ve downloaded the correct version from the official Blender website. Also, check if Windows Defender or your antivirus is blocking the file. You may need to temporarily disable your antivirus or allow the installer through the firewall.
- Error Messages During Installation: Make sure your Windows 11 system meets the minimum requirements for Blender. If you receive error messages about missing system components, you may need to update your operating system or install specific libraries or frameworks, such as the latest Microsoft Visual C++ Redistributable.
- Blender Crashes on Startup: This could be due to incompatible or outdated graphics drivers. Ensure your graphics card drivers are up to date by visiting the manufacturer\"s website and downloading the latest drivers for your specific GPU model.
- Slow Performance or Instability: Adjust Blender\"s settings for optimal performance on your machine. Reducing the rendering resolution or viewport shading complexity can improve performance. Additionally, consider running Blender as an administrator to prevent permission-related issues.
- Missing Features or Add-ons: If certain features or add-ons aren\"t available, make sure you\"ve enabled them in the Blender preferences. Some features may also require additional downloads or configurations.
For more specific issues or error messages, the Blender community forums and official Blender support can be excellent resources for finding solutions. Remember, keeping your operating system and drivers up to date is crucial for running software like Blender smoothly.
_HOOK_
Enhancing Your Blender Experience with Add-ons
Blender\"s functionality can be greatly expanded through the use of add-ons, which are tools and features created by the Blender community and developers. Add-ons can streamline your workflow, introduce new functionalities, and help you achieve results faster. Here\"s how to enhance your Blender experience with add-ons:
- Accessing Add-ons: Blender includes several add-ons by default, which you can access through Edit > Preferences > Add-ons. Here, you can enable or disable available add-ons.
- Finding New Add-ons: The Blender Market, Gumroad, and Blender Artists Community are excellent places to find new add-ons. These platforms feature both free and paid add-ons tailored to a wide range of needs.
- Installing Add-ons: To install a new add-on, download the add-on file, usually with a .zip extension. In Blender, go to Edit > Preferences > Add-ons > Install, then navigate to and select the downloaded file. Once installed, you\"ll need to enable the add-on by checking the box next to its name.
- Exploring Add-on Categories: Add-ons can vary greatly in their purpose and functionality. Common categories include modeling, animation, rendering, and VFX. Explore different categories to find tools that best suit your project needs.
- Customizing Your Workflow: Many add-ons are designed to improve efficiency in specific areas of Blender. Identify areas in your workflow that could benefit from automation or enhancement and look for add-ons that address those needs.
- Staying Updated: Keep your add-ons up to date to ensure compatibility with the latest version of Blender. Updates can also bring new features and improvements to existing add-ons.
- Supporting Developers: Consider supporting add-on developers by purchasing their paid add-ons or donating. This support helps sustain the development of new and existing tools for the Blender community.
By carefully selecting and integrating add-ons into your workflow, you can significantly enhance your Blender experience, making it more powerful, efficient, and suited to your specific needs.
READ MORE:
Conclusion: Starting Your Creative Journey with Blender
Embarking on your creative journey with Blender on Windows 11 marks the beginning of an exciting exploration into the world of 3D modeling, animation, and rendering. With Blender\"s comprehensive suite of tools, the possibilities for creativity are limitless. Whether you aim to create stunning visual effects, intricate models, or engaging animations, Blender provides a robust platform to bring your visions to life.
Remember, the path to mastering Blender is a journey of continuous learning and practice. Utilize the wealth of resources available online, from official tutorials to community forums, to enhance your skills and knowledge. Don\"t be afraid to experiment with Blender\"s features and tools, as hands-on experience is invaluable.
With patience, dedication, and creativity, you\"ll find that Blender is not just a tool, but a gateway to expressing your artistic ideas in three dimensions. The Blender community is vast and supportive, ready to assist you in your creative endeavors. Welcome to the Blender family, and enjoy the journey of discovery and creation.
Embark on your 3D creative journey with Blender on Windows 11, unlocking a world where imagination meets reality. This guide sets the foundation, ensuring a smooth start and an exciting path of endless possibilities and creativity.