Topic blender render settings cycles: Unlock the full potential of Blender"s Cycles render engine with our comprehensive guide. Discover how to enhance your 3D projects by optimizing render settings for speed and quality, ensuring your creations stand out with stunning visual fidelity.
Table of Content
- Viewport and Final Render Denoising
- Performance Enhancements
- Conclusion
- Performance Enhancements
- Conclusion
- Conclusion
- Introduction to Blender Cycles Rendering
- What are the fastest render settings for Blender\'s Cycles engine?
- YOUTUBE: 5 Steps for Faster Renders in Blender Cycles
- Optimizing GPU Settings for Faster Rendering
- Understanding and Adjusting Light Bounces
- Denoising Techniques for Cleaner Renders
- Improving Render Efficiency with Sample Settings
- Tile Size Optimization for Quicker Renders
- Utilizing Advanced Cycles Features
- Rendering with HDRIs and Environmental Lighting
- Adaptive Sampling and Noise Reduction Strategies
- Practical Tips for Real-world Rendering Scenarios
- Conclusion and Further Resources
Viewport and Final Render Denoising
For viewport rendering, options like Optix and OpenImageDenoise are recommended, with Optix preferred for its speed on compatible NVidia GPUs. Final renders benefit from similar denoising techniques, offering noise-free outputs. Additionally, NLM, a non-AI based option, is available but generally produces less satisfactory results compared to AI-based denoisers.
Advanced Settings
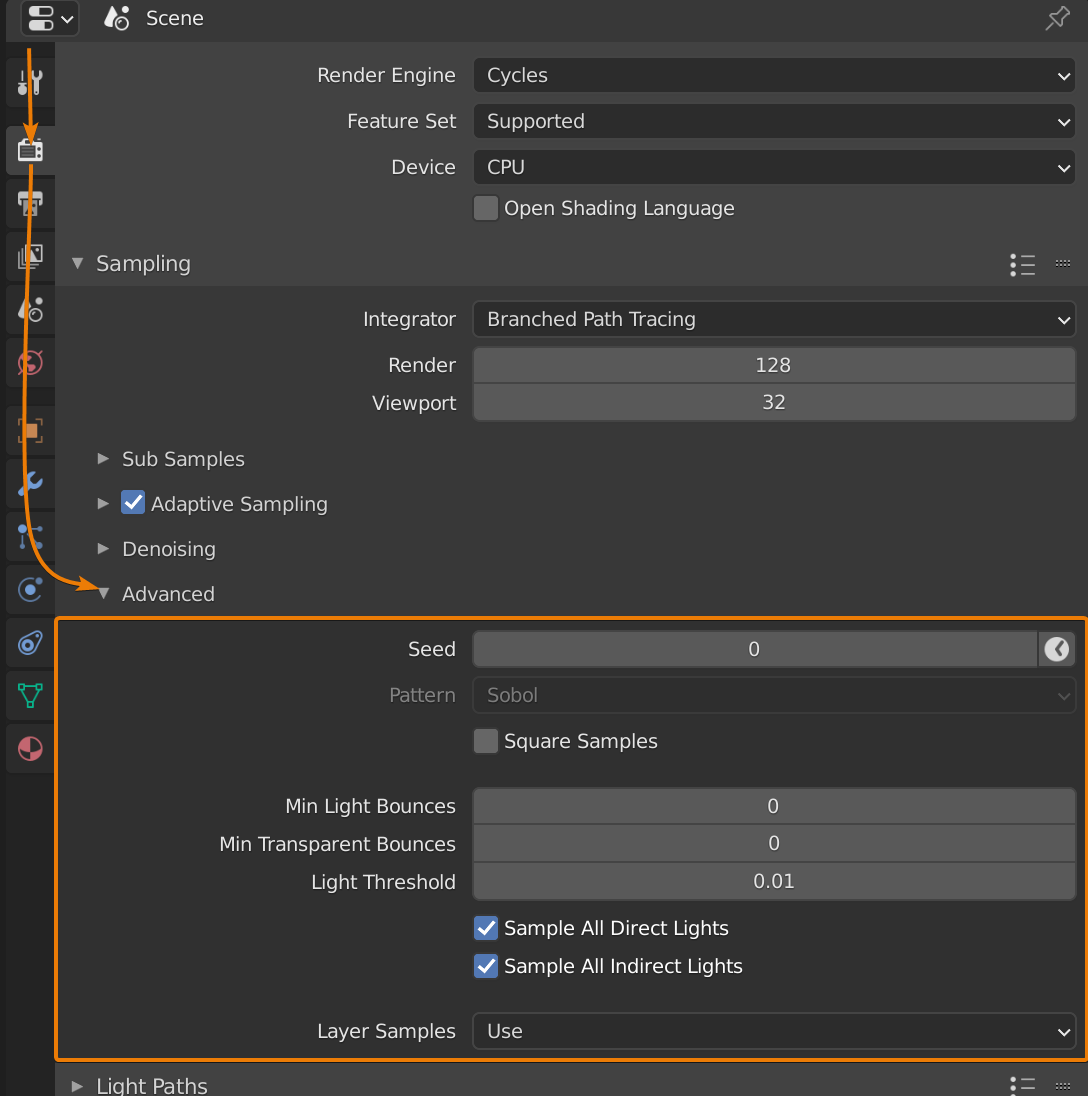
Adjusting the seed value for random distribution and choosing between Sobol and multi-jitter sampling patterns can affect the noise pattern and overall render quality. Enabling adaptive sampling with progressive multi-jitter can also impact the render efficiency.
READ MORE:
Performance Enhancements
- Switch rendering devices to GPU under Cycles Render Devices in system preferences for significant speed improvements, especially with NVidia GPUs using CUDA or OptiX.
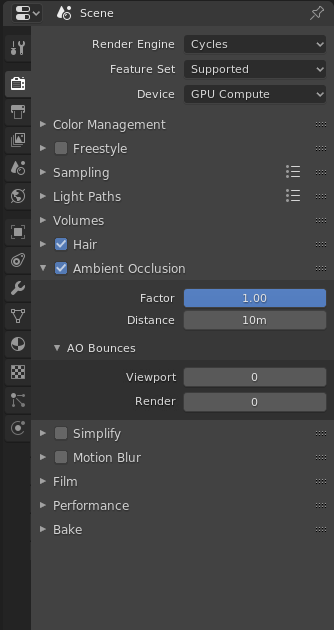
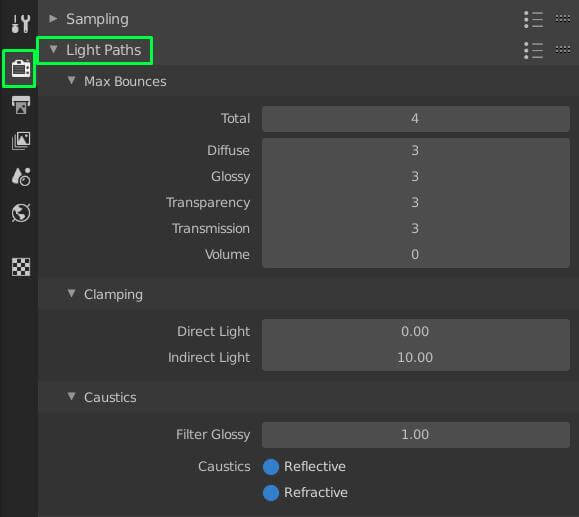
- Reduce light bounces in the Render Properties panel to decrease rendering times, adjusting Max Bounces within the Light Paths section.
- Modifying clamp value settings can help mitigate intense pixels or \"fireflies\" without greatly affecting realism.
- Optimize render tile size, with larger tiles (256x256) recommended for GPU rendering to speed up the process.
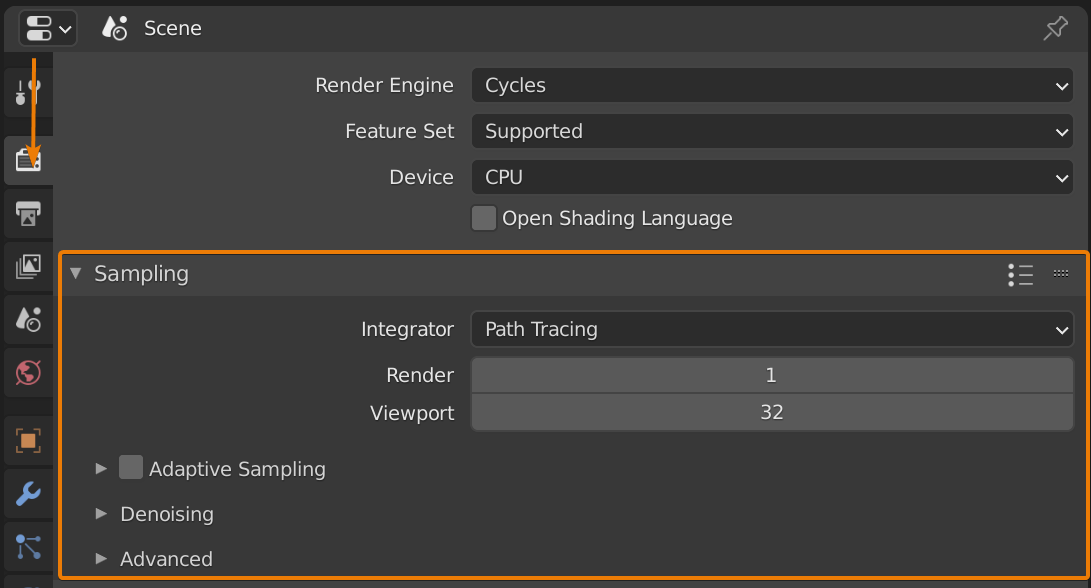
- Decreasing sample rates in the Sampling tab under Render Properties can also lead to faster renders, with an option to adjust sample counts for quality balance.
Additional Tips for Speed
- Activating Blender’s Persistence Data feature can speed up renders by up to 5 times in static scenes by caching data from the first frame.
- Optimizing HDRI multi-importance sampling in World settings can improve responsiveness and reduce fireflies.
- Setting a render region for focused work on shading or lighting enhances viewport rendering speed.
- Changing the file output format to TIFF or OpenEXR can significantly speed up the rendering process.
- Utilizing Temporal Denoising for animations can reduce noise and save rendering time.

Conclusion
By carefully adjusting these settings, users can significantly improve render times in Blender\"s Cycles engine, making it an invaluable tool for both novice and professional 3D artists.
Performance Enhancements
- Switch rendering devices to GPU under Cycles Render Devices in system preferences for significant speed improvements, especially with NVidia GPUs using CUDA or OptiX.
- Reduce light bounces in the Render Properties panel to decrease rendering times, adjusting Max Bounces within the Light Paths section.
- Modifying clamp value settings can help mitigate intense pixels or \"fireflies\" without greatly affecting realism.
- Optimize render tile size, with larger tiles (256x256) recommended for GPU rendering to speed up the process.
- Decreasing sample rates in the Sampling tab under Render Properties can also lead to faster renders, with an option to adjust sample counts for quality balance.
Additional Tips for Speed
- Activating Blender’s Persistence Data feature can speed up renders by up to 5 times in static scenes by caching data from the first frame.
- Optimizing HDRI multi-importance sampling in World settings can improve responsiveness and reduce fireflies.
- Setting a render region for focused work on shading or lighting enhances viewport rendering speed.
- Changing the file output format to TIFF or OpenEXR can significantly speed up the rendering process.
- Utilizing Temporal Denoising for animations can reduce noise and save rendering time.
Conclusion
By carefully adjusting these settings, users can significantly improve render times in Blender\"s Cycles engine, making it an invaluable tool for both novice and professional 3D artists.
_HOOK_
Conclusion
By carefully adjusting these settings, users can significantly improve render times in Blender\"s Cycles engine, making it an invaluable tool for both novice and professional 3D artists.

Introduction to Blender Cycles Rendering
Blender\"s Cycles is a powerful, physically-based rendering engine that offers stunningly realistic visual effects by simulating the physical properties of light. It seamlessly integrates with Blender, providing artists and designers with the tools to create photorealistic images and animations. Understanding Cycles\" render settings is key to maximizing efficiency and achieving the highest quality in your projects.
- Ray Tracing: At its core, Cycles uses ray tracing to simulate light interactions in a scene, offering realism that can be adjusted through various settings.
- Sampling: Control over sampling rates is crucial for balancing render quality with time. Higher sample counts lead to smoother, more accurate images but increase rendering time.
- Light Paths: Settings for light bounces, caustics, and shadows allow fine-tuning of how light travels and interacts with materials, affecting the scene\"s overall look.
- Performance Optimization: Cycles offers settings to optimize rendering times, including GPU acceleration, tile sizes, and adaptive sampling.
- Materials and Textures: Cycles\" node-based material system provides endless possibilities for creating complex materials that react realistically to light.
- Viewport Rendering: Cycles also supports real-time viewport rendering, allowing artists to see near-final results in real-time as they work.
Mastering Blender Cycles rendering settings not only improves the quality of your renders but also makes the rendering process more efficient. Whether you\"re a beginner looking to understand the basics or a seasoned professional aiming to refine your workflow, this guide will provide valuable insights into making the most of Cycles\" capabilities.
What are the fastest render settings for Blender\'s Cycles engine?
When trying to achieve the fastest render times in Blender\'s Cycles engine, there are several key settings you can adjust:
- Reduce the number of light bounces: Limiting the number of light bounces, especially for diffuse and glossy surfaces, can significantly speed up render times. Start with 2-3 light bounces and adjust as needed.
- Use GPU rendering: If your system supports it, utilizing GPU rendering can be much faster than CPU rendering. Make sure your GPU is selected in the Blender preferences under System.
- Lower the render samples: Decreasing the number of render samples can also help speed up the rendering process. Start with a lower value and increase as needed to reduce noise.
- Optimize geometry and textures: Simplifying your scene\'s geometry and using optimized textures can improve rendering speed. Remove unnecessary details and use efficient texture formats.
- Use denoising: Enabling denoising in the render settings can help reduce noise in the final image, allowing you to use fewer samples and speed up rendering.
5 Steps for Faster Renders in Blender Cycles
Optimization: Dive into the world of optimization and discover how to maximize your resources while achieving the best possible outcomes. Let this video guide you through the process of streamlining and improving your strategies. Efficiency: Unlock the secrets of efficiency with this video that will inspire you to work smarter, not harder. Learn valuable tips and tricks to streamline your tasks and boost productivity like never before.
5 Tips for Faster Renders in Blender Cycles
This video has recently gotten an update with new and improves settings, explanations and info on attaining the FASTEST ...
Optimizing GPU Settings for Faster Rendering
Utilizing the GPU for rendering in Blender\"s Cycles can significantly reduce render times while maintaining high-quality outputs. Follow these steps to configure your GPU settings for optimal performance.
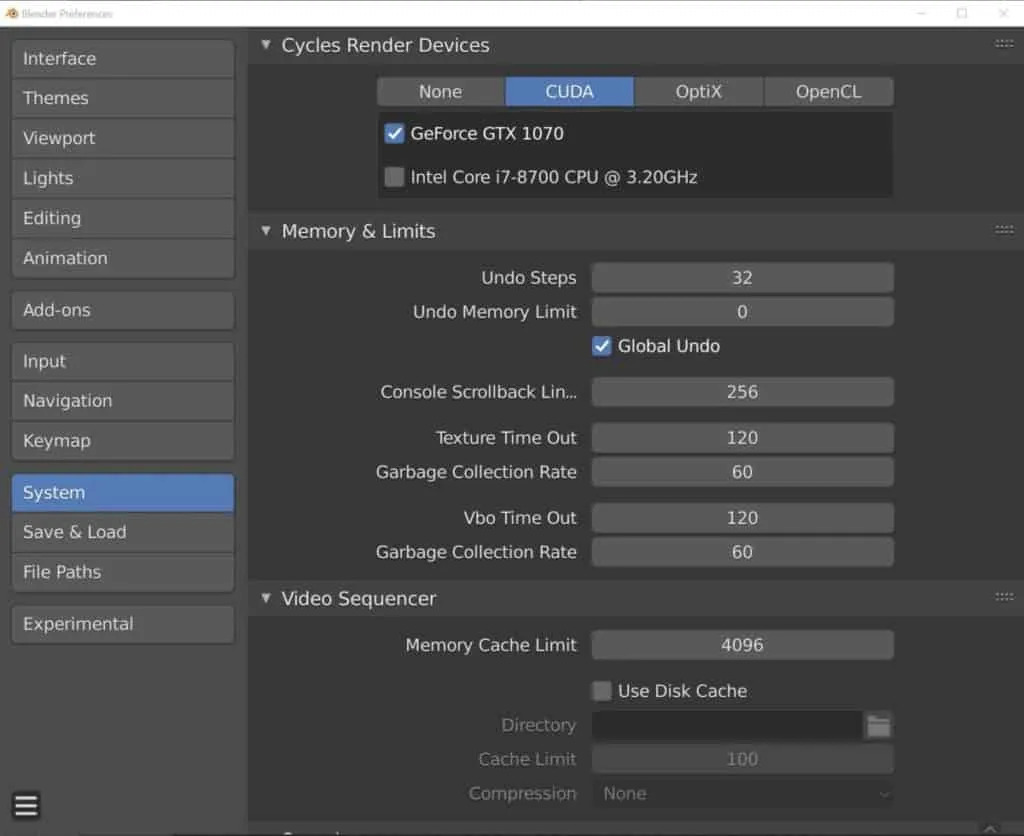
- Enable GPU Rendering: Navigate to Edit > Preferences > System, and under Cycles Render Devices, select CUDA, OptiX, or OpenCL depending on your graphics card. This enables the GPU for rendering.
- Choose the Correct Render Device: For NVIDIA users, CUDA and OptiX are recommended, with OptiX providing better performance for RTX cards. AMD users should select OpenCL.
- Adjust Tile Size: In the Render Properties panel, under Performance > Tiles, adjust the tile size. Larger tiles (e.g., 256x256) are generally faster on GPUs.
- Optimize Samples: Reduce the number of samples for viewport and render in the Sampling section, testing to find the lowest number that maintains desired quality.
- Use Adaptive Sampling: Enable Adaptive Sampling in the Sampling section to reduce render times without sacrificing image quality, as it intelligently focuses computing power where needed.
- Manage Light Paths: Reduce the number of bounces in the Light Paths settings to speed up rendering, adjusting as needed to maintain realism.
Remember, the effectiveness of these optimizations can vary based on the specifics of your project and hardware. Experiment with these settings to find the best balance between render speed and quality for your needs.
- Additional Tips: Keep your graphics drivers up to date to ensure the best performance and compatibility with Blender.
- Monitor Performance: Use Blender\"s \"Render Time\" display to monitor how changes affect rendering speed, helping you to make informed adjustments.
By fine-tuning these GPU settings, you can dramatically improve your rendering workflows in Blender, making it easier to iterate on your creative projects with faster feedback loops.

Understanding and Adjusting Light Bounces
Light bounces, also known as indirect lighting, play a crucial role in achieving realism in your renders with Blender\"s Cycles engine. Each bounce represents the path light takes as it reflects off surfaces, contributing to the overall illumination and color of a scene. However, more bounces increase render times significantly. Adjusting these settings can help you find a balance between render quality and efficiency.
- What Are Light Bounces: Light bounces simulate how light reflects and refracts within a scene. They are essential for creating realistic shadows, highlights, and color bleeding.
- Adjusting Max Bounces: In the Render Properties panel, under the Light Paths section, you can adjust the \"Max Bounces\" value. Lowering this number will reduce render times but may result in less realistic lighting.
- Types of Bounces: Cycles allows you to specify different max bounce values for different types of light paths, including Diffuse, Glossy, Transmission, and Volume. Tailoring these can enhance specific aspects of your scene without unnecessarily increasing overall render times.
- Min Bounces: Setting a minimum number of bounces ensures that light contributes to the scene\"s illumination before it\"s terminated, which can prevent scenes from being too dark.
- Filter Glossy: To avoid noise in glossy reflections with a limited number of bounces, increase the \"Filter Glossy\" value. This will smooth out the noise but can reduce the realism of sharp reflections.
Experimenting with light bounce settings is key to mastering Cycles rendering. By understanding how each setting affects your scene, you can make informed decisions to optimize your render settings for both speed and quality. Remember, the best settings depend on your specific scene\"s needs and finding the right balance is a matter of practice and experimentation.
_HOOK_
Denoising Techniques for Cleaner Renders
To achieve cleaner renders in Blender\"s Cycles, denoising techniques are essential. These methods help reduce noise, improving the visual quality of your renders without significantly increasing rendering times.
- Enable Denoising in Render Layers: Blender offers built-in denoising options that can be enabled in the Render Layers tab. This feature automatically reduces noise in your final render.
- Choose Your Denoiser: Blender supports several denoisers, including the default Blender Denoiser, Intel Open Image Denoise, and NVIDIA OptiX. Each has its strengths, with OptiX being preferred for NVIDIA GPU users.
- Use Denoising Nodes in Compositing: For more control over the denoising process, use the Denoise node in the compositor. This allows you to apply denoising after rendering, giving you the ability to tweak the intensity and look of the denoising effect.
- Adjust Denoising Settings: Within the denoising options, you can adjust settings such as Radius and Strength to fine-tune how the denoising is applied. Experiment with these settings to find a balance between detail preservation and noise reduction.
- Render Passes for Denoising: For advanced denoising, consider rendering out separate passes for color, direct and indirect light, and then use these passes in the compositor to apply denoising more selectively.
By understanding and utilizing these denoising techniques, you can significantly improve the quality of your Cycles renders, making them cleaner and more professional-looking without sacrificing render times.
Improving Render Efficiency with Sample Settings
Optimizing sample settings in Blender\"s Cycles render engine is crucial for improving render efficiency without compromising on image quality. By adjusting the number of samples, you can control the balance between render time and visual fidelity.
- Understanding Samples: Samples in Cycles determine the clarity of the render. Higher sample rates reduce noise but increase rendering times. Finding the optimal number of samples is key to efficient rendering.
- Render Samples: Adjust the Render samples in the Sampling section of the Render tab. Start with lower sample rates for quick previews and increase for final renders.
- Viewport Samples: For real-time previewing in the viewport, adjust the Viewport samples. This allows for a smoother workflow without taxing your system for simple scene adjustments.
- Adaptive Sampling: Enable Adaptive Sampling to automatically reduce samples in less noisy areas, significantly cutting down on render times while maintaining quality where it counts.
- Noise Threshold: Used in conjunction with Adaptive Sampling, the Noise Threshold setting helps determine when additional samples are unnecessary, further improving efficiency.
- Sample All Indirect Lights: This setting, when turned on, can increase sample rates for indirect light, improving quality in those areas at the cost of longer render times. Use sparingly based on your scene\"s needs.
By meticulously adjusting these sample settings, you can achieve a significant reduction in render times while still producing high-quality images. Experimenting with different settings based on the complexity of your scene and your hardware capabilities will yield the best balance between quality and efficiency.
Tile Size Optimization for Quicker Renders
Optimizing tile size in Blender\"s Cycles render engine is a crucial step for reducing render times. The tile size determines how the engine divides the image for rendering, affecting both memory usage and processing speed.
- Understanding Tile Size: Tiles are small sections of your scene that Blender processes individually during rendering. The engine can render multiple tiles simultaneously, depending on your hardware configuration.
- GPU vs. CPU Rendering: The optimal tile size depends on whether you are rendering with a CPU or a GPU. GPUs generally benefit from larger tile sizes, while CPUs perform better with smaller tiles.
- Recommended Settings:
- For GPU rendering, start with a tile size of 256x256 pixels. GPUs can efficiently handle larger tiles, reducing the overhead of managing many small tiles.
- For CPU rendering, smaller tile sizes like 32x32 or 64x64 pixels are often more effective. CPUs can benefit from processing many small tasks in parallel.
- Adjusting Tile Size: Tile size can be adjusted in the Performance section of the Render tab. Experiment with different sizes to find the optimal setting for your specific project and hardware configuration.
- Using Auto Tile Size Add-on: Blender offers an Auto Tile Size add-on that can automatically adjust the tile size for optimal rendering performance based on your hardware. Enabling this add-on can simplify the process of finding the right tile size.
By carefully adjusting the tile size, you can significantly improve rendering times in Cycles without compromising the quality of your final image. This optimization step is especially important for complex scenes or when working with limited hardware resources.
Utilizing Advanced Cycles Features
Blender\"s Cycles render engine is equipped with advanced features that enable artists to achieve photorealistic results. Leveraging these features can significantly enhance the quality of your renders while providing greater control over the rendering process.
- Volume Rendering: Cycles supports sophisticated volume rendering capabilities, allowing for the creation of complex effects like smoke, fire, and clouds. This is achieved by using the Volume Absorption and Volume Scatter shaders in your materials.
- Branched Path Tracing: This advanced sampling method offers more control over how different light paths are sampled, such as diffuse, glossy, and transmission. It can improve noise reduction in specific areas of your render at the cost of increased render times.
- Adaptive Subdivision: Adaptive subdivision, or microdisplacement, dynamically adjusts the level of subdivision on surfaces based on camera distance. This feature is excellent for creating highly detailed surfaces without overwhelming the system with geometry.
- Cryptomatte: Cryptomatte is a powerful tool for generating mattes for compositing, automatically creating masks for objects, materials, or asset layers. This significantly simplifies the post-processing workflow in complex scenes.
- Light Portals: Using light portals in scenes with environmental lighting, especially in indoor settings, can help reduce noise and focus sampling on important areas, improving render times and quality.
- Shader Nodes: Cycles\" node-based material system allows for the creation of complex and realistic materials. Experimenting with different nodes and their settings can unlock almost limitless possibilities for material appearance.
These advanced features of the Cycles render engine empower artists to push the boundaries of 3D rendering. By mastering these tools, you can significantly enhance the realism and efficiency of your rendering workflow in Blender.
Rendering with HDRIs and Environmental Lighting
High Dynamic Range Imaging (HDRI) and environmental lighting are essential for creating realistic and immersive scenes in Blender\"s Cycles render engine. These techniques provide naturalistic lighting and reflections, enhancing the overall quality of your renders.
- Using HDRIs: HDRI maps are panoramic images that store a wide range of light intensities. In Cycles, you can use an HDRI as an environment texture to simulate complex lighting scenarios effortlessly. This is particularly useful for outdoor scenes or to provide realistic global illumination for indoor scenes.
- Setting Up HDRIs: To use an HDRI, navigate to the World settings tab, add an Environment Texture, and load your HDRI image. Adjust the rotation and intensity to suit your scene\"s lighting needs.
- Environmental Lighting: Cycles allows for further customization of environmental lighting through the use of nodes. You can mix different textures, colors, and even animate the lighting for dynamic effects.
- Importance of Light Portals: In indoor scenes, light portals can be placed in windows and openings to guide environmental light into the scene, significantly reducing noise and improving render times.
- Adjusting HDRI Settings: For finer control over the lighting, consider adjusting the strength of the HDRI or using the Gamma and Hue settings to match the mood and time of day for your scene.
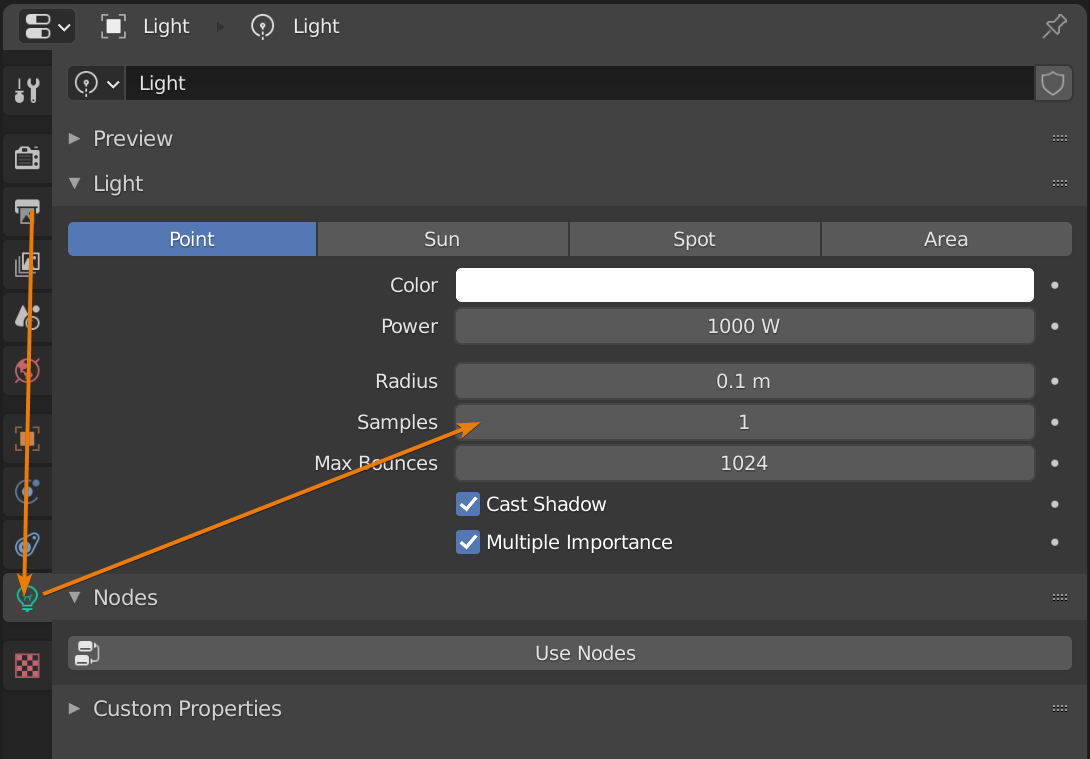
- Combining HDRI with Artificial Lights: For added realism, combine HDRI lighting with artificial light sources. This technique allows for more control over shadows and highlights, providing a more nuanced lighting setup.
By mastering HDRIs and environmental lighting in Cycles, you can achieve stunningly realistic renders with natural light and reflections. These tools are invaluable for artists looking to elevate their 3D scenes to new heights of realism.
_HOOK_
Adaptive Sampling and Noise Reduction Strategies
Adaptive Sampling and noise reduction are critical strategies in Blender\"s Cycles render engine for improving render times and image quality. These techniques smartly allocate rendering resources, focusing effort on areas of the scene that need it most.
- Understanding Adaptive Sampling: Adaptive Sampling dynamically adjusts the number of samples per pixel based on the noise level. This means areas with little to no noise receive fewer samples, allowing the engine to allocate more resources to noisier areas.
- Enabling Adaptive Sampling: You can enable Adaptive Sampling in the Sampling section of the Render properties. It\"s recommended to start with the default settings and adjust the Noise Threshold as needed for your specific scene.
- Noise Reduction Techniques:
- Denoising: Blender offers several denoising options, including NLM, OptiX, and OpenImageDenoise. These can be applied either during rendering or as a post-processing step in the Compositor.
- Render Layers: Utilizing render layers and passes allows for selective denoising, giving you control over which elements of your scene are denoised and to what extent.
- Optimizing Render Settings: Beyond adaptive sampling and denoising, other render settings such as light bounces, clamp indirect, and filter glossy can be adjusted to reduce noise and improve render efficiency.
By leveraging adaptive sampling and noise reduction strategies, you can significantly cut down on render times while maintaining, or even improving, the quality of your renders. Experimentation and fine-tuning of these settings are key to finding the best balance for your projects.
Practical Tips for Real-world Rendering Scenarios
When tackling real-world rendering projects in Blender\"s Cycles, applying practical tips and strategies can significantly enhance your workflow and output quality. Here are several tips tailored for various rendering scenarios.
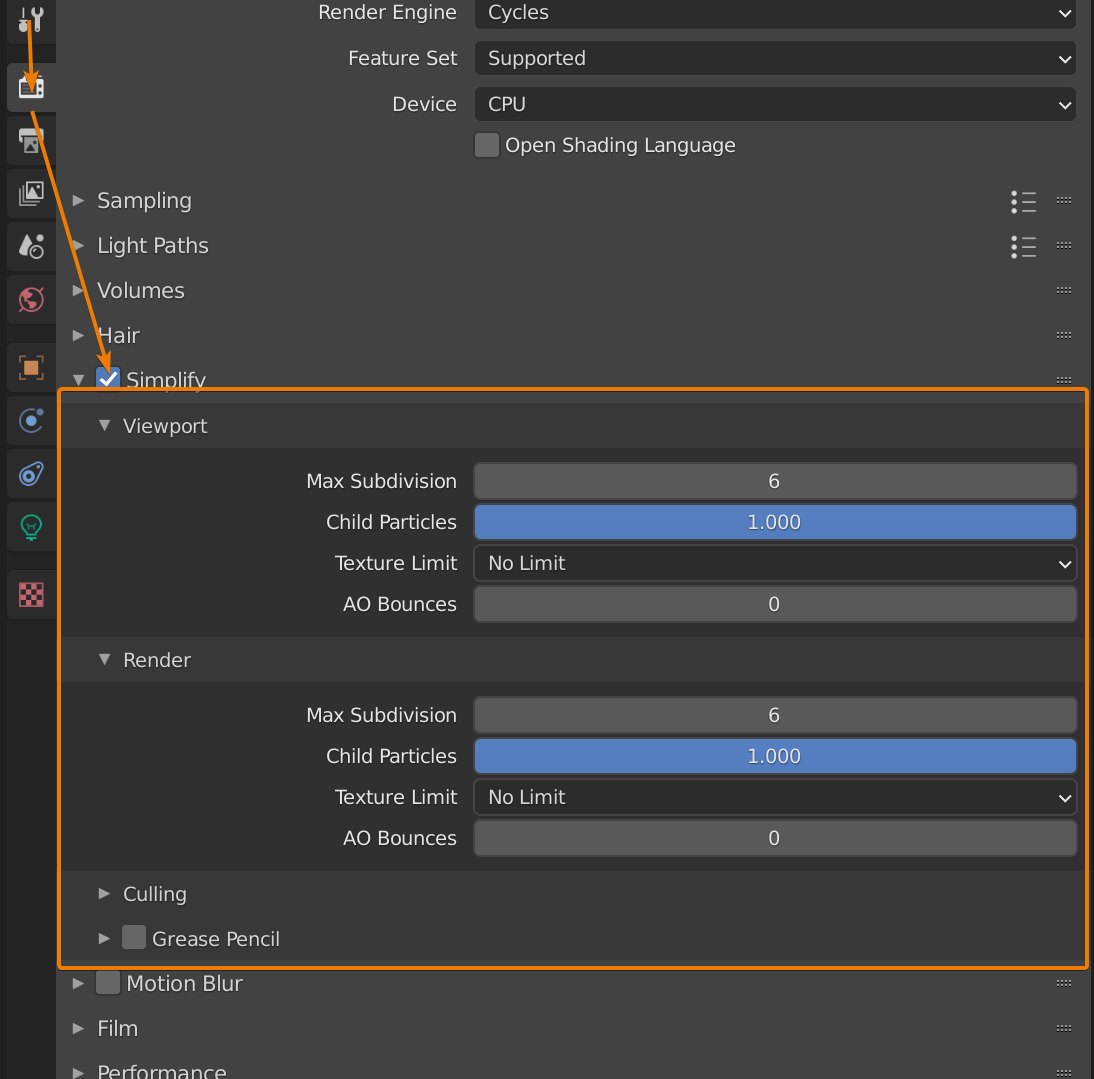
- Optimize Your Scene: Before rendering, simplify your scene by removing unnecessary geometry, optimizing modifiers, and using instancing for repeated objects. This reduces memory usage and speeds up rendering.
- Use Layers and Passes: Organize your scene into layers and render passes. This approach offers more control in post-production, allowing for adjustments to lighting, shadow, and effects separately without re-rendering the entire scene.
- Manage Light Sources Wisely: Efficient lighting is key. Use HDRIs for natural environmental lighting and be strategic with additional light sources to maintain a balance between realism and render time.
- Employ Baking Techniques: For scenes with complex materials or lighting, consider baking textures or lighting. Baking converts these elements into images, reducing the computational load during rendering.
- Adjust Render Samples Smartly: Use enough samples to reduce noise but avoid overdoing it. Adaptive sampling can dynamically adjust sample counts, optimizing render times.
- Experiment with Denoising: Utilize Cycles\" denoising features to clean up noise in renders. This can drastically reduce the need for high sample rates, especially in animation.
- Rendering Animations: For animations, ensure consistent lighting across frames and consider using motion blur for added realism. Also, render to individual frames to prevent data loss in case of interruptions.
Implementing these practical tips in your Blender projects can lead to more efficient rendering processes, allowing for high-quality outputs even under tight deadlines or limited resources. Experimentation and adaptation to the specific needs of each project are crucial for achieving the best results.
READ MORE:
Conclusion and Further Resources
Mastering Blender\"s Cycles render settings is essential for creating stunning visuals and efficient workflows. Through understanding and applying the principles of GPU optimization, light bounces, denoising, and more, artists can significantly enhance the quality and speed of their renders. The journey to mastering Cycles is ongoing, with each project offering new challenges and opportunities for growth.
- Blender Official Documentation: The first stop for any Blender user should be the official documentation, which provides comprehensive guides and tutorials on all aspects of Blender, including Cycles.
- Blender Community Forums: Engaging with the Blender community can provide insights, tips, and support from fellow users and professionals. Sites like Blender Artists and the Blender subreddit are great places to start.
- Online Tutorials and Courses: Numerous online platforms offer tutorials and courses ranging from beginner to advanced levels. These can be invaluable for learning specific techniques or solving unique rendering challenges.
- Blender Development Updates: Keeping up with Blender\"s development is crucial for staying ahead of new features and optimizations in Cycles. The Blender Development Blog and official social media channels are excellent resources for news and updates.
As you continue to explore and experiment with Cycles, remember that the most powerful tool at your disposal is your creativity. With the technical knowledge of render settings and a willingness to experiment, there\"s no limit to what you can achieve in Blender.
Embarking on the journey of mastering Blender\"s Cycles render settings opens a world of creative possibilities. By fine-tuning these settings, artists can achieve breathtaking visuals that stand out. Continue exploring, learning, and pushing the boundaries of your 3D art.