Topic how to render something in blender: Discover the art of rendering in Blender, where we guide you through turning your 3D models into breathtaking visuals with easy, step-by-step instructions for beginners and professionals alike.
Table of Content
- Getting Started
- Choosing a Rendering Engine
- Rendering Tips
- Saving Your Render
- Optimization Techniques
- Choosing a Rendering Engine
- Rendering Tips
- Saving Your Render
- How can I render something in Blender?
- Optimization Techniques
- YOUTUBE: How to Render an Image in Blender Tutorial
- Rendering Tips
- Saving Your Render
- Optimization Techniques
- Saving Your Render
- Optimization Techniques
- Optimization Techniques
- Introduction to Rendering in Blender
- Choosing the Right Rendering Engine
- Step-by-Step Guide to Rendering
- Optimizing Render Settings for Quality and Speed
- Understanding Lighting and Materials for Realistic Renders
- Post-Processing and Compositing Techniques
- Troubleshooting Common Rendering Issues
- Advanced Rendering Techniques in Blender
- Saving and Exporting Your Renders
- Conclusion: Enhancing Your Rendering Skills
Getting Started
To initiate a render in Blender, you can press F12 for a still image or Ctrl+F12 for an animation. Additionally, you can navigate to the Render menu and select either \"Render Image\" or \"Render Animation\" to start the process.

READ MORE:
Choosing a Rendering Engine
Blender offers multiple rendering engines, including Eevee and Cycles, each with its strengths and use cases. Eevee is a real-time render engine, perfect for quick previews, while Cycles offers physically accurate rendering for more detailed and realistic outputs.
Steps to Render
- Select your rendering engine in the properties panel under the \"Render\" tab.
- Adjust your scene settings, including camera angles, lighting, and materials.
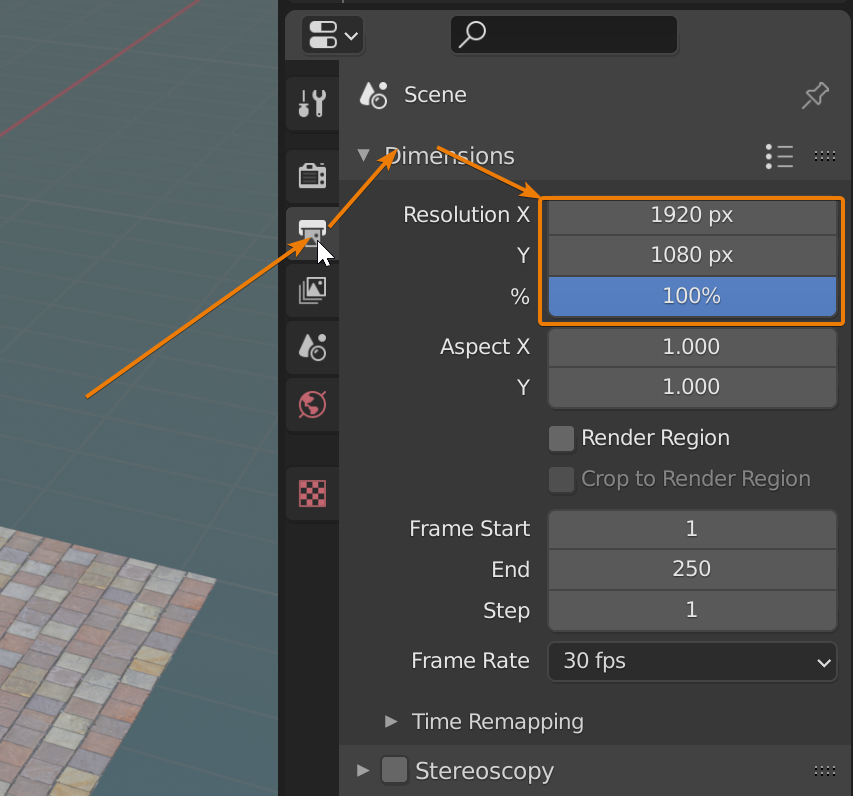
- Configure render settings such as resolution, sampling, and output format.
- Press F12 to render a still image or Ctrl+F12 for an animation.

Rendering Tips
- For faster renders in Cycles, consider reducing the number of samples or using denoising features.
- Utilize Blender\"s compositor for post-processing effects to enhance your final image.
- Experiment with different lighting setups and materials to achieve the desired aesthetic.
Saving Your Render
Once rendering is complete, a window will pop up displaying your rendered image. You can save this image by going to Image > Save As. For animations, ensure you have set the correct output path and file format before rendering.

Optimization Techniques
Optimizing your scenes can significantly reduce render times. Consider simplifying your geometry, using fewer subdivisions, and optimizing your textures for a more efficient rendering process.

_HOOK_
Choosing a Rendering Engine
Blender offers multiple rendering engines, including Eevee and Cycles, each with its strengths and use cases. Eevee is a real-time render engine, perfect for quick previews, while Cycles offers physically accurate rendering for more detailed and realistic outputs.
Steps to Render
- Select your rendering engine in the properties panel under the \"Render\" tab.
- Adjust your scene settings, including camera angles, lighting, and materials.
- Configure render settings such as resolution, sampling, and output format.
- Press F12 to render a still image or Ctrl+F12 for an animation.
Rendering Tips
- For faster renders in Cycles, consider reducing the number of samples or using denoising features.
- Utilize Blender\"s compositor for post-processing effects to enhance your final image.
- Experiment with different lighting setups and materials to achieve the desired aesthetic.

Saving Your Render
Once rendering is complete, a window will pop up displaying your rendered image. You can save this image by going to Image > Save As. For animations, ensure you have set the correct output path and file format before rendering.

How can I render something in Blender?
To render something in Blender, follow these steps:
- Open your Blender project with the object you want to render.
- Select the object by clicking on it in the 3D view.
- Set up your camera view by positioning it where you want the rendering to focus.
- Go to the Render tab on the top menu and select Render Image.
- Wait for Blender to process the rendering based on your camera view and scene setup.
- Once the render is complete, you can save the image by going to Image > Save As.
Optimization Techniques
Optimizing your scenes can significantly reduce render times. Consider simplifying your geometry, using fewer subdivisions, and optimizing your textures for a more efficient rendering process.

_HOOK_
How to Render an Image in Blender Tutorial
For the captivating world of image rendering, immerse yourself in the beauty of digital art and design. Explore the endless possibilities of bringing your imagination to life through stunning visuals. Learn the intricate art of Blender rendering with a step-by-step tutorial that will elevate your digital creations to a whole new level. From textures to lighting, master the techniques to make your designs truly stand out.
Blender Beginner Tutorial on Rendering in Blender 3.4
Hey hey, here\'s part 1, 2, 3, and 4 of this tutorial series Part 1 - https://youtu.be/HJSGoKbNBnQ Part 2 ...
Rendering Tips
- For faster renders in Cycles, consider reducing the number of samples or using denoising features.
- Utilize Blender\"s compositor for post-processing effects to enhance your final image.
- Experiment with different lighting setups and materials to achieve the desired aesthetic.
Saving Your Render
Once rendering is complete, a window will pop up displaying your rendered image. You can save this image by going to Image > Save As. For animations, ensure you have set the correct output path and file format before rendering.
Optimization Techniques
Optimizing your scenes can significantly reduce render times. Consider simplifying your geometry, using fewer subdivisions, and optimizing your textures for a more efficient rendering process.
_HOOK_
Optimization Techniques
Optimizing your scenes can significantly reduce render times. Consider simplifying your geometry, using fewer subdivisions, and optimizing your textures for a more efficient rendering process.
Introduction to Rendering in Blender
Rendering in Blender transforms your 3D models into stunning images or animations, showcasing your work\"s true potential. This process is fundamental for visualizing projects in the most realistic or artistic way possible. Whether you\"re a beginner or an experienced artist, mastering rendering in Blender can significantly enhance the quality of your creations.
Blender offers several rendering engines, with Cycles and Eevee being the most prominent. Cycles is a ray-tracing renderer known for its realism, capable of producing highly accurate and photorealistic images by simulating the way light interacts with objects. Eevee, on the other hand, is a real-time render engine that provides speed and efficiency, ideal for quick previews and less resource-intensive tasks.
To start rendering in Blender, you typically press F12 for a still image or Ctrl+F12 for an animation. Before this step, it\"s crucial to choose your rendering engine based on the needs of your project and adjust settings such as resolution, sampling, and lighting to achieve the desired outcome.
- Setting Up Your Scene: Proper scene setup, including camera placement, lighting, and material properties, is crucial for a successful render.
- Render Settings: Configuring your render settings for optimal performance and quality is essential. This includes selecting the right engine, adjusting sampling rates, and considering performance tweaks.
- Post-Processing: Blender also offers robust post-processing tools in the Compositor, where you can add effects, adjust colors, or composite different elements together for the final look.
Understanding these fundamentals will set the foundation for your rendering journey in Blender, enabling you to bring your 3D creations to life with stunning detail and realism.
Choosing the Right Rendering Engine
Selecting the appropriate rendering engine in Blender is crucial for achieving the desired outcome for your projects. Blender primarily offers two rendering engines, Cycles and Eevee, each with its unique capabilities and use cases.
- Cycles: A ray-tracing rendering engine designed for producing photorealistic images. It simulates the physical behavior of light to achieve realism and is ideal for projects where quality is the priority over speed.
- Eevee: A real-time rendering engine that provides fast render times. It is best suited for projects requiring quick previews or when working on animations that do not demand photorealistic quality.
To choose the best engine for your project, consider the following factors:
- Project Requirements: Determine whether your project benefits more from photorealism (Cycles) or from speed and interactivity (Eevee).
- Hardware Capabilities: Cycles is more computationally intensive and benefits from powerful hardware, especially GPUs. Eevee can run well on less powerful systems.
- Final Output: Decide if your final output requires the highest quality rendering (Cycles) or if faster, less resource-intensive renders suffice (Eevee).
Understanding the strengths of each engine and how they align with your project\"s needs will help you make an informed decision, ensuring your renders are both beautiful and efficient.
Step-by-Step Guide to Rendering
Rendering in Blender is a straightforward process that turns your 3D models into beautiful visuals. Follow this step-by-step guide to render your scenes effectively.
- Choose Your Rendering Engine: Decide between Cycles for photorealistic renders or Eevee for faster, real-time rendering.
- Set Up Your Scene: Place your objects, adjust the camera angle, and set up the lighting according to your project\"s needs.
- Adjust Material Properties: Apply materials to your objects, tweaking their properties to achieve the desired look.
- Configure Render Settings: In the Render tab, select your engine and adjust settings such as resolution, samples, and output format.
- Preview Your Render: Use the viewport shading mode to get a quick preview of how your render will look.
- Render Your Scene: Press F12 to render a still image or Ctrl+F12 to render an animation. For animations, ensure you have correctly set the frame start, end, and output settings.
- Save Your Render: After rendering, save your image or animation from the render window. Choose the appropriate file format and location for your output.
This guide should help you get started with rendering in Blender, whether you\"re working on simple projects or complex scenes. Remember, practice and experimentation are key to mastering rendering in Blender.
Optimizing Render Settings for Quality and Speed
Maximizing the efficiency of your render settings in Blender can significantly reduce rendering times without compromising on quality. Here are several techniques and settings adjustments to help you balance between render speed and output quality.
- Update Blender: Using the latest version ensures access to optimized features and rendering improvements.
- Engine Selection: Evaluate if Eevee can meet your project\"s needs for faster rendering compared to Cycles for more stylized scenes.
- Intel Open Image Denoise: Utilize Intel\"s denoising over Blender\"s default for cleaner images at lower sample counts.
- Noise Threshold and Sample Reduction: Adjust the noise threshold for early render termination or reduce samples directly to speed up rendering.
- Adaptive Sampling: Enables Blender to allocate sampling more efficiently across your scene, focusing on complex areas.
- Fast GI Approximation: Experiment with this to speed up global illumination calculations, noting potential impacts on scene brightness.
- Light Paths Reduction: Lowering the maximum number of light bounces can reduce render times with minimal visual impact.
- Disabling Caustics: Turn off caustics if not needed for your scene to avoid unnecessary computations.
- Resolution Reduction: Lowering the output resolution for drafts can save time, using higher resolutions only for final renders.
- Modifier Management: Reducing the complexity of modifiers like subdivision can significantly decrease render times.
- Simplify Scene: Blender\"s simplify option can reduce texture resolution and subdivision levels for complex scenes, aiding in quicker previews and renders.
These strategies from Blender\"s official rendering features and practical tips from experienced users offer a comprehensive approach to optimizing your rendering workflow for both speed and quality.
_HOOK_
Understanding Lighting and Materials for Realistic Renders
To achieve realistic renders in Blender, a deep understanding of lighting and materials is essential. Lighting in Blender, particularly with the Cycles engine, involves global illumination, different types of lights such as point, sun, spot, and area lights, and the use of environment lighting and sky models to create natural-looking scenes. The importance of light portals in managing noise in indoor scenes cannot be overstated, enhancing realism by simulating the way light diffuses into a space.
Materials, on the other hand, bring textures and surfaces to life. Using the Principled BSDF shader, a physically based rendering (PBR) shader, you can simulate a wide range of materials with realistic properties including metalness, roughness, and subsurface scattering. For texturing, UV mapping is a crucial technique that assigns 2D images to the 3D surface of a model. Techniques like box mapping and the use of generated or object coordinates allow for versatile texturing methods beyond traditional UV maps.
- Lighting Techniques: Explore the use of mesh lights for soft, diffused lighting and how different light types can affect the mood and realism of a scene.
- Material Properties: Delve into the settings within the Principled BSDF shader to create realistic glass, metal, and cloth materials.
- Texturing Methods: Learn about UV mapping for precise texture placement, and procedural texturing for dynamic surfaces.
For procedural textures, the integration of texture coordinate and mapping nodes allows for fine-tuned control over the placement and appearance of textures, offering endless possibilities for customization. Whether it\"s creating intricate surfaces or simulating real-world materials, mastering these elements is key to producing lifelike renders in Blender.
Post-Processing and Compositing Techniques
Blender offers extensive features for post-processing and compositing, allowing artists to enhance their renders with visual effects, adjustments, and layering. Utilizing Blender’s node-based compositor, you can apply and tweak various effects, from simple color corrections to complex sequences of operations that affect the final image or animation.
- Node-Based Compositing: Blender\"s compositor uses a node-based system, enabling flexible combinations of effects. By connecting nodes in a graph, artists can create intricate effects chains.
- Color Correction: Essential for adjusting the mood and feel of the render, color correction nodes alter brightness, contrast, saturation, and color balance.
- Adding Effects: Blender supports adding various effects like glare, bloom, lens distortion, and vignette to enhance realism or artistic expression.
- Multi-Layer Compositing: For complex scenes, Blender allows compositing multiple layers and passes, which can be individually manipulated for greater control over the final image.
- Denoising: High-quality renders can be achieved by using denoising nodes to reduce noise in renders, especially in low-light conditions or when using high ISO settings in virtual cameras.
Understanding and leveraging these post-processing and compositing techniques can significantly elevate the quality of renders, providing the tools to achieve the desired visual outcomes in Blender projects.
Troubleshooting Common Rendering Issues
When working on rendering in Blender, users may encounter several common issues that can hinder the process. Addressing these effectively requires understanding the root causes and applying appropriate solutions.
- Rendering Engine Conflicts: Blender includes different rendering engines like Eevee and Cycles, each suited to specific types of projects. Eevee is designed for speed and real-time preview, whereas Cycles focuses on photorealism and accuracy. Switching between these engines without adjusting settings accordingly can lead to unexpected results or performance issues.
- Output Settings: Incorrect output settings can result in renders that do not match the expected quality or resolution. It is vital to check the output properties tab and ensure that the resolution, frame rate, and file format align with your project requirements.
- Long Render Times: High-quality renders, especially in Cycles, can be time-consuming. To mitigate this, consider using GPU acceleration if supported, optimizing render settings, or utilizing Blender\"s denoising features to reduce noise without increasing render times significantly.
- Animation Challenges: Rendering animations introduces additional complexities, such as managing frame rates, timelines, and ensuring smooth playback. Utilizing batch rendering for multiple frames, ensuring the camera and objects are animated correctly, and applying temporal denoising can enhance animation quality and reduce flickering.
- Viewport Previews: For a faster workflow, use Eevee for real-time previews and adjust viewport shading settings to approximate the final render closely. This can help in making quicker iterations before committing to a full render.
For detailed guides and further assistance on specific rendering settings and troubleshooting in Blender, resources like Artisticrender.com and The Knowledge Academy provide comprehensive insights and tutorials tailored to help users navigate through common rendering challenges.
Advanced Rendering Techniques in Blender
Advanced rendering in Blender, particularly with the Eevee engine, involves a deeper understanding of several key techniques that can significantly enhance the realism and quality of your renders. Here are some of the most crucial advanced techniques:
- Indirect Lighting: Unlike Cycles, which uses path tracing for global illumination, Eevee requires setting up an Irradiance Volume for calculating bounced light. This involves placing a gizmo in the scene and adjusting settings for the best results, followed by baking the indirect lighting to enhance realism.
- Emissive Objects: To simulate objects emitting light in Eevee, irradiance calculations are necessary. This technique allows objects with emissive materials to impact their surroundings realistically, akin to how they would in the real world.
- Glass and Refractive Materials: Achieving realistic glass or transparent materials in Eevee involves tweaking the Transmission value of the Principled BSDF shader and understanding the role of the Index Of Refraction (IOR) values for different materials.
- Sub-Surface Scattering (SSS): For materials that allow light to penetrate and scatter beneath their surface, like skin or wax, Eevee offers a simplified approach. Adjusting the SSS settings in the shader and material properties can yield highly convincing results.
- Optimizing Render Performance: Eevee\"s performance is heavily dependent on the graphics hardware. Utilizing high VRAM GPUs can significantly improve render times without sacrificing quality. Specific configurations, like NVIDIA\"s RTX series, are recommended for the best balance between performance and cost.
Implementing these techniques requires a thorough understanding of Blender\"s rendering settings and the ability to experiment with different configurations. While Eevee prioritizes speed and real-time rendering, it is possible to achieve a high degree of realism by carefully adjusting the engine\"s advanced features.
Saving and Exporting Your Renders
Successfully rendering your Blender project is only half the journey; saving and exporting your render correctly is crucial to preserving the quality and usability of your final image. Here\"s how to do it effectively:
- Finalizing Your Render: Begin by rendering your scene with F12. Once rendered, access the Image menu in the render window and select \"Save As\" to open the file browser.
- Choosing the Right Format: To retain as much data as possible from your render, especially if intending to post-process, consider saving in OpenEXR (Multilayer) format. This format captures a comprehensive range of data, including render passes like Diffuse, Glossy, Shadow, and more, offering post-processing flexibility similar to a photographer\"s RAW files.
- File Browser Navigation: In the save dialog, the file browser allows you to navigate your system, set the file name, and select the format. Use the properties panel (toggle with \"N\" or the cogwheel icon) to adjust specific settings for the chosen format. Add frequently used directories to favorites for quicker access in future projects.
- Render Passes and Layers: For advanced post-processing, Blender\"s render passes feature allows you to separate and individually manipulate aspects of your render, such as lighting and shadows. Saving in OpenEXR Multilayer format keeps these passes as separate layers, which can be edited in software like Photoshop, GIMP, or Affinity Photo.
- Exporting Animations: For animations, set an output directory and file format in the Output properties tab. While PNG sequence is recommended for its flexibility in case of render interruptions, FFMPEG video format is a viable option for direct video file creation.
Remember, the goal is to maintain the integrity and flexibility of your render for any future editing or use. Whether you\"re rendering still images or animations, the correct save format and understanding of Blender\"s file browser will enhance your post-render workflow.
_HOOK_
READ MORE:
Conclusion: Enhancing Your Rendering Skills
Mastering rendering in Blender is a journey that extends far beyond learning the basics. It involves exploring and understanding the intricacies of rendering engines, optimizing settings for the perfect balance of quality and speed, and continuously experimenting with new techniques and features. Whether you are working with Eevee for real-time rendering or Cycles for photorealism, each engine offers unique advantages that can enhance your projects.
Here are steps to enhance your rendering skills:
- Practice with Both Engines: Gain proficiency in both Eevee and Cycles to leverage their strengths in different scenarios.
- Experiment with Lighting and Materials: Understanding how light interacts with materials is crucial for achieving realism in your renders.
- Utilize Post-Processing: Incorporate post-processing techniques to add the finishing touches to your renders, enhancing colors, contrast, and overall image quality.
- Explore Advanced Features: Delve into advanced features like particle systems, volumetrics, and shader nodes to bring complexity and depth to your scenes.
- Optimize Your Workflow: Learn to optimize your workflow for efficiency, using features like viewport rendering for quick previews and understanding how to effectively pause and resume renders.
- Stay Updated: Blender is continuously evolving, so stay updated with the latest features and improvements to keep your skills sharp.
- Engage with the Community: The Blender community is a rich resource for tips, tutorials, and support. Engage with forums, social media groups, and online platforms to share knowledge and learn from others.
Finally, remember that rendering is both a science and an art. The technical aspects of rendering engines, settings, and optimization techniques are foundational. However, it\"s your creativity and willingness to experiment that will truly bring your renders to life. Keep pushing the boundaries of what you can achieve with Blender, and enjoy the process of learning and growing as a digital artist.
Embark on a creative journey with Blender, mastering the art of rendering to transform your ideas into stunning visuals. This guide promises to elevate your skills, inspiring you to explore, learn, and innovate in the vibrant world of 3D art.