Topic how to make render in blender: Discover the art of rendering in Blender and bring your 3D creations to life with our comprehensive guide, designed to empower artists of all levels with essential tips, techniques, and step-by-step instructions.
Table of Content
- Basic Rendering Steps
- Choosing a Render Engine
- Render Settings Guide
- Improving Render Quality and Speed
- Advanced Tips
- Conclusion
- Choosing a Render Engine
- How can I create a render in Blender using the viewport rendering feature?
- YOUTUBE: How to Render an Image in Blender Tutorial
- Render Settings Guide
- Improving Render Quality and Speed
- Advanced Tips
- Conclusion
- Render Settings Guide
- Improving Render Quality and Speed
- Advanced Tips
- Conclusion
- Improving Render Quality and Speed
- Advanced Tips
- Conclusion
- Advanced Tips
- Conclusion
- Conclusion
- Introduction to Rendering in Blender
- Choosing the Right Render Engine
- Step-by-Step Rendering Process
- Optimizing Render Settings for Quality and Speed
- Understanding Lighting and Materials for Realistic Renders
- Advanced Rendering Techniques and Tips
- Rendering Animations vs. Still Images
- Common Rendering Issues and How to Solve Them
- Utilizing Blender’s Compositor for Post-Processing
- Conclusion: Best Practices and Final Thoughts
Basic Rendering Steps
- For a still image, press F12. For animation, use Ctrl+F12.
- Access rendering options through the render menu by selecting Render Image or Render Animation.
- To save a rendered image, go to Image > Save As in the render window.

READ MORE:
Choosing a Render Engine
Blender offers multiple render engines, each with unique features and benefits:
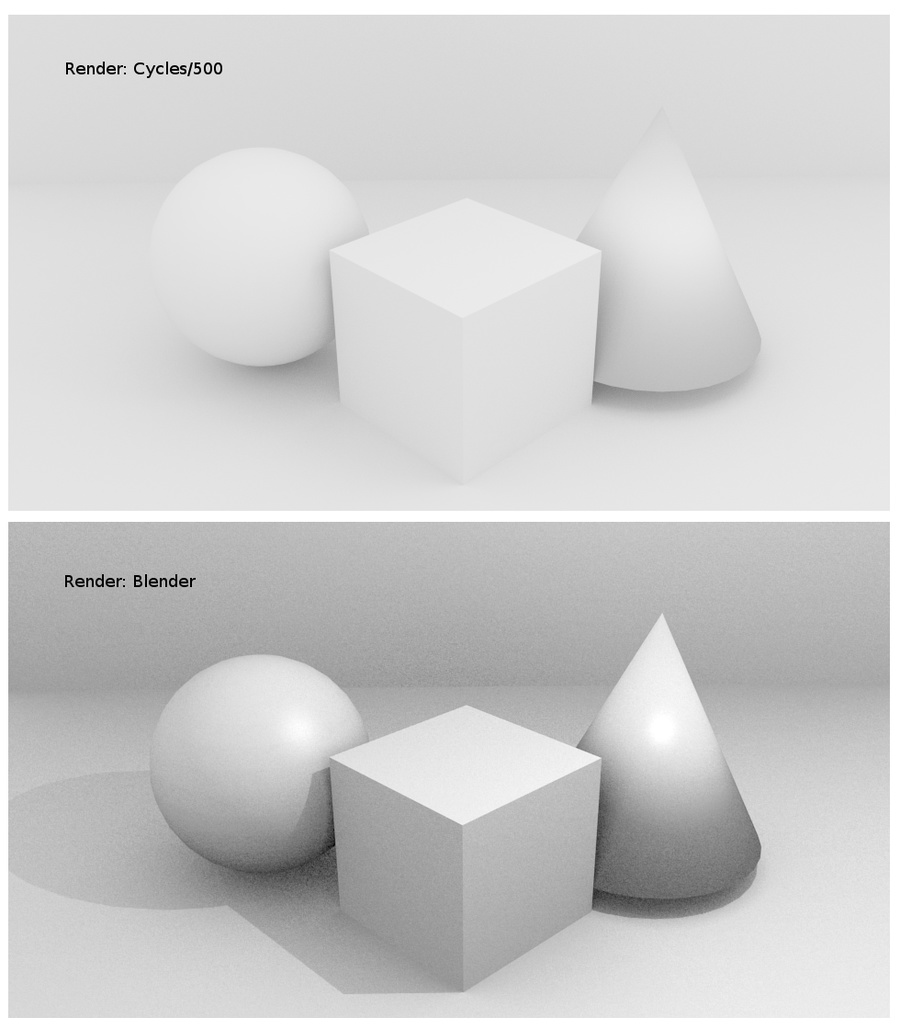
- Eevee: A real-time render engine offering faster rendering times suitable for preview and animation.
- Cycles: A ray-tracing render engine known for producing photorealistic results, ideal for high-quality final renders.
Render Settings Guide
Cycles Render Settings
For Cycles, adjust settings in Edit->Preferences->System to optimize GPU rendering with CUDA or OptiX, depending on your Nvidia GPU\"s support.
Eevee Render Settings
Eevee\"s settings focus on render quality and speed, allowing for real-time preview adjustments.

Improving Render Quality and Speed
To enhance your render quality and reduce rendering time, consider adjusting the following:
- Sample count: Increase for higher quality but longer render times.
- Resolution: Higher resolutions produce better detail at the cost of longer render times.
- Lighting and shading: Proper setup can significantly impact the realism and quality of the render.

Advanced Tips
For advanced users looking to push their renders further:
- Explore node-based materials and lighting for complex effects.
- Utilize Blender\"s compositor for post-processing enhancements.
- Experiment with different camera settings and angles for dynamic compositions.

_HOOK_
Conclusion
Rendering in Blender can be as simple or complex as your project requires. By mastering the basics and exploring advanced techniques, you can achieve stunning visual results. Remember to experiment with different settings and render engines to find the best fit for your workflow and artistic vision.

Choosing a Render Engine
Blender offers multiple render engines, each with unique features and benefits:
- Eevee: A real-time render engine offering faster rendering times suitable for preview and animation.
- Cycles: A ray-tracing render engine known for producing photorealistic results, ideal for high-quality final renders.
How can I create a render in Blender using the viewport rendering feature?
To create a render in Blender using the viewport rendering feature, follow these steps:
- Open Blender and set up your scene.
- Position your viewport to the desired angle and view that you want to render.
- Go to the Render tab at the top of the screen.
- Select Viewport Render from the dropdown menu.
- Wait for Blender to render the viewport image.
- Once the rendering is complete, you can save the image by going to Image > Save As.
By following these steps, you can easily create a render in Blender using the viewport rendering feature. This allows you to quickly preview your scene from the current viewpoint without having to set up a camera.
How to Render an Image in Blender Tutorial
Dive into the mesmerizing world of render and discover the magic of bringing digital images to life with stunning realism. Let your imagination soar as you explore the incredible possibilities in this must-watch video!
Render Settings Guide
Cycles Render Settings
For Cycles, adjust settings in Edit->Preferences->System to optimize GPU rendering with CUDA or OptiX, depending on your Nvidia GPU\"s support.
Eevee Render Settings
Eevee\"s settings focus on render quality and speed, allowing for real-time preview adjustments.

Beginners Guide to Rendering in Blender It\'s Really Simple
Calling all beginners! Unlock the secrets to mastering new skills and unleash your creativity with this engaging video catered specifically for those starting their journey. Embrace the learning process and be inspired to create something amazing.
Improving Render Quality and Speed
To enhance your render quality and reduce rendering time, consider adjusting the following:
- Sample count: Increase for higher quality but longer render times.
- Resolution: Higher resolutions produce better detail at the cost of longer render times.
- Lighting and shading: Proper setup can significantly impact the realism and quality of the render.
_HOOK_
Advanced Tips
For advanced users looking to push their renders further:
- Explore node-based materials and lighting for complex effects.
- Utilize Blender\"s compositor for post-processing enhancements.
- Experiment with different camera settings and angles for dynamic compositions.
Conclusion
Rendering in Blender can be as simple or complex as your project requires. By mastering the basics and exploring advanced techniques, you can achieve stunning visual results. Remember to experiment with different settings and render engines to find the best fit for your workflow and artistic vision.
Render Settings Guide
Cycles Render Settings
For Cycles, adjust settings in Edit->Preferences->System to optimize GPU rendering with CUDA or OptiX, depending on your Nvidia GPU\"s support.
Eevee Render Settings
Eevee\"s settings focus on render quality and speed, allowing for real-time preview adjustments.
Improving Render Quality and Speed
To enhance your render quality and reduce rendering time, consider adjusting the following:
- Sample count: Increase for higher quality but longer render times.
- Resolution: Higher resolutions produce better detail at the cost of longer render times.
- Lighting and shading: Proper setup can significantly impact the realism and quality of the render.
Advanced Tips
For advanced users looking to push their renders further:
- Explore node-based materials and lighting for complex effects.
- Utilize Blender\"s compositor for post-processing enhancements.
- Experiment with different camera settings and angles for dynamic compositions.
_HOOK_
Conclusion
Rendering in Blender can be as simple or complex as your project requires. By mastering the basics and exploring advanced techniques, you can achieve stunning visual results. Remember to experiment with different settings and render engines to find the best fit for your workflow and artistic vision.
Improving Render Quality and Speed
To enhance your render quality and reduce rendering time, consider adjusting the following:
- Sample count: Increase for higher quality but longer render times.
- Resolution: Higher resolutions produce better detail at the cost of longer render times.
- Lighting and shading: Proper setup can significantly impact the realism and quality of the render.
Advanced Tips
For advanced users looking to push their renders further:
- Explore node-based materials and lighting for complex effects.
- Utilize Blender\"s compositor for post-processing enhancements.
- Experiment with different camera settings and angles for dynamic compositions.
Conclusion
Rendering in Blender can be as simple or complex as your project requires. By mastering the basics and exploring advanced techniques, you can achieve stunning visual results. Remember to experiment with different settings and render engines to find the best fit for your workflow and artistic vision.
Advanced Tips
For advanced users looking to push their renders further:
- Explore node-based materials and lighting for complex effects.
- Utilize Blender\"s compositor for post-processing enhancements.
- Experiment with different camera settings and angles for dynamic compositions.
_HOOK_
Conclusion
Rendering in Blender can be as simple or complex as your project requires. By mastering the basics and exploring advanced techniques, you can achieve stunning visual results. Remember to experiment with different settings and render engines to find the best fit for your workflow and artistic vision.
Introduction to Rendering in Blender
Rendering is a critical step in 3D creation, transforming your models into stunning images or animations. Blender, a powerful free and open-source 3D creation suite, offers robust tools for rendering. This section provides an overview of the rendering process in Blender, helping beginners and seasoned artists alike to navigate and utilize its features effectively.
To begin rendering in Blender, you can press F12 for still images or Ctrl+F12 for animations. Blender\"s flexibility allows users to choose from different render engines, each suited for specific types of projects. The two main engines are Eevee, known for its speed and efficiency, and Cycles, celebrated for its photorealistic outcomes.
- Eevee: A real-time render engine that\"s great for quick previews and faster render times. It\"s especially useful for animations and scenes where photorealism is less critical.
- Cycles: A ray-tracing render engine that produces highly realistic images by accurately simulating light physics. It\"s ideal for final renders where detail and realism are paramount.
Blender also offers advanced features like GPU rendering, which can significantly reduce render times for complex scenes. Users can adjust render settings to balance between quality and speed, optimizing their workflow according to project requirements.
Understanding Blender\"s rendering capabilities is the first step towards producing eye-catching visuals. Whether you\"re working on a simple model or a complex scene, mastering the render process is essential for bringing your digital creations to life.
Choosing the Right Render Engine
Selecting the appropriate render engine in Blender is crucial for achieving your desired visual outcome efficiently. Blender provides several render engines, each designed for different needs and project types. Understanding the capabilities and best use cases for each will help you make an informed decision tailored to your project\"s requirements.
- Eevee: Blender\"s real-time render engine, ideal for quick previews and animations where speed is a priority. Eevee provides a good balance between speed and quality, making it suitable for real-time rendering and visualization projects.
- Cycles: A ray-tracing render engine that excels in producing photorealistic images. Cycles use a physically based rendering approach to accurately simulate light and materials, ideal for projects where realism and detail are critical.
- Workbench: This engine is designed for layout, modeling, and basic scene composition. It offers a solid viewport rendering capability, making it great for artists focusing on the modeling and design phase.
When choosing a render engine, consider factors like the complexity of your scene, the level of realism required, and rendering time constraints. Eevee is recommended for projects needing faster turnaround times, while Cycles should be used for high-quality, photorealistic renders. Workbench is best for when you\"re in the early stages of your project and need a fast, responsive engine for modeling and scene layout.
Each engine\"s settings can drastically affect the final output, so experimenting with different engines and their respective settings is key to mastering rendering in Blender. Remember, the right engine for your project depends on your specific needs and the final look you are aiming to achieve.
Step-by-Step Rendering Process
Rendering in Blender transforms your 3D scene into stunning visuals. Here\"s a step-by-step guide to ensure a smooth rendering process.
- Prepare Your Scene: Begin by setting up your scene with detailed objects, materials, lighting, and the correct camera angle. Each element adds to the realism and quality of the final render.
- Choose Your Render Engine: Select between Eevee for real-time rendering and quick previews, or Cycles for high-quality, photorealistic images. The choice affects lighting, materials, and render time.
- Launch the Rendering Process: For still images, press F12. For animations, use Ctrl+F12. Alternatively, access rendering options through the Render menu.
- Patience is Key: Rendering can be time-consuming. Monitor progress and adjust settings if needed for quality and speed balance.
- Save Your Render: Once rendering is complete, save your work. Choose the desired file format and location to store your visuals for sharing or further editing.
By following these steps, you can create captivating images and animations in Blender, utilizing its powerful rendering capabilities for your projects.
_HOOK_
Optimizing Render Settings for Quality and Speed
Optimizing render settings in Blender is crucial for balancing between render quality and speed. Below are strategies to achieve this balance efficiently.
- Use Fast GI Approximation: Enables an approximation model to control lighting after a certain number of bounces, reducing calculations while maintaining scene illumination.
- Enable Intel\"s Open Image Denoise: Replaces Blender’s default denoiser with Intel\"s, offering superior noise reduction.
- Adaptive Sub-sampling: Allows Blender to allocate more samples to complex areas and fewer to simpler ones, improving render times without sacrificing quality.
- Adjust Light Bounces: Reducing the number of light bounces can significantly speed up rendering times without greatly affecting realism.
- Disable Shadows and Ray Tracing: If shadows or ray tracing are not crucial for your project, disabling them can reduce rendering times.
- Focus on the Scene: Only include essential elements in your render scene to avoid unnecessary processing.
- Utilize GPU Rendering: Switching from CPU to GPU rendering can drastically improve render times, especially on NVIDIA GPUs using CUDA or OptiX.
- Decrease Clamp Values: Adjusting clamp values for direct and indirect lighting can reduce noise and speed up renders.
- Enable Adaptive Sampling: Distributes processing power efficiently by reducing sample sizes in less complex areas.
- Activate Denoising: Using AI-powered denoising, such as OptiX, improves image quality by removing noise, thereby reducing the need for high sample rates.
- Optimize Render Tile Size: Adjusting tile size can improve rendering efficiency, with larger tiles recommended for GPU rendering.
- Reduce Sample Amount: Lowering the number of samples can significantly reduce render times, especially for animations.
- Remove Unnecessary Polygons: Reducing polygon count in your scenes can speed up renders without affecting visual quality significantly.
Experimenting with these settings can help you find the perfect balance for your specific project, leading to faster renders without compromising on quality.
Understanding Lighting and Materials for Realistic Renders
Creating realistic renders in Blender requires a deep understanding of lighting and materials. These elements are fundamental in achieving photorealism, as they directly influence how objects interact with their environment and how they are perceived by the viewer. Below are key strategies to enhance your renders.
- Mastering Lighting: Lighting is crucial for setting the mood and enhancing the realism of your scenes. Consider using HDRIs for natural lighting environments and pay attention to the direction, intensity, and color of light sources to mimic real-world lighting conditions.
- Utilizing Materials: Materials define the appearance of your objects. Use physically based rendering (PBR) materials to achieve realistic textures and surfaces. Experiment with different shaders and textures, and consider the roughness, specularity, and bump mapping to add depth and realism to your materials.
- Reflective and Transparent Surfaces: Managing reflections and transparency can significantly impact the realism of your scene. Use the Fresnel effect for reflective materials and play with transparency settings for glass or liquid surfaces, ensuring they interact correctly with light.
- Subsurface Scattering: This is essential for materials like skin, wax, or leaves, where light penetrates the surface before scattering. Subsurface scattering can add a level of realism for organic materials by simulating light diffusion within them.
- Environmental Effects: Adding environmental effects such as fog, smoke, or dust can increase the atmospheric depth of your scene. These elements not only add to the realism but also help in creating a sense of scale and distance.
- Post-Processing: Use Blender’s compositor for post-processing to adjust the final image. Techniques such as color grading, adding bloom, or tweaking the contrast can enhance the overall appearance of your render.
Combining these techniques with a keen eye for detail will greatly enhance the realism of your renders. Remember, achieving photorealism is as much about understanding the technical aspects of Blender as it is about observing and replicating the subtleties of the real world in your digital creations.
Advanced Rendering Techniques and Tips
Advanced rendering in Blender involves a combination of techniques and settings adjustments that go beyond basic rendering. Here\"s how to elevate the quality of your renders while optimizing performance.
- Fast GI Approximation: This technique reduces the need for extensive calculations by taking control of lighting after a set number of bounces, effectively speeding up the rendering process without significantly compromising on lighting quality.
- Simplify Settings: Blender\"s simplify settings allow you to limit the complexity of your scene. By reducing geometry, particle numbers, and texture sizes, you can significantly decrease rendering times while maintaining visual fidelity.
- Optimize Geometry: Minimizing the use of geometry and utilizing instances can dramatically enhance rendering efficiency. Instances share the same data, reducing the overall memory footprint and rendering time.
- Adaptive Sampling: This feature dynamically adjusts the number of samples in different parts of your scene based on complexity, which can greatly reduce rendering times for complex scenes with varying levels of detail.
- Denoising: Blender offers several denoising options, including AI-based solutions like OptiX and OpenImageDenoise, which can clean up noise in your renders post-process, resulting in cleaner images at lower sample rates.
- Disable Shadows: If shadows are not essential to your scene, disabling them can reduce rendering times. This is particularly useful in scenes where shadows do not contribute significantly to the final output.
- GPU Rendering: Switching from CPU to GPU rendering can offer a substantial performance boost. GPUs are generally faster at processing the parallel tasks associated with rendering, thus reducing render times.
- Clamp Values: Adjusting the indirect and direct clamp values can help balance render quality and speed by reducing noise from light bounces without significantly impacting the accuracy of the rendered image.
- Use Render Layers: Render Layers allow you to render parts of your scene separately, which can save time, especially when you only need to make changes to a specific part of your scene.
- Deactivate Ray Tracing: For scenes where realistic lighting is not critical, disabling ray tracing can lead to faster render times. Consider the use of scanline rendering for such scenarios.
By employing these advanced techniques, you can significantly improve both the quality and efficiency of your renders in Blender, making your workflow faster and more productive.
Rendering Animations vs. Still Images
Rendering animations and still images in Blender involve distinct processes and considerations. Understanding these differences is crucial for optimizing your workflow and achieving the desired outcomes efficiently.
- Rendering Time: A single image may render quickly, but an animation, which consists of multiple frames, will multiply the rendering time significantly. Each frame of an animation is rendered one by one, making the total render time the sum of the time taken for each frame.
- Setup Requirements: While rendering still images and animations both require attention to lighting, materials, and camera settings, animations require additional setup. This includes defining the frame rate, animation length, and adjusting settings for motion blur and other animation-specific factors.
- Output Settings: For animations, you must choose an output format that supports multiple frames, such as a movie file format, unlike still images that can be saved in formats like PNG or JPEG.
- Render Engines: Choosing the right render engine (Eevee vs. Cycles) can impact your render times significantly. Eevee is faster and suitable for real-time rendering and previews, while Cycles is more computationally intensive but produces photorealistic results.
- Optimization Techniques: For faster renders, consider optimizing your scene using techniques such as reducing sample rates, adjusting light bounces, and utilizing Blender\"s denoising features. GPU rendering can also significantly reduce render times compared to CPU rendering.
Ultimately, the choice between rendering an animation or a still image depends on the project\"s requirements and the available resources. By carefully preparing your scene and employing strategic optimizations, you can achieve high-quality renders within a reasonable timeframe.
Common Rendering Issues and How to Solve Them
Rendering in Blender can sometimes present challenges that may impact the efficiency and outcome of your projects. Below are common issues encountered during rendering and strategies to address them, combining insights from various experts.
- Long Render Times: Utilizing GPU rendering over CPU can significantly reduce render times. Adjusting light bounces and optimizing tile sizes based on your hardware (GPU or CPU) also contribute to faster renders. Reducing the number of samples while maintaining quality, as well as considering the use of Eevee for less realistic scenes, can also speed up the process.
- Noise and Graininess: To address noise, Blender offers several denoising options, including the AI-based OptiX and OpenImageDenoise. Adjusting the noise threshold and enabling adaptive sampling can also help in reducing noise without drastically increasing render times.
- Fireflies: Fireflies, or unexpectedly bright pixels, can be mitigated by adjusting clamp values, disabling caustics, or using denoising features. Ensuring your scene doesn\"t have overly reflective or refractive surfaces without proper light path settings can also prevent fireflies.
- Crashes or Memory Errors: Reducing the resolution for test renders, simplifying modifiers, or leveraging Blender\"s simplify option can decrease the memory demand, thus preventing crashes. Using render farms or cloud-based rendering solutions may also be beneficial for particularly complex scenes.
- Unwanted Shadows or Dark Areas: Disabling shadows in scenes where they are not critical can save render time and avoid issues with darkness or shadow artifacts. Focusing only on the elements that will appear in the final render and omitting unnecessary details can also streamline the rendering process.
By implementing these strategies, you can tackle common rendering issues in Blender, leading to more efficient and higher quality outcomes for both still images and animations.
_HOOK_
Utilizing Blender’s Compositor for Post-Processing
Blender\"s Compositor offers a powerful suite of tools for post-processing, allowing artists to enhance and finalize their renders without the need for external software. This section guides you through the essential steps and techniques for leveraging the Compositor for post-production.
Getting Started
Begin by navigating to the Compositor in the active workspace toolbar and activate it by enabling the \"Use Nodes\" option. This setup allows you to input your rendered image or sequence for post-processing.
Input Nodes and Render Passes
Input nodes are the starting point for compositing, with the Render Layers node being pivotal. It imports your rendered image, offering access to various passes such as Ambient Occlusion, Mist, and Alpha for enhanced control over the final output.
Enhancing Image Quality
- Color Correction: Utilize Color nodes to adjust the brightness, contrast, and gamma of your images, simulating temperature adjustments and enhancing the overall mood.
- Converter Nodes: These nodes manipulate color and value channels, allowing for intricate adjustments to image properties.
- Filter Nodes: Apply effects like Defocus and Denoiser to refine your image, adding depth of field or removing noise.
Special Effects
- Film Grain and Noise: Add texture and a vintage feel to your renders by integrating film grain, either through subtle noise or actual grain footage.
- Lens Flare: Create realistic or stylized light effects to enhance the visual appeal of bright sources in your renders.
- Text Overlay: Incorporate text directly within the Compositor by using separate scenes or render layers, perfect for titles or annotations.
- Glare and Bloom: Emphasize bright areas with a soft glow, improving the realism and visual impact of light sources.
Final Output
The Composite and File Output nodes are crucial for exporting your work. These nodes finalize the post-processing effects and prepare your image for rendering or external use.
By exploring these tools and techniques, you can significantly enhance the quality and impact of your renders, all within Blender’s integrated environment.
READ MORE:
Conclusion: Best Practices and Final Thoughts
Mastering rendering in Blender is a journey that combines technical skill with creative vision. The key to achieving breathtaking visuals lies not only in understanding the functionalities of Blender\"s rendering engines but also in adopting best practices that streamline the rendering process while elevating the quality of the final output.
Best Practices for Rendering in Blender
- Choose the Right Render Engine: Blender offers Eevee for quick, real-time previews and Cycles for photorealistic results. Selecting the appropriate engine based on your project\"s requirements is crucial.
- Optimize Your Scene: Simplifying your scene, using efficient textures, and managing light sources can drastically reduce render times and improve performance.
- Use Render Layers and Compositing: Breaking down your scene into render layers and using Blender’s compositor can offer more control over the final image, allowing for detailed post-processing adjustments.
- Experiment with Lighting: The right lighting can make a significant difference in the realism and mood of your renders. Experiment with different lighting setups and consider using HDRI maps for natural-looking environments.
- Manage Render Samples: Adjusting the number of samples in Cycles can help find the right balance between render quality and time. Use denoising to maintain quality with fewer samples.
- Preview Renders: Utilize Blender’s preview rendering capabilities to get quick feedback on your scene’s lighting, materials, and camera setup before committing to a full render.
- Save and Export Wisely: Always save your final renders in high-quality formats like PNG or OpenEXR for still images. For animations, consider rendering to image sequences to prevent data loss in case of errors.
Final Thoughts
Rendering in Blender is an art form that requires patience, practice, and continuous learning. By adhering to these best practices, you can enhance your workflow, reduce render times, and achieve stunning results. Remember, every render is a step forward in your Blender journey, offering valuable lessons and insights. Embrace the process, experiment with new techniques, and always strive to push the boundaries of what\"s possible with your creative expressions.
Unlock the full potential of your 3D projects in Blender with our comprehensive guide, designed to elevate your rendering skills from basic to breathtaking. Embark on a journey of creativity and technical prowess to bring your visions to life.