Topic blender render settings: Unlock the full potential of your 3D projects with our guide to Blender render settings, designed to elevate your visuals to professional quality effortlessly. Discover tips, tricks, and techniques that transform your workflow and results.
Table of Content
- Render Denoising
- Rendering Animations
- Viewport Previews and Renders
- Performance Optimization Tips
- Advanced Rendering Engines
- Rendering Animations
- Viewport Previews and Renders
- Performance Optimization Tips
- What are the recommended render settings for achieving high-quality renders in Blender?
- YOUTUBE: Introduction to Render Settings in Blender 2.80 Fundamentals
- Advanced Rendering Engines
- Viewport Previews and Renders
- Performance Optimization Tips
- Advanced Rendering Engines
- Performance Optimization Tips
- Advanced Rendering Engines
- Advanced Rendering Engines
- Introduction to Blender Render Settings
- Choosing the Right Render Engine
- Optimizing Render Performance
- Denoising Techniques for Clean Renders
- Understanding Light Paths and Bounces
- Improving Render Times with GPU Rendering
- Configuring Output Properties for Quality and Efficiency
- Utilizing Simplify Settings for Faster Renders
- Animation Rendering Strategies
- Viewport Rendering Tips
- Advanced Eevee Render Settings
- Using Cloud-based Rendering Solutions
Render Denoising
For optimal denoising, Blender offers AI-based and traditional denoisers like Optix, OpenImageDenoise, and NLM. Optix and OpenImageDenoise are recommended for their superior noise reduction capabilities, producing clean renders with Denoising Normal, Albedo, and Depth passes. Interactive denoising settings are accessible in the view layer tab, allowing customization for each denoiser.

READ MORE:
Rendering Animations
To render animations, specify an output folder and file format. PNG is ideal for saving frames individually, while FFMPEG Video combines frames into a movie file. Adjusting resolution and frame settings is crucial for desired quality. Denoising animations require careful attention to avoid flickering, with temporal denoising offering a solution for smoother results.

Viewport Previews and Renders
For quick previews, use the rendered viewport shading button. Speed up viewport renders by drawing a render border with Ctrl+B, focusing on specific areas. Viewport renders serve as fast previews without full rendering, ideal for storyboarding.
Performance Optimization Tips
General Enhancements
- Enable GPU rendering for significant speed improvements.
- Reduce light bounces to minimize render times without compromising realism.
- Adjust tile size according to your device, with 256x256 optimal for GPU and 16x16 for CPU.
- Lower sample rates to speed up rendering, balancing quality with efficiency.
Scene Simplification
Use simplify settings to reduce geometry, particle numbers, and texture sizes, enhancing render speeds without affecting the final image quality. Optimizing geometry and using instances over duplicates can also significantly improve performance.

Advanced Rendering Engines
Blender offers different rendering engines, each suited for specific needs. Eevee, known for its speed, includes settings like subsurface scattering and screen space reflection, enabling realistic effects with optimized performance.
For detailed guides and more in-depth exploration of Blender\"s rendering capabilities, consider exploring additional resources and tutorials that dive deeper into each setting\"s nuances.
_HOOK_
Rendering Animations
To render animations, specify an output folder and file format. PNG is ideal for saving frames individually, while FFMPEG Video combines frames into a movie file. Adjusting resolution and frame settings is crucial for desired quality. Denoising animations require careful attention to avoid flickering, with temporal denoising offering a solution for smoother results.

Viewport Previews and Renders
For quick previews, use the rendered viewport shading button. Speed up viewport renders by drawing a render border with Ctrl+B, focusing on specific areas. Viewport renders serve as fast previews without full rendering, ideal for storyboarding.
Performance Optimization Tips
General Enhancements
- Enable GPU rendering for significant speed improvements.
- Reduce light bounces to minimize render times without compromising realism.
- Adjust tile size according to your device, with 256x256 optimal for GPU and 16x16 for CPU.
- Lower sample rates to speed up rendering, balancing quality with efficiency.
Scene Simplification
Use simplify settings to reduce geometry, particle numbers, and texture sizes, enhancing render speeds without affecting the final image quality. Optimizing geometry and using instances over duplicates can also significantly improve performance.

What are the recommended render settings for achieving high-quality renders in Blender?
When aiming to achieve high-quality renders in Blender, it is crucial to optimize your render settings. Here are some recommended settings to help you achieve top-notch results:
- Resolution: Choose a resolution that suits your project. Typically, 1920x1080px is a standard resolution, but you may need to adjust it based on your requirements.
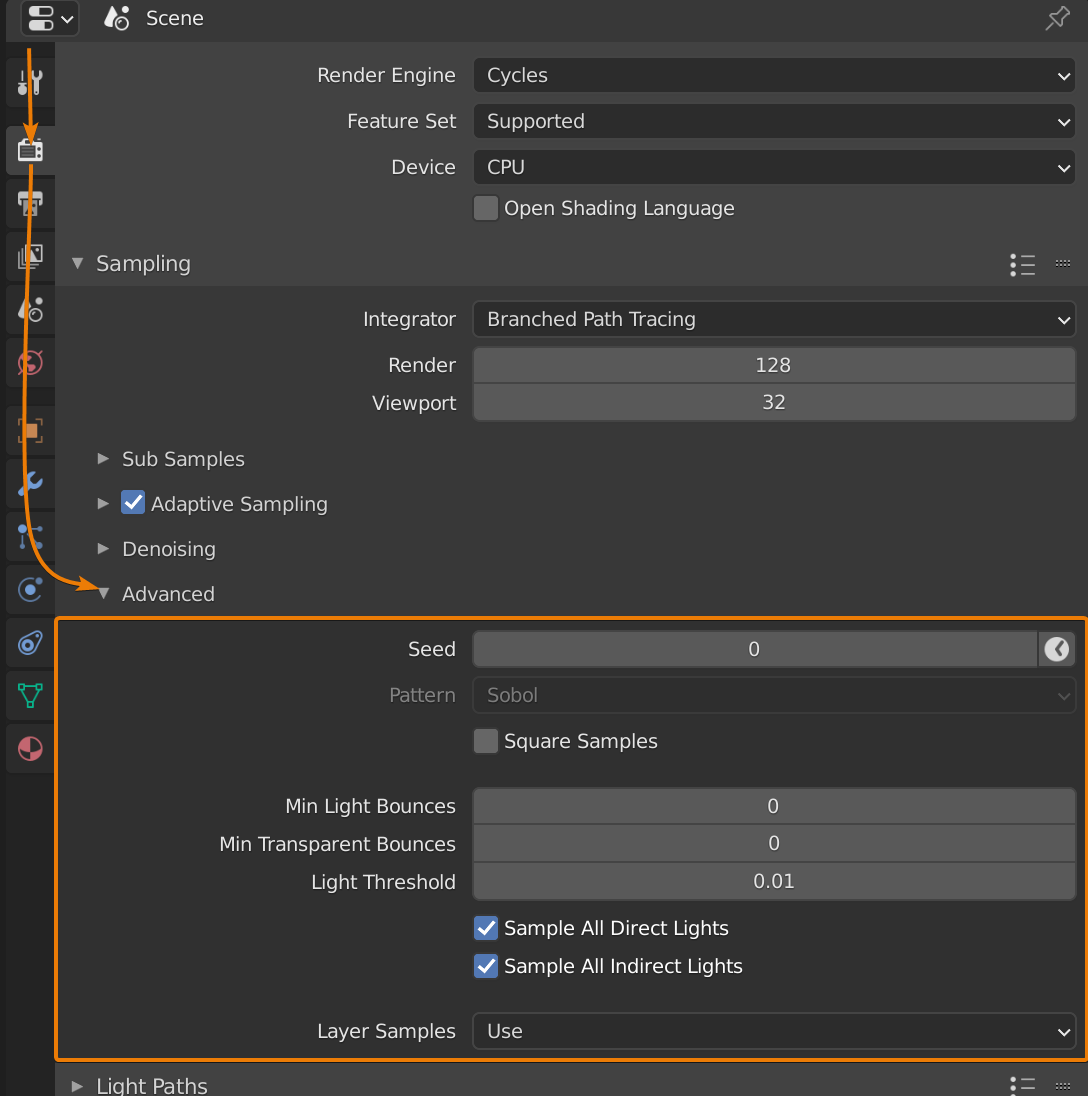
- Sampling: Increase the number of samples for better clarity and reduced noise. Start with a value of 128 and adjust as needed.
- Lighting: Experiment with different lighting setups to enhance the mood and realism of your scene.
- Textures: Use high-quality textures to add depth and detail to your renders.
- Rendering Engine: Choose the appropriate rendering engine based on your project requirements. Cycles is a popular choice for high-quality renders.
- Motion Blur: Enable motion blur for dynamic scenes to add realism to moving objects.
- Post-Processing: Consider applying post-processing effects such as color correction and compositing to enhance the final output.
By adjusting and fine-tuning these settings in Blender, you can achieve professional-grade renders that meet your visual expectations and impress your audience.
Introduction to Render Settings in Blender 2.80 Fundamentals
Render settings can be the key to bringing your digital creations to life! Learn all about the intricacies of render settings in our video tutorial and take your projects to the next level. Discover the endless possibilities of Blender, the powerful and versatile 3D creation software. Dive into our video to unlock the secrets of Blender and unleash your creativity like never before.
Advanced Rendering Engines
Blender offers different rendering engines, each suited for specific needs. Eevee, known for its speed, includes settings like subsurface scattering and screen space reflection, enabling realistic effects with optimized performance.
For detailed guides and more in-depth exploration of Blender\"s rendering capabilities, consider exploring additional resources and tutorials that dive deeper into each setting\"s nuances.
_HOOK_
Viewport Previews and Renders
For quick previews, use the rendered viewport shading button. Speed up viewport renders by drawing a render border with Ctrl+B, focusing on specific areas. Viewport renders serve as fast previews without full rendering, ideal for storyboarding.
Performance Optimization Tips
General Enhancements
- Enable GPU rendering for significant speed improvements.
- Reduce light bounces to minimize render times without compromising realism.
- Adjust tile size according to your device, with 256x256 optimal for GPU and 16x16 for CPU.
- Lower sample rates to speed up rendering, balancing quality with efficiency.
Scene Simplification
Use simplify settings to reduce geometry, particle numbers, and texture sizes, enhancing render speeds without affecting the final image quality. Optimizing geometry and using instances over duplicates can also significantly improve performance.
Advanced Rendering Engines
Blender offers different rendering engines, each suited for specific needs. Eevee, known for its speed, includes settings like subsurface scattering and screen space reflection, enabling realistic effects with optimized performance.
For detailed guides and more in-depth exploration of Blender\"s rendering capabilities, consider exploring additional resources and tutorials that dive deeper into each setting\"s nuances.
_HOOK_
Advanced Rendering Engines
Blender offers different rendering engines, each suited for specific needs. Eevee, known for its speed, includes settings like subsurface scattering and screen space reflection, enabling realistic effects with optimized performance.
For detailed guides and more in-depth exploration of Blender\"s rendering capabilities, consider exploring additional resources and tutorials that dive deeper into each setting\"s nuances.
Introduction to Blender Render Settings
Welcome to the comprehensive guide on Blender render settings, designed to help artists and designers achieve stunning visuals with efficiency and ease. Blender, an open-source 3D creation suite, offers robust tools for modeling, animation, rendering, and more. Understanding its render settings is crucial for optimizing your workflow and producing high-quality images or animations.
Rendering in Blender can be performed using different engines, each with unique features and capabilities. The most commonly used engines are Cycles and Eevee. Cycles is a ray-tracing render engine that provides high-quality, photorealistic images by simulating the physical behavior of light. Eevee, on the other hand, is a real-time render engine that offers speed and interactivity with good visual quality, making it ideal for previewing scenes or creating animations.
- Cycles: Best for photorealistic rendering, supports CPU and GPU rendering.
- Eevee: Best for real-time rendering, ideal for previews and faster workflows.
To get started with rendering in Blender, navigate to the render settings panel where you can choose your render engine and adjust various parameters such as output resolution, sampling rates, and lighting settings. Optimizing these settings can significantly impact the render quality and time, allowing for a more efficient production process.
Additionally, Blender offers features like denoising, which helps in reducing noise in renders without increasing render times significantly, and viewport rendering, which allows for quick previews of your scenes. Understanding and utilizing these tools effectively can elevate the quality of your projects and streamline your 3D creation process.
Whether you\"re a beginner or an experienced artist, mastering Blender\"s render settings will empower you to bring your creative visions to life with precision and beauty. This guide aims to introduce you to these settings and provide a foundation for exploring them in depth in subsequent sections.
Choosing the Right Render Engine
Choosing the right render engine in Blender is a pivotal decision that influences the quality, style, and efficiency of your 3D projects. Blender offers several render engines, each with its strengths and ideal use cases. Understanding these can help you select the most suitable one for your specific needs.
- Cycles: A ray-tracing engine that excels in photorealistic renders. It simulates the physical behavior of light to produce highly realistic images. Ideal for still images, architectural visualization, and any project where realism is key. Cycles can utilize both CPU and GPU, offering flexibility in balancing quality and render times.
- Eevee: Blender\"s real-time render engine, providing fast previews and decent quality outputs. It\"s optimized for speed, making it suitable for animations and projects where time is a constraint. Eevee uses rasterization instead of ray tracing, which allows for quicker render times but at the expense of some realism.
- Workbench: The simplest engine, primarily used for modeling and layout stages. It offers a quick way to visualize scenes without complex lighting or materials. Ideal for design iteration or when working on the initial stages of a project.
- External Engines: Blender also supports third-party render engines like LuxCoreRender, Octane, and V-Ray. These engines can offer specialized features like better handling of certain materials, faster render times with specific hardware, or unique visual styles.
When choosing a render engine, consider your project\"s needs: the level of realism required, render times, and hardware capabilities. For instance, Cycles might be the best choice for high-quality final renders, while Eevee could be preferred for animation work due to its faster render times. External engines might offer unique advantages that are worth exploring, depending on your project\"s complexity and visual requirements.
Experimenting with different engines and settings is key to understanding how each can best serve your creative vision. Regardless of your choice, mastering the render engine you choose will significantly enhance the quality and efficiency of your Blender projects.
Optimizing Render Performance
Optimizing render performance in Blender is essential for reducing render times while maintaining high-quality results. Whether you\"re working on a complex animation or a high-resolution still image, several strategies can help you achieve faster renders without compromising on quality.
- Adjusting Sample Rates: Lowering the number of samples in your render settings can significantly speed up rendering times. Experiment with the minimum number of samples needed to achieve acceptable quality, and consider using denoising to clean up noise in lower-sample renders.
- Optimizing Light Bounces: Reducing the number of light bounces can decrease render times. Evaluate the impact of light bounces on your scene and adjust accordingly, balancing between realism and efficiency.
- Using Simplify Settings: Blender\"s Simplify settings allow you to globally reduce the complexity of your scene, including options to lower subdivision levels and disable particle systems, which can speed up rendering.
- Choosing the Right Tile Size: For GPU rendering, larger tile sizes (like 256x256) are generally more efficient, while smaller tile sizes (like 16x16) may be better for CPU rendering. Adjust tile size based on your hardware for optimal performance.
- Employing GPU Rendering: If available, use GPU rendering, which is often faster than CPU rendering for many types of projects. Ensure your graphics card drivers are up to date to get the best performance.
- Render Layers and Compositing: Breaking your scene into render layers and compositing them together post-render can not only save time but also provide more control over the final output.
- Viewport Rendering: Use viewport rendering for previews and quick iterations. This can help you make decisions about composition and lighting without waiting for full renders.
By carefully adjusting these settings and considering the specific needs of your project, you can greatly improve render performance in Blender. Remember, the goal is to find the right balance between render quality and render time, which may require experimentation and adjustments based on the complexity of your scenes.
Denoising Techniques for Clean Renders
Denoising is a critical process in Blender for achieving clean and professional-looking renders, especially when dealing with low sample counts or in scenarios where rendering time needs to be optimized. Various denoising techniques and tools available within Blender can significantly reduce noise, making your renders look smoother and more refined without substantially increasing render times.
- Render Properties Denoising: Blender includes denoising options in the render properties tab, allowing you to clean up images post-render. This feature is particularly useful for reducing noise in renders with low sample counts.
- Intel Open Image Denoise: Integrated from Blender 2.81 onwards, this AI-powered denoiser offers an advanced method for cleaning up images. It\"s capable of producing high-quality denoised images quickly, without the unwanted artifacts that traditional denoising methods might introduce.
- OptiX Denoiser: For users with NVIDIA GPUs, the OptiX denoiser provides a fast and efficient way to denoise images directly in the viewport as well as in final renders, leveraging AI to improve image quality.
- Compositor Denoise Node: Blender’s compositor offers a Denoise node, which can be used in post-processing to clean up any remaining noise from renders. This node is particularly useful for fine-tuning the denoising process and integrating it into complex compositing workflows.
- External Denoising Tools: Besides Blender\"s built-in tools, external plugins and software can offer additional denoising capabilities. These tools often utilize different algorithms or AI models to achieve results that might be preferable for certain types of projects.
When applying denoising techniques, it\"s important to balance between noise reduction and preserving detail. Overuse of denoising can lead to renders that look too smooth or lack texture detail. Experimenting with different denoising settings and combining techniques can help you find the right balance for your project.
_HOOK_
Understanding Light Paths and Bounces
Understanding light paths and bounces is fundamental to mastering rendering in Blender. This concept is crucial for achieving realistic lighting effects and efficient render times. Light paths represent the trajectory that light rays take from the camera through the scene, interacting with various surfaces before contributing to the final image. The behavior of these rays depends on the materials they encounter, with different materials causing rays to bounce in various ways.
There are several types of rays to consider:
- Camera Rays: These originate from the camera and are the initial rays cast into the scene. They become other types of rays after their first interaction.
- Diffuse Rays: Produced when light bounces off non-reflective surfaces, scattering in many directions.
- Glossy Rays: Result from light reflecting off shiny surfaces, with the angle of reflection equal to the angle of incidence.
- Transmission Rays: Occur when light passes through transparent materials, like glass.
- Shadow Rays: Used to determine the visibility of light sources from different points in the scene, identifying shadowed areas.
Blender\"s light path settings allow control over how many times each type of ray can bounce within the scene. Adjusting these settings affects the realism and clarity of the rendered image but also impacts rendering time. For instance, limiting the number of bounces can speed up rendering at the expense of some realism, particularly in how light interacts in more complex scenes.
Key points to remember:
- Each ray type plays a specific role in rendering, influencing color, shadows, and light distribution.
- Manipulating the maximum and minimum number of bounces for each ray type allows for a balance between render quality and time.
- Understanding and effectively using light paths can significantly enhance the realism of renders without unnecessarily extending render times.
This overview highlights the importance of light paths and bounces in Blender\"s rendering process. By fine-tuning these settings, you can achieve more realistic images while optimizing render times.
Improving Render Times with GPU Rendering
Improving render times in Blender is crucial for artists and designers looking to streamline their workflow. One of the most effective ways to achieve this is by utilizing GPU rendering. This method leverages the power of your graphics card, offering a significant reduction in render times compared to CPU rendering.
- Switch to GPU Rendering: By simply switching from CPU to GPU rendering, you can experience a drastic reduction in render times. For instance, a benchmark scene that takes over 9 minutes on a CPU can render in just 46 seconds on a GPU.
- Update Blender: Always ensure you\"re using the latest version of Blender, as each update brings optimizations that can improve rendering speeds.
- Consider the Render Engine: Evaluate if your project requires Cycles for its realism, or if Eevee can achieve the desired results with faster render times.
- Optimize Light Paths: Adjusting the maximum number of light bounces can significantly affect render times. Reducing the number of bounces to a lower value like 4 or even 3 can still provide realistic results while speeding up the process.
- Adaptive Sampling: Enable adaptive sampling so Blender can allocate more samples to complex parts of the scene and fewer samples to simpler areas, optimizing render times.
- Fast GI Approximation: This setting can reduce render times considerably, especially in scenes where exact global illumination calculation is not crucial.
- Turn Off Caustics: If your scene does not require precise light refractions, disabling caustics can save rendering time.
- Utilize Denoising: Implement Intel\"s Open Image Denoise to reduce noise in renders, allowing you to lower the sample count without sacrificing quality, thus speeding up render times.
These strategies highlight the importance of GPU rendering and other optimizations within Blender. By adjusting settings to balance quality and efficiency, you can significantly enhance your rendering workflow.
Configuring Output Properties for Quality and Efficiency
When working in Blender, configuring output properties effectively can greatly impact the quality and efficiency of your renders. This section will guide you through the key settings to ensure your final product looks stunning while optimizing rendering times.
- Resolution: Under the Output Properties tab, adjust the resolution of your render. For high-quality images, a resolution of 1920x1080 is standard. However, for quicker test renders, consider lowering the resolution.
- Frame Rate: Choose the appropriate frame rate for your project. 24 fps is a common choice for cinematic looks, while 30 fps may be better for TV and web content.
- File Format: Selecting the right file format is crucial. For still images, PNG offers a good balance between quality and file size. For animations, consider using MPEG-4 to compress your video without significant quality loss.
- Color Depth: For richer colors and higher quality images, use 16-bit color depth when possible. This is especially important for projects that require post-processing.
- Compression: If you\"re working with PNGs or TIFFs, adjust the compression level to reduce file size without sacrificing too much quality. For animations, choosing the right codec can significantly affect file size and quality.
- Sampling: Increase the number of samples for higher quality renders, especially in scenes with complex lighting. However, be mindful that higher samples can greatly increase render times.
- Output Location: Always specify the output location for your renders to ensure they are saved correctly. Organizing your files by project can help keep your workflow efficient.
By carefully adjusting these settings, you can achieve a balance between render quality and efficiency. Remember, rendering is an iterative process. Start with lower quality settings for quick previews, and gradually increase the quality for your final output. Testing different configurations will help you understand how each setting affects your render times and quality.
Utilizing Simplify Settings for Faster Renders
To optimize rendering times in Blender without significantly compromising on quality, the Simplify feature can be a game-changer. This tool allows you to decrease the detail levels of your scene for faster previews and renders. Here’s how to make the most of Simplify settings:
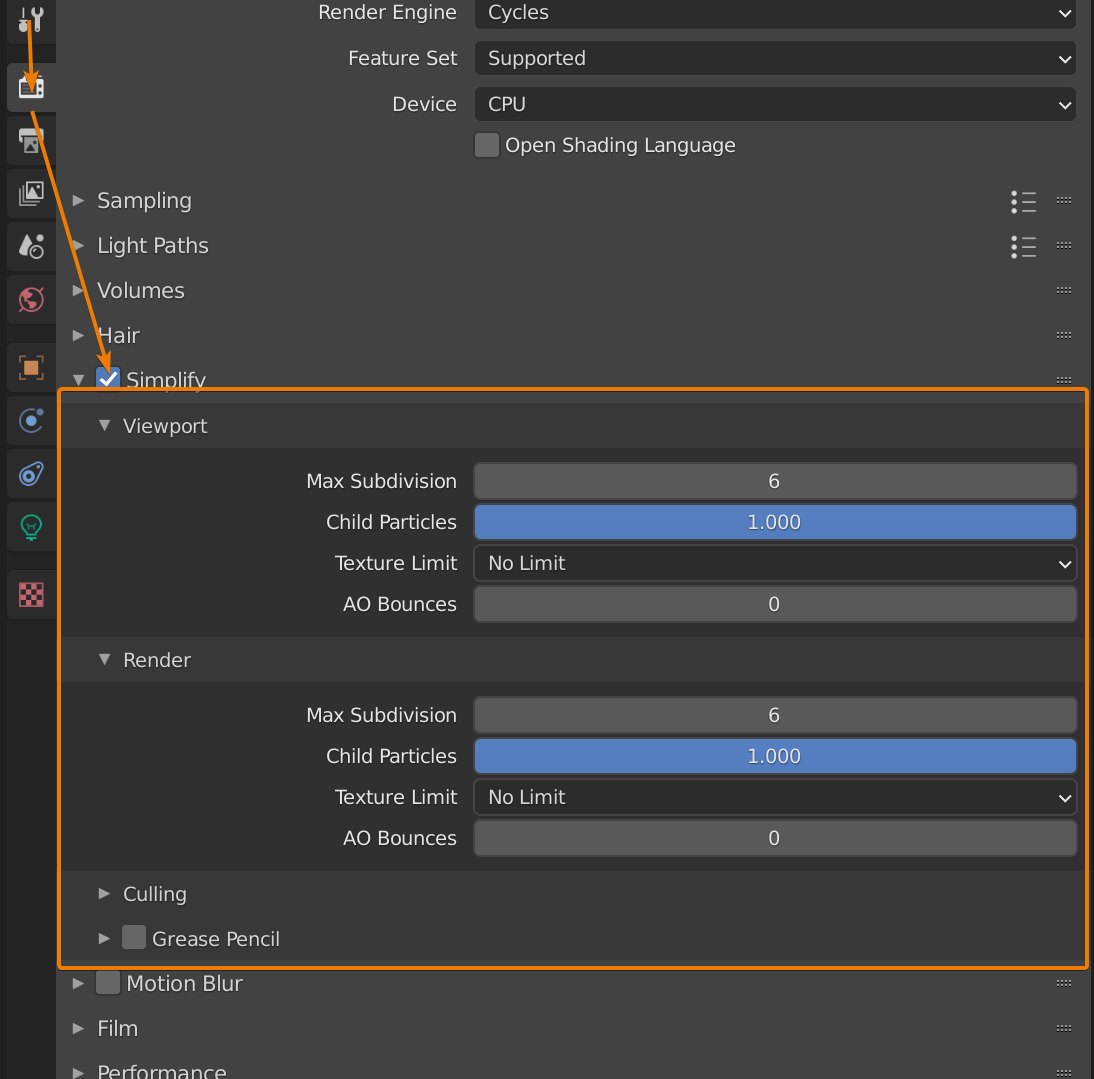
- Activate Simplify: Go to the Render Properties tab and find the Simplify section. Enable Simplify to access its settings.
- Adjust Scene Simplification: You can start by reducing the maximum subdivision level for your meshes. Lowering this value will simplify the geometry in your scene, speeding up render times.
- Child Particles: If your scene uses particle systems, reducing the percentage of child particles displayed can also enhance rendering speed. This is particularly useful in scenes with grass, fur, or other dense particle effects.
- Texture Limit: Simplify allows you to set a maximum texture size, reducing memory usage. Large textures can be automatically scaled down, improving performance with minimal impact on perceived quality.
- Shadow Samples: Decrease the shadow samples to speed up rendering times. This is effective in scenes where precise shadow detail is not critical.
- AO and SSR: Ambient Occlusion (AO) and Screen Space Reflections (SSR) settings can be adjusted to lower values to gain speed. Be mindful that this can affect the realism of your renders.
- Viewport Rendering: For faster viewport performance, you can also apply Simplify settings to the viewport. This allows for quicker navigation and scene setup.
Utilizing the Simplify settings in Blender is a powerful way to reduce rendering times, especially when working on complex scenes or when needing quick previews. While it’s a balance between speed and quality, strategic use of Simplify can significantly enhance your workflow efficiency.
Animation Rendering Strategies
Rendering animations in Blender involves more than just hitting the render button; it\"s about choosing the right settings and workflow to optimize quality and efficiency. Here\"s a guide to strategize your animation rendering process effectively.
- Choosing the Right Render Engine: Decide between Cycles for high-quality, realistic renders and Eevee for faster previews. This decision impacts rendering time and visual output significantly.
- Setting Up Your Animation: Determine your animation\"s frame rate and length early in the project. This includes setting the start and end frames and deciding on a frame rate that suits the animation\"s purpose.
- Output Settings: For animations, you can render as a movie file or as an image sequence. Image sequences are more flexible as they allow for post-render adjustments and easier recovery from rendering interruptions.
- Post-Processing and Denoising: Utilize Blender\"s compositor for post-processing. For animations, temporal denoising can be crucial for reducing noise while preserving detail across frames. This involves rendering to image files first, then applying denoising in a separate Blender session with scripting.
- Render and Convert: After rendering your animation (preferably as an image sequence for flexibility), use Blender\"s Video Sequencer or compositor to compile the images into a video file, applying any final adjustments or effects.
Throughout this process, be mindful of your project\"s requirements and the capabilities of your hardware. Adjusting settings like resolution and sampling can help balance render quality against time and resource constraints. Always test render settings with short animation clips before committing to full-scale rendering to ensure the desired outcome is achievable within your project\"s timelines.
_HOOK_
Viewport Rendering Tips
Optimizing your viewport rendering in Blender can significantly improve your workflow, especially when working on complex scenes. Here are some tips to enhance your viewport rendering experience:
- Sampling Settings: Adjust the viewport samples in the Render Properties panel to balance between quality and performance. Lower samples for faster navigation, higher for better quality previews.
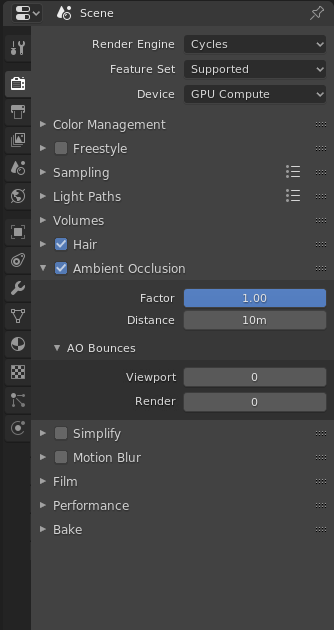
- Ambient Occlusion: Utilize Ambient Occlusion to add depth to your scene with additional shadows where surfaces meet. Adjust the distance and factor settings to get the desired effect without overburdening your viewport.
- Bloom Effect: For a touch of realism, enable the Bloom effect to create a glowing haze around bright areas. This can add a cinematic quality to your viewport renders.
- Depth of Field: Use Depth of Field for a more photographic effect, focusing on a specific object while blurring others. This is controlled from the camera settings but can be previewed in real-time in the viewport.
- Subsurface Scattering: For materials like skin or wax, subsurface scattering adds a realistic light penetration effect. Adjust the samples and jitter threshold for the best performance.
- Screen Space Reflections: Enable Screen Space Reflections for reflective materials, adjusting settings like trace precision and thickness to achieve realistic reflections without compromising viewport performance.
- Motion Blur: Motion blur adds realism to moving objects. Use the Shutter settings to control the effect\"s intensity and duration, simulating camera behavior.
- Performance Settings: Enable High Quality Normals for denser meshes to improve visual quality. Adjust shadow settings like Cube Size and Cascade Size for better shadow resolution and detail.
Remember, the key to effective viewport rendering is finding the right balance between visual quality and performance. Experiment with these settings to find what works best for your specific workflow and project requirements.
Advanced Eevee Render Settings
Eevee, Blender\"s real-time render engine, offers a plethora of settings for achieving high-quality renders quickly. Advanced Eevee render settings allow for fine-tuning of visual fidelity, balancing performance with visual complexity. Here are some of the advanced settings you can explore:
- Indirect Lighting: Bake indirect lighting to improve scene realism. This includes settings for irradiance volume and reflection cubemaps for dynamic objects.
- Screen Space Reflections (SSR): Enhance reflections with options for trace precision, thickness, and max roughness to simulate realistic surface interactions.
- Bloom: Fine-tune the bloom effect with advanced settings for intensity, threshold, and radius to achieve cinematic quality lighting.
- Subsurface Scattering: Adjust subsurface scattering settings for materials like skin or wax to control the penetration depth and softness of light scattering.
- Shadow Settings: Manipulate shadow resolution, cascade size, and bias to improve the quality and accuracy of shadows in your scene.
- Volumetric Lighting: Configure volumetric settings for fog and light scattering, including samples, density, and anisotropy for immersive atmospheric effects.
- Depth of Field: Use advanced camera settings to control the DOF effect, adjusting the f-stop, blade count, and rotation for stylized focus effects.
- Motion Blur: Customize motion blur parameters for shutter speed and duration to add realism to moving objects and cameras.
- Anti-Aliasing: Select from TAA, FXAA, and other anti-aliasing techniques to reduce jagged edges and improve image smoothness.
- Render Passes: Utilize render passes for compositing and post-processing, including options for diffuse, specular, shadow, and AO layers.
Experimenting with these advanced settings in Eevee can significantly enhance the visual quality of your renders, enabling you to achieve near-Cycles quality in real-time. Remember, balancing these settings with your hardware capabilities is key to maintaining an efficient workflow.
READ MORE:
Using Cloud-based Rendering Solutions
Cloud-based rendering solutions offer a powerful alternative for Blender users who need to free up their local resources or handle complex scenes that require more computing power than their local hardware can provide. Utilizing cloud rendering can significantly speed up the rendering process by leveraging high-performance servers in the cloud. Here\"s a step-by-step guide on how to use cloud-based rendering solutions with Blender:
- Select a Cloud Rendering Service: Choose a cloud rendering provider that supports Blender. Popular options include SheepIt, RenderStreet, and GarageFarm. Each service has its own set of features, pricing models, and hardware options.
- Prepare Your Scene: Before uploading your project, make sure it is fully prepared and optimized for rendering. This includes checking all textures, making sure all assets are linked properly, and setting up your render settings in Blender.
- Upload Your Project: Follow the instructions provided by your chosen cloud rendering service to upload your Blender project files. This may involve using a web interface or a dedicated application provided by the service.
- Configure Render Settings: Once your project is uploaded, you\"ll typically have the option to configure additional render settings through the cloud service\"s dashboard. This can include selecting the number of frames, resolution, and any specific render engine settings.
- Start Rendering: After configuring your settings, you can start the rendering process. Cloud services often provide real-time updates on the progress of your render.
- Download Your Renders: Upon completion, you\"ll be able to download your rendered files. Some services may also offer post-processing or compositing tools as part of their platform.
Using cloud-based rendering solutions can be a game-changer, especially for large projects or when tight deadlines are involved. It allows Blender users to access high-end rendering power on demand, without the need for significant hardware investments.
Unlock the full potential of your Blender projects with our comprehensive guide to render settings. Whether you\"re optimizing for speed, aiming for photorealistic results, or exploring cloud-based solutions, our expert tips and strategies will elevate your 3D art to new heights.