Topic blender image: Discover the vast potential of Blender for image creation, from crafting photorealistic scenes to transforming 2D concepts into 3D realities. Begin your journey into the art of Blender images today.
Table of Content
- How can I blend images using Blender?
- Getting Started with Blender for Image Creation
- Importing and Managing Images in Blender
- Creating 3D Models from 2D Images in Blender
- Rendering Photorealistic Images with Blender
- Utilizing Blender\"s Texturing and Material Tools for Images
- Advanced Image Editing Techniques in Blender
- YOUTUBE: Import Images into Blender 2.9: Step-by-Step Guide
- Exporting and Sharing Blender Images
- Resources for Learning More About Blender Image Capabilities
How can I blend images using Blender?
To blend images using Blender, you can follow these steps:
- Open Blender and set up your scene.
- Add a plane object to the scene by pressing Shift + A and selecting Mesh > Plane.
- Select the plane object and go to the Material Properties tab in the right sidebar (Shortcut: Shift + F5).
- Click on the New button to create a new material.
- Click on the Use Nodes checkbox to enable node-based material editing.
- Add an Image Texture node by pressing Shift + A and selecting Texture > Image Texture.
- Open the first image you want to blend by clicking on the Open button in the Image Texture node and selecting the image file.
- Add another Image Texture node for the second image in the same way.
- Add a Mix RGB node by pressing Shift + A and selecting Color > Mix RGB.
- Connect the Color output of the first Image Texture node to the top Color input of the Mix RGB node.
- Connect the Color output of the second Image Texture node to the bottom Color input of the Mix RGB node.
- Connect the Fac output of the Mix RGB node to the Surface input of the Material Output node.
- Adjust the Fac value of the Mix RGB node to control the blending amount.
- Render the image by clicking on the Render button or pressing F12.
- Save the rendered image by going to the Image Editor workspace and clicking on Image > Save As Image.
By following these steps, you should be able to blend images using Blender and create a blended image based on your desired settings.
READ MORE:
Getting Started with Blender for Image Creation
Embarking on your Blender journey opens up a world of possibilities for image creation. Whether you\"re aiming to design intricate 3D models, stunning landscapes, or photorealistic artworks, Blender offers the tools you need. Follow these steps to get started:
- Download and Install Blender: Visit the official Blender website to download the latest version. Installation is straightforward—follow the on-screen instructions.
- Familiarize Yourself with the Interface: Blender\"s interface can be overwhelming at first. Spend some time learning where the most important tools are located. The viewport, outliner, properties panel, and timeline are good places to start.
- Learn Basic Navigation: Practice navigating the 3D viewport. Learn how to zoom, pan, and rotate your view using the mouse and keyboard shortcuts.
- Start with Basic Shapes: Begin by creating simple shapes. Learn how to add, move, rotate, and scale objects. These basic skills are the foundation of all 3D modeling in Blender.
- Explore Modifiers: Modifiers are powerful tools in Blender that allow you to modify your objects in non-destructive ways. Experiment with modifiers like Subdivision Surface to see how they can enhance your models.
- Experiment with Materials and Lighting: Materials and lighting add realism to your scenes. Start by applying basic materials and explore how different light sources affect the mood and appearance of your images.
- Render Your First Image: Rendering is the process of generating a photorealistic or non-photorealistic image from your 3D scene. Use Blender\"s rendering engine to produce your first image, experimenting with settings to achieve the desired effect.
Remember, mastering Blender is a journey. Practice regularly, experiment with different features, and don\"t be afraid to make mistakes. The Blender community is vast and supportive, with countless tutorials and resources to help you along the way.
Importing and Managing Images in Blender
Blender not only excels at creating 3D models but also offers robust features for importing and managing images. These images can serve as textures, backgrounds, or references for your 3D projects. Here’s how to efficiently work with images in Blender:
- Importing Images as Textures: To use an image as a texture, navigate to the Shader Editor, create a new material, and add an Image Texture node. From here, you can open your image file and apply it to your model.
- Using Images for Backgrounds: For setting an image as a background, switch to the Camera View, then go to the World Properties tab and choose the Environment Texture option. This method is perfect for creating immersive scenes or reference backdrops.
- Importing Images as Reference: If you need an image for reference while modeling, you can import it directly into the 3D Viewport. Use the \"Add\" menu, select \"Image\" > \"Reference\", and choose your image file. This places the image in your scene, allowing you to model against it.
- Managing Images: Blender\"s Outliner and Image Editor are crucial for managing your images. The Outliner allows you to see all imported images at a glance, while the Image Editor offers detailed editing options like adjusting colors, cropping, or even painting directly on the image.
- Optimizing Images for Performance: High-resolution images can slow down Blender. Consider resizing images or using lower resolution versions during the modeling process, switching to higher resolutions only during final rendering.
Understanding how to import and manage images in Blender enhances your workflow, enabling you to create more detailed and realistic 3D scenes. Practice these steps to become proficient in integrating images into your Blender projects.
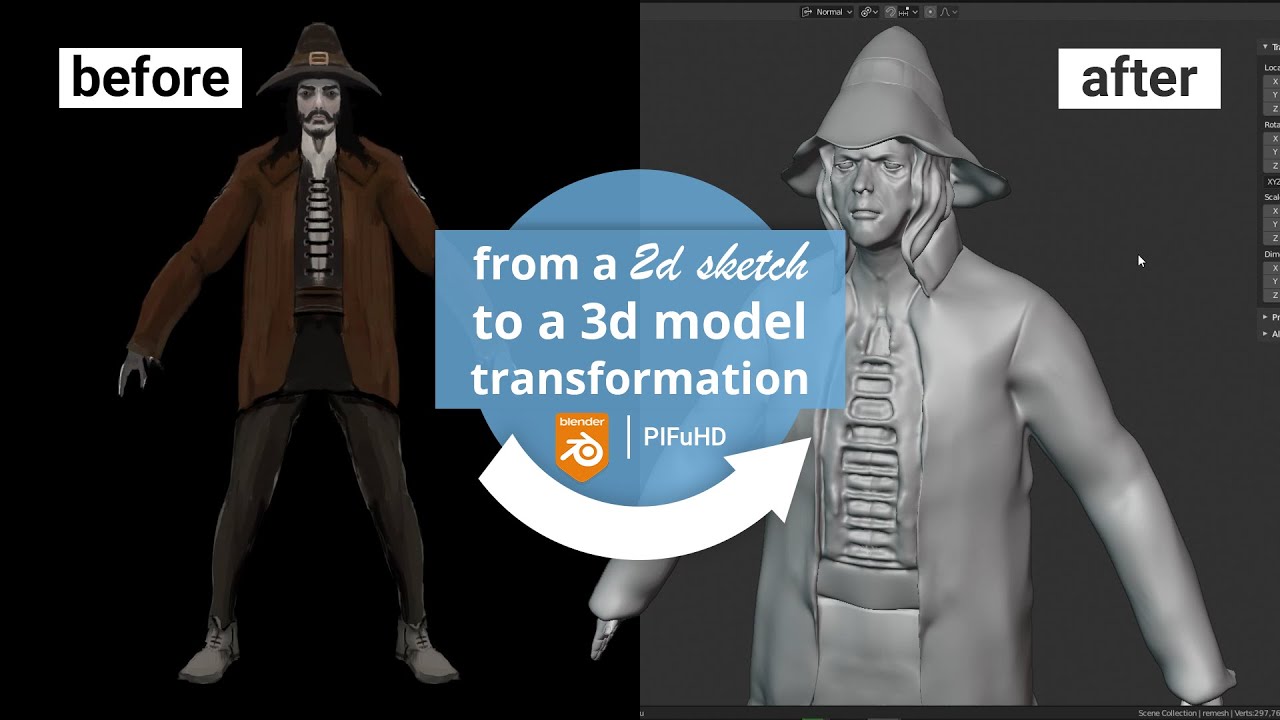
Creating 3D Models from 2D Images in Blender
Turning a 2D image into a 3D model in Blender is an exciting process that opens up new possibilities for artists and designers. This technique allows for the creation of complex models using simple images as a guide. Follow these steps to transform your 2D images into 3D models:
- Import Your 2D Image: Start by importing your 2D image as a reference. Use the \"Add\" > \"Image\" > \"Reference\" option in the 3D Viewport to place your image in the scene.
- Trace the Image with Mesh Objects: Create a new mesh object (such as a plane) and begin tracing the outlines of your image. Use edit mode to add vertices, edges, and faces that match the shapes in your image.
- Extrude to Add Depth: Once you have a basic outline, use the extrude tool to add depth to your model. This step transforms your flat shapes into 3D forms.
- Refine Your Model: Use Blender’s modeling tools to refine your model. Add more details, adjust proportions, and smooth out surfaces to achieve the desired look.
- Apply Textures: To make your model more realistic, apply textures. You can use the original 2D image as a texture or create new textures that match the model’s geometry.
- Rigging and Animation (Optional): If you want your model to be animated, consider rigging it. Rigging involves adding bones to your model and defining how it moves.
By following these steps, you can create detailed 3D models from any 2D image. This process requires patience and practice, but it allows for a high degree of creativity and customization in your Blender projects.

Rendering Photorealistic Images with Blender
Rendering photorealistic images in Blender is a key skill for any 3D artist looking to create lifelike visuals. This process involves careful attention to materials, lighting, and rendering settings. Follow these detailed steps to achieve stunning photorealism in your Blender projects:
- Set Up Your Scene: Ensure your 3D models are detailed and accurately modeled. The realism in your render starts with the quality of your models.
- Choose Realistic Materials: Utilize Blender’s material properties to create realistic surfaces. Pay attention to textures, reflectivity, and subsurface scattering for organic materials.
- Implement Advanced Lighting: Lighting is crucial for photorealism. Use HDRI images for realistic environmental lighting and add area lights for softer, more natural shadows.
- Use Depth of Field: Adding depth of field to your camera can mimic the way real cameras focus, adding another layer of realism to your render.
- Configure Render Settings: Use Blender’s Cycles render engine for the best quality. Adjust the sample rate to balance render time with image quality, and consider using denoising to clean up any noise.
- Post-Processing: After rendering, use Blender’s Compositor or external software to adjust colors, contrast, and add any final touches to your image.
Rendering photorealistic images requires practice and a keen eye for detail. By mastering these steps and experimenting with Blender’s powerful features, you can create stunning visuals that are indistinguishable from real life.
_HOOK_
Utilizing Blender\"s Texturing and Material Tools for Images
Blender\"s comprehensive suite of texturing and material tools empower artists to bring their images to life with incredible detail and realism. Mastering these tools can significantly enhance the visual appeal of your 3D projects. Here’s how to effectively use Blender\"s texturing and material capabilities:
- Understanding Material Nodes: Begin by familiarizing yourself with Blender’s Shader Editor. The node-based interface allows for the creation of complex materials by connecting different nodes.
- Creating Basic Materials: Start simple. Use the Principled BSDF shader, which is versatile for creating a wide range of materials by adjusting parameters like roughness, metallic, and subsurface scattering.
- Applying Textures: Enhance your materials with textures. Import image textures and connect them to your material using the Image Texture node. This can add detail like scratches, dirt, or realistic surface variations.
- UV Mapping: For textures to appear correctly on your model, you\"ll need to unwrap your model using UV mapping. This process translates the 3D surface of your model into a 2D layout, onto which the texture is applied.
- Using Bump and Normal Maps: Add depth to your textures without adding geometry by using bump or normal maps. These maps simulate surface details, enhancing the realism of materials.
- Exploring Advanced Techniques: Dive into more advanced texturing techniques like procedural texturing, which uses mathematical formulas to generate textures that can create complex patterns and details dynamically.
- Environmental Texturing: Use environmental textures for backgrounds or to simulate realistic lighting conditions in your scene. HDRI images are particularly effective for this purpose.
By leveraging Blender\"s texturing and material tools, you can achieve a level of detail and realism in your images that makes your 3D projects stand out. Practice and experimentation are key to mastering these techniques.
Advanced Image Editing Techniques in Blender
Blender is not just for 3D modeling; it also offers powerful tools for advanced image editing, allowing users to enhance their projects with sophisticated visual effects. Here are some techniques to elevate your image editing skills in Blender:
- Compositing for Visual Effects: Use Blender’s Node Editor for compositing. This allows you to combine multiple images, add effects, and adjust colors. You can create complex visual effects like depth of field, glare, and color grading.
- Using Masks and Layers: Similar to other image editing software, Blender supports the use of masks and layers. This enables selective editing and adjustments, allowing for detailed control over the final composition.
- Color Correction and Grading: Blender’s compositor includes nodes for color correction and grading. These tools can dramatically alter the mood and atmosphere of your images, giving them a professional finish.
- Adding Text and Graphics: Incorporate text and graphics into your scenes. Blender allows for the creation of 3D text which can be textured and integrated seamlessly with your images or animations.
- Simulation Effects for Images: Use Blender’s simulation tools (like smoke, fire, fluid, and cloth simulations) to add dynamic elements to your images. These can be rendered and composited to achieve realistic effects.
- High Dynamic Range Imaging (HDRI): Use HDRI for enhanced lighting and reflections in your images. Blender can import HDRI maps to simulate complex lighting environments, adding realism to your renders.
- Node-Based Texture Painting: For detailed texturing work, Blender’s texture paint mode offers a node-based system. This allows for the creation of complex materials and textures directly on your 3D models.
Mastering these advanced techniques requires practice and experimentation. However, the effort pays off by significantly enhancing the quality and realism of your Blender projects.

Import Images into Blender 2.9: Step-by-Step Guide
\"Discover the world of importing and how it can revolutionize your business! Watch our video to learn the ins and outs of importing, from finding the best products to navigating customs regulations. Start expanding your business today!\"
Use REFERENCE IMAGES in Blender 2.9 (Create a Low Poly Model)
\"Are you looking for a comprehensive reference guide on how to excel in your field? Look no further! Our video is filled with valuable references and resources that will help you stay ahead of the game. Don\'t miss out on this opportunity to learn from the best!\"
Exporting and Sharing Blender Images
Once you\"ve created your masterpiece in Blender, the next step is to share it with the world. Exporting and sharing your images can be done efficiently with Blender\"s built-in tools. Follow these steps to showcase your work:
- Choosing the Right File Format: Blender supports various file formats for exporting images. PNG and JPEG are popular for their balance of quality and file size, while TIFF and EXR are preferred for high-quality prints or post-production work.
- Setting Up Render Properties: Before exporting, adjust your render properties to ensure your image is of the highest quality. This includes setting the resolution, aspect ratio, and sampling rates according to your needs.
- Rendering Your Image: With your settings configured, render your image by pressing F12 or using the render button in the render properties panel. Wait for Blender to process your scene.
- Exporting the Image: After rendering, go to the \"Image\" menu in the Image Editor, select \"Save As\", and choose your desired file format and location. Name your file appropriately and click \"Save As Image\" to export.
- Sharing Your Work: There are multiple platforms to share your Blender images, including social media, online forums dedicated to 3D art, and professional portfolios. Consider the audience and platform to tailor your presentation accordingly.
- Using Blender for Animated Sequences: If your project includes animations, Blender allows you to export sequences. Render your animation and export it as a series of images or a video file to share your animated story.
Exporting and sharing your Blender creations is a rewarding part of the 3D design process. Whether for feedback, portfolio building, or social sharing, presenting your work effectively showcases your skills and creativity.
READ MORE:
Resources for Learning More About Blender Image Capabilities
Blender is a powerful tool with a steep learning curve, but a wealth of resources are available to help you master its image creation capabilities. Whether you\"re a beginner or looking to refine your skills, here are essential resources to explore:
- Blender Official Documentation: Start with the source. Blender’s official documentation is comprehensive, covering all features in detail. It\"s updated regularly with each new release.
- Online Tutorials and Courses: Platforms like YouTube, Udemy, and Coursera offer tutorials and courses ranging from beginner to advanced levels. These resources cover everything from basic navigation to complex modeling and rendering techniques.
- Blender Community Forums: Join Blender’s community forums, such as Blender Artists or the Blender subreddit. These communities are great for asking questions, sharing your work, and receiving feedback from other Blender users.
- Books and eBooks: There are several comprehensive books and eBooks available that delve into Blender\"s capabilities. These can be a valuable resource for those who prefer a structured learning approach.
- Workshops and Meetups: Participating in workshops and meetups can provide hands-on experience and the opportunity to learn from experienced Blender artists in a collaborative environment.
- Blender Conferences and Events: Attending Blender conferences and events, either virtually or in person, can provide insights into the latest features and techniques, as well as networking opportunities.
With dedication and the right resources, you can unlock the full potential of Blender for creating stunning images and animations. Explore these resources to embark on your journey to becoming a Blender expert.
Embark on a creative journey with Blender to transform your visions into stunning images. Explore, experiment, and enhance your skills with the endless possibilities that Blender offers to artists and designers alike.