Topic blender hdri tutorial: Unlock the secrets of realistic 3D lighting and reflections with our comprehensive Blender HDRI tutorial, designed to elevate your rendering skills to new heights.
Table of Content
- Understanding HDRI
- How to Use HDRIs in Blender
- Creating High-Quality HDR Environments
- Resources for HDRIs
- Conclusion
- How to Use HDRIs in Blender
- Creating High-Quality HDR Environments
- What are the best ways to light a scene in Blender using HDRI maps?
- YOUTUBE: How to Use HDRIs in Blender 3.0 Tutorial
- Resources for HDRIs
- Conclusion
- Creating High-Quality HDR Environments
- Resources for HDRIs
- Conclusion
- Resources for HDRIs
- Conclusion
- Conclusion
- Introduction to HDRI in Blender
- Step-by-Step Guide on How to Use HDRIs in Blender
- HDRI Lighting Techniques for Realistic Renders
- Creating Your Own HDRI Environments for Blender
- Resources for Downloading High-Quality HDRIs
- Advanced HDRI Tips and Tricks in Blender
- Common Challenges and Solutions When Using HDRIs
- Conclusion and Next Steps in Mastering HDRI in Blender
Understanding HDRI
HDRI stands for High Dynamic Range Image, a photographic technique that combines multiple exposures to create a single image with a wide range of luminance. In Blender, HDRIs are used as environmental backgrounds or for lighting, offering realistic lighting effects and reflections.

READ MORE:
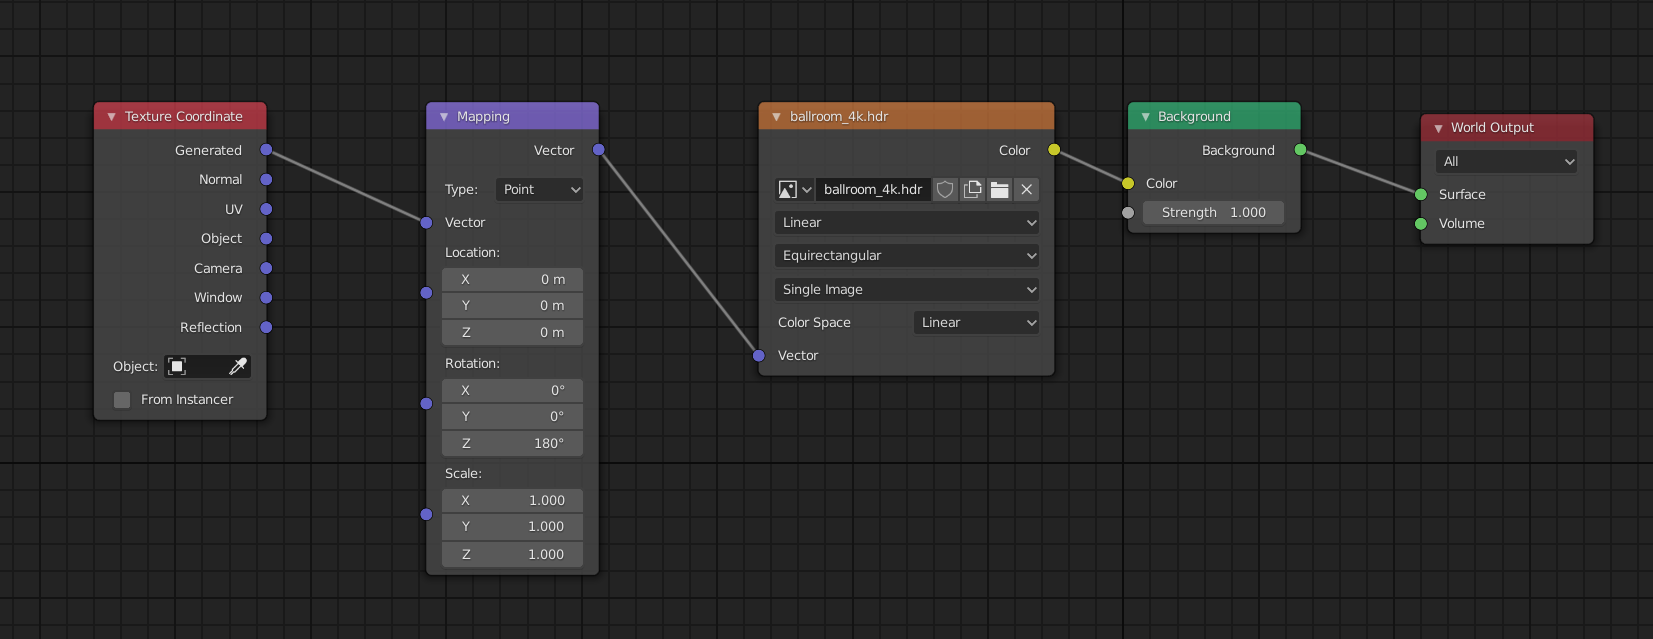
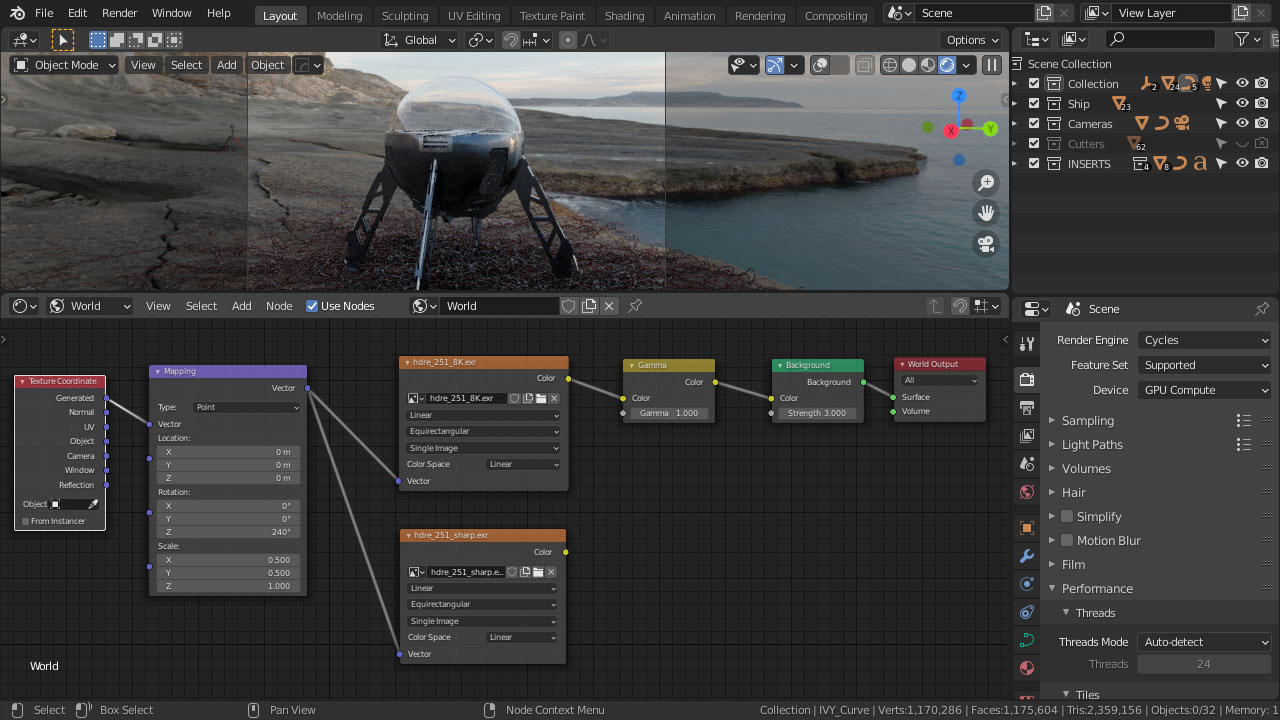
How to Use HDRIs in Blender
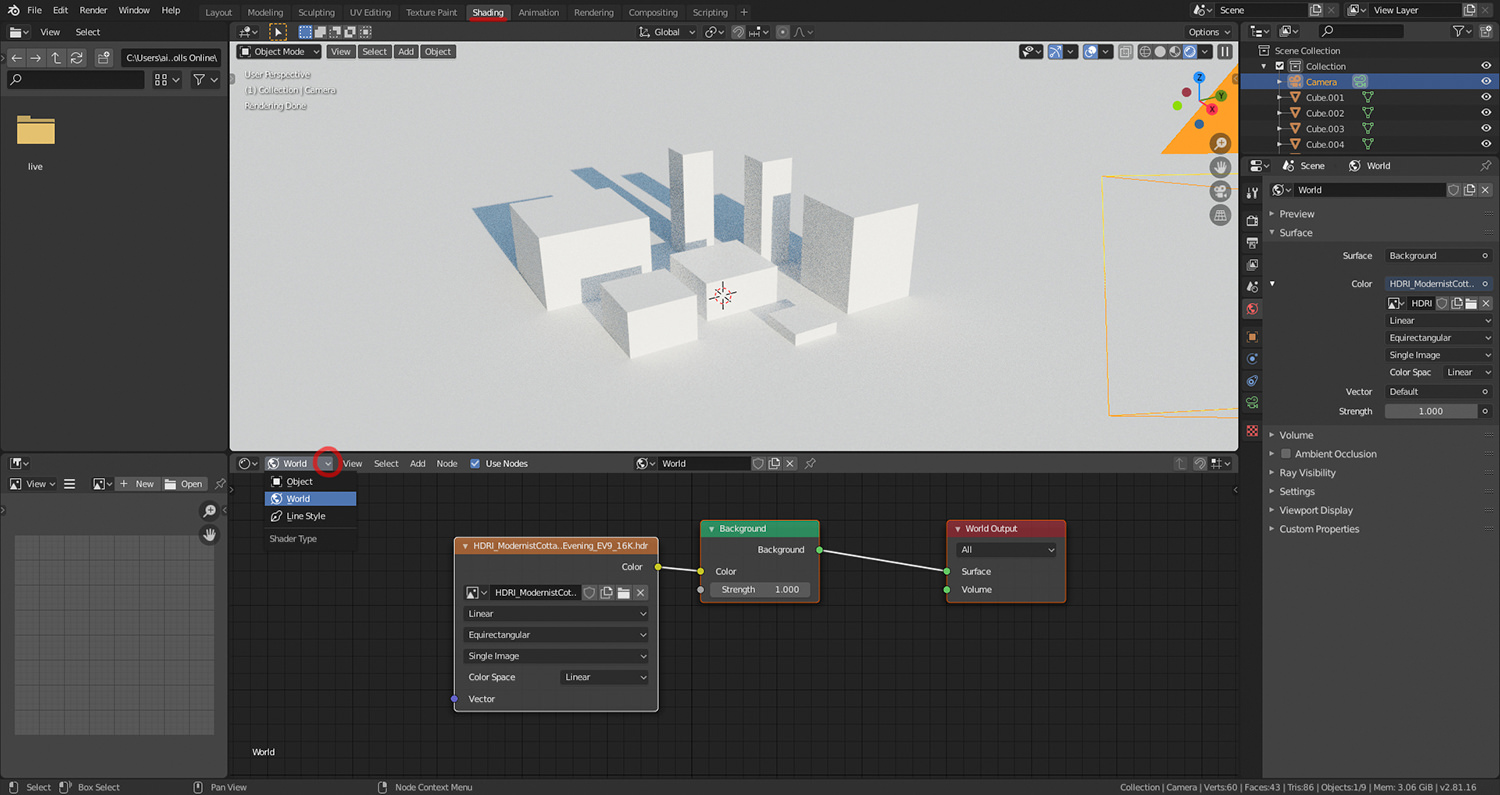
- Select the World tab in the Properties Editor.
- From the Surface dropdown, choose Background.
- In the Color input option, click the yellow circle button and select Environment Texture.
- Navigate and select your HDRI image file.
- Adjust settings as needed to fit your scene.
HDRI Lighting Techniques
- Using HDRI for global illumination to enhance realism.
- Adjusting the strength and rotation of the HDRI for desired lighting effects.
- Combining HDRI with traditional lighting methods for complex scenes.
Creating High-Quality HDR Environments
Creating your own HDR environments involves capturing 360-degree panoramas with sufficient dynamic range and processing them into HDR formats. This process ensures the lighting in your Blender scenes is as realistic as possible.
Quick Tips for HDRI in Blender
- Ensure True HDR mode is enabled for exporting in HDR formats.
- Use HDRI maps for realistic lighting and reflection effects.
- Edit the Environment\"s node structure for optimal scene integration.
Resources for HDRIs
Several online platforms offer free and premium HDRIs suitable for various Blender projects. Utilizing these resources can significantly enhance the realism and mood of your 3D scenes.

Conclusion
Integrating HDRIs into your Blender projects can dramatically improve the realism and aesthetic appeal of your renders. By following the steps and techniques outlined in this guide, you can effectively utilize HDRIs for lighting and background purposes in your 3D scenes.
_HOOK_
How to Use HDRIs in Blender
- Select the World tab in the Properties Editor.
- From the Surface dropdown, choose Background.
- In the Color input option, click the yellow circle button and select Environment Texture.
- Navigate and select your HDRI image file.
- Adjust settings as needed to fit your scene.
HDRI Lighting Techniques
- Using HDRI for global illumination to enhance realism.
- Adjusting the strength and rotation of the HDRI for desired lighting effects.
- Combining HDRI with traditional lighting methods for complex scenes.
Creating High-Quality HDR Environments
Creating your own HDR environments involves capturing 360-degree panoramas with sufficient dynamic range and processing them into HDR formats. This process ensures the lighting in your Blender scenes is as realistic as possible.
Quick Tips for HDRI in Blender
- Ensure True HDR mode is enabled for exporting in HDR formats.
- Use HDRI maps for realistic lighting and reflection effects.
- Edit the Environment\"s node structure for optimal scene integration.
What are the best ways to light a scene in Blender using HDRI maps?
Using HDRI maps to light a scene in Blender can greatly enhance the realism and quality of your renders. Here are some of the best ways to utilize HDRI maps for lighting:
- Download HDRI maps: Start by downloading high-quality HDRI maps from reliable sources such as HDRI Haven, Poly Haven, or other online repositories.
- Import the HDRI map: In Blender, go to the World tab in the Shader Editor and add an Environment Texture node. Load the HDRI map as the texture.
- Enable the HDRI lighting: Make sure to check the \'Use Nodes\' option in the Shader Editor and connect the Color output of the Environment Texture node to the Background node.
- Adjust the strength: You can adjust the strength of the HDRI lighting by changing the Strength value in the Environment Texture node. This can help control the overall brightness of the scene.
- Position the HDRI: Experiment with rotating and positioning the HDRI map to see how it affects the lighting and reflections in your scene. This can help you achieve the desired look.
- Add additional lights: While HDRI maps provide realistic lighting, you may need to add additional lights to highlight specific areas or create certain effects in your scene.
- Final adjustments: Fine-tune the settings, adjust the camera angle, and make any necessary tweaks to optimize the lighting and overall appearance of your scene.
How to Use HDRIs in Blender 3.0 Tutorial
Lighting: Step into a world of enchanting ambience and mesmerizing visuals with our expert tips on lighting. Let us illuminate your space and mood in the most delightful way possible. Tutorial: Ready to unlock your creative potential? Join us on a journey of learning and discovery with our engaging tutorial that will guide you through the process with simplicity and ease.
The Best Blender HDRI Tutorial I\'ve Made
Everything I know about using HDR Images in Blender. This tutorial covers the basics of using an HDRI (High Dynamic Range ...
Resources for HDRIs
Several online platforms offer free and premium HDRIs suitable for various Blender projects. Utilizing these resources can significantly enhance the realism and mood of your 3D scenes.

Conclusion
Integrating HDRIs into your Blender projects can dramatically improve the realism and aesthetic appeal of your renders. By following the steps and techniques outlined in this guide, you can effectively utilize HDRIs for lighting and background purposes in your 3D scenes.
_HOOK_
Creating High-Quality HDR Environments
Creating your own HDR environments involves capturing 360-degree panoramas with sufficient dynamic range and processing them into HDR formats. This process ensures the lighting in your Blender scenes is as realistic as possible.
Quick Tips for HDRI in Blender
- Ensure True HDR mode is enabled for exporting in HDR formats.
- Use HDRI maps for realistic lighting and reflection effects.
- Edit the Environment\"s node structure for optimal scene integration.

Resources for HDRIs
Several online platforms offer free and premium HDRIs suitable for various Blender projects. Utilizing these resources can significantly enhance the realism and mood of your 3D scenes.
Conclusion
Integrating HDRIs into your Blender projects can dramatically improve the realism and aesthetic appeal of your renders. By following the steps and techniques outlined in this guide, you can effectively utilize HDRIs for lighting and background purposes in your 3D scenes.
_HOOK_
Conclusion
Integrating HDRIs into your Blender projects can dramatically improve the realism and aesthetic appeal of your renders. By following the steps and techniques outlined in this guide, you can effectively utilize HDRIs for lighting and background purposes in your 3D scenes.
Introduction to HDRI in Blender
High Dynamic Range Imaging (HDRI) is a transformative technique in Blender that allows artists to utilize a wider range of luminance levels, simulating real-world lighting conditions with greater accuracy. This introduction aims to demystify HDRI, making it accessible for Blender users of all skill levels.
HDRI provides a comprehensive lighting solution, capturing complex light environments in a single image. When used in Blender, it enhances the realism of scenes by providing accurate reflections, shadows, and light diffusion.
- Understanding HDRI: HDRI stands for High Dynamic Range Imaging, a technique that combines multiple photographs with different exposure levels to create a single image that accurately represents a wide range of intensities.
- Benefits of Using HDRI in Blender: Incorporating HDRI into your Blender projects can significantly improve the quality of your renders, offering realistic environmental lighting and reflections that traditional digital lighting techniques struggle to replicate.
- How HDRI Works: In Blender, HDRIs are used as environmental textures that surround your 3D scene, providing a realistic backdrop and illuminating your models with naturalistic lighting and accurate reflections.
Implementing HDRI in your Blender workflow can elevate your renders, bringing them closer to photorealism. This technique is invaluable for artists aiming to achieve professional-level results in their 3D projects.
- Enhances the realism of 3D scenes with accurate lighting and reflections.
- Simplifies the lighting setup process, saving time and effort.
- Offers versatility in scene design, allowing for dynamic lighting changes with ease.
As we delve deeper into the specifics of selecting, applying, and optimizing HDRIs in Blender, this guide will serve as your roadmap to mastering this powerful tool. Whether you\"re creating intricate interior scenes or expansive outdoor landscapes, HDRI can provide the depth and realism your project deserves.
Step-by-Step Guide on How to Use HDRIs in Blender
Integrating High Dynamic Range Images (HDRIs) into your Blender projects can drastically improve lighting realism and visual depth. Follow this detailed step-by-step guide to master the use of HDRIs in your 3D scenes.
- Open Your Blender Project: Start by opening Blender and loading the scene you wish to enhance with HDRI lighting.
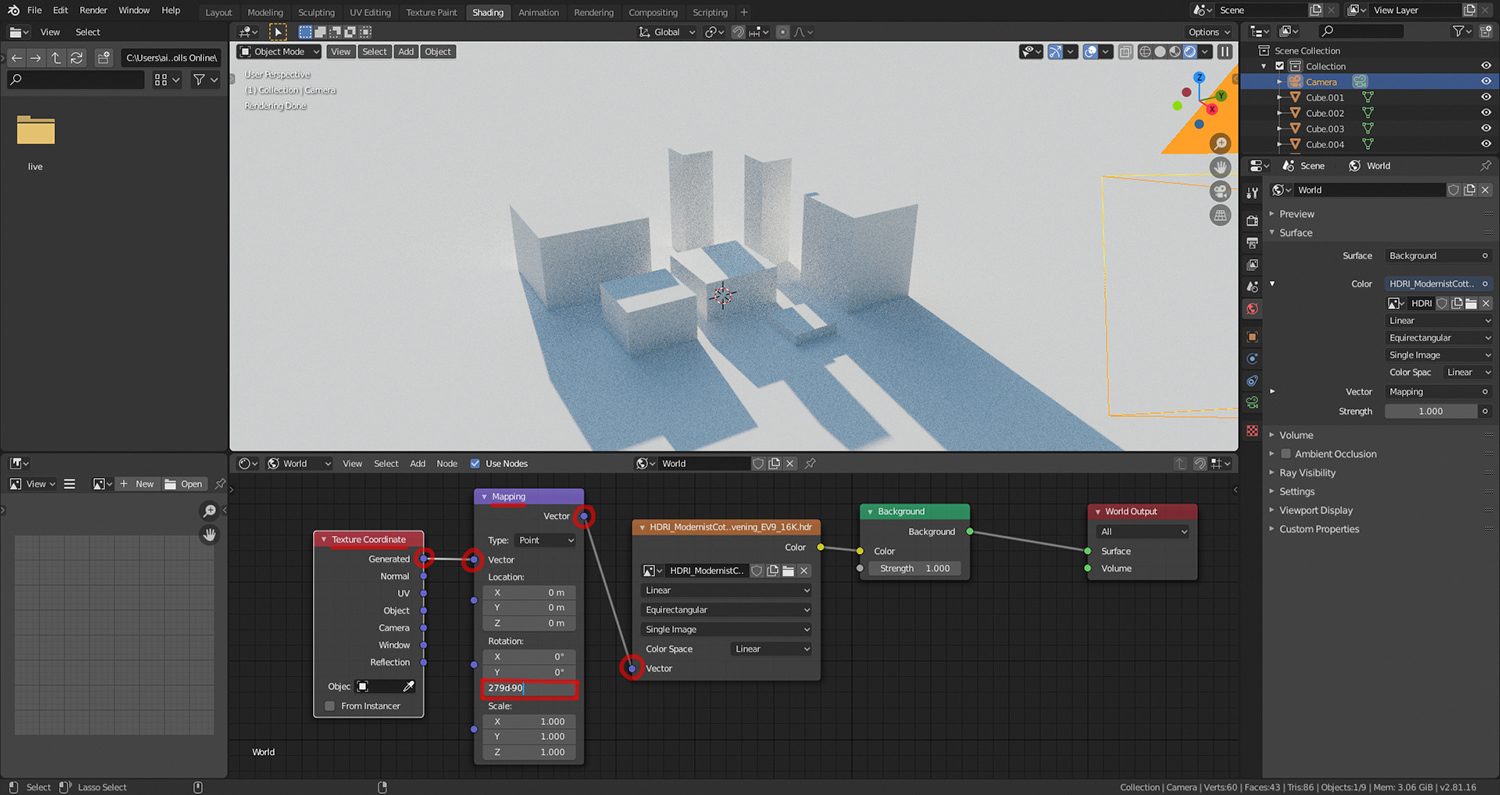
- Access the World Settings: Navigate to the World tab in the Properties panel to modify the environment settings of your scene.
- Select Environment Texture: In the World tab, find the Surface section and click on the Color field. Choose \"Environment Texture\" from the dropdown menu to apply an HDRI.
- Load Your HDRI File: Click on the open file icon beside the Environment Texture option to browse and select your HDRI file. HDRIs provide a 360-degree background and light source.
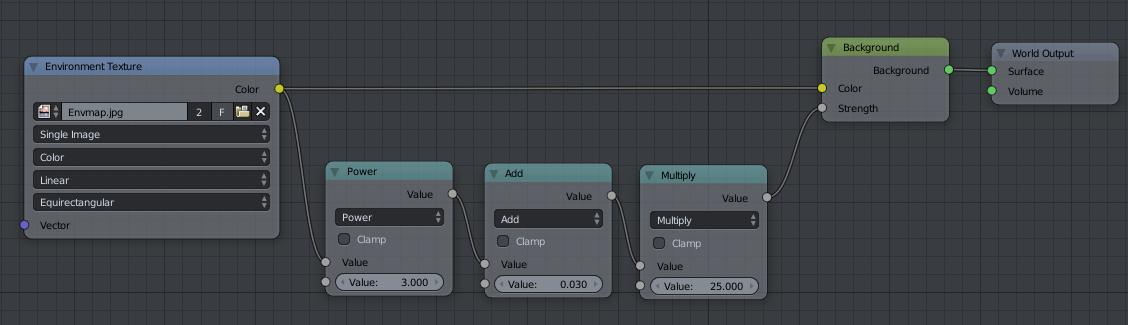
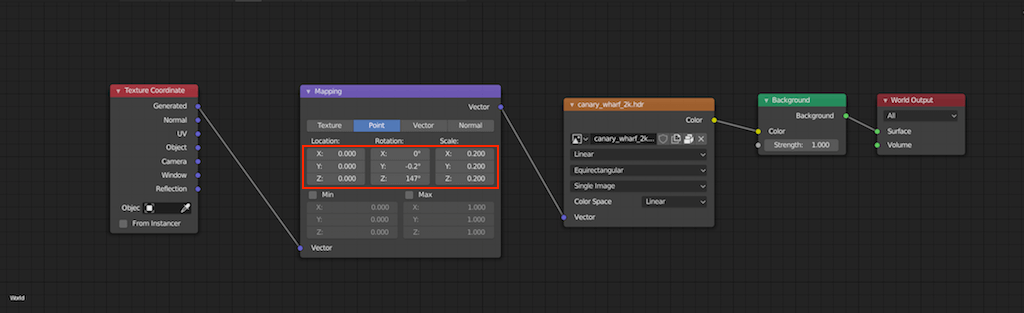
- Adjust the HDRI Settings: With your HDRI loaded, you can adjust its settings such as rotation, intensity, and scale to fit your scene\"s lighting needs.
- Preview Your Scene: Switch to rendered view to preview how the HDRI affects your scene. This will give you a better understanding of the lighting and atmosphere.
- Refine Your Settings: Based on the preview, you may need to go back and tweak the HDRI settings for optimal results. Experiment with different HDRIs and settings to achieve the desired effect.
Using HDRIs in Blender not only simplifies the lighting setup process but also adds a layer of depth and realism to your renders that\"s hard to achieve with standard lighting methods. Remember, practice and experimentation are key to mastering the use of HDRIs in Blender.
- For dynamic scenes, consider animating the HDRI settings for varying lighting conditions.
- Use the Node Editor for advanced control over the HDRI\"s influence on your scene.
- Experiment with combining HDRIs with traditional light sources for unique effects.
This guide aims to provide you with a solid foundation for using HDRIs in Blender, empowering you to enhance your 3D renders with realistic lighting and reflections.
HDRI Lighting Techniques for Realistic Renders
HDRI lighting is a cornerstone technique for achieving photorealism in 3D renders. This section delves into advanced strategies for leveraging HDRIs to illuminate your Blender scenes with unparalleled realism.
- Choosing the Right HDRI: The selection of your HDRI is critical. Look for HDRIs that match the mood and setting of your scene. Consider the time of day, weather, and location depicted in the HDRI.
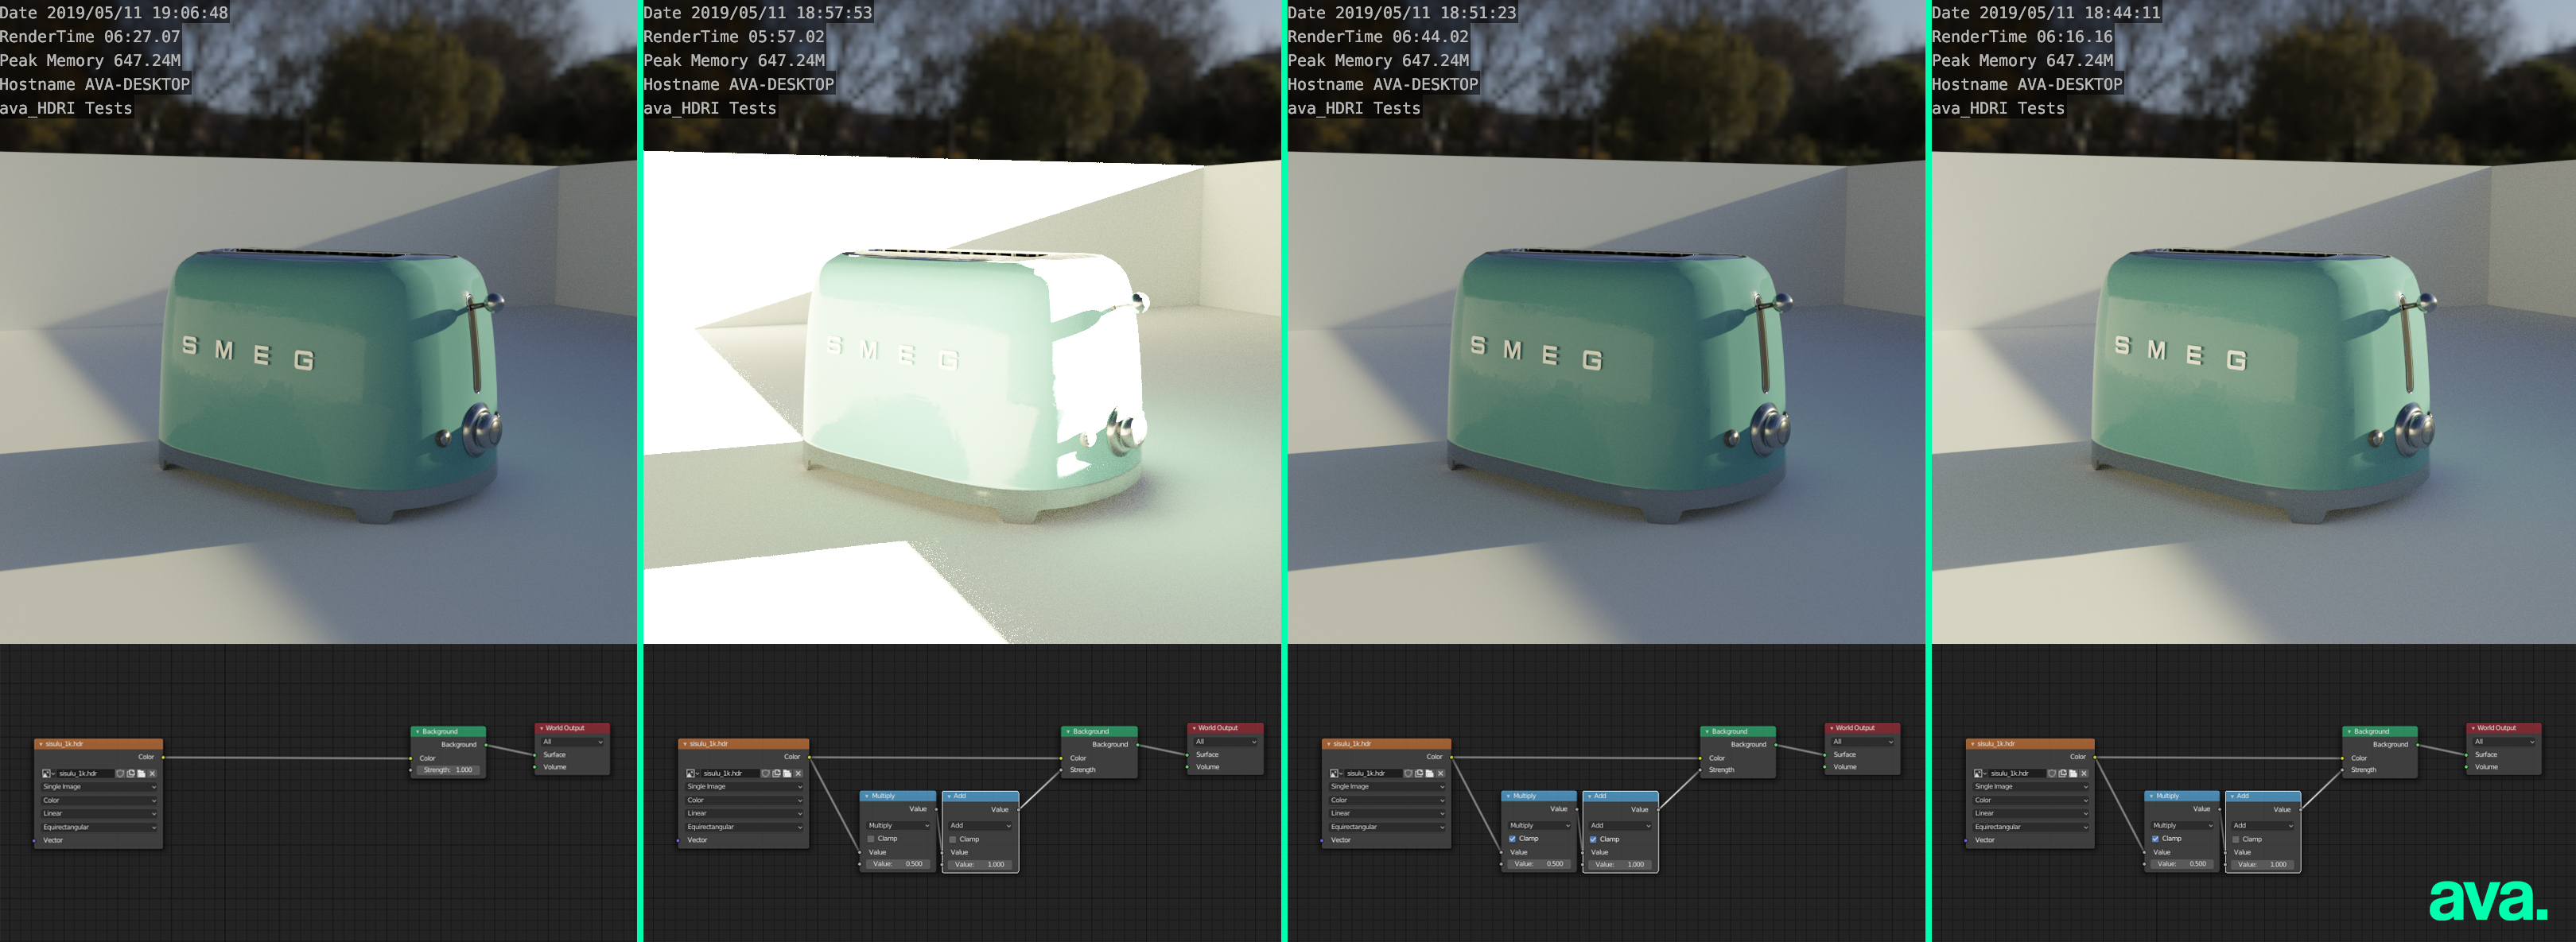
- Adjusting HDRI Strength: Control the intensity of the HDRI in the World settings. A higher value increases the overall brightness and impact of the HDRI on your scene.
- Rotating the HDRI for Optimal Lighting: Use the rotation settings to align the HDRI\"s light direction with your scene. Proper alignment can enhance shadows and highlights, adding depth to your render.
- Matching HDRI with Scene Scale: Ensure the scale of the HDRI matches your scene. Discrepancies can lead to unrealistic lighting effects. Adjust the scale to harmonize the HDRI with your 3D models.
- Using HDRI to Create Shadows: HDRIs can be used to cast natural-looking shadows. Experiment with the position and intensity of the HDRI to achieve realistic shadow effects.
- Combining HDRI with Artificial Lights: For complex lighting scenarios, combine HDRI with traditional light sources. This technique allows for more control over key areas of your scene.
These techniques, when applied thoughtfully, can elevate the realism of your renders, making them indistinguishable from real-life photographs. Experimentation and practice are key to mastering HDRI lighting in Blender.
- Experiment with different HDRIs to understand their unique effects on lighting and mood.
- Utilize Blender\"s node editor for finer control over the HDRI\"s influence, such as adjusting the gamma or contrast for more dramatic effects.
- Remember the importance of color grading your HDRI to match the color palette of your scene for a cohesive look.
By incorporating these HDRI lighting techniques, you can significantly enhance the depth, atmosphere, and realism of your Blender renders.
Creating Your Own HDRI Environments for Blender
Creating custom HDRI environments allows for unparalleled control and uniqueness in your Blender projects. This section guides you through the process of capturing and processing your own HDRIs.
- Equipment Needed: A camera capable of manual exposure settings, a tripod, and a 360-degree panorama head are essential for capturing images for HDRIs.
- Capturing the Images: Take multiple exposures at different stops to cover the entire dynamic range of the scene. This usually involves shooting a series of photos with varying exposures around a full 360-degree rotation.
- Processing the Images: Use software like Photoshop or Photomatix to merge the bracketed photos into a single HDR image. This involves aligning the images, merging them, and tone mapping to create the final HDRI.
- Testing in Blender: Import your custom HDRI into Blender by using it as an environment texture in the World settings. Adjust the settings to see how it illuminates your scene.
Creating your own HDRIs not only enhances the realism and control over lighting in your scenes but also adds a personal touch to your work. It\"s a rewarding skill that can significantly impact the quality of your renders.
- Ensure consistent camera settings across all shots to maintain uniform exposure and white balance.
- Consider using a fisheye lens to capture wider angles of your environment, reducing the number of shots needed.
- Remember to remove any moving objects between shots to avoid ghosting in the final HDRI.
By mastering the art of creating your own HDRIs, you unlock a new level of creativity and realism in your Blender projects. Practice and experimentation are key to perfecting this process.
_HOOK_
Resources for Downloading High-Quality HDRIs
Finding the right HDRI can make a significant difference in the realism and atmosphere of your 3D scenes. Below is a curated list of resources where you can download high-quality HDRIs for your Blender projects.
- HDRI Haven: A well-known source offering free, high-resolution HDRIs. Each image is public domain, allowing for unrestricted use in both personal and commercial projects.
- Poly Haven: Formerly known as HDRI Haven, Poly Haven provides not only HDRIs but also textures and 3D models, all available for free and under a public domain license.
- Texture Haven: Offers high-quality, free HDRIs alongside a vast collection of textures. It\"s a great resource for finding both environmental textures and lighting solutions.
- sIBL Archive: Features a collection of HDRIs designed for image-based lighting, providing a range of scenes from urban to natural environments.
- NoEmotion HDRs: Hosts a variety of HDRIs, well-suited for different lighting conditions and times of day, perfect for adding realism to your scenes.
Utilizing these resources can greatly enhance the quality and realism of your renders. When selecting an HDRI, consider the mood, lighting, and setting you want to convey in your scene to ensure the best match.
Remember, the use of HDRIs goes beyond simple background images; they are a powerful tool for creating immersive, lifelike lighting conditions that mimic the real world.
Advanced HDRI Tips and Tricks in Blender
Mastering HDRIs in Blender opens up a world of possibilities for enhancing your 3D renders. Here are some advanced techniques and tricks to elevate your use of HDRIs to the next level.
- Node-Based Adjustments: Utilize Blender\"s powerful node editor to make precise adjustments to your HDRI. This can include altering brightness, contrast, or even adding effects directly to the HDRI map for more dynamic lighting.
- Blending Multiple HDRIs: For complex lighting scenarios, consider blending multiple HDRIs. This technique allows for more nuanced lighting conditions, simulating different time of day or weather conditions within a single scene.
- Customizing HDRI Rotation for Dynamic Effects: Experiment with animating the rotation of your HDRI to simulate changing light conditions. This can add a layer of realism to time-lapse animations or dynamic scenes.
- Using HDRIs for Reflections Only: In some cases, you may want to use an HDRI strictly for its reflection properties without affecting the scene\"s overall lighting. This can be achieved by isolating the HDRI\"s influence to reflective surfaces through node adjustments.
- Enhancing Performance: High-resolution HDRIs can slow down your workflow. Consider using a lower resolution version of your HDRI for previewing and switch to the high-resolution version only for final renders.
These advanced tips and tricks will help you harness the full potential of HDRIs in Blender, allowing for more creative control and refined results in your 3D projects.
Common Challenges and Solutions When Using HDRIs
While HDRIs are invaluable for adding realism to 3D scenes, users may encounter specific challenges. Here are some common issues and their solutions to ensure seamless integration of HDRIs into your Blender projects.
- Overexposure or Underexposure: If your scene appears too bright or too dark after adding an HDRI, adjust the strength of the HDRI in the World settings. Experiment with different values until you achieve a balanced exposure.
- Unwanted Reflections: To control or remove unwanted reflections from an HDRI, use the node editor to tweak the HDRI\"s influence on reflective surfaces or employ a mix shader to blend the HDRI with a non-reflective color.
- Performance Issues: High-resolution HDRIs can slow down Blender\"s performance. Use a lower resolution HDRI during the setup phase and switch to a higher resolution for the final render to maintain a smooth workflow.
- Mismatched Lighting: If the HDRI\"s lighting doesn\"t match your scene, consider rotating the HDRI for better alignment or editing the HDRI in an image editor to better suit your needs before importing it into Blender.
- Seamless Integration: Sometimes, an HDRI might not seamlessly integrate with your scene. To address this, you can use Blender\"s compositor to blend the HDRI more naturally with your foreground elements.
Overcoming these challenges can significantly improve the quality and realism of your renders. With practice, integrating HDRIs into your Blender projects will become a straightforward and rewarding process.
READ MORE:
Conclusion and Next Steps in Mastering HDRI in Blender
As we reach the conclusion of this comprehensive guide on using HDRIs in Blender, it\"s clear that mastering HDRI lighting is a game-changer for creating realistic renders. The journey doesn\"t stop here; continuous learning and experimentation are key to refining your skills. Here are some steps you can take to further your mastery:
- Practice with different HDRIs to understand how they affect the mood and realism of your scenes. Each HDRI brings its own unique lighting and reflections, offering endless possibilities for creativity.
- Experiment with creating your own HDRIs. This advanced technique allows you to tailor your environments perfectly to your needs and can be a fun way to get unique lighting for your scenes.
- Join online communities and forums dedicated to Blender and HDRI usage. Sharing your work and receiving feedback is invaluable for growth. Plus, you can always find new resources and tips from fellow artists.
- Stay updated with the latest Blender releases and HDRI resources. New features and improvements in Blender can enhance how HDRIs are utilized, and new HDRI libraries are always popping up.
- Challenge yourself with projects that push the boundaries of what you can do with HDRI lighting. Try different genres of art, from photorealistic interiors to fantastical landscapes, to build your versatility.
Incorporating HDRIs into your Blender projects opens up a world of lighting possibilities that can bring your renders to life. With practice, creativity, and the right resources, you\"ll find yourself creating breathtaking scenes that blur the line between digital and reality. Remember, the key to mastery is practice and exploration, so keep experimenting and learning. Your next render could be your best one yet!
Embark on a transformative journey with Blender HDRIs to elevate your renders to new heights of realism and creativity. Dive into this guide, unleash your potential, and revolutionize your 3D artistry today!